1
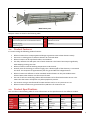
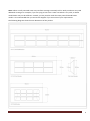
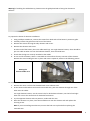
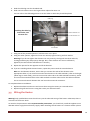
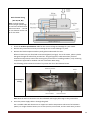
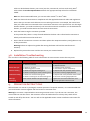
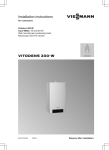
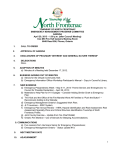
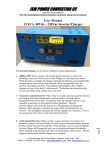
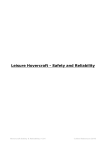
Installation & Service Manual Models ALF 20, 30, 40, 50, 60, 80 IMPORTANT! Read all safety instructions before installing, using, or servicing the heater. Installation & servicing should only be carried out by qualified electricians. TABLE OF CONTENTS 1. IMPORTANT SAFETY INSTRUCTIONS ................................................................................................ 3 2. PRODUCT OVERVIEW ...................................................................................................................... 4 2.1. 2.2. 3. PRODUCT FEATURES................................................................................................................................. 5 PRODUCT SPECIFICATIONS......................................................................................................................... 5 INSTALLATION INSTRUCTIONS ......................................................................................................... 7 3.1. 3.2. 3.3. 3.4. 3.5. 3.6. ITEMS REQUIRED ..................................................................................................................................... 7 INSTALLATION CLEARANCE ........................................................................................................................ 7 MOUNTING THE HEATER........................................................................................................................... 7 INSTALLING THE ELEMENT ......................................................................................................................... 8 WIRING THE HEATER .............................................................................................................................. 10 INSTALLATION TROUBLESHOOTING ........................................................................................................... 13 4. OPERATION INSTRUCTIONS ........................................................................................................... 13 5. HEATER MAINTENANCE ................................................................................................................. 14 5.1. 5.2. CLEANING THE HEATER ........................................................................................................................... 14 REPLACING THE ELEMENT ....................................................................................................................... 14 6. PRODUCT WARRANTY ................................................................................................................... 14 7. PRODUCT DISPOSAL ...................................................................................................................... 15 © 2013 Alfresco Heaters Ltd. All rights reserved. No part of this document may be reproduced or transmitted in any form or by any means, electronic, mechanical, photocopying, recording, or otherwise, without prior written permission of Alfresco Heaters Ltd. The information contained herein may be changed without prior notice. All product and service names mentioned are the trademarks of their respective companies. www.alfrescoheaters.ie 2 1. IMPORTANT SAFETY INSTRUCTIONS Warning! This manual contains important product safety information. Ensure that you read all provided instructions before installing, using, or servicing the product. The manufacturer is not responsible for any damage that may result from inappropriate use. The heater must be used in a responsible manner and all warnings and instructions included in this manual must be followed. General Safety Precautions Only use the heater in the manner described in this manual. To do otherwise may result in fire, electric shock, and/or severe personal injury. Do not place articles on or against the heater. In particular, do not hang clothing from or place other such combustible materials near the heater. Incorrect installation or alterations to the heater, as well as failure to adhere to the warnings and instructions contained within this manual, may cause property damage, severe personal injury, or death. Never attempt to alter the product in any way. Always allow the heater to fully cool down before touching any of its surfaces. In general, it is recommended that you do not touch the heater except when required for installation or maintenance tasks. Both these tasks must only be carried out by qualified personnel like electricians. Keep away from the heater when it is in use. Failure to do so could result in clothing catching fire and/or severe personal injury. Do not insert or allow foreign objects to enter the front of the heater as this may cause fire, electric shock, or damage to the heater. This heater is not intended for use by children, invalids, or persons with reduced capabilities unless properly supervised. Extreme caution in such circumstances is always recommended. Always leave a minimum clearance distance of 90cm in front of the heater. In particular, keep combustible materials (such as furniture, clothing, bedding, pillows, curtains, papers, etc.) beyond this minimum distance. It is also advisable to keep such items away from the sides and rear of the heater. Do not use/store aerosols or other flammable materials near the heater, especially while it is in use. Never touch the heater with wet hands. Ensure that all packaging material is kept out of reach of children. Do not paint the surface of the heater. Installation Precautions Only a qualified electrician should install the heater. Remove packaging and any transit protection before installation. After unpacking, make sure that the appliance shows no signs of visible damage or tampering. If the appliance appears damaged, contact your supplier for assistance. Ensure that the requirements of the local authority, electrical codes and regulations, municipal building codes, and any other relevant statutory regulations are followed during installation. When installing the element, ensure that the nuts at either end of the element are tightened very securely on the cable lugs. Otherwise, heat builds up and melts the lugs over time. This may result in personal injury or property damage. Failure to tighten the nuts sufficiently will also void the manufacturer’s warranty. Install the heater so that the elements are horizontal. Do not mount the heater vertically as this may cause the heating element within the tube to sag and cause premature burnout. Vertical installation voids the manufacturer’s warranty. Only use this appliance on a 230-240 volt AC single phase electricity supply. 110 volt elements are available on request. This heater is not intended for installation or use on recreational vehicles and/or boats. It is also not intended for installation in wardrobes. www.alfrescoheaters.ie 3 Do not run the power cord under carpeting. Do not cover with throw rugs, runners, etc. Arrange the cord away from all traffic areas and where people will not trip over it. Do not install the heater below or in front of an electricity outlet. Heat radiated from the appliance may damage the electricity outlet or plug. Heaters have hot and arcing or sparking parts inside. Do not install this product in areas where gasoline, paint, or flammable liquids are used or stored. Ensure that a means for disconnecting the heater is incorporated into the fixed wiring in accordance with electrical codes and regulations. Ensure that the heater is earthed appropriately using the connector provided. Install the heater using the stainless steel brackets provided. Do not use other brackets for this purpose. Before completing installation, ensure that the heater element is not turned towards the power cable. The heater element should be rotated towards the area it is intended to heat before switching on to test operation. Do not remove this Installation & Service Manual or the provided spanners from the site of installation. Ensure that the manual is stored safely for future reference. The spanners may be required for further servicing tasks related to the elements. Use only IPX4-rated (or greater) conduit fittings for the electrical installation to maintain the heater ingress protection rating. Use stainless steel fasteners appropriate to the structural material on which the heater is being mounted. Do not use or install the heater in bathrooms, laundry areas, or similar indoor locations. Never place the heater near a bathtub or other water container. Do not place switches or controls within reach of a person in a bathtub, shower, or swimming pool. To extend product life and maintain product appearance, install the heater under cover and protect from rain and weather as much as possible. Note that you must always leave a distance of 15cm (minimum) between the heater and any such covering. Maintenance Precautions Only a qualified electrician should repair or service the heater. Do not attempt to clean or service the heater until it has been switched off, the power has been disconnected, and the heater has cooled to room temperature. If you have removed the protective grille to service the heater, ensure that you replace it before operating. Regularly check the heater for damage. Discontinue use immediately if you suspect damage to the appliance and contact the supplier or a qualified electrician to repair. If the appliance has not been used, or will not be used for a long period of time, disconnect the power supply. If the supply cord is damaged, ensure that it is replaced by a qualified electrician. Ensure that the heater is serviced and inspected by a qualified electrician on an annual basis. 2. PRODUCT OVERVIEW Alfresco heaters are available in a range of single and dual element models to suit your outdoor and indoor heating requirements. Using the right model, you can ensure that your particular heating area is made warm and comfortable. Single Element Heater Dual Element Heater You can refer to the following diagram for the various heater parts. www.alfrescoheaters.ie 4 7 2 6 1 3 5 4 Main heater parts The part names are listed in the following table. Part Description 1 2 3 4 Part Mounting bracket Bracket bolt (with lock and standard washers) Exterior casing Protective grille 5 6 7 Description Heating element Element end cover Reflector 2.1. Product Features It is worth noting the following product features: Alfresco heaters have a unique patented design to generate intense heat almost instantly. There are no moving parts so Alfresco heaters do not break down. Alfresco heaters can be used both indoors and outdoors. The alloy reflectors are 98% pure mirror-finish aluminium. This boosts heat output significantly while keeping running costs low. Alfresco heaters reach full working temperature in 60 seconds. Virtually none of the energy is wasted as light. This is because 94% of the electricity is converted into heat. This compares to approximately 45% for gas and 60% for halogen heaters. Alfresco heaters are different to other standard outdoor heaters as they use medium-wave infrared. Most other heaters use short-wave infrared. The use of soft-start technology allows Alfresco heaters to be fitted with motion sensors. This means that the heater will operate only when people are present. The exterior casing is manufactured from G4 stainless steel so is very resistant to rust. Alfresco heater elements are guaranteed for 7,000 hours of continuous use. 2.2. Product Specifications You can refer to the following table for more information on the specifications for the different models. Model ALF 20 ALF 30 ALF 40 ALF 50 ALF 60 ALF 80 Elements Length Power Current Heating Area Weight Single 70cm 2kW 8.5 amps 2.5m x 2.5m 6kg Single 156cm 3kW 12.5 amps 3m x 3.5m 10kg Single 156cm 4kW 17amps 4m x 4m 10kg Dual 99cm 5kW 21.1amps 4m x 4m 8.5kg Dual 156cm 6kW 25amps 4m x 4.5m 10kg Dual 156cm 8kW 34amps 5m x 5m 10kg www.alfrescoheaters.ie 5 Note: Indoor or well protected areas may need less coverage. Extremely cold or windy conditions may need additional coverage. For example, if you are trying to heat a 3m x 3.5m area which is very cold, an ALF30 model heater may not be sufficient. Instead, you may need to install the more powerful ALF40 heater model. It is recommended that you contact the supplier if you are unsure of your requirements. The following diagrams show the main dimensions of the product. www.alfrescoheaters.ie 6 3. INSTALLATION INSTRUCTIONS Warning! The heater must only be installed by a qualified electrician. Never attempt to carry out an installation while the electrical power is switched on. Please remove all protective plastic from the heater before installation! 3.1. Items Required You can refer to the following table for information on what items are supplied with the installation pack and what additional items you may require. Qty. Items Supplied Qty. 1 Radiant heater 4 Quartz elements Mounting brackets Spanners 1 1-2 2 2 Tools & Additional Items Required (Not Supplied) Mounting fasteners (appropriate for surface, 25 x 5mm) Phillips screwdriver Drilling and electrical installation equipment Ensure that all the items listed under the Items Supplied column are included in your installation pack. If not, please contact your supplier. 3.2. Installation Clearance Clearance distances vary between different models. You can check the appropriate clearance distances for your model in the following table. Model ALF 20 ALF 30 ALF 40 ALF 50 ALF 60 ALF 80 Mounting Height Distance from Mounting Surface 1.9 - 2.4m 15cm 2.1 - 2.5m 15cm 2.1 - 2.5m 15cm 2.1 - 2.5m 15cm 2.5 - 3m 15cm 2.5 - 3.5m 15cm 3.3. Mounting the Heater Warning! Do not mount the heater vertically. It must always be mounted horizontally. Alfresco heaters are suitable for both wall and ceiling mounting. Ensure that you refer to the installation precautions under Important Safety Instructions before starting to mount the heater. 1. Mark the mounting hole centres on the ceiling or wall in accordance with the measurements in the following diagrams. 156.5cm between mounting hole centres Mounting distances for models ALF 30, 40, 60, 80 16.0cm www.alfrescoheaters.ie 7 99.5cm between mounting hole centres Mounting distances for model ALF 25,50 16.0cm 2. Attach the stainless steel mounting brackets to the ceiling/wall using the appropriate fasteners (not supplied). 3. Loosen and then remove the thick bracket bolts from either end of the heater. There are two washers supplied with each bracket bolt. Keep them together with the bolts after you have removed them. 4. Thread a bracket bolt through the hole in one of the mounting brackets. 5. Ensure that the washers are on the bracket bolt in the following order: a. Lock washer (notched washer) b. Standard washer (flat washer) The bracket should be inside both washers, with the standard washer closest to the heater. You can refer to the following picture to see this illustrated. Standard washer Mounting bracket Replacing the bracket bolt washers Bracket bolt Lock washer Once you tighten the bracket bolts after mounting the heater, the lock washer allows the angle of the heater to be adjusted without loosening the bracket bolt. 6. 7. 8. 9. Position the heater between the mounting brackets. Thread the bracket bolt into one end of the heater. Tighten the bracket bolt securely to lock the heater into the mounting. Repeat this process with the other end of the heater, ensuring that the weight of the heater is supported until both bracket bolts are secured. 10. Rotate the heater to the desired angle to point towards the heating area. 3.4. Installing the Element The quartz heating elements are fragile. It is recommended that you mount the heater before installing the element. This helps to minimise any possible damage to the element that could occur during installation. www.alfrescoheaters.ie 8 Warning! If installing the Gold Element, please ensure the gold plated side is facing the aluminium reflector. To prepare the heater for element installation: 1. 2. 3. 4. Using a Phillips screwdriver, remove the screws from both ends of the heater’s protective grille. Carefully remove the grille from the front of the heater. Remove the screws securing the alloy element end covers. Remove the element end covers. At either end of the heater, there are cables with lugs. For single element heaters, there should be just one cable at either end. For dual element heaters, there should be two. 5. Check that the lugs are securely attached to the cables. 6. At one end of the heater, there is a moveable arm that allows for easy insertion of the element. Remove the screw holding this arm in place and move it upwards, similar to the following picture. Moving the element holder arm To install the element: 1. Remove the outer nut from the threaded stud at one element end. 2. At the heater end that does not have the moveable arm, push the element through one of the holes near the cables. For single element heaters, use the centre hole; for dual element heaters, use the left and right holes. Do not use the centre hole for dual element heaters. 3. Lay the opposite element end into position, underneath the arm. 4. Once the element is in place, close the moveable arm over the element end and replace the securing screw. Note: If you are installing two elements, ensure that both are in place before replacing the moveable arm. www.alfrescoheaters.ie 9 5. Slide the cable lug onto the threaded stud. 6. Slide one lock washer next to the lug and then replace the outer nut. You can refer to the following picture to see the order in which they should be placed. Cable lug Installing the cable lug, lock washer, and element nuts Outer element nut Inner element nut Lock washer 7. Using one of the provided spanners, hold the inner nut in place. 8. Using the other spanner, tighten the outer nut securely against the lug and lock washer. Warning! If you do not tighten the element nuts very securely, the lugs will overheat and melt, causing possible injury and property damage. Also, if the element nuts are not sufficiently tightened, this will void the manufacturer’s warranty. 9. Repeat this process for the opposite end of the element. 10. If you are installing a dual element heater, repeat this process with the second element. Note: For dual element heaters, ensure that you connect the ends of the element to the appropriate cables. If you connect one end of the element to the cable marked L (refer to the bright yellow tags on each cable), you must connect the other end to the cable marked N. Similarly, attach one end of the second element to the cable marked L1 and the other end to the cable marked N1. This is to ensure that each element has one live and one neutral connection. To complete element installation: 1. Replace the element end covers and secure them using the screws you removed earlier. 2. Replace the grille and secure it using the screws you removed earlier. 3.5. Wiring the Heater Warning! Only qualified electricians should carry out the electrical wiring of the heater. Otherwise, there is a serious risk of electric shock. As noted in the precautions under Important Safety Instructions, you should only install this appliance on a 230-240 volt AC single phase electricity supply. When installing several heaters to a location where 3-phase www.alfrescoheaters.ie 10 power is used, you should divide the units across the different phases. For example, you could install six heaters at two per phase. You can refer to the following table for more information on what cable should be used for single and dual element heaters. Model ALF 20 ALF 30 ALF 40 ALF 50 ALF 60 ALF 80 Elements Cable core Cable wire size Cable type Single 3-core 2.5mm2 NYMJ Single 3-core 2.5mm2 NYMJ Single 3-core 2.5mm2 NYMJ Dual 5-core 2.5mm2 NYMJ Dual 5-core 4mm2 NYMJ Dual 5-core 4mm2 NYMJ Refer to the following diagrams for more information on the wiring for both single and dual element heaters. Single element wiring (ALF 20,30, 40) www.alfrescoheaters.ie 11 Dual element wiring (ALF 50, 60, 80) Note: For dual element heaters, bright yellow tags are used to indicate the live and neutral wires - L and N for one element and L1 and N1 for the other. 1. Check the Product Specifications table for the correct voltage and wattage for your model. 2. Remove the junction box cover by unscrewing the two screws holding it in place. 3. Remove the black neoprene weather-proof gasket underneath the cover. Alfresco heaters are pre-fitted with an IP4-rated gland (cord-grip). This is the cream, plastic cylinder that goes through the side of the junction box. The gland grips the cable wire when you have installed it and prevents water from entering the junction box. If installing outdoors, only use wiring components approved for outdoor use with a minimum IPX4 rating. The following picture shows the inside of a junction box for a dual element heater. Neutral connector Gland Junction box wiring Live connector Earth connector Note: Neutral and live connectors are also indicated with bright yellow tags in the junction box. 4. Insert the power supply cable in through the gland. Use a suitable cable with aluminium or copper wire with a temperature tolerance of at least 90°C (194°F). For single element heaters, use 3-core (one live, one neutral, and one earth wire), 2.5mm2 www.alfrescoheaters.ie 12 cable. For dual element heaters, use 5-core (two live, two neutral, and one earth wire), 4mm2 cable. Check the Product Specifications table for the appropriate amp values for each heater model. Note: For the ALF 50 model heater, you can use either 2.5mm2 or 4mm2 cable. 5. Make the electrical connections in compliance with the applicable electrical codes and regulations. Ensure that you connect each cable wire to its matching connector. For example, the neutral wire from your cable must be connected to the neutral wire connector in the junction box. For the single element heaters, you need to make only one live and one neutral connection. For the dual element heaters, you need to make two live and two neutral connections. 6. Earth the heater using the connector provided. In the junction box, there is a strip of metal welded to the base. This is fitted with a connector to which you should connect the earth wire. 7. Ensure that all connections are secure and then replace the neoprene weather-proof gasket on top of the junction box. Warning! Failure to replace this gasket after wiring the heater will void the manufacturer’s warranty. 8. Replace the junction box cover and the two screws you removed earlier. 3.6. Installation Troubleshooting You can refer to the following table for more information on some common issues that may occur. Symptom Possible Cause Corrective Action Element not heating 1. Incorrect connection 2. Defective element Element hot spot 1. Heater is not level 2. Moisture/grease on tube 1. Heater too large for heating area 2. Heater mounting too close to heating area 1. Heater too small for heating area 2. Heater mounting too far from heating area Nuts and lock washers not tight enough 1. Check power connections 2. Replace element 1. Change to level mounting 2. Clear tube or replace if necessary 1. Replace with less powerful heater model 2. Increase mounting height/distance 1. Replace with more powerful heater model 2. Decrease mounting height/distance Tighten the nuts and lock washers more securely against the element ends. Excessive heating Insufficient heating Cable lugs overheating 4. OPERATION INSTRUCTIONS Alfresco heater can remain in prolonged, constant operation if required. However, it is recommended that you install motion sensors together with the heaters to minimise costs. Warning! A contactor is required when connecting a motion sensor. If you do not use a contactor, the current will burn out the sensor. The contactor carries the load and acts as a heavy-duty switch that is turned on and off by the sensor. You can refer to the applicable motion sensor installation instructions for more information. www.alfrescoheaters.ie 13 5. HEATER MAINTENANCE The appearance and product life of the heater can be extended by means of regular cleaning and servicing. You should check the heater regularly for correct operation and have it serviced at least once a year. Warning! If you do not disconnect the heater from its power source before cleaning or servicing it, there is a risk of serious personal injury or death due to electric shock. Ensure that the heater is only serviced by a qualified electrician. 5.1. Cleaning the Heater It is recommended that you clean the exterior steel casing of the heater on a monthly basis and the alloy reflector and elements on an annual basis. Warning! Do not use harsh detergents during cleaning as they may damage the heater. Only soap and water should be used. 1. 2. 3. 4. Switch off the heater and disconnect its power supply. If the heater has been in use, wait until it has fully cooled down before handling. Remove the heater grille by unscrewing the screws at either end. Clean the alloy reflector and elements with a soft damp cloth. Note: Ensure that you squeeze all excess moisture from the cloth before using it. It should be damp rather than wet. 5. Wipe down the exterior casing of the heater with a soft damp cloth. 6. Replace the grille and the screws you removed earlier. 7. Reconnect the power supply to the heater. 5.2. Replacing the Element The heater element must be replaced every three to four years. Warning! Like the initial element installation, this task should only be carried out by a qualified electrician. 1. 2. 3. 4. 5. 6. 7. 8. 9. 10. 11. 6. Switch off the heater and disconnect its power supply. If the heater has been in use, wait until it has fully cooled before handling. Remove the heater grille and element end covers. Remove the screw securing the moveable arm in place over the element and raise the arm. Using one of the provided spanners, remove the outer nut from the element to be replaced and disconnect the element from the cable lug. Repeat this with the other end of the element. Remove the old element and dispose of it appropriately. Follow the instructions under Installing the Element to install the new element. When finished installing, ensure that the moveable arm is replaced over the element and secured with a screw. Replace the element end covers and the grille and then screw into place. Reconnect the power supply and switch on the heater to ensure that it is operating correctly. PRODUCT WARRANTY All Alfresco heaters are CE-rated and under warranty for a period of two years. For more information on the heater warranty, contact your supplier. www.alfrescoheaters.ie 14 7. PRODUCT DISPOSAL At the end of this product’s life, do not dispose of it as domestic waste. Instead, take it to a collection centre for waste electrical and electronic equipment. Note that it is the owner’s responsibility to dispose of this heater appropriately at the end of its product life. Failure to do so may incur penalties in accordance with waste disposal laws. The appropriate collection and the subsequent recycling, processing, and environmentally approved disposal of waste equipment avoids unnecessary damage to the environment as well as related health risks. Contact your local waste disposal service or the supplier for further information on waste collection and disposal. Alfresco Heaters Ltd. Cloyne, Co. Cork, Ireland +353 (0)21 465 1808 [email protected] www.alfrescoheaters.ie 15