1
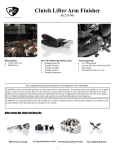
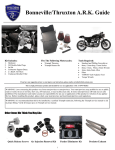
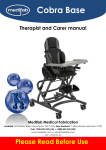
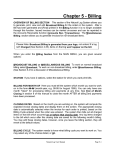
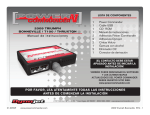
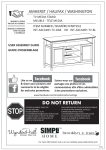
Modern Classics Air Box Removal Kit Kit Includes: 1. 2. 3. 4. 5. 6. BC Battery Box 2 x K&N High Flow Air Filters 1 x K&N Crankcase Breather Filter Carburetor Support Brace (Carbureted Only) Jet Kit (Carbureted Only) Hardware Fits The Following Motorcycles: Triumph Bonneville Triumph Bonneville EFI Triumph Thruxton Triumph Thruxton EFI Tools Required: 5, 3, 4 mm Allens T30 19 , 24, 8 mm Wrenches Torque Wrench Flathead & Phillips Screwdriver This is a high performance product and intended for race use applications! USE AT OWN RISK! Please be advised that in California, this product is intended for “Racing vehicles” only. A “Racing Vehicle” is defined to mean “a competition vehicle not used on public highways.” It is not enough that the vehicle will be used for off-road use. It must be for “competition use only” and for “closed-course competition use only.” The manufacturer and retailer assume no responsibility for any use or application of this product in violation of any applicable law. Before installing this product, please check your state/province and local/municipal laws and regulations. WARNING: It is recommended that this kit be installed by a certified Triumph technician, following the Triumph service manual to aid in proper fitting. Verify all torque specs in Triumph service manual. Other Items We Think You May Like Side Cover Screws Front Sprocket Cover Oil Pressure Guage 1 Keihin CVK Choke Knob Modern Classics Air Box Removal Kit Step 1: Start by removing the stock seat with a 5mm allen. Step 2: Remove the side covers using a flathead screwdriver. Step 3: Disconnect the battery, negative (black) side first with a Phillips screwdriver. Remove the battery retaining strap. Step 4: Remove the ECU retainer and battery spacer. Now you can remove the ECU and battery. 2 Modern Classics Air Box Removal Kit Step 5: Disconnect the taillight and turn signal harnesses. Step 6: Remove the fender bolts using a T30. *Note* Be careful to not let the fender drop when removing the bolts. Step 7: Slide the solenoid, starter, and turn signal relays from the mounting brackets. Step 8: Using an 8 mm socket remove the air intake from the air box on the left side of the bike. Remove the stock air filter. 3 Modern Classics Air Box Removal Kit Step 9: Remove the rear brake reservoir and the fuse box using a 5mm allen. Keep the brake reservoir upright to avoid leaking. Step 10: Remove the air box sensor Step 11: Using a 3mm allen loosen the airbox manifold clamps. Step 12: Remove the secondary air injection (SAI) hose that runs along the bottom left side of the tank from the air box to the SAI solenoid. 4 Modern Classics Air Box Removal Kit Step 13: Using a jack, lift the bike from the center of the frame to allow for better access to the air box. Step 14: Remove the rear axle using a 19mm wrench on the brake side and a 24 mm wrench on the drive side. Loosen the chain tensioners with an 8 mm wrench. Step 15: Pull the chain off the rear sprocket and let it hang on the swingarm. Roll the rear wheel out while guiding the wheel spacers and brake caliper off the wheel as you remove. *Note* To prevent the caliper from swinging dur ing the install, we secured it to the swingarm with tape. Step 16: Remove the 4 air box bolts in the battery box using a T30. The air box will now be loosely hanging from the manifolds. 5 Modern Classics Air Box Removal Kit Step 17: Pull the air box from the stock manifolds and remove the crankcase breather hose connected to the lower front of the air box. Remove air box through the back of the frame. Step 18: Install British Customs Battery Box and mount it in place with the supplied hardware using a 4mm allen. Step 19: Remove the fuse box and the rear brake reservoir from the old bracket. The fuse box is held in place by a plastic push-in clip. Simply pry it out with a flathead screwdriver. The brake reservoir comes off with an 8mm wrench. Step 20: Using the supplied hardware, attach the fuse box to the new battery box with a 4mm allen. 6 Modern Classics Air Box Removal Kit Step 21: Attach the rear brake reservoir to the battery box with the supplied hardware and a 4mm allen. Step 22: Optional: The sensor removed in Step 10 may throw a check engine light if not reinstalled. Remove the sensor mount from the stock air box using a 5 mm allen. Step 23: Optional: Plug the sensor into the mount. Zip-tie the sensor to a wiring harness to prevent dangling. Step 24: Reinstall the solenoid, starter, and turn signal relays by sliding them onto the new brackets on the battery box. 7 Modern Classics Air Box Removal Kit Step 25: Install the new crankcase breather filter. We suggest cutting the crankcase hose so that the filter sits under the throttle body or carburetor. Step 26: Attach the supplied K&N Air Filters to the throttle body/ carburetor. Tighten the clamps down with a flathead screwdriver. Step 27: Reinstall the rear wheel while keeping the spacers in place, holding the rear brake caliper in its position, and aligning the rotor between the pads. Then set the chain in place. Step 28: Before running the axle through the wheel, make sure the swingarm, caliper mount, wheel holes and spacers are lined up. Then, run the axle through from the brake side and loosely tighten it. 8 Modern Classics Air Box Removal Kit Step 29: Use an 8 mm wrench, adjust the chain tensioners and set to specifications. Step 30: Tighten the rear axle down with a 19 mm wrench on the brake side and 24 mm wrench on the drive side, then torque down to 85 Nm. *Note* It is now safe to remove the jack from the fr ame Step 31: Install the ECU, battery, and spacers into the new battery box and secure using the stock strap. Step 32: Reattach the rear fender to the frame using the stock hardware and a T30. Tighten and torque these 4 bolts to 9 Nm. 9 Modern Classics Air Box Removal Kit Step 33: Reconnect the taillight and turn signal harnesses. After making sure all the wiring harnesses are mounted properly and have been connected, re-connect the battery starting at the positive terminal. Step 34: Reinstall the side covers with a flathead screwdriver. Step 35: Reinstall the seat using the stock hardware and a 5mm allen. *Note* For proper per for mance, it is required that the motorcycle is re-jetted or re-mapped immediately after install. Please be advised that in California, this product is intended for “Racing vehicles” only. A “Racing Vehicle” is defined to mean “a competition vehicle not used on public highways.” It is not enough that the vehicle will be used for off-road use. It must be for “competition use only” and for “closed-course competition use only.” The manufacturer and retailer assume no responsibility for any use or application of this product in violation of any applicable law. Before installing this product, please check your state/province and local/municipal laws and regulations. 10