1
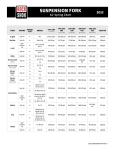
2014
SUSPENSION FORK
OIL, AIR, AND COIL CHARTS
GEN.0000000004392 Rev A © 2013 SRAM LLC
RockShox Oil Volume Chart
30 Gold
Fork
Drive Side
Model
Damper
Technology
TK
Volume
(mL)
Lower Leg
Oil wt
Volume
(mL)
Oil wt
5
5
15
Turnkey
TK 27
TK 29
143
3-8
BoXXer
Domain
Lyrik
Oil wt
-
Solo Air
Volume
(mL)
Oil wt
10
15
3-8
Solo Air
5
RC
130
15
10
-
Motion Control
DH
30
Solo Air with
Volume Adjust
10
230
5
R2C2
10
15
Coil with Drop
Stop
RC
Motion Control IS
290
Coil
Dual
Crown RC
Motion Control IS
325
Coil
Dual
Crown R
Rebound
370
RC
15
Coil
Rebound
5
10
15
-
15
40
40
Coil U-Turn
Coil
-
15
30
Motion Control
Coil U-Turn
Coil
200
Pike
Volume
(mL)
Lower Leg
105
World Cup
Reba
Upper Tube
Motion Control
R
Recon Gold
Spring
Technology
85
RCT
Argyle
Upper Tube
Non-Drive Side
R
Rebound
RC2L
RC2DH
Mission Control
Mission Control
DH
184
RC
Motion Control IS
187
R
Rebound
213
Charger
Bleed
Dual Position Air
Solo Air
5
10
15
-
10
15
Solo Air
Coil
RCT3
3
5
0w30
Solo Air
-
15
0w30
5
5
15
Solo Air
Grease
5
15
6
15
RC
RLT, RL
106
Motion Control
RL3
TK
TK29
RL
R
111
Turnkey
Rebound
Motion Control
Solo Air
133
5
6
3
15
15
Coil
-
10
2
RockShox Oil Volume Chart
Recon Silver
Model
TK
Revelation
Fork
Drive Side
WC
XXWC
XX
RCT3
RLT
RL
Damper
Technology
SID
Volume
(mL)
Oil wt
Lower Leg
Volume
(mL)
Turnkey
Oil wt
150
5
6
15
Motion Control
WC
XXWC
XX
RCT3
RLT
RL
134
Volume
(mL)
Oil wt
6
-
15
12
Dual Position Air
Solo Air
Grease
5
15
5
5
15
Solo Air
Grease
5
15
3-8
15
10-16
15
12
15
98
Motion Control
106
111
120
U-Turn 130
5
5-8
-
15
U-Turn 140
125
U-Turn 150
Sektor Silver
125
5
6
15
XC 32
Motion Control
Turnkey
Solo Air
150
TK
Turnkey
150
5
6
15
Solo Air
-
6
Solo Air
-
15
12
Coil
100
TK
Turnkey
122
5
5
15
Solo Air
Coil
-
5
10
15
Coil
-
10
15
123
TK 27
93
80/100
Turnkey
120
Oil wt
15
Turnkey
TK 29
Volume
(mL)
5
130
RL
TK
Lower Leg
5
TK
XC 30
Upper Tube
Coil
RLT3
RL3
XC 28
Spring
Technology
Solo Air
WC 1 1/8
XXWC 1 1/8
Sektor Gold
Upper Tube
Non-Drive Side
-
109
3
RockShox Air Spring Pressures
by Rider Weight
<140 LBS
140-160 LBS
160-180 LBS
180-200 LBS
200-220 LBS
(<63 KG)
(63-72 KG)
(72-81 KG)
(81-90 KG)
(90-99 KG)
90-110 psi
110-125 psi
125-140 psi
140-160 psi
175+ psi
265 psi
50-70 psi
70-85 psi
85-100 psi
100-120 psi
135+ psi
205 psi
Argyle
120-135 psi
135-150 psi
150-165 psi
165-180 psi
180+ psi
220 psi
BoXXer
30-45 psi
45-60 psi
60-75 psi
75-90 psi
90-105 psi
165 psi
Lyrik
45-55 psi
55-65 psi
65-75 psi
75-85 psi
85-95 psi
148 psi
Lyrik
45-65 psi
65-85 psi
85-105 psi
105-125 psi
125-145 psi
248 psi
Pike
45-55 psi
55-65 psi
65-75 psi
75-85 psi
85-95 psi
148 psi
Pike 29
55-65 psi
65-75 psi
75-85 psi
85-95 psi
95-105 psi
163 psi
45-65 psi
65-85 psi
85-105 psi
105-125 psi
125-145 psi
248 psi
Reba
70-90 psi
90-105 psi
105-120 psi
120-135 psi
135+ psi
200 psi
Recon Gold
90-110 psi
110-125 psi
125-140 psi
140-160 psi
175+ psi
265 psi
50-70 psi
70-85 psi
85-100 psi
100-120 psi
135+ psi
205 psi
90-110 psi
110-125 psi
125-140 psi
140-160 psi
175+ psi
265 psi
50-70 psi
70-85 psi
85-100 psi
100-120 psi
135+ psi
205 psi
Revelation
65-85 psi
75-100 psi
85-115 psi
95-125 psi
125+ psi
220 psi
Revelation
<110 psi
110-125 psi
125-140 psi
140-155 psi
155-170 psi
255 psi
Sektor Gold
40-60 psi
60-75 psi
75-90 psi
90-105 psi
105+ psi
225 psi
Sektor Silver
50-70 psi
70-85 psi
85-100 psi
100-120 psi
120+ psi
200 psi
SID
70-90 psi
90-105 psi
105-120 psi
120-135 psi
135+ psi
200 psi
XC32
90-110 psi
110-125 psi
125-140 psi
140-160 psi
175+ psi
265 psi
50-70 psi
70-85 psi
85-100 psi
100-120 psi
135+ psi
205 psi
90-110 psi
110-125 psi
125-140 psi
140-160 psi
175+ psi
265 psi
50-70 psi
70-85 psi
85-100 psi
100-120 psi
135+ psi
205 psi
FORK
30 Gold
80 mm
30 Gold
100-120 mm
Dual Position Air
120-140 mm
Pike
Dual Position Air
80 mm
Recon Gold
100-120 mm
Recon Silver
80 mm
Recon Silver
100-120 mm
Dual Position Air
80 mm
XC32
100-120 mm
XC30
80 mm
XC30
100-120 mm
MAX PSI
4
RockShox Coil Springs
by Rider Weight
FORK
Argyle
<140 LBS
140-160 LBS
160-180 LBS
180-200 LBS
200-220 LBS
(<63 KG)
(63-72 KG)
(72-81 KG)
(81-90 KG)
(90-99 KG)
Red Medium
Blue Firm
Black X-Firm
Not Available
Pink XXX-Firm
Silver X-Soft
Yellow Firm
Red Medium
Blue Firm
Black X-Firm
Silver X-Soft
Yellow Firm
Red Medium
Blue Firm
Black X-Firm
Green X-Soft
Black Soft
Yellow Medium
Red Firm
Blue X-Firm
Silver X-Soft
Yellow Firm
Red Medium
Blue Firm
Black X-Firm
BoXXer
Domain
Lyrik
Recon Silver
Recon Gold
Sektor
XC 28
80 / 100 mm
XC 28
120 mm
XC30
XC32
5
SUSPENSION FORK
Us er Man u al
SRAM LLC WARRANTY
EXTENT OF LIMITED WARRANTY
Except as otherwise set forth herein, SRAM warrants its products to be free from defects in materials or workmanship
for a period of two years after original purchase. This warranty only applies to the original owner and is not
transferable. Claims under this warranty must be made through the retailer where the bicycle or the SRAM component
was purchased. Original proof of purchase is required. Except as described herein, SRAM makes no other warranties,
guaranties, or representations of any type (express or implied), and all warranties (including any implied warranties
of reasonable care, merchantability, or fitness for a particular purpose) are hereby disclaimed.
LOCAL LAW
This warranty statement gives the customer specific legal rights. The customer may also have other rights which vary
from state to state (USA), from province to province (Canada), and from country to country elsewhere in the world.
To the extent that this warranty statement is inconsistent with the local law, this warranty shall be deemed modified to
be consistent with such law, under such local law, certain disclaimers and limitations of this warranty statement may
apply to the customer. For example, some states in the United States of America, as well as some governments outside
of the United States (including provinces in Canada) may:
a. Preclude the disclaimers and limitations of this warranty statement from limiting the statutory rights of the
consumer
(e.g. United Kingdom).
b. Otherwise restrict the ability of a manufacturer to enforce such disclaimers or limitations.
For Australian customers:
This SRAM limited warranty is provided in Australia by SRAM LLC, 133 North Kingsbury, 4th floor, Chicago, Illinois,
60642, USA. To make a warranty claim please contact the retailer from whom you purchased this SRAM product.
Alternatively, you may make a claim by contacting SRAM Australia, 6 Marco Court, Rowville 3178, Australia. For
valid claims SRAM will, at its option, either repair or replace your SRAM product. Any expenses incurred in making
the warranty claim are your responsibility. The benefits given by this warranty are additional to other rights and
remedies that you may have under laws relating to our products. Our goods come with guarantees that cannot be
excluded under the Australian Consumer Law. You are entitled to a replacement or refund for a major failure and for
compensation for any other reasonably foreseeable loss or damage. You are also entitled to have the goods repaired
or replaced if the goods fail to be of acceptable quality and the failure does not amount to a major failure.
LIMITATIONS OF LIABILITY
To the extent allowed by local law, except for the obligations specifically set forth in this warranty statement, in no
event shall SRAM or its third party suppliers be liable for direct, indirect, special, incidental, or consequential damages.
LIMITATIONS OF WARRANTY
This warranty does not apply to products that have been incorrectly installed and/or adjusted according to the
respective SRAM user manual. The SRAM user manuals can be found online at sram.com, rockshox.com, avidbike.com,
truvativ.com, or zipp.com.
This warranty does not apply to damage to the product caused by a crash, impact, abuse of the product, noncompliance with manufacturers specifications of usage or any other circumstances in which the product has been
subjected to forces or loads beyond its design.
This warranty does not apply when the product has been modified, including, but not limited to any attempt to open
or repair any electronic and electronic related components, including the motor, controller, battery packs, wiring
harnesses, switches, and chargers.
This warranty does not apply when the serial number or production code has been deliberately altered, defaced or
removed.
This warranty does not apply to normal wear and tear. Wear and tear parts are subject to damage as a result of normal
use, failure to service according to SRAM recommendations and/or riding or installation in conditions or applications
other than recommended.
Wear and tear parts are identified as:
•
•
•
•
•
•
•
Dust seals
Bushings
Air sealing o-rings
Glide rings
Rubber moving parts
Foam rings
Rear shock mounting
hardware and main seals
• Upper tubes (stanchions)
• Stripped threads/bolts
(aluminium, titanium,
magnesium or steel)
• Brake sleeves
• Brake pads
• Chains
• Sprockets
• Cassettes
• Shifter and brake cables
•
•
•
•
•
•
•
•
(inner and outer)
Handlebar grips
Shifter grips
Jockey wheels
Disc brake rotors
Wheel braking surfaces
Bottomout pads
Bearings
Bearing races
•
•
•
•
•
•
•
•
•
Pawls
Transmission gears
Spokes
Free hubs
Aero bar pads
Corrosion
Tools
Motors
Batteries
Notwithstanding anything else set forth herein, the battery pack and charger warranty does not include damage from
power surges, use of improper charger, improper maintenance, or such other misuse.
This warranty shall not cover damages caused by the use of parts of different manufacturers.
This warranty shall not cover damages caused by the use of parts that are not compatible, suitable and/or authorised
by SRAM for use with SRAM components.
This warranty shall not cover damages resulting from commercial (rental) use.
2
SAFETY INSTRUCTIONS
• It is extremely important that your RockShox® suspension fork (fork) is installed
correctly by a qualified bicycle mechanic. Improperly installed forks are extremely
dangerous and can result in severe and/or fatal injuries.
• The fork on your bicycle is designed for use by a single rider, on mountain trails, and
similar off-road conditions.
• Before riding your bicycle, be sure the brakes are properly installed and adjusted. Use
your brakes carefully and learn your brakes’ characteristics by practicing your braking
technique in non-emergency circumstances. Hard braking or improper use of the front
brake can cause you to fall. If the brakes are out of adjustment, improperly installed or
are not used properly, the rider could suffer serious and/or fatal injuries.
• Your fork may fail in certain circumstances, including, but not limited to, any condition
that causes a loss of oil; collision or other activity bending or breaking the fork’s
components or parts; and extended periods of non-use. Fork failure may not be visible.
Do not ride your bicycle if you notice bent or broken fork parts, loss of oil, sounds of
excessive topping out, or other indications of a possible fork failure, such as loss of
shock absorbing properties. Instead, take your bike to a qualified dealer for inspection
and repair. In the event of a fork failure, damage to the bicycle or personal injury may
result.
• Always use genuine RockShox parts. Use of aftermarket replacement parts voids the
warranty and could cause structural failure to the fork. Structural failure could result in
loss of control of the bicycle with possible serious and/or fatal injuries.
• Use extreme caution not to tilt the bicycle to either side when mounting the bicycle
to a carrier by the fork drop-outs (front wheel removed). The fork legs may suffer
structural damage if the bicycle is tilted while the drop-outs are in the carrier. Make
sure the fork is securely fastened according to the bike carrier's instructions. Make sure
the rear wheel is fastened down when using ANY bike carrier that secures the fork’s
drop-outs. Not securing the rear can allow the bike’s mass to side-load the drop-outs,
causing them to break or crack. If the bicycle tilts or falls out of its carrier, do not ride
the bicycle until the fork is properly examined for possible damage. Return the fork to
your dealer for inspection or call RockShox if there is any question of possible damage.
The International Distributor List is available on-line at www.sram.com. A fork leg or
drop-out failure could result in loss of control of the bicycle with possible serious and/
or fatal injuries.
• Forks designed for use with disc-style brakes: follow the brake manufacturer’s
installation instructions for proper installation and mounting of the brake caliper. For
forks using a post style disc brake mount, ensure that your brake caliper mounting
bolts have 9-12 mm of thread engagement and are torqued to 90 in-lb (10.2 N·m) when
installed on the fork. Failure to have proper thread engagement can damage the brake
mounting posts, which can result in severe injury and/or death.
• Your RockShox fork is designed to secure a front wheel using a quick release thru
axle. Be sure you understand which axle your bike has and how to properly operate it.
Do not use a bolt on axle. An improperly installed wheel can allow the wheel to move
or disengage from the bicycle, causing damage to the bicycle and serious injury and/or
death to the rider.
• Observe all instructions for care and service of this product.
ROCKSHOX FORKS DO NOT COME WITH THE REFLECTORS REQUIRED BY FEDERAL LAW
FOR NEW BICYCLES, 16 CFR §1512.16. ADDITIONAL REQUIREMENTS FOR REFLECTORS
AND LIGHTING MAY EXIST AND VARY BY LOCATION. YOUR DEALER SHOULD INSTALL
PROPER REFLECTORS AND LIGHTING SYSTEMS TO MEET ALL APPLICABLE FEDERAL,
STATE, AND LOCAL REQUIREMENTS. ALWAYS USE FRONT AND REAR LIGHTS IN
ADDITION TO REFLECTORS IF RIDING AT NIGHT OR IN REDUCED VISIBILITY.
3
Thanks for Choosing RockShox®
We are excited, pleased, and honored that you have chosen RockShox for your bicycle
suspension. You can feel confident that your suspension is the best in the market today
because RockShox products are developed and engineered by people who love to ride and
who are as passionate about performance as you.
This manual contains the important safety, maintenance, and warranty information you need
in order to safely install and use your RockShox suspension. To ensure that your RockShox
suspension performs properly, we recommend that you have it installed by a qualified bicycle
mechanic.
Additional detailed set-up, tuning, and service information for your RockShox suspension is
available online at www.sram.com.
Suspension Fork Installation
Remove the existing fork from the bicycle. Measure the RockShox steerer tube against
the length of the existing one as you may need to cut the RockShox steerer tube. If your
RockShox fork has a tapered steerer tube, be sure to leave enough steerer above the taper
in order to clamp the stem. Prior to cutting, consult your stem manufacturer's instructions to
determine the length of steerer tube required to clamp the stem.
Remove the crown race from the existing fork and install it firmly against the RockShox
crown. Use a 39.8 mm crown race for 1 1/2" steerer tubes and a 29.9 mm crown race for 1 1/8"
steerer tubes.
WA R N I N G
Improperly installed forks are extremely dangerous and can result in severe and/or fatal injuries.
Do not add threads to RockShox steerers. The steerer tube crown assembly is a one-time
press fit. Replacement of the assembly must be done to change the length or diameter of the
steerer tube.
Do not remove or replace the steerer tube. This could result in the loss of control of the
bicycle with possible serious and/or fatal injuries.
Aluminum Crown-Steerer
4
1
Mark the steerer tube and cut to the proper length.
2
Install a star nut or headset compression device into the steerer tube.
3
Install the fork onto the bike.
4
Install your stem according to the manufacturer's instructions and adjust the headset
until you feel no play or drag.
Brakes
Install your brakes according to the manufacturer's instructions and adjust the brake pads
properly. Use only disc style brakes on the provided disc mounting holes.
N OT I C E
Do not let brake or derailleur cables rest on, or be attached to the crown. Abrasion
over time may cause damage to the crown. If contact is unavoidable, use tape or similar
protection to cover the surface. Crown abrasion is not covered under warranty.
Wheel Installation
Check tire clearance whenever you change tires. To do this, remove the air pressure or coil
spring from the fork, then compress the fork completely and ensure there is at least 6 mm of
clearance between the top of the inflated tire and the bottom of the crown.
For complete instructions, refer to the RockShox Service Manual at www.sram.com.
WA R N I N G
Failure to leave 6 mm clearance between the top of the inflated tire and the bottom of the
crown will cause the tire to jam against the crown when the fork is fully compressed which
can result in severe and/or fatal injuries.
Riding with an improperly installed wheel can allow the wheel to move or disengage from
the bicycle, causing damage to the bicycle, and serious injury or death to the rider. It is
essential that you:
• Ensure that your axle, dropouts, and quick release mechanisms are clean and free of dirt
or debris. Always check and clean this area when reinstalling the wheel. Accumulated
dirt and debris can compromise the security of the axle, leading to serious and/or fatal
injury.
• Ask your dealer to help you understand how to properly secure your front wheel using
the Maxle quick release thru axle system.
• Apply the correct techniques when installing your front wheel.
• Never ride your bicycle unless you are sure the front wheel is installed properly and
secure.
5
Maxle™ Quick Release Thru Axle System
The axle threads into the non-drive side fork drop out and compresses the hub between
the non-drive and drive side fork legs. The axle is fixed in place in the lower leg by the Maxle
quick release lever.
Position your wheel in the lower leg drop outs. The hub should seat firmly in the drop outs.
Be sure to position the disc brake rotor in the caliper. Verify that the rotor, hub, and rotor
bolts do not interfere with the lower fork legs. If you are unfamiliar with adjusting your disc
brakes, see your brake manufacturer’s instructions.
N OT I C E
Never use any other tool to tighten the axle into the lower fork leg. Over-tightening of the
axle can damage the axle and/or the lower fork leg.
WA R N I N G
After closing the Maxle quick release lever, do not reposition or spin the lever.
Repositioning or spinning the Maxle lever can cause the axle to come loose,
compromising the security of the axle which can lead to serious injury and/or death.
6
Installation
1
Open the Maxle™ lever. Ensure the lever rests against the hard stop.
2
Slide the Maxle through the drive side fork leg drop out until it engages the threads of
the non-drive side drop out.
3
To tighten the Maxle into the drop out, turn the lever clockwise until there is a small
gap between the lever head and drop out.
Small Gap
7
Secure
1
Close the Maxle™ lever. Lever tension is sufficient if the lever leaves an imprint on your
hand.
2
To increase lever tension, open the lever and turn it clockwise. Close the lever to
recheck lever tension. Repeat until the tension is sufficient, then close the lever.
When the lever is closed, verify there is no gap between the lever head and dropout.
Remove
8
1
Open the Maxle lever.
2
Turn the lever counter-clockwise until the Maxle is disengaged from the threads on the
fork drop out, then slide the Maxle out of the hub.
Position
1
To change the direction of the Maxle™ lever when it is in the closed position, first remove
the Maxle from the fork leg drop out.
2
With the Maxle lever in the open position, place the flat end of the Maxle vertically on a
hard surface. Use the palm of your hand to push the lever head in to compress the spring
inside the Maxle. While the spring is compressed, rotate the lever head to the desired
position using the numbered lines on the Maxle as a reference.
3
Install, tighten, and secure the Maxle into the lower fork leg. Repeat until your desired
closed lever position is achieved.
9
Maintenance
We recommend any service be performed by a qualified bicycle mechanic. To obtain
service information or instructions, visit our website at www.sram.com or contact your local
RockShox dealer or distributor.
Take your bicycle to a qualified dealer for inspection and repair if there is any question of
component integrity due to a crash or other direct impact.
WA R N I N G
Before disassembly or service of any air system remove the air pressure from all air
chambers. For complete service instructions visit www.sram.com/service.
To maintain the high performance, safety, and long life of your front suspension, it is required
that you periodically check the fastener torque values for compliance as well as perform
routine maintenance on your fork. If you ride in extreme conditions, torque compliance
checks and maintenance should be performed more frequently.
FRONT SUSPENSION FASTENER
13.6 N•m (120 in-lb) Non-drive side
28.2 N•m (250 in-lb) drive side
Top Caps
Bottom Bolt
7.3 N•m (65 in-lb)
Disc Brake Mounting Bolts
MAINTENANCE
10
TORQUE VALUE
10.2 N•m (90 in-lb)
INTERVAL (hours)
Clean dirt and debris from upper tubes
Every ride
Check air pressure (air forks only)
Every ride
Inspect upper tubes for scratches
Every ride
Lubricate dust seals and upper tubes
Every ride
Check front suspension fasteners for proper torque
25
Remove lowers, clean/inspect bushings and change
oil bath
50
Clean and lubricate air spring assembly
100
Change oil in damping system (including hydraulic
lockout)
100