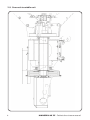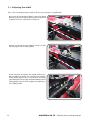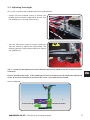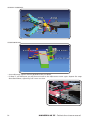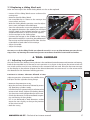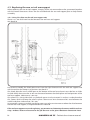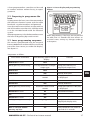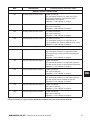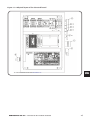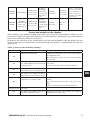
1
MONSTER
AG TT
Code 4-329712_uk dated 02/10
English
Technical assistance manual
3
Français
Manuel d’assistance technique75
Deutsch
Kundendienst-Handbuch
Español
Manual de asistencia técnica147
111
I
diritti di traduzione, di memorizzazione elettronica, di
riproduzione e di adattamento totale o parziale con qualsiasi
mezzo (compresi microfilm e copie fotostatiche) sono riservati.
Le informazioni contenute in questo manuale sono soggette a
variazioni senza preavviso.
A
ll rights reserved. No part of this publication may be
translated, stored in an electronic retrieval system, reproduced, or partially or totally adapted by any means (including
microfilm and photostats) without prior permission.
The information contained herein may be subject to modifications without prior notice.
L
es droits de traduction, de mémorisation électronique, de
reproduction et d’adaptation complète ou partielle par tout
type de moyen (y compris microfilms et copies photostatiques)
sont réservés.
Les informations fournies dans ce manuel peuvent être modifiées à tout moment et sans préavis.
A
lle Rechte der Übersetzung, der Speicherung, Reproduktion
sowie der gesamten oder teilweisen Anpassung durch ein
beliebiges Mittel (einschließlich Mikrofilm und Fotokopien)
sind vorbehalten.
Die in diesem Handbuch enthaltenen Informationen können
ohne Vorbescheid geändert werden.
Q
uedan reservados los derechos de traducción, de memorización electrónica, de reproducción y de adaptación
total o parcial con cualquier medio (incluidos microfilmes y
fotocopias).
Las informaciones contenidas en el presente manual pueden
sufrir variaciones sin aviso previo.
Italiano
English
Français
Deutsch
Español
Elaborazione grafica e impaginazione
Ufficio Pubblicazioni Tecniche
2
MONSTER AG TT - Technical assistance manual
TRANSLATION OF ORIGINAL INSTRUCTIONS
TABLE OF CONTENTS
MECHANICAL PART..............................................................................4
1. FIRST CHECKS AFTER INSTALLATION.................................................... 4
2. TURNTABLE TROLLEY UNIT..................................................................... 5
3. SLIDING BLOCKS UNIT........................................................................... 13
4. TOOL CARRIAGE....................................................................................... 17
5. MACHINE ADJUSTMENT.......................................................................... 20
6. HYDRAULIC CONTROL UNIT.................................................................. 21
Electronic/electric PART...........................................................23
1. INTENDED USE........................................................................................ 23
2. HOW THE MANUAL IS STRUCTURED.................................................... 23
3. AN OVERALL GLANCE AT THE MACHINE............................................ 24
4. SERVICE PROGRAMMES......................................................................... 27
5. MACHINE CALIBRATION.......................................................................... 29
6. ADVANCE STOPPING CALIBRATION...................................................... 30
7. GLOBAL BEAD BREAKER DISC TANGENT CORRECTION.................. 32
8. GLOBAL TOOL TANGENT CORRECTION.............................................. 34
9. PROGRAMMING THE LASER SENSOR.................................................. 36
10. ELECTRONIC BOARDS - LAYOUT AND MEASURING POINTS.......... 38
12. ADJUSTMENTS........................................................................................ 53
13. TROUBLESHOOTING............................................................................. 55
COMIM - Code 4-329712_uk dated 02/10.
UK
MONSTER AG TT - Technical assistance manual
3
MECHANICAL PART
1. FIRST CHECKS AFTER
INSTALLATION
Carry out the following checks after connecting
to an electrical socket:
- With one wheel mounted, enter the rim diameter on the display and carry out a Side To Side
procedure. Check that the chain sensor blinks
during the Side To Side.
- Checking the tool's working position. A distance
of 160 mm between the centre of the ball joint
and closing of the cylinder. See the relative
paragraph for more information.
AGTT 1600A / 1600 versions:
Monster and AGTT 1600A/1600 versions:
- Perform a complete stroke for each hydraulic
cylinder.
- Check maximum pressure setting which must
be 180 bar.
- Check the level of oil in the control unit. With
all the cylinders closed there must be 5 cm
between the dipstick and the plug without
screwing it down.
- Check the levelling off of the base. If the customer primarily uses heavy-duty wheels, level
with one wheel locked on the turntable. In the
case of very heavy-duty wheels it is advisable
to turn the foot one more time. The chassis
is designed to absorb jolts due to the heavy
weight.
- Checking the 3 turntable rotation speeds. Low
speed has only one rotation direction.
- Speed performance might not be good when the
machine is cold. Heat the oil for a few minutes
by moving the cylinders. Even the QS2 switch
can be used to heat the oil, it keeps the control
unit ON and the oil moving. But the second
translation speed will not work in this way!
- Check that if there is a radio connection it is
subject to no interference and does not create
interference with any nearby equipment.
- Checking tool arm rotation.
- Checking the manual search mechanism.
Recommendations:
- When working with wheels that are heavier than
300 Kg, use only the first rotation speed of the
turntable spindle. This will safeguard the gear
unit and ensure a longer life.
- Advise the customer to keep the sliding block
guides well greased to protect them and ensure
a longer life.
MONSTER version:
- Check tool tangent and bead breaker disc position at 22.5” and at 42”.
- At 22.5” there must be 27 mm between the
tool pad and bead seat on the rim. The
same applies to the bead breaker disc
- At 42” there must be 45 mm between the
tool pad and bead seat on the rim. The
same applies to the bead breaker disc
If necessary correct the positions by means
of the calibrations explained in the electric/
electronic part of the service manual.
4
MONSTER AG TT - Technical assistance manual
2. TURNTABLE TROLLEY UNIT
DISTRIBUTORE
OLEODINAMICO
GRUPPO RIDUTTORE
CINGHIA e
PULEGGIE
MOTOINVERT
ER
CILINDRO
AUTOCENTRANTE
POTENZIOMETRO A FILO
GRUPPO PATTINO
AUTOCENTRANTE
UK
GRUPPO GRIFFA
MONSTER AG TT - Technical assistance manual
5
2.1. Replacing and tensioning the motor inverter belt
- Remove the casing
- Loosen the 4 screws securing the motor
- Loosen the nuts on the tie-rod
- By means of the motor, remove tension to the
belt
- Replace the belt
- Tighten the belt by way of the nut on the tie-rod
- Tension value: 180 Hz
- Tighten the outside nut on the tie-rod and the
4 screws of the motor
- Refit the casing
2.2. Replacing the pulleys
- Remove the casing
- Loosen the 4 screws securing the motor
- Loosen the nuts on the tie-rod
- Remove the belt
- Loosen the screw locking the pulley
- Replace the pulley
- Tighten the screw, using some medium strength
Loctite thread-locking agent 243
- Refit the belt, following the instructions given in
the relative paragraph
- Check the tightness of the screw on the pulley you
have just replaced.
2.3. Replacing the motor-inverter
- Remove the casing
- Loosen the 4 screws securing the motor
- Loosen the nuts on the tie-rod
- Remove the belt
- Disconnect the cables of the motor-inverter in the junction box
- Completely undo the 4 screws supporting the motor
- Replace the motor-inverter
- For assembly, repeat the same steps for
disassembly but in the reverse order
- Use medium strength Loctite 243 on the
4 screws locking the motor
- Refit the belt, following the instructions
given in the relative paragraph
- Check tightness of the screw on the driving
pulley.
6
MONSTER AG TT - Technical assistance manual
2.4. Replacing the mobile clamp
- Remove the screw securing the locking spring
- Take the pin out
- Unscrew the M 18x1.5 nut
- Replace the mobile clamp
- Insert 2 new plugs, supplied with the machine,
or on request
- Refit the M18x1.5 bolt, tightening the nut so the
clamp is gripped in rotation and the pin fits into
the two seats
- Refit the spring
- Insert the pin.
2.5. Replacing the fixed clamp
- Open the turntable almost completely, without
reaching the end of travel
- Take the mobile clamp off by removing the
M18x1.5 bolt
- Unscrew the other M 18x1.5 nut
- Unscrew the dowel locking the pin between the connecting rod and the fixed clamp
- Remove the pin and the M18x1.5 screw
- Replace the fixed clamp
- For assembly, repeat the same steps for disassembly but in the reverse order
- Use medium strength Loctite 243 on the dowel locking the pin on the connecting rod
- Check tightness of the M18x1.5 nuts, movements must be gripped.
2.6. Replacing the hydraulic distributor
- Close the turntable
- Remove the protective casing
- Disconnect the hydraulic pipes
- Remove the 2 screws and the stop washer
- Pull the distributor out
- It is compulsory to use the cone for assembly as it prevents damaging the gaskets
- Refit the new distributor
- Repeat the same steps for disassembly but in the reverse
order
- Use medium strength Loctite 243 on the 2 screws locking
the distributor
- Adjust clearance if necessary with the adjustment
screw.
UK
2.7. Replacing the turntable cylinder
- Open the turntable completely at maximum pressure
- Unscrew the M27 nut on top of the rod
- Close the turntable cylinder completely
- Remove the casing and the distributor as explained
above
- Unscrew the whole cylinder
- Screw the new cylinder down. Use medium strength
Loctite 243. Tightening torque with wrench 500 Nm
- For assembly, repeat the same steps for disassembly
but in the reverse order.
MONSTER AG TT - Technical assistance manual
7
2.8. Gear unit-turntable unit
8
MONSTER AG TT - Technical assistance manual
2.9. Replacing the gear unit crown
Before opening the gear unit box, remove the pulley casing and the driven pulley followed by the
distributor and turntable cylinder, as explained in the relative sections.
UK
- Remove the big cover and the two small ones from the box
- Remove the locking ring between the crown and spindle hub
- Unscrew the two nuts under the axial bearings
- Remove the worm screw
- Remove the crown
- Clean the box of grease and replace it with new grease.
2.9.1. Use shims when assembling the crown-worm screw
The axis of the crown must be positioned in the halfway point of the worm screw
A 3 mm steel ring and a 2 mm bronze ring are positioned between the crown and the fixed part
of the spindle seat. For correct assembly there should be a gap of 0.1 mm between the two rings.
0.2 mm thick steel shims are used to ensure the position is correct.
The 100 diameter spindle hub projects 1.7 mm from its seat. 2 x 0.2 mm thick steel rings are to be
fitted on the 83 diameter, where the crown is mounted. Summing up the two rings and the projection
we have 2.1 mm. The bronze ring is to be housed in the projecting part of the spindle, being 2 mm,
leaving 0.1 mm with respect to the two steel rings.
If the spindle projects less than 1.7 it will be necessary to add one or two 0.2 mm steel rings to reach
MONSTER AG TT - Technical assistance manual
9
2.1 mm with a tolerance of 0/ + 0.1 mm. On the contrary, if it projects more than 1.7 then remove 1 or
both the 0.2 mm rings.
The measurement to be guaranteed is 2.1 mm with a tolerance of 0/ + 0.1 mm.
When this measurement is guaranteed, the 3 mm steel ring is to be inserted on the 83 diameter. By
resting against the 0.2 mm rings there will be an 0.1 mm clearance with respect to the bronze ring.
Then add another two 0.2 mm rings.
Insert the two tabs in the housings on the spindle hub and fit the crown.
Once mounted, check with a ruler that the crown hub is on the same level as the edge of the gear
unit box.
If the hub projects with respect to the edge of the box, remove one or both the 0.2 mm rings inserted
between the crown and the 3 mm steel ring. Vice versa, if the crown is below the level of the box edge,
add the necessary number of 0.2 mm rings to bring it up to the same level.
Assembly diagram, detail C:
10 MONSTER AG TT - Technical assistance manual
Once the crown is mounted correctly
- Insert the worm screw
- Fit the end position ring. Tighten the 4 cylindrical head screws to 35 Nm. Spread some medium
strength Loctite 243 on the 4 dowels
- Mount the bearing pack as per the enclosed diagram.
The axial bearings must have the part with the smallest hole towards the outside of the bearing
pack
- Tighten the nut on the first thrust bearing to 22 Nm then, holding the latter still, tighten the second
nut. Use full strength Loctite. Once mounted, check that the worm screw is not too gripped and is
able to operate the gear unit.
- Replace the gaskets on the three covers
- Fit the three covers
- Tighten the 7 screws on the gear unit cover to 12 Nm. Tighten the eighth screw directly onto the
aluminium taking care not to ruin the thread
- Refit the turntable cylinder, distributor and pulley as explained in the relative chapters.
2.9.2. Assembly diagram of bearings on the gear unit
Cuscinetto Assiale 51205
Cuscinetto Radiale 62055
UK
Distanziale
40x52x3
Cuscinetto Assiale 51205
8G
Rondella Acc
2 Dadi Bassi 6mm
MONSTER AG TT - Technical assistance manual
11
2.10. Replacing the gear unit box
Proceed as described for replacing the gear unit crown
In addition:
- Replace the gasket between the box and hub
- Tighten the 12 screws between the gear unit box and spindle holder hub to 85 Nm.
- Screw the remaining two anchorage points without stretching the box.
2.11. Replacing the turntable spindle
To remove the spindle it is necessary to remove the pulley casing and the driven pulley, the distributor, the turntable cylinder and the gear unit crown as explained in the relative sections.
- Extract the spindle from its seat
- Check wear of the DU bushings and replace them if necessary
- Check the gaskets on the spacer ring between the spindle and its seat and replace them if necessary
- Make certain that a 1 mm steel ring is inserted inside the spacer ring
- Insert the spacer ring in the spindle hub up to the end position
- Mount the new spindle
- Move the spindle to the end position, using one or two clamps if needed
- Carry out all the steps explained for mounting the crown, paying attention to the correct use of the
shims.
Detail B:
Guarnizioni
12 MONSTER AG TT - Technical assistance manual
2.12. Replacing the wire potentiometer
- Open the junction box, disconnect the
potentiometer cable from the board and
unscrew the cable gland checknut.
- Disconnect the sensor wire
- Undo the screws supporting the potentiometer
- Replace the potentiometer
- Repeat the above steps described for assembly but in the reverse order
- Calibrate as described in the electric/
electronic part of the Service Manual.
3. SLIDING BLOCKS UNIT
This new sliding block has the characteristic of being able to recover the clearance that is acquired
with the passing of time.
The upper part (dark grey in the picture) is fixed to the carriage on which it is assembled whereas the
lower part (light grey) is able to slide thanks to the slanting tops, by turning the adjusting screw. It is
this sliding that allows clearance to be recovered, created during operation.
UK
It is of paramount importance to know the mechanism and the adjustment methods for a perfect
tyre changer operation.
On these sliding blocks it is possible to adjust the width and height of the plate on which they
slide.
MONSTER AG TT - Technical assistance manual
13
3.1. Adjusting the width
This is the same adjustment made to all the tyre changers in production.
- By means of the two M12 dowels, move the fixed
part up against the sliding plate and then go back
a quarter of a turn. Tighten the checknut.
- Tighten to 70 Nm the two M10x35 screws to lock
the fixed part of the sliding block.
- If you are going to replace the whole sliding unit,
do not forget to centre the carriage with respect
to the sliding plate using a 2.5 mm shim. The shim
goes between the carriage and the fixed part of the
sliding block. See also the chapter on replacing a
new sliding block.
14 MONSTER AG TT - Technical assistance manual
3.2. Adjusting the height
This is the new adjustment added with these sliding blocks
- Loosen the four M10x80 screws to release the
mobile part and make it adjustable. Ensure that
the mobile part is actually free to move.
- Turn the adjustment screw to recover clearance.
Turn the wrench to tighten the sliding block. The
following pictures help understand how to tighten
the mobile part.
The > < arrows by the adjustment screws show the direction in which to turn the screws to recover
clearance!
Be very careful at this stage - if the mobile part is not free to move you risk ruining the adjustment
screw. If you feel resistance do not force the screw - you could ruin the thread.
TOOL CARRIAGE:
MONSTER AG TT - Technical assistance manual
15
UK
SPINDLE CARRIAGE:
TURNTABLE BAR:
- Once adjusted, tighten the four M10x80 screws to 70 Nm.
- If there is still clearance you will have to work on the adjustment screw again. Repeat the steps
described above, tightening half a turn at a time.
16 MONSTER AG TT - Technical assistance manual
3.3 Replacing a sliding block unit
Here are some tips if the whole sliding block unit has to be replaced.
- Loosen all the sliding block screws and ease the
carriage out.
- Remove the old sliding block.
- Pre-assemble the six screws on the carriage. Use
new washers and nuts.
- With the sliding block in position, turn the adjustment screw and open the mobile part.
- Turn the adjustment screw two complete turns in
the opposite direction. The mobile part will close
slightly. Look at the enclosed pictures to understand the direction in which the screw tightens.
- Fit the carriage on the sliding plate.
- Position the carriage in the middle of the sliding
plate with the aid of a 2.5 mm shim, placed between
the carriage and the fixed part of the slide. This has
to be done on both sides of the carriage.
- Adjust the width.
- Adjust the height.
One way to see if the sliding blocks are adjusted correctly is to see at what minimum pressure the carriages move. By lowering the control unit pressure movements should be between 30 and 40 bar.
4. TOOL CARRIAGE
4.1. Adjusting tool position
The new Leva la Leva (Without Lever) device is the combined action between tool rotation and moving
back of the turntable unit. If the tool is not in position A (as shown in the figure) the micro-switch will
not switch and the Leva la Leva (Without Lever) command will not work. See also the error message
on the display in the relative chapter of the electric/electronic service manual. It is the micro-switch
that determines the horizontal working position.
UK
Position A is 160 mm. Tolerance allowed: ± 2 mm.
Adjusting position A between the middle of the
ball joint and the cylinder closing flange:
- Remove the protective casing.
- Bring the joint to a distance of 160 mm by manually operating cylinder stroke.
- Position the cam symmetrically in relation to the
micro-switch wheel. Tighten the locking dowel
- Fix the micro-switch perpendicular to the cam.
- Check that distance A is observed both in opening and closing of the cylinder.
- If it is not observed in both directions, either
move the cam slightly or change the position
of the micro-switch.
- Refit the casing.
MONSTER AG TT - Technical assistance manual
AA
17
4.2. Replacing the arm or tool arm support
When replacing the arm or tool support, integrity of the unit mounted must be guaranteed together
with the correct clearances. Shims are also included with the arm and support parts to help correct
assembly.
4.2.1. Using the shims on the tool arm-support unit
There is a 1 mm thick steel washer between the tool arm and support.
See detail B.
For correct assembly the check plate must have the right clearance with the tool arm support and
with the washer that keeps it in position. See detail C.
The check plate fits into a milled part on the bottom of the tool arm where it must be free to slide.
To slide freely there must be an 0.2 mm clearance between the check plate and end position of the
tool arm support. Tolerance 0 / +0.2 mm
This plate has a slot inside which a cylindrical spacer is to be inserted. A washer is to be placed on
this spacer which will keep the plate in place. There must be a clearance of 0.3 mm between the
washer and plate. Tolerance 0 / +0.2 mm
To guarantee a correct assembly it might be necessary to have to increase or reduce the shim between
the tool arm and support, as explained above in detail B.
If the tool arm support ever needs replacing, pay attention to eliminating clearances with the tool carriage; 40 diam. shims are foreseen for the pin that acts as the pivot. Maximum clearance 0.2 mm
18 MONSTER AG TT - Technical assistance manual
Replacing the tool arm rotation cylinder
If the tool arm rotation cylinder, ball joint or check plate has to be replaced you will have to adjust
the ball joint so the cylinder does not reach the end of its stroke - there should be 0.5 to 1 mm left
to the end.
To make this adjustment, move the rotation cylinder to the end of its stroke, tighten or loosen the ball
joint until it is off centre in relation to the check plate pin by 0.5 - 1 mm. This offset must be towards
the outside of the plate rotation path, both in closing and opening of the cylinder.
4.3. Replacing the tool rotation micro-switch
If the micro has to be replaced it must be removed
when servicing the tool carriage. Pay attention to
how it works as correct operation of the automatisms
connected to Side to Side depends on it.
The micro-switch for controlling tool rotation must
be squeezed when the hook is facing the turntable
and the cylinder is closed.
MONSTER AG TT - Technical assistance manual
UK
19
5. MACHINE ADJUSTMENT
5.1. Adjusting the lifting cylinder with wheel support
The secondary lifting cylinder has a wheel support
so it can move during translation.
The tip of the stem is milled for a size 38 spanner
for adjusting the wheel support position. Loosen the
checknut, keep the support still and turn the stem;
depending on the turning direction, the support will
move away or come closer to the round bar.
With the cylinder at the end of its stroke, both open
and closed, the wheel support must have a maximum
clearance of 1 mm in relation to the round seat in
which it slides.
5.2. Adjusting the base feet
The base is fitted with two adjustable feet. They are used to level the machine with respect to the
ground on which it is installed.
The centre part of the base is 10 mm off the ground which imparts elasticity to the structure so it can
absorb rebounds.
- Loosen the checknut.
- Turn the foot to lift or lower the base.
- Tighten the checknut
As a rule with very heavy wheels it is necessary to unscrew the left foot even by several centimetres.
In the case of very heavy wheels it might be necessary to adjust the feet. This eliminates any jolting of the rear of the base.
In the case of very heavy wheels it is advisable to turn the foot one more time. The chassis is designed to absorb jolts due to the heavy weight.
20 MONSTER AG TT - Technical assistance manual
6. HYDRAULIC CONTROL UNIT
6.1. Replacing the solenoid valve
If one or more solenoid valves need replacing, the tightening torque of the nuts on the solenoid
valve pack tie-rods is of great importance. If tightening torque is too much there could be friction on
valve slides resulting in poor holding of switching. The cylinders might not stay in position, oil could
drain into the tank.
- Loosen the nuts on the tie-rods
- Replace the faulty solenoid valves
- Pay attention to the right position of the O rings
when replacing
- Tighten the nuts on the tie-rods to a torque of
22-25 Nm.
6.2. Replacing the hydraulic pump
Proceed as described
- Undo the 2 screws connecting the solenoid valve block to
the manifold.
- Take care not to bend the hydraulic pipes when putting the
solenoid valve block back.
- Remove the electric motor.
- Remove the manifold.
- Replace the pump.
- Clean the filter, removing all residue.
- Refit the manifold and position the joint.
- Put the electric motor back in place.
- Reposition the solenoid valve block, taking care not to damage the 2 O rings.
MONSTER AG TT - Technical assistance manual
UK
21
Notes
22 MONSTER AG TT - Technical assistance manual
Electronic/electric
PART
1. INTENDED USE
This technical manual is intended for people
who install, provide assistance and service the
automatic heavy-duty tyre changers.
Consequently this manual is not intended for
the end customer.
Some information in this manual is to be considered confidential and, therefore, not to be disclosed in any shape or form to third persons.
The manual must be read in its entirety with
maximum attention; some of the operations
described are potentially dangerous (e.g. the
service programmes) and are to be done only
by adequately trained personnel.
This manual is to be used together with the
Operating and Maintenance manual (it does not
replace it!) that gives other information, tables
and diagrams essential to understand how the
machine works and, therefore, perform technical
assistance jobs in conditions of maximum safety
for one's self and for others.
2. HOW THE MANUAL IS
STRUCTURED
This manual is structured in the following way:
CHAP. 3 - This chapter describes the overall
structure of the machine, its component parts
and the available functions.
CHAP. 6 - The advance stopping calibration
procedure is described in this chapter.
CHAP. 7 - The procedure for setting global bead
breaker disc tangent correction is described
here.
CHAP. 8 - The procedure for setting tool tangent
correction is described here.
CHAP. 9 - This chapter explains how to programme
the laser sensor.
CHAP. 10 - The purpose of this chapter is to illustrate, in detail, the electronic boards on the
machine, describing the function of the main
components, the meaning of the warning lights,
connections and so on.
CHAP. 11 – All the information about the machine's electrical system is given in this chapter
including the protection devices (fuses and circuit
breakers). The wiring diagrams and physical
layout of the system are enclosed.
CHAP. 12 – All the adjustments to be made on
the electromechanical and electronic parts of
the machine are described in this chapter (e.g.
proximity sensors and micro-switches).
CHAP. 13 – This chapter is dedicated to troubleshooting.
CHAP. 14 – The glossary gives all the abbreviations and acronyms used in this technical
manual.
CHAP. 15 – This chapter gives a table summarising
the calibration and setting operations for global
tangent corrections.
CHAP. 4 - This chapter gives a detailed explanation of how to access and use the service programmes. The service programmes are auxiliary
programmes intended only for technical assistance personnel and studied to facilitate installation, maintenance and troubleshooting.
CHAP. 5 - The machine's calibration procedure
is described in this chapter.
MONSTER AG TT - Technical assistance manual
23
UK
3. AN OVERALL GLANCE AT THE MACHINE
The machine, object of this manual, is intended for demounting tyres for heavy-duty use (wheels for
vehicles in the transport, earth moving, agriculture, forestry sectors, etc.).
The machine allows a traditional type of use where the operator controls the actuators at his complete
discretion (manual mode) or an innovative use where the onboard electronics executes some functions automatically (automatic modes).
The machine has some sensors for executing the functions automatically: a potentiometer for tangent
operations, a laser and proximity switch for the Side To Side operations as well as some micro-switches
used in several functions.
If these sensors are missing or malfunctioning, the automatic functions can be completely inhibited
or performed incompletely.
Whatever the case, the manual controls are always available.
Table 3-1 summarises the automatic and manual functions that are available together with their main
features.
Table 3 1 Automatic and manual functions with their features
Function
Type of function
Type of command
Remarks
Manual commands
Manual, hands-on
Always available even if there
are ongoing alarms relative to
the automatic functions.
Bead Breaker Disc Tangent
Automatic, hands-on
Uses the potentiometer to
work
Immediate Bead Breaker
Disc Tangent
Automatic, NOT hands-on
Uses the potentiometer to
work.
It is started automatically
straight after a diameter has
been selected with the +/keys on the control panel.
This function can be cancelled
but not aborted.
Tool Tangent
Automatic, hands-on
Uses the potentiometer and
the SQ3 micro-switch to work.
Side To Side
Automatic, NOT hands-on
Uses the laser, SQ4 microswitch for working and the
proximity switch. This function
can be cancelled but not
aborted.
Leva la Leva (Without Lever)
Automatic, hands-on
Uses the potentiometer and
the SQ3 micro-switch to work.
This function can be cancelled
and/or aborted.
24 MONSTER AG TT - Technical assistance manual
Function
Type of function
Type of command
Remarks
Return from Leva la Leva
(Without Lever)
Automatic, hands-on
Uses the potentiometer and
the SQ3 micro-switch to work.
This function can be cancelled
and/or aborted.
Double hydraulic unit speed
Manual, hands-on
With push button SB2.
Limited to right or left translation movement of the tool
holder arm (and with temporary reverse movement of the
turntable clamp carriage).
Selecting the rotation speed
of the turntable clamp
Manual, NOT hands-on
Using the lever selector SA16.
Three speeds in the clockwise
direction (of which one for
grooving, two speeds in the
anticlockwise direction).
3.1 Function types
The available functions can be performed with
either manual or automatic controls.
Manual controls are those the machine performs
upon the direct command of the operator, without
the use of any automatism. These controls remain
active even if there are alarm conditions that
preclude the use of the automatic commands.
Manual controls are always the hands-on type.
Automatic controls are commands that are
partly or completely based on the machine's
automatisms.
If there is a failure with the machine's sensors,
the automatic controls are disabled and the error
codes are displayed.
Automatic controls can be the hands-on type or
NOT hands-on type.
The automatic hands-on controls can be aborted
at any time, even intervalled by manual controls or they can be cancelled before they have
finished.
•NOT hands-on: the worker is NOT required to
operate the control device continuously, it will
suffice to operate it for a moment to start an
automatic procedure. In some cases the automatic procedure starts when the push button
is released.
The NON hands-on automatic controls can be
cancelled at any time but not aborted.
Figure 3-1 shows the control console: (a) shows
the automatic hands-on control, (b) the automatic NON hands-on controls and (c) the manual
controls.
3.2 Control types
Based on the operating device used (joystick,
push buttons, levers, pedals,etc.) the controls
can be of the following types:
•Hands-on: the worker is required to operate the
control device continuously all the time that
particular action is called for on the machine;
MONSTER AG TT - Technical assistance manual
25
UK
Figure 3-1 Layout of the controls on the console.
The serial data are received by the CPU-RX2
board that then decodes them and actuates
them, driving the solenoid valves and the two
motors.
See figures 3-2 and 3-3 to see the machine's different electrical and electronic parts.
Transmission is normally by radio but if the
batteries are flat or the radio modem fails, it
is possible to use the emergency serial cable
which is provided with the machine; it sees to
feeding the control console and to guaranteeing
transmission of the commands.
The commands are given by a control console that
is physically separate from the machine (it is on a
trolley) to give the worker more mobility.
The commands are recognised by the CPU-TX
board on the control console, serialised and then
sent to the machine via radio or cable.
When the emergency serial cable is connected
the CABLE LED turns on (HL4 - green) on the
side of the electrical board and communication
via cable is set automatically.
If an emergency cable is connected when the
transmitter is in stand-by (i.e. if no more than
30 seconds have elapsed since the end of the
last command) the green LED will not turn on.
However, it is enough to give any command
on the console to awaken the transmitter and
automatically set the communication channel
via cable and turn the green LED on.
Figure 3-2
Layout diagram of the machine's control console and electrical board
26 MONSTER AG TT - Technical assistance manual
Figure 3-3 Position of the sensors on the machine
MOTOR INVERTER
MICRO-SWITCH
LASER
WIRE
POTENTIOMETER
PROXIMITY
SWITCH
4. SERVICE PROGRAMMES
The software provided with the electronic control board includes, besides the normal work
programme, some service programmes intended
for technical assistance personnel.
The service programmes may only be used by
technical assistance personnel on the following
occasions:
- When installing the machine on the end customer's premises, to either calibrate or adjust
machine parameters.
- During technical assistance operations and/or
routine maintenance.
To identify a certain dip switch the designation
SW1:X will be used where SW1 is the name of
the whole set and X the subject dip switch.
For example, when it is written in the text to
set dip switch SW1:2 ON it means that only dip
switch 2 must be switched ON and therefore
does not mean that dip switches 1 and 2 must
both be switched ON.
Figure 4-1 DIP switches on the electronic
control board
Posizione
normale
TE 0 01 1
TE00116
The service programmes are used with
great caution to avoid setting wrong parameters
which could cause the machine to malfunction.
UK
A specific programme is associated with each
one of these dip switches as indicated in
table 4-1:
These programmes can be accessed via the set of
SW1 dip switches on the electronic control board.
These dip switches are normally all in the OFF
position as can be seen in figure 4-1.
MONSTER AG TT - Technical assistance manual
27
Table 4-1 Service programmes available
DIP SWITCH
Reference
Programme
#
Service programme function
Chapter
1
#1
Machine calibration
5
2
#2
Setting the global correction factor
of the bead breaker disc tangent
7
3
#3
Setting the global correction factor of the tool
tangent (from software release CG R0.18).
8
4
#4
Advance stopping calibration.
(from software release CG R1.0)
6
5
#5
Not used
---
6
#6
Not used
---
7
#7
Not used
---
8
#8
Forced switching-on of the laser /
Laser functioning test
4.1
Some service programmes require the use of the
P1 push button to confirm the values displayed
or to continue with the procedure. The P1 push
button is on the CPU-RX2 board by the side of
the SW1 dip switch.
Other service programmes instead require
the use of the “F” push button, which is on the
control panel, to confirm continuing with the
procedure.
parasitic reflections or malfunctions etc.) he can
use dip switch #8 to force its switching-on.
Forced switching-on of the laser/Laser functioning test
Dip switch #8 has the dual function of forcing
switching-on of the laser and testing its operation.
Access to one function or the other depends on
the status of the machine when the dip switch
is turned ON.
The purpose of this mechanism is to avoid
leaving the laser on all the time, forgetting dip
switch #8 ON.
To remove forced switching-on of the laser, turn
dip switch #8 OFF.
If you forget and leave dip switch #8 ON and
you then turn the machine off, when turning
on the next time the machine goes to the laser
functioning test programme, described in the
next paragraph.
Forced switching-on of the laser
The laser is normally off and is turned on only
on the following occasions:
- For 2 seconds when switching the machine
on.
- During the Side To Side (STS) function.
If the technician needs to keep the laser on for
test purposes (e.g. aligning the beam, checking for
28 To force switching-on of the laser proceed as
follows:
1. Make sure the machine is already on.
2. Turn dip switch #8 ON. The laser turns on immediately and stays on.
Laser functioning test
The laser functioning test, not to be confused
with the laser Programming procedure described
in chapter 9, verifies that the laser's measuring
channel is in perfect working order.
The laser functioning test is to be run on the
following occasions:
- When the machine is manufactured (in the
factory).
- When a new laser is installed.
- When replacing laser wiring.
MONSTER AG TT - Technical assistance manual
- Whenever any anomalies occur with the Side
To Side (STS) procedure that can be put down
to a laser malfunction (error code “E04” displayed or wrong measurement of the side of
the wheel).
Working of the whole chain is verified with this
test: laser (hardware and programming), laser
wiring, electronic CPU-RX2 board.
During the laser functioning test the machine
cannot perform any movements, neither in the
Manual nor in the Automatic mode.
To access the laser functioning test proceed as
follows:
1. Make sure the machine is OFF.
2. Turn dip switch #8 ON.
3. Turn on the machine. “dip8” will be shown
blinking on the display to remind you that dip
switch #8 is ON.
4. Turn dip switch #8 OFF. The word “laser” will
be displayed for 1 second to remind you that
you are in the laser functioning test procedure.
A numerical number will then be shown on the
machine's display ranging from 0 to 1023 which
represents the reading of the analogical signal
given by the laser.
Note: the value displayed does not represent
the target distance in mm but merely the
analogical-digital conversion value calculated
by the CPU-RX2 board.
5. Move the target over the whole laser measuring
range and check that reading varies continuously.
This is a qualitative type check. It is also possible
to leave the target still in two or three positions
to check that the value displayed is stable. But in
this case the target must be absolutely stable.
Note: the last digit of the value displayed could
fluctuate even if the target is perfectly stable.
This fact is normal. If, on the other hand, the
fluctuation amplitude is too much the problem
could even be due to the target used: highly
reflecting surfaces (e.g. chromed or galvanised),
particularly dark (e.g. certain types of rubber)
or transparent should not be used. Use ordinary
card or plastic, not coloured.
Switch the machine off to exit the Laser functioning test.
5. MACHINE CALIBRATION
The machine must be calibrated to be able to
use the automatic bead breaker disc tangent and
tool tangent functions. It is a two-point calibration
and is done by moving the turntable carriage into
the all up and all down radial positions.
During calibration the only movements the machine can do are the Turntable UP and DOWN
Radial Displacements.
5.1. When calibration is to be done
Calibration is to be done on the following occasions:
- When the machine is manufactured (in the factory).
- When a new electronic control board is installed
(and therefore has never been calibrated).
- When an already calibrated electronic control
board is installed but on another machine.
- When a different electronic buffer board is
installed (the buffer board is near the potentiometer).
- When the potentiometer is replaced (e.g. for
repairs).
- When the potentiometer's mechanical system is
removed and/or replaced (steel wire retainers,
the potentiometer's supporting plate, etc.).
- When there are malfunctions on the machine
because the potentiometer is no longer calibrated.
The calibration procedure has priority over all
the other calibrations and software corrections
available and must always be done first.
The new electronic control boards are supplied
without calibration data. The machine will refuse
all attempts to use the automatic functions and
the error code E00 will be displayed.
5.2. How to calibrate
Calibrate as follows:
1. If there is a wheel on the turntable, remove it.
This is recommended but not mandatory. Position the turntable carriage in a point where the
radial up/down displacement movement does
not interfere mechanically with other parts of the
machine, especially the tool holder arm.
MONSTER AG TT - Technical assistance manual
29
UK
2. Turn the machine off, open the electrical board
and put dip switch #1 ON.
3. Turn the machine back on: dip1 appears blinking on the display.
4. Put dip switch #1 OFF: Cal1 will now appear
on the display blinking.
5. With the joysticks of the control panel, move
the turntable carriage into the all-up radial position and then press the P1 push button on the
electronic control board. The machine acquires
the first calibration point and therefore shows
Cal2 on the display, blinking.
Actually point Cal1 can be acquired indifferently with the turntable in the all-up or all-down
radial position provided point Cal2 is acquired
in the opposite position: the software will automatically put the two points acquired in order
before storing.
6. With the joysticks of the control panel, move
the turntable carriage into opposite radial position and then press the P1 push button on the
electronic control board. The machine acquires
the second calibration point and shows the word
END on the display, blinking, for 1 second.
7. Calibration is complete and the machine goes
to the normal operating mode displaying the
default diameter (22.5) not blinking.
It is now possible to proceed with the advance
stopping calibration (see chapter 6) if there are the
conditions for it, or continue trying the automatic
tangent functions.
But if the automatic bead breaker disc tangent
or tool tangent function fail to give optimum
results, carry out the global bead breaker disc
and global tool correction procedures, described
in the relative chapters.
6. ADVANCE STOPPING
CALIBRATION
To carry out the automatic tangent functions (bead
breaker disc or tool) with maximum precision and
repeatability, the machine anticipates stopping
of the radial movement of the turntable clamp
unit to compensate for the unavoidable inertia
of the system.
The actual advance differs according to whether
the turntable clamp carries out a radial UP or a
radial DOWN displacement because the speeds
are different. The two advance values are stored
in a non volatile memory and were defined at the
machine design stage to ensure the best results
in terms of precision and repeatability.
Besides this set advance time, the machine also
performs a “dynamic” correction, taking into account the positioning error made in a tangent
so as to correct the calculation and execution of
the next tangent.
However if, for any reason, the speed of the
turntable clamp unit differs a great deal from
what was foreseen at the design stage (e.g. for
replacing the hydraulic cylinder which performs
a radial movement with a slightly different boring
one) it is possible to calibrate advance stopping
so as to store the two advance values required
for that particular machine.
NOTE: This procedure is only available starting
from the software release CG R1.0 (incl.).
This procedure is not enabled for previous software releases (dip switch #4 is not active).
The potentiometer is required in order to calibrate. Without the potentiometer, the electronic
buffer board or if there are anomalies with the
electrical connections, the machine will exit the
calibration procedure with the error code E01
shown on the display.
30 MONSTER AG TT - Technical assistance manual
6.1. When to calibrate advance
stopping
Advance stopping calibration is not strictly necessary and must be done in the cases listed below
only after having verified that the automatic
tangent functions (bead breaker disc or tool)
are not equally precise if the tangent is reached
with the turntable clamp unit coming from the
highest radial positions (furthest away from the
user) or the lowest radial positions (nearest to
the user):
- When an important mechanical part of the turntable clamp unit is replaced (e.g. the hydraulic
cylinder).
- When the hydraulic oil is changed with one
whose characteristics differ from those foreseen.
- When the hydraulic pump is replaced with
one whose characteristics differ from those
foreseen.
- When the automatic tangent functions (bead
breaker disc or tool) give results that are quite
different depending on the starting position of
the turntable clamp unit in relation to the final
tangent position.
The operation is optional in the following
cases:
- When the machine is manufactured (in the factory).
- When a new electronic control board is installed
(never calibrated).
- When an electronic control board is installed
that was used before on another machine;
In these latter cases, evaluate the need to
calibrate advance stopping based on the results
obtained with the tangents.
In all cases, calibrating advance stopping must
be done only after having calibrated the machine
(Chapter 5).
6.2. Verifying the need to calibrate
advance stopping
To verify the need for advance stopping calibration, proceed as follows:
Temperatures that are considerably different
from these could give incorrect results that
will then effect the precision of the automatic
tangents.
3. Perform the automatic bead breaker disc
tangent procedure several times, starting the
turntable clamp unit from opposite radial positions (at least twice from all-up and twice from
all-down) and each time measure the distance
between the bead breaker disc and the rim.
4. Calculate the difference between the maximum
and minimum distance measured at the end of
the tangents. If the difference is less than 10 mm
it will not be necessary to calibrate advance stopping and work can be started straight away with
the machine. If, instead, the difference is greater,
then it is better to calibrate advance stopping as
described in the next paragraph.
6.3. How to calibrate advance
stopping
Proceed as follows to calibrate advance stopping:
1. Turn the machine on and remove the wheel or
rim (if any) from the turntable.
2. Position the tool holder arm in the all-up
position.
3. Manually carry out a complete up and down
radial stroke of the turntable clamp unit to check
it comes up against no obstacles (in a following
phase the turntable clamp unit will move on its
own so there will be no need to guarantee there
are no mechanical interferences).
4. Turn the machine off, open the electrical board
and put dip switch #4 (on the electronic control
board) ON (no other dip switch must be ON).
5. Turn the machine back on: “dip4” appears
blinking on the display.
6. Put dip switch #4 OFF: “CAF” will now appear
for two seconds on the display.
7. Then the following will appear, each for one
second: “AFdn” followed by a numerical value
that stands for the extent of the advance stopping of the downward radial movement and also
“AFup”, again followed by a numerical value that
stands for the extent of the advance stopping of
the upward radial movement.
1. Turn the machine on, mount a 22.5” metal
sheet rim on the turntable and check that “22.5”
is shown on the display.
2. Make sure the temperature of the hydraulic
oil is between 35 and 40°C.
MONSTER AG TT - Technical assistance manual
31
UK
8. At this stage the message “GO?” appears on
the display blinking which means the machine is
asking confirmation to start the procedure. Turn
the machine off if you do not want to continue
otherwise press and release the “F” key on the
control panel;
CAUTION!
Before confirming the procedure make sure there
is no one that can be injured or obstacles that can
be damaged or that could in any way prevent the
machine from automatically moving the turntable
clamp unit radially.
9. The machine will automatically start a series of
bead breaker disc tangents (for a wheel diameter
of 22.5”). To abort the ongoing procedure press
any key on the control panel otherwise wait for
the procedure to finish;
10. When it has finished “AFdn” and “AFup” will
appear on the display always followed by two
numerical values that represent the new advance
stopping values. These values will be stored in
the non volatile memory to be used each time
the machine is turned on.
7. GLOBAL BEAD
BREAKER DISC TANGENT
CORRECTION
Once calibrated the machine is able to perform
all the automatic bead breaker disc tangent functions correctly. However, due to tiny mechanical
differences between machines, the automatic
bead breaker disc tangent functions could bring
the bead breaker disc too near or too far away
from the rim.
To solve this problem a global bead breaker disc
tangent correction procedure is available with
which it is possible to fix the tangent point (i.e.
the distance between the bead breaker disc and
rim) deemed optimum.
NOTE: In the software releases before release
CG R0.18 the global bead breaker disc tangent
correction procedure also acts on the tool,
moving it away or bringing it up to the rim
edge by the same extent fixed for the bead
breaker disc.
32 7.1. When to set global bead breaker
disc tangent correction
Global correction of the bead breaker disc tangent is not strictly necessary and must be done in
the cases listed below only after having verified
that the automatic bead breaker disc tangent
functions are not giving optimum results:
- When the machine is manufactured (in the
factory).
- When a new electronic control board is installed
(never calibrated).
- When an electronic control board is installed
that was used before on another machine.
- When the potentiometer is replaced (e.g. for
repairs).
- When the automatic bead breaker disc tangent
functions fail to give satisfactory results (bead
breaker disc too near or too far from the rim).
Whatever the case, global correction of the bead
breaker disc tangent must only be set after the
machine has been calibrated (Chapter 5).
7.2. Verifying the need for global correction of the bead breaker disc tangent
To verify the need to set global correction of the
bead breaker disc tangent proceed as follows:
1. Turn the machine on and mount a 22.5” metal
sheet rim on the turntable.
2. Carry out an automatic bead breaker disc tangent procedure and check the distance between
disc and rim: if the distance is correct there will
be no need to carry out the global bead breaker
disc tangent correction procedure and you can
start working straight away with the machine.
Figure 7-1 gives the nominal bead breaker discrim distance values used in the production of the
machines. Please refer to these values to evaluate
the precision of the tangent just performed and
the need for global correction.
3. If, on the other hand, the distance is too small
or too great, proceed with setting global correction of the bead breaker disc described in the
next paragraph.
MONSTER AG TT - Technical assistance manual
Figure 7-1 Nominal bead breaker disc-rim distance values in the bead breaker disc tangents.
7.3. How to set global bead breaker
disc tangent correction
To set the procedure for global correction of the
bead breaker disc tangent proceed as follows:
1. Turn the machine on and mount a 22.5” metal
sheet rim on the turntable.
2. Carry out an automatic tangent procedure on
the bead breaker disc and then move the rim with
the manual controls up to the distance with the
bead breaker disc deemed optimum.
3. Turn the machine off, open the electrical board
and put dip switch #2 (on the electronic control
board) ON (no other dip switch must be ON).
4. Turn the machine back on: “dip2” appears
blinking on the display.
5. Put dip switch #2 OFF: for two seconds “Corr
disc” followed by a blinking numerical value now
appears on the display, indicating the global correction value of the bead breaker disc tangent
currently stored on the electronic control board.
This value will be between -128 and +127;
New electronic control boards are supplied with
a global bead breaker disc tangent correction
value equal to 0.
The numerical value displayed is an internal
machine parameter and does not represent
the rim-bead breaker disc distance expressed
in millimetres or inches.
Positive values move the bead breaker disc away
from the rim, negative values bring it closer.
6. Confirm the rim-bead breaker disc distance
chosen at point 1 by pressing push button P1
on the electronic control board. The machine
shows the numerical value for one second on the
display that corresponds to the global correction
of the bead breaker disc tangent that has just
been acquired.
MONSTER AG TT - Technical assistance manual
33
UK
Alternatively it is possible to set the numerical
value directly of the global bead breaker disc
correction with the + and – keys on the control
panel (limited to values ranging between -128
and +127) and then confirm by pressing P1.
In this case, however, the physical distance
between rim and bead breaker disc will be
ignored and the value shown on the display
will be stored.
8. GLOBAL TOOL TANGENT
CORRECTION
7. The machine now goes to the normal operating
mode displaying the default diameter (22.5) not
blinking. Carry out the automatic bead breaker
disc tangent function a few times to check that
setting of the global tangent correction has been
successful.
8. If the rim-bead breaker disc distance is what
is wanted, the procedure can be deemed completed and normal work can be started. Otherwise
global correction of the bead breaker disc tangent
will need varying again, so repeat the procedure
from point 1.
To solve this problem a global tool tangent correction procedure is available with which it is
possible to fix the tangent point (i.e. the distance
between the tool and rim) deemed optimum.
Once in the setting procedure, if key “C” (Clear) is
pressed on the control panel the global correction
value of the bead breaker disc is set directly at
value 0 and the procedure finishes writing End
on the display for one second. However this
operation is not mandatory.
Once calibrated the machine is able to perform
all the automatic tool tangent functions. However,
due to tiny mechanical differences between
machines, the automatic tool tangent functions
could bring the tool too near or too far away
from the rim.
NOTE: This procedure is only available starting
from the software release CG R0.18 (incl.).
In the software releases before release R0.18
the global bead breaker disc tangent correction
procedure also acts on the tool, moving it away
or bringing it up to the rim edge by the same
extent fixed for the bead breaker disc.
Therefore, this procedure is not enabled for
previous software releases (dip switch #3 is
not active).
8.1. When to set global tool tangent
correction
Global correction of the tool tangent is not
strictly necessary and must be done in the cases
listed below only after having verified that the
automatic tool tangent functions are not giving
optimum results:
- When the machine is manufactured (in the
factory).
- When a new electronic control board is installed
(never calibrated).
- When an electronic control board is installed
that was used before on another machine;
- When the potentiometer is replaced (e.g. for
repairs).
- When the tool is removed and/or replaced;
- When the micro-switch of a horizontal tool is
removed and/or replaced (SQ3).
- When the automatic tool tangent functions fail
to give satisfactory results (tool too near or too
far from the rim).
34 MONSTER AG TT - Technical assistance manual
Whatever the case, global correction of the tool
tangent must be set only after the machine has
been calibrated (Chapter 5) and made certain
that the micro-switch has been adjusted correctly
(Chapter 12-2).
Figure 8-1 gives the nominal tool-rim distance
values used in the production of the machines.
Please refer to these values to evaluate the
precision of the tangent just performed and
the need for global correction.
8.2. Verifying the need for global
correction of the tool tangent
3. If, on the other hand, the distance is too small
or too great, proceed with setting global correction
of the tool described in the next paragraph.
To verify the need to set global correction of the
tool tangent proceed as follows:
1. Turn the machine on and mount a 22.5” metal
sheet rim on the turntable.
2. Carry out an automatic tool tangent procedure
and check the distance between the plastic pad
mounted on the tool and the rim: if the distance
is correct there will be no need to carry out the
global tool tangent correction procedure and
you can start working straight away with the
machine.
Figure 8-1 Nominal tool-rim distance values in the tool tangents.
UK
MONSTER AG TT - Technical assistance manual
35
8.3. How to set global tool tangent
correction
To set the procedure for global correction of the
tool tangent proceed as follows:
1. Turn the machine on and mount a 22.5” metal
sheet rim on the turntable.
2. Carry out an automatic tangent procedure on
the tool and then move the rim with the manual
controls up to the distance with the tool deemed
optimum.
3. Turn the machine off, open the electrical board and
put dip switch #3 (on the electronic control board)
ON (no other dip switch must be ON).
4. Turn the machine back on: “dip3” appears
blinking on the display.
5. Put dip switch #3 OFF: for two seconds “Corr
tool” followed by a blinking numerical value now
appears on the display, indicating the global correction value of the tool tangent currently stored
on the electronic control board. This value will
be between -128 and +127.
New electronic control boards are supplied with a
global tool tangent correction value equal to 0.
The numerical value displayed is an internal
machine parameter and does not represent the
rim-tool distance expressed in millimetres or
inches.
Positive values move the tool away from the rim,
negative values bring it closer.
6. Confirm the rim-tool distance chosen at point
1 by pressing push button P1 on the electronic
control board. The machine shows the numerical value for one second on the display that
corresponds to the global correction of the tool
tangent that has just been acquired.
Alternatively it is possible to set the numerical
value directly for global correction with the
+ and – keys on the control panel (limited to
values ranging between -128 and +127) and
then confirm by pressing P1.
In this case, however, the physical distance
between rim and tool will be ignored and the
value shown on the display will be stored.
7. The machine now goes to the normal operating
mode displaying the default diameter (22.5) not
blinking. Carry out the automatic tool tangent
function a few times to check that setting of the
global tangent correction has been successful.
36 8. If the rim-tool distance is what is wanted, the
procedure can be deemed completed and normal
work can be started. Otherwise global correction
of the tool tangent will need varying again, so
repeat the procedure from point 1.
Once in the setting procedure, if key “C” (Clear)
is pressed on the control panel the global correction value of the tool is set directly at value
0 and the procedure finishes writing End on the
display for one second. However this operation
is not mandatory.
9. PROGRAMMING THE
LASER SENSOR
The laser is supplied already programmed by
the manufacturer but in the case of necessity
it can be (re)programmed at any time, even on
the machine.
The purpose of programming is to set the laser
operating parameters (e.g. measuring range,
selection of the type of output, etc.) on values
suitable to be able to work on the machine.
9.1. When to programme the laser
Programming is not necessary because the lasers
are already programmed when supplied. However, laser programming can be checked (and
repeated if necessary) in the following cases:
- When the machine is manufactured (in the
factory)
- When a new laser is installed
- When there are doubts as to whether or not it
is working properly.
It is necessary to check that the reference measurements are stored. For this check, see chapters
9.2, 9.3 and proceed with the first 4 steps, if the
measurement of 200 is already stored wait 15 seconds to exit the programming mode.
If the measurement of 200 is not stored, proceed
with the whole programming sequence.
MONSTER AG TT - Technical assistance manual
Figure 9-1 Laser display and programming
buttons
A laser programmed on a machine can be used
on another machine without having to reprogramme it.
9.2. Preparing to programme the
laser
To programme the laser it must be connected to
the machine's electrical system (with the cable
fitted with a 4-pole connector) and powered.
Turn the machine on and then set dip switch #8
ON (all the others must be OFF). The dip switch
is on the CPU-RX2 board inside the electrical
system.
When programming is finished remember to turn
the laser off by putting dip switch #8 OFF.
When programming, if the keys are not pressed
for more than 15 seconds the laser returns to
its initial status, storing any changes made up
to that point.
9.3. Laser programming sequence
The sensor is programmed using the two push
buttons Mode/Enter and Set which are in the top
part of the laser sensor, just under the display.
See figure 9-1.
Programme as follows:
Press/Action to be done
Mode/Enter 4 times
Set by pressing continuously
The following appears on the
display
OU2
List of parameters analogue
output type
Mode/Enter
OU2
Mode/Enter
ASP
Set
Numerical values from 0
to 9999
Mode/Enter
ASP
Mode/Enter
AEP
Set by pressing continuously
Mode/Enter 2 times
Numerical values from 0
to 9999
EF
Set
dS1
Mode/Enter 5 times
diS
Set by pressing continuously
Remarks
List of display parameters
Mode/Enter
diS
Wait 15 seconds without
pressing any keys
diS
MONSTER AG TT - Technical assistance manual
Keep pressed until U is
displayed (output live)
UK
Analog Start Point
Keep pressed until 200 (mm)
is displayed
Analog End Point
Keep pressed until 1700 (mm)
is displayed
Extended Functions
Keep pressed until OFF is
displayed (display OFF)
The parameters are stored at
the end of 15 seconds
37
Note: To see the distance value even when the
display is off, press the Mode/Enter button
once: the display turns back on for 15 seconds
showing the distance.
At the end of programming it is advisable to run
the laser functioning test procedure described
in chapter 4.1 to check that programming has
been done correctly.
10. ELECTRONIC BOARDS LAYOUT AND MEASURING
POINTS
10.1. Electronic control board CPURX2
The function of the electronic control board CPURX2 is to receive the serial commands sent via
cable or radio from the control console and to
put them into practice, driving the motors and
solenoid valves on the machine as required. The
board also uses sensors (potentiometer, proximity switch, laser as well as some micro-switches
for carrying out the automatic functions that are
available, such as, for example, tangent positioning of the bead breaker disc and demounting
tool and the automatic bypassing of the wheel
(Side To Side).
The CPU-RX2 is shown in figure 10-1.
This chapter shows the layouts of the electronic
boards used on the machine. On each board the
electrical measurement points are indicated and
all the components that may be important during
the troubleshooting phase.
Figure 10-1 Electronic control board CPU-RX2.
38 MONSTER AG TT - Technical assistance manual
Table 10-1 Description of the LEDS on the CPU-RX2 board
REF.
DEFINITION
Comment and/or reference value
POWER OUTPUT LEDS
from LD1
to LD24
Power output LEDS OUT-1 ..
OUT-24 (solenoid valves)
Green. Outputs in DC +30V (not stabilised).
Each of these LEDs is associated with a solenoid
valve: LD1 to YV1, LD2 to YV2 up to LD24 associated
with YV24.
They must turn on each time the relative valve is
powered.
Note: LED LD24 turns on each time the second
translation speed is activated because this output is
reserved for use with the Radio Update Kit.
LD25
Hydraulic control unit motor
LED in second speed
Green. Output in AC 25V.
This LED must turn on each time the motor of the
hydraulic control unit turns in second speed.
It can never be ON together with LD26.
LD26
Control unit motor LED in first
speed
Green. Output in AC 25V.
This LED must turn on each time the motor of the
hydraulic control unit turns in first speed.
It can never be ON together with LD25.
DIGITAL INPUT LEDS
LD27
Digital input LED DIN-1
Red. This LED turns on when the sensor connected to
connector X20 supplies an active signal.
LD29
Digital input LED DIN-2
Red. This LED turns on when the sensor connected to
connector X21 supplies an active signal.
LD32
Digital input LED DIN-3
Red. This LED turns on when the sensor connected to
connector X22 supplies an active signal.
LD34
Digital input LED DIN-4
Red. This LED turns on when the sensor connected to
connector X23 supplies an active signal.
LD28
Digital input LED DIN-5
Red. This LED turns on when the sensor connected to
connector X26 supplies an active signal.
LD39
Digital input LED DIN-6
Red. This LED turns on when the sensor connected to
connector X27 supplies an active signal.
LD30
Control output S1 of the motor Red.
inverter
This LED turns on when the speed/rotation direction
control bit S1 of the motor inverter is set.
LD31
Control output S2 of the motor Red.
inverter
This LED turns on when the speed/rotation direction
control bit S2 of the motor inverter is set.
MOTOR INVERTER CONTROL OUTPUT LEDS
MONSTER AG TT - Technical assistance manual
39
UK
REF.
DEFINITION
Comment and/or reference value
POWER OUTPUT LEDS
LD33
Control output S3 of the motor Red.
inverter
This LED turns on when the speed/rotation direction
control bit S3 of the motor inverter @is set.
LD35
Power supply +30V
Green. Ground GND30.
This LED indicates that the solenoid valves are
being powered (+30V – not stabilised).
Protection fuse F5 (on the CPU-RX2 board)
LD36
Power supply +24V
Green. Ground GND30.
This LED indicates that the solenoid valves are
powered (+24V stabilised) Protection fuse F5 (on
the CPU-RX2 board)
LD37
Power supply +5V
Green. Ground GND/AGND.
This LED indicates the presence of the board's
internal logic supply voltage (+5V stabilised).
Protection fuse F7 (on the CPU-RX2 board)
LD38
Power supply +20V
Green. Ground GND/AGND.
This LED indicates the presence of the supply
voltage of the logic and analog parts external to the
board (+20.1V stabilised).
Protection fuse F7 (on the CPU-RX2 board)
POWER SUPPLY LEDS
Note:the four power supply LEDs, LD35, LD36, LD37 and LD38 must be on all the time the machine is on.
If the measurement is taken connecting to another ground the resulting values will have no meaning.
40 MONSTER AG TT - Technical assistance manual
Test point
The test points on the CPU-RX2 board, shown in table 10-2, are for measuring the voltage.
Table 10-2 Description of the test points on the CPU-RX2 board
REF.
VOLTAGE
Comment and/or
reference value
TP1
+30V
TP2
GND30
TP3
+24V
Voltage DC +24V
stabilised.
Reference ground
GND30.
TP4
+5V
Voltage DC +5V
stabilised.
Reference ground
GND/AGND.
TP5
GND/AGND
Ground GND/AGND.
TP6
+VA
Voltage DC +VA not
stabilised.
Reference ground
GND/AGND.
Voltage DC +30V not
stabilised.
Reference ground
GND30.
Ground GND30.
Voltages +30V and +24V share the GND30 ground. Voltages +5V and +20V share the GND/AGND
grounds. The grounds GND30 and GND/AGND are not in common.
To measure voltage, connect the negative test lead of the multimeter to its reference ground (these
are given in table 10-2).
If the measurement is taken connecting to another ground the resulting values will have no meaning.
MONSTER AG TT - Technical assistance manual
41
UK
Connectors
The functions of all the connectors on the CPU-RX2 board are given in table 10-3.
The connectors' reference numbers are first grouped by function and then by progressive number.
Table 10-3 Description of the connectors on the CPU-RX2 board.
REF.
DEFINITION
Comment and/or reference value
POWER OUTPUT CONNECTORS
X1
Power outputs
OUT-1 .. OUT-6 (solenoid
valves)
12-pole connector. Outputs in DC +30V.
Common +30V on pins 1,3,5,7,9,11;
YV1 on pin 2, YV2 on pin 4 and so on.
X2
Power outputs
OUT-7 .. OUT-12 (solenoid
valves)
12-pole connector. Outputs in DC +30V.
Common +30V on pins 1,3,5,7,9,11;
YV7 on pin 2, YV8 on pin 4 and so on.
X3
Power outputs
OUT-13 .. OUT-18 (solenoid
valves)
12-pole connector. Outputs in DC +30V.
Common +30V on pins 1,3,5,7,9,11;
YV13 on pin 2, YV18 on pin 4 and so on.
X4
Power outputs
OUT-19 .. OUT-24 (solenoid
valves)
12-pole connector. Outputs in DC +30V.
Common +30V on pins 1,3,5,7,9,11;
YV19 on pin 2, YV20 on pin 4 and so on.
X7
Ground GND30
2-pole connector.
This connector has both pins connected to
GND30 ground and only used on the Radio
Update Kits.
DIGITAL CONTROL OUTPUT CONNECTORS
42 X6
Contactor drive outputs
3-pole connector. 25 Vac outputs
X6:3 K2 drive output (first hydraulic control unit
speed)
X6:2 K1+K3 drive output (second hydraulic control
unit speed).
X6:1 common output.
X11
Acoustic-light signal
4-pole connector.
Supplies a +30V voltage in output.
X12
@Outputs to control speed 5-pole connector. Photo-coupled outputs.
and rotation direction of the There are three bits on this connector,
motor inverter
S1,S2 and S3 to control the speed and rotation
direction of the motor inverter.See table 10-4.
X13
RXON LED (white)
2-pole connector.
It provides a +5V voltage in output to drive the
led.
X14
ALARM LED (red)
2-pole connector.
It provides a +5V voltage in output to drive the
LED.
X15
CABLE LED (green)
2-pole connector.
It supplies a +5V voltage in output to drive the
LED.
MONSTER AG TT - Technical assistance manual
REF.
DEFINITION
Comment and/or reference value
X16
Analog input channel AIN-1
4-pole connector.
This connector receives in input the signal
of the potentiometer used for the radial
displacement movement.
Supplies a +20V voltage in output.
X17
Analog input channel AIN-2
4-pole connector.
Not used at present.
Supplies a +20V voltage in output.
X18
Analog input channel AIN-3
4+4-pole connector.
Not used at present.
Supplies a +20V voltage in output.
X19
Analog input channel AIN-4
4+4-pole connector.
This connector receives in input the laser
signal used for the Side to Side function (STS).
Supplies a +20V voltage in output.
ANALOG INPUT CONNECTORS
DIGITAL INPUT CONNECTORS
X20
Digital input channel DIN-1
3-pole connector.
This connector receives in input the signal
of the proximity switch used for counting the
chain links.
Supplies a +24V voltage in output.
X21
Digital input channel DIN-2
3-pole connector.
This connector receives in input the signal of
the tool micro switch in the horizontal position.
Supplies a +24V voltage in output.
X22
Digital input channel DIN-3
3-pole connector.
Not used at present.
Supplies a +24V voltage in output.
X23
Digital input channel DIN-4
3-pole connector.
This connector receives in input the signal of
the tool micro-switch rotated to the left.
Supplies a +24V voltage in output.
X26
Digital input channel DIN-5
3-pole connector.
Not used at present.
Supplies a +24V voltage in output.
X27
Digital input channel DIN-6
3-pole connector.
Not used at present.
Supplies a +24V voltage in output.
UK
Table 10 4 Control signals of the speed and rotation direction of the motor inverter.
MONSTER AG TT - Technical assistance manual
43
Table 10 -4 Control signals of the speed and rotation direction of the motor inverter.
Control signals and relative LED indicator light
Turntable
clamp
rotation
direction
Speed
off
None
Stopped
off
off
Clockwise
Medium speed
on
off
on
Clockwise
High speed
on
on
off
Clockwise
Low speed
off
on
off
Anticlockwise
Medium speed
off
on
on
Anticlockwise
High speed
S1
LD30 LED
S2
LD31 LED
S3
LD33 LED
off
off
on
Notes
Tyre grooving
Other combinations NOT ALLOWED
NOTE: The rotation direction of the turntable clamp is reversed with respect to the rotation direction
of the motor inverter shaft.
The CPU-RX2 board could be faulty if there are other control signal combinations.
Fuses on the CPU-RX2 board
There are seven protection fuses on the CPU-RX2 board which are described in detail in table 11-1
in the chapter dedicated to fuses.
Two of these fuses are replaceable while the others are the self-restoring type - remove the short
circuit and they return to their normal status.
10.2. Potentiometer buffer board (MFPOT4)
The potentiometer buffer board is used to transmit the potentiometer signal to the CPU-RX2 board
so that it is not altered by the electrical interference in the environment.
The electrical signal in input to the MFPOT4 board (connector X1 - coming from the potentiometer) is
transferred in output (connector X2) with an amplification equal to 1; consequently, electrical measurement of the input signal must always be the same as the signal in output.
The board is near the potentiometer and enclosed in a plastic box guaranteeing water tightness.
Figure 10-2 Potentiometer buffer board MFPOT4
44 MONSTER AG TT - Technical assistance manual
A LED on the board indicates the presence of
the supply voltage, +20V, coming from the CPURX2 board.
Figure 10-3 Display board SGP58.
The CPU-RX2 board is able to detect a failure
on the MFPOT4 board (no supply, an internal
break or faulty wiring). In this case, when the
user requires an automatic function that uses the
potentiometer signal, the software programme
prevents the function from being sent and shows
the error code “E01” on the display.
There are no adjustments to be done on the
potentiometer buffer board.
10.3. Display board
The display board (DISPLAY SGP58) has four
figures, each with 7 segments plus a decimal
point.
The following information is shown from time to
time on the display:
- The diameter set (in inches or mm).
- Information messages (short messages or abbreviations).
- Error codes (e.g. E00).
The values or messages displayed are usually
fixed; if they are blinking it means the machine is
waiting for confirmation or for the operator to do
something (in some cases press a key, in others
release a key or maybe via the dip switches or
the P1 push button).
The presence of the display is indispensable
for using the automatic functions: if there is
no display, any request made for an automatic
function is refused and the machine signals this
condition with the red ALARM LED blinking on
the electrical board.
See visual signalling Table 13-2 for this.
The display communicates serially with the
electronic control board (with RS232 electrical
levels). Communication is bidirectional: the
display responds to each command of the control
board with a received signal.
There are no adjustments to be done on the
display board.
10.4. Radio modem – RX unit
The RX radio modem receives the serial flow of
data sent via radio by the homologous TX unit
mounted on the trolley that houses the control
console.
Once the data have been received via radio it
sends them, always serially (with TTL electrical
levels) to the CPU-RX2 control board through a
flat 10-pole cable.
The RX radio modem can only receive data via
radio and not transmit via radio. There are no
indicator lights on the RX radio modem unit.
There is a dip switch on the RX radio modem
for selecting the radio channel to use (receiving
only). 16 different radio channels are available
that can be selected by a combination of four dip
switches. The same channel must be set on the
homologous TX unit on the control console.
Radio channel set-up
The machines are delivered with the RX and
TX radio modes set on radio channel 16 (all dip
switches OFF).
To set the communication radio channel proceed
as follows:
1. Switch the machine off.
2. Disconnect the emergency cable if connected.
3. Open the RX radio modem using a cross slotted screwdriver.
4. Select the radio channel wanted by setting the
four dip switches in the combination indicated
in Table 10-5.
MONSTER AG TT - Technical assistance manual
45
UK
5. Repeat the same setting on the TX radio modem. Since the TX radio modem is connected to the
control console, which is normally battery powered and has no turning on switch, the plastic cover
must be removed (under the console) and the battery disconnected from the CPU-TX board. Now
set the radio channel on the TX radio modem and reconnect the battery.
6. Turn the machine on and run a functioning test. The RX ON LED (white) on the electrical board
must blink when commands via radio are received.
7. If the functioning test is positive, close the two radio modems otherwise check you have selected
the same channel on both radio modems and reconnected the battery on the TX unit.
Table 10-5 Selecting the radio channel on the radio modems.
4-way dip switch
Radio
Channel
1
2
3
4
1
ON
ON
ON
ON
2
OFF
ON
ON
ON
3
ON
OFF
ON
ON
4
OFF
OFF
ON
ON
5
ON
ON
OFF
ON
6
OFF
ON
OFF
ON
7
ON
OFF
OFF
ON
8
OFF
OFF
OFF
ON
9
ON
ON
ON
OFF
10
OFF
ON
ON
OFF
11
ON
OFF
ON
OFF
12
OFF
OFF
ON
OFF
13
ON
ON
OFF
OFF
14
OFF
ON
OFF
OFF
15
ON
OFF
OFF
OFF
16
(Default)
OFF
OFF
OFF
OFF
10.5.
Radio modem – TX unit
The TX radio modem receives the serial flow of data via cable (10-pole flat cable with TTL electrical
levels) from the CPU-TX board located on the control console and transmits them via radio to the
homologous RX unit located on the machine's control panel.
The TX radio modem can only transmit data via radio and not receive via radio.
The same considerations for the RX radio modem apply to the TX radio modem including selection
of the radio channel which, in this case, is a transmission and not receiving channel.
46 MONSTER AG TT - Technical assistance manual
10.6.
Electronic transmission board CPU-TX
The electronic transmission board CPU-TX is inside the control console and its function is to detect
the commands sent by the operator via the push buttons, joysticks or pedal unit, to serialise them
and then to send them via radio modem or cable to the machine to be actuated.
The CPU-TX board has a double power supply: battery or via an emergency serial cable.
When the battery is nearly flat, the LOW BATT LED (yellow) - visible on the control console - turns on
to remind the operator it needs recharging, using the charger supplied with the machine.
When the control console is connected to the machine with an emergency serial cable the battery
is not recharged.
The LD5 LED (green) on the CPU-TX board, but not visible on the outside, must turn on each time the
emergency serial cable is used to signal that the board is being fed via cable and not by battery.
Figure 10-4 Electronic transmission board CPU-TX.
UK
Four LEDS are on the board which are easy to see from the outside, plus another one that cannot be
seen from the outside. Their meanings are given in table 10-6.
MONSTER AG TT - Technical assistance manual
47
Table 10-6 Description of the LEDs on the transmission board CPU-TX.
REF.
DEFINITION
LD1
TX ON
Green.
This LED must turn on each time a command is
activated and must turn off when there are no more
commands activated.
F
Red.
This LED must turn on each time a the push button
F is pressed together with another key to access the
second function of the latter.
If the key has no second function, pressing the
F button has not importance.
By pressing just the F key the LED does not turn on
but the push button code is still sent to the machine
(and consequently the RX ON LED on the machine
blinks).
LD2
Comment and/or reference value
LD3
STOP
Red.
This LED turns on and stays on the whole time the
STOP push button is pressed.
Note: the STOP push button is not an emergency
stop.
LD4
LOW BATT
Yellow.
The LED turns on when the battery is low and must
be recharged.
LD5
+5V
Green. NOT VISIBLE from the outside.
The LED must turn on and stay on the whole time the
board is powered with the emergency serial cable.
11. ELECTRICAL SYSTEM
The machine's electrical system is enclosed in an
electrical board positioned next to the hydraulic
control unit. All the cables lead from this electrical board, each one is laid inside a corrugated
sheath to guarantee maximum resistance, to the
two motors, solenoid valves and to the sensors on
the machine.
The electrical system is completed by the part on
the trolley which houses the control console.
11.1. Electrical system wiring
diagram
The machine's wiring diagram is shown in figures
11-1, 11-2 and 11-3.
A printed copy of the wiring diagram is inside a
plastic envelope inside the electrical board.
This copy is always the most updated seeing as it
is put in by the system manufacturer when tested
so has priority over the diagrams in this manual or
in other documents.
48 Figure 11-1 Wiring diagram, part 1 – Solenoid
valve, sensor and board connections.
•
SEE USER MANUAL
Figure 11-2 Wiring diagram, part 2 – Power supply,
motor and transformer connections.
•
SEE USER MANUAL
Figure 11-3 Wiring diagram part 3 – Internal connections on the control column.
•
SEE USER MANUAL
11.2. Physical layout of the electrical
system
The electrical system is housed inside an electrical board located on the same structure as the
hydraulic control unit.
All the cables lead from this electrical board to
the various parts of the machine (motors, sensors,
etc.). All cables are laid inside corrugated sheaths
for greater protection.
MONSTER AG TT - Technical assistance manual
Figure 11-4 Physical layout of the electrical board
UK
MONSTER AG TT - Technical assistance manual
49
11.3. Fuses
The fuses protecting the electrical system and the electronic control board are mounted in different
points. There are 7 fuses on the CPU-RX2 board and 2+1 fuses in the electrical board.
Table 11-1 lists all the fuses, showing their position, electrical properties and functions.
Table 11-1 Position and properties of the fuses on the machine
FUSE
POSITION
CPU-RX2 board
CPU-RX2 board
CPU-RX2 board
CPU-RX2 board
50 REF.
F1
F2
F3
F4
VALUE
NOTES
200 mA
Self-restoring fuse.
Reference ground: GND/AGND.
This fuse protects the CPU-RX2
board from short circuits on the
control console or its connecting
cable (internal or external part of
the electrical board).
No replacement is required; to
restore the fuse remove the cause
for the short circuit.
200 mA
Self-restoring fuse.
Reference ground: GND/AGND.
This fuse protects the CPU-RX2
board from short circuits on the
display board or its connecting
cable.
No replacement is required; to
restore the fuse remove the cause
for the short circuit.
200 mA
Self-restoring fuse.
Reference ground: GND/AGND.
This fuse protects the CPU-RX2
board from short circuits on the
radio modem or its connecting
cable.
No replacement is required; to
restore the fuse remove the cause
for the short circuit.
200 mA
Self-restoring fuse.
Reference ground: GND/AGND.
This fuse protects the CPU-RX2
board from short circuits on the
external analog sensors or in their
connecting cables. No replacement
is required; to restore the fuse
remove the cause for the short
circuit.
MONSTER AG TT - Technical assistance manual
CPU-RX2 board
CPU-RX2 board
CPU-RX2 board
Electrical board
F5
F6
200 mA
Automobile type blade fuse.
Reference ground: GND30.
This fuse protects the CPU-RX2
board from short circuits on
the solenoid valves or in their
connecting cables.
If they blow the following LEDs
turn off:
- LD35
200 mA
Self-restoring fuse.
Reference ground: GND30.
This fuse protects the CPU-RX2
board from short circuits on the
external digital sensors or in their
connecting cables.
No replacement is required; to
restore the fuse remove the cause
for the short circuit.
If they blow the following LEDs turn
off (or become faint):
- LD36
F7
Glass fuse 5x20 mm delayed.
Reference ground: GND/AGND.
This fuse protects the CPU-RX2
board from short circuits inside the
logic part.
If they blow the following LEDs turn
off (or become faint):
-LD37, LD38
FU1
Ceramic fuses 10.3x38.
This pair of fuses protects both
branches of the TC1 transformer
primary from short circuiting. If they
blow, unplug the X5 connector from
the CPU-RX2 board, replace the
fuse and turn the machine back on.
If it blows again, the problem could
be the wiring of the white indicator
light HL1 or even the transformer
itself.
If it does not blow, plug the X5
connector back into the board
and turn back on. If it blows now,
replace the CPU-RX2 board after
making sure there are no short
circuits on the solenoid valve
connectors.
1A gG
(400 V 3ph machines)
T 3.15 A
Electrical board
FU2
MONSTER AG TT - Technical assistance manual
Glass fuse 5x20 mm delayed.
Fuse FU2 protects the transformer
from shorts on the lamp that lights
the working area (optional) or on its
connecting cable.
51
UK
Line fuses to protect against short
circuits
The line fuses are the responsibility of the
user who has to have a socket fitted with fuses
installed by his own electrician. The size of the
fuses must be chosen based on the power the
machine absorbs that can be gleaned from the
ID plate affixed on each machine.
The line fuses blow in the event of short circuits
in the electrical system (control unit motor
and relative control circuits, mains filter, motor
inverter and relative wiring, wiring inside the
electrical board).
Protection against overcurrents
The QF1 circuit breaker protects the hydraulic
control unit motor against overcurrents.
The motor inverter is protected against overcurrents by its own control electronics.
For this please see the Motor Protection chapter.
11.4. Motor Protection
A circuit breaker installed on the electrical system
protects the hydraulic control motor in the event
of overloads and/or overcurrents. The circuit
breaker must be rated according to the current
absorbed by the motor.
The circuit breaker can be seen in figure 11-4.
Calibrating the circuit breaker must be done on
the following occasions:
•When the lift is manufactured (in the factory).
•Each time the circuit breaker is replaced (e.g.
when assistance is given).
None of the circuit breakers sent as spares are
rated and have to be calibrated as indicated in
Table 11-2.
Table 11-2 Circuit breaker calibration values.
Voltage
Frequency
at which the
electrical
system works
Calibration
value
Notes
400V 50/60Hz
9A
***
Other
voltage and/
frequency
values
NOT
SPECIFIED
See Chap.
11.5
Resetting the circuit breaker
The circuit breaker that protects the hydraulic
control unit motor is designed for manual resetting: this means that if it trips it will not reset
itself automatically - the control knob has to
be turned round to position “0” and, after waiting for the motor to cool down, turned back to
position “1”.
The circuit breaker trips, cutting supply voltage
to the hydraulic control unit motor.
There are no external signals to indicate that
the circuit breaker has tripped. The electronic
control board continues being powered so if
manual or automatic commands are given the
solenoid valves continue to trigger and all the
indicating devices (display, LEDs, acousticluminous signals, indicator lights) will continue
working normally.
The turntable clamp will still continue to rotate
because the circuit breaker QF1 does not protect the motor inverter.
The motor inverter is protected by its own
control electronics.
11.5. Versions of the machine supplied
at 200/208/230 V THREE-PHASE
To be able to use the machine with mains voltages of 200/208/230 V three-phase (50/60 Hz) a
transformer with a suitable power has to be used
that transforms this voltage to 400 V.
52 MONSTER AG TT - Technical assistance manual
A THREE-PHASE 200-208-230-400V - 7.5 KVA
AUTO-TRANSFORMER unit is available, designed
specifically for this application.
This unit consists of an electrical board inside
which the actual auto-transformer is housed. Only
the electrical cable for connecting to the room's
mains socket leads from this board.
The machine's power lead must be inserted
inside the electrical board and connected to the
output terminals of the three-pole fuse-holder.
The auto-transformer unit is supplied wired for
a mains voltage of 230 V 3ph. To use the mains
voltages of 200 V or 208 V, open the electrical
system box and move the R, S and T wires onto
the relative terminals of the auto-transformer.
Using the three-phase auto-transformer unit, no
adjustments of alterations are necessary of the
machine's electrical connections.
12. ADJUSTMENTS
The following mechanical adjustments of the
machine's sensors are required:
•Adjustment of the proximity switch.
•Adjustment of the horizontal tool micro-switch
(SQ3).
•Adjustment of the right tool rotation microswitch (SQ4).
The working distance is to be adjusted as follows:
1. Translate to the left or right until the most
prominent part of the chain (the convex part)
is facing the proximity switch.
2. If the proximity switch is faulty remove it and
install the new one.
3. Move the proximity switch near until there is
a space of 2 mm between the flat surface of
the sensor and the chain, as can be seen in
figure 12-1, and then tighten the two locking
nuts by hand to keep it in position. The LED
on the body of the proximity switch must turn
on.
4. Tighten the two nuts with a spanner, taking
care that the distance is always 2 mm. The
tightening torque must not be too much
otherwise it will damage the component.
5. Translate several times to the right and left
checking that the LED on the component turns
on and off at a rate of about 50% between
turning on and turning off. Also check that
LED LD27 on the CPU-RX2 board turns on
and off at the same rate. LED LD27 allows
you to check that all the proximity switch's
wiring up to the electronic board is working;
6. Repeat the translations in second speed,
checking both LEDs.
Figure 12-1 Adjusting the working distance of
the proximity switch.
UK
The adjustments are described in the following
paragraphs. The potentiometer, on the other
hand, does not require mechanical adjustments
but only a software calibration (Chapter 5).
12.1. Adjusting the proximity switch
The proximity switch is used during the Side
To Side function to count the links of the chain
and, therefore to know indirectly the relative
position of the laser in relation to the edge of
the wheel.
MONSTER AG TT - Technical assistance manual
53
Grease, oil and dust do not influence proximity
switch reading.
12.2. Adjusting the horizontal tool
micro-switch
To adjust the horizontal tool micro-switch (SQ3)
consult the mechanical part of the service
manual.
12.5. Connecting and adjusting the
acoustic/luminous indicator
The acoustic/luminous indicator (identified by
H1 on the wiring diagram) can work in different
modes depending on the type of connection. The
indicator on this machine must work intermittently both acoustically and luminously.
12.3. Adjusting the left-rotated tool
micro-switch
To have the right operating mode, connect the
wires as indicated in figure 12-3.
To adjust the left-rotated tool micro-switch
(SQ4) consult the mechanical part of the service
manual.
Figure 12-3 Connecting the acoustic/luminous
indicator.
12.4. Replacing the potentiometer
The potentiometer that measures radial displacement requires no mechanical adjustments.
If the potentiometer has to be removed and/or
replaced, simply fix it to the machine and hook its
steel cable on the steel hooking-up sheet. See the
relative chapter in the mechanical section.
The steel cable must be parallel with the bar to
achieve maximum linearity in reading. Therefore,
adjust the hooking-up sheet as illustrated in
figure 12-2.
Figure 12-2 Adjusting parallelism of the potentiometer's steel cable.
Acoustic power can be adjusted via the trimmer
using a small, slotted screwdriver; the trimmer
is inside the body of the indicator, as shown in
figure 12-4.
The indicators installed on the machines are
adjusted to the minimum acoustic power.
Subsequent to replacing/reassembly, calibration
has to be done (Chapter 5) followed, if necessary,
by the global correction procedures of the bead
breaker disc tangent (Chapter 7) and/or global
correction of the tool tangent (Chapter 8).
54 MONSTER AG TT - Technical assistance manual
Figure 12-4 Adjusting the acoustic power of the indicator.
13. TROUBLESHOOTING
For troubleshooting purposes, the first thing that ought to be done is to check the messages and
acoustic and luminous indications given by the machine.
Based on the operating mode, the indications given on the display (written messages and acoustic
signals) by three external LEDs and the acoustic/luminous indicator can help understand the reason
for the malfunctions or faults.
13.1.Operating modes and indications
The machine has different ways of working and different personnel access levels.
Moreover, during operation three LEDs on the side of the electrical board are used as well as the
display (that also has a buzzer) to indicate the active mode and machine status.
There is also an acoustic-luminous indicator (blinking) that is activated when potentially dangerous
commands are being executed.
MONSTER AG TT - Technical assistance manual
55
UK
Operating modes
Table 13-1 summarises the machine's operating modes.
Table 13-1 Operating modes
Mode
NORMAL
MODE
MANUAL
MODE
ALARM LED
(red)
RX ON LED
(white)
CABLE LED
(green)
off
It blinks when
commands
are received
On with a
steady light
if the cable
is connected;
otherwise it
is off
Blinks
quickly when
automatisms
are required,
otherwise it
is off.
It blinks when
commands
are received
On with a
steady light
if the cable
is connected;
otherwise it
is off
Blinks
quickly (until
the machine
turns off) as
soon as an
automatism
is asked for
It blinks when
commands
are received
On with a
steady light
if the cable
is connected;
otherwise it
is off
It blinks very
slowly (the
on/off cycle
lasts 2 s)
STOP
MODE
56 on
Off
On with a
steady light
if the cable
is connected;
otherwise it
is off
Off for at least
20 seconds
then blinks
if commands
continue arriving
It stays in the
status it was in
before entering the Stop
Mode
DISPLAY
Variable
messages
Variable
messages
Variable
messages
Variable
messages or
OFF
It displays
“STOP” for
at least 20
seconds
Access
level
Notes
END
USER
Standard working
mode.
END
USER
If there is no display
or it malfunctions
the automatisms
cannot be used only the manual
controls can.
END
USER
If there are no calibration data the
automatisms cannot be used, only
the manual controls
can.
END
USER
This indication can
only occur when
switching on and
means the display
is disconnected/
faulty and a dip
switch is ON at the
same time. Simply
turn the dip switch
off in order to continue working, even
if only in the manual
mode.
END USER
The stop button
has been pressed
(NOT the emergency button). Lasts at
least 20 seconds
but continues until
all controls are released.
MONSTER AG TT - Technical assistance manual
SERVICE
MODE
Slow blinking
It blinks when
commands
are received
FACTORY
MODE
Variable
status based
on the commands given
It blinks when
commands
are received
On with a
steady light
if the cable
is connected;
otherwise it
is off
Variable
messages
Technical
assistance
personnel
On with a
steady light
if the cable
is connected;
otherwise it
is off
Variable
messages
Factory
staff
This operating
mode includes
the Calibration
and Setting programmes for global
corrections.
Errors and signals on the display
When working in the NORMAL MODE some occurs can occur that are described in Table 13-2. The
error code is displayed. Some errors prevent use of the machine's automatisms (e.g. errors E00 and
E01) or cause advance ending (e.g. error E11).
By pressing the Clear key on the control panel the error code disappears from the display but the
cause for the alarm is not removed so if the command that caused it is repeated the message will
appear again
Table 13-2 Error codes and their meanings
# ERROR
MEANING
ACTION
Calibration data missing
Calibrate the machine. If the error persists replace
the CPU-RX2 board.
This indication is always given also when installing
a new board.
E01
No signal on the analog channel
#1 (radial displacement measuring
potentiometer).
Check the connection of the potentiometer and that
it is sound.
If the error persists call for technical assistance.
E02
No signal on the analog channel #2
(this channel is not used at present)
E03
No signal on the analog channel #3
(this channel is not used at present)
E00
No signal on the analog channel #4
(analog laser for Side To Side)
E04
from E05 to E10
E11
UK
Check the connection of the laser and that it is
sound.
Also check that the front glass of the laser is not
dirty.
If the error persists call for technical assistance.
Not used
No signal on the digital channel #1
(proximity chain link count)
Check the connection of the proximity, its soundness
and adjustment (Chap. 12-1).
MONSTER AG TT - Technical assistance manual
57
The figures or message displayed are normally fixed but in some cases can blink.
As a general rule, applicable for all operating modes, the following is true:
when the figures and/or messages are blinking it means that the value displayed must be confirmed
by the operator or is waiting for the operator to do something.
Acoustic indications via the display
In all operating modes the display emits the beeps indicated in Table 13-3:
Table 13-3 Beeps emitted by the display
Beep
Meaning
Action
1 short beep
Confirming pressure of the following push None.
buttons:
- setting/deleting memory;
- selecting inches/mm;
2 short beeps
Not used
None.
1 short beep +
1 long beep
Confirm.
The action that was taken was successful.
None.
3 short beeps
Negation.
The action that was taken was unsuccessful
or the action required is not allowed.
Repeat the action after having
changed the parameter of the
machine you are working on
or carry out an action that is
allowed.
Continuous slow
intermittence
Special operating mode active.
Used in the SERVICE MODE (e.g.
in calibration) to call one's attention to the fact that a special
potentially hazardous operating
mode is active.
Luminous-acoustic indicator
The luminous-acoustic indicator, which is located on top of a rod next to the electrical board, is
activated by the machine each time potentially dangerous manual or automatic commands are executed. The indicator has a blinking orange light. Besides blinking, the indicator emits a high intensity
intermittent sound.
The following commands activate the acoustic-luminous indicator:
- Turntable opening/closing;
- Turntable lifting/lowering;
- Tool arm + bead breaker disc lifting/lowering;
- Bead breaker disc tangent;
- Tool tangent;
- Side to Side.
13.2. Check correct turning on/off of the solenoid valves
The machine has a set of 17 solenoid valves for actuating all the commands except those for rotating
the turntable clamp.
The solenoid valves are driven directly by the control board CPU-RX2.
58 MONSTER AG TT - Technical assistance manual
The function of the YV1 solenoid valve is to drain
the oil (BYPASS) and is the normally open type so
that the flow of oil is always drained into the tank
all the time the valve is NOT powered; as soon
as it is powered it switches to the closed status,
rendering the oil available to the actuators.
indicated by the screen printing then there
could be a reversal of the connections on the
solenoids of the valves or the hydraulic pipes
have been reversed.
The YV1 solenoid valve is powered as soon as a
command is given to the machine and unpowered
only when there are no other solenoid valves
powered.
If, for the same command, the solenoid valve
powered is different from the one shown in
figure 13-1 then it could be that the connections
inside the control console have been reversed
or the joysticks and lever switches mounted
incorrectly.
All the other solenoid valves are the normally
closed type and open hydraulically only when
they are powered.
This check is to be repeated for each manual
command to ensure correct connection of the
solenoid valves and hydraulic pipes.
There is a correspondence between the commands given on the control console and the
solenoid valves.
This correspondence is direct in the case of
manual commands: one command powers just
one solenoid valve (most obviously YV1).
In the case of automatic commands however,
several solenoid valves can be powered simultaneously and,with some of these commands the
solenoid valves can be powered in sequence
determined by software based on the initial
conditions of the machine.
This makes it harder to establish the correctness
of powering the solenoid valves.
However, it is still possible to check which
solenoid valves are powered by observing the
LD1:LD24 LEDs on the CPU-RX2 board.
Each of these LEDs turn on when the relative
solenoid valve is powered according to the following correspondence: LD1 Æ YV1, LD2 Æ YV2,
LD3 Æ YV3 and so on.
UK
Figure 13-1 graphically illustrates all the solenoid
valves that must be powered by the various
machine commands.
Generally speaking, however, the following is
true:
To analyse correct powering of the solenoid
valves, give any one manual command and see
which solenoid valve is powered and what the
machine does.
If, for the command given, the solenoid valve
powered is the one shown in figure 13-1 but
the movement of the machine is opposite that
MONSTER AG TT - Technical assistance manual
59
Figure 13-1 Correspondence of the solenoid valves with the commands.
13.3. Frequent Questions
This chapter lists possible malfunctions in the
shape of questions. An answer is given for each
one with the possible cause and remedy.
normally be in position 0.
In addition, if you are carrying out a Side To Side
procedure with the switch QS2 on 1 the operation
will be aborted as soon as translation starts and
error code “E11” will be displayed.
#001
D. The machine only works at first speed and
never turns off at the end of the commands.
R. Maybe the emergency switch QS2 has been
activated - it is on the left of the electrical board.
Check if this switch is in position 1. It should
60 MONSTER AG TT - Technical assistance manual
#002
D. When the turntable clamp is turning in the
anticlockwise direction it is impossible to have
the lowest speed (grooving speed) whereas it is
possible in clockwise rotation.
R. This is perfectly normal: grooving speed is only
available with clockwise rotation.
#003
D. The machine is not moving anymore, even
turning it off and then on again but rotation of
the turntable clamp is still possible.
R. Maybe the QF1 circuit breaker has tripped,
cutting power to the hydraulic unit motor. If this
happens reset the circuit breaker (chapter 11.4.1).
Alternatively fuse F5 could have blown (10 A,
blade type) which is on the CPU-RX2 board. In
this case replace the fuse after having checked
the cause for it blowing.
#004
D. When some commands are given the machine
does not execute them and a loud buzzing can
be heard coming from the electrical system.
Turntable clamp rotation is always available
however.
R. The solenoids relative to the commands that
are not executed could have shorted. Unplug
the electrical connector of these solenoids and
measure their electrical resistance. If they have
shorted they must be replaced.
#005
D. The machine is only carrying out manual commands and not the automatic ones although there
are no error codes on the display. The alarm LED
on the side of the electrical system box blinks
when automatic commands are required.
R. Probably the control board CPU-RX2 failed
to recognise the presence of the display, even
if it is present and working, so has consequently
disabled the automatic commands.
Try turning the machine off and on: if nothing
happens, check the connecting cable between
the control board and the display. If the cable
is connected as it should be, try replacing the
cable, then the display board and lastly the
control board CPU-RX2.
#006
D. When the machine is switched on it often
causes the differential circuit breaker on the
power supply board to trips.
R. The machine's connection to the electricity
mains must include installation upstream of a
thermal-magnetic circuit breaker and a differential circuit breaker with tripping characteristics
as recommended in the ELECTRICAL CONNECTIONS chapter in the Operating and Maintenance
manual.
#007
D. “8.8.8.8.” is always on the display. Sometimes
the machine works, sometimes it doesn't.
R. This could be due to two completely different reasons:
a) the CPU-RX2 board is malfunctioning so is
not sending any data to the display which, with
no data, enters its self-test mode, turning on all
the segments and dots. In this case however the
machine is blocked because the electronic control
board is malfunctioning.
In this case the only solution is to replace the
CPU-RX2 board.
b) the CPU-RX2 boards sends data to the display
which fail to arrive at destination so the display
enters its self-test mode anyway. In this case the
machine executes all the manual commands but
not the automatic ones because, not receiving the
data, the display does not respond to confirm
reception and therefore, as far as the electronic
control board is concerned, the display is not
present.
The most likely cause for this failure is a defect
with the cable connecting the display to the
electronic control board.
Note: the same indication can be caused by partial
failures with the display board or CPU-RX2 board
(possible but unlikely).
MONSTER AG TT - Technical assistance manual
61
UK
14. GLOSSARY
Circuit breaker = device that protects against
overcurrent. It is used on this machine to protect
the motor of the hydraulic control unit.
Leva la Leva (Without Lever) = automatic procedure to extract the bead. In this procedure we
have a simultaneous movement of the turntable
clamp unit and the tool.
Leva la Leva (Without Lever) Backwards = procedure opposite that of Leva la Leva (Without
Lever) that brings the turntable clamp unit and
tool back into their initial positions. Also in this
procedure we have a simultaneous movement
of the turntable clamp unit and the tool but
reversed.
Proximity switch = inductive type, used to count
the chain links and therefore know the relative
displacement between the tool holder arm and
the turntable clamp carriage during the STS
procedure.
Side To Side = automatic procedure where, by
means of the laser signal, the machine bypasses
the wheel. This procedure is abbreviated with
the acronym STS.
STS = see Side To Side.
62 MONSTER AG TT - Technical assistance manual
15. SUMMARY OF MACHINE CALIBRATIONS AND
SETTINGS
The following figure summarises the service programmes for calibrations to be done on the machine
starting with the most important. Not all operations are compulsory except for calibration.
Only the most common cases of application are given in the boxes in the Application column: consult
the relative chapter to see what all the application cases are.
OPERATION
APPLICATION
MONITOR
(Chap.5)
COMPULSORY when:
- replacing the CPU-RX2 board with a new one
or coming from another machine;
- replacing and/or removing and remounting
the potentiometer.
Dip switch #1
ADVANCE STOPPING
CALIBRATION
(Chap.6)
Dip switch #4
GLOBAL BEAD BREAKER DISC
TANGENT CORRECTION
(Chap.7)
Dip switch #2
GLOBAL TANGENT CORRECTION
OF THE TOOL
(Chap.8)
Dip switch #3
OPTIONAL when:
- replacing the CPU-RX2 board with a new one
or coming from another machine;
- Tangent results are not exact and/or repeatable and vary depending on the turntable
clamp's direction;
RECOMMENDED when:
- The hydraulic cylinder that provides radial
movement to the turntable clamp is replaced;
- The turntable clamp unit is removed and
remounted.
COMPULSORY when:
- replacing the CPU-RX2 board with a new one
or coming from another machine;
OPTIONAL when:
- the potentiometer is replaced;
COMPULSORY when:
- replacing the CPU-RX2 board with a new one
or coming from another machine;
OPTIONAL when:
- the potentiometer is replaced;
- when the tool is removed and/or replaced;
- the tool's micro-switch is removed and/or
adjusted.
Key:
COMPULSORY: the operation is indispensable if the cases listed in the box on the right occur.
OPTIONAL: the operation is not indispensable but should only be done if the results are
unsatisfactory.
RECOMMENDED: the operation is not indispensable but is recommended anyway to
be certain of getting the best results.
MONSTER AG TT - Technical assistance manual
63
UK
Notes
64 MONSTER AG TT - Technical assistance manual
Notes
UK
MONSTER AG TT - Technical assistance manual
65
Notes
66 MONSTER AG TT - Technical assistance manual
Notes
UK
MONSTER AG TT - Technical assistance manual
67
COMIM - Code 4-329712_uk - 02/10
CORGHI S.p.A. - Via per Carpi n.9
42015 CORREGGIO - RE - ITALY
Tel. +39 0522 639.111 - Fax +39 0522 639.150
www.corghi.com - [email protected]