1
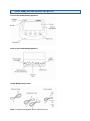
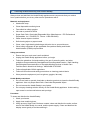
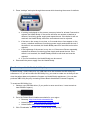
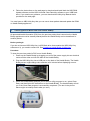
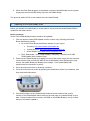
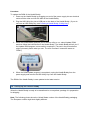
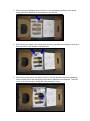
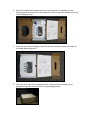
Health Buddy 3
Field Service Manual
BOSCH Ex. 2070
Medtronic v. Bosch IPR2014-00488
Table of Contents
1.
Introduction ................................................................................................................. 3
2.
Health Buddy part identification and part list ............................................................... 4
3.
Retrieving the Health Buddy ....................................................................................... 5
4.
Cleaning and disinfecting the Health Buddy ................................................................ 6
5.
Inspecting the Health Buddy ....................................................................................... 7
6.
Testing the Health Buddy ............................................................................................ 8
7.
Creating a Health Buddy 3 Utility Key ......................................................................... 9
8.
Clearing patient data from the Health Buddy ..............................................................10
9.
Updating the Health Buddy ROM ...............................................................................11
10. Packaging the Health Buddy......................................................................................12
11. Storing and shipping the Health Buddy ......................................................................16
1.
Introduction
Health Buddy appliances that are in good condition and that are no longer needed by
disenrolled patients can be reused by other patients who are starting a Health Buddy
program.
This field service manual describes the procedures for transferring Health Buddy 3
appliances to other patients. It is intended for customers of Robert Bosch Healthcare.
However, Robert Bosch Healthcare does not warranty the results of any field service work
that is done by the customer.
Before you do any field service work, observe the following restrictions:
•
Do not open the plastic casing of the Health Buddy appliance. Opening the plastic
casing of a Health Buddy appliance voids any and all warranties.
•
Do not immerse the Health Buddy appliance in liquid.
•
Do not modify the label on the Health Buddy appliance in any way.
Providing feedback on this document
If you have suggestions or feedback on this document, you can send an email to
[email protected]. A response will not be provided unless you request one.
2.
Health Buddy part identification and part list
Front of the Health Buddy appliance
Back of the Health Buddy appliance
Health Buddy components
Note: Component diagrams are for reference only.
Health Buddy 3 part list
Part
Part Number for Health
Part Number for Health
Buddy Model 096-1000-001 Buddy Model F.03D.200.035
Health Buddy Appliance
096-1000-001
F.03D.200.035
US Power Supply
F.03D.200.024*
F.03D.600.440
Telephone cord (shielded, RJ11
connectors)
F.03D.600.159*
Not applicable
Telephone cord with ferrite bead
(unshielded, RJ11 connectors)
Not applicable
F.03D.200.061
Ethernet Cable
F.03D.600.910
F.03D.600.910
Instructions for Use Manual (IFU)
042-0716-001
F.03D.600.424
Packaging Carton
F.03D.600.740
F.03D.600.436
Packaging Handle
F.03D.600.438
F.03D.600.438
Packaging Insert
F.03D.600.437
F.03D.600.437
Polybag
740-0110-001
F.03D.600.446
Silica Gel Pak
740-0112-001
F.03D.600.447
Converter Plug for United Kingdom
Converter Plug for Europe
* For some older Health Buddy units, the Power Supply part number is F.03D.600.440 and the Telephone Cord
part number is F.03D.600.425. Please ask when ordering.
3.
Retrieving the Health Buddy
Health Buddy appliances that are no longer needed by disenrolled patients should be
retrieved from the patient. Then you can determine if it can be reused by other patients who
are starting a Health Buddy program.
Retrieve the following Health Buddy 3 components from the patient:
•
Health Buddy Appliance
•
US Power Supply
•
Telephone Cords
•
Ethernet Cable
All paper products, including shipping cartons and Instructions for Use Manuals, are
considered to be fomites (contaminated objects) and should be discarded and never
reissued to patients or clients.
To replace missing components, call Robert Bosch Healthcare support.
4.
Cleaning and disinfecting the Health Buddy
Always clean and disinfect the Health Buddy appliance and components that you retrieve
from a patient before you do any other service procedures with it.
Materials and equipment
•
Hand wash soap
•
Clean disposable medical gloves
•
Face shield or safety goggles
•
Lab coat or protective smock
•
Super Sani-Cloth, Germicidal Disposable Wipe (Manufacturer: PDI Professional
Disposables, Inc.; P/N Q55172; Phone: 1-800-999-6423)
•
Glass cleaner wipes or solution
•
Soft cleaning wipes or paper towels
•
Clean, clear, high-density plastic bags with twist ties or secured closure.
•
Other safety equipment as per applicable Occupational Safety and Health
Administration (OSHA) requirements
Safety precautions
•
Ensure that your work area is well-ventilated.
•
Unplug the Health Buddy appliance before you begin.
•
Follow the guidelines for hand-washing, the use of protective attire, and other
guidelines recommended by Standards and Recommended Practice, “Safe Handling
and Biological Decontamination of Reusable Medical Devices in Health Care
Facilities and in Nonclinical Settings,” ANSI/AAMI ST35:2003.
•
Follow all applicable OSHA regulations.
•
Follow all instructions and safety precautions on cleaning product labels.
•
Wear protective equipment (such as gloves, goggles, lab coat).
Health Buddy restrictions
•
Do not use harsh or caustic chemicals or abrasive products to clean the Health Buddy
appliance. Use only Super Sani-Cloth, Germicidal Disposable Wipes.
•
Do not immerse the Health Buddy in any liquids.
•
Do not spray cleaning solution directly on the Health Buddy appliance. Avoid soaking
open areas in and around buttons and openings.
Procedure
To clean and disinfect the Health Buddy:
1. Wash your hands.
2. Apply clean medical gloves.
3. Using as many Super Sani-Cloths as needed, clean and disinfect the entire surface
area of the Health Buddy, the cords, and the power supply. Clean and disinfect the
display screen gently to avoid scratching it.
4. Set aside the cleaned product for 10 minutes to fully air dry to kill the microorganisms.
5. Dispose of the Super Sani-Cloths in biohazard receptacles in accordance with local
policies.
6. If you see evidence of insect infestation in the Health Buddy, place the Health Buddy
in a clear, high-density, airtight plastic bag or container for 30 days and record the
day and time in and the day and time out. After 30 days, clean the unit as defined in
steps 3-5 above.
7. Remove your gloves.
8. Wash your hands.
References
ANSI/AAMI ST35:2003 “Safe Handling and Biological Decontamination of Reusable Medical
Devices in Health Care Facilities and In Nonclinical Settings.”
21 CFR 820 Medical Devices: Current Good Manufacturing Practice (cGMP).
CAN/ISO 13485, Section 7.5.5 Medical Devices: Quality Management Systems.
CMDR Sections 14, 21.
29 CFR 1910.1030 subpart Z Occupational Safety and Health Administration (OSHA) of the
U.S. Department of Labor.
Public Health Notification from FDA, CDC, EPA and OSHA: Avoiding Hazards with Using
Cleaners and Disinfectants on Electronic Medical Equipment. October 31, 2007.
5.
Inspecting the Health Buddy
The Health Buddy appliance and components must be inspected to determine whether they
can be reused. To replace defective components, call Robert Bosch Healthcare support.
Health Buddy appliance
Reject the Health Buddy appliance if you see any of the following defects:
•
Labels on the bottom and back are not legible or intact
•
On the LCD screen:
o Scratches, fogging, or other defects that would hinder the user from reading
the screen
o Cracks in the glass
o Film delamination on the glass
•
On the plastic casing and connector ports on the back:
o Cracks, abrasions, or discolorations
o Stains that cannot be removed with a dampened cotton cloth
AC power supply and converter plugs
Reject the power supply if you see any of the following defects:
•
Text or symbols are not legible
•
Casing has cracks, scratches, abrasions or indentations
•
Connector blades and plugs are not intact
•
Cord is badly twisted or has knots, cuts, abrasions, or discoloration
If the power supply and converter plugs pass the visual inspection, test the power supply with
a functioning Health Buddy. Reject the power supply if the Health Buddy does not start up
and display the logo screen.
Telephone cord
Reject the telephone cord if you see any of the following defects:
•
Cord is twisted or has knots, cuts, abrasions, or discoloration
•
Connectors have missing tang or 4 pins are not intact
Ethernet cable
Reject the Ethernet cable if you see any of the following defects:
6.
•
Cable is twisted or has knots, cuts, abrasions, or discoloration
•
Connectors have missing tang or 8 pins are not intact
Testing the Health Buddy
Before you can transfer a Health Buddy to another patient, you need to verify that it works
properly.
To test the Health Buddy:
1. Power up the Health Buddy by plugging one end of the power supply into an electrical
outlet and the other end into the back of the Health Buddy. After displaying the logo
screen, the Health Buddy will display the message, “Your Health Buddy has
experienced an interruption in power.”
2. Go to the welcome screen by pressing “continue.”
3. Press “settings” and cycle through the screens while observing the screen for defects.
a. If nothing is displayed on the screen, press any button for at least 5 seconds to
activate the Health Buddy. If the screen still does not activate, substitute a
different, functioning power supply and repeat the test. If the defect is still not
resolved, the Health Buddy cannot be serviced and must be rejected.
b. If the text on the screen is not clear, or if unusual dots or lines appear on the
screen, substitute a different, functioning power supply and repeat the test. If
the defect is not resolved, the Health Buddy cannot be serviced and must be
rejected.
c. If the brightness of the screen is very low, or if the screen flickers repeatedly,
substitute a different, functioning power supply and repeat the test. If the
defect is not resolved, the Health Buddy cannot be serviced and must be
rejected.
d. If you find no defects, the Health Buddy can be reused.
4. Disconnect the power supply from the Health Buddy.
7.
Creating a Health Buddy 3 Utility Key
A Health Buddy 3 (HB3) Utility Key is a USB flash drive that contains the HB3 Utility Key
software on it. If you do not have an HB3 Utility Key, you need to create one so that you can
clear the patient data and update the firmware on Health Buddy appliances. (You can also
purchase HB3 Utility Keys by contacting Robert Bosch Healthcare Customer Support.)
To create an HB3 Utility Key:
1. Obtain a new USB flash drive. (If you prefer to reuse an old one, it must contain at
least 50 MB of space.)
2. Go to the Robert Bosch Healthcare website for your region:
•
Germany: http://www.bosch-telemedizin.de
•
United Kingdom: http://www.bosch-telehealth.co.uk
•
United States: http://www.bosch-telehealth.com
3. Click “Downloads,” and then click “Health Buddy 3 Utility Key.”
4. Follow the instructions on the web page to download and install both the HB3 ROM
Update software and the HB3 Universal Clear Data Key software to your USB flash
drive. If you need more guidance, you can download the Utility Key Manual that is
provided on the web page.
You now have an HB3 Utility Key that you can use to clear patient data and update the ROM
on Health Buddy appliances.
8.
Clearing patient data from the Health Buddy
All protected health information (PHI) from the previous patient that is stored on the Health
Buddy appliance must be erased (cleared) before the Health Buddy can be transferred to
another patient.
Before you begin
If you do not have an HB3 Utility Key (a USB flash drive that contains the HB3 Utility Key
software on it), you need to create one. See Creating a Health Buddy 3 Utility Key.
Procedure
To clear the previous patient’s PHI from a Health Buddy:
1. Power up the Health Buddy by plugging one end of the power supply into an electrical
outlet and the other end into the back of the Health Buddy.
2. Plug the HB3 Utility Key into a USB port on the back of the Health Buddy. The Health
Buddy screen might change color and take a full minute before displaying a menu.
3. When the Health Buddy prompts you to select a utility program to run, select Clear
Data, and then follow the instructions on the Health Buddy. The Health Buddy will tell
you if the Clear Data program is successfully completed. (The text in the picture
below might not exactly match what you see.)
4. When the Clear Data program is completed, unplug the Health Buddy from the power
supply and remove the HB3 Utility Key from the Health Buddy.
The previous patient’s PHI is now cleared from the Health Buddy.
9.
Updating the Health Buddy ROM
Before you transfer a Health Buddy to a new patient, ensure that the Health Buddy ROM is
updated to the latest version.
Before you begin
Check if the Health Buddy firmware needs to be updated:
1. Find out what the latest ROM Update version number is by checking the Robert
Bosch Healthcare website:
a. Go to the Robert Bosch Healthcare website for your region:
•
Germany: http://www.bosch-telemedizin.de
•
United Kingdom: http://www.bosch-telehealth.co.uk
•
United States: http://www.bosch-telehealth.com
b. Click “Downloads,” click “Health Buddy 3 Utility Key,” and then click “HB3
ROM Update Utility Installer Page.”
2. Power up the Health Buddy by plugging one end of the power supply into an electrical
outlet and the other end into the back of the Health Buddy. After displaying the logo
screen, the Health Buddy will display the message, “Your Health Buddy has
experienced an interruption in power.”
3. Go to the welcome screen by pressing “continue.”
4. Go to the first technical screen by pressing the third button (which is not labeled), and
then read the build number.
5. If the build number on the Health Buddy technical screen matches the version
number of the ROM Update that is listed on the web page, the Health Buddy is up to
date. If those numbers do not match, the ROM on the Health Buddy is not up to date,
and you will need to update it.
Procedure
To update the ROM of the Health Buddy:
1. Power up the Health Buddy by plugging one end of the power supply into an electrical
outlet and the other end into the back of the Health Buddy.
2. Plug the HB3 Utility Key into a USB port on the back of the Health Buddy. (If you do
not have an HB3 Utility Key, see Creating a Health Buddy 3 Utility Key.)
3. When the Health Buddy prompts you to select a utility to run, select Update ROM,
and then follow the instructions on the Health Buddy. The Health Buddy will tell you if
the Update ROM program is successfully completed. (The text in the picture below
might not exactly match what you see. The term “firmware” means the same as
“ROM.”)
4. When the ROM Update program is completed, unplug the Health Buddy from the
power supply and remove the HB3 Utility Key from the Health Buddy.
The ROM of the Health Buddy is now updated to the latest version.
10. Packaging the Health Buddy
When the Health Buddy is ready to be transferred to a new patient, package it in preparation
for shipping.
Note: The following photos show the United States version of the Health Buddy packaging.
The European version might look slightly different.
To package the Health Buddy:
1. Assemble the packaging carton.
2. If the serial number label is present on the packaging carton, remove it.
3. Place the foam packaging insert in the box. The rectangular opening for the power
supply should be adjacent to the diagram on the box lid.
4. Place the power supply in the rectangular opening, and place the telephone cord and
Ethernet cable in the smaller rectangular slot.
5. Place the Instructions for Use Manual (IFU) in the slot between the foam packaging
insert and the side of the packaging carton that is adjacent to the diagram. The front
cover of the IFU should be facing the foam packaging insert.
6. Place the Health Buddy appliance and one silica gel pak in a polybag, pull the
polybag tight around the front of the appliance, and then place the appliance face up
in the packaging insert.
7. Close the side of the packaging carton that has the hole that matches the shape of
the Health Buddy appliance.
8. Close the other side of the packaging carton, ensuring that the handle can be
grasped through the slot made for it in the packaging carton.
11. Storing and shipping the Health Buddy
Store the Health Buddy in a cool, dry location. Keep the Health Buddy out of direct sunlight
and away from heat. Ship the Health Buddy only in the packaging carton and in accordance
with the instructions provided in this document.