1
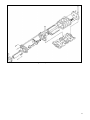
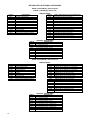
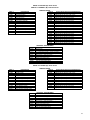
Figure 6
STEP 9 (Gilmer belt). Install all belt-driven engine accessories and drive belts before installing the blower drive. Put the 5/8-11
socket head bolt through the center of the idler pulley assembly. Put the bolt through the slot in the idler support plate and put
the nut on the back side of the plate. Align the nut with the slot and tighten the bolt finger tight with the pulley slid as far inboard
as possible. Put the blower drive belt over the drive and driven pulleys and over the idler. Make sure that the belt is seated in the
grooves in the upper and lower pulleys. Slide the idler pulley out until there is about 1-1/2" of slack in the belt when the blower is
cold. Tighten the bolt. The belt tension will be rechecked later after the engine has been warmed up. There must be a minimum
of 1/2-5/8" slack in the belt when the engine is hot, or the blower or crankshaft can be over stressed. (See the included Gilmer
Belt Installation and Adjustment Instruction sheet for more details.
STEP 10. Install the fan if required. It may be necessary to put a fan spacer between the fan and the water pump so that the fan
will not hit the supercharger drive belt. Allow at least 3/8" between the fan blades and the rear side of the radiator and fan
shroud to avoid contact. You may need to modify an available fan spacer to achieve proper fan clearance. We do not
recommend using a large viscous drive clutch fan with a blower. The addition of a fan spacer to the system together with the
higher engine speeds frequently used with a supercharger seems to aggravate the possibility of breakage of the water pump. A
lighter weight flex fan is recommended, particularly for truck usage. Also make sure that the pump pulley, spacer and fan
assembly are concentric and balanced.
Some applications may not have enough room for a conventional fan with the supercharger installed. In this case electric
cooling fan(s) can be used.
STEP 11. Remove the cardboard cover(s) from the top of the blower. Install the carburetor(s) on the top of the supercharger. If a
spreadbore is being used install a carburetor gasket at least 1/8" thick, preferably the stock GM carburetor spacer/insulator. This
spacer/insulator assures a complete seal between the carburetor and the top of the blower. Some gaskets have a channel at the
back that can cause a vacuum leak. Check the carburetor gasket and spacers that you are using to be sure that they fully seal
to both the bottom of the carb and to the top of the blower. Holley spread bore carburetors will not always seal to the top of the
Holley blower using standard gaskets. If there is an air leak between the carburetor and the blower, the engine will not run
correctly and it will probably be lean. If you are using the Holley #90747 throttle cable bracket, install it between the carburetor
and the blower when the carburetor is installed. Be sure to use a cork or rubber gasket between the air cleaner and the
carburetor, or excessive noise may result.
Check to see that the secondary throttle blade of the spreadbore carburetor can open fully without hitting the blower. The 1/8"
gasket or spacer should be enough to avoid this problem, but it should be checked to be sure. If a Holley carburetor with the
REO accelerator pump is used, it may be necessary to use two gaskets, so that the pump will not hit the supercharger housing.
Check all carburetor secondary throttle plates in the full open position to make sure they don’t hit the blower housing. If they do,
space the carburetor up with the appropriate spacer or gaskets. If you have adequate hood clearance it’s not a bad idea to
utilize a non-metallic spacer between the carb and blower as a heat insulator. These are available from several manufacturers.
8