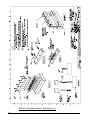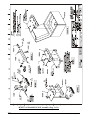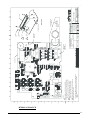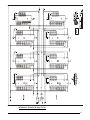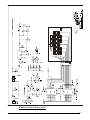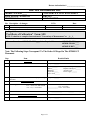
1
ELx50 Automated Strip Washer Service Manual ELx50 Automated Strip Washer Service Manual December 2000 COPYRIGHT 1999 PART NUMBER 4071008 REVISION E BIO-TEK® INSTRUMENTS, INC. ii Notices BIO-TEK INSTRUMENTS, INC. Highland Park, Box 998 Winooski, Vermont 05404-0998 USA Phone: (802) 655-4040 (888) 451-5171 (800) 24-BIOTK (Service) BBS: (802) 655-4107 (Technical Assistance Center) Fax: (802) 655-7941 (Sales) (802) 655-3399 (Service) E-Mail: [email protected] Internet Site: http://www.biotek.com Coordination Center Europe/Africa Bio-Tek Instruments, S.a.r.l. Parc d’Activités de l’Observatoire 43 Avenue des Trois Peuples - Bât E 78180 Montigny-Bretonneux France Phone: (33) 1 39 30 2276 Fax: (33) 1 39 30 0987 All rights reserved Copyright 1999 Printed in the United States of America. Bio-Tek Part Number 4071008. This publication is protected by copyright and all rights are reserved. No part of this manual may be reproduced or transmitted in any form, or by any means electronic or mechanical, including photocopying and recording for any purpose other than the purchaser's personal use without written permission of BioTek Instruments, Inc. Trademarks Bio-Tek is a registered trademark, and ELx50 is a trademark of Bio-Tek Instruments, Inc. All other trademarks are the property of their respective holders. iii Restrictions and Liabilities Information in this document is subject to change and does not represent a commitment by Bio-Tek. Changes made to the information in this document will be incorporated in new editions of the publication. No responsibility is assumed by Bio-Tek for the use or reliability of software or equipment that is not supplied by Bio-Tek for its affiliated dealers. Revision Revision Date Changes A B C 8/97 4/98 6/98 D 8/99 E 12/00 Released to Production. Updated assembly drawings and Bills of Material. Updated TAC phone numbers. Edited/reformatted text throughout for clarity. Updated contact information for Coordination Center Europe/Africa. Added Section 1: General Information and Section 2: Functional Description. Updated assembly drawings and bills of material to include support for the 16-channel manifold. Updated service procedures ,BOM’s and drawings iv Warranty This Warranty is limited and applies only to new products, except for computer-based software which is covered under a separate Warranty Policy, manufactured by Bio-Tek Instruments, Inc. (“Bio-Tek”). BioTek makes no warranty whatsoever regarding the condition of used products. Bio-Tek warrants the instrument (hereinafter collectively referred to as “Products” or “Product”) for a period of one (1) year from the original purchase date against defective materials or workmanship. This Warranty is limited to the original purchaser (the “Purchaser”) and cannot be assigned or transferred. All claims under this Limited Warranty must be made in writing to Bio-Tek, Attention: Service Department. Purchaser must ship the Product to Bio-Tek, postage pre-paid. Bio-Tek shall either repair or replace with new or like new, at its option and without cost to the Purchaser, any Product which in Bio-Tek’s sole judgment is defective by reason of defects in the materials or workmanship. This Warranty is VOID if the Product has been damaged by accident or misuse, or has been damaged by abuse or negligence in the operation or maintenance of the Product, including without limitation unsafe operation, operation by untrained personnel, and failure to perform routine maintenance. This Warranty is VOID if the Product has been repaired or altered by persons not authorized by Bio-Tek, or if the Product has had the serial number altered, effaced, or removed. This Warranty is VOID if any of the Products has not been connected, installed or adjusted strictly in accordance with written directions furnished by BioTek. Batteries, fuses, light bulbs, and other “consumable” items used in any of the Products are not covered by this Warranty. Software utilized in conjunction with any of the Products is not covered by the terms of this Warranty but may be covered under a separate Bio-Tek software warranty. We will continue to stock parts for a maximum period of five (5) years after the manufacturer of any equipment has been discontinued. Parts shall include all materials, charts, instructions, diagrams, and accessories that were furnished with the standard models. THIS WARRANTY CONTAINS THE ENTIRE OBLIGATION OF BIO-TEK INSTRUMENTS, INC., AND NO OTHER WARRANTIES, EXPRESSED, IMPLIED, OR STATUTORY ARE GIVEN. PURCHASER AGREES TO ASSUME ALL LIABILITY FOR ANY DAMAGES AND/OR BODILY INJURY OR DEATH WHICH MAY RESULT FROM THE USE OR MISUSE OF ANY EQUIPMENT OR INSTRUMENT BY THE PURCHASER, HIS EMPLOYEES, AGENTS, OR CUSTOMERS, OTHER THAN THE EXPRESS WARRANTY CONTAINED HEREIN. WE SHALL NOT BE RESPONSIBLE FOR ANY DIRECT OR CONSEQUENTIAL DAMAGES OF ANY KIND. THIS WARRANTY SHALL NOT BE CHANGED OR MODIFIED IN ANY WAY WITHOUT THE EXPRESS WRITTEN PERMISSION OF AN OFFICER OF BIO-TEK INSTRUMENTS, INC. v Contents at a glance SECTION 1........................................................................................................................................................... 1-1 General Information............................................................................................................................................................. 1-1 SECTION 2........................................................................................................................................................... 2-1 Functional Description ........................................................................................................................................................ 2-1 SECTION 3........................................................................................................................................................... 3-1 Error Codes.......................................................................................................................................................................... 3-1 SECTION 4........................................................................................................................................................... 4-1 Bulletins ................................................................................................................................................................................ 4-1 SECTION 5........................................................................................................................................................... 5-1 Assembly Drawings ............................................................................................................................................................. 5-1 SECTION 6........................................................................................................................................................... 6-1 Schematics ............................................................................................................................................................................ 6-1 SECTION 7........................................................................................................................................................... 7-1 Bills of Material ................................................................................................................................................................... 7-1 SECTION 8........................................................................................................................................................... 8-1 Recommended Service Replacement Parts ....................................................................................................................... 8-1 SECTION 9........................................................................................................................................................... 9-1 Procedures............................................................................................................................................................................ 9-1 vi Table of Contents Notices ................................................................................................................................................................................. iii All rights reserved ............................................................................................................................................................... iii Trademarks .......................................................................................................................................................................... iii Restrictions and Liabilities ...................................................................................................................................................iv Revision ................................................................................................................................................................................iv Warranty ................................................................................................................................................................................v SECTION 1........................................................................................................................................................... 1-1 General Information............................................................................................................................................................. 1-1 Purpose and Scope............................................................................................................................................................. 1-1 Mail:............................................................................................................................................................................... 1-1 Telephone: ..................................................................................................................................................................... 1-1 Fax: ................................................................................................................................................................................ 1-1 Email:............................................................................................................................................................................. 1-1 Abbreviations and Symbols............................................................................................................................................... 1-2 Warnings............................................................................................................................................................................ 1-3 Hazards .............................................................................................................................................................................. 1-4 Precautions......................................................................................................................................................................... 1-4 Equipment Overview ......................................................................................................................................................... 1-5 SECTION 2........................................................................................................................................................... 2-1 Functional Description ........................................................................................................................................................ 2-1 Principles of Operation ...................................................................................................................................................... 2-1 Overview ....................................................................................................................................................................... 2-1 Hardware ....................................................................................................................................................................... 2-1 Controller................................................................................................................................................................... 2-1 Manifold .................................................................................................................................................................... 2-1 Carrier ........................................................................................................................................................................ 2-3 Carrier to Manifold Positioning................................................................................................................................. 2-3 Manifold Vertical Positioning ................................................................................................................................... 2-3 Positive Displacement Pump ..................................................................................................................................... 2-3 Vacuum Pump ........................................................................................................................................................... 2-4 Vessels and Connections ........................................................................................................................................... 2-4 Display and Keypad................................................................................................................................................... 2-5 Power Supply............................................................................................................................................................. 2-5 Decontamination........................................................................................................................................................ 2-5 Aerosol Cover............................................................................................................................................................ 2-5 Software......................................................................................................................................................................... 2-6 Configuration Software ............................................................................................................................................. 2-7 SECTION 3........................................................................................................................................................... 3-1 Error Codes.......................................................................................................................................................................... 3-1 Homing an Axis................................................................................................................................................................. 3-1 Carrier Axis Home Position........................................................................................................................................... 3-1 Manifold Axis Home Position ....................................................................................................................................... 3-1 Syringe Axis Home Position.......................................................................................................................................... 3-1 Verifying an Axis .............................................................................................................................................................. 3-1 Manifold ........................................................................................................................................................................ 3-1 Syringe........................................................................................................................................................................... 3-1 Carrier............................................................................................................................................................................ 3-2 Error Codes........................................................................................................................................................................ 3-2 Non-fatal errors : ........................................................................................................................................................... 3-2 Fatal errors:.................................................................................................................................................................... 3-3 System Configuration ........................................................................................................................................................ 3-3 vii SECTION 4........................................................................................................................................................... 4-1 Bulletins ................................................................................................................................................................................ 4-1 Mandatory Field changes................................................................................................................................................... 4-1 FCN L0015 .................................................................................................................................................................... 4-1 Non Mandatory Field Changes.......................................................................................................................................... 4-1 Eco 32194 ...................................................................................................................................................................... 4-1 L0021............................................................................................................................................................................. 4-2 SECTION 5........................................................................................................................................................... 5-1 Assembly Drawings ............................................................................................................................................................. 5-1 4070004-AS Kit Slider Upgrade (Page 1 of 1).......................................................................................................... 5-3 4070005-AS Final ASBY Strip Wshr 8 Well (Page 1 of 4) ...................................................................................... 5-4 4070005-AS Final ASBY Strip Wshr 8 Well (Page 2 of 4) ...................................................................................... 5-5 4070005-AS Final ASBY Strip Wshr 8 Well (Page 3 of 4) ...................................................................................... 5-6 4070005-AS Final ASBY Strip Wshr 8 Well (Page 4 of 4) ...................................................................................... 5-7 4070507-AS Mechanical ASBY (Page 1 of 3).......................................................................................................... 5-9 4070507-AS Mechanical ASBY (Page 2 of 3)........................................................................................................ 5-10 4070507-AS Mechanical ASBY (Page 3 of 3)........................................................................................................ 5-11 4070508-AS Carrier ASBY (Page 1 of 1) ............................................................................................................... 5-14 4070509-AS Lift Motor Cam ASBY (Page 1 of 1) ................................................................................................. 5-16 4070510-AS Tubing Set Supply System Assembly (Page 1 of 1)........................................................................... 5-18 4070511-AS Tubing Set Waste System ASBY (Page 1 of 1) ................................................................................. 5-19 4070513-AS Manifold ASBY 12 Well (Page 1 of 1).............................................................................................. 5-20 4070515-AS Bottle Supply ASBY (Page 1 of 1) .................................................................................................... 5-22 4070516-AS Syringe Pump ASBY (Page 1 of 1).................................................................................................... 5-23 4070517-AS Aerosol Cover ASBY (Page 1 of 1) ................................................................................................... 5-25 4070518-AS Seal and Cylinder ASBY (Page 1 of 1).............................................................................................. 5-27 4070522-AS Kit, Supply Tube Valve Opto Assembly (Page 1 of 1) ...................................................................... 5-29 4070524-AS Syringe Pump ASBY Medtec (Page 1 of 1)....................................................................................... 5-30 4070527-AS Manifold 16 Well Assembly (Page 1 of 1)......................................................................................... 5-32 SECTION 6........................................................................................................................................................... 6-1 Schematics ............................................................................................................................................................................ 6-1 4070400-AS Main PCB............................................................................................................................................. 6-3 4070400-SC Main PCB (Page 1 of 6) ....................................................................................................................... 6-6 4070400-SC Main PCB (Page 2 of 6) ....................................................................................................................... 6-7 4070400-SC Main PCB (Page 3 of 6) ....................................................................................................................... 6-8 4070400-SC Main PCB (Page 4 of 6) ....................................................................................................................... 6-9 4070400-SC Main PCB (Page 5 of 6) ..................................................................................................................... 6-10 4070400-SC Main PCB (Page 6 of 6) ..................................................................................................................... 6-11 4070401-AS PCB Filters Assembly ........................................................................................................................ 6-12 4070401-SC PCB Filters ......................................................................................................................................... 6-13 SECTION 7........................................................................................................................................................... 7-1 Bills of Material ................................................................................................................................................................... 7-1 ELX50/8 Strip Washer 8 Well................................................................................................................................... 7-3 ELX50/8G Strip Washer 8 Well (Generic)................................................................................................................ 7-4 ELX50/8V Strip Washer 8 Well w/Valves................................................................................................................ 7-5 ELX50/8GV Strip Washer 8 Well (Generic) w/Valves............................................................................................. 7-6 ELX50/8S Strip Washer 8 Well Short Dispense ....................................................................................................... 7-7 ELX50/8GS Strip Washer 8 Well (Generic) Short Dispense .................................................................................... 7-8 ELX50/8VS Strip Washer 8 Well w/Valves, Short Dispense ................................................................................... 7-9 ELX50/8GVS Strip Washer 8 Well (Generic) w/Valves, Short Dispense .............................................................. 7-10 ELX50/12 Strip Washer 12 Well............................................................................................................................. 7-11 ELX50/12G Strip Washer 12 Well (Generic).......................................................................................................... 7-12 viii ELX50/12V Strip Washer 12 Well w/Valves.......................................................................................................... 7-13 ELX50/12GV Strip Washer 12 Well (Generic) w/Valves....................................................................................... 7-14 ELX50/16 Strip Washer 16 Well............................................................................................................................. 7-15 ELX50/16G Strip Washer 16 Well (Generic).......................................................................................................... 7-16 ELX50/16V Strip Washer 16 Well w/Valves.......................................................................................................... 7-17 ELX50/16GV Strip Washer 16 Well (Generic) w/Valves....................................................................................... 7-18 4070001 Accessories Set, Bottles and Tubes .......................................................................................................... 7-19 4070002 Accessories Set, Generic Unit .................................................................................................................. 7-20 4070018 Accessories Set, 384 Unit ......................................................................................................................... 7-21 4070019 Accessories Set, 384 Generic Unit ........................................................................................................... 7-22 4070520 Aerosol Cover Assembly, Generic ........................................................................................................... 7-23 SECTION 8........................................................................................................................................................... 8-1 Recommended Service Replacement Parts ....................................................................................................................... 8-1 SECTION 9........................................................................................................................................................... 9-1 Procedures............................................................................................................................................................................ 9-1 ix x Section 1 General Information Purpose and Scope This document is a service manual. It provides technical information for qualified service personnel to assemble and test the functionality of the ELx50 line of instrumentation, and assumes a general understanding of the Bio-Tek Instruments, Inc. ELx50 Automated Strip Washer product line. This manual should be used in conjunction with the “Operator's Guide for the ELx50 Automated Strip Washer”, Bio-Tek part number 4071000. Certain sections of this manual contain copies of documentation that is currently in use at Bio-Tek. All documentation is subject to revision over time. Schematics are included in this manual if component-level repair is necessary. Assembly drawings are included to aid in the assembly and disassembly of the ELx50. If you need further information, please contact the Technical Assistance Center: Mail: Bio-Tek Instruments, Inc. Technical Assistance Center Highland Park, Box 998 Winooski, Vermont USA 05404-0998 Telephone: 1-800-242-4685 From within the United States 1-802-655-4044 From outside the United States, excluding Europe 33 1 39 30 2276 From within Europe 1-802-655-3399 USA 33 1 39 30 0987 Europe Fax: Email: [email protected] Elx50 Strip Washer Service Manual 1-1 Abbreviations and Symbols The following warning and informational symbols may be found in various locations on the ELx50 Strip Washer. Only qualified personnel who recognize shock hazards and are familiar with the safety precautions should repair this instrument. Alternating current Courant alternatif Dreiphasen-Wechselstrom Corriente Atterna Corrente alternata Direct current Courant continue Gleichstrom Corriente continua Corrente continua Both direct and alternating current Courant continu et courant alternatif Allstrom (Gleich - und Wechselstrom) Corriente continua y corriente alterna Corrente continua e corrente alternata Earth ground terminal Borne de terre Erde (Bettriebserde) Borne de Tierra Terra (di funzionamento) Protective conductor terminal Borne de terre de protection Schutzleiteranscluss Borne de Tierra de Protección Terra di protezione On (Supply) Marche (alimentation) Ein (Verbindung mit dem Netz) Connectado Chiuso Off (Supply) Arrest (alimentation) Aus (Trennung vom Netz) Desconectado Aperto (sconnessione dalla rete di alimentazione) 1-2 General Information Caution (refer to accompanying documents) Attention (voir documents d'accompanement) Achtung siehe Begleitpapiere Atención (vease los documentos incluidos) Attenzione, consultare la doc annessa Caution, risk of electric shock Attention, risque de choc electrique Gefährliche elektrische Spannung Atención, riesgo de sacudida eléctrica Alta tensione (in questo documento Alta tensione non significa “tensione pericolosa” come definito in IEC 417) Warnings Use the ELx50 Automated Strip Washer on a flat surface and away from excessive humidity. When operated in a safe environment, according to the instructions in this manual, there are no known hazards associated with the ELx50. However, the operator should be aware of certain situations which could result in serious injury. Do not reach under the instrument during operation, as the syringe pump may pinch your fingers. Elx50 Strip Washer Service Manual 1-3 Hazards Warning! Power Rating. The ELx50 Strip Washer’s power supply must be connected to a power receptacle that provides voltage and current within the specified rating for the system. Use of an incompatible power receptacle may produce electrical shock and fire hazards. Warning! Electrical Grounding. Never use a two-prong plug adapter to connect primary power to the ELx50 power supply. Use of a two-prong adapter disconnects the utility ground, creating a severe shock hazard. Always connect the system power cord directly to a three-prong receptacle with a functional ground. Warning! Internal Voltage. Always turn off the power switch and unplug the power cord before cleaning the washer’s outer surface. Warning! Liquids. Avoid spilling liquids on the washer; fluid seepage into internal components creates a potential shock hazard. Wipe up all spills immediately. Do not operate the instrument if internal components have been exposed to fluid. Warning! Potential Biohazards. Some assays or specimens may pose a biohazard. Adequate safety precautions should be taken as outlined in the assay’s package insert. Always wear safety glasses and appropriate protective equipment, such as chemically resistant rubber gloves and apron. Warning! Software. The washer operator must follow the manufacturer’s assay package insert when modifying software parameters and establishing wash methods, using the washer’s on-board software. Precautions The following precautions are provided to help avoid damage to the instrument: Caution: Service. The washer should be serviced by Bio-Tek authorized service personnel. Only qualified technical personnel should perform troubleshooting and service procedures on internal components. Caution: Environmental Conditions. Do not expose the instrument to temperature extremes. For proper operation, ambient temperatures should remain between 15-40ºC. Performance may be adversely affected if temperatures fluctuate above or below this range. Storage temperature limits are broader. Caution: Sodium Hypochlorite. Do not expose any part of the instrument to Sodium Hypochlorite solution (bleach) for more than 30 minutes. Prolonged contact may damage the instrument surfaces. Be certain to rinse and thoroughly wipe all surfaces. Caution: Wash Buffer Solution. Although many precautions have been taken to ensure that the instrument is as corrosion-proof as possible, the washer is not sealed and liquids can seep into sensitive components. Make sure that any spilled wash buffer solution is wiped off the washer. Prolonged exposure to salt solution may corrode parts of the microplate carrier, movement rail, springs and other hardware. Caution: Warranty. Failure to follow preventive maintenance protocols may void the ELx50 warranty. 1-4 General Information Equipment Overview There are several models in the ELx50 Washer product line. "G" refers to a Generic instrument, and "V" indicates a "Valve" instrument with the multiple valve hardware. PART NUMBER DESCRIPTION ELX50/8 Strip Washer, 8-Well Manifold ELX50/8G Strip Washer, 8-Well Manifold, (Generic) ELX50/8V Strip Washer, 8-Well Manifold, w/Valves ELX50/8GV Strip Washer, 8-Well Manifold, (Generic), w/Valves ELX50/8S Strip Washer, 8-Well Manifold, Short Dispense ELX50/8GS Strip Washer, 8-Well Manifold, (Generic), Short Dispense ELX50/8VS Strip Washer, 8-Well Manifold, W/ Valves, Short Dispense ELX50/8GVS Strip Washer, 8-Well Manifold, (Generic), W/ Valves, Short Dispense ELX50/12 Strip Washer, 12-Well Manifold ELX50/12G Strip Washer, 12-Well Manifold, (Generic) ELX50/12V Strip Washer, 12-Well Manifold, w/Valves ELX50/12GV Strip Washer, 12-Well Manifold, (Generic), w/Valves ELX50/16 Strip Washer, 16-Well Manifold ELX50/16G Strip Washer, 16-Well Manifold, (Generic) ELX50/16V Strip Washer, 16-Well Manifold, w/Valves ELX50/16GV Strip Washer, 16-Well Manifold, (Generic), w/Valves Elx50 Strip Washer Service Manual 1-5 1-6 General Information Section 2 Functional Description Principles of Operation This section of the manual discusses the principles of operation for each sub-assembly within the ELx50 Automated Strip Washer. Overview The ELx50 Automated Strip Washer performs microwell strip washing functions consistent with Enzyme Immuno Assay (EIA) needs. These functions include aspirating from and dispensing into 1x8 or 1x12 microwell strips and 96- and 384-well plates. Flat, round, and 'V' bottom strips are accommodated. A variety of wash parameters are user-programmable via the on-board software. This instrument is powered by an external 24 volt power supply. An internal positive displacement pump delivers wash buffer to the microwells from a 2-liter supply bottle. The positive displacement pump allows for control of a variety of flow rates and volumes. An internal vacuum pump aspirates liquid from the microwells into a waste collection vacuum vessel. Stepper motors provide accurate and repeatable carrier and manifold positioning. Hardware Controller The strip washer is a microprocessor-driven device with memory sufficient to perform all functions described in the “ELx50 Software Requirements Specification”, Bio-Tek part number 4076200, and for storage of up to 75 washer programs. Washer programs can be defined directly from the washer keypad, or they can be downloaded to the washer from a separate computer via the RS232 port, using the Define Reader protocol.. Manifold Aspirating from and dispensing into the microwells can occur through a 1x8, 1x12, or a 1x16 manifold. There is no automatic detection of which if any manifold is present. Only one manifold is included with an instrument, with the other manifolds available as accessories. The manifolds are easily removed and serviceable by the user. They are constructed in a manner which allows for, and with materials that are not damaged by, chemical decontamination with 0.5% sodium hypochlorite or 70% ethanol. Elx50 Strip Washer Service Manual 2-1 The ELx50/16 models contain the patented dual-manifold design. The 16-channel manifold has 16 sets of dispense and aspirate tubes arranged in a fixed horizontal position relative to each other but located in two separate manifolds. The two manifolds move independent of each other in the vertical axis. This design overcomes the problem of fitting both dispense and aspirate tubes into the much smaller 384-well at the same time, yet it allows for overfill washing of the smaller 384 wells. The dispense tubes are held above the plate when the dispense manifold reaches a mechanical stop, while the aspirate tubes are able to continue descending into the wells. MANIFOLD MICROPLATE CARRIER DISPENSE HEIGHT ASPIRATE HEIGHT Single manifold system of the 8- and 12-channel manifolds. Dispense manifold Tubes are positioned for overfill washing Aspirate manifold Tubes are positioned for aspiration Patented dual-manifold system of the 16-channel manifold. 2-2 Functional Description The following table shows the washing capabilities of each manifold: Manifold: Washing Capabilities 8-channel 8-well strips, 96-well plates 8s-channel* 8-well strips, 96-well plates 12-channel 12-well strips, 96-well plates 16-channel 8-well strips, 96-well plates, 384-well plates * The 8s-channel manifold has shorter dispense tubes for special applications. The ELx50 washer supports the washing of standard flat, round, and ‘V’ bottom microwells. Note: The 16-channel manifold uses two aspirating tubes for each well when used with 8-well strips and 96well plates. For these formats, it may be difficult for the tubes to reach the very bottom of round or ‘V’ bottom wells, possibly leading to higher residuals. An ELx50 washer can be reconfigured to support a different manifold. The level of difficulty for reconfiguration depends on the current and desired manifolds. Appendix C in the ELx50 Automated Strip Washer Operator's Manual discusses manifold reconfiguration. Carrier There are two possible plate carrier assemblies, p/n 4070526 for the 16-channel washer models and p/n 4070508 for all of the other models. • 4070508 holds 96-well plates and 1x8 or 1x12 strips, and may be used with either the 1x8 or 1x12 manifold. • 4070526 holds 384-well plates, 96-well plates, and 1x8 strips, and may be used with either a 1x16 or 1x8 manifold. Strips must be placed in their frames to be held by the carrier. The carrier positions the strips beneath the manifold where wash solution is aspirated from and dispensed to the test wells. The carrier is removable by the user and is constructed in a manner which allows for, and with materials that are not damaged by, chemical decontamination with 0.5% sodium hypochlorite or 70% ethanol. There is a priming/soaking trough that is the normal home position for the manifold and which is an integral part of the carrier. Carrier to Manifold Positioning Carrier movements are controlled by a timing belt and microstepping stepper motor. Positions are configured for 1x8, 1x12, and 1x16 well columns. Resolution of carrier position is 0.002 inches (minimum). Through the on-board software, the carrier position can be offset from the factory default settings to optimize washing performance in a specific plate type or with a specific chemistry. Manifold Vertical Positioning The washing manifold moves vertically by a microstepping stepper motor control. It is possible for the user to offset the vertical position of the aspirating tubes relative to the carrier surface to optimize washing performance. This offset is in equal increments, no greater than 0.005 inches. The offset range is from 0.100 to 1.0000 inches above the carrier top surface. The manifold vertical positioning design allows for the manifold to lift as the aspirate tubes touch the well bottom and in that way compensate for vertical misalignment of the manifold and strips. Positive Displacement Pump Wash solution, rinse solution, and disinfecting solutions are delivered to the microwells by a built in positive displacement pump (syringe pump). The pump draws fluid from the supply bottles and forces it through the dispense tubes of the manifold. It is possible to dispense at one of nine different flow rates, by running the Elx50 Strip Washer Service Manual 2-3 pump at different voltages. The flow rate is selectable by the user within the on-board software. The onboard software contains calibration values for each flow rate. Vacuum Pump The ELx50 has an internal vacuum pump which is cycled on and off as needed. Vessels and Connections There are two 2-liter supply bottles (three if "V" version washer). No self-sealing pressure vessels are required for fluid supply. Each supply vessel has a hole in its cap that retains a suction tube. A single inlet supply tube to the strip washer is connected to one or the other of these supply bottles though a pair of fittings. Typically one bottle will be used for wash buffer solution and the second bottle will be used for deionized water rinse. The user will disconnect the supply tube from the suction tube of one supply bottle and connect it to the suction tube of the other supply bottle when switching from one solution to the other. There is no supply bottle liquid level detection. It is the responsibility of the user to monitor and refill the supply bottles. The washer may or may not have the multiple-valves hardware (“V” version washers). Washers equipped with this hardware prompt the user to enter a supply bottle designation (A, B, or C), at program run-time, and then use that bottle when running the program. There is one 2-liter waste vessel. The waste vessel has a sealing closure with one inlet and one outlet. It is connected to an internal vacuum pump and a vacuum is created in the waste vessel. The vessel is strong enough to withstand the external atmospheric pressure present under these conditions. The collection vessel also connects directly to the manifold and solution is aspirated from the test wells by the manifold and pulled into the collection vessel. 2-4 Functional Description An optional hydrophobic vacuum filter may be placed in line between the vacuum pump and the collection vessel. This filter impedes aerosols from entering the vacuum pump and therefore the room, and waste from being pulled into the vacuum pump in the event of a collection vessel overflow. It is the responsibility of the user to monitor and periodically empty the waste vessel. There is no waste vessel level detection. Display and Keypad The washer is equipped with a 2x24 character LCD display and a 25-key keypad. Power Supply The washer is supplied with a 24 volt external power supply and cable. Decontamination All exposed surfaces are designed to be chemically disinfected with 0.5% sodium hypochlorite and 70% ethanol. Aerosol Cover The fluid dispensing region is covered with an aerosol cover. The aerosol cover is easily removed to provide access to the manifold and plate carrier. Elx50 Strip Washer Service Manual 2-5 Software The ELx50 washer is operated by on-board software, controllable through the washer’s keypad. This on-board software, referred to as the “basecode”, has an identifying part number. Your washer is installed with one of two possible ELx50 basecode part numbers: 4070201 or 4070230. Each part number in turn has an identifying version number. If you need to contact Bio-Tek Instruments for technical assistance, you will be asked for the part number and version of the basecode currently residing on your washer. • To locate this information, press these keys from the washer's main menu: UTIL TESTS CHKSUM The basecode part number and accompanying version number will appear for a few seconds, followed by additional configuration information. The display will automatically return to the main menu. The 4070201 basecode supports the following features: • Compatibility with the 8-, 8s-, and 12-channel manifolds. • An easy to use, menu-driven interface. • Ability to create Wash, Prime, Dispense, and Aspirate programs for automated microplate washing. • Storage of up to 75 washer programs. • User-definable washer program names, for rapid recall at program run time. • Configurable program parameters such as variable soaking, multispeed shaking, bottom washing, and crosswise aspiration. • Pre-defined washer programs that can be copied and used as the basis for new programs. • Pre-defined maintenance programs, including AutoPrime, used to keep the manifold tubes moist and free from clogging. • Support for the following languages: English, French, German, Italian, and Spanish. Note: Contact Bio-Tek for information on changing to a different language. The 4070230 basecode supports all of the 4070201 features, plus the following: 2-6 • Compatibility with the 16-channel manifold, for 384-well plate washing. • Ability to create Soak and Link programs. Functional Description The basecode is downloaded from a PC to the washer via the serial communication port. • To prepare the washer for basecode software download, press SHIFT+HIDDEN KEY #1 from the main menu. Hidden key #1 is between the CLEAR and ENTER keys. • To download the software, exit to DOS and type A:\DLOAD 1 and press Enter. “A” represents the drive containing the basecode diskette and “1” represents the com port. For detailed basecode download instructions, refer to 8291007-AW Field Software Download Procedure. Configuration Software The ELx50 washer requires information downloaded from a configuration software disk, containing default washer programs, diagnostics programs, and a configuration file (config.50). It is NOT recommended that you modify the config.50 file. The on-board software provides ample parameters for adjusting horizontal positions, dispense and aspirate height, etc. Contact Bio-Tek engineering with any specific questions or suggestions. The configuration software is downloaded from a PC to the washer via the serial communication port, using Bio-Tek's Download Utility. • To prepare the washer for configuration software download, press SHIFT+HIDDEN KEY #2 from the main menu. Hidden key #2 is between the Main Menu and Previous Screen keys. • For configuration download instructions, refer to 8291007-AW Field Software Download Procedure. Elx50 Strip Washer Service Manual 2-7 2-8 Functional Description Section 3 Error Codes Homing an Axis When any motor axis is moved to sensor home, its position is set to 0. Sensor home and the home position are not necessarily the same. The following is a description of how each axis is moved to sensor home. For the Carrier and Syringe axis there are two ways the motor can move to sensor home: 1. If the carrier or syringe is on the sensor(typically at home) then the axis is moved off the sensor plus 3 full steps. The axis is then moved toward the sensor until the sensor is marked. 2. Otherwise the carrier or syringe axis is off the sensor and the axis is moved toward the sensor until the sensor is marked. For the manifold, the process is similar: 1. If the sensor is open (typically at home), then the axis is moved away from the sensor until the sensor is marked, plus 3 full steps. The manifold is then moved toward the sensor until the sensor is open. 2. Otherwise the manifold axis is moved toward the sensor until the sensor is open. Carrier Axis Home Position The carrier home position is defined to be sensor home plus an offset. This offset, Carrier Home Offset, is presently defined in System Configuration The only time that sensor home and the home position are the same is if this value is set to zero. Manifold Axis Home Position The manifold home position is defined to be sensor home. Syringe Axis Home Position The syringe home position is defined to be sensor home plus an offset. This offset, Syringe Home Offset, is presently defined in System Configuration The only time that sensor home and the home position are the same is if this value is set to zero. Verifying an Axis Manifold When the verification is performed on this axis, the software compares the number of steps observed at its present position to the actual number of steps required to move the axis back to the sensor home position. At the completion of any program, the manifold position is verified. There are two scenarios: 1. If the manifold is on the sensor or the observed motor position is less than 3 full steps from the sensor, then the manifold is moved away from the sensor 6 full steps. The manifold is then moved toward the sensor until the sensor is marked. If the observed motor position is outside the range of -3 full steps to plus 3 full steps inclusive, then an error is generated. 2. Otherwise the manifold is moved toward the sensor until the sensor is marked. If the observed motor position is outside the range of -3 full steps to plus 3 full steps inclusive, then an error is generated. Syringe There are five distinct actions that are being tested to insure the syringe is functioning correctly. 1. At the beginning of each syringe intake stroke, the software checks to insure that the optical sensor is marked. If the sensor is not marked, an error is generated. 2. During the syringe intake stroke, the software detects how many steps the syringe travels before the sensor changes from marked to open. If this number of steps falls outside the specified range (syringe sensor clear +/Syringe FMEA Range) then an error is generated. 3. At the beginning of each syringe dispense stroke, the software checks to insure that the optical sensor is open. If the sensor is not open then an error is generated. 4. After completion of a Dispense, Prime or Wash Program, the software checks to insure that the optical sensor is marked. If the sensor is not marked and error is generated. Elx50 Strip Washer Service Manual 3-1 5. When power-up or self test is performed, the number of steps from syringe home position to clear the sensor is determined (syringe sensor clear). If this value is greater than the value specified, Syringe_FMEA_Offset, then an error is generated. This determined value is then used during step 2 along with Syringe FMEA Range to determine a failure. Carrier When the verification is performed on this axis, the software compares the number of steps observed at its present position to the actual number of steps required to move the axis back to the sensor home position. At the completion of a dispense, aspirate or wash program, the carrier position is verified. There are two scenarios: 1. If the carrier is on the sensor or the observed motor position is less than 3 full steps from the sensor, then the carrier is moved away from the sensor 6 full steps. The carrier is then moved toward the sensor until the sensor is marked. If the observed motor position is outside the range of -3 full steps to plus 3 full steps inclusive, then an error is generated. 2. Otherwise the carrier is moved toward the sensor until the sensor is marked. If the observed motor position is outside the range of -3 full steps to plus 3 full steps inclusive, then an error is generated. Error Codes Non-fatal errors : Error ABORT_ERR NO_SENSOR_ERR AUTOCAL_JIG_ERR MOTOR_VERIFY_ERR UNDEF_PROG_TYPE_ERR PROGRAM_NUM_ERR PROGRAM_SET_ERR PROGRAM_DEL_ERR SYR_VOLUME_TO_LARGE PROGRAM_CHECKSUM_ERR MANIFOLD_AUTOCAL_ERR INVALID_BUFFER_ERR CAL_CHECKSUM_ERR DISPENSE_RATE_ERR DISPENSE_VOLUME_ERR CNFG_DATA_ERR CNFG_CHECKSUM_ERR CAL_DATA_ERR MOTOR_NOT_HOMED_ERR AUTOCAL_ABORT_ERR MALLOC_ERR ASPIRATE_POS_ERR DISPENSE_POS_ERR SYRINGE_FMEA_ERR Error Code 0x0100 0x0200 0x0300 0x0400 0x0500 0x0600 0x0700 0x0800 0x0900 0x0A00 0x0B00 0x0C00 0x0D00 0x0E00 0x0F00 0x1000 0x1100 0x1200 0x1300 0x1400 0x1900 0x1A00 0x1B00 0x1C00 MANIFOLD_POS_ERR AUTOCAL_CHECKSUM_ERR 0x1D00 0x1E00 3-2 Brief Description wash function aborted (*motor) couldn't find optical-sensor (*motor) couldn't find edge of hole in jig (*motor) failed positional verify undefined program type specified invalid (assay number) invalid write attempt invalid delete attempt syringe volume to large checksum failure (assay number) invalid manifold for calibration invalid buffer selected failed calibration checksum test dispense rate is invalid for manifold type dispense volume invalid for manifold type necessary configuration data missing failed configuration checksum test necessary calibration data missing (*motor) not homed successfully autocal of washer was aborted memory allocation failure Carrier offset position is out of range for present manifold Carrier offset position is out of range for present manifold 1=sensor not found at start of syringe aspirate stroke. 2=sensor not open at start of dispense stroke. 3=syringe aspirate stroke failure 4=sensor verify after last syringe stroke in program failed 5= sensor clear from home position too many steps could not calculate manifold position for offset provided autocal checksum error Error Codes *Motor Identification Motor Axis Manifold Carrier Syringe Axis Number 0 1 2 Fatal errors: Error TCB_NOT_AVAIL_ERR READ_NOT_AVAIL_ERR NOT_AVAIL_ERR CHECKSUM_ERR POWER_ERR QFLASH_TIMEOUT_ERR QFLASH_ERR Error Code 0xA100 0xA200 0xA300 0xA400 0xA500 0xA600 0xA700 Brief Description task control block not available reader function already in use (device) not available failed code checksum test on power up power dropped below safe level quick flash configuration timed out quick flash read didn't match write All of these items are system configuration values which can be changed and loaded via extensions without a rebuild of the software: System Configuration Parameter Default Range Vacuum Pump Startup Delay 0 0-10 Vacuum Pump Dissipation Delay 10 0-10 Trough Dispense Height 96 12-180 Trough Aspirate Height 30 12-180 Trough Clearance Height 146 12-180 Prime Aspirate Delay 3000 0-5000 Crosswise Clearance Height 64 12-180 Extended Soak Delay 30 15-600 Extended Soak Vacuum Delay 30 15-600 Syringe Backlash 7 0-100 Volume per Step (syringe) 12.32 0-1000 Maximum Stroke (syringe) 9000 0-65000 Carrier Overshoot 2 0-10 Carrier Home Offset 20 0-50 Plate Clearance 146 12-180 Valve Open Delay 0 0-65000 Valve Close Delay 0 0-65000 Syringe Home Offset -160 -1600 to +1600 Syringe FMEA Offset 560 0-16000 Syringe FMEA Range 160 0-16000 See the Operation section of the operator’s manual for current information. Elx50 Strip Washer Service Manual Units seconds seconds milliseconds seconds seconds full steps ul/step ul full steps full steps milliseconds milliseconds 16th steps, full step resolution 16th steps, full step resolution 16th steps, full step resolution 3-3 3-4 Error Codes Section 4 Bulletins This section contains Mandatory and recommended field change notices / bulletins. Mandatory Field changes FCN L0015 SERVICE BULLITEN DATE: 31-MAR-98 ENGINEER: TOM GRAVELIN CHANGE PRIORITY: Mandatory PURPOSE: To reduce the plate carrier noise when in motion. This change should be performed on ELx50 units with serial numbers below 137288 (Rev 21-Apr-99) DISCUSSION: When the plate carrier was in motion, the plate carrier would vibrate against the carrier slide. A load spring is to be added to reduce the vibration. EQUIPMENT REQUIRED: 1) Ball end 3/32” hex wrench 2) Slider Load Spring ( 4072063) 3) Slider Load Plate ( 4072064) CORRECTIVE ACTION: 1) Perform the modifications per the ELx50 Slider Upgrade Kit Instructions ( 4070004-AW) See 4070004-AS Kit Slider Upgrade (Page 1 of 1), page 5-3. 2) End of procedure Non Mandatory Field Changes Eco 32194 Replace the O-ring (49259) on the 4070509 assembly with O-Ring (45045). Elx50 Strip Washer Service Manual 4-1 L0021 SERVICE BULLITEN DATE: 2 SEPTEMBER, 1999 CHANGE PRIORITY: Discretionary PURPOSE: ELx50 piston for the syringe was installed without being polished. DISCUSSION: ELx50 pistons, Part Number 4072060, .were installed without the part being polished to reduce friction on the Teflon seal. This will cause the Teflon seal to wear prematurely and will eventually leak. This Teflon seal could wear after one (1) year of use. The polished piston would take years before the Teflon seal wears. The serial number range is : 144664 - 144699 145600 - 145648 Only eighteen (18) unit are affected. The ship dates were between June 23, 1999 and July 30 1999. CORRECTIVE ACTION: For all units returned to Bio-Tek Instrument Inc. Remove the Syringe and visually verify the piston appears to be polished. It should be a high gloss mirror stainless steel finish. If the finish appears slightly dull, then replace with a polished part. PARTS REQUIRED: QTY: 1 PART DESCR. BTI PART # Piston, Syringe Pump Polished 4072060 PROCEDURE: 1) 2) 3) 4) Verify the unit serial number is within the suspected serial number ranges. If not, then do not proceed. Remove the two flat head screws holding the syringe. Remove the syringe from the syringe piston. Inspect the Piston. It should have a mirror finish. If the finish is slightly dull and does not have a glossy/mirror finish, remove the syringe piston by removing the flat head screw that is located on the head of the piston. 5) Install the new piston ( part # 4072060). 6) Re-install the syringe 7) End of procedure. 4-2 Bulletins Section 5 Assembly Drawings This section contains Assembly Drawings that are used in building the ELx50 Strip Washer. These documents are subject to change. DRAWING # DESCRIPTION 4070004-AS Kit Slider Upgrade (Page 1 of 1), page 5-3 4070005-AS Final ASBY Strip Wshr 8 Well (Page 1 of 4), page 5-4 4070507-AS Mechanical ASBY (Page 1 of 3), page 5-9 4070508-AS Carrier ASBY (Page 1 of 1),page 5-14 4070509-AS Lift Motor Cam ASBY (Page 1 of 1), page 5-16 4070510-AS Tubing Set Supply System Assembly (Page 1 of 1), page 5-18 4070511-AS Tubing Set Waste System ASBY (Page 1 of 1), page 5-19 4070513-AS Manifold ASBY 12 Well (Page 1 of 1), page 5-20 4070515-AS Bottle Supply ASBY (Page 1 of 1), page 5-22 4070516-AS Syringe Pump ASBY (Page 1 of 1), page 5-23 4070517-AS Aerosol Cover ASBY (Page 1 of 1), page 5-25 4070518-AS Seal and Cylinder ASBY (Page 1 of 1), page 5-27 4070522-AS Kit, Supply Tube Valve Opto Assembly (Page 1 of 1), page 5-29 4070524-AS Syringe Pump ASBY Medtec (Page 1 of 1), page 5-30 4070527-AS Manifold 16 Well Assembly (Page 1 of 1), page 5-32 Elx50 Strip Washer Service Manual 5-1 5-2 Assembly Drawings 4070004-AS Kit Slider Upgrade (Page 1 of 1) Elx50 Strip Washer Service Manual 5-3 4070005-AS Final ASBY Strip Wshr 8 Well (Page 1 of 4) 5-4 Assembly Drawings 4070005-AS Final ASBY Strip Wshr 8 Well (Page 2 of 4) Elx50 Strip Washer Service Manual 5-5 4070005-AS Final ASBY Strip Wshr 8 Well (Page 3 of 4) 5-6 Assembly Drawings 1 2 3 4 5 6 7 8 9 10 A B 5 END CAP SHIPPING 5 SEE STEP 9 TAPE TOP OF BOX WITH 2 LAYER 91093 BOX,INNER, SHIPPING BLOCK,LIFTER SUPPORT,SHIPPING TURN CAM SO THE ROLLER IS IN THE DOWN POSITION SEE DETAIL K. ALIGN GROOVE IN BLOCK TO MANIFOLD BRACKET & PUSH ONTO MANIFOLD BRACKET. 5 (MANIFOLD BRACKET) STEP 8 5 PART OF 4073001 SHIPPING CONTAINER ASBY. NOTES: STEP 11 5 TURN CAM TO POSITION SHOWN D BOX,OUTER SHIPPING END CAP SHIPPING 5 5 E INSERT PKNG BOTTLES/MIST CVR MANUAL & DECLARATION OF CONFORMITY DETAIL K REMOVE CAPS FROM 4070515 BOTTLES AND PLACE THEM INTO A PLASTIC BAG 98079. 5 SEE STEP 5 PLACE UNIT INTO BOX ALL THE WAY FORWARD AS SHOWN. PLACE INSERT #1 INNER BOX IN TO BOX AS SHOWN. SLIDE THE UNIT ALL THE WAY BACK TO INSERT #1 INNER BOX. 98085 PLACE UNIT IN BAG. AFTER INSTALLING BLOCK, LIFTER SUPPORT, SHIPPING. INSERT #1, INNER BOX C STEP 12 F STEP 9 5 H DO NOT SCALE MATERIAL: REMOVE ALL BURRS FINISH: STEP 10 63 BREAK SHARP EDGES ALL DIMENSIONS ARE IN INCHES PRODUCTION TOLERANCES .X±.015 ANGULAR TOL..X±2.X° .XX±.010 SURFACE FINISH .XXX±.005 I 6/9/97 5/1/97 DATE THIRD ANGLE PROJECTION HIGHLAND PARK, BOX 998 WINOOSKI, VT. 05404-0998 SCALE: D SIZE REV I 4 4 OF 3/4 SHEET 4070005-AS DRAWING NO. FINAL ASBY STRIP WASHER 8 WELL TITLE: MARK ASBY NUMBER AND SERIAL NUMBER OF UNIT APPROX. 4" FROM BOTTOM (MINIMUM 2 PLACES) THIS DOCUMENT CONTAINS CONFIDENTIAL AND PROPRIETARY INFORMATION OF BIO-TEK INSTRUMENTS INC. AND NEITHER IT NOR THE INFORMATION CONTAINED THEREIN SHALL BE DISCLOSED TO OTHERS OR DUPLICATED OR USED FOR OTHERS WITHOUT EXPRESS WRITTEN CONSENT OF BIO-TEK INSTRUMENTS INC. B.SMITH B.BEDARD ENGR: SIGNATURE DRN BY: J WASTE TUBING SET (4070511) PUT FILTER (49146) INTO THIS BAG. SUPPLY TUBING SET 4070510 STEP 13 UNLESS OTHERWISE SPECIFIED (MANIFOLD 16 WELL ASBY) SEE STEP 7 SLIDE UNDER AEROSOL COVER. SEE BOM MARK ASBY NUMBER AND SERIAL NUMBER OF UNIT ON BOX. 4070515 2X 91016 TAPE TOP OF BOX (INSTALLED BY SHIPPING) (61062) DISCARD THE ORIGINAL BOX IF PROVIDED. IF POWER SUPPLY IS NOT WRAPPED IN BUBBLE WRAP, PLACE IN 91083 BUBBLE BAG. APPLY 91084 BENEATH (61062) AS ADDITIONAL PACKING. (CARRIER) SEE STEP 6 OR 7 PLACE IN 91083 BUBBLE BAG (MANIFOLD ASBY) SEE STEP 6 PLACE IN 98083 BAG. SEE BOM AEROSOL COVER ASBY (IN PLASTIC BAG) PLACE IN BOX AS SHOWN. 48140 4070515 OPTIONAL 3rd BOTTLE SEE BOM. INSERT #2, INNER BOX G 4070005-AS Final ASBY Strip Wshr 8 Well (Page 4 of 4) Elx50 Strip Washer Service Manual 5-7 Item 15012 16016 16017 17021 17059 19053 19139 19194 4070507 4072081 4072500 4072501 4072505 4072513 4072518 4072519 4072523 45056 49845 49918 7342500 8290206 91093 5-8 4070003 Kit, Generic Hardware Final Assembly Description NUT KEPS 10-32 LKWSHR #8 HELICAL SPR SS LKWSHR #10 HELICAL SPR SS WSHR FL .20IDX.44OD,1/16TK SS WSHR FL .188IDX.375ODX.049 SS SCR SOCK CAP 8-32X5/16 BK SCR SOCK CAP #10-32X5/8" SS SCR SOCK CAP 10-32X3/8" SS MECHANICAL ASBY COVER BOTTOM BASE JIG MANIFOLD ALIGNMENT JIG ASSEMBLY STAND JIG MAINIFOLD CALIBRATION JIG OVERLAY ALIGNMENT TOOL STOPPER 3 HOLE WASTE BTL TOOL INLET DISTRIBUTION LINE JIG FOOT ALIGN FOOT,RUBR 1.062ODX27/32H3/16ID RUBBER FOOT .81" DIA,GREY,PSA TUBING CLIP 1/4DIA SELF ADHESV JIG MICROPLATE STOP ALIGN SFTWR DOWNLOAD UTIL V1.42 LABEL 4"X72YDS CLEAR TAPE rev J As of 11-20-00 Rev Qty Remarks B 2 A 3 A 4 E 4 B 3 A 3 A 2 B 4 K 1 A 1 D 0 TOOL ONLY A 0 TOOL ONLY C 0 TOOL ONLY A 0 TOOL ONLY A 0 TOOL ONLY A 0 TOOL ONLY A 0 TOOL ONLY A 2 B 1 A 1 E 0 TOOL ONLY H 0 TOOL ONLY A 0 A/R Assembly Drawings 4070507-AS Mechanical ASBY (Page 1 of 3) Elx50 Strip Washer Service Manual 5-9 4070507-AS Mechanical ASBY (Page 2 of 3) 5-10 Assembly Drawings 4070507-AS Mechanical ASBY (Page 3 of 3) Elx50 Strip Washer Service Manual 5-11 Item 12028 12077 15011 15012 16003 16016 16017 16048 16051 16065 17003 17021 17033 17055 17056 17059 18033 18034 19055 19112 19139 19143 19186 19198 19332 19393 4070400 4070401 4070500 4070505 4070507-AS 4070508 4070509 4070516 4071004 4071005 4072002 4072004 4072005 4072008 4072013 4072018 4072032 4072033 4072063 4072064 4072082 4072500 4072501 4072502 4072503 41049 42058 42210 45056 5-12 4070507 Mechanical Assembly rev K As of 11-20-00 Description Rev Qty SCR PAN 10-32X3/8 SS SLOT A 2 SCR SOCK CAP 6-32X1/2 SST A 3 NUT KEPS 8-32 B 2 NUT KEPS 10-32 B 2 LKWSHR #6 HELICAL SPR SS A 8 LKWSHR #8 HELICAL SPR SS A 5 LKWSHR #10 HELICAL SPR SS A 5 WSHR CURVED .203ID .322OD SS A 8 WSHR FL,.194IDX.312ODX.04T SS B 4 WSHR CENTERING A 1 WSHR FL .156IDX.312OD B 1 WSHR FL .20IDX.44OD,1/16TK SS E 11 WSHR FLAT #4 .125X.250 SS B 2 WSHR FL .156IDX.375ODX.049 SS B 4 WSHR FL .219IDX.438ODX.049 SS C 2 WSHR FL .188IDX.375ODX.049 SS B 5 WSHR #6 FENDER SS B 3 WSHR SPRING WAVE #4 SS B 2 SCR SOCK CAP 6-32X5/8 BLK A 1 SCR SOCK CAP 4-40X3/8 SS B 2 SCR SOCK CAP #10-32X5/8" SS A 4 SCR SOCK CAP#8-32X1/2 SS A 5 SEMS 6-32X1/4 ST PHIL ITOOTH A 7 SCR SET 8-32X3/16 CUPPT SS B 4 SCR SHLDR 6-32X.187ODX.375 SS A 4 SCR 8-32X.375 ROLOK PHH THDFRM A 1 MAIN PCB ASBY E 1 PCB FILTERS ASBY A 1 CABLE MOTOR CARRIER ASBY B 1 CABLE VACUUM PUMP POWER ASBY B 1 -MECHANICAL ASBY J 0 CARRIER ASBY A 1 LIFT MOTOR/CAM ASBY B 1 SYRINGE PUMP ASBY B 1 LABEL REAR A 1 LABEL POWER IN/SERIAL A 1 BASE PAN E 1 MOUNTING BRACKET MANIFOLD D 1 SHAFT MICROPLATE CARRIER F 1 SHAFT PIVOT E 1 COLLAR WASHER SHAFT B 2 SLIDER MOLDED B 1 STANDOFF MANIFOLD BRACKET F 5 STRIP FOAM A 1 SLIDER LOAD SPRING A 1 SLIDER LOAD PLATE A 1 PARTITION BASE A 1 JIG MANIFOLD ALIGNMENT D 0 JIG ASSEMBLY STAND A 0 JIG TEFLON/FOAM STRIP ALIGN B 0 JIG LIFTING CAM ALIGNMENT B 0 BELT TIMING 260T 1/4W D B 1 TIE WRAP 3" A 3 SCREWLOCK FM/25P SUB D A 1 FOOT,RUBR 1.062ODX27/32H3/16ID A 2 Remarks CABLE A CABLE D DOCUMENT ONLY TOOL ONLY TOOL ONLY TOOL ONLY TOOL ONLY Assembly Drawings Item 49128 49894 49895 49898 49899 49902 49905 66006 66023 66039 66290 67468 68062 7120595 7330503 7330506 7332004 7332020 7332028 7333002 Description SPCR FF 6-32X.25L HEXAL BEARING SNAPIN .312ID TEP642 W STDOFF FF 4-40 1.125L AL HEX GROMMET SPLIT PLASTIC .625 ID GROMMET SPLIT PLASTIC .500 ID FTG M LUER X 1/4 BARB PP FTG F LUER X 1/4 BARB PP LOCTITE 242 BLUE LOCTITE PRIMER 'T' GREASE, LINEAR WAY TAPE UHMW .030X.5 ADHES BACK TUBING SILICON 3/16ID X 3/8OD COMPRESSOR DIAPH 24VDC IDLER PULLEY ASBY CABLE POWER INPUT ASBY CABLE OPTO 14L ASBY SPRING TORSION ARM BELT TENSION SPACER TENSION ARM CABLE ASBY RS232 INTFC 486CPU Elx50 Strip Washer Service Manual Rev B A B B B A A A B A A A B B F C B B C B Qty 4 2 2 1 2 1 1 0 0 0 1 1.33 1 1 1 1 1 1 1 1 Remarks A/R A/R 8" (2X) 733 CABLE B 733 CABLE E 5-13 4070508-AS Carrier ASBY (Page 1 of 1) 5-14 Assembly Drawings Item 14006 14041 14042 19394 4070508-AS 4072016 4072017 4072019 49187 49897 4070508 Carrier Assembly rev A As of 11-20-00 Description Rev Qty NUT HEX 10-32 SS A 2 NUT SQUARE 8-32 SS A 2 NUT SQUARE 6-32 SS A 2 SCR 10-32X.50 NYLON HEX HEAD A 2 -CARRIER ASBY A 0 CARRIER MOLDED C 1 SUPPORT CARRIER B 2 SPRING MICROPLATE C 1 FSTNR,BLACK,6-32X1/2 B 2 FSTNR BLACK 8-32X1/2 A 2 Elx50 Strip Washer Service Manual Remarks DOCUMENT ONLY 5-15 4070509-AS Lift Motor Cam ASBY (Page 1 of 1) 5-16 Assembly Drawings Item 16016 16017 17021 18034 18038 19112 19140 19143 19197 19198 4070501 4070509-AS 4072006 4072007 4072014 4072015 4072504 4072509 45045 66289 8050546 4070509 Lift Motor/Cam Assembly rev B As of 11-20-00 Description Rev Qty Remarks LKWSHR #8 HELICAL SPR SS A 4 LKWSHR #10 HELICAL SPR SS A 2 WSHR FL .20IDX.44OD,1/16TK SS E 2 WSHR SPRING WAVE #4 SS B 2 WSHR .130IDX.250ODX.020T NYLON A 1 SCR SOCK CAP 4-40X3/8 SS B 2 SCR SOCK CAP #10-32X1/2" SS A 2 SCR SOCK CAP#8-32X1/2 SS A 4 RING RETAINING 1/8 SHAFT SS A 1 SCR SET 8-32X3/16 CUPPT SS B 2 CABLE MOTOR LIFT ASBY B 1 CABLE E -LIFT MOTOR/CAM ASBY C 0 DOCUMENT ONLY CAM LIFTING D 1 ROLLER CAM A 1 BRACKET MOTOR MOUNTING C 1 MOUNT MOTOR B 1 JIG LIFTING CAM OFFSET B 0 TOOL ONLY JIG RETAINING CLIP ASBY C 0 TOOL ONLY O-RNG 3/16ID X 5/16OD VITON B 1 LOCTITE 454 GEL 20GRAM A 0 A/R CABLE OPTO ASBY D 1 CABLE BM Elx50 Strip Washer Service Manual 5-17 4070510-AS Tubing Set Supply System Assembly (Page 1 of 1) Item 4070510-AS 49901 67262 68061 98011 5-18 4070510 Tubing Set Supply System Assembly rev D As of 11-20-00 Description Rev Qty Remarks -TUBING SET SUPPLY SYSTEM ASBY D 0 DOCUMENT ONLY FTG F LUER X 5/32 BARB PP A 2 TUBING,SILICON,1/8 ID X 1/4 OD B 3.27 3"(2X), 9.25", 24" VALVE CHK 3/16 BARBS PP V 2.1# A 2 BAG ZIP-LOCK SMALL A 0 Assembly Drawings 4070511-AS Tubing Set Waste System ASBY (Page 1 of 1) Item 4070511-AS 4072034 48124 49902 49904 49907 67262 67468 98146 4070511 Tubing Set Waste System Assembly rev A As of 11-20-00 Description Rev Qty Remarks -TUBING SET WASTE SYSTEM ASBY A 0 DOCUMENT ONLY STOPPER 2-LITER BOTTLE B 1 FITTING 3/16 Y-CONN PLASTIC C 1 FTG M LUER X 1/4 BARB PP A 1 FTG M LUER X 5/32 BARB PP B 2 FTG 1/4X1/4 ELBOW 90 PP B 2 TUBING,SILICON,1/8 ID X 1/4 OD B 0.63 3.75"(2X) TUBING SILICON 3/16ID X 3/8OD A 4 24"(2X) BAG ZIP-LOCK MEDIUM 10X12 A 0 Elx50 Strip Washer Service Manual 5-19 4070513-AS Manifold ASBY 12 Well (Page 1 of 1) 5-20 Assembly Drawings Item 12105 2872220-MP 2872538 4070513-AS 4072010 4072011 4072012 4072041 4072041-DG 4072042 4072043 4072057 4072507 4072508 4072517 49903 49906 49908 98011 99204 4070512 Manifold Assembly, 8-Well rev B As of 11-20-00 Description Rev Qty Remarks SCR PAN 8-32X1/2 PHILLIPS SS A 8 -TEFLON DISPENSE TUBE ASBY MP D 0 DOCUMENT ONLY JIG .0595 DIA TEFLON TUBE DRAW A 0 TOOL ONLY -MANIFOLD ASBY 12 WELL B 0 DOCUMENT ONLY MANIFOLD WASHER 8 WELL G 1 TOP WASHER MANIFOLD E 1 GASKET WASHER MANIFOLD A 1 TUBE DISPENSE TEFLON B 8 -TUBE DISPENSE TEFLON A 0 DOCUMENT ONLY STYLUS, TUBE ASPIRATE C 0 TOOL ONLY STYLUS, TUBE DISPENSE C 0 TOOL ONLY PACKING MANIFOLD A 1 JIG TEFLON TUBE CUTTING A 0 TOOL ONLY JIG TEFLON SLEEVE INSTALL A 0 TOOL ONLY JIG HOLDER MANIFOLD A 0 TOOL ONLY FTG M LUER X 1/4-28 PP A 1 FTG F LUER X 1/4-28 PP A 2 O-RING 1/4X1/32 70DURO EP A 1 BAG ZIP-LOCK SMALL A 0 RUBBER BAND 7 X 1/8 X 1/16 A 1 Item 12105 2872220-MP 2872538 4070513-AS 4072009 4072011 4072012 4072041 4072041-DG 4072042 4072043 4072057 4072507 4072508 4072517 49903 49906 49908 98011 99204 4070513 Manifold Assembly, 12-Well rev B As of 11-20-00 Description Rev Qty Remarks SCR PAN 8-32X1/2 PHILLIPS SS A 8 -TEFLON DISPENSE TUBE ASBY MP D 0 DOCUMENT ONLY JIG .0595 DIA TEFLON TUBE DRAW A 0 TOOL ONLY -MANIFOLD ASBY 12 WELL B 0 DOCUMENT ONLY MANIFOLD WASHER 12 WELL G 1 TOP WASHER MANIFOLD E 1 GASKET WASHER MANIFOLD A 1 TUBE DISPENSE TEFLON B 12 -TUBE DISPENSE TEFLON A 0 DOCUMENT ONLY STYLUS, TUBE ASPIRATE C 0 TOOL ONLY STYLUS, TUBE DISPENSE C 0 TOOL ONLY PACKING MANIFOLD A 1 JIG TEFLON TUBE CUTTING A 0 TOOL ONLY JIG TEFLON SLEEVE INSTALL A 0 TOOL ONLY JIG HOLDER MANIFOLD A 0 TOOL ONLY FTG M LUER X 1/4-28 PP A 1 FTG F LUER X 1/4-28 PP A 2 O-RING 1/4X1/32 70DURO EP A 1 BAG ZIP-LOCK SMALL A 0 RUBBER BAND 7 X 1/8 X 1/16 A 1 Item 12105 4070513-AS 4072011 4072012 4072046 4072047 4072047-DG 4072057 4072516 49903 49906 49908 98011 99204 4070519 Manifold Assembly, 8-Well, Short Dispense rev A As of 11-20-00 Description Rev Qty Remarks SCR PAN 8-32X1/2 PHILLIPS SS A 8 -MANIFOLD ASBY 12 WELL B 0 DOCUMENT ONLY TOP WASHER MANIFOLD E 1 GASKET WASHER MANIFOLD A 1 MANIFOLD 8 WELL SHORT DISP E 1 TUBE DISPENSE TEFLON SHORT B 8 -TUBE DISPENSE TEFLON SHORT A 0 DOCUMENT ONLY PACKING MANIFOLD A 1 JIG SHORT TEFLON SLEEVE INSTL A 0 TOOL ONLY FTG M LUER X 1/4-28 PP A 1 FTG F LUER X 1/4-28 PP A 2 O-RING 1/4X1/32 70DURO EP A 1 BAG ZIP-LOCK SMALL A 0 RUBBER BAND 7 X 1/8 X 1/16 A 1 Elx50 Strip Washer Service Manual 5-21 4070515-AS Bottle Supply ASBY (Page 1 of 1) Item 4070515-AS 4072038 48370 49904 67262 98079 5-22 4070515 Bottle Supply Assembly rev B As of 11-20-00 Description Rev Qty Remarks -BOTTLE SUPPLY ASBY B 0 DOCUMENT ONLY CAP MOD 2 HOLE 89MM PP LINED A 1 BTL 2QT LG MOUTH PE D 1 FTG M LUER X 5/32 BARB PP B 1 TUBING,SILICON,1/8 ID X 1/4 OD B 0.83 10" BAG POLY 12 X 18 B 0 Assembly Drawings 4070516-AS Syringe Pump ASBY (Page 1 of 1) Elx50 Strip Washer Service Manual 5-23 1 2 3 4 5 6 7 8 9 10 19105 2X 4072069 4072075 19979 2X INSERT UNTIL THE SHAFT IS FLUSH TO SIDE OF 4072068. 3 A 4072068 3 1 SEE STEP 1 SEE STEP 2 2 49486 2X (4072067) STEP 2 49908 4072067 E RELEASE TO PRODUCTION DESCRIPTION REV CHG PER ECO A B STEP 4 ECO 32501 32708 F DATE 6/15/99 8/17/99 BY BPS BPS 3 49484 2 G DO NOT SCALE REMOVE ALL BURRS FINISH: I BREAK SHARP EDGES 63 6/18/99 3/9/99 DATE THIRD ANGLE PROJECTION THIS DOCUMENT CONTAINS CONFIDENTIAL AND PROPRIETARY INFORMATION OF BIO-TEK INSTRUMENTS INC. AND NEITHER IT NOR THE INFORMATION CONTAINED THEREIN SHALL BE DISCLOSED TO OTHERS OR DUPLICATED OR USED FOR OTHERS WITHOUT EXPRESS WRITTEN CONSENT OF BIO-TEK INSTRUMENTS INC. B.SMITH M.JOHNSON DRN BY: ENGR: SIGNATURE STEP 5 J SCALE: C SIZE TITLE: 1 1 OF B SHEET 3/4 REV 4070527-AS DRAWING NO. MANIFOLD 16 WELL ASBY HIGHLAND PARK, BOX 998 WINOOSKI, VT. 05404-0998 4072078 SEE STEP 4 PLACE IN 98077 BAG & THEN CAREFULLY PLACE FOAM CUT OUT. 3 APPLY LOCTITE 66294 TO THE THREADS. 2 LUBRICATE WITH ALCOHOL TO MAKE ASSEMBLY EASIER. ALL DIMENSIONS ARE IN INCHES PRODUCTION TOLERANCES .X±.015 ANGULAR TOL..X±2.X° .XX±.010 SURFACE FINISH .XXX±.005 MATERIAL: H 1 WASH PARTS WITH ALCOHOL AND BLOW DRY PRIOR TO ASSEMBLY. ASSEMBLY MUST BE DUST FREE BOTH INTERNALLY AND EXTERNALLY. NOTES: UNLESS OTHERWISE SPECIFIED 4072071 4072070 PLACE STEP 3 ON THE 3 LARGE PINS. WHILE LOWERING ALIGN THE SLOT & HOLE IN THE BOTTOM OF 4072067 ONTO THE 2 SMALLER PINS. INSERT THE 3 JIG MOUNTING SCREWS (12174). ADJUST 4072075 SO IT'S PARALLEL TO 4072067. TIGHTEN 5 SCREWS LEFT LOOSE IN STEP 3. 4072524 JIG,16 CH MANIFOLD ASBY (4072075) SEE STEP 3 (19112 SCREW & 17033 WASHERS) PART OF JIG 1 D 49903 TIGHTEN BY HAND ONLY 1 2 49486 49906 2X DO NOT OVER TIGHTEN C 12101 FINGER TIGHTEN 5X STEP 1 STEP 3 B Item 12062 12105 14041 16002 16016 16067 17059 18034 19112 19143 19397 19401 4070506 4070516-AS 4070518 4072023 4072025 4072027 4072060 4072506 66006 66039 5-24 4070516 Syringe Pump Assembly rev B As of 11-20-00 Description Rev Qty Remarks SCR PAN 8-32X3/4 SS SLOT A 2 SCR PAN 8-32X1/2 PHILLIPS SS A 4 NUT SQUARE 8-32 SS A 4 LKWSHR #4 HELICAL SPR SS A 2 LKWSHR #8 HELICAL SPR SS A 10 WSHR .177IS X .50 OD X .062 SS A 4 WSHR FL .188IDX.375ODX.049 SS B 6 WSHR SPRING WAVE #4 SS B 2 SCR SOCK CAP 4-40X3/8 SS B 2 SCR SOCK CAP#8-32X1/2 SS A 4 SCR SELF SEAL 10-32X.75 A 1 STANDOFF M/F HEX 4-40X9/16 SS A 2 CABLE SYRINGE PUMP ASBY D 1 CABLE B -SYRINGE PUMP ASBY B 0 DOCUMENT ONLY SEAL AND CYLINDER ASBY A 1 MOUNTING BRACKET SYRINGE PUMP C 1 NUT LEAD SCREW B 1 MOUNT SYRINGE PUMP PISTON D 1 PISTON SYRINGE PUMP POLISHED A 1 JIG GLUE SYRINGE PUMP B 0 TOOL ONLY LOCTITE 242 BLUE A 0 A/R GREASE, LINEAR WAY A 0 A/R Assembly Drawings 4070517-AS Aerosol Cover ASBY (Page 1 of 1) Elx50 Strip Washer Service Manual 5-25 Item 12107 16003 17055 19396 4070517-AS 4072020 4072021 4072059 48255 67316 98079 98170 5-26 4070517 Aerosol Cover Assembly rev B As of 11-20-00 Description Rev Qty Remarks SCR PAN 6-32X1/2 PHILLIPS SS A 3 LKWSHR #6 HELICAL SPR SS A 3 WSHR FL .156IDX.375ODX.049 SS B 3 SCR 10-32X.375 THUMB NYLON A 2 -AEROSOL COVER ASBY B 0 DOCUMENT ONLY COVER MIST B 1 COVER REAR MIST A 1 RETAINER BAR AEROSOL COVER A 1 TAPE LAB 1" WIDE YELLOW A 0 A/R CHANNEL,RUBBER EXTRUSION A 0.08 BAG POLY 12 X 18 B 0 BAG #1 BAG ZIP-LOC 3X4 A 0 BAG #2 Assembly Drawings 4070518-AS Seal and Cylinder ASBY (Page 1 of 1) Elx50 Strip Washer Service Manual 5-27 Item 4070518-AS 4072045 4072511 49909 66033 5-28 4070518 Seal & Cylinder Assembly rev A As of 11-20-00 Description Rev Qty Remarks -SEAL AND CYLINDER ASBY B 0 DOCUMENT ONLY SYRINGE PUMP CAP MACHINED C 1 JIG SEAL ASBY A 0 TOOL ONLY SEAL ENERGIZED .875X1.12 PE A 1 LOCTITE INSTANT GEL C 0 A/R Assembly Drawings 4070522-AS Kit, Supply Tube Valve Opto Assembly (Page 1 of 1) Item 15011 4070504 4070522-AS 42113 48124 49539 49893 49901 49904 4070522 Kit, Supply Tube Valve Opto Assembly Description NUT KEPS 8-32 CABLE SOLENOID ASBY -KIT,SUPPLY TUBE VLVE OPT ASBY JUMPER FOR BERG HEDRS FITTING 3/16 Y-CONN PLASTIC CLIP WIRE PVC SELF ADHESIVE BUSHING SNAP .25OID FTG F LUER X 5/32 BARB PP FTG M LUER X 5/32 BARB PP 67262 TUBING,SILICON,1/8 ID X 1/4 OD 98146 BAG ZIP-LOCK MEDIUM 10X12 Elx50 Strip Washer Service Manual rev C As of 11-20-00 Rev Qty Remarks B 3 IN BAG C 3 IN BAG C 0 DOCUMENT ONLY A 1 IN BAG C 2 IN BAG A 2 IN BAG A 4 IN BAG A 6 B 4 IN BAG 1.5", 4"(3X), 5.25", B 10.1 8.25", 11", 11.25", 24"(3X) IN BAG A 0 5-29 4070524-AS Syringe Pump ASBY Medtec (Page 1 of 1) 5-30 Assembly Drawings Item 12062 12105 14041 16002 16016 16067 17059 18034 19112 19143 19397 19401 28160 4070518 4070524-AS 4070525 4072023 4072025 4072027 4072060 4072506 66006 66039 91012 98083 4070524 Syringe Pump Assembly Medtec rev A As of 11-20-00 Description Rev Qty Remarks SCR PAN 8-32X3/4 SS SLOT A 2 SCR PAN 8-32X1/2 PHILLIPS SS A 4 NUT SQUARE 8-32 SS A 4 LKWSHR #4 HELICAL SPR SS A 2 LKWSHR #8 HELICAL SPR SS A 10 WSHR .177IS X .50 OD X .062 SS A 4 WSHR FL .188IDX.375ODX.049 SS B 6 WSHR SPRING WAVE #4 SS B 2 SCR SOCK CAP 4-40X3/8 SS B 2 SCR SOCK CAP#8-32X1/2 SS A 4 SCR SELF SEAL 10-32X.75 A 1 STANDOFF M/F HEX 4-40X9/16 SS A 2 OPTO SENSOR MEDTEC A 1 SEAL AND CYLINDER ASBY A 1 -SYRINGE PUMP ASBY MEDTEC A 0 DOCUMENT ONLY CABLE SYRINGE PUMP ASBY MEDTEC A 1 CABLE "F" MOUNTING BRACKET SYRINGE PUMP C 1 NUT LEAD SCREW B 1 MOUNT SYRINGE PUMP PISTON D 1 PISTON SYRINGE PUMP POLISHED A 1 JIG GLUE SYRINGE PUMP B 0 LOCTITE 242 BLUE A 0 A/R GREASE, LINEAR WAY A 0 A/R BOX 5X5X9 200# TEST WHITE A 0 BAG,9X12 PLASTIC 2MIL A 0 Elx50 Strip Washer Service Manual 5-31 4070527-AS Manifold 16 Well Assembly (Page 1 of 1) 5-32 Assembly Drawings Item 12101 19105 19979 4070527-AS 4072042 4072043 4072067 4072068 4072069 4072070 4072071 4072075 4072078 4072524 49484 49486 49903 49906 49908 66294 99204 4070527 Manifold 16 Well Assembly rev B As of 11-20-00 Description Rev Qty Remarks SCR PAN 8-32X5/16 PHILLIPS SS A 5 SCR SET 6-32 X 1/8 CUPPT SS A 2 PIN DOWEL .1875 X .625 SS A 2 MANIFOLD 16 WELL ASBY B 0 DOCUMENT ONLY STYLUS, TUBE ASPIRATE C 0 TOOL ONLY STYLUS, TUBE DISPENSE C 0 TOOL ONLY MANIFOLD DISPENSE 16 CH D 1 MANIFOLD ASPIRATE 16 CH C 1 MTG BLOCK MFD BRACKET B 1 PLUG MANIFOLD CHANNEL C 1 PIN GLIDE D 1 BRACKET DISP MANIFOLD MTG A 1 PACKING 16 CH MANIFOLD A 1 JIG 16 CH MANIFOLD ASBY B 0 TOOL ONLY O-RING .203ODX.07DIA DUR70SIL C 1 BUMPER ATS WASHER MANIFOLD A 3 FTG M LUER X 1/4-28 PP A 1 FTG F LUER X 1/4-28 PP A 2 O-RING 1/4X1/32 70DURO EP A 1 LOCTITE ASSURE 425 A 0 RUBBER BAND 7 X 1/8 X 1/16 A 2 Elx50 Strip Washer Service Manual 5-33 5-34 Assembly Drawings Section 6 Schematics This section contains the Component Layout drawing and Electrical Schematic for the ELx50 Strip Washer. These documents are subject to change. DRAWING # DESCRIPTION 4070400-AS Main PCB, page 6-3 4070400-SC Main PCB (Page 1 of 6), page 6-6 4070401-AS PCB Filters Assembly, page 6-12 4070401-SC PCB Filters, page 6-13 Elx50 Strip Washer Service Manual 6-1 6-2 Schematics 1 2 3 4 5 6 7 Q2 + C45 U22 J3 C3 J2 C4 C10 F1 C5 1 C2 RN8 R16 R13 R22 1 C27 R15 CR5 Q1 U23 R14 R11 R12 C51 1 J4 U1 RN7 U20 C6 L1 C22 R20 C17 R19 C12 U9 C26 U2 C21 U3 1 R18 J12 C24 C36 1 J20 C53 4. BOARD ASSEMBLIES ARE TO BE SERIAL NUMBERED AND MARKED WITH INDICATOR THAT THEY WERE TESTED. C33 1 C30 C25 U8 J13 C19 C20 U7 3 SWAGE MUST BE TIGHT TO PCB WITHOUT DAMAGING THE BOARD. 2 MARK MONTH AND YEAR ON BATTERY. USE A FELT TIP MARKER (BLACK) AND MARK ON NEGATIVE SIDE OF BATTERY. 1 C15 U6 C14 1 SOLDER 42311 TO DISPLAY BEFORE MOUNTING DISPLAY TO BOARD (LOCATE IN HOLES 1-14). HOLES 15 & 16 NOT USED. NOTES: 1 J1 GND C44 C42 8 1 J21 J15 1 J14 1 1 CR10 C37 C39 + + 9 C56 R3 R5 R7 1 R4 R6 R8 J7 C74 U11 RN3 P4 P3 P2 P1 Y2 1 Q6 1 R32 C101 C60 1 C62 1 C73 C75 Q5 C58 + C72 U47 C89 U45 U41 (SOCKET) LOW BANK 28880 RELEASE TO PRODUCTION DESCRIPTION A REV ECO 29079 CORRECT POLARITY ON CAPACITORS U40 (SOCKET) HIGH BANK U44 B U46 C87 RN6 J9 32578 C92 1 U10 ADD NOTE 4 U37 U30 C83 C8 C RN12 RN10 U34 U36 U33 C85 C108 C94 E MAIN PCB R37 C95 C59 U28 R36 U31 R39 U48 (SOCKET) RN16 RN14 U49 U35 1 1 J16 D RN13 1 C C100 10 1 CR3 1 5.25v + RN4 RN5 F2 R42 R38 C78 C96 RN15 1 + 1 + U39 R41 B C86 + C57 C34 C80 U38 R40 + + C93 + C16 CR4 + R21 1 U43 C65 DATE 3/10/97 4/15/97 7/13/99 1 C66 Y1 C71 U32 RN11 U27 BP1 - BY PEB BPS BPS RT1 B1 G 42307 4X 42311 DO NOT SCALE MATERIAL: REMOVE ALL BURRS FINISH: BREAK SHARP EDGES ALL DIMENSIONS ARE IN INCHES PRODUCTION TOLERANCES .X±.015 ANGULAR TOL..X±2.X° .XX±.010 SURFACE FINISH .XXX±.005 63 MARK REV OF BOM 3 1 16001 4X 12089 4X UNLESS OTHERWISE SPECIFIED ADD DISPLAY FARSIDE SEE DETAIL A U42 C91 C102 U29 Q4 F C103 C61 C82 C88 C81 + C90 + + + J6 +C54 C97 + C46 + C47 +C35 + + Elx50 Strip Washer Service Manual + A 4070400 REV + 4070400-AS Main PCB 6-3 DATE 3/12/97 11/11/96 THIRD ANGLE PROJECTION THIS DOCUMENT CONTAINS CONFIDENTIAL AND PROPRIETARY INFORMATION OF BIO-TEK INSTRUMENTS INC. AND NEITHER IT NOR THE INFORMATION CONTAINED THEREIN SHALL BE DISCLOSED TO OTHERS OR DUPLICATED OR USED FOR OTHERS WITHOUT EXPRESS WRITTEN CONSENT OF BIO-TEK INSTRUMENTS INC. B.SMITH M.JOHNSON DRN BY: HIGHLAND PARK, BOX 998 WINOOSKI, VT. 05404-0998 04018 J SCALE: 1 1 OF C SHEET NONE REV 4070400-AS DRAWING NO. MAIN PCB ASBY C SIZE TITLE: 2 47049 POSITIVE SIDE DOWN ENGR: SIGNATURE DETAIL A I OPTIONAL PARTS SEE BOM SOLDER SIDE H Item 04018 12089 16001 21010 21013 23099 25108 4070400 Main PCB rev E As of 11-20-00 Description Rev Qty LCD 2X24 SUPERTWIST DISPLAY E 1 SCR PAN 2-56X1/4 SS PHIL A 4 LKWSHR #2 HELICAL SPR A 4 DIODE IN5821 SCHOTTKY 30V 1/4W B 2 DIODE SF21 50V 2AMP A 1 VOLT REG LM2575S-ADJ A 1 IC LT1017CN8 COMPARATOR A 1 25135 IC 80C186-20 UP PLCC B 1 25136 25140 25141 25142 25143 25144 25145 25146 25147 26024 27009 27013 28004 28043 28131 28133 29131 29137 29138 29139 29140 35009 37002 37007 37046 38005 38026 38067 38086 38087 38088 38089 38090 38091 38093 38094 4070200 4070400-AS 4070400-SC 4070400-TP 4071400 42112 IC DS1233-10 ECONO RESET IC 74HC574 SOP20 IC 74AC32 SOP14 IC 74AC08 S0P14 IC 74AC373 SOP20 IC 74AC245 SOP20 IC 74AC138 SOP16 IC 74HC541 SOP20 IC 74LSO4 SOP14 IC 2003A TRANS ARRAY SM MOSFET,2A 80V RFP2N08L POWER TRANSISTOR 2N7008RLRA N-CH VOLT REF 2.5 VOLT REF 1.2 LT1004 +/-4MV IC PBL3771QN STPR MTR DRV SM IC LT1080 SOP18 TRANSZORB 33V 1.5KE33A IC PBM3960QN DUAL 7 BIT D/A SM IC AT29C010-12TC FMEM 128K SM IC AM29F040-120 512K FMEM SM IC 128KX8 STATIC RAM TSOP 8X20 TRIMPOT 20K, 25T RESNET 10K OHM 5R 6P SIP RESNET 180 OHM 5R 10P SIP RESNET 10K SIP 10PIN 9RES 5% RES 1.00K OHM 1% SIZE 1206 RES 475 OHM SIZE 1206 RES .65 OHM 1W 1% RES 29.4K .1% 1/8W 1206 RES 10.0K .1% 1/8W 1206 RES 30 OHM 5% 1/8W 1206 RES 3.01K OHM 1% 1/8W 1206 RES 2.0K OHM 1% 1/8 1206 RES 3.32K OHM 1% 1/8W 1206 RES 15.0K 1% 1/8W 1206 RES 2.49M 1% SIZE 1206 FIRMWARE ASBY ELX50 V1.02 -MAIN PCB ASBY -MAIN PCB SCHEMATIC -MAIN PCB ASBY TEST PROCEDURE MAIN PCB HEDR 4-PIN DUAL A A A A A A A A A A C E C B C A B B B B C A B B A D A B B A B B A A B A A D D A D B 1 3 2 1 3 1 2 2 1 1 1 1 1 1 3 1 1 3 2 2 2 1 4 3 6 7 1 6 1 1 3 1 1 1 3 1 1 0 0 0 1 2 6-4 Remarks DIPLAY TO MOUNT DISPLAY TO MOUNT DISPLAY CR4,5 CR10 Q1 U31 INSTALLED IN SOCKET (U48) Q6 U10,23,29 U37,38 U39 U34-36 U33 U28,30 U20,27 U49 U22 Q2 Q4 U9 Q5 U1-3 U11 CR3 U6-8 U44,45 U46,47 U42,43 RT1 RN13-16 RN3-5 RN6-8,10-12 R11-16,21 R43 R3-8 R37 R38 R40-42 R32 R36 R22 R18-20 R39 U40 HIGH, U41 LOW DOCUMENT ONLY DOCUMENT ONLY DOCUMENT ONLY P1-P4 Schematics Item 42150 42225 42307 42310 Description HEDR 12-P .100 RTANG BRKS HEDR 3-P .156 LOK SWAGE CONN 5/32 RND 1/4L HEDR 14PIN FOR LCD MOUNTING Rev B A B A Qty 1 1 4 1 42311 42319 42324 42468 42626 42627 46082 49014 49149 49478 49694 49743 62027 63018 65020 81004 81022 81027 HEDR 14PIN .1X.1 FOR LCD B 1 HEDR 4-P .100 PCB MOUNT GOLD HEDR 5-P .100 PCB MOUNT GOLD HEDR 2-P .100 PCB MOUNT STR HEDR 10PIN .1 RT ANGLE HEDR 2P RT ANG LOCK POLAR FUSE RESETABLE 5A PCB MNT TERM PCB SOCKET IC 28-PIN DIP SOCKET 84-PIN PLCC HEDR 10P .1 CRYSTAL CLOCK OSC 32 MHZ FILTER EMI SUPPR .5-1GHZ INDUCTOR 220UH BUZZER 3-16V PIEZO CAP 100 UF 63V ELEC CAP 470 UF 35V ELEC VERTICAL CAP 10000UF ELECTROLYTIC A A A A A A B B A B B A A C A C A 2 2 1 1 4 1 1 2 1 1 1 1 1 1 6 1 2 83054 CAP 820PF NPO 100V 10% 1206 B 10 83062 84040 CAP 3300PF CER 1206 CAP 10 UF 25V TANT SIZE 7343 A A 3 4 84041 CAP .1 UF 50V X7R SIZE 1206 A 36 84066 CAP 1UF TANT 35V SIZE 3528 B 9 85002 CAP .01 uF 100V 1% G 1 Elx50 Strip Washer Service Manual Remarks J6 J1 SWAGED INTO PCB J9 MOUNTED ON DISPLAY J2,3 J14,15 J21 J4 J12,13,16,20 F2 GND IN U40,41 IN U48 J7 Y2 F1 L1 BP1 C2-6,94 C30 C8,10 C12,16,17,21,22,26,3 7,39,42,44 C14,19,24 C45,53,57,58 C15,20,25,27,33,36,5 1,54,56,59-62,66,7175,78,8083,85,86,88,90,92,9597,100-103 C34,35,46,47,65,87,8 9,91,93 C108 6-5 4070400-SC Main PCB (Page 1 of 6) 6-6 Schematics 4070400-SC Main PCB (Page 2 of 6) Elx50 Strip Washer Service Manual 6-7 4070400-SC Main PCB (Page 3 of 6) 6-8 Schematics 4070400-SC Main PCB (Page 4 of 6) Elx50 Strip Washer Service Manual 6-9 4070400-SC Main PCB (Page 5 of 6) 6-10 Schematics 4070400-SC Main PCB (Page 6 of 6) Elx50 Strip Washer Service Manual 6-11 4070401-AS PCB Filters Assembly Item 4070401-AS 4070401-SC 4071401 42063 42664 62057 68062 6-12 4070401 PCB Filters Assembly rev A As of 11-20-00 Description Rev Qty -PCB FILTERS ASBY A 0 -PCB FILTERS ASBY A 0 PCB FILTERS B 1 HEDR .25 MTAB A 2 TERM FMALE .25 PC MNT A 2 FILTER EMI BEAD 43 OHMS A 2 COMPRESSOR DIAPH 24VDC B 0 Remarks DOCUMENT ONLY DOCUMENT ONLY J3,4 J1,2 L1,2 JIG ONLY Schematics 4070401-SC PCB Filters Elx50 Strip Washer Service Manual 6-13 6-14 Schematics Section 7 Bills of Material This section contains the Bills of Material used in building the ELx50 Automated Microplate Strip Washer and its variations. These documents are subject to change. PART NUMBER DESCRIPTION ELX50/8 Strip Washer 8 Well, page 7-3 ELX50/8G Strip Washer 8 Well (Generic), page 7-4 ELX50/8V Strip Washer 8 Well w/Valves, page 7-5 ELX50/8GV Strip Washer 8 Well (Generic) w/Valves, page 7-6 ELX50/8S Strip Washer 8 Well Short Dispense, page 7-7 ELX50/8GS Strip Washer 8 Well (Generic) Short Dispense, page 7-8 ELX50/8VS Strip Washer 8 Well w/Valves, Short Dispense, page 7-9 ELX50/8GVS Strip Washer 8 Well (Generic) w/Valves, Short Dispense, page 7-10 ELX50/12 Strip Washer 12 Well, page 7-11 ELX50/12G Strip Washer 12 Well (Generic), page 7-12 ELX50/12V Strip Washer 12 Well w/Valves, page 7-13 ELX50/12GV Strip Washer 12 Well (Generic) w/Valves, page 7-14 ELX50/16 Strip Washer 16 Well, page 7-15 ELX50/16G Strip Washer 16 Well (Generic), page 7-16 ELX50/16V Strip Washer 16 Well w/Valves, page 7-17 ELX50/16GV Strip Washer 16 Well (Generic) w/Valves, page 7-18 4070001 Accessories Set, Bottles and Tubes, page 7-19 4070002 Accessories Set, Generic Unit, page 7-20 4070018 Accessories Set, 384 Unit, page 7-21 4070019 Accessories Set, 384 Generic Unit, page 7-22 4070520 Aerosol Cover Assembly, Generic, page 7-23 Elx50 Strip Washer Service Manual 7-1 7-2 Bills of Material ELX50/8 Strip Washer 8 Well Item 4070001 4070003 4070005-AS 4070020-DS 4070020-TP 4070230 4070231 4070512 4070602 4071001 4071002 4072001 4072500 4072501 4072505 4072513 4072518 4072519 4072521 4072522 4072523 4072526 49900 7332501 7770102 7771011 7771012 8290206 9001018 ELX50/8 Strip Washer 8 Well rev O As of 11-20-00 Description Rev Qty ACCESSORIES G 1 KIT GENERIC HDW FINAL ASBY J 1 -FINAL ASBY STRIP WSHR 8 WELL N 0 FINAL TEST PROCEDURE ELX50/16 C 0 FINAL TEST PROCEDURE ELX50/16 D 0 SFTWR DOWNLOADED CODE V1.06 C 0 SFTWR DWNLD ASSAY CONFIG V1.04 A 0 MANIFOLD ASBY 8 WELL B 1 TEST STATION UQUANT QC ASSAY B 0 OVRLY FRONT B 1 OVRLY KEYBOARD A 1 COVER TOP D 1 JIG MANIFOLD ALIGNMENT D 0 JIG ASSEMBLY STAND A 0 JIG MAINIFOLD CALIBRATION C 0 JIG OVERLAY ALIGNMENT A 0 TOOL STOPPER 3 HOLE WASTE BTL A 0 TOOL INLET DISTRIBUTION LINE A 0 JIG MICROPLATE STOP ALIGN C 0 JIG CARRIER POSITION CHECK A 0 JIG FOOT ALIGN A 0 JIG AUTOCAL VERIFY B 0 PLUG .437DIA HOLE NYLON BLACK B 4 JIG OVRLY ALIGNMENT A 0 LABEL "FCC COMPLIANCE" A 1 LABEL ETL WITHOUT UL B 1 TAG S/N WITH CE MARK A 1 SFTWR DOWNLOAD UTIL V1.42 H 0 LABEL IN-VITRO DIAG USE A 1 99125 LABEL 1"X1/2" CONTINOUS Elx50 Strip Washer Service Manual C 1 Remarks DOCUMENT ONLY DOCUMENT ONLY DOCUMENT ONLY TOOL ONLY TOOL ONLY TOOL ONLY TOOL ONLY TOOL ONLY TOOL ONLY TOOL ONLY TOOL ONLY TOOL ONLY TOOL ONLY TOOL ONLY TOOL ONLY TOOL ONLY TOOL ONLY TOOL ONLY MARK WITH MODEL NUMBER 7-3 ELX50/8G Strip Washer 8 Well (Generic) Item 4070002 4070003 4070005-AS 4070020-DS 4070020-TP 4070230 4070232 4070512 4070602 4071003 4072040 4072500 4072501 4072505 4072513 4072518 4072519 4072521 4072522 4072523 4072526 49900 7332501 7770102 7771011 7771012 8290206 9001018 99125 7-4 ELX50/8G Strip Washer 8 Well (Generic) rev P As of 11-20-00 Description Rev Qty Remarks ACCESSORIES GENERIC UNIT G 1 KIT GENERIC HDW FINAL ASBY J 1 -FINAL ASBY STRIP WSHR 8 WELL N 0 DOCUMENT ONLY FINAL TEST PROCEDURE ELX50/16 C 0 DOCUMENT ONLY FINAL TEST PROCEDURE ELX50/16 D 0 DOCUMENT ONLY SFTWR DOWNLOADED CODE V1.06 C 0 TOOL ONLY SFTWR GENERIC ASSAY V1.04 A 0 TOOL ONLY MANIFOLD ASBY 8 WELL B 1 TEST STATION UQUANT QC ASSAY B 0 TOOL ONLY OVRLY KEYBOARD GENERIC B 1 COVER TOP GENERIC D 1 JIG MANIFOLD ALIGNMENT D 0 TOOL ONLY JIG ASSEMBLY STAND A 0 TOOL ONLY JIG MAINIFOLD CALIBRATION C 0 TOOL ONLY JIG OVERLAY ALIGNMENT A 0 TOOL ONLY TOOL STOPPER 3 HOLE WASTE BTL A 0 TOOL ONLY TOOL INLET DISTRIBUTION LINE A 0 TOOL ONLY JIG MICROPLATE STOP ALIGN C 0 TOOL ONLY JIG CARRIER POSITION CHECK A 0 TOOL ONLY JIG FOOT ALIGN A 0 TOOL ONLY JIG AUTOCAL VERIFY B 0 TOOL ONLY PLUG .437DIA HOLE NYLON BLACK B 4 JIG OVRLY ALIGNMENT A 0 TOOL ONLY LABEL "FCC COMPLIANCE" A 1 LABEL ETL WITHOUT UL B 1 TAG S/N WITH CE MARK A 1 SFTWR DOWNLOAD UTIL V1.42 H 0 TOOL ONLY LABEL IN-VITRO DIAG USE A 1 MARK WITH MODEL LABEL 1"X1/2" CONTINOUS C 1 NUMBER Bills of Material ELX50/8V Strip Washer 8 Well w/Valves Item 4070001 4070003 4070005-AS 4070020-DS 4070020-TP 4070230 4070231 4070512 4070515 4070522 4070602 4071001 4071002 4072001 4072500 4072501 4072505 4072513 4072518 4072519 4072521 4072522 4072523 4072526 7332501 7770102 7771011 7771012 8290206 9001018 99125 ELX50/8V Strip Washer 8 Well w/Valves rev R As of 11-20-00 Description Rev Qty Remarks ACCESSORIES G 1 KIT GENERIC HDW FINAL ASBY J 1 -FINAL ASBY STRIP WSHR 8 WELL N 0 DOCUMENT ONLY FINAL TEST PROCEDURE ELX50/16 C 0 DOCUMENT ONLY FINAL TEST PROCEDURE ELX50/16 D 0 DOCUMENT ONLY SFTWR DOWNLOADED CODE V1.06 C 0 TOOL ONLY SFTWR DWNLD ASSAY CONFIG V1.04 A 0 TOOL ONLY MANIFOLD ASBY 8 WELL B 1 BOTTLE SUPPLY ASBY B 1 KIT,SUPPLY TUBE VLVE OPT ABY C 1 TEST STATION UQUANT QC ASSAY B 0 TOOL ONLY OVRLY FRONT B 1 OVRLY KEYBOARD A 1 COVER TOP D 1 JIG MANIFOLD ALIGNMENT D 0 TOOL ONLY JIG ASSEMBLY STAND A 0 TOOL ONLY JIG MAINIFOLD CALIBRATION C 0 TOOL ONLY JIG OVERLAY ALIGNMENT A 0 TOOL ONLY TOOL STOPPER 3 HOLE WASTE BTL A 0 TOOL ONLY TOOL INLET DISTRIBUTION LINE A 0 TOOL ONLY JIG MICROPLATE STOP ALIGN C 0 TOOL ONLY JIG CARRIER POSITION CHECK A 0 TOOL ONLY JIG FOOT ALIGN A 0 TOOL ONLY JIG AUTOCAL VERIFY B 0 TOOL ONLY JIG OVRLY ALIGNMENT A 0 TOOL ONLY LABEL "FCC COMPLIANCE" A 1 LABEL ETL WITHOUT UL B 1 TAG S/N WITH CE MARK A 1 SFTWR DOWNLOAD UTIL V1.42 H 0 TOOL ONLY LABEL IN-VITRO DIAG USE A 1 MARK WITH MODEL LABEL 1"X1/2" CONTINOUS C 1 NUMBER Elx50 Strip Washer Service Manual 7-5 ELX50/8GV Strip Washer 8 Well (Generic) w/Valves Item 4070002 4070003 4070005-AS 4070020-DS 4070020-TP 4070230 4070232 4070512 4070515 4070522 4070602 4071003 4072040 4072500 4072501 4072505 4072513 4072518 4072519 4072521 4072522 4072523 4072526 7332501 7770102 7771011 7771012 8290206 9001018 99125 7-6 ELX50/8GV Strip Washer 8 Well Generic w/Valves rev R Description Rev ACCESSORIES GENERIC UNIT G KIT GENERIC HDW FINAL ASBY J -FINAL ASBY STRIP WSHR 8 WELL N FINAL TEST PROCEDURE ELX50/16 C FINAL TEST PROCEDURE ELX50/16 D SFTWR DOWNLOADED CODE V1.06 C SFTWR GENERIC ASSAY V1.04 A MANIFOLD ASBY 8 WELL B BOTTLE SUPPLY ASBY B KIT,SUPPLY TUBE VLVE OPT ABY C TEST STATION UQUANT QC ASSAY B OVRLY KEYBOARD GENERIC B COVER TOP GENERIC D JIG MANIFOLD ALIGNMENT D JIG ASSEMBLY STAND A JIG MAINIFOLD CALIBRATION C JIG OVERLAY ALIGNMENT A TOOL STOPPER 3 HOLE WASTE BTL A TOOL INLET DISTRIBUTION LINE A JIG MICROPLATE STOP ALIGN C JIG CARRIER POSITION CHECK A JIG FOOT ALIGN A JIG AUTOCAL VERIFY B JIG OVRLY ALIGNMENT A LABEL "FCC COMPLIANCE" A LABEL ETL WITHOUT UL B TAG S/N WITH CE MARK A SFTWR DOWNLOAD UTIL V1.42 H LABEL IN-VITRO DIAG USE A LABEL 1"X1/2" CONTINOUS C As of 11-20-00 Qty Remarks 1 1 0 DOCUMENT ONLY 0 DOCUMENT ONLY 0 DOCUMENT ONLY 0 TOOL ONLY 0 TOOL ONLY 1 1 1 0 TOOL ONLY 1 1 0 TOOL ONLY 0 TOOL ONLY 0 TOOL ONLY 0 TOOL ONLY 0 TOOL ONLY 0 TOOL ONLY 0 TOOL ONLY 0 TOOL ONLY 0 TOOL ONLY 0 TOOL ONLY 0 TOOL ONLY 1 1 1 0 TOOL ONLY 1 MARK WITH MODEL 1 NUMBER Bills of Material ELX50/8S Strip Washer 8 Well Short Dispense Item 4070001 4070003 4070005-AS 4070020-DS 4070020-TP 4070230 4070231 4070519 4070602 4071001 4071002 4072001 4072500 4072501 4072505 4072513 4072518 4072519 4072521 4072522 4072523 4072526 49900 7332501 7770102 7771011 7771012 8290206 9001018 99125 ELX50/8S Strip Washer 8 Well Short Dispense rev P As of 11-20-00 Description Rev Qty Remarks ACCESSORIES G 1 KIT GENERIC HDW FINAL ASBY J 1 -FINAL ASBY STRIP WSHR 8 WELL N 0 DOCUMENT ONLY FINAL TEST PROCEDURE ELX50/16 C 0 DOCUMENT ONLY FINAL TEST PROCEDURE ELX50/16 D 0 DOCUMENT ONLY SFTWR DOWNLOADED CODE V1.06 C 0 TOOL ONLY SFTWR DWNLD ASSAY CONFIG V1.04 A 0 TOOL ONLY MANF 8 WELL SHORT DISP ASBY A 1 TEST STATION UQUANT QC ASSAY B 0 TOOL ONLY OVRLY FRONT B 1 OVRLY KEYBOARD A 1 COVER TOP D 1 JIG MANIFOLD ALIGNMENT D 0 TOOL ONLY JIG ASSEMBLY STAND A 0 TOOL ONLY JIG MAINIFOLD CALIBRATION C 0 TOOL ONLY JIG OVERLAY ALIGNMENT A 0 TOOL ONLY TOOL STOPPER 3 HOLE WASTE BTL A 0 TOOL ONLY TOOL INLET DISTRIBUTION LINE A 0 TOOL ONLY JIG MICROPLATE STOP ALIGN C 0 TOOL ONLY JIG CARRIER POSITION CHECK A 0 TOOL ONLY JIG FOOT ALIGN A 0 TOOL ONLY JIG AUTOCAL VERIFY B 0 TOOL ONLY PLUG .437DIA HOLE NYLON BLACK B 4 JIG OVRLY ALIGNMENT A 0 TOOL ONLY LABEL "FCC COMPLIANCE" A 1 LABEL ETL WITHOUT UL B 1 TAG S/N WITH CE MARK A 1 SFTWR DOWNLOAD UTIL V1.42 H 0 TOOL ONLY LABEL IN-VITRO DIAG USE A 1 MARK WITH MODEL LABEL 1"X1/2" CONTINOUS C 1 NUMBER Elx50 Strip Washer Service Manual 7-7 ELX50/8GS Strip Washer 8 Well (Generic) Short Dispense ELX50/8GS Strip Washer 8 Well (Generic) Short Dispense rev P As of 11-20-00 Item Description Rev Qty Remarks 4070002 ACCESSORIES GENERIC UNIT G 1 4070003 KIT GENERIC HDW FINAL ASBY J 1 4070005-AS -FINAL ASBY STRIP WSHR 8 WELL N 0 DOCUMENT ONLY 4070020-DS FINAL TEST PROCEDURE ELX50/16 C 0 DOCUMENT ONLY 4070020-TP FINAL TEST PROCEDURE ELX50/16 D 0 DOCUMENT ONLY 4070230 SFTWR DOWNLOADED CODE V1.06 C 0 TOOL ONLY 4070232 SFTWR GENERIC ASSAY V1.04 A 0 TOOL ONLY 4070519 MANF 8 WELL SHORT DISP ASBY A 1 4070602 TEST STATION UQUANT QC ASSAY B 0 TOOL ONLY 4071003 OVRLY KEYBOARD GENERIC B 1 4072040 COVER TOP GENERIC D 1 4072500 JIG MANIFOLD ALIGNMENT D 0 TOOL ONLY 4072501 JIG ASSEMBLY STAND A 0 TOOL ONLY 4072505 JIG MAINIFOLD CALIBRATION C 0 TOOL ONLY 4072513 JIG OVERLAY ALIGNMENT A 0 TOOL ONLY 4072518 TOOL STOPPER 3 HOLE WASTE BTL A 0 TOOL ONLY 4072519 TOOL INLET DISTRIBUTION LINE A 0 TOOL ONLY 4072521 JIG MICROPLATE STOP ALIGN C 0 TOOL ONLY 4072522 JIG CARRIER POSITION CHECK A 0 TOOL ONLY 4072523 JIG FOOT ALIGN A 0 TOOL ONLY 4072526 JIG AUTOCAL VERIFY B 0 TOOL ONLY 49900 PLUG .437DIA HOLE NYLON BLACK B 4 7332501 JIG OVRLY ALIGNMENT A 0 TOOL ONLY 7770102 LABEL "FCC COMPLIANCE" A 1 7771011 LABEL ETL WITHOUT UL B 1 7771012 TAG S/N WITH CE MARK A 1 8290206 SFTWR DOWNLOAD UTIL V1.42 H 0 TOOL ONLY 9001018 LABEL IN-VITRO DIAG USE A 1 MARK WITH MODEL 99125 LABEL 1"X1/2" CONTINOUS C 1 NUMBER 7-8 Bills of Material ELX50/8VS Strip Washer 8 Well w/Valves, Short Dispense ELX50/8VS Strip Washer 8 Well w/Valves, Short Dispense rev R As of 11-20-00 Item Description Rev Qty Remarks 4070001 ACCESSORIES G 1 4070003 KIT GENERIC HDW FINAL ASBY J 1 4070005-AS -FINAL ASBY STRIP WSHR 8 WELL N 0 DOCUMENT ONLY 4070020-DS FINAL TEST PROCEDURE ELX50/16 C 0 DOCUMENT ONLY 4070020-TP FINAL TEST PROCEDURE ELX50/16 D 0 DOCUMENT ONLY 4070230 SFTWR DOWNLOADED CODE V1.06 C 0 TOOL ONLY 4070231 SFTWR DWNLD ASSAY CONFIG V1.04 A 0 TOOL ONLY 4070515 BOTTLE SUPPLY ASBY B 1 4070519 MANF 8 WELL SHORT DISP ASBY A 1 4070522 KIT,SUPPLY TUBE VLVE OPT ABY C 1 4070602 TEST STATION UQUANT QC ASSAY B 0 TOOL ONLY 4071001 OVRLY FRONT B 1 4071002 OVRLY KEYBOARD A 1 4072001 COVER TOP D 1 4072500 JIG MANIFOLD ALIGNMENT D 0 TOOL ONLY 4072501 JIG ASSEMBLY STAND A 0 TOOL ONLY 4072505 JIG MAINIFOLD CALIBRATION C 0 TOOL ONLY 4072513 JIG OVERLAY ALIGNMENT A 0 TOOL ONLY 4072518 TOOL STOPPER 3 HOLE WASTE BTL A 0 TOOL ONLY 4072519 TOOL INLET DISTRIBUTION LINE A 0 TOOL ONLY 4072521 JIG MICROPLATE STOP ALIGN C 0 TOOL ONLY 4072522 JIG CARRIER POSITION CHECK A 0 TOOL ONLY 4072523 JIG FOOT ALIGN A 0 TOOL ONLY 4072526 JIG AUTOCAL VERIFY B 0 TOOL ONLY 7332501 JIG OVRLY ALIGNMENT A 0 TOOL ONLY 7770102 LABEL "FCC COMPLIANCE" A 1 7771011 LABEL ETL WITHOUT UL B 1 7771012 TAG S/N WITH CE MARK A 1 8290206 SFTWR DOWNLOAD UTIL V1.42 H 0 TOOL ONLY 9001018 LABEL IN-VITRO DIAG USE A 1 99125 LABEL 1"X1/2" CONTINOUS C 1 Elx50 Strip Washer Service Manual 7-9 ELX50/8GVS Strip Washer 8 Well (Generic) w/Valves, Short Dispense ELX50/8GVS Strip Washer 8 Well (Generic) w/Valves, Short Dispense rev R As of 11-20-00 Item Description Rev Qty Remarks 4070002 ACCESSORIES GENERIC UNIT G 1 4070003 KIT GENERIC HDW FINAL ASBY J 1 4070005-AS -FINAL ASBY STRIP WSHR 8 WELL N 0 DOCUMENT ONLY 4070020-DS FINAL TEST PROCEDURE ELX50/16 C 0 DOCUMENT ONLY 4070020-TP FINAL TEST PROCEDURE ELX50/16 D 0 DOCUMENT ONLY 4070230 SFTWR DOWNLOADED CODE V1.06 C 0 TOOL ONLY 4070232 SFTWR GENERIC ASSAY V1.04 A 0 TOOL ONLY 4070515 BOTTLE SUPPLY ASBY B 1 4070519 MANF 8 WELL SHORT DISP ASBY A 1 4070522 KIT,SUPPLY TUBE VLVE OPT ABY C 1 4070602 TEST STATION UQUANT QC ASSAY B 0 TOOL ONLY 4071003 OVRLY KEYBOARD GENERIC B 1 4072040 COVER TOP GENERIC D 1 4072500 JIG MANIFOLD ALIGNMENT D 0 TOOL ONLY 4072501 JIG ASSEMBLY STAND A 0 TOOL ONLY 4072505 JIG MAINIFOLD CALIBRATION C 0 TOOL ONLY 4072513 JIG OVERLAY ALIGNMENT A 0 TOOL ONLY 4072518 TOOL STOPPER 3 HOLE WASTE BTL A 0 TOOL ONLY 4072519 TOOL INLET DISTRIBUTION LINE A 0 TOOL ONLY 4072521 JIG MICROPLATE STOP ALIGN C 0 TOOL ONLY 4072522 JIG CARRIER POSITION CHECK A 0 TOOL ONLY 4072523 JIG FOOT ALIGN A 0 TOOL ONLY 4072526 JIG AUTOCAL VERIFY B 0 TOOL ONLY 7332501 JIG OVRLY ALIGNMENT A 0 TOOL ONLY 7770102 LABEL "FCC COMPLIANCE" A 1 7771011 LABEL ETL WITHOUT UL B 1 7771012 TAG S/N WITH CE MARK A 1 8290206 SFTWR DOWNLOAD UTIL V1.42 H 0 TOOL ONLY 9001018 LABEL IN-VITRO DIAG USE A 1 MARK WITH MODEL 99125 LABEL 1"X1/2" CONTINOUS C 1 NUMBER 7-10 Bills of Material ELX50/12 Strip Washer 12 Well Item 4070001 4070003 4070005-AS 4070020-DS 4070020-TP 4070230 4070231 4070513 4070602 4071001 4071002 4072001 4072500 4072501 4072505 4072513 4072518 4072519 4072521 4072522 4072523 4072526 49900 7332501 7770102 7771011 7771012 8290206 9001018 ELX50/12 Strip Washer 12 Well rev P As of 11-20-00 Description Rev Qty ACCESSORIES G 1 KIT GENERIC HDW FINAL ASBY J 1 -FINAL ASBY STRIP WSHR 8 WELL N 0 FINAL TEST PROCEDURE ELX50/16 C 0 FINAL TEST PROCEDURE ELX50/16 D 0 SFTWR DOWNLOADED CODE V1.06 C 0 SFTWR DWNLD ASSAY CONFIG V1.04 A 0 MANIFOLD ASBY 12 WELL B 1 TEST STATION UQUANT QC ASSAY B 0 OVRLY FRONT B 1 OVRLY KEYBOARD A 1 COVER TOP D 1 JIG MANIFOLD ALIGNMENT D 0 JIG ASSEMBLY STAND A 0 JIG MAINIFOLD CALIBRATION C 0 JIG OVERLAY ALIGNMENT A 0 TOOL STOPPER 3 HOLE WASTE BTL A 0 TOOL INLET DISTRIBUTION LINE A 0 JIG MICROPLATE STOP ALIGN C 0 JIG CARRIER POSITION CHECK A 0 JIG FOOT ALIGN A 0 JIG AUTOCAL VERIFY B 0 PLUG .437DIA HOLE NYLON BLACK B 4 JIG OVRLY ALIGNMENT A 0 LABEL "FCC COMPLIANCE" A 1 LABEL ETL WITHOUT UL B 1 TAG S/N WITH CE MARK A 1 SFTWR DOWNLOAD UTIL V1.42 H 0 LABEL IN-VITRO DIAG USE A 1 99125 LABEL 1"X1/2" CONTINOUS Elx50 Strip Washer Service Manual C 1 Remarks DOCUMENT ONLY DOCUMENT ONLY DOCUMENT ONLY TOOL ONLY TOOL ONLY TOOL ONLY TOOL ONLY TOOL ONLY TOOL ONLY TOOL ONLY TOOL ONLY TOOL ONLY TOOL ONLY TOOL ONLY TOOL ONLY TOOL ONLY TOOL ONLY TOOL ONLY MARK WITH MODEL NUMBER 7-11 ELX50/12G Strip Washer 12 Well (Generic) Item 4070002 4070003 4070005-AS 4070020-DS 4070020-TP 4070230 4070232 4070513 4070602 4071003 4072040 4072500 4072501 4072505 4072513 4072518 4072519 4072521 4072522 4072523 4072526 49900 7332501 7770102 7771011 7771012 8290206 9001018 99125 7-12 ELX50/12G Strip Washer 12 Well (Generic) rev P As of 11-20-00 Description Rev Qty Remarks ACCESSORIES GENERIC UNIT G 1 KIT GENERIC HDW FINAL ASBY J 1 -FINAL ASBY STRIP WSHR 8 WELL N 0 DOCUMENT ONLY FINAL TEST PROCEDURE ELX50/16 C 0 DOCUMENT ONLY FINAL TEST PROCEDURE ELX50/16 D 0 DOCUMENT ONLY SFTWR DOWNLOADED CODE V1.06 C 0 TOOL ONLY SFTWR GENERIC ASSAY V1.04 A 0 TOOL ONLY MANIFOLD ASBY 12 WELL B 1 TEST STATION UQUANT QC ASSAY B 0 TOOL ONLY OVRLY KEYBOARD GENERIC B 1 COVER TOP GENERIC D 1 JIG MANIFOLD ALIGNMENT D 0 TOOL ONLY JIG ASSEMBLY STAND A 0 TOOL ONLY JIG MAINIFOLD CALIBRATION C 0 TOOL ONLY JIG OVERLAY ALIGNMENT A 0 TOOL ONLY TOOL STOPPER 3 HOLE WASTE BTL A 0 TOOL ONLY TOOL INLET DISTRIBUTION LINE A 0 TOOL ONLY JIG MICROPLATE STOP ALIGN C 0 TOOL ONLY JIG CARRIER POSITION CHECK A 0 TOOL ONLY JIG FOOT ALIGN A 0 TOOL ONLY JIG AUTOCAL VERIFY B 0 TOOL ONLY PLUG .437DIA HOLE NYLON BLACK B 4 JIG OVRLY ALIGNMENT A 0 TOOL ONLY LABEL "FCC COMPLIANCE" A 1 LABEL ETL WITHOUT UL B 1 TAG S/N WITH CE MARK A 1 SFTWR DOWNLOAD UTIL V1.42 H 0 TOOL ONLY LABEL IN-VITRO DIAG USE A 1 MARK WITH MODEL LABEL 1"X1/2" CONTINOUS C 1 NUMBER Bills of Material ELX50/12V Strip Washer 12 Well w/Valves Item 4070001 4070003 4070005-AS 4070020-DS 4070020-TP 4070230 4070231 4070513 4070515 4070522 4070602 4071001 4071002 4072001 4072500 4072501 4072505 4072513 4072518 4072519 4072521 4072522 4072523 4072526 7332501 7770102 7771011 7771012 8290206 9001018 99125 ELX50/12V Strip Washer 12 Well w/Valves rev R As of 11-20-00 Description Rev Qty Remarks ACCESSORIES G 1 KIT GENERIC HDW FINAL ASBY J 1 -FINAL ASBY STRIP WSHR 8 WELL N 0 DOCUMENT ONLY FINAL TEST PROCEDURE ELX50/16 C 0 DOCUMENT ONLY FINAL TEST PROCEDURE ELX50/16 D 0 DOCUMENT ONLY SFTWR DOWNLOADED CODE V1.06 C 0 TOOL ONLY SFTWR DWNLD ASSAY CONFIG V1.04 A 0 TOOL ONLY MANIFOLD ASBY 12 WELL B 1 BOTTLE SUPPLY ASBY B 1 KIT,SUPPLY TUBE VLVE OPT ABY C 1 TEST STATION UQUANT QC ASSAY B 0 TOOL ONLY OVRLY FRONT B 1 OVRLY KEYBOARD A 1 COVER TOP D 1 JIG MANIFOLD ALIGNMENT D 0 TOOL ONLY JIG ASSEMBLY STAND A 0 TOOL ONLY JIG MAINIFOLD CALIBRATION C 0 TOOL ONLY JIG OVERLAY ALIGNMENT A 0 TOOL ONLY TOOL STOPPER 3 HOLE WASTE BTL A 0 TOOL ONLY TOOL INLET DISTRIBUTION LINE A 0 TOOL ONLY JIG MICROPLATE STOP ALIGN C 0 TOOL ONLY JIG CARRIER POSITION CHECK A 0 TOOL ONLY JIG FOOT ALIGN A 0 TOOL ONLY JIG AUTOCAL VERIFY B 0 TOOL ONLY JIG OVRLY ALIGNMENT A 0 TOOL ONLY LABEL "FCC COMPLIANCE" A 1 LABEL ETL WITHOUT UL B 1 TAG S/N WITH CE MARK A 1 SFTWR DOWNLOAD UTIL V1.42 H 0 TOOL ONLY LABEL IN-VITRO DIAG USE A 1 MARK WITH MODEL LABEL 1"X1/2" CONTINOUS C 1 NUMBER Elx50 Strip Washer Service Manual 7-13 ELX50/12GV Strip Washer 12 Well (Generic) w/Valves ELX50/12GV Strip Washer 12 Well (Generic) w/Valves rev R As of 11-20-00 Item Description Rev Qty Remarks 4070002 ACCESSORIES GENERIC UNIT G 1 4070003 KIT GENERIC HDW FINAL ASBY J 1 4070005-AS -FINAL ASBY STRIP WSHR 8 WELL N 0 DOCUMENT ONLY 4070020-DS FINAL TEST PROCEDURE ELX50/16 C 0 DOCUMENT ONLY 4070020-TP FINAL TEST PROCEDURE ELX50/16 D 0 DOCUMENT ONLY 4070230 SFTWR DOWNLOADED CODE V1.06 C 0 TOOL ONLY 4070232 SFTWR GENERIC ASSAY V1.04 A 0 TOOL ONLY 4070513 MANIFOLD ASBY 12 WELL B 1 4070515 BOTTLE SUPPLY ASBY B 1 4070522 KIT,SUPPLY TUBE VLVE OPT ABY C 1 4070602 TEST STATION UQUANT QC ASSAY B 0 TOOL ONLY 4071003 OVRLY KEYBOARD GENERIC B 1 4072040 COVER TOP GENERIC D 1 4072500 JIG MANIFOLD ALIGNMENT D 0 TOOL ONLY 4072501 JIG ASSEMBLY STAND A 0 TOOL ONLY 4072505 JIG MAINIFOLD CALIBRATION C 0 TOOL ONLY 4072513 JIG OVERLAY ALIGNMENT A 0 TOOL ONLY 4072518 TOOL STOPPER 3 HOLE WASTE BTL A 0 TOOL ONLY 4072519 TOOL INLET DISTRIBUTION LINE A 0 TOOL ONLY 4072521 JIG MICROPLATE STOP ALIGN C 0 TOOL ONLY 4072522 JIG CARRIER POSITION CHECK A 0 TOOL ONLY 4072523 JIG FOOT ALIGN A 0 TOOL ONLY 4072526 JIG AUTOCAL VERIFY B 0 TOOL ONLY 7332501 JIG OVRLY ALIGNMENT A 0 TOOL ONLY 7770102 LABEL "FCC COMPLIANCE" A 1 7771011 LABEL ETL WITHOUT UL B 1 7771012 TAG S/N WITH CE MARK A 1 8290206 SFTWR DOWNLOAD UTIL V1.42 H 0 TOOL ONLY 9001018 LABEL IN-VITRO DIAG USE A 1 MARK WITH MODEL 99125 LABEL 1"X1/2" CONTINOUS C 1 NUMBER 7-14 Bills of Material ELX50/16 Strip Washer 16 Well Item 16077 4070003 4070005-AS 4070018 4070020-DS 4070020-TP 4070230 4070231 4070527 4070602 4071001 4071002 4072001 4072073 4072077 4072079 4072500 4072501 4072505 4072513 4072518 4072519 4072521 4072522 4072523 4072526 49900 7101028 7332501 7770102 7771011 7771012 8290206 9001018 98011 98083 ELX50/16 Strip Washer 16 Well rev G As of 11-20-00 Description Rev Qty WSHR FLT .174X.375X.030+/-.003 A 1 KIT GENERIC HDW FINAL ASBY J 1 -FINAL ASBY STRIP WSHR 8 WELL N 0 ACCESSORIES 384 UNIT B 1 FINAL TEST PROCEDURE ELX50/16 C 0 FINAL TEST PROCEDURE ELX50/16 D 0 SFTWR DOWNLOADED CODE V1.06 C 0 SFTWR DWNLD ASSAY CONFIG V1.04 A 0 MANIFOLD 16 WELL ASBY B 1 TEST STATION UQUANT QC ASSAY B 0 OVRLY FRONT B 1 OVRLY KEYBOARD A 1 COVER TOP D 1 PLATE MANIFOLD GLIDE C 1 STRIP GLIDE A 1 SPACER GLIDE STRIP B 1 JIG MANIFOLD ALIGNMENT D 0 JIG ASSEMBLY STAND A 0 JIG MAINIFOLD CALIBRATION C 0 JIG OVERLAY ALIGNMENT A 0 TOOL STOPPER 3 HOLE WASTE BTL A 0 TOOL INLET DISTRIBUTION LINE A 0 JIG MICROPLATE STOP ALIGN C 0 JIG CARRIER POSITION CHECK A 0 JIG FOOT ALIGN A 0 JIG AUTOCAL VERIFY B 0 PLUG .437DIA HOLE NYLON BLACK B 4 LABEL PATENT A 1 JIG OVRLY ALIGNMENT A 0 LABEL "FCC COMPLIANCE" A 1 LABEL ETL WITHOUT UL B 1 TAG S/N WITH CE MARK A 1 SFTWR DOWNLOAD UTIL V1.42 H 0 LABEL IN-VITRO DIAG USE A 1 BAG ZIP-LOCK SMALL A 0 BAG,9X12 PLASTIC 2MIL A 0 99125 LABEL 1"X1/2" CONTINOUS Elx50 Strip Washer Service Manual C 1 Remarks DOCUMENT ONLY DOCUMENT ONLY DOCUMENT ONLY TOOL ONLY TOOL ONLY TOOL ONLY TOOL ONLY TOOL ONLY TOOL ONLY TOOL ONLY TOOL ONLY TOOL ONLY TOOL ONLY TOOL ONLY TOOL ONLY TOOL ONLY TOOL ONLY TOOL ONLY MARK WITH MODEL NUMBER 7-15 ELX50/16G Strip Washer 16 Well (Generic) Item 16077 4070003 4070005-AS 4070019 4070020-DS 4070020-TP 4070230 4070232 4070527 4070602 4071003 4072040 4072073 4072077 4072079 4072500 4072501 4072505 4072513 4072518 4072519 4072521 4072522 4072523 4072526 49900 7101028 7332501 7770102 7771011 7771012 8290206 9001018 98011 98083 99125 7-16 ELX50/16G Strip Washer 16 Well (Generic) rev G As of 11-20-00 Description Rev Qty Remarks WSHR FLT .174X.375X.030+/-.003 A 1 KIT GENERIC HDW FINAL ASBY J 1 -FINAL ASBY STRIP WSHR 8 WELL N 0 DOCUMENT ONLY ACCESSORIES GENERIC 384 UNIT B 1 FINAL TEST PROCEDURE ELX50/16 C 0 DOCUMENT ONLY FINAL TEST PROCEDURE ELX50/16 D 0 DOCUMENT ONLY SFTWR DOWNLOADED CODE V1.06 C 0 TOOL ONLY SFTWR GENERIC ASSAY V1.04 A 0 TOOL ONLY MANIFOLD 16 WELL ASBY B 1 TEST STATION UQUANT QC ASSAY B 0 TOOL ONLY OVRLY KEYBOARD GENERIC B 1 COVER TOP GENERIC D 1 PLATE MANIFOLD GLIDE C 1 STRIP GLIDE A 1 SPACER GLIDE STRIP B 1 JIG MANIFOLD ALIGNMENT D 0 TOOL ONLY JIG ASSEMBLY STAND A 0 TOOL ONLY JIG MAINIFOLD CALIBRATION C 0 TOOL ONLY JIG OVERLAY ALIGNMENT A 0 TOOL ONLY TOOL STOPPER 3 HOLE WASTE BTL A 0 TOOL ONLY TOOL INLET DISTRIBUTION LINE A 0 TOOL ONLY JIG MICROPLATE STOP ALIGN C 0 TOOL ONLY JIG CARRIER POSITION CHECK A 0 TOOOL ONLY JIG FOOT ALIGN A 0 TOOL ONLY JIG AUTOCAL VERIFY B 0 TOOL ONLY PLUG .437DIA HOLE NYLON BLACK B 4 LABEL PATENT A 1 JIG OVRLY ALIGNMENT A 0 TOOL ONLY LABEL "FCC COMPLIANCE" A 1 LABEL ETL WITHOUT UL B 1 TAG S/N WITH CE MARK A 1 SFTWR DOWNLOAD UTIL V1.42 H 0 TOOL ONLY LABEL IN-VITRO DIAG USE A 1 BAG ZIP-LOCK SMALL A 0 BAG,9X12 PLASTIC 2MIL A 0 MARK WITH MODEL LABEL 1"X1/2" CONTINOUS C 1 NUMBER Bills of Material ELX50/16V Strip Washer 16 Well w/Valves Item 16077 4070003 4070005-AS 4070018 4070020-DS 4070020-TP 4070230 4070231 4070515 4070522 4070527 4070602 4071001 4071002 4072001 4072073 4072077 4072079 4072500 4072501 4072505 4072513 4072518 4072519 4072521 4072522 4072523 4072526 7101028 7332501 7770102 7771011 7771012 8290206 9001018 98011 98083 99125 ELX50/16V Strip Washer 16 Well w/Valves rev G As of 11-20-00 Description Rev Qty Remarks WSHR FLT .174X.375X.030+/-.003 A 1 KIT GENERIC HDW FINAL ASBY J 1 -FINAL ASBY STRIP WSHR 8 WELL N 0 DOCUMENT ONLY ACCESSORIES 384 UNIT B 1 FINAL TEST PROCEDURE ELX50/16 C 0 DOCUMENT ONLY FINAL TEST PROCEDURE ELX50/16 D 0 DOCUMENT ONLY SFTWR DOWNLOADED CODE V1.06 C 0 TOOL ONLY SFTWR DWNLD ASSAY CONFIG V1.04 A 0 TOOL ONLY BOTTLE SUPPLY ASBY B 1 KIT,SUPPLY TUBE VLVE OPT ABY C 1 MANIFOLD 16 WELL ASBY B 1 TEST STATION UQUANT QC ASSAY B 0 TOOL ONLY OVRLY FRONT B 1 OVRLY KEYBOARD A 1 COVER TOP D 1 PLATE MANIFOLD GLIDE C 1 STRIP GLIDE A 1 SPACER GLIDE STRIP B 1 JIG MANIFOLD ALIGNMENT D 0 TOOL ONLY JIG ASSEMBLY STAND A 0 TOOL ONLY JIG MAINIFOLD CALIBRATION C 0 TOOL ONLY JIG OVERLAY ALIGNMENT A 0 TOOL ONLY TOOL STOPPER 3 HOLE WASTE BTL A 0 TOOL ONLY TOOL INLET DISTRIBUTION LINE A 0 TOOL ONLY JIG MICROPLATE STOP ALIGN C 0 TOOL ONLY JIG CARRIER POSITION CHECK A 0 TOOL ONLY JIG FOOT ALIGN A 0 TOOL ONLY JIG AUTOCAL VERIFY B 0 TOOL ONLY LABEL PATENT A 1 JIG OVRLY ALIGNMENT A 0 TOOL ONLY LABEL "FCC COMPLIANCE" A 1 LABEL ETL WITHOUT UL B 1 TAG S/N WITH CE MARK A 1 SFTWR DOWNLOAD UTIL V1.42 H 0 TOOL ONLY LABEL IN-VITRO DIAG USE A 1 BAG ZIP-LOCK SMALL A 0 BAG,9X12 PLASTIC 2MIL A 0 MARK WITH MODEL LABEL 1"X1/2" CONTINOUS C 1 NUMBER Elx50 Strip Washer Service Manual 7-17 ELX50/16GV Strip Washer 16 Well (Generic) w/Valves ELX50/16GV Strip Washer 16 Well (Generic) w/Valves rev G As of 11-20-00 Item Description Rev Qty Remarks 16077 WSHR FLT .174X.375X.030+/-.003 A 1 4070003 KIT GENERIC HDW FINAL ASBY J 1 4070005-AS -FINAL ASBY STRIP WSHR 8 WELL N 0 DOCUMENT ONLY 4070019 ACCESSORIES GENERIC 384 UNIT B 1 4070020-DS FINAL TEST PROCEDURE ELX50/16 C 0 DOCUMENT ONLY 4070020-TP FINAL TEST PROCEDURE ELX50/16 D 0 DOCUMENT ONLY 4070230 SFTWR DOWNLOADED CODE V1.06 C 0 TOOL ONLY 4070232 SFTWR GENERIC ASSAY V1.04 A 0 TOOL ONLY 4070515 BOTTLE SUPPLY ASBY B 1 4070522 KIT,SUPPLY TUBE VLVE OPT ABY C 1 4070527 MANIFOLD 16 WELL ASBY B 1 4070602 TEST STATION UQUANT QC ASSAY B 0 TOOL ONLY 4071003 OVRLY KEYBOARD GENERIC B 1 4072040 COVER TOP GENERIC D 1 4072073 PLATE MANIFOLD GLIDE C 1 4072077 STRIP GLIDE A 1 4072079 SPACER GLIDE STRIP B 1 4072500 JIG MANIFOLD ALIGNMENT D 0 TOOL ONLY 4072501 JIG ASSEMBLY STAND A 0 TOOL ONLY 4072505 JIG MAINIFOLD CALIBRATION C 0 TOOL ONLY 4072513 JIG OVERLAY ALIGNMENT A 0 TOOL ONLY 4072518 TOOL STOPPER 3 HOLE WASTE BTL A 0 TOOL ONLY 4072519 TOOL INLET DISTRIBUTION LINE A 0 TOOL ONLY 4072521 JIG MICROPLATE STOP ALIGN C 0 TOOL ONLY 4072522 JIG CARRIER POSITION CHECK A 0 TOOL ONLY 4072523 JIG FOOT ALIGN A 0 TOOL ONLY 4072526 JIG AUTOCAL VERIFY B 0 TOOL ONLY 7101028 LABEL PATENT A 1 7332501 JIG OVRLY ALIGNMENT A 0 TOOL ONLY 7770102 LABEL "FCC COMPLIANCE" A 1 7771011 LABEL ETL WITHOUT UL B 1 7771012 TAG S/N WITH CE MARK A 1 8290206 SFTWR DOWNLOAD UTIL V1.42 H 0 TOOL ONLY 9001018 LABEL IN-VITRO DIAG USE A 1 98011 BAG ZIP-LOCK SMALL A 1 MARK WITH MODEL 99125 LABEL 1"X1/2" CONTINOUS C 1 NUMBER 7-18 Bills of Material 4070001 Accessories Set, Bottles and Tubes Item 12174 4070510 4070511 4070515 4070517 4071000 4071006 4071007 4071015 4072042 4072043 4073001 44299 48140 48146 49744 49745 61062 91083 94075 98079 98083 98085 4070001 Accessories Set, Bottles and Tubes rev G As of 11-20-00 Description Rev Qty Remarks USED ON FINAL SCR KNURLED HD 4-40 X 5/8 SS A 2 FOR HOLDING MANIFOLD TUBING SET SUPPLY SYSTEM ASBY D 1 TUBING SET WASTE SYSTEM ASBY A 1 BOTTLE SUPPLY ASBY B 2 AEROSOL COVER ASBY B 1 MANUAL OPERATORS ELX50 E 1 IN 2ND BOX DECLARATION OF CONFORMITY B 1 IN MANUAL PERFORMANCE VERIFICATION RPT A 1 INSTRUCTIONS CUSTOMER PACKING B 1 STYLUS, TUBE ASPIRATE C 1 IN TUBE 1 STYLUS, TUBE DISPENSE C 1 IN TUBE 1 SHIPPING CNTNR ASBY W/BOTTLES C 0 LABEL "NO SHARP OBJECTS" A 1 BOTTLE 2L H.D. HDPE NALGENE C 1 FILTER,HYDROPHOPIC VACUUM LINE B 1 SHELL 3/16 DIA X 4 5/8 OL A 1 TUBE 1 PLUG 3/16 DIA CLEAR A 1 IN TUBE 1 PWR SUPPLY 24VDC DESKTOP F 1 BUBBLE BAG 8X11.5 A 0 INSTALLED BY SHIPPING DOCUMENT KIT F 1 SHIPPING BAG POLY 12 X 18 B 0 FOR MANIFOLD BAG,9X12 PLASTIC 2MIL A 0 AND CARRIER BAG POLY 26X32 2 MIL A 0 FOR UNIT Elx50 Strip Washer Service Manual 7-19 4070002 Accessories Set, Generic Unit Item 12174 4070510 4070511 4070515 4070520 4071000 4071006 4071007 4071015 4072042 4072043 4073001 44299 48140 48146 49744 49745 61062 91083 94075 98079 98083 98085 7-20 4070002 Accessories Set, Generic Unit rev G As of 11-20-00 Description Rev Qty Remarks USED ON FINAL SCR KNURLED HD 4-40 X 5/8 SS A 2 FOR HOLDING MANIFOLD TUBING SET SUPPLY SYSTEM ASBY D 1 TUBING SET WASTE SYSTEM ASBY A 1 BOTTLE SUPPLY ASBY B 2 AEROSOL COVER ASBY GENERIC B 1 MANUAL OPERATORS ELX50 E 1 IN SECOND BOX DECLARATION OF CONFORMITY B 1 IN MANUAL PERFORMANCE VERIFICATION RPT A 1 INSTRUCTIONS CUSTOMER PACKING B 1 STYLUS, TUBE ASPIRATE C 1 IN TUBE 1 STYLUS, TUBE DISPENSE C 1 IN TUBE 1 SHIPPING CNTNR ASBY W/BOTTLES C 0 LABEL "NO SHARP OBJECTS" A 1 BOTTLE 2L H.D. HDPE NALGENE C 1 FILTER,HYDROPHOPIC VACUUM LINE B 1 SHELL 3/16 DIA X 4 5/8 OL A 1 TUBE 1 PLUG 3/16 DIA CLEAR A 1 IN TUBE 1 PWR SUPPLY 24VDC DESKTOP F 1 BUBBLE BAG 8X11.5 A 0 INSTALLED BY SHIPPING DOCUMENT KIT F 1 SHIPPING BAG POLY 12 X 18 B 0 FOR MANIFOLD BAG,9X12 PLASTIC 2MIL A 0 AND CARRIER BAG POLY 26X32 2 MIL A 0 FOR UNIT Bills of Material 4070018 Accessories Set, 384 Unit Item 12174 2872304 4070510 4070511 4070515 4070517 4071000 4071006 4071007 4071015 4072042 4073001 44299 48140 48146 49744 49745 61062 91083 94075 98079 98083 98085 4070018 Accessories Set, 384 Unit rev B As of 11-20-00 Description Rev Qty Remarks USED ON FINAL SCR KNURLED HD 4-40 X 5/8 SS A 3 FOR HOLDING MANIFOLD PLUNGER DISP TUBE MANIFOLD XL D 1 TUBING SET SUPPLY SYSTEM ASBY D 1 TUBING SET WASTE SYSTEM ASBY A 1 BOTTLE SUPPLY ASBY B 2 AEROSOL COVER ASBY B 1 MANUAL OPERATORS ELX50 E 1 IN 2ND BOX DECLARATION OF CONFORMITY B 1 IN MANUAL PERFORMANCE VERIFICATION RPT A 1 INSTRUCTIONS CUSTOMER PACKING B 1 STYLUS, TUBE ASPIRATE C 1 IN TUBE 1 SHIPPING CNTNR ASBY W/BOTTLES C 0 LABEL "NO SHARP OBJECTS" A 1 BOTTLE 2L H.D. HDPE NALGENE C 1 FILTER,HYDROPHOPIC VACUUM LINE B 1 SHELL 3/16 DIA X 4 5/8 OL A 1 TUBE 1 PLUG 3/16 DIA CLEAR A 1 IN TUBE 1 PWR SUPPLY 24VDC DESKTOP F 1 BUBBLE BAG 8X11.5 A 0 INSTALLED BY SHIPPING DOCUMENT KIT F 1 SHIPPING BAG POLY 12 X 18 B 0 FOR MANIFOLD BAG,9X12 PLASTIC 2MIL A 0 AND CARRIER BAG POLY 26X32 2 MIL A 0 FOR UNIT Elx50 Strip Washer Service Manual 7-21 4070019 Accessories Set, 384 Generic Unit Item 12174 2872304 4070510 4070511 4070515 4070520 4071000 4071006 4071007 4071015 4072042 4073001 44299 48140 48146 49744 49745 61062 91083 94075 98079 98083 98085 7-22 4070019 Accessories Set, 384 Generic Unit rev B As of 11-20-00 Description Rev Qty Remarks USED ON FINAL SCR KNURLED HD 4-40 X 5/8 SS A 3 FOR HOLDING MANIFOLD PLUNGER DISP TUBE MANIFOLD XL D 1 TUBING SET SUPPLY SYSTEM ASBY D 1 TUBING SET WASTE SYSTEM ASBY A 1 BOTTLE SUPPLY ASBY B 2 AEROSOL COVER ASBY GENERIC B 1 MANUAL OPERATORS ELX50 E 1 IN SECOND BOX DECLARATION OF CONFORMITY B 1 IN MANUAL PERFORMANCE VERIFICATION RPT A 1 INSTRUCTIONS CUSTOMER PACKING B 1 STYLUS, TUBE ASPIRATE C 1 IN TUBE 1 SHIPPING CNTNR ASBY W/BOTTLES C 0 LABEL "NO SHARP OBJECTS" A 1 BOTTLE 2L H.D. HDPE NALGENE C 1 FILTER,HYDROPHOPIC VACUUM LINE B 1 SHELL 3/16 DIA X 4 5/8 OL A 1 TUBE 1 PLUG 3/16 DIA CLEAR A 1 IN TUBE 1 PWR SUPPLY 24VDC DESKTOP F 1 BUBBLE BAG 8X11.5 A 0 INSTALLED BY SHIPPING DOCUMENT KIT F 1 SHIPPING BAG POLY 12 X 18 B 0 FOR MANIFOLD BAG,9X12 PLASTIC 2MIL A 0 AND CARRIER BAG POLY 26X32 2 MIL A 0 FOR UNIT Bills of Material 4070520 Aerosol Cover Assembly, Generic Item 12107 16003 17055 19396 4070517-AS 4072020 4072039 4072059 48255 67316 98079 98170 4070520 Aerosol Cover Assembly Generic rev B As of 11-20-00 Description Rev Qty Remarks SCR PAN 6-32X1/2 PHILLIPS SS A 3 LKWSHR #6 HELICAL SPR SS A 3 WSHR FL .156IDX.375ODX.049 SS B 3 SCR 10-32X.375 THUMB NYLON A 2 -AEROSOL COVER ASBY B 0 DOCUMENT ONLY COVER MIST B 1 COVER REAR MIST GENERIC B 1 RETAINER BAR AEROSOL COVER A 1 TAPE LAB 1" WIDE YELLOW A 0 A/R CHANNEL,RUBBER EXTRUSION A 0.08 BAG POLY 12 X 18 B 0 BAG #1 BAG ZIP-LOC 3X4 A 0 BAG #2 Elx50 Strip Washer Service Manual 7-23 7-24 Bills of Material Section 8 Recommended Service Replacement Parts The following are recommended service replacement parts for the ELx50 Strip Washer and its variations. These are the most common parts that might have to be replaced during preventive maintenance or repair. This list is subject to change. Description Bio-Tek Part Number Display LCD 2 X 24 Super twist Belt Timing 260T 1/4W D Overlay/Keyboard Main PCB Assembly Tubing Supply Set Assembly Tubing Waste Set Assembly Bottle Supply Assembly Syringe Pump Assembly Operators Manual ELx50 Strip Washer Cover, Top Shipping Container Assembly Waste Bottle Top Case Mounting Screws Power Supply Valve, Check 3/16” barbs, PP V 2.1# Compressor, Diaphragm 24VDC Idler Pulley Assembly Cable, Opto Sensor 14L Assembly 04018 41049 4071002 4070400 4070510 4070511 4070515 4070516 4071000 4072001 4073000 48140 49748 61062 68061 68062 7120595 7330506 Jigs for Assembly & Calibration Bio-Tek Part Number JIG MANIFOLD ALIGNMENT JIG ASSEMBLY STAND JIG LIFTING CAM ALIGNMENT JIG MANIFOLD CALIBRATION 4072500 4072501 4072503 4072505 Elx50 Strip Washer Service Manual 8-1 Section 9 Procedures This section contains the Final Inspection and Test Procedures and Data Sheet for the ELx50 Strip Washer. These documents are subject to change. PART NUMBER DESCRIPTION 4070005-ST Strip Washer Service Test 4070005-SD Strip Washer Service Data Sheet 4070020-IP Final Inspection Procedure ELx50/16 4070020-TP Final Test Procedure ELx50/16 4070020-DS Final Test Procedure ELx50/16 Data Sheet 8291007-AW Field Software Download Procedure Elx50 Strip Washer Service Manual 9-1 9-2 Procedures CONFIDENTIAL Bio-Tek Instruments, Inc. Model: ELx50/8, ELx50/12 Strip Washers Procedure: 4070005-ST Title: Service Test Procedure Rev Description of changes ECO Date A B C D E Release to Production Changed Step # 10 to #13 and #13 to #10 Add Shake Test & Custom Assay Check Off Added 16 Channel Manifold Testing / Calibrating Correction to step 23 accuracy limits 29941 30327 30711 33883 35485 10/14/97 02/24/98 06/10/98 10/03/00 10/17/01 Equipment Required: * Requires listing on the SF8 document. Equipment ELx50 Operator’s Guide ELx50 Service Manual 24 Volt Power Supply Power Cord Set USA 2 ELx50 Supply Bottles BTI 1 ELx50 Waste Bottles BTI 1 ELx50 Supply Tubing Sets BTI 1 ELx50 Waste Tubing Sets BTI Strip Washer Final Inspection Procedure Costar Flat Bottomed 96 Well Plates BTI *Jig, Manifold Alignment *Jig Microplate Stop Align (with pin removed) *Jig Stand Asby *Jig Autocal Verify *Jig Manifold Calibration *Jig 16 Channel Manifold Asby *Jig Cam Alignment *Jig Carrier Flatness 0.375” +/- .001” high spacer: (3/8” x 3/8” lathe bit) Stylus, Tube Aspirate Stylus, Tube Dispense Strip Washer Final Test Procedure WINWORD PAGE 1 OF 6 Part Number 4071000 4071008 61062 75011 4070515 48140 4070510 4070511 4070005-IP 98102 4072500 7342500 4072501 4072526 4072505 4072524 4072522 4072521 4072042 4072043 4070005-TP 4070005-ST REV E SERVICE TEST PROCEDURE *Precision scale with minimum 0.01 resolution and 120 gram capacity DI H2O with 0.1% Tween 20 solution FD&C #1 Blue Dye ( Warner Jenkinson Part # 05601-1105) 50-200 ul pipette with tips Tool Inlet Distribution Line 4072519 Supply Tube Valve Option Asby 4070522 Null Modem Serial Cable 75053 *Test Station MQX200 QC Assays 4070600 Parallel Cable 71072 Parallel printer emulating Epson mode Field Software Download Procedure 8291007-AW PC (386 min) with 1.44mb 3.5” floppy drive, 1 COM port minimum, mouse and 4 MB RAM Windows 3.1 or Windows ’95 installed on above PC Download Utility 8290206-FW Basecode and assay configuration firmware (see BOM for specific model requirements) Instructions: 1. Decontaminate washer as described in ELx50 Operator’s Guide (4071000). (If the customer complaint has been recreated during this step, Please record this on the Data sheet.) 2. Record The following Information on the ELx50 Data Sheet: ( 4070005-SD) Return Authorization Serial Number Technician Date 3. Note the accessories received with unit and record on the receiving report document 4. Turn the instrument over and remove the Base Pan. Inspect all PCBs and ensure all cables and components are seated and oriented properly. For valve version units, verify all tubing is snug on each fitting. 5. Set a DVM to measure DC Volts. Attach the DVM to the positions noted below and measure the voltages. Record the values on the data sheet. PAGE 2 OF 6 4070005-ST REV E SERVICE TEST PROCEDURE - Connect a DVM positive lead to C8+ and the negative lead to chassis ground. Set - Connect the DVM positive lead to C5+ and the negative lead to chassis ground. 6. Record EPROM Information that is labeled on the EPROMs. Cleaning and Updates: 7. Place the instrument on the Jig Stand ( Refer to the 4070507-AS drawing in the ELx50 Service Manual.). Remove the top shroud. 8. Remove the Syringe Cap and inspect the inner Teflon compression ring for evidence of leaking. Replace cap if leaking is evident. Verify the plunger is clean and has a high gloss appearance. 9. Remove the manifold cover and inspect the rubber gasket for wear and puncture holes caused by the cleaning stylus.( Note: Do not lubricate the gasket) 10. Clean the following: - The Plate Carrier - Check Valves ( If received by the customer) - All the rails. - manifold aspirate and dispense tubes. 11. Perform all mechanical Field Change Notices. 12. Inspect the up/down CAM rubber roller for wear. Replace if cracking. 13. Verify the up/down CAM is not rubbing against the optical sensor as it moves clockwise and counter clockwise. 14. Verify the Belt and pully hardware is tight. Inspection: 15. Replace the top shroud. Remove the instrument from the jig stand and install the bottom base pan. Setup the instrument to perform a wash. 16. Power On the instrument. Allow the instrument to initialize. At main menu select UTIL, TESTS, and CHKSUM. Record the information on the data sheet. 17. Duplicate the customer reported problem if applicable. Note your findings on the data sheet. PAGE 3 OF 6 4070005-ST REV E SERVICE TEST PROCEDURE 18. If required by an Engineering Change Order or requested by the customer, update the instrument to latest version of the Basecode and Assay Configuration using the Field Software Download Procedure 8291007-AW. Record the information on the data sheet. ( Please inform the customer that the programmed wash routines will be erased when the new Assay Configuration files are loaded.) 19. NOTE: For instruments with Basecode part # 4070230 downloaded, Please got to step # 21 Perform verification of the Vertical and Horizontal Alignment as described in Final Inspection Procedure, 4070005-IP. This is found in the ELx50 Service Manual Section 3. (If this step fails, perform the Auto calibration outlined in the Final Test Procedure, 4070005-TP. This test procedure can be found in the ELx50 service manual Section 3.0) 20. Run a shake test per the procedure outlined in the 4070005-TP. 21. NOTE: If the instrument has Basecode Part # 4070202 downloaded, Please go to the Performance Testing section. Perform verification of the Vertical and Horizontal Alignment as described in Final Inspection Procedure, 4070020-IP. This is found in the ELx50 Service Manual Section 3. (If this step fails, perform the Auto calibration outlined in the Final Test Procedure, 4070020-TP. This test procedure can be found in the ELx50 service manual Section 3.0) 22. Run a shake test per the procedure outlined in the 4070020-TP. PAGE 4 OF 6 4070005-ST REV E SERVICE TEST PROCEDURE 23. Performance Testing For Basecode part # 4070202: Perform the Residual, Accuracy tests as described in the Final Test Procedure 4070005-TP. Include copy of test results to the job sheet. For Basecode part # 4070230: Perform the Residual, Accuracy tests as described in the Final Test Procedure 4070020-TP. Include copy of test results to the job sheet. Accuracy Test Limits: 8/12 Channel: • Plate Weight with Fluid: 14.40 mg +/- 3% ( 13.97 - 14.83 ) • Line #3 of Printout is less than 2.5% • Line #4 of Printout is less than or equal to 2.99 16 Channel: • Line # 3 is less than 3% • Line #4 is less than 3% Residual Test Limits: 8/12 Channel: • Passes unless “Residual Test Failure” is displayed in the comments field. 16 Channel: • Average residual less than 1.00mg and must say “PASS” • Maximum residual less than 1.50mg and must say “PASS” Final Quality Check: 24. Rinse washer with de-ionized water 2X or until all dye is gone. 25. Empty washer of fluid by running Prime with no fluid connected. (Do not run for longer than one minute without fluid.). 26. Clean the exterior of unit. Verify all hardware is tight and all tubing is properly seated. 27. Remove the manifold and place into the proper shipping container. PAGE 5 OF 6 4070005-ST REV E SERVICE TEST PROCEDURE 28. Ensure all received accessories accompany the unit. For Bio-Tek Instruments demo units, complete the demo checklist. 29. Attach the data sheet to Job Sheet. PAGE 6 OF 6 Return Authorization # ____________________ Bio-Tek Instruments Inc. MODEL: ELX50/____ PROCEDURE: 4070005-SD TECHNICIAN: TITLE:SERVICE TEST DATA SHEET SERIAL # DATE STARTED: Rev Description of changes A B Release To Production Correction in step 23 Accuracy Limits ECO Date 33883 35485 10/03/00 10/17/01 For Page 1&2 use, "Certificate of Calibration" Form: SF8 NOTE: Technician to complete form and mark "Uncertainty of Measurement" as _4_:_1_ Reference Procedure: 4070005-ST REV____ Other Required Documents: 4070005-TP REV____ 4070020-TP REV____ 4070005-IP REV____ Note: The Following Steps Correspond To The Order Of Steps On The 4070005-ST Document. Step Item Results/Limits ASSEMBLY: 1 Decontaminate Instrument Completed______(v) 3 Record accessories received. Carrier:_______ Bottles:_______ Manifold______ Stylus Kit:_______ Power Cord_______ 4 Inspect the Instrument for loose hardware and proper tubing placement TEST/DOWNLOAD Completed______(v) 5 Power Supply Checks: VCC Across C8+ and Ground +VA C5 (+) to Ground 6 ______________ 27.5 - 23.5 VDC ______________ 5.525 - 4.475 VDC Part #:______________ Version:_______ EPROM information CLEANING AND UPDATES 7 Aspirate Tubing set:_______ Dispense Tubing set_______ Aerosol Cover:______ Power supply:_______ Remove the top shroud Completed ______(v) Page 3 of 5 Rev:_____ 4070005-SD REV B SVCE TEST DATA SHEET 8 Return Authorization # _____________________ Syringe Cap Inspection Completed ______ (v) Comments: 9 Manifold Gasket Inspection Completed ______(v) Comments: 10 11 12 Cleaning of : Completed ______(v) Plate Carrier Check Valves Plate Carrier Rail Manifold Tubes Perform all Field Change Notices (FCNs) and Engineering Changes ( ECOs) Inspect the Up/Down CAM rubber roller for wear Comments: Completed ______(v) Completed ______(v) Comments: 13 Up/Down CAM inspection Completed ______(v) Comments: 14 Belt and Pulley hardware inspection Completed ______(v) Comments: 16 UTIL, TESTS and CHECKSUM Basecode P/N:________________________ VER:________ CHECKSUM:________ Assay Config P/N:________________________ VER:________ 17 Duplicated Customer Complaint Comments: 18 UTIL, TESTS and CHECKSUM ( If new software was loaded.) Basecode P/N:________________________ VER:________ CHECKSUM:________ Assay Config P/N:________________________ VER:________ ______ (⌦) if no download was performed. 19 or 21 Verification of Vertical and Horizontal Alignment. ____PASS _____FAIL Comments: Page 4 of 5 4070005-SD REV B SVCE TEST DATA SHEET Return Authorization # _____________________ 20 or 22 Shake Test ____PASS _____FAIL 23 Performance Testing ____PASS _____FAIL Accuracy Test ( 8/12 Channel) __________ Plate Weight with Fluid (13.97 – 14.83) __________ Line # 3 of Printout. ( < 2.50%) __________ Line #4 of Printout ( <= 2.99) Accuracy Test ( 16 Channel) __________ Line #3 of Printout ( < 3.0%) __________ Line #4 of Printout ( < 3.0%) Residual Test ( 8/12 Channel) ____ PASS _____ FAIL ( Comments field on printout) Residual Test ( 16 Channel ) ________ Average residual ( < 1.00mg and must say “PASS) ________ Maximum Residual ( < 1.50mg : Says “PASS”) Comments: Final Quality Check 24 Rinse the Washer 2 times. Complete ______(v) 25 Empty the fluid from the washer Complete ______(v) 26 Clean Exterior Complete ______(v) 27 Manifold placed in proper shipping container Complete ______(v) 28 Accessories with Unit Complete ______(v) 29 Attach Data sheet to Job Sheet Complete ______(v) I HEREBY CERTIFY THAT I HAVE REVIEWED ALL ACCEPTANCE DATA, THAT THE PRODUCT MEETS SPECIFICATIONS AND IS ACCEPTABLE FOR RELEASE. __________________________ Service Technician. ________________ Date Page 5 of 5 CONFIDENTIAL Bio-Tek Instruments, Inc. Model: Elx50 Strip Washer Procedure: 4070020-IP Title: Final Inspection Procedure ELx50/16 Rev Description of changes ECO Date A Release To Production 32594 07/21/99 Equipment and Materials Jig, Autocal Verify (4072526) 24 volt power supply (61062) Feeler Gauges 0.001”-0.025” Detailed Procedure 1.0 Alignment Setup 1.1 Verify that the carrier has the same serial number as the instrument. It is possible that an instrument will have one carrier for use with 8 and 16 channel manifolds and another for use with 12 channel manifolds. 1.2 Verify that the carrier rests on both adjustable feet and on the rail without rocking. Use the appropriate carrier for the manifold to be tested. 1.3 Install Autocal Verify Jig, #4072526, into the carrier. The jig must be positioned correctly in the carrier. One corner of the jig is labeled 12 CH with an arrow pointing to the corner. Another corner of the jig is labeled 8 or 16 CH with an arrow pointing to the corner. Choose the appropriate corner for the manifold being tested, and align that corner toward the front and against the right edge of the carrier. 1.4 Place the 8, 12, or 16 channel manifold on the manifold bracket. Fasten the manifold in place with thumb screws (4072066). WINWORD PAGE 1 OF 2 4070020-IP REV A FINAL INSPECTION PROCEDURE ELx50/16 1.5 Configure the UUT for an 8, 12, or 16 channel manifold, whichever is appropriate. From the Main Menu use the soft keys and select UTIL, SETUP, MANIFLD, and press the soft key to select an 8, 12, or 16 channel manifold. Press the Main Menu key to return to the Main Menu. 2.0 Vertical and Horizontal Alignment Check 2.1 Use the soft keys and select UTIL, TESTS, and press the shift key and the #1 hidden key simultaneously (the #1 hidden key is located between the clear and enter keys). 2.2 Use the soft keys and press AUTOCAL, VERIFY, and then press the ENTER key. The carrier will slowly move into the UUT and the manifold will lower a position just above the jig. to 2.3 Verify that the manifold aspirate tubes do not touch the jig. Verify that the manifold aspirate tubes are less that .023 inches above the surface of the jig. 2.4 Verify that the difference between the aspirate tube which is closest to the jig surface and that which is furthest from the jig surface is less than .010 inches. 2.5 Press the ENTER key. The manifold will lift and the carrier will move further away from home and the manifold will lower into holes in the jig. 2.6 Verify that the manifold aspirate tubes have moved into the holes without catching the edge of the holes and lifting the manifold. 2.7 Press the ENTER key. The manifold and carrier will return to home. 2.8 Remove the jig from the carrier and press the Main Menu key. 2.9 Mark the data sheet to indicate that the UUT has met all of the above criteria. 2.10 Repeat of sections 8.0 and 8.1 for a second or third manifold as necessary. 2.11 Initial the routing to indicate that the UUT has met all of the above criteria. PAGE 2 OF 2 CONFIDENTIAL Bio-Tek Instruments, Inc. Model: ELx50 Strip Washer Procedure: 4070020-TP Title: Final Test Procedure ELx50 Strip Washer Rev Description of changes ECO Date A B C Release To Production PG 9: Modify The Autocal Verification Chg section 3.0 to Make Generic; Highlight In Para 7.1,8.0,8.1; Order of Accuracy Changed; Add to Residual Test; Chg Para 1 In Clean Up Section; Update Index Add To Para 7.1 Step 5; Remove from Para 9.1 Step 20; Chg Para 9.4 Step 2 32594 32708 33701 07/21/99 08/17/99 06/27/00 33806 08/16/00 D Table of Contents 4070020-TP REV D FINAL TEST PROCEDURE ELx50 STRIP WASHER Equipment and Materials ...................................................................................... 3 1.0 Introduction ..................................................................................................... 4 2.0 Procedure ....................................................................................................... 4 2.1 Connections ................................................................................................ 4 2.2 Power Up..................................................................................................... 5 3.0 Entering Windows ........................................................................................... 5 4.0 Downloading Base Code................................................................................. 6 5.0 Downloading Define Assay Configurations ..................................................... 6 6.0 Software Configuration Verification................................................................. 8 7.0 Autocalibration ................................................................................................ 8 7.1 Setting Up and Running Autocal ................................................................. 8 8.0 STOP: Autocal Verification.............................................................................. 9 8.1 Vertical and Horizontal Alignment Check .................................................. 10 9.0 Fluidics Test.................................................................................................. 10 9.1 Accuracy Test ............................................................................................ 11 9.2 Residual Test ............................................................................................. 14 9.3 Burin Testing.............................................................................................. 18 9.5 Cleanup ..................................................................................................... 19 10.0 Label Application......................................................................................... 20 Appendix A: Bottle and Supplies Maintenance ................................................... 20 Setting Up Fluidics Test .................................................................................. 20 Appendix B: Download Computer Setup............................................................. 20 Appendix C: Error Codes ................................................................................... 21 General Errors................................................................................................. 21 Fatal Errors ..................................................................................................... 23 Appendix D: Clear Assays .................................................................................. 23 Appendix E: Using KCjr Data Reduction Software.............................................. 23 PAGE 2 OF 25 4070020-TP REV D FINAL TEST PROCEDURE ELx50 STRIP WASHER Equipment and Materials (X) Requires listing on the “Lab Product Equipment Calibration Data” form specified on the data sheet. (X) (X) A PC (386 min) with a 1.44 mb 3.5" floppy drive, 2 COM ports , mouse and 4 meg of ram min. Windows 3.1 installed on the above PC A PC (486 min) with a 1.44 mb 3.5" floppy drive, 2 COM ports , mouse and 16 megabytes of ram (recommended) Windows 95, microsoft Excel version 7.0, and KCjr installed on above PC 75053 Serial Cable 71072 Parallel Cable Any parallel printer with paper Firmware (see BOM for what is required for the assembly being tested) Costar flat bottomed 96 well plates BTI (98102) Costar 384 well plates (98174) 2 ELx50 supply bottles BTI (4070515) 1 ELx50 waste bottles BTI (48140) 1 ELx50 supply tubing sets BTI (4070510) 1 ELx50 waste tubing sets BTI (4070511) Precision Scale with a min resolution of 0.01 and capacity of 120 grams. Tween 20 FD&C #1 Blue dye Deionized water Gelman glass filter system for filtering dye 50ml beaker (2) Plastic reservoir 200 ul pipettes w/tips 200-1000 ul pipettes w/tips 50-200 ul 8-channel pipette w/tips Power Supply (61062) Power Cord Jig Manifold Calibration (4072505) Jig Microplate Stop Align (4072521) Jig Autocal Check (4072522) Test Station µQuant (4070602) Jig Autocal Verify (4072526) Jig 16 CH Manifold Asby (4072524) Tool Stopper 3 Hole Waste Btl (4072518) Tool Inlet Distribution Line (4072519) needed for washers with valves only Supply Tube Valve Option Asby (4070522) needed for washers with valves only ELx50/16 - (Set up to Dispense 150 ul, or 50 ul) ELx50/16 - (Set up to Dispense 300 ul, or 100 ul) Thumb screws (4072066) PAGE 3 OF 25 4070020-TP REV D FINAL TEST PROCEDURE ELx50 STRIP WASHER 1.0 Introduction The ELx50 is a EB80C186 based computer which is assembled with no internal software installed other then two BOOT EPROMs. The ELx50 display the following message at initial power up. "Power Up Sequence V*.**” READY FOR DOWNLOAD... NOTE: The first line may vary depending on the version and model number, “*” Represents any number. At this point the ELx50 will do nothing else until it has had Operating Software and Assay Configuration Software downloaded to it. Once operating software is downloaded the unit will need a configuration download, which loads in assay definition parameters. The need for two download operations comes about because we will in the future be manufacturing many different versions of this instrument. Each version will have different assay definition parameters. The Assay Configuration disk part number will be called out on each instrument versions final assembly BOM. The Assay Configuration Software installed on the load PC should be checked for the proper revision level each time the loading PC is used. See set up appendix for instructions. 2.0 Procedure 2.1 Connections Connect the Unit Under Test (UUT) in the following manner with the power switches OFF. FW Disk see BOM PC 75053 Connects COM1 on the PC to the Serial Port on the ELx50 Elx50 Unit Under Test Power Supply 120 VAC PAGE 4 OF 25 4070020-TP REV D FINAL TEST PROCEDURE ELx50 STRIP WASHER 2.2 Power Up Once all of the test equipment is connected turn on the PC. Once the PC has completed its BOOT sequence switch on the ELx50. The ELx50 will display the following in sequence: Power Up Sequence V*.** Initializing......................... then Power Up Sequence V*.** Clearing Download Area then Power Up Sequence V*.** READY FOR DOWNLOAD... Note: The top line of the display may vary with model but the display must say, "Ready for Download" before proceeding. If the instrument has something else on the display turn it off and on again and press the shift and #1 hidden key (between the clear and enter keys) at the same time. This will erase the memory in the instrument. Note: If at any time the Main PCB is replaced, tag the failed PCB with the appropriate version and rev of the firmware, which is loaded, as it is removed from the unit. 3.0 Entering Windows (If Windows program is present on screen, go to para 4.) Enter Windows 3.X, 95, or 98 operating system as needed. Note: The PC in use as a download tool will need its windows environment configured one time. Once properly setup the system should work as described in the following procedure. See set up appendix at the end of this procedure. PAGE 5 OF 25 4070020-TP REV D FINAL TEST PROCEDURE ELx50 STRIP WASHER 4.0 Downloading Base Code Insert the 4070201-FW Operating Software disk into the A: drive of the PC. Use the mouse and double click on the ELx50 Utilities Icon if the ELx50 utilities dialog box is not already open. Double Click on the ELx50 Code Download Icon (Swiss Army knife) in the dialog box. On the reader display "Download In Progress" will appear. The following will appear on the computer screen: (“*” Represents any number) Download Utility 7330201 Version *. ** Downloading elx50.bin to washer... File size: (this number may vary with version & model number) Bytes sent: (this will count up during download) Checksum: (this will appear at completion of download) Download Successful (this will appear at completion of download) The UUT will reset at this point and may display an error (0BFF) because there is no assay configuration loaded yet. This may be variable depending on what has been done to the instrument. Press the "Stop" key to stop the beeping and wait for the main menu to appear (30 sec), then press the shift and #2 hidden key(between Main menu and Previous Screen keys). This may bring up a screen which says "Start Assay Download Y/N". In this case answer "Yes" and the "Ready for Download" screen will appear. In any case the unit needs to display the "Ready for Download" screen before proceeding. 5.0 Downloading Define Assay Configurations NOTE: If unit was previously programmed you must clear the assays. See Appendix D: Clear Assays. The following download loads actual assay definitions into the instrument under test. Insert the Assay Config program disk 4070202, or 4070203 as per the BOM into the A:\ drive. The display on the UUT must say "Ready For Download" before proceeding. If it does not, Press the Main Menu key and then the shift and hidden key #2 simultaneously. Press Yes for download. PAGE 6 OF 25 4070020-TP REV D FINAL TEST PROCEDURE ELx50 STRIP WASHER Use the mouse to double click on the ELX50 Assay Config Download Icon from within the ELX50 Utilities dialog box. The user then will be prompted to select whether the target is an ELx800 Reader or an ELx50 Strip Washer. Insure that the ELx50 Strip Washer is selected. The computer will read in the files from the disk in the A:\ drive. This will take some time. A 50 series Download screen will appear on the computer screen. Use the mouse to select File and then Open. Click on "Bio-Tek ELx50" in the Group list box then click on "OK". This will bring in the assay definitions. If a foreign language configuration is required select it now by clicking on the arrow to the right of the language field, then select the appropriate language. Then click on the box to the left of the phrase “DOWNLOAD LANGUAGE”. Click on the Download button to initiate the download. NOTE: The group list box may not list Bio-Tek ELx50 if the software version is different. There will be only one group listed and its name should be close to the software version name in ISIS. (For exceptions see following note). The UUT display will change to DOWNLOAD IN PROGRESS while the assays are being downloaded. When the download is done the computer will display a download successful message and the UUT will be reset to the normal main menu screen. This may take up to 15min to get to the main menu screen. The UUT will usually ERROR IE00 because the AUTOCAL sequence has not been run. Press the "Stop" key to stop the beeper and return to the main menu. Use the mouse to Click on OK, FILE and then EXIT to return to the windows menu. Perform software configuration verification per Section 6.0 and record on data sheet. To download the custom assay disk 407020** as per BOM. Follow instructions per Section 5.0, using 407020** as per BOM. Perform software configuration verification per Section 6.0 and record on data sheet. PAGE 7 OF 25 4070020-TP REV D FINAL TEST PROCEDURE ELx50 STRIP WASHER If the define assay download is unsuccessful or you want to download new define assay files, you must first erase the existing assay files. See Appendix D. 6.0 Software Configuration Verification With the introduction of Assay definitions downloaded from a PC the need for determining if the assays loaded are the ones, which we really want in the version of the ELx50, we are setting up. If a foreign language was downloaded, the display should now reflect the appropriate language. From the UUT main menu press the Util soft key. Then press the Tests soft key. Then press the Chksum key. A revision level and part number will appear on the display, as will the code checksum. Compare these against 407XXXX SP/MP version and checksum. On the second display, version and part number of assay/config download will be displayed. They should match 407XXXX-SP version number. Refer to BOM for proper –SP/MP. 7.0 Autocalibration The Autocal procedure establishes an accurate manifold and carrier location for each washer. All ELx50 Washers with 16 channel manifolds shall be calibrated in both 8 and 16 channel configurations. All ELx50 Washers with only an 8 or 12 channel manifold shall be calibrated as 8 channel only. 7.1 Setting Up and Running Autocal Note: Install Serial Number Label and mark Serial Number on Carrier. 1. Connect the ELx50 to the 24-volt power supply that will ship with the instrument, and power on the instrument. 2. Plug the connector for the 4072505 jig into the header which is underneath the left side of the washer. The correct header to use is the one closest to the front of the instrument. 3. Install part 1, the stepped plate portion of the jig, into the carrier. The tall steps are nearer the front of the instrument. 4. Install part 2, for (8, 12 ch) the contact pin portion of the jig onto the manifold bracket of the washer being tested and hold in place with 12174 screws. 5. Configure the UUT for an 8 or 12 channel manifold. From the Main Menu use the soft keys and select UTIL, SETUP, MANIFLD, and Press the soft key to select 8 or 12. Press the Main Menu key to return to the Main Menu. PAGE 8 OF 25 4070020-TP REV D FINAL TEST PROCEDURE ELx50 STRIP WASHER Check off on the Data Sheet the Manifold(s) that are being tested. 6. From the Main Menu use the soft keys and select UTIL, TESTS, and then press the shift key and the #1 hidden key simultaneously (the #1 hidden key is located between the clear and enter keys). 7. Use the soft keys press AUTOCAL, MECH, and YES. The carrier will slowly move into the UUT and AUTOCAL will be performed. 8. If the UUT is a 16-channel ELx50, then configure the UUT for a 16-channel manifold (part 3). From the Main Menu use the soft keys and select UTIL, SETUP, MANIFLD, and Press the soft key to select a 16 channel manifold. Press the Main Menu key to return to the Main Menu. 9. On ELX50/16, remove 4072505 part 3 from the manifold bracket of the UUT and install 4072505 part 2. Hold in place with 12174 screws. 10. Repeat steps 6-7 above. 11. Remove the autocal jigs. NOTE: TURN UNIT OFF AFTER AUTOCAL TO ENSURE UNIT HOMES AT NEXT POWER UP, BEFORE FLUIDICS TEST. 8.0 Autocal Verification 1. Verify that the carrier has the same serial number as the instrument. 2. Verify that the carrier rests on both adjustable feet and on the rail without rocking. 3. Install Autocal Verify Jig, #4072526, into the carrier. The jig must be positioned correctly in the carrier. One corner of the jig is labeled 12 CH with an arrow pointing to the corner. Another corner of the jig is labeled 8 or 16 CH with an arrow pointing to the corner. Choose the appropriate corner for the manifold being tested, and align that corner toward the front and against the right edge of the carrier. 4. Place the 8, 12, or 16-channel manifold on the manifold bracket. 5. Configure the UUT for an 8, 12, or 16 channel manifold, whichever is appropriate. From the Main Menu use the soft keys and select UTIL, SETUP, MANIFLD, and press the soft key to select an 8, 12, or 16 channel manifold. Press the Main Menu key to return to the Main Menu. PAGE 9 OF 25 4070020-TP REV D FINAL TEST PROCEDURE ELx50 STRIP WASHER 8.1 Vertical and Horizontal Alignment Check 1. Use the soft keys and select UTIL, TESTS, and press the Shift Key and the #1 hidden key simultaneously (the #1 hidden key is located between the clear and enter keys). 2. Use the soft keys and press AUTOCAL, VERIFY, and then press the ENTER key. The carrier will slowly move into the UUT and the manifold will lower to a position just above the jig. 3. Verify that the manifold aspirate tubes do not touch the jig. Verify that the manifold aspirate tubes are less than .023 inches above the surface of the jig. 4. Verify that the difference between the aspirate tube, which is closest to the jig surface, and that which is furthest from the jig surface is less than .010 Inches. Furthest-Closest<.010” 5. Press the ENTER key. The manifold will lift and the carrier will move further away from home and the manifold will lower into holes in the jig. 6. Verify that the manifold aspirate tubes have moved into the holes without catching the edge of the holes and lifting the manifold. 7. Press the ENTER key. The manifold and carrier will return to home. 8. Remove the jig from the carrier and press the Main Menu key two times. 9. Mark the data sheet to indicate that the UUT has met all of the above criteria. 10. Repeat of sections 8.0 and 8.1 for a second or third manifold as necessary. Refer to 4070005-IP, Mechanical Alignment Check, if UUT fails Autocal Verify. 9.0 Fluidics Test (See Page #20 For Solutions Mixtures) Connect the Printer to the Parallel port of the Test Station. Apply Power to the Test Station and the Printer. 9.1 Accuracy Test PAGE 10 OF 25 4070020-TP REV D FINAL TEST PROCEDURE ELx50 STRIP WASHER NOTE: When testing 8 channel and 16 channel manifolds the first 6 columns of the plate are used. When testing 12 channel manifolds the first 4 rows of the plate are used. SETUP: 1. Set up the washer for the manifold to be tested. From the Main Menu screen use the soft keys and press UTIL, SETUP, MANFLD, and select the 8, 12, or 16-channel manifold. 2. Install the appropriate manifold on the UUT. 3. Place the stopper of a 4070511, Tubing Set Waste System Assembly, firmly into the top of an empty waste bottle. 4. Connect the two manifold outlet ports of the UUT to the waste line of this stopper. 5. Connect the vacuum supply line from the stopper to the vacuum port on the rear of the UUT. 6. Connect a buffer bottle containing 300 ul Solution to the washer inlet of the UUT using the long tube of a 4070510, Tubing Set Supply System Asby. The washer inlet is the lower syringe port at the back of the instrument. Make sure that there is a check valve in place, and that the flow arrow is pointing in direction of the inlet port. (For instruments with valves, connect the supply line from the lower syringe port to the outlet port on the back of the washer, after shortening the line to 5 inches long. Use a 4072519, Tool Inlet Distribution Line, to connect valve ‘A’ to the buffer bottle of 300 ul Solution.) 7. Connect the manifold supply line to the manifold inlet and the syringe outlet port. The manifold inlet port is the single port closest to the edge of the manifold. The syringe outlet is the top syringe port at the back of the instrument. Make sure that the check valve is in place, and that the flow arrow is pointing toward the manifold. 8. When testing 16 channel manifolds, it will be necessary to run the reader test station from a remote computer. This PC will have Windows 9X operating system, Excel, and KC jr software loaded. Connect the serial port of the computer to the serial port of the uQuant. Power on the computer and open the KCjr program. Open the EXCEL spreadsheet program and the files ACCURACY.XLT and RESIDUAL.XLT. 9. From the Main Menu select: RUN, PRIME, and press the OPTION key, if necessary, until NEW_BUFFER_PRIME is displayed. Then press the ENTER key to select this program. If priming empty supply lines, then repeat the PAGE 11 OF 25 4070020-TP REV D FINAL TEST PROCEDURE ELx50 STRIP WASHER priming steps twice. (For washers with valves press the ENTER key again to select valve ‘A’.) Press the ENTER key or the START key to run NEW_BUFFER_PRIME. (For washers with valves, repeat for valves B and C.) This will prime the washer with the 300 ul Solution. When the program is complete, press the MAIN MENU key. TESTING: 10. Place a Costar flat-bottomed plate on the balance and tare the balance. Use a 96 well plate for testing 8 and 12 channel manifolds and a 384 well plate for testing 16 channel manifolds. 11. Load the plate onto the carrier of the UUT making sure that the orientation of the plate in the carrier matches that of the manifold in the washer. 12. From the Main Menu select RUN, DISP, and press the OPTION key until accuracy_qc_test is displayed for 8 or 12 channel manifolds or the acc_qc_test384 is displayed for 16 channel manifolds. Then press the ENTER key to select this program. (If this is a ELX50 model with valves, then use the soft keys to select valve A.) 13. Use the number keys to Enter the number of Strips to process (6 or 4). Press the ENTER key again to save the selection. 14. Press the ENTER key a final time to start the program. The washer will dispense 300 ul or 100 ul to the wells depending on which manifold is in place. When the program is complete, press the MAIN MENU key. 15. Immediately remove the plate from the carrier and Weigh it. Record the Weight. 16. Place the plate in the carrier of the µQuant reader test station with the strips containing the fluid to left side of the carrier or to the back of the carrier depending on which manifold is being tested. NOTE: Follow steps 17-20 for 8 and 12 channel washers. Go to step 21 for 16 channel washers. 17. Use the soft keys to select READ, and then press the OPTION key until the 1x8 ACCURACY or the 1x12 ACCURACY test is displayed. Press the ENTER key to select this program. 18. Enter the Serial Number of the instrument being tested for the PLATE ID and press the ENTER key. 19. Enter the Weight including the decimal point and press the ENTER key. PAGE 12 OF 25 4070020-TP REV D FINAL TEST PROCEDURE ELx50 STRIP WASHER Press the ENTER key to start the read. 20. Remove the printouts from the printer and observe the results. For 8 and 12 channel manifolds, under QC_Results, Accuracy_pct_err, the third item on the list, must be less than +2.5%. CV_Percent, the fourth item on the list must be less than +2.99. NOTE: Follow steps 12-22 are for 16 channel washers. Use PC with Microsoft Windows 9X operating system and Microsoft Excel. 21. Setup: Click on the “Excel" icon to open and “File.” Open the “test 384 16 channel accuracy.xlt. Click on password “READ ONLY” Minimize excel by clicking on the “-“ on the upper right corner. Open KcJr by clicking on the KcJr icon and Select “OK”. Open the “protocol” and select “384_630450” if not selected at the open protocol dialog. Click on “ Open”. Now you are ready to read the plate. NOTE: Use the mouse to switch back to the KC jr program. In the KC jr program select the 384_630450 protocol (if not already selected). 22. NOTE: When you read the plate ensure the µQuant (Test Station 4070602) is at the main menu. Click “Read Plate” and “Read Plate at dialog”. Now click on “OK”. The µQuant will read the plate and the absorbence data will be displayed. This will take about 8 minutes to complete. When the plate has finished and the data is showing, click on the “Transformation” Tab (these results are the solutions with the scratches from the plate removed). 23. Highlight A1-P6 (hold & drag mouse) of the data displayed in KC jr. Press the CTL Key and simultaneously press the C key. This is a copy command. 24. Minimize KCjr by clicking on the” – “ on the upper righter hand corner of the window. 25. Open excel by clicking on the excel tap on the taskbar( this should have been minimized in step #12) ensuring the “test 384 16 channel accuracy.xlt” is open. 26. The cursor must be at Excel cell C3 (A1 well of the UUT). Press the CTRL PAGE 13 OF 25 4070020-TP REV D FINAL TEST PROCEDURE ELx50 STRIP WASHER Key and simultaneously press the V key. This is a paste command. The data from the reader file will be copied into the spreadsheet program. 27. Below the data (Excel cell E23) enter Weight and cell I23 Valve or NonValve information needed. 28. Plug the printer into the parallel port of the computer with EXCEL installed. Print the results by clicking on the print icon. 29. Observe the results that were printed. For 16 channel manifolds Accuracy and %CV error <3%. Both must state “Pass”. 30. For washers with multiple manifolds, Accuracy and Residual tests must be performed on each manifold. Repeat sections 9.1 and 9.2 for each manifold. Remember to configure the washer for the manifold being tested. 31. For washers with valve option, (A,B,C) Ensure proper operation of each Valve with a Prime. Observe during the Prime, the fluid is moving through the tubes marked accordingly: A to A valve , B to B, C to C. It is possible for the wiring to be incorrect, causing it to select the wrong valve. 32. Initial The Printouts and make a second copy of each to be shipped with the instrument. Attach original print out(s) to the data sheet. 9.2 Residual Test 1. Place a Costar flat-bottomed plate on the balance and tare the balance. Use a 96 well plate for testing 8 and 12 channel manifolds and a 384 well plate for testing 16 channel manifolds. 2. When testing 8 or 12 channel manifolds, use an 8-channel hand pipette and add 150 ul of Evacuate Solution to one half of the microwell plate. When testing 16 channel manifolds, use an 8-channel pipette and add 50 ul of Evacuate Solution to 6 columns of the microwell plate. Avoid getting dye on the rim of the wells. This will cause unexplainable failures of the test. The ELx50 Test Station with a 16-channel manifold may be used rather than the hand pipette method. ELX50 150 ul TEST STATION SETUP 1. Select test manifold 8,12, or 16 channel 2. Depress the soft key, utility, setup, manifold then select 8 ,12, or 16 and return to the main menu. PAGE 14 OF 25 4070020-TP REV D FINAL TEST PROCEDURE ELx50 STRIP WASHER 3. Depress soft keys run then option key. 4. Select D150 programs for 8 or 12 channel manifolds or select Resid-QC-test 384 (for 16 channel). 5. Hit enter, main menu, run, prime, option key to select New – Buffer-Prime then enter twice. 6. Weigh the tray, then place it in the carrier. Run disp then enter twice NOTE: When testing 8 channel and 16 channel manifolds, the First 6 columns of the plate are used. When testing 12 Channel manifolds, the first 4 rows of the plate are used. 3. Place the plate in the carrier of the UUT with the 150 ul Evacuate Solution wells toward the back of the carrier. Make sure that the orientation of the plate is in the carrier. 4. From the Main Menu select RUN, MORE, ASPIR, then press the OPTION key until residual_qc_test is displayed for 8 and 12 channel manifolds or the resid_qc_test384 is displayed for 16 channel manifolds and press the ENTER key to select this program. 5. Use the number keys to Enter The Number Of Strips to process (6 or 4). Press the ENTER key again to save the selection. 6. Press the ENTER key or the START key a final time to start the program. The washer will aspirate the contents of the strips containing the Evacuate Solution. When the program is complete, return to the main menu and prime the unit to clean. 7. Immediately remove the plate from the carrier and weigh it because the residual is small and it will begin to evaporate. Record the weight. 8. When testing 8 and 12 channel manifolds, use an 8-channel hand pipette add 300 ul of DI Tween 20 to the wells containing the residual dye solution (this will require dispensing more than once to each well). When testing 16 channel manifolds, use an 8-channel hand pipette and add 100 ul of DI Tween 20 to the wells containing the residual dye solution. The ELx50 Test Station with a 16-channel manifold may be used rather than the hand pipette method. ELX50 300 ul TEST STATION SETUP 1. Select test manifold 8, 12, or 16 channel. PAGE 15 OF 25 4070020-TP REV D FINAL TEST PROCEDURE ELx50 STRIP WASHER 2. Depress soft key, Util, Setup, Manifold select 8,12, or 16 and return to the main menu. 3. Depress the soft key Disp, then options, select Disp 300 for 8 or 12 ch. or Accur-QC-test384 16 channel. 4. Select 6 strips for 8 or 16 ch. units. Select 4 strips for 12 ch. units. 5. Depress soft key Enter, Main Menu, Run, Prime, Option key to select New Buffer-Prime then enter twice. 6. Weigh tray, place in carrier, press Run, Disp, Enter twice. 9. Place the plate in the carrier of the µQuant reader test station with the strips containing the fluid to left side of the carrier or to the back of the carrier depending on which manifold is being tested. Residual Test Limits: For 8 and 12 channel manifold testing, passes unless “Residual Test Failure” is displayed in the comments section. For 16 channel manifolds, Average residual <1.0 mg must say PASS and Maximum residual <1.5 mg must say “PASS”. NOTE: Follow steps 10-14 for 8 and 12 channel washers. Go to step 15 for 16 channel washers. 10. If testing an 8 or 12-channel manifold, then use the soft keys to select READ, and then press the OPTION key until 1x8 RESIDUAL or 1x12 RESIDUAL test is displayed. Press the ENTER key to select the appropriate program. 11. Enter the Serial Number of the instrument being tested for the PLATE ID and press the ENTER key. 12. Enter the Weight including the decimal point and press the ENTER key. Note, if the weight was .01 or less, enter .01. 13. Press the ENTER key to start the read. The reader will read the plate, calculate the results, and print the results. 14. To print a second copy of the report, on the reader key pad, press the REPORT soft key, the RESULT soft key, and the OPTION key until the file PAGE 16 OF 25 4070020-TP REV D FINAL TEST PROCEDURE ELx50 STRIP WASHER to print is displayed, then press the ENTER key. NOTE: Follow steps 15-25 for 16 channel washers. 15. Open Excel selecting: File, test 384 16 channel residual.xlt. Minimize Excel and Open KCjr. In KCjr program select Protocol, Open protocol, 384-630450. Refer to Appendix E to create this protocol if it isn’t present. 16. Click on Read Plate, read plate at dialog, and Ok. The µQuant will read the plate and the absorbence data will be displayed. 17. Use the mouse and select the Transformations Tab, then use the arrow keys of the computer to move to well A1 of the data displayed in KC jr. 18. Press the Shift Key and simultaneously use the arrow key to move the cursor from A1, down and over to highlight A1- P6. The wells from A1-P6 Should now appear highlighted. 19. Press the CTL Key and simultaneously press the C key. This is a copy command. 20. Use the computer mouse and change to the EXCEL spreadsheet application. Click on File selecting program test 384 16 channel residual.xlt to change to the correct spreadsheet program. 21. With the cursor in cell C3 press the CTR key and simultaneously press the V Key. This is a paste command. The data from the reader file will be copied into the spreadsheet program. See 9.1 paragraph 8. 22. Move the cursor to cell E23 and Enter The Weight including the decimal point. Press the ENTER key when finished. 23. Move the cursor to cell E25 and Enter The Serial Number of the UUT. Press the ENTER key when finished. 24. Move the cursor to cell E27 and Enter Your Name Or Initials. Press the ENTER key when finished. 25. Plug the printer into the parallel port of the computer with EXCEL installed. Click on the print icon or go to file and select print. 9.3 Burnin Testing Burnin testing may be run now or after completing the residual and precision and accuracy testing. Each ELx50 shall be run for a minimum of 1 hour of burnin. There is a burnin program loaded with the base code of each ELx50. This PAGE 17 OF 25 4070020-TP REV D FINAL TEST PROCEDURE ELx50 STRIP WASHER program mimics a plate washing program and loops continuously until stopped. The object of running the burnin program is to reveal any early life component failures, which may occur. The operator must observe the instrument under test just prior to terminating the test and determine that it is aspirating and dispensing to the microplate wells and that there are no visible leaks. NOTE: It is important to maintain clean solutions and bottles and tubing for all testing of ELx50 washers. Water and dye solutions, which are recycled over several days, will grow algae, bacteria, molds, or other undesirable organisms. Refer to Appendix A for maintenance recommendations for supplies. 1. Add approximately 250 ml of DI H2O with 0.1% Tween to a clean empty waste bottle. 2. Place the stopper of a Tool Stopper 3 Hole Waste Btl (4072518) firmly into the top of the waste bottle. 3. Connect the 2 waste line fittings of the stopper to the manifold of the UUT and the vacuum line to the vacuum port of the UUT. NOTE: Do not over tighten the tapered luer fitting connections. Finger tighten only. If finger tight were rated 1-10 with 10 being hard, this shall be a 1. 4. Connect the short tube of a 4070510 Tubing Set to the inlet port on the washer manifold. Connect the other end of this tube to the top port of the syringe of the UUT. 5. Connect the long tube of a fluid inlet line (4070510 Tubing Set Supply System Asby) to the fitting on the stopper and to the bottom port of the syringe of the UUT. For ELx50s with valves, connect the fluid inlet line from the output port on the back of the instrument to the syringe, and use the Tool Inlet Distribution Line, 4072519, to connect the supply port of the bottle to the three inlet ports of the washer. 6. If the washer is an ELx50/16, then install a 16 channel manifold on the washer and configure the washer for a 16 channel manifold. 7. Start the burnin program. From the Main Menu, use the soft keys and press UTIL, TESTS, then press the shift and #1 hidden key simultaneously. Use the soft keys and press MFG and BURNIN. PAGE 18 OF 25 4070020-TP REV D FINAL TEST PROCEDURE ELx50 STRIP WASHER NOTE: If the wash manifold is catching on the edge of the Microplate wells, then the Autocal configuration is not correct, and Autocal must be rerun. 8. When burnin cycling has completed, press the STOP key to end cycling, and disconnect the UUT from the fluid and vacuum lines. 9.4 Verify Shaking 1. The burnin program includes shaking as part of its program. During the shaking cycle, observe that the carrier is moving back and forth and that the liquid is mixing in the wells. 2. Check Pass or Fail to indicate that shaking has been verified. NOTE: Repeat any failed test. 9.5 Cleanup 1. Disconnect the DI H2O with 0.1 Tween solution from the UUT and connect a supply bottle of plain Deionized Water. Run the maintenance program DAY_RINSE. From the Main Menu select MAINT, and press the OPTION key until DAY_RINSE is displayed, then press the ENTER key to select this program. Repeat process. 2. (For UUT with valves, disconnect the fluid single supply line from the burn in bottle and connect and connect the fluid inlet lines 4072519. Run the maintenance program DAY_RINSE again. Repeat this step for valve ‘A, B, C’.) 3. Disconnect all tubes from UUT and remove the carrier. Take care not to mix the carriers from different washers since each carrier is aligned for a specific washer. 4. Pick the UUT off of the bench and tilt it back to drain any remaining fluid from the syringe pump. 5. If only one manifold is being tested and this is not an instrument with valves, repeat step one. NOTE: Do not let the weight of the washer rest on the rear panel because this may damage the syringe cup, which sticks out of the back of the instrument. PAGE 19 OF 25 4070020-TP REV D FINAL TEST PROCEDURE ELx50 STRIP WASHER 7. Use a paper towel or acid brush with Isopropyl Alcohol to remove any blue dye stain from the fluid ports of the manifold and the washer. 10.0 Label Application After successful completion of all tests, apply regulatory labels per BOM and final assembly drawing. This is to be done by a certified technician. Not required for Service. Appendix A: Bottle and Supplies Maintenance Prepare batches of dye and Deionized water solution that are small enough to be consumed within two weeks. Rinse the bottles before adding fresh dye. Sanitize all supply bottles and tubing sets, waste bottles and hoses once a month with 70% isopropyl alcohol. Dump residual dye and water down the drain. And rinse everything with water from the sink first. Thoroughly wash all supplies in hot soapy water. Rinse again with sink water. Then rinse all with the alcohol. SETTING UP FLUIDICTS TEST Prepare a solution of DI H2O with 0.1% Tween 20, by mixing 1 liter of Deionized water with 0.9 ml of Tween 20. Prepare the washer Evacuate Solution by mixing 1 liter of DI H2O Tween solution with 0.50 grams of FD&C #1 blue dye. This solution will be referred to as the Evacuate Solution. Mix the solution well. Prepare the washer precision and accuracy solution by mixing 1770 ml of DI H2O Tween with 30.0 ml of washer evacuate solution. This is a 1:60 dilution. This solution will be referred to as the 300 ul Solution. Setup the 4070602, Test Station uQuant QC Assays. Connect the printer to the parallel port of the test station. Power on the test station and the printer. Appendix B: Download Computer Setup Adjustments to the default Windows and Extensions installation that needs to be done before the above procedure will function as described. These adjustments will only need to be made once, and will remain on the set up computers hard disk. The mouse and keyboard will be used to manipulate files. Click and Double Click refer to using the mouse to select something (by moving the cursor to the item) and depressing and releasing the left most mouse button. PAGE 20 OF 25 4070020-TP REV D FINAL TEST PROCEDURE ELx50 STRIP WASHER First: Install 8290206-FW (SFTWR DWNLD Utility Vx.xx) (Reference BOM) Follow the Procedure in 8291007-AW. Second: Modify Configuration and Add Functionality Change the Extensions Description to "ELX50 Utilities". Change the Description of the Define Protocol Download Icon to read "ELx50 Assay definition download". Create a shortcut in Windows with these Properities for Downloading Basecode. Description: ELx50 Code Download Command line: A:\Dload Working Directory: A:\ Appendix C: Error Codes An error code is displayed on the Microplate washer as a four-digit identifier. The first character will be either 0, 1, or A. 0 or a 1 indicates a non-critical error, and the instrument will respond to keypad input. An A as the first character denotes a more serious error. In this latter case, turn off the washer. Upon restarting the washer, you should be able to enter commands into the keypad. General Errors These errors indicate non-fatal conditions that require attention. If an error is displayed, refer to the troubleshooting tips and checklists shown in Chapter 5. Contact Bio-Tek’s Technical Assistance Center for further instructions. Error Error Code Cause ABORT_ERR 0100 Wash function aborted. NO_SENSOR_ERR 0200 Manifold motor couldn't find opticalsensor. NO_SENSOR_ERR 0201 Carrier motor couldn't find opticalsensor. NO_SENSOR_ERR 0202 Syringe motor couldn't find opticalsensor. AUTOCAL_JIG_ERROR 0300 Manifold motor couldn’t find edge of jig. MOTOR_VERIFY_ERR 0400 Manifold motor failed positional verify. MOTOR_VERIFY_ERR 0401 Carrier motor failed positional verify. PAGE 21 OF 25 4070020-TP REV D FINAL TEST PROCEDURE ELx50 STRIP WASHER MOTOR_VERIFY_ERR 0402 Syringe motor failed positional verify. UNDEF_PROG_TYPE_ERR 0500 Undefined program type specified. PROGRAM_NUM_ERR 0600 Invalid (assay number). PROGRAM_SET_ERR 0700 Invalid write attempt. PROGRAM_DEL_ERR 0800 Invalid delete attempt. Error (continued) Cause SYR_VOLUME_TO_LARGE Error Code 0900 PROGRAM_CHECKSUM_ERR 0A00 Checksum failure (assay number). MANIFOLD_AUTOCAL_ERR 0B00 Invalid manifold for calibration. INVALID_BUFFER_ERR 0C00 Invalid buffer selected. CAL_CHECKSUM_ERR 0D00 Failed calibration checksum test. DISPENSE_RATE_ERR 0E00 Dispense rate is invalid for manifold type. DISPENSE_VOLUME_ERR 0F00 Dispense volume invalid for manifold type. CNFG_DATA_ERR 1000 Necessary configuration data missing. CNFG_CHECKSUM_ERR 1100 Failed configuration checksum test. CAL_DATA_ERR 1200 Necessary calibration data missing. MOTOR_NOT_HOMED_ERR 1300 Manifold motor not homed successfully. MOTOR_NOT_HOMED_ERR 1301 Carrier motor not homed successfully. MOTOR_NOT_HOMED_ERR 1302 Syringe motor not homed successfully. AUTOCAL _ABORT_ERR 1400 Autocal of washer was aborted. MALLOC_ERR 1900 Memory allocation failure. ASPIRATE_POS_ERR 1A00 DISPENSE_POS_ERR 1B00 SYRINGE_FMEA_ERR 1C01 SYRINGE_FMEA_ERR 1C02 SYRINGE_FMEA_ERR SYRINGE_FMEA_ERR 1C03 1C04 SYRINGE_FMEA_ERR MANIFOLD_POS_ERR 1C05 1D00 AUTOCAL_CHECKSUM_ERR 1E00 Carrier offset position is out of range for present manifold. Carrier offset position is out of range for present manifold. Sensor not found at start of syringe aspirate stroke. Sensor not open at start of dispense stroke. Syringe aspirate stroke failure. Sensor verify after last syringe stroke in program failed. Syringe FMEA failure. Could not calculate manifold position for offset provided. Autocal checksum error. Syringe volume too large. PAGE 22 OF 25 4070020-TP REV D FINAL TEST PROCEDURE ELx50 STRIP WASHER Fatal Errors These errors indicate fatal conditions that require immediate attention. If a fatal error is displayed, contact Bio-Tek’s Technical Assistance Center for further instructions. Error Error Code Cause TCB_NOT_AVAIL_ERR A100 Task control block not available. READ_NOT_AVAIL_ERR A200 Reader function already in use. NOT_AVAIL_ERR A300 Device not available. CHECKSUM_ERR A400 Failed code checksum test on power up. POWER_ERR A500 Power dropped below safe level. QFLASH_TIMEOUT_ERR A600 Quick flash configuration timed out. QFLASH_ERR A700 Quick flash read didn’t match write. Appendix D: Clear Assays 1. Place any assay disk in drive A:\, double click on 800 Assay Definition Icon. 2. Click on ELx50 strip washer. Click on OK. 3. Plug serial cable into ELx50. Turn on ELx50, push SHIFT key and hidden key between Main Menu and Previous Screen to make unit ready for download. Press YES on ELx50. 4. Click on SETUP; click on Clear Wash Programs. Click on the box to the left of “remain in download mode” (to make X in box go away). Click on “Clear Wash Programs”. 5. Now all assay software should be cleared. Appendix E: Using KCjr Data Reduction Software Creating a data reduction protocol. 1. Use the mouse to double click the KCjr icon on the desk top or select START, PROGRAMS, Kcjunior, and click the Kcjunior pop up box. 2. Select OK and wait for the program to initialize. 3. Select NEW PROTOCOL and enter a protocol name in the appropriate box. Use the name 384_630450. This protocol will read a 384 well plate at 630 nm and 450 nm reference wavelengths. PAGE 23 OF 25 4070020-TP REV D FINAL TEST PROCEDURE ELx50 STRIP WASHER 4. Use the mouse to select the READ METHOD tab. 5. In the box labeled Read Method Type, select MultiWavelength. 6. In the boxes labeled Wavelengths (nm) select first 630 and then 450. 7. In the box labeled Plate Geometry select 16x24 8. Use the mouse to select the TEMPLATE tab. 9. Use the mouse to select Well Ids. 10. At the box labeled Well Type Selections, choose sample. 11. Using the mouse, click and hold the left mouse button on Well A1and drag the mouse down to well P1 and then across to well P24. This will assign Well Ids to all 384 wells. Well A1 should read SMP01 and well P24 should read SMP384. 12. Use the mouse to select TRANSFORMATIONS. 13. At the box labeled Transformation Formula use the mouse to click the down arrow and highlight the transformation formula WV(630)-WV(450). 14. Using the mouse, click and hold the left mouse button on Well A1and drag the mouse down to well P1 and then across to well P24. This will highlight all 384 wells. 15. Using the mouse click the button labeled APPLY. The formula will be applied to all wells. 16. Use the mouse to select the REPORTS tab. 17. In the box labeled Report Banner type “384 Well Absorbance Data 630-450”. 18. Use the mouse to check the box labeled Formula Reports. 19. Use the mouse to click the button labeled OK. 20. At the main Screen select New Protocol. You will be prompted to save the protocol 384_630450, select yes. PAGE 24 OF 25 Certificate # (WO/UNIT):_______________ Bio-Tek Instruments Inc. MODEL: Elx50/______ PROCEDURE: 4070020-DS TITLE: Final Test Data Sheet Elx50 SERIAL # Rev Description of changes A B C Release To Production Add Ref To Metal Strip, Verify Stylus Per BOM, Modify Autocal Verification Section, Delete Note, Add Fluids Test Heading Rewrite To New Format ECO Date 32594 07/21/99 32708 33806 08/17/99 08/16/00 For Page 1 & 2 use, "Lab Product Equipment Calibration Data (C of C) Form” QA70. 02FORM7 NOTE: Technician to complete form and mark "Uncertainty of Measurement" as _4_:_1_ Reference Procedure: 4070020-TP REV___ Note: The Following Steps Correspond To The Order Of Steps On The Cal Procedure. Attach All Printouts To The Back Of The Data Sheet. Numbers In Paragraphs 8.0-9.2 Parenthesis Are The Steps In The Procedure. ASSEMBLY/ALIGNMENT Refer to 4070005-AS. Check off items below as completed Item Shoulder screws on carrier rail and manifold bracket rail are tight. Four set screws in shaft collar of manifold bracket rail are tight with loctite applied. 4072503 jig for cam assembly is tight against post and slides freely with little or no gap on jig surface. Tighten nylon screw and nut on carrier and verify there isn’t an rocking. Verify EPROM revision and version per 4070400-BOM. Ensure they are installed correctly. (high and low in the correct sockets). Verify/Adjust display for correct contrast. Ensure part number label installed. (P/N 99125) Tubing clip, shell plug, tube aspirate stylus,and tube dispense stylus on cover.(verify stylus per BOM) Using a 19396 screw, verify the 2 threaded holes for the aerosol cover do not have any paint in them. Metal strip installed in the carrier, Elx50/16 units only. Results ___Pass___Fail ___Completed ___Pass___Fail ___Pass___Fail ___Rev______________Ver ___Pass___Fail ___Completed ___Completed ___Completed ___Completed ___Completed ___N/A By____________________________ Date_________ DOWNLOAD/TESTING Refer to 4070020-TP TEST PROCEDURE. Para Item 4.0 Record Base Code, Revision, Version loaded. 5.0 Record Assay Def, Revision, Version Loaded. 6.0 Verify Correct Firmware Installed Per BOM. Results/Limits ______________________Base Code_____Rev__________Ver ______________________Assay Def _____Rev__________Ver ___Completed PAGE 3 OF 4 4070020-DS REV C Final Test Data Sheet Elx50/16 Para 7.1 8.0 8.1 9.1 9.2 9.3 9.4 9.5 10.0 Certificate # (WO/Unit #)_______________ Item (5) UUT Configured For Correct Manifold (8,12,or 16/8) Check Manifold(s) Auto Cal Performed. (1) Verify S/N engraved On Carrier Is The Same As UUT. (2) Carrier Rests On Feet With No Rocking. (3) Verify Aspirate Tubes Are Less Than .023” Above Jig (4) Verify Diff Between Closest And Furthest From Jig Is Less Than .010” (6) Verify Aspirate Tubes Have Moved And Do Not Catch On The Edge (10) Second or Third Manifold Completed Above Testing (20) 8/12 Ch. (For Valve Units Also) Record Line #3 Of Printout. (20) 8/12 Ch. (For Valve Units Also) Record Line #4 Of Printout (29) 16 Ch. (For Valve Units Also) Record Accuracy Test Results. (29) 16 Ch. (For Valve Units Also) Record CV% Error (30) Multiple Manifold Units. Manifold Passes Accuracy Tests (31) Valves A, B, C Ensure Proper Operation Of Each Valve With a “ Prime” (13) 8/12Ch. Residual Test (All Channels) (25) 16 Ch. Residual Test (All Channels)Ave Residual Max Residual Burnin Test (1 Hr Minimum) Record Start and Stop Times. Ensure Supplied Power Supply Can Be Properly Screwed Into Conn (Threads Ok), And The UUT Does Turn On Properly (Indicating Power Supply Is Working) Results/Limits ___Pass___Fail ___8 ___12 ___16/8 ___Completed ___Pass___Fail ___Pass___Fail ___Pass___Fail ___Pass___Fail ___Pass___Fail ___Pass___Fail ___N/A _______-2.5 - +2.5% ___N/A _______ 0-2.99% ___N/A _______<3.0% ___N/A _______<3.0% ___N/A ___Pass___Fail ___N/A ___Pass___Fail ___N/A _______ 0.0-4.00mg ___N/A _______<1.0mg Ave ___N/A _______<1.5mg Max. ___N/A ____________Start ___________Stop Time ___Pass___Fail ___Pass___Fail ___Completed ___Completed (2) Shake Test Verify Carrier Shakes Burnin Testing Proper Cleanup Has Been Finished Labels And Accessories Applied Or With UUT By ___________________________ Date_________ QC: NOTE: A Qualified QC Technician Must Perform The Following. Step 1.0 2.0 3.0 Item Ensure UUT is Free From Scratches and Other Cosmetic Defects. Review the Data Sheet For Completeness. Ensure it has Been Signed off. All Printouts are Attached All labels are Applied Per BOM Results/Limits ___Pass___Fail ___Pass___Fail ___Pass___Fail I HEREBY CERTIFY THAT I HAVE REVIEWED ALL ACCEPTANCE DATA, THAT THE PRODUCT MEETS SPECIFICATIONS AND IS ACCEPTABLE FOR RELEASE. __________________________ Name or Inspector No. ___________________ Title PAGE 4 OF 4 ________________ Date CONFIDENTIAL Bio-Tek Instruments, Inc. Model: ELX800, ELx808, PowerWave, uQuant, ELx405, ELX50 and all variations of each Procedure: 8291007-AW Title: Field Software Download Procedure Rev Description of changes ECO Date A B Release To Production Updated DLOAD commands; Add procedure for loading ASSAY CONFIG; Add ELX50 and PowerWave information Change PoweWave References Add Filter Table note; add reference to µQuant Add Ref to ELx405;Remove Assay from Text Add Ref to ELx50/16 Software 28381 29671 11/19/96 08/05/97 29972 31209 32306 32679 10/21/97 10/21/98 04/06/99 08/10/99 C D E F Equipment Required A PC (386 min) with a 1.44mb 3.5" floppy drive, 1 COM port minimum, mouse and 4 MB RAM Windows 3.1 or Windows '95 installed on the above PC 75053 Null Modem Serial Cable 8290206-FW Download Utility Instrument Basecode and Assay Configuration Software Diskettes (see About This Document, below) Special Notes: 1) We may refer to the Elx800, ELx808, PowerWave, µQuant, ELx405 or Elx50 as the "Instrument" throughout this procedure 2) The purpose of this Download Utility is to allow field upgrading of reader and washer software. If Extensions: Define Protocol (BTI P/N 8290501) is installed on your computer, this Download Utility should not be installed. Uninstall the Define Protocol before using the utility. 3) When updated software is downloaded onto the Instrument, any open assays that have been programmed on board the Instrument will be erased and will have to be re-programmed. Please print the assay definitions before WINWORD PAGE 1 OF 16 8291007-AW REV F FIELD SOFTWARE DOWNLOAD PROCEDURE downloading new software. To do this, attach a printer to the parallel port of the Instrument, choose REPORT from the main menu on the Instrument, then press ASSAY and choose the programmed assay definition to print. This printout will detail all assay parameters, except any formulas which may have been defined. (The formulas are printed as part of the assay results report printout; refer to a hardcopy of an assay results report, or step through the define formula section from the front keypad to obtain the formula definition) Note: The download process will set the reader’s filter table to its original default configuration. The user must also check that the reader’s filters and filter table positions match after the download. To check the reader’s filter table, press UTIL->SETUP->FILTER->. Scroll through each of the filters programmed positions and compare to the physical position on the filter wheel. See reader’s operation manual for instructions on how to access the reader’s filter wheel. 4) When updated software is downloaded into the Elx50 or ELx405, existing programs are retained. The software download adds new programs to the existing programs on board the washer. In the event the user attempts to download too many assays for the washer program to store, an error message will be displayed during the download process. About This Document The ELx800, ELx808, PowerWave, µQuant, ELx405 and ELx50 (all models) have two "levels" of software installed on board: 1) 2) The Basecode software and The Configuration software All ELx800 instruments have the same Basecode software, part number 7330202-FW All ELx808 instruments have the same Basecode software, part number 7340201-FW All PowerWave instruments have the same Basecode software, part number 7260201-FW All µQuant instruments have the same Basecode software, part number 7270201-FW All OEM ELx50 instruments have the same Basecode software, part number 4070201FW All other ELx50 instruments have the Basecode software, part number 4070230-FW All Elx405 instruments have the same Basecode software,part number 7100201-FW The configuration software part number is dependent on the model of the instrument. Contact Bio-Tek Instruments to obtain current software revisions and versions. These two levels of software are loaded into the instrument's memory via a computer connected to the serial port of the instrument. This procedure explains the process for downloading both the Basecode and assay configuration software onto the instrument PAGE 2 OF 16 8291007-AW REV F FIELD SOFTWARE DOWNLOAD PROCEDURE To load the Basecode and configuration files follow Procedure A for Basecode and Configuration files. To load just the Configuration files, use the Procedure B for Configuration Download. A. Loading the Basecode and Configuration files 1. Connect the instrument serial port to the computer COM port, using the 75053 null modem cable.(If your computer has a 25-pin COM port, it will be necessary to attach a 9-pin to 25-pin adapter to the computer end of the cable) 2. Turn the computer and instrument ON. 3. BASECODE DOWNLOAD: Insert the Basecode software diskette into the computer's floppy drive. 3.1.Get to the DOS a:\> prompt (or appropriate floppy drive prompt). 3.2. On the instrument, press the Shift and Hidden Key #1 simultaneously. (Hidden key #1 is between the 'CLEAR' and 'ENTER' keys). The instrument display should read "START CODE DOWNLOAD?" YES NO IMPORTANT: To properly load the Basecode software, the above message MUST BE displayed on the instrument. If "START ASSAY DOWNLOAD" is displayed, press NO and repeat step 3.2, making certain that Hidden Key #1 is pressed. 3.3. Select 'YES'. The instrument display will read "Clearing Download Area", then "Ready for Download" 3.4. At the computer DOS prompt, type DLOAD and press Return (↵). The Instrument display will read "DOWNLOAD IN PROGRESS". ( if using a COM port other than COM1, Type DLOAD x ( x indicates the COM port number.)) Examples: (COM1) Type DLOAD (COM2) Type DLOAD 2 3.5.The computer will display: File size: 3000513 (may vary) Bytes sent: xxxxxx (will be counting up) 3.6. The download will take several minutes. When complete, the computer will display "DOWNLOAD SUCCESSFUL!" The instrument will display either "START ASSAY DOWNLOAD", or will return to the Main Menu. Remove the Basecode diskette from the floppy drive. PAGE 3 OF 16 8291007-AW 4. REV F FIELD SOFTWARE DOWNLOAD PROCEDURE CONFIGURATION DOWNLOAD: This download is performed using the Download Utility Program, part number 8290206-FW. Start Windows 3.1 or Windows '95 on the computer. Note: If the Download Utility is already installed on your computer, go to step 4.3 4.1. Install the Download Utility via the File Manager or Windows Explore.(Double click on the Download Utility's Winstall.exe file) 4.2. The install program will ask several questions - it is highly recommended that the user accept all the default settings in the installation process. Once the Winstall.exe is begun, you will see screens similar to those shown below: Select C: to install the Download Utility onto hard drive C: PAGE 4 OF 16 8291007-AW REV F FIELD SOFTWARE DOWNLOAD PROCEDURE The Download Utility will be installed in subdirectory C:\XTENSION, unless a different subdirectory name is entered. The assay configuration files will be installed from a floppy diskette in drive a: (other floppy drive designators may be available at this screen). It is recommended that the assay configuration files be loaded from a floppy drive. PAGE 5 OF 16 8291007-AW REV F FIELD SOFTWARE DOWNLOAD PROCEDURE The Download Utility files are being loaded. In most cases, there is only one Download Utility disk. When the installation of the Utility is complete, an ICON similar to the icon below will be seen in Windows 3.1 or Windows '95. Remove the Download Utility diskette from the computer's floppy drive. 4.3. Insert the appropriate CONFIGURATION diskette into the floppy drive. 4.4. If the instrument display reads "ASSAY DOWNLOAD" (Readers) or “READY FOR DOWNLOAD (Washers), double click on the Download Utility icon. If the instrument is at the main menu, press the Shift and Hidden Key #2 simultaneously (Hidden Key #2 is between the 'Main Menu' and 'Previous Screen' keys.). The instrument should display : START ASSAY DOWNLOAD? START PROGRAM DOWNLOAD? YES YES NO NO (Readers) (Washers) Select “YES” on the instrument. The instrument will display as stated in 4.4. Click on the Download Utility icon. The floppy drive should become active while the PAGE 6 OF 16 8291007-AW REV F FIELD SOFTWARE DOWNLOAD PROCEDURE application is initializing. The following screen (or similar) should appear on the computer: Select ELx800/808 Reader for : ELx800, ELx808, uQuant and PowerWave Readers Select ELx50 Washer for the Elx50. Select ELx405 Washer for the ELx405. After Selecting, click OK. A screen similar to the one below should appear: PAGE 7 OF 16 8291007-AW REV F FIELD SOFTWARE DOWNLOAD PROCEDURE The Group ID will be either ELx800, ELx808, PowerWave, µQuant, ELx405 or ELx50, depending on the Configuration software being installed. The names may vary as well, if the Configuration files have been customized by Bio-Tek. Select the DOWNLOAD button. The Configuration download will begin. If the instrument and computer are not properly connected, or if the instrument display does not read "Start Assay Download", the following message window may appear: aCheck that the cable is connected between the computer and the SERIAL port of the instrument. aIt may be necessary to check/change the configuration of the serial port in the Download Utility (under Setup - Serial Port). If the instrument does NOT display "Start Assay Download", press the Shift and Hidden Key #2 simultaneously (Hidden Key #2 is between the 'Main Menu' and 'Previous Screen' keys.). The instrument should display : START ASSAY DOWNLOAD? START PROGRAM DOWNLOAD? YES YES NO NO (Readers) (Washers) Choose YES, then double click on the DOWNLOAD button in the Download Utility start the process again. After the configuration download is complete, the Instrument will reinitialize and return to the Main Menu. Check that the current software is loaded onto the instrument by pressing UTIL, TEST, CHKSUM. The instrument display will scroll through the seven digit part numbers and versions of both the Basecode and Configuration part numbers. Check them against the list at the end of this procedure. The software update is complete. ELx50/16 Users ELx50/16 software defaults to an 8 channel manifold configuration at download. When the download is complete, it is important to set up the instrument for the appropriate manifold. Press UTIL, then SETUP, then MANFLD and select the desired manifold. IMPORTANT!!! PAGE 8 OF 16 8291007-AW REV F FIELD SOFTWARE DOWNLOAD PROCEDURE To check your Instrument’s NEW software configuration, from the instrument’s Main Menu, press UTIL, then TESTS, then CHKSUM. Record the information below and fax this portion to BTI Technical Assistance Center at 802-655-3399, so that we may update your instrument records. If you are updating more than one instrument, please make note of all serial numbers of updated instruments. I have successfully updated my Bio-Tek Autoreader/Autowasher, Model ________________________ S/N:__________________________. The new software installed is : ___________________ Version ____________ Code Checksum: ( ) ___________________ Version ____________ Company name__________________ Signature ________________Date___________ PAGE 9 OF 16 8291007-AW REV F FIELD SOFTWARE DOWNLOAD PROCEDURE B. Loading Assay Configuration Files Only. 1. Connect the instrument serial port to the computer COM port, using the 75053 null modem cable.(If your computer has a 25-pin COM port, it will be necessary to attach a 9-pin to 25-pin adapter to the computer end of the cable) 2. Turn computer and instrument ON. 2.1. On the instrument, press the Shift and Hidden Key #2 simultaneously. (Hidden key #2 is between the 'Main Menu' and 'Previous Screen' keys). The instrument display should read "START ASSAY DOWNLOAD?" YES NO (Readers) YES START PROGRAM DOWNLOAD? NO (Washers) Select ‘Yes’. The instrument will now wait for the download. 3. The download is performed using the Download Utility Program, part number 8290206-FW. Start Windows 3.1 or Windows '95 on the computer. Note: If the Download Utility is already installed on your computer, go to step 3.3 3.1. Install the Download Utility via the File Manager or Windows Explore.(Double click on the Download Utility's Winstall.exe file) 3.2. The install program will ask several questions - it is highly recommended that the user accept all the default settings in the installation process. Once the Winstall.exe is begun, you will see screens similar to those shown below: PAGE 10 OF 16 8291007-AW REV F FIELD SOFTWARE DOWNLOAD PROCEDURE Select C: to install the Download Utility onto hard drive C: The Download Utility will be installed in subdirectory C:\XTENSION, unless a different subdirectory name is entered. PAGE 11 OF 16 8291007-AW REV F FIELD SOFTWARE DOWNLOAD PROCEDURE The configuration files will be installed from a floppy diskette in drive a: (other floppy drive designators may be available at this screen). It is recommended that the configuration files be loaded from a floppy drive. The Download Utility files are being loaded. In most cases, there is only one Download Utility disk. When the installation of the Utility is complete, an ICON similar to the icon below will be seen in Windows 3.1 or Windows '95. Remove the Download Utility diskette from the computer's floppy drive PAGE 12 OF 16 8291007-AW 3.3. REV F FIELD SOFTWARE DOWNLOAD PROCEDURE Insert the CONFIGURATION diskette into the floppy drive. Double click on the Download Utility Icon. The floppy drive should become active while the application is initializing. The following screen (or similar) should appear on the computer: Select ELx800/808 Reader for : ELx800, ELx808, uQuant and PowerWave Readers Select ELx50 Washer for the Elx50. Select ELx405 Washer for the ELx405. After Selecting, click OK. A screen similar to the one below will appear: PAGE 13 OF 16 8291007-AW REV F FIELD SOFTWARE DOWNLOAD PROCEDURE The Group ID will be either ELx800 or ELx808, PowerWave, µQuant, ELx405 or ELx50. The names may vary as well, if the Configuration files have been customized by Bio-Tek. Select the DOWNLOAD button. The Configuration download will begin. If the instrument and computer are not properly connected, or if the Instrument display does not read "Start Assay Download", the following message window may appear: PAGE 14 OF 16 8291007-AW REV F FIELD SOFTWARE DOWNLOAD PROCEDURE aCheck that the cable is connected between the computer and the SERIAL port of the instrument. aIt may be necessary to check/change the configuration of the serial port in the Download Utility (under Setup - Serial Port). If the instrument does NOT display "Start Assay Download", press the Shift and Hidden Key #2 simultaneously (Hidden Key #2 is between the 'Main Menu' and 'Previous Screen' keys.). The instrument should display : START ASSAY DOWNLOAD? YES NO (Reader) START PROGRAM DOWNLOAD? YES NO (Washer) Choose YES, then double click on the DOWNLOAD button in the Download Utility start the process again. After the configuration download is complete, the instrument will reinitialize and return to the Main Menu. Check that the current software is loaded onto the instrument by pressing UTIL, TEST, CHKSUM. The instrument display will scroll through the seven digit part numbers and versions of both the Basecode and configuration part numbers. Check them against the list at the end of this procedure. The software update is complete. PAGE 15 OF 16 8291007-AW REV F FIELD SOFTWARE DOWNLOAD PROCEDURE IMPORTANT!!! To check your instrument’s NEW software configuration, from the instrument’s Main Menu, press UTIL, then TESTS, then CHKSUM. Record the information below and fax this portion to BTI Technical Assistance Center at 802-655-3399, so that we may update your instrument records. If you are updating more than one instrument, please make note all serial numbers of updated instruments. I have successfully updated my Bio-Tek Autoreader/Autowasher, Model ________________________ S/N:__________________________. The new software installed is : ___________________ Version ____________ Code Checksum: ( ) ___________________ Version ____________ Company name__________________ Signature ________________Date___________ PAGE 16 OF 16