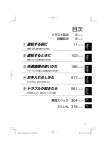
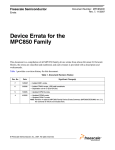
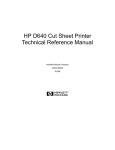
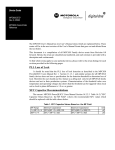
1
RoadStar & HighwayStar Pump Service Manual
SERVICE AND OPERATION MANUAL
ROADSTAR AND HIGHWAYSTAR
JOINT SEALANT PUMP SYSTEMS
© 2000-2001
braydenwërks, inc.
Page 1
RoadStar & HighwayStar Pump Service Manual
SOME OF THE AIR CONTROL ITEMS MAY HAVE BEEN REMOVED FOR
PROTECTION DURING SHIPPING. FOLLOW THE INSTRUCTIONS
BELOW TO RE-INSTALL THEM.
MOUNT THE VALVE WITH THE FOUR ALLEN HEAD
CAP SCREWS PROVIDED. THE LOCK WASHERS
BELONG UNDER THE HEAD OF THE SCREW AND ON
TOP OF THE VALVE.
© 2000-2001
braydenwërks, inc.
Page 2
RoadStar & HighwayStar Pump Service Manual
CONNECT THE AIR LINE TUBING. MATCH THE IDENTIFYING TAG OR
TAPE STRIP TO THE FITTING, INSERT THE TUBE INTO THE FITTING
AND PUSH UNTIL IT SEATS. IF YOU HAVE TO REMOVE THE TUBING,
PUSH IN ON THE SMALL RING AT THE FITTING INLET WHILE PULLING
OUT ON THE TUBING WITH THE OTHER HAND.
CONNECT THE FOLLOWER PLATE DRUM BLOW OFF HOSE ONTO THE
FOLLOWER PLATE FITTING.
© 2000-2001
braydenwërks, inc.
Page 3
RoadStar & HighwayStar Pump Service Manual
MOUNT THE ELEVATOR CONTROL REGULATOR
THREAD THE REGULATOR FITTING INTO THE OUTLET FITTING OF
THE MAIN AIR CONTROL.
TIGHTEN REGULATOR IN PLACE WITH 11/16” WRENCH. STOP WHEN
SNUG AND THE GAUGE FACES FORWARD.
© 2000-2001
braydenwërks, inc.
Page 4
RoadStar & HighwayStar Pump Service Manual
CONNECT THE COILED HOSE FROM THE ELEVATOR CONTROL
VALVE TO THE REGULATOR. THE FITTING SWIVELS. USE A 9/16”
WRENCH ON THE HEX CLOSEST TO THE THREADS.
© 2000-2001
braydenwërks, inc.
Page 5
RoadStar & HighwayStar Pump Service Manual
Value Added Systems
Incorporated
WARRANTY REGISTRATION
Goods and equipment sold by Value Added Systems, Inc. are covered by the original
manufacturer’s warranty. All warranty claims must be processed through us. To register
the warranty, this form must be returned to us by fax or by mail at the time the equipment
is received by the end user. If the warranty is not registered, the original shipping date
from our facility or the manufacturer’s plant will be used as the beginning of the warranty
period.
Company Name _____________________________________________________________
Mailing Address _____________________________________________________________
City, State (Prov), Zip (Post Code) _______________________________________________
Shipping Address ____________________________________________________________
City, State (Prov), Zip (Post Code) _______________________________________________
Phone _____________________________________________________________________
Fax _______________________________________________________________________
E-mail _____________________________________________________________________
Model _____________________________________________________________________
Ship Date __________________________________________________________________
Setup / First Use Date ________________________________________________________
Experience Counts – Count On Ussm
Value Added Systems, Inc. • PO Box 2335 • Denton, Texas 76202 • 940.566.2508 • Fax 940.382.1164
Technical Support 800.825.2379 • Fax Orders 800.736.4119
URL http://www.dispense.com • e-mail: [email protected]
© 2000-2001
braydenwërks, inc.
Page 6
RoadStar & HighwayStar Pump Service Manual
© 2000-2001
braydenwërks, inc.
Page 7
RoadStar & HighwayStar Pump Service Manual
PRELIMINARY SETUP
You will need simple hand tools, rags or paper towels, several large drink cups or small
coffee cans, petroleum jelly and a trash bag.
1. Remove all shipping and packaging material. Inspect for shipping damage.
Report any damage to the carrier immediately. Remove the pump from the
shipping skid.
2. Un-pack any boxes that were shipped with the pump. These may include the tool
kit, air line lubricant, pump throat packing seal fluid, pieces for the dispensing
wand and elevator control valve handle.
3. Check all external nuts and bolts for any that may have loosened in-transit,
including the air motor-to-pump shaft coupling and the air motor-to-elevator
crossbar connections. Tighten as necessary.
4. Locate the air line lubricant. Add it to the air line lubricator through the fill port on
the top. Fill it at least half way. Do not mix up the airline oil and the throat packing
lubricant.
5. Locate the pump packing seal fluid; add about half of it to the packing nut cavity.
6. Tighten the packing nut with the face spanner wrench provided. It is shipped
slightly loose.
7. If included, extend pump shaft bellows over the packing nut and secure in place
with the clamp provided.
8. Check the air bleed valve on the back of the pump head. Make sure that the
center stem is screwed all the way in. Use the hex wrench provided.
9. If it was removed for shipment, locate the elevator control valve handle (chrome
plated, about 4” long with a grey knob) and install it in the valve. Some type of
liquid thread lock is recommended.
© 2000-2001
braydenwërks, inc.
Page 8
RoadStar & HighwayStar Pump Service Manual
INSTALLATION – GENERAL
1. Make sure that there is at least 8 feet of overhead clearance.
2. Make sure that the air supply hose is of adequate length, and has ample
clearance, so that it can move up and down with the pump during drum changes.
3. Main supply air must have a shut off valve at its source.
4. Do not use any quick disconnect type fittings or valves with an inside diameter less
than ½”.
INSTALLATION – FACTORY
Securing the pump to the factory floor is recommended after it has been in operation for a
short period of time and the proper location for the application has been determined.
Proper concrete anchor screws must be used in most floors.
INSTALLATION - TRUCK OR TRAILER MOUNTED
1. Position the pump on the truck or trailer where it will be used. Typically the pump
is located on the driver's side towards the rear. The hose goes out over the side
where the driver can watch it in the mirror. The drums are loaded from the middle
of the truck or trailer. The air source is typically a tow-along compressor. The
pump is set up to accommodate this arrangement. The pump may be reconfigured into a mirror image (except for the elevator control valve) if this is better
for your installation.
2. CAUTION: We strongly advise that you secure the pump to the bed of the truck or
trailer using the four 1/2" holes in the corners of the elevator base plate; (even
though we sell a reasonable number of parts each year to people who turn their
pumps over, or drop them off the truck completely.) The shipping bolts ARE NOT
adequate for this purpose. They are either grade 2 or un-graded hardware store
variety bolts.
3. Open the air motor control valve (move the handle parallel to the valve body).
Increase pressure on the main regulator until the air motor starts to cycle. After
one or two cycles, turn off the air motor control valve (move the handle
perpendicular to the valve body).
4. Remove the barrel locator clamp pin and swing the front of the clamp full open.
(The clamp may be mounted for either right or left opening, whichever suits the
installation.)
5. If used, install the extension hose to the pump outlet fitting. Attach the hose
support clamp to the elevator crossbar bracket. (If purchased with a new pump, it
may be shipped pre-installed).
© 2000-2001
braydenwërks, inc.
Page 9
RoadStar & HighwayStar Pump Service Manual
6. Straighten out the main material hose with the swivel and short whip hose.
Tighten all connections and install the dispense valve or pistol grip flow gun if
used.
7. Check that the dispense valve is closed. On units with a ball valve, a mark has
been engraved on the valve handle keeper washer. The mark indicates the
direction of the port in the ball. WITH the valve is OPEN, ACROSS the valve is
CLOSED. Leave the long wand off.
8. Connect the dispense hose directly to the pump using the adapter fitting provided
with the hose, or connect it to the swivel on the extension hose, if used. If the
hose is connected directly to the pump, use the support clamp provided to anchor
the hose to the elevator crossbar. This clamp is not used if an extension hose is
installed.
9. Check that the elevator control valve handle is set in the neutral position
(horizontal) and that the small brass valve on the blow-off hose is closed.
10. NOTE: THE “NEUTRAL” POSITION OF THE ELEVATOR CONTROL VALVE
DOES NOT LOCK THE ELEVATOR IN POSITION. IF THE ELEVATOR IS LEFT
IN THE RAISED POSITION AND AIR IS LEAKING OR DISCONNECTED FROM
THE SYSTEM, THE ELEVATOR WILL EVENTUALLY LOWER AND HAS THE
POTENTIAL OF CAUSING DAMAGE OR INJURY. USE CARE, CAUTION AND
COMMON SENSE WHEN WORKING AROUND THIS, OR ANY, PIECE OF
EQUIPMENT.
11. Check that the main follower plate bleed port (hook shaped handle screwed into
the plate) is installed and that the blow-off stem valve is closed.
12. Check that the blow-off hose from the elevator control valve to the follower plate
blow-off stem is NOT connected, and that the hose is draped outside of the barrel
locator hoop.
13. Connect the main airline to the air inlet coupling provided. ¾” I.D. air hose with a
minimum length of 25’ is recommended. Maximum inlet pressure must be limited
to 125 PSI. Minimum volume required is 50 SCFM clean dry air.
14. Check that the air motor air valve is closed (handle is perpendicular to the valve
body). Place the elevator valve in the DOWN position. (Move the handle from
horizontal neutral position to point down at a 45° angle.)
15. Blow out any moisture from the air supply line. Use a minimum of 3/4" I.D. hose
25' long. (50’ is preferred; air must have a chance to cool after leaving the
compressor.) Connect the main air supply and turn it on. If everyone has done
everything correctly at this point nothing will happen. If anything leaks, or moves,
turn off the main air supply and go back over the steps above. If there is still a
problem, call your reseller or the tech support number in the back of the book for
advice.
16. Check that the drum clamp is completely open.
© 2000-2001
braydenwërks, inc.
Page 10
RoadStar & HighwayStar Pump Service Manual
17. Set the elevator regulator pressure to 40 PSI. Move the elevator control valve
from the 45° down position to the 45° up position. The elevator should start to
rise.
a. With no drum in place, it may be necessary to pull the pump forward to
allow the follower plate seals to clear the back of the drum locator clamp.
Grab the upright bars that connect the follower plate to the elevator
crossbar and pull the pump forward enough that the drum seals can clear
the back drum locator. DO NOT GRAB THE FOLLOWER PLATE ITSELF.
With no drum in place a possible pinch point exists between the follower
plate and the drum locator clamp. This condition does not normally exist on
a pump that is in production, only on new pumps during set-up.
b. On pumps with the black o-ring style follower plate seals, the upper seal
may roll out of its groove if it contacts the drum locator clamp while raising
the elevator with no drum in place. Roll the seal back into the groove and
continue.
18. Move the elevator control valve to horizontal neutral as soon as the follower plate
clears the drum locator clamp.
19. Check for overhead clearance of at least eight feet. Check that the material hose
is not caught on the pump or any surrounding equipment.
20. Move the elevator control valve from horizontal neutral to 45° up position. Allow
the elevator to rise to the full-extended position.
21. Move the elevator control valve from the 45° up position to the 45° down position.
Allow the elevator to lower to the base plate. It may be necessary to pull the pump
forward to allow the drum seals to clear the back drum locator. Leave the handle in
the 45° down position.
22. Open the main air valve to the pump air motor.
23. Adjust the air motor regulator until the pump just starts to cycle.
24. After 2 or 3 cycles (cycle = up and back down), close the main air valve with the
pump in the full DOWN stroke of the air motor.
25. NOTE: The pump primer plate bolt head may hit the base plate when there is no
drum installed. You will hear it, and the pump will rise slightly at the same time.
This is normal.
© 2000-2001
braydenwërks, inc.
Page 11
RoadStar & HighwayStar Pump Service Manual
FIRST DRUM INSTALLATION
1. Be prepared to use the pump the same day that you install the first drum. It takes
several gallons of material to assure that all of the air is initially purged from the
system. It is better to put this material into a joint than to throw it away. Air
trapped in the pump the first day may cause material to cure inside the pump or
hose. If you want to prime the pump in your yard before taking it out on a job,
dispense at least 3 – 4 gallons of material before shutting it down.
NOTE: Handling the drum up to the pump and placing it on the edge of the pump
base plate is normally a two person job. FOR OPERATOR SAFETY, FINAL
POSITIONING OF THE DRUM UNDER THE PUMP AND OPERATING THE
ELEVATOR CONTROL VALVE MUST BE DONE BY THE SAME PERSON! Do not
lower the pump into the drum without looking to make sure there is nothing that could
be trapped between the pump and the drum. USE CARE, CAUTION AND COMMON
SENSE WHEN WORKING AROUND THIS, OR ANY, PIECE OF EQUIPMENT.
2. Clean any debris from the top of the material drum.
3. Remove the drum lid clamp.
4. Pick the lid straight up off of the drum. Do not grab it by one edge and tip that
edge up. This will cause any water or dirt on top of the lid to fall into the drum.
5. Remove any plastic cover that may be shipped inside the drum. Discard in the
trash bag.
6. If equipped, pull the drum liner straight and tight. Pull the open end down over the
outside of the drum. It is important that the liner does not bunch up under the
follower plate. This may cause the liner to be sucked up into the pump.
7. Move the elevator control valve from 45° down to the 45° up. Allow the elevator to
rise to the full-extended position.
26. NEW PUMPS: Look under the follower plate. In the center of the pump inlet you
will see the pump primer plate. This helps load material into the pump when it is
operating. If anything gets caught in the pump inlet, NEVER PUT YOUR
FINGERS ABOVE THE PRIMER PLATE TO REMOVE THE OBSTRUCTION. Do
not even put any tools you like in there without first backing the pump air regulator
back to zero AND closing the air motor air valve. (You have to keep the main air
on to assure that the elevator stays in the up position.) USE CARE, CAUTION
AND COMMON SENSE WHEN WORKING AROUND THIS, OR ANY, PIECE OF
EQUIPMENT.
8. With new follower plate seals, coat them with petroleum jelly (Vaseline® or similar)
or use some of the pump throat packing seal fluid on a cloth. This is only
necessary with new seals.
9. Position the new barrel next to the pump base plate. Tip the drum back and “walk”
it up onto the two skid rails on the pump base. Push the barrel onto the pump
base until it stops against the rear barrel locator clamp.
10. Close the open half of the barrel locator clamp and re-insert the pin thru the hinge.
© 2000-2001
braydenwërks, inc.
Page 12
RoadStar & HighwayStar Pump Service Manual
11. Move the elevator valve handle to the 45° down position and lower the pump onto
the drum. Make sure that the follower plate is centered in the drum opening.
12. It may be necessary to increase the elevator down pressure to 80 or 100 PSI to
force new follower seals into the barrel. If so, remember to reduce the pressure
back to 40 PSI.
13. Once the follower plate seals touch the top of the drum, air will be trapped
between the follower plate and the surface of the material in the drum. Open the
ball valve on the blow-off stem. Air should exhaust from the stem. Place your
thumb over the stem to stop the flow of air. The follower plate will also stop
lowering into the barrel. Remove your thumb again and listen/feel for the air flow
to stop. Immediately close the ball valve on the blow-off stem.
14. Removing the hooked handle bleed plug from the follower plate is a faster way to
bleed the air from under the follower plate, but it always makes a mess on top of
the plate unless you are very careful.
15. Leave the elevator control valve in the 45° down position. Make sure the regulator
is set about 40 PSI.
16. Stretch the dispense hose out straight. Make sure the dispense valve is still
closed.
17. Hold a large cup under the air bleed valve on the pump head.
18. Open the bleed valve center stem 2 or 3 turns with the hex wrench provided.
19. Open the main air motor air valve. The pump should start to cycle slowly. If it
does not, slowly increase the air pressure on the main regulator until the pump
starts to cycle.
20. As the pump starts to prime, it may slow down or stop. Slowly increase the air
pressure on the main regulator until the pump keeps cycling.
21. Observe material flowing out of the air bleed valve on the pump head. Continue,
changing cups as necessary, until the material is flowing for the complete up and
down stroke, and air bubbles quit “popping”. Close the bleed valve stem with the
wrench provided.
22. Open the dispense valve. Point the dispense tip into the trash bag or a large cup
or small can. Elevate the hose as much as possible to help trapped air escape.
23. It may be necessary to increase the pressure on the main air motor regulator as
the hose fills with material.
24. Allow material to flow from the dispense tip until it is air free.
25. Shut off the dispense valve. The pump should stop wherever it is in the stroke. If
it does not, there is still air trapped in the pump or the hose. (If the pump stops in
one direction but not the other, this is an indication that something is caught in one
of the two check valves.)
26. Open and close the dispense valve several times for the operator to get the feel of
starting and stopping the material flow.
© 2000-2001
braydenwërks, inc.
Page 13
RoadStar & HighwayStar Pump Service Manual
27. With the dispense valve open, adjust the main air motor regulator for the desired
material flow rate.
28. With the dispense valve open and the pump running, observe the view dome on
the air motor lubricator. There should be one drop of oil form and fall every 1 – 2
minutes while the pump is operating. Typically ¼ - ½ turn from fully closed on the
lubricator adjustment knob is adequate.
29. Install the dispense wand by threading it onto the outlet of the dispense gun or
valve. Loosen and adjust the wand guide handle and the shut-off valve handle
until they are comfortable for the operator. On units with a ball valve shut-off, the
valve handle may be removed and repositioned in any of eight locations if one of
these is better for the operator. The on-off lever may also be operated horizontally
or vertically depending on the operator’s preference.
© 2000-2001
braydenwërks, inc.
Page 14
RoadStar & HighwayStar Pump Service Manual
DRUM CHANGING
1. When you observe the elevator piston shafts are almost fully retracted, and
then hear the pump cycle rate increase sharply, the drum is empty.
2. Immediately close the dispense valve and the main air motor air valve.
3. Clean any debris from the top of the new material drum.
4. Remove the drum lid clamp.
5. Pick the lid straight up off of the drum. Do not grab it by one edge and tip that
edge up. This will cause any water or dirt on top of the lid to fall into the drum.
6. Remove any plastic cover that may be shipped inside the drum. Discard in a
trash bag.
7. If equipped, pull the drum liner straight and tight. Pull the open end down over
the outside of the drum. It is important that the liner does not bunch up under
the follower plate. This may cause the liner to be sucked up into the pump.
8. Connect the blow-off air hose to the blow-off stem. Open the ball valve on the
blow-off stem.
9. Open the ball valve on the other end of the blow-off hose.
10. Move the elevator control valve from the 45° down position to the 45° up
position. The pump should start to rise from the drum.
11. When the follower plate is close to the top of the drum, repeatedly move the
elevator control valve from the 45° up position to the horizontal neutral position
to ease the pump up out of the drum. Leave the valve in the 45° up position.
12. Close the ball valve at the top of the blow-off hose. Allow the elevator to rise to
the fully extended position.
13. With a putty knife and rag or paper towels, clean most of the material from the
follower plate seals. Especially clean any material that has gotten on top of the
follower plate.
14. Pull the pin from the barrel locator clamp and swing the front half fully open.
15. For operator safety, remove the empty drum by pushing it out FROM THE
BACK. Do not grab it by the top lip and pull it out from the front.
16. Check the bottom of the follower plate for cured material. Remove with a putty
knife or similar tool. Make sure that the elevator control valve is in the 45° up
position, that the blow off hose is disconnected and that the main air is on so
that the elevator cannot move while you are cleaning.
17. NOTE: Handling the drum up to the pump and placing it on the edge of the
pump base plate is normally a two person job. FOR OPERATOR SAFETY,
FINAL POSITIONING OF THE DRUM UNDER THE PUMP AND OPERATING
THE ELEVATOR CONTROL VALVE MUST BE DONE BY THE SAME
PERSON!
© 2000-2001
braydenwërks, inc.
Page 15
RoadStar & HighwayStar Pump Service Manual
18. Position the new barrel next to the pump base plate. Tip the drum back and
“walk” it up onto the two skid rails on the pump base. Push the barrel onto the
pump base until it stops against the barrel locator clamp.
19. Close the open half of the barrel locator clamp and re-insert the pin thru the
hinge.
20. Check for hoses or other objects between the follower plate and the top of the
drum.
21. Move the elevator valve handle to the 45° down position and lower the pump
onto the drum. Make sure that the follower plate is centered in the drum
opening.
22. Once the follower plate seals touch the top of the drum, air will be trapped
between the follower plate and the surface of the material in the drum. Open
the ball valve on the blow-off stem. Air should exhaust from the stem. Place
your thumb over the stem to stop the flow of air. The follower plate will also
stop lowering into the barrel. Remove your thumb again and listen/feel for the
air flow to stop. Immediately close the ball valve on the blow-off stem.
23. Leave the elevator control valve in the 45° down position.
24. Hold a large cup under the air bleed valve on the pump head and open the
bleed valve center stem 2 or 3 turns with the wrench provided.
25. Open the main air motor air valve. Observe material flowing out of the air
bleed valve on the pump head until air bubbles quit “popping”. Close the bleed
valve stem.
© 2000-2001
braydenwërks, inc.
Page 16
RoadStar & HighwayStar Pump Service Manual
NIGHTLY SHUT-DOWN
1. Turn off the main air motor air valve.
2. Open the dispense valve until all fluid pressure bleeds from the system.
3. Turn off the compressed air at its source.
4. Remove the tip from the dispense wand. Soak the tip overnight in a can of mineral
spirits or other suitable solvent.
5. Install a pipe cap or plug in place of the dispense tip. This will keep atmospheric
moisture away from the material in the dispense wand, which will cause silicone
and urethane products to cure.
DAILY START-UP
1. Clean out and replace dispense tip.
2. Check level of oil in the lubricator.
3. Check that elevator control valve is in the 45° down position.
4. Check that the main air motor air valve is off.
5. Turn on main air supply.
6. Turn on main air motor air valve.
7. Check both the air motor and the elevator pressure gauges for normal settings.
8. Open dispense valve and test for material flow rate.
© 2000-2001
braydenwërks, inc.
Page 17
RoadStar & HighwayStar Pump Service Manual
THE PUMP WILL NOT COME OUT OF THE DRUM
STEP ONE:
1. REMOVE THE "BLOW OFF TUBE" FROM THE FOLLOWER PLATE. THIS IS
THE ASSEMBLY OF THE ¼” PIPE NIPPLE, ¼” BRASS BALL VALVE AND THE
QUICK DISCONNECT STEM THAT IS THREADED INTO THE FOLLOWER
PLATE. UNSCREW IT FROM THE FOLLOWER PLATE AND OPEN THE BALL
VALVE. STICK A WIRE COAT HANGER OR SIMILAR THROUGH IT TO MAKE
SURE IT IS COMPLETELY OPEN FROM END TO END.
2. IF IT IS NOT OPEN, TAKE IT APART AND CLEAN IT, OR BUY SIMILAR ITEMS
AT A HARDWARE STORE OR PLUMBING SUPPLY TO DUPLICATE IT.
3. WHEN IT IS COMPLETELY OPEN, CONNECT IT BACK TO THE AIR HOSE.
OPEN THE BALL VALVE ON THE BLOW OFF TUBE AND THE BALL VALVE AT
THE OTHER END OF THE HOSE. PLACE THE ELEVATOR CONTROL VALVE
IN THE UP POSITION. AIR SHOULD BLOW OUT OF THE BLOW OFF TUBE. IF
IT DOES NOT, THEN THE AIR HOSE AND/OR THE QUICK DISCONNECT
SOCKET AT THE END OF THE AIR HOSE IS PLUGGED. THESE PIECES CAN
BE REPLACED WITH SIMILAR COMMERCIAL ITEMS FROM A HARDWARE
STORE OR POSSIBLY FROM AN AUTO PARTS STORE.
4. BOTH THE AIR HOSE AND BLOW OFF TUBE ARE MUST BE CLEAR TO
REMOVE THE PUMP FROM THE DRUM. RE-INSTALL THE BLOW OFF TUBE
BACK INTO THE FOLLOWER PLATE. YOU SHOULD BE ABLE TO CHANGE
THE DRUM AS NORMAL.
STEP TWO:
1. IF THE FIRST TROUBLESHOOTING TIP DOESN'T WORK, PULL THE DRAW
PIN FROM THE DRUM LOCATOR CLAMP, AND SWING OPEN THE CLAMP.
2. PLACE THE ELEVATOR CONTROL VALVE IN THE UP POSITION. DO NOT
OPEN THE BLOW OFF TUBE VALVE. IF THE ELEVATOR CONTROL VALVE IS
WORKING PROPERLY, THE ELEVATOR SHOULD RAISE AND PICK UP THE
EMPTY DRUM WITH THE PUMP.
a. IF YOU CAN PICK UP THE EMPTY DRUM, AND IF THE BLOW OFF
TUBE AND HOSE ARE FUNCTIONING CORRECTLY, THE DRUM IS
GLUED TO THE FOLLOWER PLATE WITH CURED MATERIAL. YOU
WILL HAVE TO BREAK THE BOND ALL THE WAY AROUND WITH A
PRY BAR OF SOME SORT.
b. IF YOU CANNOT PICK UP THE EMPTY DRUM, EITHER THE ELEVATOR
CONTROL VALVE OR THE REGULATOR FEEDING AIR TO THE
ELEVATOR CONTROL VALVE IS FAULTY, OR© 2000-2001
braydenwërks, inc.
Page 18
RoadStar & HighwayStar Pump Service Manual
c. IF YOU CANNOT PICK UP THE EMPTY DRUM AND AIR BLOWS
CONTINUOUSLY OUT OF THE ELEVATOR CONTROL VALVE EXHAUST
PORT, THERE IS A BAD SEAL AROUND ONE OR BOTH OF THE
ELEVATOR CYLINDER PISTONS.
NOTE:
ALWAYS LEAVE THE ELEVATOR CONTROL VALVE IN THE DOWN POSITION
WHILE OPERATING THE PUMP. ONLY MOVE IT TO THE UP POSITION TO
CHANGE DRUMS. DO NOT LEAVE IT IN THE CENTER (NEUTRAL) POSITION FOR
ANY REASON.
ALWAYS LEAVE THE BLOW OFF HOSE DISCONNECTED FROM THE BLOW OFF
TUBE AND THE BLUE HANDLE AIR VALVE ON THE BLOW OFF TUBE CLOSED
UNLESS YOU ARE CHANGING DRUMS. AS SOON AS THE FOLLOWER PLATE
LEAVES THE OLD DRUM, CLOSE THE BLUE HANDLE AIR VALVE AND
DISCONNECT THE BLOW OFF HOSE.
© 2000-2001
braydenwërks, inc.
Page 19
RoadStar & HighwayStar Pump Service Manual
PUMP TUBE ASSEMBLY
709.132.C & 709.132.D for 38:1 & 59:1 PUMPS
709.163.C & 709.163.D for 31:1 & 48:1 PUMPS
Parts List
1. 700.123 bleed valve assembly*
a. 700.123.001 body*
b. 700.123.002 stem*
2. 5001.08Z.0816 internal shakeproof washer *
3. 5012.02Z.008 hex nut *
4. 700.053 stand off rod *
5. 700.042.B tube center section
6. 700.048 tube inlet
7. 700.040.200 pump head lower section
8. 700.040.100 pump head upper section
9. 700.012.200 tail shaft
10. displacement rod
a. 700.012.100 for 38:1 & 59:1 pumps
b. 700.002.100 for 31:1 & 48:1 pumps
© 2000-2001
braydenwërks, inc.
Page 20
RoadStar & HighwayStar Pump Service Manual
11. 700.125.A primer plate assembly
a. 700.125.A01 flow thru disk
b. 700.125.A02 primer disk
c. 700.125.A03 adapter
d. 5006.05Z.0610 hex head bolt
12. 700.072.A lower check seat
13. 5192.236.V o-ring ‡◊
14. 700.072.001 lower check spacer
15. 5216.275 snap ring ‡◊
16. 700.046.A lower check assembly
a. 700.046.001 lower check
b. 700.046.002 spring retainer
c. 700.046.003 spring spacer
d. 700.046.004 spring
e. 700.046.005 wear band ‡◊
f. 5217.100 snap ring ‡◊
g. 5192.210.V o-ring ‡◊
h. 5284.210 spiral backup ring ‡◊
17. 5192.234.V o-ring (3) ‡◊
18. 700.004 upper check seat
19. upper check
a. 700.013 upper check for 38:1 and 59:1 pumps
b. 700.003 upper check for 31:1 and 48:1 pumps
20. 5192.146.V o-ring ‡◊
21. packing assembly
a. 700.021.004 packing assembly for 38:1 & 59:1 pumps
i. 700.021.041 male packing brass ring ‡
ii. 700.021.142 TFE v-packing (5) ‡
iii. 700.021.043 female packing brass ring ‡
b. 700.001.004 packing assembly for 31:1 & 48:1 pumps
i. 700.001.041 male packing brass ring ◊
ii. 700.001.142 TFE v-packing (5) ◊
iii. 700.001.043 female packing brass ring ◊
22. packing support
© 2000-2001
braydenwërks, inc.
Page 21
RoadStar & HighwayStar Pump Service Manual
a. 700.021.003 packing support for 38:1 & 59:1 pumps
b. 700.001.003 packing support for 31:1 and 48:1 pumps
23. 700.041 spring
24. 700.052 coupler stud*
25. 700.051 coupler nut*
26. 700.050.A packing wrench *
27. 700.021.A01 packing nut
a. 700.021.A01 packing nut for 38:1 and 59:1 pumps
b. 700.001.A01 packing nut for 31:1 and 48:1 pumps
28. 700.040.160 outlet fitting
29. 700.040.150 outlet clamp set
a. 5192.219.V o-ring (part of clamp set) ‡◊
Items with ‡ are included in the SK709.132.C service kit.
Items with ◊ are included in the SK709.163.C service kit.
Items with an asterisk * are shown for reference only, they are not part of the pump assembly.
© 2000-2001
braydenwërks, inc.
Page 22
RoadStar & HighwayStar Pump Service Manual
AIR MOTOR AIR VALVE
The air motor air valve directs the air to the top and bottom of the air motor piston,
causing the air motor to stroke. The air valve receives its signals to shift from the
spool & sleeve valves in the air motor end caps.
1. 710.009 base gasket*
2. 5099.041 socket head cap screw (8)
3. 710.016 detent plunger & sleeve (2)
4. 710.040.003 gasket (2)*
5. 710.011 valve body
6. 5154.038.S socket head cap screw (2)
© 2000-2001
braydenwërks, inc.
Page 23
RoadStar & HighwayStar Pump Service Manual
7. 710.023 end cap (2)
8. 710.001.001 shuttle and plate assembly
9. 5020.416 ¼” lock washer – not shown (8)
10. 710.015 spool
11. 710.019 u-cup (2)*
12. 710.018 bumper (2)*
13. 710.024 push button (2)
14. 5192.013.N o-ring (for reference only, included in 710.024)*
*Included in SK710.010 service kit
SK710.010 AIR VALVE KIT
INSTALLATION INSTRUCTIONS
Disassemble the air valve and clean all parts. Clean all gasket surfaces.
Inspect the valve slide and plate assembly (the plate is the part with the three rectangular
slots and two screw holes in it, the slide is the hollowed out square piece with the two
grooves on the back). These are a set. If rebuilding more than one valve, do not mix
these parts. If the mating face between the slide and the plate is scored, they must be
replaced as a set.
Inspect both detent assemblies. The detent is the brass part with the steel ball in the end
of it. It pulls straight out of the valve body. Push on the steel ball. It must move freely. If
it does not, the detent needs to be replaced.
Inspect the re-set push buttons in the end caps. If the center part does not slide in and
out freely, disassemble and clean. This kit includes new o-rings for the base of the push
button
If used, inspect the decoupler chamber on the side of the bottom end cap. These valves
have the push button on the top and a cylindrical piece mounted to one side of the
bottom end cap that sticks up beside the valve body. Note: this chamber was added to
the valve to enhance its operation under certain conditions. No other changes were
made to the valve. The decoupler chamber may be replaced with the push button style
end cap if necessary when using salvage parts for field repairs.
(Note: If you are using this kit to service a Pyles built air valve, the kit includes stainless steel screws to
replace the black oxide coated screws that hold the slide plate into the body. The standard screws tend to
rust in place. These screws may not work in valves built prior to 1978. Valves built after 1978 can be
identified by a three letter code stamped into the valve body. Early valves do not have this code. In any
case, after installing these screws snug - NOT TIGHT - sight across the valve plate and body. If the screw
head sticks up above the plate they will not work in your valve. Remove the screw and grind off about
.030” from the screw head. Re-install the screw and check again.)
© 2000-2001
braydenwërks, inc.
Page 24
RoadStar & HighwayStar Pump Service Manual
Instructions for using a plastic wire tie during valve re-assembly.
• Install both u-cups on the spool shaft. Make sure that the open faces of the u-cups
face in toward each other. Lightly grease both u-cups.
• Stand the air valve body upright on a flat surface. (On valves with the PYLES script, the
word should be right side up.) On newer valves with no script, pick one end to be the top
and keep that end as the top when the end caps are installed.
• Insert the spool with the u-cups into the valve body from the top. The first u-cup will
fold up as it enters each bore in the body.
• When the second u-cup reaches the top of the valve body it will try and spread out
rather than enter the bore. Wrap the plastic wire tie around the u-cup and spool. Pull
the wire tie tight to collapse the u-cup back inside the spool. Gently push the spool
into the valve body.
© 2000-2001
braydenwërks, inc.
Page 25
RoadStar & HighwayStar Pump Service Manual
AIR MOTOR SPOOL VALVE
In each end cap of the air motor is a directional 3-way valve. When the piston
reaches the end of its stroke, the spool in the valve is shifted. This sends an air
signal to the main air valve which re-directs the main air supply to the opposite
side of the air motor piston.
A. 750.050 PLUG (1)
B. 84010.057 SPRING (1)*
C. 5192.014.N O-RING (5)*
D. 710.020 SPOOL & SLEEVE ASSEMBLY (1)
E. 84010.056 SPACER (2)*
*Included in the air motor repair kit
Typically, if the air motor will not reverse directions, one of the ports to the spool
valve in the end cap at that end of the stroke is plugged with dirt.
If the air motor reverses directions and immediately reverses back the other way
causing it to “stutter” at one end of the stroke, the spool valve in the OTHER end
cap is usually stuck in the open position.
To remove the spool valve for cleaning, remove the plug (or snap ring & plug) from
the end cap. Remove the reset spring. Insert an o-ring pick into the center of the
spool. Apply a slight side pressure and slide the spool out of the housing. To
properly remove the spool sleeve from the air motor end cap, the end cap should
be removed from the air motor, and the sleeve pushed out by inserting a 1/8”
punch through the hole provided.
An alternate method of removing the sleeve is to insert an o-ring pick or a bent
paper clip into the SECOND ring of air holes in the sleeve and gently pull it out of
the end cap. DO NOT SCRATCH THE INSIDE DIAMETER OF THE HOUSING.
© 2000-2001
braydenwërks, inc.
Page 26
RoadStar & HighwayStar Pump Service Manual
Any burrs or scratches on the sleeve or the spool will cause the valve to hang up
and not operate.
To clean the spool & sleeve, you will need a drill motor, some denture cream or
toothpaste and a very light oil such as 3-in-1® oil. (The toothpaste is a very light
abrasive; do not use the “gel” style.)
1. Chuck the stem of the spool in the drill motor.
2. Coat the spool with toothpaste or denture cream.
3. Slide the sleeve over the spool. It must be perfectly square with the spool,
or it will not go. Rotating it between your fingers while sliding it on helps.
When new, these parts have a .0001” clearance between the two
diameters, or .00005” per side.
4. Run the drill motor at a low to medium speed while holding the sleeve from
turning. Move the sleeve back and forth on the turning spool, but do not
come completely out of the bore.
5. Occasionally, slide the sleeve completely off of the spool and reverse it
end-for-end. Resume the polishing process.
6. Continue this activity until the sleeve can pass the entire length of the spool
without hanging up in any position.
If either the spool or sleeve has a bad build-up of varnish from the lubricating oil,
or bad nicks or scratches from dirt or improper handling, this operation can take 15
– 30 minutes.
When the spool passes freely through the sleeve, clean both parts with hot water
and dry them thoroughly. Coat both parts with the light oil and re-insert the spool
into the sleeve.
Hold the sleeve in a vertical position. The spool should slide completely out from
gravity alone. (Don’t let it fall on the floor, or you will end up doing the whole
process over.) If the spool will not move from gravity, it will probably not work
correctly when installed in the air motor. Either continue to polish it, or replace it
with a new one.
© 2000-2001
braydenwërks, inc.
Page 27
RoadStar & HighwayStar Pump Service Manual
AIR MOTOR END CAP SPOOL VALVE TEST
1. With the spool valve installed in the end cap of the air motor, and the air motor
piston not in contact with the interior face of the end cap:
2. Squirt oil in the COMMON PORT (center port of the diagonal set shown above).
3. Oil should come out of the EXHAUST PORT (port closest to the interior face on
the diagonal set shown above.)
4. Oil should NOT come out of the PILOT PORT (port furthest away from the interior
face on the diagonal set shown above.)
If the end cap is not installed on the motor, press and hold the end of the spool that
projects through the interior face of the end cap. Repeat the steps above. Now oil should
come out of the pilot port and not out of the exhaust port.
If oil can flow from the common port to each of the other ports all the time:
a. An o-ring on the O.D. of the spool sleeve is worn, damaged or missing.
Replace o-rings.
b. The spacer/bumper in the bottom of the spool valve bore is damaged or
missing and the ports in the end cap and spool valve are not lined up.
Replace 710.018 bumper.
c. Spool-to-sleeve clearance is excessive. Replace 710.020 valve assembly.
d. The bore in the end cap for the spool valve is scored and the o-ring(s) on
the sleeve are not sealing. Replace end cap or return to manufacturer for
repair.
© 2000-2001
braydenwërks, inc.
Page 28
RoadStar & HighwayStar Pump Service Manual
5. ELEVATOR ASSEMBLY
The elevator/ram assembly picks up the pump and follower plate for drum changes. It
also provides a constant down pressure on the surface of the material while the pump is
in operation.
1.
700.080.B01 elevator frame weldment
2.
5001.014 lock washer, internal shakeproof (2)
3.
5003.014 flat washer (2)
4.
5099.082 socket head cap screw (2)
5.
5020.816 lock washer (2)
6.
5099.044 socket head cap screw (4)
7.
86181.MF air valve
© 2000-2001
braydenwërks, inc.
Page 29
RoadStar & HighwayStar Pump Service Manual
8.
2900.002.YEL (48 inches) air hose
9.
2900.001.044 hose fitting (2)
10.
920.027 quick disconnect
11.
700.080.300 hose support (includes #4 & #5)
12.
2400.200 air valve
13.
86337 restrictor
14.
700.084 nut
15.
5148.211 dowel pin
16.
700.083 shaft
17.
700.A82 locator bracket, wide
18.
5005.08Y.1418 hex head bolt (2)
19.
700.080.A03 tie bar, wide
20.
700.130.007 lift rod (2)
21.
700.080.150 grease seal
22.
700.080.160 bearing
23.
5192.222.N o-ring (4)
24.
5192.232.N o-ring (4)
25.
86348A end cap & guide (2)
26.
86365 bumper (6)
27.
5217.516.150 snap ring (4)
28.
5192.218.N o-ring (4)
29.
86345 air piston (2)
30.
5192.334.N o-ring (2)
31.
86346 wear band
32.
5289.11B.040404 “T” fitting
33.
5037.004.004 tubing elbow 90° (5)
34.
5205.004.000 tubing fitting “Y” (2)
35.
2920.002.YEL ¼” nylon tubing (192 inches)
36.
5098.051 button head cap screws (8 – not shown)
37.
5099.047 socket head cap screw (2)
38.
5012.02Z.004 nut (2)
39.
5020.416 lock washer (6)
ELEVATOR DISASSEMBLY
© 2000-2001
braydenwërks, inc.
Page 30
RoadStar & HighwayStar Pump Service Manual
Clean the cylinders and replace the seals once each year. Moisture collects in the
cylinders causing a rust ring to build up at the top of the piston travel which makes
disassembly very difficult if it is not cleaned out properly.
Total time about 1 hour. You will need one SK700.080.B service kit, o-ring grease, air
tool oil, large snap ring pliers and a hex key set, rags or shop towels and Scotch Brite or
similar pads. A flashlight and an automotive cylinder hone are desirable.
1.
Disconnect air supply from pump.
2.
Bleed remaining air in elevator using hand valve.
3.
Remove tie bar by removing hex bolts, lock washers and flat washers. If still
connected, remove nuts and washers from follower plate support rods.
4.
Remove all 4 button head cap screws from the cylinder ends.
5.
Lift the cylinder rod out of the cylinder. DO NOT ATTEMPT TO USE AIR
PRESSURE TO FORCE THE ROD OUT! THIS WILL LAUNCH THE PISTON
AND ROD SEVERAL FEET IN THE AIR!
6.
Remove the cylinder cap & guide from the cylinder rod.
7.
Remove the grease seal and bearing from the cylinder cap.
8.
Remove 2 external and 2 internal o-rings from the cylinder cap.
9.
Remove the lower snap ring from the cylinder rod.
10.
Remove the piston from the cylinder rod.
11.
Remove the o-ring from the cylinder rod.
12.
Remove the upper snap ring from the cylinder rod.
13.
Remove the wear band and o-ring from the piston.
14.
Clean all components.
15.
Remove the pipe plugs from the bottom of the cylinder.
16.
Clean out the inside of the cylinder with clean rags attached to a rod.
17.
Use the abrasive pads attached to a rod or a cylinder hone to clean the inside of
the cylinder. (To use the hone in a deep cylinder requires a chuck extension for
your drill motor.)
18.
Flush any dirt from the cylinder with water.
19.
Dry the cylinder with clean rags or towels attached to a rod.
20.
Wipe the cylinder down with oil on a clean rag or towel attached to a rod.
21.
Reassemble in the opposite order.
Apply a liberal amount of o-ring grease to all o-rings during re-assembly.
© 2000-2001
braydenwërks, inc.
Page 31
RoadStar & HighwayStar Pump Service Manual
When installing the piston on the cylinder rod, put the upper snap ring and the o-ring on
the rod first. Put the piston on the rod with the o-ring groove down and the wear band
groove up.
Installing the piston and rod into the cylinder is easier for 2 people. Insert the piston into
the cylinder as far as the o-ring. Have a helper wrap the wear band around the piston
and make sure that it stays completely in the groove. Slide the piston and wear band into
the cylinder.
Slide the 3 rubber bumpers over the rod now. You will probably forget them if you don’t.
Pour about ¼ cup of air tool oil into the cylinder on top of the piston.
Set the bearing into the cylinder cap with a large diameter socket, or order the bearing &
grease seal insertion tool. The bearing must go into the cap square, or it will deform and
not fit over the rod. The bearing goes to the bottom of its cavity.
Set the grease seal into the cylinder cap with a large diameter socket. It sits flush with
the top of the cylinder cap. Take care to not damage the brass scraper lip.
Use the pump packing wrench in the holes in the top of the cylinder cap to align the
threaded holes with the holes in the cylinder. You should be able to install all 4 button
head screws by hand.
Repeat the steps above for the other cylinder.
© 2000-2001
braydenwërks, inc.
Page 32
RoadStar & HighwayStar Pump Service Manual
PREPARATION FOR MAJOR REPAIR OR REBUILD
These instructions assume that the pump is at least partially operational. If it is not,
please call the support number in the back of the book for additional assistance.
USE CARE, CAUTION AND COMMON SENSE WHEN WORKING ON THIS, OR ANY,
EQUIPMENT.
These instructions are written with the Bradenwerks pumps in mind, but they will work for
pumps built by Johnstone, Pyles, Graco and Aro also, with slight modifications. (When
known, comments for other brand pumps are included in these instructions.)
If the elevator works, even if nothing else is working, do steps 1 thru 8 below before doing
any additional work. This will keep silicone from curing on the follower plate, resulting in
additional cleanup. DO NOT REMOVE THE PUMP FROM THE SILICONE DRUM AND
LEAVE THE FOLLOWER PLATE EXPOSED TO THE AIR.
1. Raise the pump to the full height of the elevator.
2. NOTE: On pumps equipped with a safety guard and elevator interlock, it will be
necessary to open the guard while doing work, and close the guard while raising
or lowering the elevator.
3. On pumps without a safety guard and elevator interlock:
a. Cut two boards (2”X4”, 2”X2” or similar) just slightly less than the distance
between the top of the elevator cylinders and the underside of the elevator
crossbar.
b. Place the boards on top of the elevator cylinders and against the elevator
shafts where they are right under the crossbar. Duct tape or wire ties are
useful in keeping the boards in place.
c. Lower the elevator until the crossbar is resting on the boards. DO NOT
TRUST THE ELEVATOR CONTROL VALVE TO KEEP THE ELEVATOR
UP WHILE YOU ARE WORKING ON THIS PUMP.
4. If connected, remove the blow-off hose from the valve and fittings that go down
into the follower plate.
5. Remove all of the fittings and valve that go into the follower plate.
a. Disassemble and inspect the quick disconnect stem, ball valve and any
pipe nipples or bushing involved. These must all be clean and operational
before proceeding.
b. If there is a one-way check valve (a spring loaded device that lets air flow
into the plate but doesn’t let material flow back out) installed at the follower
plate, clean it, and set it aside at this time. Replace it with an appropriate
reducing bushing from a local hardware supply, if required, to match up
sizes.
6. Remove the boards and set them aside for future use.
© 2000-2001
braydenwërks, inc.
Page 33
RoadStar & HighwayStar Pump Service Manual
7. Obtain a clean empty drum and 10 – 15 gallons of mineral spirits (assuming you
have been pumping a silicone, other materials may require other solvents. Check
with your material supplier for an adequate solvent.)
8. Install the clean drum with mineral spirits the same way you would a fresh material
drum.
a. WEAR SAFETY GLASSES.
b. DO NOT REMOVE THE BLEED HANDLE FROM THE FOLLOWER
PLATE. SOLVENT WILL MAKE A FOUNTAIN OUT OF THE LARGE
OPENING.
c. WHEN THE FOLLOWER PLATE REACHES THE SOLVENT LEVEL,
OPEN THE BALL VALVE ON THE BLOW-OFF FITTINGS TO LET OUT
ANY AIR TRAPPED UNDER THE DRUM. PLACE YOUR THUMB OVER
THE QUICK DISCONNECT STEM OUTLET TO START AND STOP THE
FLOW OF AIR UNTIL IT IS ALL EXHAUSTED. CLOSE THE BALL VALVE.
9. Reduce the air pressure at the pump air motor to zero. If the pump was at least
partly operational, place a waste container under the bleed valve at the pump
head and open the bleed valve. Some bleed valves have a ¼” pipe thread in their
outlet. You may connect pipe fittings or a hose of adequate working pressure at
this point to help control the flow of material and solvent.
a. WEAR SAFETY GLASSES! WHEN THE SOLVENT PUSHES THE
MATERIAL OUT OF THE BLEED VALVE, THE FLOW RATE WILL
INCREASE SHARPLY.
b. HAVE A HELPER AVAILABLE TO TURN OFF THE AIR TO THE PUMP.
10. Increase the air pressure to the air motor slowly until the pump starts to cycle.
Catch the material and then some solvent in the waste container. Turn off the air
to the pump. Close the bleed valve.
11. Open the dispense valve or gun.
12. Increase the air pressure to the air motor slowly until the pump starts to cycle;
continue to pump solvent until it reaches the outlet.
13. If no solvent or material reaches the outlet and the pump stalls (stops moving even
though there is still air pressure applied), the hose, gun or valve, or outlet fittings
may be plugged with cured material.
a. Turn off the air to the pump air motor.
b. Place a waste container under the bleed valve closest to the hose
connection. (Johnstone, Pyles, Graco and some Aro pumps have the bleed on the
pump head. Johnstone and some Pyles pumps also have a bleed on the side port
check. If a side port check is used, you must bleed that valve first.)
c. WEAR SAFETY GLASSES. Open the bleed valve and allow trapped fluid
pressure to vent.
14. Remove the tip from the dispense wand. Repeat steps 11 & 12 above. If material,
then solvent flow, go on to step 15. If there is no flow, repeat step 13 above,
remove the next item at the end of the wand and repeat steps 11, 12. Keep
© 2000-2001
braydenwërks, inc.
Page 34
RoadStar & HighwayStar Pump Service Manual
removing items from the end of the dispense hose and wand assembly until you
determine which item was plugged. Remember to always bleed off trapped
pressure before removing a part that may be plugged.
15. Flushing the pump. There are three ways to deal with the solvent when flushing
the pump.
16. Swapping Drums:
a. Use two clean empty drums and a waste drum. Using mineral spirits in a
clean drum, pump the material out of the system into the waste drum.
b. As soon as mostly solvent is being pumped, turn off the pump and switch
the outlet to the second empty drum.
c. Start the pump and continue pumping solvent until the first drum is empty.
d. Change drums and pump from the second drum into the first drum.
e. Keep swapping drums for 30 – 60 minutes.
17. If the follower seals are going to be replaced:
a. Use a clean empty drum and a waste drum. With mineral spirits in a clean
drum, pump the material out of the system into the waste drum.
b. As soon as mostly solvent is being pumped, turn off the pump.
c. Raise the pump from the drum and remove the follower seals. (Remove the
screw clamps, or cut through the clamp strap. Johnstone seals pry off with
two large screwdrivers.) Remove the bleed handle probe and the blow-off
valve & fittings.
d. Lower the pump back into the drum until it is immersed in the mineral
spirits. Point the outlet hose back into the drum. Start the pump and
recirculate solvent very slowly for 30 – 60 minutes.
18. If the follower seals are not going to be replaced:
a. Use two clean drums and a waste drum. With mineral spirits in a clean
drum, pump the material out of the system into the waste drum.
b. As soon as mostly solvent is being pumped, turn off the pump.
c. Secure the pump air motor to the elevator cross-bar.
i. Pyles and Braydenwërks pumps have a clamp kit available for this
purpose.
ii. (Johnstone and Graco pumps have a lift eye and Aro pumps have two cast
in holes at the top of the air motor that works. If you need to tie off the air
motor to the cross-bar (Graco, Johnstone & Aro) make sure that you use
something adequate for this purpose.)
d. Remove the two nuts (or bolts depending on brand) that connect the
follower plate support rods to the elevator cross-bar. Make sure that there
are no other physical connections to the follower plate.
i. Pyles and Bradenwerks pumps should be ok.
© 2000-2001
braydenwërks, inc.
Page 35
RoadStar & HighwayStar Pump Service Manual
ii. (Johnstone pumps require removing 6 bolts that clamp the pump inlet to the
follower plate.
iii. Graco and some Aro pumps require removing follower plate clamp bolts
and air motor-to-support rod brackets.)
e. Raise the elevator with the pump off of the follower plate.
f. Remove the first drum with the follower plate immersed in the mineral
spirits.
g. Place the second clean drum with 5 – 10 gallons of mineral spirits under the
pump. Lower the pump back into the mineral spirits and point the outlet
hose back into the same drum. Start the pump and recirculate solvent
slowly for 30 – 60 minutes.
19. Stop the pump and transfer the discharge hose to the waste container. Start the
pump again and pump out as much of the dirty solvent as possible. Stop the
pump.
20. Add clean solvent to the drum under the pump inlet. Start and pump into the waste
container until the fresh solvent reaches the end of the discharge hose. Stop the
pump.
21. Cap the end of the discharge hose and let the pump soak for 24 – 48 hours. It
may be necessary to skip this step due to production requirements, but it will make
disassembly and clean-up much easier. If possible, recirculate some solvent
through the pump periodically during the soak period.
22. Stop the pump WITH THE COUPLER BETWEEN THE PUMP TUBE AND AIR
MOTOR EXPOSED, and bleed the pressure from the hose and dispense wand.
23. Remove the discharge hose from the pump outlet and cap it with an appropriate
cap. Set it aside for replacement, re-installation or rebuild of the gun or valve.
The pump fluid section is now ready to be disassembled and cleaned with the least
amount of effort.
© 2000-2001
braydenwërks, inc.
Page 36
RoadStar & HighwayStar Pump Service Manual
TROUBLESHOOTING AND TIPS SECTION
End user input is always welcome for this section. Please fax any tips that
we can include in future manuals to 800.736.4119.
Do not mix products from Dow-Corning and Crafco or Pecora in the same pump. The
cure system chemistry is different between D-C and the other two: the material may not
set up. Completely flush the pump, hose and wand with mineral spirits before making a
material change. Some end users have reported that they pump the system out with
grease when changing materials. Before trying this, check with your material supplier or
someone who actually does this regularly. We have never tested this method of cleaning.
Do not mix any of the silicone products with urethane products without completely
flushing the pump, disassembling and hand cleaning. The chemistry is totally different.
Replacing the hoses is also recommended.
Do not let the pump run empty. It is capable of pulling a vacuum on the drum and
sucking the bag liners up into the pump. The ONLY way to correct this condition is to
completely disassemble and clean the pump fluid section.
Drums with minor dents will work. The follower plate will push out smooth dents as much
as 2” deep. It may not push out deeper dents, nor dents that are creased. Refuse badly
dented drums at the time of shipment.
Silicone and Urethane joint sealant materials cure from exposure to the moisture that is in
the air. The higher the humidity, the faster the cure. Always keep your system sealed
up. Remove the pump from an empty drum only long enough to change drums. If a
fresh drum is not ready with the lid removed and the bag stretched, leave the pump
sealed up in the old drum.
For short term storage between jobs, leave the pump in the last drum used. Once a
week, start the pump and dispense about a gallon of material – enough to move fresh
material from the drum into the pump and hose.
For long term storage, more than 3 months, it is best to flush the entire system with
mineral spirits. Leave the mineral spirits in the system for a week and flush it out again.
Remove and cap the hose(s) with fresh mineral spirits in them. Disassemble and clean
the pump by hand, install new packings and o-rings, lightly lubricate and store empty.
Clean the follower plate, install new seals, lubricate lightly and store clean. These
operations are relatively easy to do with fresh silicone and very difficult to do with cured
silicone.
© 2000-2001
braydenwërks, inc.
Page 37
RoadStar & HighwayStar Pump Service Manual
DO NOT REPLACE ANY OF THE FLUID FITTINGS WITH PIPE FROM THE LOCAL
HARDWARE STORE. Use high pressure fittings designed for use in hydraulic systems.
The exception is the dispense wand. It is down stream from the shut-off point and not
subject to the high pressures that are created when the dispense valve is closed. It is
made from common Schedule 40 hardware store variety pipe to allow field modification
and replacement.
Commercial hydraulic hoses are relatively inexpensive and readily available. They make
a handy emergency replacement for the dispense hose, but they will absorb moisture
thru the wall of the hose and start to cure the silicone inside the hose. The result is that
the I.D. of the hose gets continually smaller until the flow rate is unacceptable.
If the main air motor air valve does not shift properly DO NOT BEAT ON IT WITH A
HAMMER OR OTHER HANDY OBJECT!!! This will not fix the problem and it frequently
results in a cracked valve body.
Do not use the red Marvel Mystery Oil in the air line oiler. It is not designed to lubricate
an air cylinder or air valves. Use any air tool oil or 5 weight non-detergent oil. Air tool oil
is available at most hardware stores and other places that sell pneumatic tools (impact
wrenches, air drills etc.)
Pump stops (stalls) in the up stroke when the dispense valve is closed, but will not stop in
the down stroke. Something is caught in the lower check valve. Make sure that the bag
liner has not been sucked up into the pump.
What is the correct elevator down pressure? If the pump cavitates (cycles without
moving any fluid) there is not enough down pressure. If material starts to leak up around
the follower plate seals there is too much down pressure. 40 – 60 PSI is common.
What is the correct air motor pressure? The air pressure on the air motor controls how
fast the pump runs. You may need more or less pressure depending on the skill of the
operator and the width & depth of the joint. 50 PSI is a good place to start and adjust
from there.
The exhaust muffler is forming ice on the outside. There is too much moisture in the
compressed air service. Ice on the muffler will eventually stop the pump. Do not remove
the muffler from the air motor. The air valve needs the back pressure to operate
properly. Running the pump without the muffler will damage the valve. Fix the problem
with the air supply instead. A temporary work-around is to buy a ¾” street elbow, a ¾” x
12” – 18” pipe nipple and a ¾” pipe coupling from a hardware store. Remove the muffler,
© 2000-2001
braydenwërks, inc.
Page 38
RoadStar & HighwayStar Pump Service Manual
install the elbow pointing up, and install the pipe, the coupler and the muffler. This will
reduce the icing problem until you can correct the source.
Removing Silicone
Before it is cured: use a putty knife to remove any of the uncured paste. Wipe the area
clean with isopropyl alcohol to remove any leftover residue.
After it is cured: First you should mechanically remove as much of the silicone as you can
with either a knife or a razor. A solvent can them be used to remove any oily residue or
any remaining silicone. It may be necessary to soak the silicone in a solvent overnight to
break it down. Below is a list of solvents in the order of aggressiveness in attacking the
silicone:
Paint thinner (mineral spirits)
Toluene
Xylene
Acetone
Methylene chloride.
When using solvents, as with any material, proper safety precautions should be
observed. Material Safety Data sheets are available upon request from your suppliers.
© 2000-2001
braydenwërks, inc.
Page 39
RoadStar & HighwayStar Pump Service Manual
TECHNICAL SUPPORT
If you purchased this pump from a re-seller, contact that company first. They know you
and your operation better than the factory representatives, and have agreed to provide
you with field and customer support as part of their sales effort.
If you purchased this pump from the factory representative Value Added Systems, Inc., or
need second tier technical support, please call us at 800.825.2379. You may be asked to
leave a message: if so, please describe your problem briefly and leave a name, company
name and phone number. Every effort is made to return these calls within 15 minutes.
If you prefer to contact us via e-mail, or have digital pictures of an area of concern,
please use [email protected].
AN UPDATED COPY OF THIS MANUAL IS AVAILABLE FOR DOWNLOADING AT:
http://www.dispense.com/rs
© 2000-2001
braydenwërks, inc.
Page 40
RoadStar & HighwayStar Pump Service Manual
Warranty Statement
Braydenwërks Inc. will repair or replace at no charge any part(s) it
determines are defective if said part(s) returned prepaid to its
authorized warranty agent or reseller. If the claimed defect is
verified, Braydenwërks Inc. will repair or replace the defective part(s)
and return it (them) to the original purchaser freight prepaid.
Damages due to causes other than defective material or
workmanship will be repaired at normal service charges which may
include labor, parts and transportation. Braydenwërks Inc. is not
responsible for labor or material charges arising from removal or
replacement of warranted parts.
Any part which is incorporated into Braydenwërks Inc. products but
are made by others, if warranted at all, are warranted only by the
original manufacturer.
There are no warranties, express or implied, beyond those stated
herein. Damages for breach of warranty are limited to the purchase
price of the product. Upon repayment of such amount to the buyer /
end user, the contract of sale of the equipment is cancelled without
reservation of rights. Braydenwërks Inc. is not liable for any
incidental or consequential damages arising out of any failure of its
equipment, including losses caused by defective materials and
workmanship.
This warranty is exclusive, and is in lieu of any other warranties,
express or implied, including but not limited to warranty of
merchantability or warranty of fitness for a particular purpose.
© 2000-2001
braydenwërks, inc.
Page 41
braydenwërks usa inc
Braydenwërks Inc. warrants to the original purchaser / end user, for
a period of 12 months from date of purchase that its products are
free from defects in material and workmanship. This warranty does
not cover, and Braydenwërks Inc. shall not be liable for, normal wear
or to damage or wear resulting from misuse, abrasion, corrosion,
negligence, accident, improper installation or tampering, inadequate
or improper maintenance.
RoadStar & HighwayStar Pump Service Manual
OPTIONAL TOOL KIT
© 2000-2001
braydenwërks, inc.
Page 42