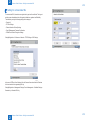
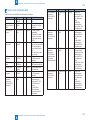
1
February 23, 2012
Revision 0
Universal SEND ADVANCE
Service Manual
imageRUNNER ADVANCE 8105/8095/8085 Series
imageRUNNER ADVANCE 6075/6065/6055 Series
imageRUNNER ADVANCE 4051/4045/4035/4025 Series
Specifications
Functions
Installation
Maintenance
1
2
3
4
0-2
Application
This manual has been issued by Canon Inc. for qualified persons to learn technical theory,
The following paragraph does not apply to any countries where such provisions are
installation, maintenance, and repair of products. This manual covers all localities where the
inconsistent with local law.
products are sold. For this reason, there may be information in this manual that does not
apply to your locality.
Trademarks
The product names and company names used in this manual are the registered trademarks
Corrections
of the individual companies.
This manual may contain technical inaccuracies or typographical errors due to improvements
or changes in products. When changes occur in applica0-1le products or in the contents of
Copyright
this manual, Canon will release technical information as the need arises. In the event of major
This manual is copyrighted with all rights reserved. Under the copyright laws, this manual may
changes in the contents of this manual over a long or short period, Canon will issue a new
not be copied, reproduced or translated into another language, in whole or in part, without the
edition of this manual.
written consent of Canon Inc.
(C) CANON INC. 2012
Caution
Use of this manual should be strictly supervised to avoid disclosure of confidential
information.
0-2
0-3
Contents
Specifications
Specifications-------------------------------------------------------------------1-2
SEND Options----------------------------------------------------------------------- 1-2
Item on Restriction: ------------------------------------------------------------------------- 1-3
Specifications------------------------------------------------------------------------ 1-4
E-mail transmission ------------------------------------------------------------------------ 1-4
I-Fax Tx/ Rx function ----------------------------------------------------------------------- 1-4
File transmission function ----------------------------------------------------------------- 1-4
Confirmed server applications ----------------------------------------------------------- 1-4
Ipv6 environment-----------------------------------------------------------1-5
Functions
Basic Function------------------------------------------------------------------2-2
Authentication at TX---------------------------------------------------------------- 2-2
POP before SMTP -------------------------------------------------------------------------- 2-2
SMTP AUTH---------------------------------------------------------------------------------- 2-2
Authentication at RX--------------------------------------------------------------- 2-5
APOP ------------------------------------------------------------------------------------------ 2-5
POP AUTH ----------------------------------------------------------------------------------- 2-5
CRAM-MD5----------------------------------------------------------------------------------- 2-5
NTLM------------------------------------------------------------------------------------------- 2-6
PLAIN------------------------------------------------------------------------------------------- 2-6
LOGIN------------------------------------------------------------------------------------------ 2-6
Encrypted transmission----------------------------------------------------------- 2-8
Transmission packet encryption (SSL) ------------------------------------------------ 2-8
Encrypted reception---------------------------------------------------------------- 2-9
Encrypted POP Reception - -------------------------------------------------------------- 2-9
STLS-------------------------------------------------------------------------------------------- 2-9
Encrypted SMTP Reception - ------------------------------------------------------------ 2-9
MAC Address Block Function--------------------------------------------------- 2-11
Receiving MAC Address Settings ----------------------------------------------------- 2-11
URL Send---------------------------------------------------------------------------- 2-11
Setting for communicate SSL---------------------------------------------------2-12
i-Fax Divided Data Transmission----------------------------------------------2-13
E-Mail Divided Data Transmission---------------------------------------------2-14
E-Mail Divided Data Reception-------------------------------------------------2-15
USB Deactivation------------------------------------------------------------------2-16
USB Device On/Off ------------------------------------------------------------------------2-16
USB Host On/Off ---------------------------------------------------------------------------2-16
Location of Parameters ------------------------------------------------------------------2-16
Document Orientation Auto Detection----------------------------------------2-17
Document Name OCR------------------------------------------------------------2-17
BOX back up------------------------------------------------------------------------2-18
System configurations---------------------------------------------------------------------2-18
Data to be backed up----------------------------------------------------------------------2-18
Data to be initialized at the restoration -----------------------------------------------2-18
Backup destination settings -------------------------------------------------------------2-18
Execution of the backup------------------------------------------------------------------2-19
Data of the backup destination----------------------------------------------------------2-19
Execution of the restoration -------------------------------------------------------------2-19
Security----------------------------------------------------------------------------------------2-20
Activation of SSL for RUI ----------------------------------------------------------------2-20
Transmission File Format--------------------------------------------------------2-21
Increased Support of File in a Box--------------------------------------------2-21
Compact Transmission -------------------------------------------------------------------2-21
Support of Compact/OCR (text searchable) Transmission - --------------------2-21
Support of Trace & Smooth -------------------------------------------------------------2-21
Limit of Reception Length of Extra Long Original--------------------------2-22
Restriction of Paper Type Information Delivery----------------------------2-22
Paper Type Support: ----------------------------------------------------------------------2-22
Restriction of Paper Type Information Delivery: - ----------------------------------2-22
HDD Data Erase Kit---------------------------------------------------------------2-23
Types of user data erased ---------------------------------------------------------------2-23
HDD Data Erase ---------------------------------------------------------------------------2-23
Turn the host machine's main power supply OFF/ ON ---------------------------2-23
HDD Data Erase timing settings -------------------------------------------------------2-23
HDD Data Erase mode settings --------------------------------------------------------2-23
Related service modes -------------------------------------------------------------------2-24
IP Address Range Settings------------------------------------------------------2-25
0-3
0-4
Protocol-Related Setup-----------------------------------------------------------2-26
Transmitting a Machine Signature PDF File ----------------------------------------- 3-4
Protocols and Applications Concerned -----------------------------------------------2-26
Making SSOH Settings------------------------------------------------------------ 3-5
RUI Log-in Procedure-------------------------------------------------------------2-26
cc/bcc Settings---------------------------------------------------------------------2-26
Send to Myself----------------------------------------------------------------------2-27
WebDAV Support------------------------------------------------------------------2-27
Enabling SSOH Using the SMS --------------------------------------------------------- 3-5
Registering SSOH Users ----------------------------------------------------------------- 3-6
Points to Note About Using WebDAV -------------------------------------------------2-27
IPv6 setting display list-----------------------------------------------------------2-28
Encrypted PDF---------------------------------------------------------------------2-29
Caution: --------------------------------------------------------------------------------------2-29
Notes: -----------------------------------------------------------------------------------------2-29
Digital Signature PDF-------------------------------------------------------------2-30
Searchable PDF/XPS-------------------------------------------------------------2-32
Display Host Name(Device Information Delivery Settings)-------------2-33
Display IP Address ------------------------------------------------------------------------2-33
Display Host Name ------------------------------------------------------------------------2-33
SSOH(Single Sign-On Hybrid)-------------------------------------------------2-35
XPS(XML Paper Specification)-------------------------------------------------2-36
USB Keyboard support-----------------------------------------------------------2-36
Restrictions-----------------------------------------------------------------------------------2-36
Initialization of all data and settings-------------------------------------------2-37
Limitations: ----------------------------------------------------------------------------------2-37
Data to be erased --------------------------------------------------------------------------2-37
Data not to be erased ---------------------------------------------------------------------2-37
How to erase --------------------------------------------------------------------------------2-38
How to erase the data collectively: ----------------------------------------------------2-38
Specification of erasing the data: ------------------------------------------------------2-38
HDD--------------------------------------------------------------------------------------------2-39
The number of rewriting the hard disk ------------------------------------------------2-39
Installation
Installation Procedure---------------------------------------------------------3-2
Overview of the Installation Procedure---------------------------------------- 3-2
Device Signature PDF------------------------------------------------------------- 3-3
Overview -------------------------------------------------------------------------------------- 3-3
Registering the License Information --------------------------------------------------- 3-3
Generating the CA Certificate and Key for the Machine Signature Function -3-3
User Signature PDF---------------------------------------------------------------- 3-8
Overview -------------------------------------------------------------------------------------- 3-8
Registering the License Information --------------------------------------------------- 3-8
Sending a User Certificate Through an RUI to an iR Machine ------------------ 3-8
Obtaining a User Certificate -------------------------------------------------------------- 3-8
Installable certificate format: ------------------------------------------------------------- 3-9
Checking the User Key and Certificate List ------------------------------------------ 3-9
Transmitting a PDF File with a User Signature - -----------------------------------3-10
User Signature creation----------------------------------------------------------3-12
Maintenance
Notes when service------------------------------------------------------------4-2
Other Points to Note--------------------------------------------------------------- 4-2
Recommended setting of system management information------------- 4-2
Creating SSL Key-Pair and Server Certification---------------------------- 4-3
Generating key-pair and server certification ----------------------------------------- 4-3
CA-KAY---------------------------------------------------------------------------------------- 4-5
User data Erase of the HDD----------------------------------------------------- 4-6
For a machine where the HDD Data Encryption Kit is installed - --------------- 4-6
In the case that the HDD Data Encryption Kit is not installed ------------------- 4-6
How to create WebDAV environment for verification---------------------- 4-7
Add the FrontPage 2002 Server Extensions - --------------------------------------- 4-7
Open WebDAV Folder --------------------------------------------------------------------4-12
Transmission Setup from the iR - ------------------------------------------------------4-12
Reference: -----------------------------------------------------------------------------------4-13
IPv6 settings------------------------------------------------------------------------4-14
IPv6 address automatic settings -------------------------------------------------------4-14
IPv6 address confirmation from a Windows Vista PC ----------------------------4-14
Local area connection confirmation from a Windows Vista PC ----------------4-15
IPv6 connection confirmation from the iR main unit touch panel --------------4-16
Related Service Modes List-----------------------------------------------------4-17
Service mode comparative table-----------------------------------------------4-19
Related Error code----------------------------------------------------------- 4-21
0-4
0-5
Confirm method of error code--------------------------------------------------4-21
E-mail Transmission errors------------------------------------------------------4-22
I-Fax Transmission errors--------------------------------------------------------4-25
I-Fax Reception errors------------------------------------------------------------4-27
SMB Transmission errors--------------------------------------------------------4-29
FTP Transmission errors---------------------------------------------------------4-31
Box Transmission errors---------------------------------------------------------4-33
WebDAV Transmission errors--------------------------------------------------4-34
Related Service Mode------------------------------------------------------ 4-37
Invalidating the License for Transfer to a Different Device (Level 2)-- 4-37
Possible Situation --------------------------------------------------------------------------4-37
Invalidation Procedure --------------------------------------------------------------------4-37
Installation Procedure --------------------------------------------------------------------4-37
Screen Design: -----------------------------------------------------------------------------4-37
0-5
0-6
The following rules apply throughout this Service Manual:
Explanation of Symbols
The following symbols are used throughout this Service Manual.
Symbols
1. Each chapter contains sections explaining the purpose of specific functions and the
Explanation
relationship between electrical and mechanical systems with reference to the timing of
Using it for general attention, warning, a notice of the danger that does not specify.
operation.
In the diagrams,
represents the path of mechanical drive; where a signal name
accompanies the symbol, the arrow
indicates the direction of the electric signal.
The expression "turn on the power" means flipping on the power switch, closing the front
Using the possibility of the electric shock for notice to be careful to.
door, and closing the delivery unit door, which results in supplying the machine with power.
2.In the digital circuits, '1' is used to indicate that the voltage level of a given signal is "High",
Mention about written item in the copier BASIC series to understand mention
contents.
while '0' is used to indicate "Low". (The voltage value, however, differs from circuit to
circuit.) In addition, the asterisk (*) as in "DRMD*" indicates that the DRMD signal goes on
T-0-1
when '0'.
In practically all cases, the internal mechanisms of a microprocessor cannot be checked in
the field. Therefore, the operations of the microprocessors used in the machines are not
discussed: they are explained in terms of from sensors to the input of the DC controller
PCB and from the output of the DC controller PCB to the loads.
The descriptions in this Service Manual are subject to change without notice for product
improvement or other purposes, and major changes will be communicated in the form of
Service Information bulletins.
All service persons are expected to have a good understanding of the contents of this Service
Manual and all relevant Service Information bulletins and be able to identify and isolate faults
in the machine.
0-6
1
1
Specifications
Specifications
■
■Specifications
1
Specifications > Specifications > SEND Options
1-2
Specifications
The individual option functions are characterized as follows:
SEND Options
A SEND function may be used to add to the existing transmission functions or to Adobe
Scalable PDF
This function outlines text in a scanned image so that a fine image is displayed
without jaggies even when it is enlarged.
Encrypted PDF
This function sets up a password for a document, which is a basic function of
Acrobat.
Two types of passwords can be selected; one is needed to open the document,
and the other is needed to edit the document.
To make this function available, it is necessary to enable the license for SEND
Security Kit -C1.
Digital User
Signature PDF/
XPS
This function generates a PDF document by embedding the user information for
which SDL or SSO (Single Sign-On Hybrid) was performed or that recorded in
the IC card into a scanned image.
The embedded user information can be checked in the signature tab when the
document is opened with Acrobat Reader.
To make this function available, it is necessary to enable the license for Digital
User Signature Kit - C1 and install the key pair and user certificate on the
computer using the remote UI.
Additional Functions > Setting the user key and certificate > Installation
Checking the key pair and user certificate
System Settings > Network Settings > TCP/IP Settings > Certificate Settings >
List of keys and certificates > List of user keys and certificates > Selecting the
target key pair > Certificate Details > Certificate Verification
Acrobat PDF/XML paper specification-related functions.
Individual options are enabled after enabling the SEND transmission function and then
obtaining an appropriate license. There is no specific order as to which license option to
enable first. Except for Except for Trace & Smooth, all options may be enabled independently
of one another.
B asic
SEND
F unction
C om pact
P D F /X P S
U n ive rsal S e n d A d va n ce d
F e a tu re S e t
T race & S m ooth P D F
S earchable P D F/X P S
Device Signature This function generates a PDF document by embedding encrypted information
PDF/XPS
of the device name or serial number into a scanned image.
The embedded device information can be checked in the signature tab when
the document is opened with Acrobat Reader.
To make this function available, it is necessary to enable SEND Security Kit
- D1 and generate a certificate and key pair for the device signature under
System Settings.
System Settings > Network Settings > TCP/IP Settings > Certificate Settings
Generate Key > Start key Generate
Checking the key pair and device certificate
System Settings > Network Settings > TCP/IP Settings > Certificate Settings
> List of keys and certificates > List of keys and certificates for this machine >
Device Signature Key > Certificate Details > Certificate Verification
R eader E xtensions P D F
U niversal S end S ecurity
F eature S et
E ncrypted P D F
D evice S ignature
Reader
Extension
U niversal S end D igital
U ser S ignature K it
PDF file which edited by this function, can be edited by not only Acrobat but
also Acrobat Reader.
This gives, it is not necessary to purchase Acrobat or print paper to pass a
circular document.
D igita l U se r S igna tu re
F-1-1
1
Specifications > Specifications > SEND Options
1-2
1
Specifications > Specifications > SEND Options > Item on Restriction:
1-3
Adobe Life
Cycle Rights
Management
Function to create a PDF of scanned document to which the policy information
is added by linking with the Rights Management server.
Since the function adds policy information to documents and centrally manages
the rights on the Rights Management server, permission/restriction to view, print
or copy is possible even after the document is distributed.
There is not a button on UI at the time of the shipment.
So turn on Adobe Rights Management function with service mode after
customer made user's registration in Adobe company. At the time of PDF
sending, the button which can generate PDF with Policy appears. But it is
covered by gray, and disable to choose it. Appointing the URL of the server with
User mode make it possible to clear and push the button.
PDF/A-1b
A PDF format to save it for a long term used in government organizations.
T-1-1
■■Item on Restriction:
For the electronic signature-attached PDF transmission, user can send with any combination
of signature-registering method (device signature, user signature).
User, however, need to take care of the following points to note.
• In the case of selecting multiple signature-registering methods, signature is attached by the
order of the following: Device Signature => User Signature.
• In the case of setting multiple signature-registering methods, and opening the signatureattached PDF by Acrobat, only the last-attached signature is valid as a specification of
Acrobat (PDF).
When the signature was added, some changes were generated in PDF.
The signature that proves the state before enters the falsified state.
This is the same meaning as the addition of the change to PDF.
Warning that 'There have been subsequent changes to the document' to the property of the
signature.
• To execute user signature, SSOH has to be used.
1
Specifications > Specifications > SEND Options > Item on Restriction:
1-3
1
Specifications > Specifications > Specifications > Confirmed server applications
Specifications
<SEND function basic specifications>
■■E-mail transmission
• Transmission protocol: SMTP, POP3
• Transmission authentication: SMTP AUTH, POP before SMTP
• Reception authentication: POP3, APOP, POP AUTH
• Encoded transmission: Corresponds to SSL communication in each protocol when SMTP
transmission and SMTP and POP reception. (The server side needs to correspond.)
• Key and certificate: Server certificate that the device has is used when SSL communication.
• Supported formats: TIFF (monochrome), JPEG(color), PDF (monochrome, color), PDF/
XPS(high compression)(color), PDF/XPS (OCR) = Searchable PDF, Encrypted PDF,
Trace&Smooth PDF, Device Signature PDF/XPS, Digital Signature PDF/XPS.
• PDF files can be split and sent page by page.
• Resolution: 100 X 100, 150 X 150, 200 X 100, 200 X 200, 200 X 400, 300 X 300, 400 X
400, 600 X 600 (dpi)
• Document size: A3 to A5
• Addresses available from LDAP server (e-mail address and FAX telephone number)
Max. number of searching: 2000; The number of broadcasting selection after searching: 64
1-4
• Addresses available from LDAP server (e-mail address and FAX telephone number)
Max. number of searching: 2000; The number of broadcasting selection after searching: 64
• When broadcasting transmission, display/write all the addresses in the To: field.
■■File transmission function
• Transmission protocol: SMB (NetBios over TCP/IP), FTP(TCP/IP), WebDAV(HTTP)
• Supported formats: TIFF (monochrome), JPEG(color), PDF/XPS (OCR), Searchable PDF,
Encrypted PDF, Trace&Smooth PDF, Device Signature PDF/XPS, Digital Signature PDF/
XPS.
• PDF files can be split and sent page by page.
• Resolution: 100 X 100, 150 X 150, 200 X 100, 200 X 200, 200 X 400, 300 X 300, 400 X
400, 600 X 600 (dpi)
• Document sizes: A3, A4
• CanonFTP automatically distinguishes responses from the server and switches operation
accordingly.
■■Confirmed server applications
SEND
Service
Protocol
Applications
OS
eMail
SMTP
Sendmail 8.12.5 or later
UNIX
Exchange Server 5.5 + SP1
WinNTS
Domino R4.6 or later
Domino 6.5
WinNTS
FTP Server
UNIX
FTP Server(IIS4.0, 5.0, 6.0)
WinNTS
FTP Server
Mac OS X
Windows File System
WinNTS
Samba2.2/3.0
• No E-mail reception function. Error mails can be printed out.
When broadcasting transmission, display/write all the addresses in the To: field and separate
every 100 addresses to send.
File
FTP
■■I-Fax Tx/ Rx function
• Transmission protocol: SMTP (Tx/ Rx), POP3 (Rx), I-Fax (Simple mode, Full mode)
SMB
• Transmission authentication: SMTP AUTH, POP before SMTP
• Reception authentication: POP3, APOP, POP AUTH
• Encoded transmission: Corresponds to SSL communication in each protocol when SMTP
transmission and SMTP and POP reception. (The server side needs to correspond. When
the server-less transmission, the encoded transmission is not executed. )
• Key and certificate: Server certificate that the device has is used when SSL communication.
• Supported formats: TIFF (monochrome: MH, MR MMR)
• Resolution: monochrome:200 X 100, 200 X 200, 200 X 400, 300 X 300, 400 X 400, 600 X
Report
Error Mail
Report
SMTP
Sendmail 8.93
RedHat Linux 7.2
Mac OS 10.2
UNIX
POP3
qpopper 2.53
UNIX
SMTP,
POP3
Exchange Server 5.5 + SP1
WinNTS
Domino R4.6 or later
WinNTS
600 (dpi)
• Document size: A3, A4
• Reception sizes: A3, A4
• Server-less transmission supported
1
Specifications > Specifications > Specifications > Confirmed server applications
1-4
1
Specifications > Specifications > Specifications > Ipv6 environment
●● Mail client for SMTP certification required
Outlook2000
• OutlookExpress5
• Becky! 2.0.5
• WinBiff 2.42
• Eudora 5.1-J
• PC-Pine 4.50
• Netscape 7.01
1-5
■■Ipv6 environment
●● Email / IFAX
• OS (SUN): Solaris9
• SMTP : Sendmail : 8.13.5
• POP3 : Qpopper : 4.0.8
• SSL : OpenSSL : 0.9.8
• Mozilla 1.2.1
●● WebDAV
●● File transmission of environment
• WebDAV : Apache : 2.0.5.8
WebDAV
• Sun Solaris 2.6 or later + Apache2.0
• Red Hat Enterprise + Apache2.0
• Linux AS/ES/WS 4.0 or later + Apache2.0
• Windows 2000 Server + Apache2.0
• Windows 2000 Professional/Server + IIS5.0
• Windows XP Professional + IIS5.1/Apache2.0
• Windows Server 2003 + IIS6.0/Apache2.0
• Mac OS X + Apache1.3
• OS (SUN) : Solaris9
• OS : WindowsServer2003
• IIS : 6.0
• OS : WindowsXP
• IIS : 5.1
●● FTP
• OS : Solaris9
• OS Standard FTP server wu-2.6.2
• OS : MacOS X 10.3
• OS Standard FTP server(tnftpd 20040810)
●● LDAP
• OS (SUN) : Solaris9
• Open LDAP 2.3.31
●● SMB
• Windows XP
• Windows VISTA
• Windows Server 2003
• Windows Server 2008
1
Specifications > Specifications > Specifications > Ipv6 environment
1-5
2
2
Functions
Functions
■
Function
■Basic
2
Functions > Basic Function > Authentication at TX > SMTP AUTH
Basic Function
2-2
■■SMTP AUTH
In SMTP AUTH, user authentication is performed when the SMTP server is connected, so that
Authentication at TX
When the mail server is set on the internet, you need to prevent from Third Party Mail Relay
that the third party uses the false name. Third Party Mail Relay means that the third party
sends large amount of spam mails using the mail server which other people are operating. If
you do not take any measures for this, resources like server and network lines are exhausted
and at the same time, you will get the claim from the user who received the spam mail. As a
measure, the authentication operation when SMTP transmission is prepared.
In case of the inner network (LAN), you can prevent from Third Party Mail Relay by restricting
the IP address and the domain name. In order to send from the outside domain using the
mail address or securely use the mail server set on the internet which the provider prepares,
the authentication is indispensable at the transmission. This machine uses two authentication
methods, POP Before SMTP and SMTP AUTH and they enable to send i-FAX and e-mail to
SMTP server which requests the sender's authentication.
■■POP before SMTP
With this method, before SMTP transmission is performed, the POP server is logged into.
SMTP transmission can only be continued once the POP server has confirmed the IP
address of the connected client as authorized within a specific period of time. After user
authentication is carried out at the POP server, the authenticated client IP address is relayed
to the SMTP server, where it is processed. The process requires a certain amount of time.
Taking this processing time into consideration, there is an idle period of 300msec, from
POP authentication to the start of SMTP transmission. If a POP before SMTP transmission
is generated during POP reception, POP authentication is made to wait until the reception
is finished and then POP authentication and SMTP transmission are performed. Errors
occurring while the POP server is connected are treated as transmission errors.
With regard to the actual programming, all that is necessary is for Settings / Registration >
Function Settings > Send > E-Mail/ I-Fax > Communication Settings > Authent./ Encryption >
POP Authentication bofore Sending to be set to ON.
Related new user error codes are #810 and #813. For details, refer to Troubleshooting.
mail can only be received from registered users. This method was standardized in March,
1999, as RFC2554. SMTP AUTH uses ESMTP protocol, which is an extension of SMTP,
and uses the SASL (Simple Authentication and Security Layer) authentication mechanism,
standardized as RFC2222, to authenticate the user by sending the user name and password
information in response to the server challenge data.
<Authentication mechanisms>
The SMTP server can have multiple authentication mechanisms and the most suitable
authentication mechanism is programmed in accordance with the security policy decided by
the SMTP server administrator. The client E-Mail client application selects the authentication
algorithm from among the available authentication mechanisms and performs authentication
upon transmission.
This model supports the following five types of authentication mechanism.
CRAM-MD5
Challenge-Response Authentication Mechanism, computed by using the key-protected MD5
algorithm by HMAC-MD5 (RFC2104)
NTLM
Windows NT authentication method
User name must be set in the form 'username@NTdomainname'
E.g.:
Windows2000 or earlier: username\\CANON (domain name may be omitted, depending on
the environment)
Windows2000: [email protected] (domain name may be omitted, depending on the
environment)
GSSAPI
Authentication system using Kerberos Version 5 (RFC1510)
User name must be set in the form 'username@realmname'.
[email protected]
(In Exchange2000, realm name = domain name)
PLAIN
Assumes that user name and password are sent as plain text (BASE64 encoded) and the
communication packet is encoded. (RFC2595) Allows secure authentication when used in
2
Functions > Basic Function > Authentication at TX > SMTP AUTH
2-2
2
Functions > Basic Function > Authentication at TX > SMTP AUTH
combination with the encoded transmission described later.
2-3
S: PENCeUxFREJoU0NnbmhNWitOMjNGNndAZWx3b29kLmlubm9zb2Z0LmNvbT4=
C: ZnJlZCA5ZTk1YWVlMDljNDBhZjJiODRhMGMyYjNiYmFlNzg2ZQ==
S: 235 Authentication successful.
LOGIN
Sends the user name and password as plain text (BASE64 encoded). Actual transaction is
the same as with PLAIN. Similarly, allows secure authentication when used in combination
<Authorisation algorithm selection>
with encoded transmission.
Where the SMTP has multiple authentication mechanisms, selection is made in the order of
the priority list given below.
<SMTP AUTH transmission operation>
Even if the unit is programmed for transmission with SMTP AUTH, if the mail server does
1) CRAM-MD5
not support SMTP AUTH and the encoding system supported by the server does not match
2) NTLM
that supported by this model, SMTP AUTH transmission will not be possible. In that case,
3) GSSAPI
even if SMTP AUTH is programmed, transmission will be by normal SMTP and there will be
4) STARTTLS operation PLAIN
no transmission error generated. If an unauthenticated mail transmission is attempted to a
5) STARTTLS operation LOGIN
server that will not allow such transmission, subsequent SMTP protocols will generate an
6) STARTTLS non-operation LOGIN
error in the mail server. Unauthenticated mail can be transmitted to a server that will accept
7) STARTTLS non-operation PLAIN
such transmission. These security policies are determined by the server so, even if SMTP
AUTH is not programmed, it is impossible to tell whether transmission is possible without
Authentication methods can be disabled in service mode. When the service mode value is
checking with the customer's server administrator.
set to '1', the encoding system can be disabled. (The default setting is all enabled.)
Ordinarily, the default setting is used, but if the server administrator wants to disable a
<Authentication protocol>
particular encoding system, the settings need to be changed by the service mode settings.
Examples of transmission protocol using SMTP AUTH are given below.
The EHLO response from the client tells whether SMTP AUTH is supported by the server and
<SMTP AUTH related user modes>
the authentication algorithm being used at that time is described. In the event that there are
For the actual SMTP AUTH settings, system administrator settings > network settings >
multiple authentication algorithms, multiple algorithm names are described. The client selects
E-Mail/ I-Fax > Authent./ Encryption > SMTP Authentication (SMTP AUTH) should be set ON
one of the relayed authentication algorithms and then relays it on to the server. Server
and the required user names and passwords for SMTP AUTH need to be entered. If SSL
challenge data come from the server and coded data made up from the server challenge
permission, which is the encoded transmission setting, described later, is ON, with PLAIN and
data, user name and password are returned in response for authentication. In general,
LOGIN authentication, the authentication encoded by the STARTTLS command can be used.
the authentication algorithm to be used can be selected on the server side and PLAIN and
LOGIN authentication and others which are undesirable from the perspective of security can
<Outlook Express example>
be blocked by the server setting. (Security policy is determined by the server.)
For reference, this section describes what happens to the Outlook Express settings when
using an SMTP server that supports SMTP AUTH. Outlook Express PLAIN authentication
Server:220 smtp.example.com ESMTP server ready
only.
Client(iR):EHLO ifax.example.com
1) From the Outlook Express tools menu, select Accounts. In the example, pop3.canon.com
S: 250-smtp.example.com
is selected.
S: 250-DSN
2) From Internet Accounts, select the desired account and click on Properties. In the
S: 250-EXPN
example, the pop3.canon.com server tab has been selected from the Properties window.
S: 250 AUTH CRAM-MD5 DIGEST-MD5 : <- server declares authentication algorithm
3) Put a check in the 'My server requires authentication' box against the OutGoing mail
C: AUTH CRAM-MD5 : <- client selects CRAM-MD5
server.
S: 334 : <- server response (subsequently, authentication begins with CRAM-MD5.)
2
Functions > Basic Function > Authentication at TX > SMTP AUTH
2-3
2
Functions > Basic Function > Authentication at TX > SMTP AUTH
2-4
selected, encoding is carried out by TSL(SSL), using the STARTTTLS command.
<SMTP AUTH related user error codes>
The related new user error codes are #839 and #843. For details, refer to the section on
Troubleshooting.
F-2-1
4) Press the settings button that has been made active.
5) Programme the transmission mail server window's logon information. In the default, 'use
same settings as my incoming server' is selected. This setting uses the POP3 authentication
account name and password entered against the reception mail server in the previous
window and performs SMTP AUTH operation.
F-2-2
If 'Log on using' is selected, the account and password to be used with SMTP AUTH can
be specified individually. In that case, if 'Log on using Secue Password Authentication' is
2
Functions > Basic Function > Authentication at TX > SMTP AUTH
2-4
2
Functions > Basic Function > Authentication at RX > CRAM-MD5
Authentication at RX
The username and the password flow by the plaintext in the reception form by past POP3.
And POP3 logs in POP server at a short cycle. Therefore, the password is easily stolen in
POP3.
Enable the password to encrypt and to be attested by using APOP and POP AUTH. APOP
is defined by RFC1939, and executed with UNIX system POP server, and POP AUTH is
defined by RFC2449, and executed with the MS Exchange server.In addition, if POP server
supports the SSL(TLS) encryption by the STLS instruction, not only the password but also the
entire reception packet can be encrypted.
"POP AUTH Method " exists in Settings Registration >Function Settings >Send >E-mail/I FAX
>Communication Settings >Authent./Encryption , and it is possible to select it from Standard /
APOP / POP AUTH .
APOP and POP AUTH are executed respectively when APOP and POP AUTH are selected,
and when Standard is specified, the authentication by the username and the password is
executed.
Default: It is Standard.
error occurs at the APOP authentication, "APOP Authentication Error" is displayed on the
status line for certain time.
Following items are the examples of communication.
S: +OK POP3 server ready <[email protected]>
C: APOP mrose c4c9334bac560ecc979e58001b3e22fb
S: +OK maildrop has 1 message (369 octets)
C: :
When the server connection, the password "tanstaaf" character strings of the user mrose
is linked after "<[email protected]>" message. Character strings of
"<[email protected]>tanstaaf" is hashed by MD5, then it becomes
"c4c9334bac560ecc979e58001b3e22fb".
For actual settings, set as follows. System Settings > Network Settings > E-mail/I-Fax >
Authent./ Encryption > POP AUTH Method >APOP.
■■POP AUTH
POP AUTH uses the authentication mechanism of SASL(Simple Authentication and Security
Layer) provided in RFC2222 and conducts the user authentication by returning the user name
■■APOP
APOP authentication procedures are as follows.
(1) As a greeting message when connecting to POP server, the server returns the character
strings consisting of the time stamp and the host name to the client. The client links these
character strings with the password character strings, and creates the message digest by
MD5 from the linked character strings.
(2) With the APOP command, the client returns the message digest created with the user
name to the server.
(3) Message digest is created in the POP server with the same algorism. By comparing this
created digest and the digest from the client, if both digests are the same, the password is
considered as the correct one.
Greeting message when connecting to the server includes the time stamp, so analyzing is
difficult since the created message digest changes every time.
Different from the POP AUTH described later, there is no protocol to check whether or not the
server is supporting APOP from the client, so the user have to decide whether or not APOP is
used and set User mode.
If the server does not support APOP and the user uses APOP, an error occurs. When the
2
2-5
Functions > Basic Function > Authentication at RX > CRAM-MD5
and password information as a response to the server challenge and its data from the server.
This is standardized as RFC1734 "POP3 AUTHentication command". By the CAPA command
extended in RFC2449 "POP3 Extension Mechanism", you can know the capability which the
server has, and SASL authentication algorism which the server supports is included in one
capability and returned by the SASL tag.
<Authentication mechanism>
In the POP server, multiple authentication mechanisms can be possessed and the
authentication mechanism is set according to the security policy which the server
administrator decides. E-mail client application selects the authentication algorism from the
specified authentication algorism and performs the authentication at the transmission. This
device supports the following authentication algorism.
■■CRAM-MD5
Challenge-Response Authentication Mechanism calculated using MD5 algorism with the key
based on the HMAC-MD5 (RFC2104).
Note:
Currently, POP AUTH server in the field are mostly made by Microsoft and NTLM
2-5
2
Functions > Basic Function > Authentication at RX > LOGIN
2-6
authentication is used. CRAM-MD5 is installed, but there is no server which the operations
<Authentication protocol example>
are checked, so the evaluation has not performed. For this reason, POP AUTH operations
Examples of transmission protocol when using POP AUTH are shown below.
with CRAM-MD5 are not supported.
With the CAPA response from the client, supporting SASL is informed from the server. At
this time, usable authentication algorism is described. If multiple authentication algorisms
■■NTLM
are possessed, multiple algorism names are described. Client selects one algorism from
Authentication method of Windows NT
User name has to be set in the form of "User name@ NT domain name".
the authentication algorisms which the server informed and the selected authentication
algorism is informed to the server. The server sends the server challenge data, and performs
authentication by returning this data and the encrypted data created from the user name and
password as a response. Generally, the authentication algorism can be selected on the server
Example:
Windows2000 or former: User name\\CANON (Domain name can be omitted according to the
environment.)
Windows 2000: User [email protected] (Domain name can be omitted according to the
environment.)
side whether to be used. If it is not suitable to be used for the security, it can be prohibited by
the settings on the server side. (Security policy can be determined by the server.)
Server: +OK POP3 v2001.78 server ready <[email protected]>
Client(iR): CAPA
S: +OK Capability list follows:
■■PLAIN
S: TOP
Authentication method that user name and password are transmitted in plaintext (BASE64
encode) and the packet is encrypted. (RFC2595) By applying with the later "Encrypted
transmission", the authentication is secured.
S: LOGIN-DELAY 180
S: UIDL
S: STLS
S: USER
S: SASL CRAM-MD5 LOGIN
■■LOGIN
User name and password are transmitted in plaintext (BASE64 Encode). Actual method
of communicating information is same as PLAIN. By applying with the later "Encrypted
transmission", the authentication is secured.
S: .
C: AUTH CRAM-MD5
S: + PDE5MDQ0LjEwNDU4MTEyMThAYmFiYS5jY20uY2Fub24uY28uanA+
C: ZnJlZCA5ZTk1YWVlMDljNDBhZjJiODRhMGMyYjNiYmFlNzg2ZQ==
S: +OK Authentication successful....
Note:
When SSL is not operated, the authentication of PLAIN and LOGIN is not encrypted, so there
is no difference from the authentication of the plaintext USER/PASS. For this reason, there is
no meaning of using POP AUTH. This operation gives misunderstanding that it is encrypted,
so operations with POP AUTH are prohibited.
< POP AUTH reception operations>
Even POP AUTH is set to be used for receiving, if the mail server does not support POP
AUTH, the server supporting-authentication method and the device supporting-authentication
method are different, the reception with POP AUTH is impossible. In this case, "POP AUTH
Encryption Error" is displayed on the status line.
...
<Selection of the authentication algorism>
When SMTP server possesses multiple authentication mechanisms, the authentication
method is determined in the following priority order.
1) CRAM-MD5 (Not supported)
2) NTLM
3) PLAIN when STLS (SSL) operation
4) LOGIN when STLS(SSL) operation
From Service mode, you can prohibit the usage of each authentication method. If you set
Service mode setting to "1", you can prohibit the usage of the authentication method. (All
defaults: usable)
Usually, the device is used with the default settings, but if the server administrator prohibits
2
Functions > Basic Function > Authentication at RX > LOGIN
2-6
2
Functions > Basic Function > Authentication at RX > LOGIN
2-7
the usage of the specific authentication method, you can change the setting by Service mode.
< POP AUTH-related Addtional Settings>
Actual POP AUTH-related setting is selected in the order of Settings /Registration > Function
Settings > Send > E-mail/I-Fax > Communication Settings > Authent./ Encryption > POP
AUTH Method > POP AUTH, and then you want to enter the user name and password
necessary for POP address and POP password. When enabling "SSL Allow (POP)" (the
setting of encryption communication), the encrypted authentication by STLS command can
be used at PLAIN and LOGIN authentication.
2
Functions > Basic Function > Authentication at RX > LOGIN
2-7
2
Functions > Basic Function > Encrypted transmission > Transmission packet encryption (SSL)
Encrypted transmission
■■Transmission packet encryption (SSL)
2-8
<User error>
Related new user errors are #841 and #842. For details, refer to the section on
Troubleshooting.
When Settings /Registrations > Function Settings > Send > E-Mail/ I-Fax > Communication
Settings > Authnt. /Encryption > allow SSL(SMTP send) is set to ON, and the mail server
supports the SMTP protocol's STARTTLS command, SSL (TLS) is used for transmission
packet encryption. Not only the user name and password are encrypted, but also all of the
mail transmission data. Therefore, the transmission speed is slower.
If 'allow SSL(SMTP Semd)' is set to OFF, or the mail server does not support the SMTP
protocol's STARTTLS command, the transmission packet is not encrypted.
<STARTTLS command>
STARTTLS is an SMTP command that tells the server that encrypted transmission (SSL/
TLS) is about to start. The command is standardized in RFC2487. Following is an example
of the protocol flow during STARTTLS.
The EHLO response from the client declares that STARTTLS is supported from the server.
When the client generates the STARTTLS command, the operation is reprocessed from the
starts and negotiation is initiated and the packet data are encrypted.
S: 220 mail.imc.org SMTP service ready
C: EHLO mail.example.com
S: 250-mail.imc.org offers a warm hug of welcome
S: 250-8BITMIME
S: 250-STARTTLS : <- Shows that the server supports STARTTLS.
S: 250 DSN
C: STARTTLS : <- Declares to server that SSL/TLS are to be performed.
S: 220 Go ahead
-- All subsequent transmission packets will be encrypted.
C: <starts TLS negotiation>
C&S: <negotiate a TLS session>
C&S: <check result of negotiation>
C: EHLO mail.example.com
S: 250-mail.imc.org touches your hand gently for a moment
S: 250-8BITMIME
S: 250 DSN
2
Functions > Basic Function > Encrypted transmission > Transmission packet encryption (SSL)
2-8
2
Functions > Basic Function > Encrypted reception
Encrypted reception
There are two types of encrypted reception methods available - encrypted POP and SMTP
email receptions.
■■Encrypted POP Reception
When Allow SSL (POP) control is turned on in Authentication/Encryption Settings window*
and the POP server supports STLS command, defined in POP3 protocol, the imageRUNNER/
iR can communicate with encrypted packets using SSL (TLS). The communications slows
down since not only the user name and password but also the entire communication data for
email reception are encrypted. If Allow SSL (POP) control is turned on but the POP server
does not support STLS command of POP3 protocol, it results in an error. If an error occurs in
POP SSL communications, the status line displays "SSL Error (POP)."
* Authentication/Encryption Settings window: opens by selecting Settings /Registration >
Function Settings > Send > Email/I-Fax > Communication Settings > Authent./ Encryption.
2-9
<TLS negotiation, further commands are under TLS layer>
S: +OK POP3 v2001.78 server ready [email protected]
■■Encrypted SMTP Reception
The iR 2270 and later models support SSL (TLS) encryption for receiving email messages
from SMTP servers. To use this feature, a valid server certificate is required. When SSL
or On option is selected for Allow SSL (SMTP Receive)* and the email server supports
STARTTLS command, the imageRUNNER/iR can communicate with encrypted packets
using SSL (TLS). When Off option is selected for Allow SSL (SMTP Receive) control, the
imageRUNNER/iR does not include STARTTLS in a response for EHLO. The communications
slows down since not only the user name and password but also the entire data for email
sending are encrypted. When Off option is selected for Allow SSL (SMTP Receive) or the
email server does not support STARTTLS command of SMTP protocol, the communication
packets are not encrypted.
*Allow SSL (SMTP Receive) control: is displayed by selecting Settings /Registration >
Function Settings > Send > Email/I-Fax > Communication Settings > Authent./ Encryption.
■■STLS
An extended SMTP command, defined in RFC 2487. RFC 2449 -- POP3 Extension
Mechanism -- specifies that STLS must support CAPA command. If a server supports STLS,
it states the support in response to CAPA command.
The following lines exemplify communications when STLS is enabled.
...
S: +OK POP3 v2001.78 server ready <[email protected]>
C: CAPA
S: +OK Capability list follows:
S: TOP
S: LOGIN-DELAY 180
S: UIDL
S: STLS :<-- Indicates the server supports STLS.
S: USER
S: SASL CRAM-MD5 LOGIN
S: .
STARTTLS Command
An extended SMTP command that notifies a start of encrypted communications in SSL/TLS
to the SMTP server, defined in RFC 2487.
The following lines exemplify communications when STLS is enabled.
...
S: 220 mail.imc.org SMTP service ready
C: EHLO mail.example.com
S: 250-mail.imc.org offers a warm hug of welcome
S: 250-STARTTLS :<-- Indicates the server supports STARTTLS.
S: 250 DSN
C: STARTTLS : <--Declares the use of SSL/TLS.
S: 220 Go ahead
C: <starts TLS negotiation>
C & S: <negotiate a TLS session>
C & S: <check result of negotiation>
C: STLS
S: +OK Begin TLS negotiation
2
Functions > Basic Function > Encrypted reception
-- The communication packets are encrypted from now on --
2-9
2
Functions > Basic Function > Encrypted reception
2-10
C: EHLO mail.example.com
S: 250-mail.imc.org touches your hand gently for a moment
S: 250 DSN
C: MAIL FROM <[email protected]>
S: 250 Sender OK
...
The client is notified with the response of EHLO that the server supports STARTTLS. When
the client issues STARTTLS command, the server and client perform TLS negotiation and
resume communications from the beginning with encrypted packet data.
If SSL option is selected for Allow SSL (SMTP Receive) control and the client carry on
communicating in plain text, without using STARTTLS, the imageRUNNER/iR replies "530
Must issue a STARTTLS command first" of SMTP mail command and terminates the SMTP
connection with the error. The user interface indicates "SSL Error (SMTP RX Reject)" in the
status line.
If On option is selected for Allow SSL (SMTP Receive) control, the imageRUNNER/iR accepts
communications with the client in plain text, without using STARTTLS. If an SSL processing
results in an error, for example the imageRUNNER/iR does not feature an encryption
algorithm common to the client, the user interface indicates "SSL Error (SMTP Receive)" and
terminates the SMTP connection with the error.
Allow SSL (SMTP Receive) control defaults to Off.
2
Functions > Basic Function > Encrypted reception
2-10
2
Functions > Basic Function > URL Send
MAC Address Block Function
■■Receiving MAC Address Settings
Limits network packets to receive by MAC address. To enable this function, select Settings/
Registration > Preferences > Network > Firewall Settings > MAC Address Filter > RX Filter
.On for Receiving MAC Address Settings. Up to 100 MAC addresses can be registered
to allow communicating with the iR C/Color imageRUNNER. If a conflict occurs between
Receiving MAC Address Settings and IP Address Settings, Receiving MAC Address Settings
overrides IP Address Settings.
This function filters packets in the network layer and the reception logs for applications are
not recorded.
2-11
URL Send
It is function to transmit URL information with E-Mail to be able to refer the image with remote
UI. Image preserved in box including fax box instead of transmitting.
The E-mail address where URL is notified can be set by selecting one address or one group
address of each box from the address table.
Set the notified mail address by "URL Sending" of "box specification setting."
E-mail automatically notified that the image is stored in the box of the URL sending setting
ending is transmitted.
Settings/Registration > Function Settings > Store/Access Files > Mail Box Settings > Set/
Register Mail Boxes
F-2-3
2
Functions > Basic Function > URL Send
2-11
2
Functions > Basic Function > Setting for communicate SSL
2-12
Setting for communicate SSL
To communicate SSL, this machine can register the key pair and the certificate. The key pair
and the server authentication book self-signed by default have registered as DefaultKey.
The default key used by the following settings can be changed.
• Remote UI
• IPP Print Settings
• Device Information Delivery Settings
• Dept. ID Management Password Confirmation
• E-Mail/I-Fax: Authent./ Encryption Settings
Settings/Registration > Preferences > Network > TCP/IP Settings > SSL Settings
F-2-5
F-2-4
In the case of IPPS print from Windows Vista, the Common Name should be the IP address
of the host machine when generating SSL key.
Settings/Registration > Management Settings > Device Management > Certificate Settings >
Generate key > Generate SSL Key
2
Functions > Basic Function > Setting for communicate SSL
2-12
2
Functions > Basic Function > i-Fax Divided Data Transmission
2-13
i-Fax Divided Data Transmission
The mail division mechanism (message/partial) as prescribed by RFC2045 is used to divide
mail data for transmission.
If the data of a mail is in excess of the size specified for 'transmission data size upper limit' in
user mode, the mail will be transmitted using the specified upper limit.
The order of pages in page-based divided transmission may not be as expected on the
receiving side.
A job may make its way between jobs.
In the event of a log mismatch between transmitting and receiving sides, or if the size of the
image data per page is in excess of the limit, a solution is offered for the resulting error.
However, if the communication is by way of a mail server, there will normally be an increase
in the mail data size when the server affixes a Received header.
To accommodate the fact, the division is initiated with a safety margin of about 4K bytes at
time of transmission.
F-2-6
The transmission is by way of a server, or is a server-less transmission in which IFAX-SZL of
service mode is set to '0'.
• the target of transmission is set to 'data size division: ON' in the address book.
• the data size of the transmission mail is in excess of the 'transmission data size upper limit'
set in user mode.
• if the transmission is by dividing the data, there will be a serial number affixed to the head
of Subject of each mail (e.g., [1/5], [2/5],..., [5/5]).
• mail data will carry 'message/partial' as 'MIME Content Type' to indicate the use of divided
transmission.
-there will be indications of 'number', 'total', and 'division ID'.
• 'division ID' is a character string made up of the following: date of transmission, time of
transmission, 0000 (fixed character string), transmission file number, host name.
• all units of the same mail will have the same ID'.
ex:
Content-Type: message/partial; number=1; total=3;
id="[email protected]"
2
Functions > Basic Function > i-Fax Divided Data Transmission
2-13
2
Functions > Basic Function > E-Mail Divided Data Transmission
E-Mail Divided Data Transmission
If a value other than '0' is set as the 'transmission data size upper limit' in service mode, the
size of data sent for a single mail will be no more than the specified limit.
If the transmission data size is in excess of the setting, the following will be true for models
other than the iR C3170/C2570:
• if 'data size division' is enabled (ON) for the target in the address book, data size division
transmission will be executed; if disabled (OFF), on the other hand, the transmission will be
by page-based division.
• when division transmission is executed, there will be a serial number affixed to the head of
Subject of each mail (e.g., [1/5], [2/5], ..., [5/5]).
• if multiple mails have been transmitted to individual addresses by divided transmission, the
transmission results report and the communications management reports will treat them as
a single mail.
2-14
The attached image data is divided with reference to page breaks within the 'transmission
data size upper limit' specified in user mode, transmitting it by dividing it into multiple mails.
If Multi Page TIFF or PDF is selected, multiple pages up to the specified upper limit will be
transmitted as a single Multi Page TIFF or PDF file.
If transmission is by collecting multiple files inside a Box, the transmission will be as a single
job, increasing the possibility of its being divided.
If the size of the attached image data for a single page is in excess of the setting, the
transmission will be handled as an error, ending the ongoing transmission.
If the setting is '0', no division of the data will occur, and all data will be transmitted as a single
mail regardless of its size.
Default maximum data size is 3MByte.
Example of Divided Transmission for Multiple Files
When using PDF transmission of the following 3 files:
(1)Data Size Division Transmission
If the size of the mail is in excess of the 'transmission data size upper limit' set in user mode
as prescribed for mail division (message/partial) in RFC2045 and RFC2046, the mail will be
transmitted using the upper limit.
If the mailer supports RFC, this function enables merging of received mails.
However, if the communication is by way of a mail server, there will normally be an increase
in the mail data size when the server affixes a Received header.
To accommodate the fact, the division is initiated with a safety margin of about 4K bytes at
time of transmission.
• file A, consisting of 5 pages
• file B, consisting of 6 pages
• file C, consisting of 2 pages
In keeping with the setting for divided transmission, the mail will be divided as follows,
converted into PDF files, and transmitted as 3 mails:
• mail 1, consisting of 1 through 5 pages of file A + 1st page of file B (as PDF file)
• mail 2, consisting of 2 through 6 pages of file B + 1st page of file C (as PDF file)
• mail 3, consisting of 2 pages of file C (as PDF file)
• mail data will carry 'message/partial' as 'MIME Content Type' to indicate the use of divided
transmission.
• there will be indications of 'number', 'total', and 'division ID'.
• 'division ID' is a character string made up of the following: date of transmission, time of
transmission, 0000 (fixed character string), transmission file number, host name.
• all units of the same mail will have the same ID'.
ex:
Content-Type: message/partial; number=1; total=3;
id="[email protected]"
(2)Page-Based Division Transmission
2
Functions > Basic Function > E-Mail Divided Data Transmission
2-14
2
Functions > Basic Function > E-Mail Divided Data Reception
2-15
E-Mail Divided Data Reception
The following takes place in response to an incoming divided mail:
The divided mail (message/partial) will be temporarily stored in 'divided data reception box'
inside the System Box; once all divisions are available, merging is initiated.
As in the case of a normal mail, the result of merging will be printed, transferred, or stored in
the System Box.
If a length of time is specified for 'divided reception time-out', and such a time passes, as
many divided mails as possible are merged and the result will be printed as soon as data is
enough to make up a single page.
If the data is not enough to make up a single page, such information as on To, From, and
Subject provided as part of the main Header will be printed.
A mail for which a time-out condition has occurred and mail units with the same ID will be
removed, ending the job as an error (code #848).
F-2-7
The mails that are stored in 'division data reception box' may be manually removed.
If a check mark is put for 'print at time of deletion', an attempt for merging will be made, and
printing occurs if possible. This operation will be identified by error code #99.
2
Functions > Basic Function > E-Mail Divided Data Reception
2-15
2
Functions > Basic Function > USB Deactivation
USB Deactivation
This feature sets permissions for using the USB device/host interface.
2-16
The USB host is always enabled when update firmware is selected in Service Mode.
After the update is completed and the device restarted, the state of the USB host is again
dependent on the value of the System Settings parameter.
■■USB Device On/Off
When USB is connected with iR and PC is printed, it uses it with the USB device.
iR rectangular connector on A side is done.
This parameter is located under the System Settings. With this parameter, the USB device
interface can be turned on or off (the factory preset is on).
On: normal operation
Off: both raw mode and USB's 1284.4 mode operations stop
The plug-and-play function is also disabled because the device does not respond to DeviceID requests.
Changes to the on/off setting take effect the next time the device is restarted.
■■USB Host On/Off
When IC card reader etc. are connected with iR, it uses it with the USB host.
It connects it with the flat type connector of iR.
This parameter is located under the System Settings. With this parameter, the USB device
interface can be turned on or off (the factory preset is on).
On: normal operation
Off: operation stops
The plug-and-play function is also disabled because the device does not respond to DeviceID requests.
Changes to the on/off setting take effect the next time the device is restarted.
Note that this parameter is used to disable all devices that can be connected to the USB host,
including IC cards and other authorization tokens, keyboards, and USB keys.
■■Location of Parameters
Under Additional Functions,
Settings Registration > Preferences > External Interface > USB Settings
Use USB device
Use USB host
These parameters cannot be accessed from remote user interfaces.
Operation when updating firmware using USB memory
2
Functions > Basic Function > USB Deactivation
2-16
2
Functions > Basic Function > Document Name OCR
2-17
Document Orientation Auto Detection
Document orientation auto detection is available when PDF (OCR) is selected. When a PDF
(OCR) file is sent to an e-mail address or a file server, the result of OCR processing is used
to identify the orientation of the original (with reference to the orientation of characters), and
the file is sent after automatically rotating the image, if necessary, so that the user need not
concern himself with the orientation of the document for transmission. It is important to bear in
mind, however, that any of the following types of documents may be transmitted in the wrong
orientation:
• whose characters are at an angle (+/-3 deg or more)
• which contains white characters against black background, uncommon font, or handwritten
characters
• whose text is not at 300 dpi and is not between 10 and 20 pt
• whose characters per page are appreciably limited in number (ideally, there must be 50
characters or more)
F-2-8
NOTE
A document may not fall under the foregoing types, but may still be transmitted in the
wrong orientation. If wrong orientation is too frequent, disable the function.
Document Name OCR
The file name OCR function is available when PDF (OCR) is selected. When a PDF (OCR)
file is sent to an e-mail address or a file server, a file name will be assigned with reference
to the result of OCR processing. When transmission is executed with the File Name OCR
button checked (part of transmission settings), as many characters as specified in Additional
Functions will be collected from the head of the text block on the first page and used as the
name of the file. A maximum of 24 characters may be used, and it may be combined with a
name that has separately been assigned. All characters that follow the initial 24 will be cut out
of the name.
NOTE
If the setting Additional Functions>Common Settings>Langage Switch is set to [ON]
, 2-byte characters will not be collected for the file name. If a name must include a
2-byte character, be sure to set the setting to [OFF].
2
Functions > Basic Function > Document Name OCR
2-17
2
Functions > Basic Function > BOX back up > Backup destination settings
BOX back up
2-18
■■Data to be initialized at the restoration
After folders and Mail Box documents in the iR device are all erased, the restoration is
Purpose:
In order to prevent from missing documents in MAIL BOX permanently because of the hard
disk failure inside the iR device, the following function was added: Documents in Mail Box are
backed up or restored to the file server connected on the network.
■■System configurations
The following items are necessary.
• iR device
• SMB server connected on the network
The following types are supported as the SMB server.
Windows system
WIN2K/XP/2003
UNIX system
OS: Linux/RedHat
Server software: samba2.2.8/3.0
You can set the access right to the backup data stored in the server.
In this case, the appropriate user account is necessary.
■■Data to be backed up
The following data are backed up.
• User Inboxes specification settings(Register Inbox Name, Password, Time until Document
Auto Erase, Print upon storing from the printer driver)
• Image data of User Inboxes documents
• Setting information of User Inboxes documents
• Confidential Fax Inbox specification settings(Register Inbox Name, Password)
• Image data of Confidential Fax Inbox, Memory RX Inbox and Register Form for Form
Composition Image Data
executed.
Data to be initialized at the restoration are as follows.
• Information in Confidential Fax Inboxes and Memory RX Inbox
• Mail Box documents created after the previous backup operation
• Reception number (Target jobs: PDL print, copy, Mail Box Scan, Mail Box Print)
• Mail Box documents backed up using this function can be used in the same model
only. If the backup documents are used in the different model, we will not guarantee the
operations.
■■Backup destination settings
Specify "Host IP Address", "User Name", "Password" and "File Path" of the SMB server in
which Mail Box documents are backed up. After clicking "Add. Func." of the remote UI, select
"Custom Settings" from the menu and click "Backup Destination Settings".
• Host IP Address
Enter the server address which provides the SMB service.
Specify the setting value in the format of \\Server name\Name of the shared folder.
If the correct value is not set, the backup operation cannot be proceeded.
Note: Set "User limit" of the shared folder in the server to "2" or more value or "Maximum
allowed".
When you set "User limit" to "1", the restoration is not executed correctly.
• User Name
Enter the user name of the SMB server.
If you do not enter the account name which exists on the server, the backup operation cannot
be proceeded.
• Password
Enter the password which corresponds to the server account name above.
If you do not enter the password which corresponds to the server account name above, the
backup operation cannot be proceeded.
• File Path
Important
Mail Box documents backed up using this function can be used in the same model
only. If the backup documents are used in the different model, we will not guarantee
the operations.
2
Functions > Basic Function > BOX back up > Backup destination settings
Enter the file path which the data are backed up and stored.
If you do not enter the directory which exists on the server, the backup operation cannot be
proceeded.
2-18
2
Functions > Basic Function > BOX back up > Execution of the restoration
2-19
\\<Host IP Address>\<File Path>\BOX.tmp\
Note:
Specify the setting value in the format of
“\\Server name\Name of the shared folder \Sub folder”
- Case1
Host IP Address: \\Server name\Shared folder
This path will be renamed as follows when the backup operation is completed:
\\<Host IP Address>\<File Path>\BOX\
■■Execution of the restoration
Folder Path : \Sub folder
After clicking "Add. Func." of the remote UI, select "Custom Settings" from the menu and click
-> This mention is right.
"Restore".
- Case2
When you press the "Execute" button, the restoration which the backup data are read from
Host IP Address: \\Server name
the server set in "Backup Destination Settings" is executed.
Folder Path: \Shared folder\Sub folder
In order to guarantee that the other functions are not executed during the restoration, the
-> transmit a data normally
actual restoration is not executed until the device is started next time.
Host IP Address does not have "Name of Shared folder".
After all the Mail Box documents are restored, the auto-reboot is executed and the device is
A file transmission of a message module moves character string of "Name of Shared
started normally. Then, the process will be the same as the normal operations.
folder "of Folder Path in" Host IP Address "and you get over for a format of Case1
and call API.
- Case3
Host IP Address: \\Server name\Shared folder\Sub folder
Folder Path: None
-> Transmission error (#751)
Cannot judge it where is "Shared folder".
Dispatch input character string to API of the SMB transmission of a message.
Transmission error
■■Execution of the backup
After clicking "Add. Func." of the remote UI, select "Custom Settings" from the menu and click
"Backup". When you press the "Execute" button, the backup operation will be executed.
However, the error occurs when either of the following folders already exists on the file path:
Mail Box folder which is previously backed up the data or BOX.tmp folder which is the folder
for operations. Therefore, before executing the backup operation, you need to delete or
rename the folders described above.
■■Data of the backup destination
In order to prevent from the failure during the backup operation, such as the device's power
shutdown, start the backup operation by generating the following path on the SMB server:
2
Functions > Basic Function > BOX back up > Execution of the restoration
2-19
2
Functions > Basic Function > BOX back up > Activation of SSL for RUI
2-20
■■Security
There is no encryption support for the communication route between the machine and the
SMB server. In order to prevent information leaks of the Box documents, those data must be
encrypted prior to transmission. Following procedure enables encryption/decryption of backup
data using the encryption module in the iR machine.
Setup:
In RUI, select initial setup / registration > specification setup > specification setup > specify
the destination to backup, and then select 'Encrypt the backup data'. Enter the password.
The password which was set on the RUI is cleared by deactivating 'Encrypt Backup Data'.
The same password is required for decryption of the encrypted backup data. The data is not
restored by different password.
F-2-9
■■Activation of SSL for RUI
Unless SSL setting is activated for RUI, ID and password are sent as uncoded text.
SSL setting must be activated in order to ensure security.
From the control panel, select 'Settings Registration > Management Settings > License /Other
> Remote UI > Use SSL, and activate 'Use SSL'.
2
Functions > Basic Function > BOX back up > Activation of SSL for RUI
2-20
2
Functions > Basic Function > Increased Support of File in a Box > Support of Trace & Smooth
Transmission File Format
2-21
Increased Support of File in a Box
Make the following selections to bring up a list of possible combination options: Send>File
■■Compact Transmission
Format.
'Compact' and 'OCR' (text searchable) may be set separately.
If the reading resolution of the file to transmit is 300 dpi or higher, it may be converted to 300
In other words, an OCR file (text searchable) that is not "compact" may be created.
File Format
BW
Color
Greyscale
TIFF/PDF
TIFF
OK
None
Auto Select
PDF
None
OK
TIFF/XPS
TIFF
OK
None
Auto Select
XPS
None
OK
TIFF/JPEG
TIFF
OK
None
Auto Select
JPEG
None
OK
PDF
None
OK
XPS
None
OK
JPEG
None
OK
TIFF
OK
None
Selectable : OK
Not selectable : None
*1 Trace & Smooth works in conjunction with Compact when selected.
None
OK
None
OK
None
OK
OK
OK
OK
None
dpi for compact transmission. Such conversion or compact transmission will not take place if
Divide into
pages
No
the resolution is less than 300 dpi (i.e., the transmission will be in non-compression PDF).
■■Support of Compact/OCR (text searchable) Transmission
PDF (OCR) transmission of files in a Box is supported. Regardless of the reading resolution
No
of the files to transmit, the resolution will be converted to 300 dpi, processed by OCR, and
transmitted.
Yes
Yes/No
Yes/No
No
Yes/No
■■Support of Trace & Smooth
PDF transmission of files after processing by Trace & Smooth is supported. The files will
be converted to 300 dpi (high compression) for transmission. No conversion or compact
transmission will take place if the resolution of the file is less than 300 dpi. (The transmission
will be in non-compression PDF.)
T-2-1
File Format
Trace &
Smooth
Compact
OCR(Text
Searchable)
TIFF/PDF
TIFF
None
None
None
Auto Select
PDF
TIFF/XPS
TIFF
None
None
None
Auto Select
XPS
TIFF/JPEG
TIFF
None
None
None
Auto Select
JPEG
PDF
OK
OK*1
OK
XPS
None
OK
OK
JPEG
None
None
None
TIFF
None
None
None
Selectable : OK
Not selectable : None
*1 Trace & Smooth works in conjunction with Compact when selected.
Encrypt
Add Digital
Signature
None
None
None
None
None
None
OK
None
None
None
OK
OK
None
None
T-2-2
2
Functions > Basic Function > Increased Support of File in a Box > Support of Trace & Smooth
2-21
2
Functions > Basic Function > Restriction of Paper Type Information Delivery > Restriction of Paper Type Information Delivery:
Limit of Reception Length of Extra Long Original
In previous models, reception length limit (except the case that resolution is as high as 600 x
600) was 1 m.
Only in the case the resolution is FINE (204 x 196) or less, reception length limit can be
changed up to 2 m from the service switch SPECIALB SW29 B2 setting.
Resolution
204*98=STD
200*100
204*196=FINE
200*200
204*391=SFINE
200*400
300*300
400*400
408*391=UFINE
600*600
Permission/prohibition of the paper database delivery can be set in the following service
mode.
In the service mode level 2,
COPIER>OPTION>FNC-SW>PT3-INEX
0: Not permit
1: Permit
Length limit
B2=0
1m
1m
1m
1m
1m
1m
1m
1m
1m
1m
2-22
B2=1
2m
2m
2m
2m
1m
1m
1m
1m
1m
1m
In case of prohibition:
• The paper database is not displayed in item selection when executing manual delivery,
automatic delivery, and data recovery.
• When executing the delivery from a machine with which handling of the paper database is
permitted to a machine with which the handling is not permitted, the operation is terminated
as #887 error at the reception side.
T-2-3
Restriction of Paper Type Information Delivery
Add the paper type information delivery at the time of the device information delivery settings.
■■Paper Type Support:
The paper type support is the mechanism that enables to print various types of paper
distinctively besides the existing paper types (plain paper, heavy paper, etc).
For instance, the grammage (paper weight) and the surface property of a paper, generally
called as plain paper, vary by makers and product names.
If the paper type differs although sharing the same printing property, the appearance of the
outputs will be differed.
In order to obtain the optimal output, it becomes possible to register the paper type
information that enables to adjust printing property for each paper type and print with the
appropriate printing property.
■■Restriction of Paper Type Information Delivery:
The following 2 types of information delivery are selectable at the time of the device
information delivery settings.
• User setting paper
• Paper database
2
Functions > Basic Function > Restriction of Paper Type Information Delivery > Restriction of Paper Type Information Delivery:
2-22
2
Functions > Basic Function > HDD Data Erase Kit > HDD Data Erase mode settings
HDD Data Erase Kit
The earlier iR Security Kit was a function that enabled the complete erasure of all user
data, as well as user data encryption and decryption. As the data encryption is performed
by software, when using functions that temporarily store data on the main unit HDD, such
as copy, scan, print and box, performance falls by more than 20% in comparison with when
such functions are not being used. Also, the used data erase operation may cause a drop in
performance.
The HDD Data Encryption Kit performs encryption and decryption by hardware, without any
loss of performance. The HDD Data Encryption Kit allows the user to guard against the
leaking of user data due to theft of the hard disk. However, data pertaining to copy, scan,
print and box functions will remain on the hard disk after the Data Encryption Kit has been
used so, in order to guard against unauthorised viewing by a malicious third party, it was
necessary to use the iR Security Kit in addition.
With the HDD Data Erase Kit, copy, scan, print and box data can be automatically erased
after use, without using the iR Security Kit, thus preventing unauthorised viewing. Also, use
of the HDD Data Erase Kit results in no loss of performance and allows the user to prevent
user data from being leaked due to theft of the hard disk. However, with the Data Erase Kit,
the data erase operation will result in some loss of performance, as with the iR Security Kit.
2-23
The following data are erased.
• temporary image data generated when a scan is made
• cascade copy/ remote copy transmission and reception data
• residual data after box texts have been deleted
• fax/ i-fax transmission and reception data
• spool data
• temporarily stored print data
■■HDD Data Erase
HDD Data Erase can be performed in either of the following two ways.
• Turn the host machine's main power supply OFF/ ON.
• HDD Data Erase will be performed automatically after copy, scan, print or box operations.
■■Turn the host machine's main power supply OFF/ ON
When the HDD Data Erase Kit has been activated, once the host machine's main power
supply is turned ON, all data in the HDD are erased. In such cases, the following message
will be displayed for a few minutes, after which time the touch panel will be operational.
----------Remaining data that is not needed is being erased.
Do not need turn off the main power.
-----------
F-2-10
■■HDD Data Erase timing settings
Additional Functions > System Settings > Hard Disk Data Complete Erase Set > Erase Timing
The Data Erase Kit is a function for erasing data after they have been used by the main
> During job or After job
unit.This has nothing to do with the erasure of user data at lease renewal.To erase user
If the user frequently outputs documents with multiple pages, selecting [After job] means that
data all at once, including address tables, use the following user mode, as in the past.
the erasure will be done after the job is finished, so the erasure time is not included in the
processing time.
Settings/Registration > Management Settings > Data Management > Initialise all Data/
When outputting multiple jobs in sequence, selecting [During job] means that the time waiting
Settings
between jobs is shortened.
■■Types of user data erased
Once the HDD Data Erase Kit is activated, all unnecessary data and deleted data on the hard
disk can be completely erased.
The erasure timing and erasure mode can be selected with the HDD Data Erase Kit.
2
Functions > Basic Function > HDD Data Erase Kit > HDD Data Erase mode settings
■■HDD Data Erase mode settings
Additional Functions > System Settings > Hard Disk Data Complete Erase Set > Erase Mode
>
0 (Null) Data 1 time
2-23
2
Functions > Basic Function > HDD Data Erase Kit > Related service modes
2-24
Random data 1 time
Random data 3 times
The more the number of write operations increases, the more loss of performance there will
be during jobs.
■■Related service modes
Sub item
COPIER>OPTION>USER
Specification selection related to user mode
Description
level.
HDCR-DSP
Used to turn off display of user mode hard disk clear mode and switch clear
operations.
0: Don't display and don't clear
1: Clear once with zeroes
2: Clear once with random data
3: Clear 3 times with random data (mode displayed for settings 1 to 3)
MEMO: function for HDD initialization
This is the function to clear the data on HDD completely by overwriting the
0 (null) data and random data to file data area at the moment of deleting
files logically (timing for deleting the administrative information data) in
HDD.
HDCR-DSW Selection of whether to display 'all HDD data clear ON/OFF' item in user
mode
To select whether to display the 'all HDD data clear ON/OFF' item in the
user mode.
This mode takes effect only when the all HDD data clear function (licensed)
is activated.
When the user asks for the item to be provided.
0: The item is not displayed.[default]
1: The item is displayed.
CLR-TIM
All processing data erase timing
This selects the timing at which all the data is to be erased in the security
kit. When erasing all the data, the job processing performance may
deteriorate depending on the data erased. The reason for this is as
follows: since the already processed page data is erased in parallel while
jobs are being processed, an extra burden is placed on the CPU and hard
disk access process. The job processing capability can be improved by
delaying this process until after the job has been completed.
Settings
0: The data is erased while the job is being processed.
1: The data is erased after the job has been completed.
[Factory setting/value after clearing RAM: 0]
2
1
2
T-2-4
2
Functions > Basic Function > HDD Data Erase Kit > Related service modes
2-24
2
Functions > Basic Function > IP Address Range Settings
2-25
IP Address Range Settings
IP addresses may be set one by one or as a range of addresses.
IP Address Range Settings is a function used to either enable or disable (reject) the reception
For both, as many as 8 addresses may be selected.
of packets from a specific IP address.
Settings/Registration>Preferences>Network>Firewall Settings>IPv4 or IPv6 Address
Filter>RX Filter
By specifying a reception/printing range, limits may be imposed on printing from a PC.
By specifying a setup/reference range, limits may be imposed on the PC given access to
MFP machine settings (e.g., editing thereof).
F-2-12
Where reception/printing is concerned, the following protocols and applications apply:
LPD, RAW, SMB, FTP, HTTP (IPP), PDF, SMTP
Where setup/reference is concerned, the following protocols apply:
SNMP, HTTP (RUI)
F-2-11
2
Functions > Basic Function > IP Address Range Settings
2-25
2
Functions > Basic Function > cc/bcc Settings
2-26
Protocol-Related Setup
Protocols and applications make use of specific ports. If left "open," an unused protocol can
prove to be a security risk. In this regard, it is made possible to enable/disable (on/off) the
ports individually.
■■Protocols and Applications Concerned
Additional Functions
LPD
RAW
SMB
HTTP
IPP
FTP
SNMP
Settings/Registration>Preferences>Network>TCP/IP Settings>LPD Print Settings
Settings/Registration>Preferences>Network>TCP/IP Settings>RAW Print Setting
Settings/Registration>Preferences>Network>SMB Server Settings>Use SMB Server
Settings/Registration>Preferences>Network>TCP/IP Settings>Use HTTP
Settings/Registration>Preferences>Network>TCP/IP Settings>IPP Print Setting
Settings/Registration>Preferences>Network>TCP/IP Settings>FTP Print Setting
Settings/Registration>Preferences>Network>SNMP Settings>Use SNMPv1 and Use
SNMPv3
T-2-5
RUI Log-in Procedure
F-2-13
In 'Settings/Registration', if 'System Manager ID' and 'System Password' are selected under
Management Settings>User Management, a press on the User Mode button of the RUI will
bring up a screen that asks for the appropriate ID and password.
Previously, as many log-in attempts as needed might be made (i.e., failing to type in the
correct ID/password). With the current version, making the following service mode setting
will cause port 8000 to close for 3 min if the log-in operation fails 3 times within 3 min, during
which time log-in operation will remain impossible:
COPIER>OPTION>USER>RUI-RJT
cc/bcc Settings
In addition to the address used in the e-mail, transmission may be controlled by means of cc
(carbon copy) and bcc (blind carbon copy).
This applies to e-mail addresses only, and is available when 'Send Transmission Function' is
enabled.
In the case of 'cc' and 'bcc' alone, as many as 64 addresses may be specified. Including 'To',
a total of 256 addresses may be used.
2
Functions > Basic Function > cc/bcc Settings
2-26
2
Functions > Basic Function > WebDAV Support > Points to Note About Using WebDAV
Send to Myself
2-27
The input images will be saved in the selected directory of the appropriate server using a
For 'New Address' under 'Send', a press on 'Send to Myself' will enable the use of an address
collected from user information (log-in by SSOH).
user-defined file name or date of transmission.
If WebDAV needs to be set for verification purposes, refer to the appropriate documentation
prepared for field servicing work.
■■Points to Note About Using WebDAV
-If the load imposed on the network is appreciable and, therefore, retry communications
are frequent, increase the value of 'Retry Times' under the following: Settings/
Registration>Function Settings>Send>Common Settings.
• If data transmission is in an Apache environment, try enabling (on) ”Use Divided Chunk
Send for WebDAV TX 'ON' with WebDAV Sending of Settings/Registration>Function
Settings>Send>Common Settings.
• Where transmission to a WebDAV server outside the LAN is involved, set 'Proxy Settings'
of Settings/Registration>System Settings>Network Settings>TCP/IP Settings.
• To find out whether WebDAV has been implemented, check the version by making the
following selections (if absent, '--.--' will appear): Service Mode>Copier>Display>Version>
WebDAV.
• To disable the use of WebDAV, set '1' to the following: Service Mode Level
F-2-14
WebDAV Support
So that a folder may be accessed through SMB or an FTP server may be accessed by an
FTP client, a file may be placed where access is possible over the Internet, thanks to the
WebDAV function (WWW distributed authoring and versioning).
The WebDAV file here must have been created as part of IIS (Internet information services)
and its name must have been solved through Windows 2000 Server or Windows 2003 Server.
Access by a client PC was possible also with previous versions, and the new version
additionally permits transfer of a file from the iR machine to a WebDAV folder.
The WebDAV transmission function is used to send any of the following types of input images
2>Copier>Optional>Body>WebBV-SW.
If disabled, the following will be true:
• There will no longer be WebDAV choice under Settings/Registration>Set
Destination>Register Destination>Type.
• The following will be grayed out: Settings/Registration>Function Settings>Send>Common
Settings>Use Divided Chunk Send for WebDAV TX.
Important
This unit cannot transmit to a WebDAV server on Wndows Vista.
Documents sent from Windows Vista to a WebDAV server on a network can be
viewed.
to a WebDAV server on the Internet or intranet using the WebDAV protocol.
Types of Images
images read by a scanner
• images transferred by a fax machine (or by a fax receiving mechanism)
• Images sent by a user Box/system Box
2
Functions > Basic Function > WebDAV Support > Points to Note About Using WebDAV
2-27
2
Functions > Basic Function > IPv6 setting display list
2-28
IPv6 setting display list
Settings Registration > Preferences > Network > TCP/IP Settings > IPv4 Settings > Use IPv4
> OFF
Each function display for IPv6 is shown below.
Application
Set display
DNS
Domain Name System Settings Registration > Preferences > Network > TCP/IP
Settings > DNS Settings
DDNS
Dynamic DNS
Settings Registration > Preferences > Network > TCP/IP
Settings > DNS Settings >DNS Dynamic Update Settings
DHCPv6
Dynamic Host
Settings Registration > Preferences > Network > TCP/IP
Configuration Protocol Settings > IPv6 Settings > Use DHCPv6
version 6
SNTP
Simple Network Time
Settings Registration > Preferences > Network > TCP/IP
Protocol
Settings > SNTP Settings
Ping
Packet INternet Groper Settings Registration > Preferences > Network > TCP/IP
Settings > IPv6 Settings > PING Command
IP block
Internet Protocol
Settings Registration > Preferences > Network > Firewall
Settings > IPv6 Address Filter > RX Filter
RAW
Read After Write
Settings Registration > Preferences > Network > TCP/IP
Settings > RAW Print Settings
LPD
Line PRinter daemon
Settings Registration > Preferences > Network > TCP/IP
protocol
Settings > LPD Print Settings
FTP Print
File Transfer Protocol Settings Registration > Preferences > Network > TCP/IP
Settings > FTP Print Settings
HTTP Server HyperText Transfer
Settings Registration > Preferences > Network > TCP/IP
Protocol
Settings > Use HTTP
IPP
Internet Printing
Settings Registration > Preferences > Network > TCP/IP
Protocol
Settings > IPP Print Settings
RUI
Remot user interface
Settings Registration > Management Settings > License/
Other > Remote UI
SNMPv1/v3 Simple Network
Settings Registration > Preferences > Network > SNMP
Management Protocol Settings
Email/FAX
Electronic Mail/
Settings Registration > Function Settings > Send >
Facsimile
E-mail/i-FAX
WebDAV
WWW Distributed
Settings Registration > Set Destination > Register
Authoring
Destinations > Register New Dest. > File > Protocol >
andVersioning
WebDAV
SLP Server
Service Location
Settings Registration > Preferences > Network > TCP/IP
Protocol
Settings > Multicast Discovery Settings
IPSec/IKE
IP security
Settings Registration > Preferences > Network > TCP/IP
Internet Key Exchange Settings > IP Sec Settings > Use IP Sec ON > Register >
IKE Settings
T-2-6
Each to set IPv6, the use of IPv6 is turned on on the following screens.
Settings Registration > Preferences > Network > TCP/IP Settings > IPv6 Settings > Use IPv6
> ON
To stop using IPv4, turn IPv4 OFF in the window shown below.
2
Functions > Basic Function > IPv6 setting display list
2-28
2
Functions > Basic Function > Encrypted PDF > Notes:
2-29
Encrypted PDF
When sending a PDF file to an e-mail address or to a file server, the file may be encrypted
and a password may be assigned to it for security. Once a password is assigned, the recipient
must type in the correct password to open or print/edit the file. A PDF file may be turned into
an encryption PDF file by clicking a button in the course of making settings for transmission.
For particulars of settings, see the specifications given previously.
■■Caution:
The target of transmission of an encryption PDF file must be an e-mail address or a file
server. For instance, the target must not be a group of addresses that include an i-fax or Box
address.
■■Notes:
A license key may be registered by making the following selections: Settings/
F-2-15
Registration>Management Settings>License/Other>License Register. To prevent cracking of
a license key, the use of a remote user interface is not considered.
Important
When 'High (128-bit AES)/ Acrobat 7.0 or later' has been selected as the encryption
level, Acrobat/ Acrobat Reader 7.0 or later will be required.
2
Functions > Basic Function > Encrypted PDF > Notes:
2-29
2
Functions > Basic Function > Digital Signature PDF
2-30
Digital Signature PDF
Digital signature PDF may be any of the following 2 types:
Device Signature PDF The name of the MFP machine and machine information are encoded
and imbedded to the scanned image so that, when opened in Acrobat, the
information will appear on the signature tab.
The input of the signature is by means of a machine certificate and secret
key.
User Signature PDF
For the MFP machine in use based on SSOH, the appropriate user
(SSOH authentication) certificate associated with the appropriate personal ID (obtained through
the RUI) is recorded.
The appropriate user information is encoded and embedded in the
scanned image so that it may appear on the signature tab when opened in
Acrobat.
This will be used to prevent unauthorized editing of data or impersonation.
T-2-7
F-2-16
'Prohibit transmission of non-PDF files' function when device signature is attached to PDF
In units with the licence option Device Signature PDF installed, when transmission is
performed with the SEND function, device signatures can be attached in order to enable
confirmation of which unit the PDF file came from.
With the following settings, usage conditions are restricted.
- Always Add Device Signature to Send
- Restrict File Format
Setting procedures for [Always Add Device Signature to Send] and [Restrict File Format]
Settings/Registration > Function Settings > Send > Common Settings > Always Add Device
Signature to Send
F-2-17
After setup,
Send > open File Format and select the [Add Digital Signatures] button.
2
Functions > Basic Function > Digital Signature PDF
2-30
2
Functions > Basic Function > Digital Signature PDF
2-31
F-2-18
2
Functions > Basic Function > Digital Signature PDF
2-31
2
Functions > Basic Function > Searchable PDF/XPS
2-32
Searchable PDF/XPS
In the case of XPS, the following viewers can be used for searching.
• IE7.0 (Win Vista)
A searchable PDF file consists of pages of scanned images that have been put through
OCR processing. The test data is extracted, and is laid over the original images in the form
of invisible text so that a search may be run for a particular segment of the data. A search
• IE6.0 + .NET Framework 3.0 (WinXP/ Server 2003)
• Dedicated viewer [Microsoft XPS Essential Pack] (Win XP/Server2003) provided by MS
in a PDF file requires a PDF browser application (e.g., Adobe Acrobat, Adobe Reader). Or,
Windows' search function may be used to look for a string of characters. Here again, the
target of transmission must be an e-mail address or a file server. To make use of this function,
PDF (OCR) is specified when selecting the file format on the Transmission screen. A PDF file
that will be generated in response will consist of the following:
• Imaging Block
With Compact setting: 300 x 300 dpi fixed, Compact
No Compact setting: scanning resolution, JPEG (colour)/ MMR (black and white binary)
• Supported Languages
Japanese, Latin 1, Latin 2, Estonian, Latvian, Lithuanian, Russian (Cyrillic), Greek, Chinese
simplified, Chinese traditional, Korean
The character codes recognised with OCR are determined by the language selected in user
mode as the display language.
Note, however, that no matter which language is selected, ASCII characters (English) will be
recognised by OCR.
• Recognized Fonts
Language
Recognised fonts
Japanese
Mincho, Gothic
Alphabetic
Helvetica, Courier New, Times New Roman
Chinese simplified
SimSun, NSimSun, SimHei, MS UI Gothic
Chinese traditional
MingLiU, PMingLiU, MS UI Gothic
Korean
Batang, Dotum, Gulim, MS UI Gothic
Fonts which have different character shapes from the above may have lower recognition rates.
T-2-8
Important
Searchable PDF can only be transmitted when email or file servers only are specified
as the destinations. If the destinations include fax, Ifax or boxes, PDF cannot be
transmitted.
2
Functions > Basic Function > Searchable PDF/XPS
2-32
2
Functions > Basic Function > Display Host Name(Device Information Delivery Settings) > Display Host Name
Display Host Name(Device Information Delivery
Settings)
2-33
■■Display Host Name
Device information delivery now supports IPv6.
Because the IPv6 addresses are lengthy, it is easy to mistake them when searching for them
from lists with Auto Search/ Register. Therefore, in order to make them easier to identify, a
Display Host Name button has been added.
After pressing the Display Host Name button, once Auto Search is started, the host names
will be displayed.
■■Display IP Address
F-2-20
If the unit is enabled for both IPv4 and IPv6, it is necessary to avoid both addresses being
displayed. Therefore, there is a new service mode setting that allows one or the other to be
displayed.
Even if the settings are for only one of either IPv4 or IPv6 to be used, DNSTRANS is not
used.
When the settings are for IPv4 only to be used, the IPv4 address is displayed.
When the settings are for IPv6 only to be used, the IPv6 address is displayed.
F-2-19
2
Functions > Basic Function > Display Host Name(Device Information Delivery Settings) > Display Host Name
2-33
2
Functions > Basic Function > Display Host Name(Device Information Delivery Settings) > Display Host Name
COPIER > OPTION > NETWORK
DNSTRANS
2-34
Level
If both IPv4 and IPv6 settings exist in Device Information Delivery
Settings, Register Destinations, Auto Search/ Register, only one of
either IPv4 or IPv6 will be displayed.
Values
0: ipv4
1: ipv6
1
T-2-9
F-2-21
2
Functions > Basic Function > Display Host Name(Device Information Delivery Settings) > Display Host Name
2-34
2
Functions > Basic Function > SSOH(Single Sign-On Hybrid)
2-35
SSOH(Single Sign-On Hybrid)
The login application configuration has changed from the iR3245 series.
• The Simple Device Login (SDL) and earlier Single Sign On (SSO) features have been
merged in Security Agent into the Single Sign-On Hybrid (SSOH) feature.
• Pre-installed login applications required for the iR device are now Default Authentication
(DA) and SSO-H only.
Authentication mode
Domain authentication
Local device authentication
Description
Authenticates users registered with Active Directory.
Authenticates users registered with device internal
DB.Same as the 'Local device authentication' found in SDL
and the original SSO.
Domain authentication + local device This mode enables both domain authentication and local
authentication
device authentication to be used.Local device authentication
is performed by selecting 'This device'.
• The original SSO and Security Agent (SA) are now only provided with the Administrator's
T-2-11
CD.
• SDL has been discontinued. (The same login service as SDL can be operated by SSO and
SSO-H local device authentication.)
Pre-install
Administrator's CD
Earlier models
iR3245 and later
Default Authentication(Default)
Simple Device Login
Single Sign On
Default Authentication
Simple Device LoginSingle Sign On
and
Security Agent
Default Authentication(Default)Single
Sign On Hybrid
Important
When attempting to carry out domain authentication (Kerberos authentication),
the clocks of the authentication server and the device must be matched. If there
is a discrepancy between the clocks when login is performed, there will be an
authentication error.
The permissible difference in the initial settings is less than 5 minutes.
Default Authentication
Single Sign On Hybrid
Single Sign On
and
Security Agent
In the case of NTLM authentication only, login is possible even if there is a clock
discrepancy.
Settings location: Additional Functions > System Settings > Date & Time Settings
T-2-10
In the event that SSOH settings have been changed from a PC, JavaVM will be
required in order to display the windows that appear after login. In order to operate the
unit in IPv6 mode, Java VM 1.5 or later is required.The Windows 2003 server does not
yet support IPv6 login with, so if the unit is in IPv6 mode, login will not be possible.
In the case that domain authentication is used, it is required to reset the setting of user
logon name and password on Active directory when a user ID or password is changed.
As for the user ID and password that have been registered before the start of operation
of Active Directory, it is also required to reset the password.
If an incorrect user name or password is input, the error dialog is displayed.
F-2-22
2
Functions > Basic Function > SSOH(Single Sign-On Hybrid)
2-35
2
Functions > Basic Function > USB Keyboard support > Restrictions
2-36
XPS(XML Paper Specification)
USB Keyboard support
Supported Operating Systems: Windows Server 2003; Windows Vista; Windows XP Service
When the following conditions are fulfilled, input from a USB keyboard is possible while the
Pack 2
software keyboard is being displayed on the unit's touch panel.
Browser software: XPS Viewer EP(included in Microsoft XML Paper Specification Essentials
• Service Mode Level 2 > Option > USER > USBI-DSP to "1"
Pack)
• Settings/Registration > Preferences > External Interface > USB Settings > Use MEAP
XPS
SEND function list
Single-Page XPS MMR
Multi-Page XPS MMR
Searchable
Digital Signature XPS
Driver for USB Input Device set ON
Details
Single-Page XPS(OCR)
Multi-Page XPS(OCR)
Auto -rotation(document orientation
detection)
Auto -rotation restriction(document
placement prioritised)
User Signature(MEAP authentication
method)
Device Signature
• A USB keyboard enabled for USB ports is connected to and recognised by the unit.
• Input is only accepted when the keyboard is being displayed on the unit's touch panel.
T-2-12
F-2-24
■■Restrictions
• A maximum of two USB keyboards or USB keyboard type card readers can be connected.
• Some non recommended keyboards will not work. (Recommended keyboard: Cherry
G84-4100PTAUS)
F-2-23
• Keyboard input cannot be accepted into Web browser windows.
• Some MEAP applications are not supported.
2
Functions > Basic Function > USB Keyboard support > Restrictions
2-36
2
Functions > Basic Function > Initialization of all data and settings > Data not to be erased
Initialization of all data and settings
2-37
■■Data to be erased
• Data stored in mail boxes/Advanced Box
Purpose:
Previous devices did not have the function to erase all the user data collectively. However,
the following function was newly added: The user data in the device including the hard disk
can be initialized by the user's operation.
In order to maintain the confidential information, we provide the function to erase all the user
data stored in the iR device (image data, various logs, Address Book, Additional Functions
settings, etc.) collectively.
■■Limitations:
a. Confirmation of the erased data
The function to confirm if all the data are erased collectively is not provided.
Verification after erasing the hard disk, such as Verification Check, is not performed.
b. Installed License key (Register information of Valid license)
It never happens that installed license key is deleted (valid license becomes invalid) by batch
deletion.
In order to delete license key (make valid license invalid), Service Mode Item Used to
Invalidate a License for Transfer to a Different Device (Level 2), which is described in 4.4.2, is
required.
c. Limitation of the device
When erasing all the user data collectively, LAN and FAX lines are disconnected, so you
cannot access from the outside.
d. Limitation of the job
When erasing all the user data collectively, all jobs in the device are erased.
e. NewCardReader
When mounting NewCardReader, execution of 'Initialize All Data/Settings' results in deletion
of department ID information, leading to the screen not being able to move to standard
screens such as COPY screen. Setup of NewCardReader must be performed again.
f. MEAP Application
When 'Initialize All Data/Settings' is executed in the machine in which MEAP application is
installed, the MEAP application is deleted from the machine, resulting in the same condition
as the one uninstalled with the MEAP application. Re-installation of MEAP application
enables the use of MEAP application from the point the application was uninstalled.
• Data stored in Fax/I-Fax Inbox (Confidential Fax Inbox/Memory RX Inbox)
• Address data stored in the Address Book
• Scan settings registered for the Sending function
• Mode Memory settings registered for the Copy or Mail Box function
• MEAP applications and license files
• Data saved from MEAP applications
• The password for the SMS (Service Management Service) login service of MEAP
• (If you changed the password, it returns to the default password.)
• User authentication information registered in the Local Device Authentication system of
SSO-H (Single Sign-On H)
• Unsent documents (reserved documents and documents set with the Delayed Send mode)
• Job history
• Settings/Registration settings
• Forms registered for the Superimpose Image mode
• Registered forwarding settings
• Key Pair and Server Certificate registered in [Certificate Settings] in [Device Management]
in Management Settings (from the Settings/Registration screen)
• Auto Adjust Gradation
■■Data not to be erased
• Counter
• SoftID(License Registraton/License key)
• Values in Service mode which are adjusted in the factory
• System software
• System data (such as the preinstalled font data)
• Limited Function Mode (Settings/Registration > Management Settings > Device
Management > Limited Function Mode (On/Off)
All the data related with the printer are erased collectively. Then, the data are restored from
the backup data, so the data will be the state of the default settings. Therefore, the fonts
which the user installed will be erased.
g. Function Restriction Mode
Items in 'User Mode > Management Settings > Device Management > Function Restriction'
are not initialized by executing 'Initialize All Data/Settings'
2
Functions > Basic Function > Initialization of all data and settings > Data not to be erased
2-37
2
Functions > Basic Function > Initialization of all data and settings > Specification of erasing the data:
2-38
■■How to erase
• Without Security Kit or HDD Data Erase Kit-A1
Only the logical information of FAT(File Allocation Tables) is erased.
• With Security Kit or HDD Data Erase Kit-A1
All the data are erased in the magnetic level according to the Erase mode.
■■How to erase the data collectively:
• Select "Additional Functions", "System Settings" and "Install All Data/Settings" in order.
F-2-26
• After rebooting the device, erasing all the data is executed.
■■Specification of erasing the data:
SRAM
Select Service Mode, Copier, Function and Clear in order. Then, write whether the data are to
be erased when erasing all the user data collectively.
Service Mode->Copier->Function->Clear
Data to be erased
F-2-25
• Select "Yes" in the confirmation dialog box.
2
To be erased?
ERR
Keep
DC-CON
R-CON
JAM-HIST
ERR-HIST
PWD-CLR
ADRS-BK
CNT-MCON
Keep
Keep
Keep
Keep
Erased
Erased
Keep
CNT-DCON
Keep
OPTION
Keep
Functions > Basic Function > Initialization of all data and settings > Specification of erasing the data:
Description
Indicates the error code information latched at the
occurrence of error
Indicates RAM information of DC controller PCB
Indicates RAM information of reader controller PCB.
Indicates jam history
Indicates error code history
Indicates password for system administrator
Indicates address book data
Indicates service counter information counted by the main
controller
Indicates service counter information counted by the DC
controller
Backup information of Service Mode (OPTION)
2-38
2
Functions > Basic Function > Initialization of all data and settings > The number of rewriting the hard disk
Data to be erased
MMI
To be erased?
Erased
NM-CON
CARD
ALARM
SLT-CLR
SND-STUP
CA-KEY
DRN-LIFE
YTN-CLR
CTN-CLR
MTN-CLR
KTN-CLR
Keep
Erased
Keep
Erased
Erased
Keep
Keep
Keep
Keep
Keep
Keep
Description
User Mode setting value
-User setting value for copy control panel
-Common settings, User settings
-Other user setting values except for FAX-related settings
Indicates all RAM data within controller
Indicates card ID (department)-related data
Indicates alarm log
Indicates salutation settings
Indicates transmission-reading settings
Indicates CA certificate and key pair
Indicates drum life
Indicates clearance of Y toner counter
Indicates clearance of C toner counter
Indicates clearance of M toner counter
Indicates clearance of K toner counter
T-2-13
Item
TEL
USSW SW
Clear or Keep
Clear
Clear
SRV SW
NCU
SRV DATA
REPORT
ALL
Keep
Keep
Keep
Keep
Keep
COUNTER
Keep
2-39
■■HDD
Data to be erased
To be erased?
Stored compression image data
Temporary file, log data, others
PDL spool
FAX reception guaranteed
Address Book/Filter
MEAP application
General
Document management table, profile
Font used in PDL, others
Execution module, message file, RUI contents
OK
OK
OK
OK
OK
OK
OK
OK
OK
NG
T-2-15
■■The number of rewriting the hard disk
Depending on whether there is Security Kit/HDD Data Erase Kit or not, the erasing method of
the hard disk data when erasing all the user data collectively will change.
Data to be initialized
telephone number registration data (*1)
user data and data registered under Service Mode #1
through #3.
of user data, the memory management data will not be
deleted.
image data collected in memory will not be deleted.
user data and data in Service Mode #1 through #3, #7.
data under Service Mode #4.
system dump list data.
communication control report data.
all settings/registered data except data under Service Mode
#5 TYPE.
number of prints, number of sheets read.
T-2-14
• Without Security Kit
Erase mode is fixed with NULL: 1 time. Other modes are not selectable.
• With Security Kit
From Service Mode(HDCR-DSP), any Erase mode can be specified.
There are three patterns of the Erase mode; NULL: 1 time, Random: 1 time, Random: 3 times
Sub item
HDCR-DSP
COPIER>OPTION>USER
Specification selection related to user mode
Description
Used to turn off display of user mode hard disk clear mode and switch
clear operations.
0: Don't display and don't clear
1: Clear once with zeroes
2: Clear once with random data
3: Clear 3 times with random data (mode displayed for settings 1 to 3)
MEMO: function for HDD initialization
This is the function to clear the data on HDD completely by overwriting
the 0 (null) data and random data to file data area at the moment of
deleting files logically (timing for deleting the administrative information
data) in HDD.
level.
2
T-2-16
2
Functions > Basic Function > Initialization of all data and settings > The number of rewriting the hard disk
2-39
3
3
Installation
Installation
■
procedure
■Installation
3
Installation > Installation Procedure > Overview of the Installation Procedure
Installation Procedure
Overview of the Installation Procedure
As a rule, the user is expected to obtain a license key and register it to the device. Detailed
instructions are found in the User's Guide. The following is an outline of the instructions:
1. Using the following URL, access the LMS, and obtain the license key by following the
3-2
"The function has already been enabled."
>> Make sure that the Kit has not already been enabled.
4. Turn off the main power switch and turn it back on.
5. The registered license will become valid when the device is turned back on. When it has
started normally, press the Counter key, and click the Device Configuration button to make
sure that the Kit is indicated as part of the options.
instructions shown on the screen:
http://www.canon.com/lms/license/
NOTE
A license key is issued in exchange for the 16-digit number indicated on the License
Access Number Certificate and the serial number of the device (e.g., ABC01234)
to which the license will be registered. The device serial number will be indicated in
response to a press on the Counter key on the iR device (under [Serial Number]).
2. Copy the 24-digit number shown on the Web browser screen in the space given for the
purpose on the License Access Number Certificate sheet.
Important
Be sure to double-check the number to avoid an error. Be sure that the user is aware
of the importance of the License Access Number Certificate and that it must be stored
away in a safe place.
3. Make the following selections: user mode>system control setup>license control. Then, type
in the 16-digit number, and click [Execute]. In response, the license key will be registered and
the appropriate functions will be enabled. Otherwise, any of the following error messages will
appear:
"The number of the license key is not correct. Check the license key."
>> Make sure that the license key is not issued for a different device.
>> Make sure that the number has been correctly typed in.
>> Make sure that the license key is the correct one.
3
Installation > Installation Procedure > Overview of the Installation Procedure
3-2
3
Installation > Installation Procedure > Device Signature PDF > Generating the CA Certificate and Key for the Machine Signature Function
3-3
Device Signature PDF
■■Overview
The machine signature function enables identification of the very machine used to scan the
original of a file, thus preventing data manipulation. It makes use of a unique CA certificate
and key stored within the machine.
The CA certificate and key used by the machine signature mechanism may be exported from
an iR machine to an outside target, but the target must also be an iR machine (e.g., not a
PC).
The certificate used for the function is created or updated through the control panel. Its
validity is fixed to 5 years, but may be updated for continued use.
Management Settings>Device Management>Certificate Settings>Generate Key>Generate/
update Device Signature Key
F-3-2
■■Generating the CA Certificate and Key for the Machine
Signature Function
Management Settings>Device Management>Certificate Settings>Generate Key>Generate/
update Device Signature Key
F-3-1
■■Registering the License Information
Make the following selections: Additional Functions>System Settings>License Registration,
and type in the license number obtained from the LMS; after pressing the Execute button,
follow the instructions on the control panel to turn off and then back on the iR machine.
F-3-3
Management Settings>Certificate Settings>Key and Certificate list
3
Installation > Installation Procedure > Device Signature PDF > Generating the CA Certificate and Key for the Machine Signature Function
3-3
3
Installation > Installation Procedure > Device Signature PDF > Transmitting a Machine Signature PDF File
3-4
Make the following selections to see that the appropriate machine signature key has been
generated:
F-3-6
Using Acrobat Reader, open the PDF file that has been transmitted after scanning an image.
F-3-4
■■Transmitting a Machine Signature PDF File
Check to be sure that the signature tab shows a machine signature.
Signature Tab as Viewed in Acrobat Reader
Using SEND, indicate a file or e-mail address, and press the File Format button. Select 'PDF',
and press the Add Digital Signature button.
F-3-7
F-3-5
Select 'Machine Signature', and press the OK button.
3
Installation > Installation Procedure > Device Signature PDF > Transmitting a Machine Signature PDF File
3-4
3
Installation > Installation Procedure > Making SSOH Settings > Enabling SSOH Using the SMS
3-5
Making SSOH Settings
SSOH (Simple Device Login Hybrid) is a login service that can be used with stand-alone iR
devices.
SSOH is used by utilising the SMS (Service Management Service) on the iR unit, via a PC on
the network.
■■Enabling SSOH Using the SMS
Management Settings>License/Other>MEAP Settings>Use HTTP then Enable (ON)
• If a PC is used in combination with a Web browser, set it so that the cookie function and
JavaScript may be used.
• MEAP applications are written using JavaScript, and SSOH and SMS operate as MEAP
applications. In other words, they will not function without access to JavaScript.
• When an MEAP application communicates with an outside entity, SSL must always be
brought in for use. When a connection is established (logged in), port 8000 will use a
cookie to connect to a different port (redirecting). This series of operations cannot be
executed for connection to the SMS unless cookies may be used.
• All characters typed in through a Web browser must be those that may be used on the
touch panel of the iR machine.
A Windows PC typically uses shift JIS (character code), while MEAP applications (written in
F-3-8
JavaScript) use UTF-8, not permitting the use of special characters, which are expressed
3. Select 'System Management'.
differently between shift JIS and UFT-8.
4. Select 'Enhanced Sys.App'.
5. Select 'Single Sign-On H'.
6. Press the Select button.
1. Type in the following URL as 'address' in the PC's Web browser:
http://iR machine's IP address:8000/sms/
2. When the Log-in page of the SMS has appeared, type in the appropriate password, and
press the Log-in button.
At time of shipmen, the password is 'MeapSmsLogin'. (case-sensitive)
3
Installation > Installation Procedure > Making SSOH Settings > Enabling SSOH Using the SMS
3-5
3
Installation > Installation Procedure > Making SSOH Settings > Registering SSOH Users
F-3-9
7.Turn off and then back on the iR machine.
3-6
F-3-10
4. When a connection has been established (logged in), click [User Management].
Hold down the ON/OFF button on the control panel for 3 sec or more, and follow the
instructions in the display to turn off the main power.
■■Registering SSOH Users
1. Start up the Web browser on the PC.
2. Type the following URL in 'address'. (case-sensitive)
-If TCP/IP Settings>Use HTTP is enabled (ON) as part of the network settings of the iR
machine,
http://iR machine's IP address:8000/sso/
-If TCP/IP Settings>Use HTTP is disabled (OFF) as part of the network settings of the iR
machine,
http://iR machine's IP address/sso/
The Log-in page appears.
3. Type in the name and password of the user that has been registered as administrator of
F-3-11
5. Click [Register].
SSOH, and click 'log-in'.
At time of shipment, the user name is "Administrator" and the password, "password." (case
sensitive)
3
Installation > Installation Procedure > Making SSOH Settings > Registering SSOH Users
3-6
3
Installation > Installation Procedure > Making SSOH Settings > Registering SSOH Users
3-7
6. Fill in the relevant fields, and click [OK].
Important
However, there may be no more than 100 users per iR machine.
F-3-13
F-3-12
3
Installation > Installation Procedure > Making SSOH Settings > Registering SSOH Users
3-7
3
Installation > Installation Procedure > User Signature PDF > Obtaining a User Certificate
User Signature PDF
3-8
■■Sending a User Certificate Through an RUI to an iR Machine
Set the iR machine so that it is ready for an SSOH MEAP authentication log-in session. On
■■Overview
The user signature function serves to enable the identification of users and, thus, the
prevention of data manipulation.
When a PDF file is created using this function and displayed in Acrobat, its signature tab will
provide information on the user who has singed it, making it possible to assess the propriety
of the file data.
the PC, use the browser to log on to the RUI.
Hereafter, the discussions assume that the user has been registered according to the
instructions under "Making SDL Settings."
Selecting 'initial setup/register' of the RUI enables making settings for user keys and
certificates (provided that the user certificate PDF license option and the MEAP authentication
SSOH have been enabled).
User signature PDF files may make use of a user certificate stored on the iR machine. To
install a user certificate or to transmit a user signature PDF file, it is necessary to make sure
that all following conditions are satisfied:
-The user signature PDF transmission option is enabled.
-The iR machine itself is run on MEAP authentication (SSOH).
-The user certificate of the user in question has been installed.
■■Registering the License Information
Make the following selections: Management Settings>License/Other>License Registration.
Then, type in the license number obtained from the LMS, and press the Execute button.
Follow the instructions on the control panel to turn off and then back on the iR machine.
F-3-15
If the log-in has been made as administrator, there will be a list of all users (as many as 100
per iR machine). If the log-in has been as a general user, on the other hand, the RUI will
show that user alone.
■■Obtaining a User Certificate
There must be a User certificate to use a user signature PDF license option. It is likely that a
User certificate is provided by the system administrator to each user, but it may nevertheless
be created in a demonstration environment. To do so, refer to the information under "Creating
a User Certificate for Verification Purposes" in Field Service-Related Implementation.
F-3-14
3
Installation > Installation Procedure > User Signature PDF > Obtaining a User Certificate
3-8
3
Installation > Installation Procedure > User Signature PDF > Checking the User Key and Certificate List
3-9
■■Installable certificate format:
The certificate installable to the host machine iR by using RUI is as follows:
-The certificate file format is only for the PKCS#12 format protected by password.
-The certificate file extension needs to be .p12 and .pfx.
-The key length of the installable certificate is up to 1024bit.
On the User Key Certificate Install screen, select a User certificate file by indicating its path.
Then, press the Start Install button.
F-3-17
■■Checking the User Key and Certificate List
It is necessary to login with the Administrator authority to confirm it.
Make the following selections: Settings/Registration>Management Settings>Device
Management>Certificate Settings>Key and Certificate List.
The indication differs from the list used by the SSL server certificate for the following:
-Instead of the key name, the log-in name is used.
F-3-16
The long-in name (shown as part of user key/certificate settings) should be as follows: log-in
-There is no need to enable/disable (ON/OFF) the default key settings and, therefore, there is
no button for the purpose.
name@domain name. If the domain name is absent, the log-in name is used alone.
3
Installation > Installation Procedure > User Signature PDF > Checking the User Key and Certificate List
3-9
3
Installation > Installation Procedure > User Signature PDF > Transmitting a PDF File with a User Signature
F-3-18
■■Transmitting a PDF File with a User Signature
3-10
F-3-20
2. Press the User Signature button.
If SSOH is in use, the control panel of the iR machine shows the following log-in screen;
type in the ID and password to bring up the SEND screen. In the case of SSOH, there is no
domain selection field, as the log-in is on the machine itself.
F-3-21
. As in the case of using ordinary SEND functions, place an original on the copyboard or
in the feeder, and make the following selections: New Address>E-Mail>File>Store In User
F-3-19
1. On the SEND screen, press the File Format button and then the Add Digital Signature
button.
Inbox. Fill 'User Inbox' with the appropriate means of transmission from 'Register', and then
press the Start key to start scanning the original.
4. When done, open the transmitted PDF file in Acrobat Reader, and check to see that the
signature tab shows the correct user information.
3
Installation > Installation Procedure > User Signature PDF > Transmitting a PDF File with a User Signature
3-10
3
Installation > Installation Procedure > User Signature PDF > Transmitting a PDF File with a User Signature
3-11
Signature Tab as Viewed in Acrobat Reader
F-3-22
3
Installation > Installation Procedure > User Signature PDF > Transmitting a PDF File with a User Signature
3-11
3
Installation > Installation Procedure > User Signature creation
User Signature creation
3-12
3. Press the Add ID button.
In order to use a User signature PDF, it is necessary to create an User Signature file.
The following procedures can be used to create a certificate that can be used easily in a
validation environment.
Important
When 'Use Self-Sign Security Handler to create a digital ID' in the following procedures
is carried out, any attempt to alter the created PDF can be detected. However, the
details to be displayed in the user certificate need to be confirmed by the person who
created it. Even if Acrobat is used to view the details of the certificate, the authenticity
of the document cannot be ascertained.
Preparations:
PC running Adobe Acrobat 7.0 Professional
1. Launch Adobe Acrobat 7.0 Professional.
2. Under Advanced, open Security Settings.
F-3-24
4. Select Create a Self-Signed Digital ID to create a digital ID.
F-3-25
F-3-23
3
Installation > Installation Procedure > User Signature creation
3-12
3
Installation > Installation Procedure > User Signature creation
5. Press Next.
3-13
7. Select Enable Unicode Support and fill in the Name and Organizational Unit.
F-3-26
6. Select New PKCS#12 Digital ID File.
F-3-27
3
F-3-28
8. Enter the password and press Finish.
Installation > Installation Procedure > User Signature creation
F-3-29
3-13
3
Installation > Installation Procedure > User Signature creation
3-14
9. From Start, go to Search for Files and Folders. Enter the folder name and '*.pfx', and begin
the search.
F-3-30
10. From the Search Results, find out the storage location of the certification file and then
copy the certification file to the desired location.
F-3-31
3
Installation > Installation Procedure > User Signature creation
3-14
4
Maintenance
■
when service
■Notes
■
Service Mode
■Related
■
Error code
■Related
4
Maintenance
4
Maintenance > Notes when service > Recommended setting of system management information
4-2
Notes when service
Other Points to Note
At times, it is a good idea to print out the user data list (network) and the address table list
in user mode before initializing the memory (MMI CLEAR) to keep a backup of the data. (Be
sure to obtain the consent of the user before doing so by explaining its importance.) If it is
possible to use an RUI, the data may be exported for a backup, thus facilitating restoration
work. If the user is using multiple iR machines, it may also be a good idea to make use of
'Device Information Delivery Settings', which is a newly available mechanism.
Recommended setting of system management
information
When multiple users use an iR host machine, it is necessary to advise each user to set the
system management information.
Setting ID and password of system administrator on the operation unit under (Settings/
Registration) > [Management settings] > [User Management] > [Setting of system
administrator's information] has an effect of restraining the third person from falsifying
information, for the ID and password are required when a user carries out an important
setting of the iR host machine.
Under the environment that the setting is not done, if a user who does not sufficiently know
operation situation of the iR tries to change the setting, following troubles may occur.
• When the user changes [User ID Management] from [off] to [on], copying operation cannot
be done unless ID and password are input.
• When each setting is changed on the network from RUI, that enables to falsify data of
address book or delete log.
• When TCP/IP fixed address is changed on the network setting, printing operation via
network cannot be done until the port setting is changed.
• When usage restriction of USB device is changed to [on], printing operation via USB
becomes disabled.
4
Maintenance > Notes when service > Recommended setting of system management information
4-2
4
Maintenance > Notes when service > Creating SSL Key-Pair and Server Certification > Generating key-pair and server certification
4-3
Creating SSL Key-Pair and Server Certification
When exchanging data between MFP machine and PC/Server, it enables setting to execute
encryption by SSL (Secure Sockets Layer).
When executing SSL, it needs to generate key-pair and server certification with MFP
machine.
By applying SSL, the following functions are available:
• Remote UI
• IPP Print Settings
• Device Information Delivery Settings
• Dept. ID Management Password Confirmation
• E-Mail/I-Fax: Authent./ Encryption Settings
Settings/Registration > Preferences > Network > TCP/IP Settings > SSL Settings
F-4-2
Select 'Generate SSL Key' button, then input key name.
F-4-1
■■Generating key-pair and server certification
Important
Up to 2 key-pairs can be registered.
F-4-3
When generating keys inside MFP machine, make the following selections:
Settings/Registration > Management Settings > Device Management > Certificate Settings >
Generate Key
4
Maintenance > Notes when service > Creating SSL Key-Pair and Server Certification > Generating key-pair and server certification
4-3
4
Maintenance > Notes when service > Creating SSL Key-Pair and Server Certification > Generating key-pair and server certification
F-4-4
Input the items for 'Generate Key: Certificate Settings', and select 'Start Key Generate' button.
4-4
F-4-6
In the case of IPPS print from Windows Vista, the Common Name should be the IP address
of the host machine when generating SSL key.
Settings/Registration > Management Settings > Device Management > Certificate Settings >
Generate key > Generate SSL Key
F-4-5
Make the following selections:
Settings/Registration > Management Settings > Device Management > Certificate Settings >
Generate Key
F-4-7
Open 'Key and Certificate List'.
Encryption setting is done if there is a key mark and 'Certificate Details' shown in the display.
4
Maintenance > Notes when service > Creating SSL Key-Pair and Server Certification > Generating key-pair and server certification
4-4
4
Maintenance > Notes when service > Creating SSL Key-Pair and Server Certification > CA-KAY
■■CA-KAY
4-5
By execution of CA-KEY, the default key recovers.
CA-KAY is service mode to execute “Deletion of CA Certificate and key pair”.
Select LEVEL 2 > COPER > FUNCTION > CLEAR > CA-KEY, then additionally registered
CA Certificate and key pair are deleted.
Key pair returns to the same status when shipped from a plant.
Therefore, after execution of CA-KEY, the following actions are required.
When user has added key pair, backup of the key pair is required for recovery.
Key pair for Device Signature PDF requires re-generation.
Key pair for Digital User Signature requires re-registration from RUI.
Key pair that was registered by MEAP application requires re-registration.
F-4-9
F-4-8
4
Maintenance > Notes when service > Creating SSL Key-Pair and Server Certification > CA-KAY
4-5
4
Maintenance > Notes when service > User data Erase of the HDD > In the case that the HDD Data Encryption Kit is not installed
4-6
User data Erase of the HDD
If the host machine is used by a user for such cases as demonstration, clear the address
book for FAX and the user data on HDD completely and remove the machine from the user's
site.
The following are the method to clear HDD completely.
■■For a machine where the HDD Data Encryption Kit is installed
When clearing the key information with SST, the encryption key of the main controller
becomes not identical to that of HDD and all data in the HDD cannot be read.
All data in HDD are targeted. When using the same HDD in the host machine, the following
tasks are required.
1) HDD format
2) System installation
■■In the case that the HDD Data Encryption Kit is not installed
Settings/Registration > Management Settings > Data Management > Initialise all Data/
Settings
If the HDD Data Erase Kit has been installed, the setting in service mode enables overwriting
the 0 data and random data to the data area on the deleted HDD and makes decryption more
difficult.
Sub item
HDCR-DSP
COPIER>OPTION>USER
Specification selection related to user mode
Description
Used to turn off display of user mode hard disk clear mode and switch
clear operations.
0: Don't display and don't clear
1: Clear once with zeroes
2: Clear once with random data
3: Clear 3 times with random data (mode displayed for settings 1 to 3)
MEMO: function for HDD initialization
This is the function to clear the data on HDD completely by overwriting
the 0 (null) data and random data to file data area at the moment of
deleting files logically (timing for deleting the administrative information
data) in HDD.
level.
2
T-4-1
4
Maintenance > Notes when service > User data Erase of the HDD > In the case that the HDD Data Encryption Kit is not installed
4-6
4
Maintenance > Notes when service > How to create WebDAV environment for verification > Add the FrontPage 2002 Server Extensions
4-7
How to create WebDAV environment for verification
The procedure is described in order to improve understanding of WebDAV through the
experiment.
For practical use, many anti-virus measures or countermeasures against security are
necessary.
The environment created by the procedure must not be connected to the outside or LAN
environment because it is highly likely to be the target for attacks targeting IIS.
WebDAV works on the IIS. Therefore, before starting the installation of WebDAV, IIS should
be enabled in Windows 2000 Server or Windows 2003 Server.
The setting method in Windows 2003 Server is described below.
F-4-11
■■Add the FrontPage 2002 Server Extensions
Select 'FrontPage 2002 Server Extensions' and press 'OK'.
Select Start > Setup > Control panel > Add or Remove Programs > Add or Delete Window
components > Application server, and press 'Detail' button.
F-4-12
F-4-10
Select 'Internet Information Service (IIS)' and press 'OK'.
4
Maintenance > Notes when service > How to create WebDAV environment for verification > Add the FrontPage 2002 Server Extensions
4-7
4
Maintenance > Notes when service > How to create WebDAV environment for verification > Add the FrontPage 2002 Server Extensions
4-8
F-4-13
Press 'Complete' on the completion screen of Windows component wizard.
F-4-15
Select created new folder(ex. 01).
Open Properties by mouse right button.
Put Permissions button on the Sharing Tab.
Select Everyone.
Select Full Control Allow on the Permmisions for Everyone.
F-4-14
Create new folder to be used in WebDAV under the IIS Web public folder.
Do not make under the C\Intepub\wwwroot\
It is named 01 on the screen.
Usually, [wwwroot] folder should be put outside of [C\] in order to improve security.
F-4-16
Open Internet Service Manager under Start > Setup > Control panel > Administration tool.
Select Web site directory for WebDAV.
4
Maintenance > Notes when service > How to create WebDAV environment for verification > Add the FrontPage 2002 Server Extensions
4-8
4
Maintenance > Notes when service > How to create WebDAV environment for verification > Add the FrontPage 2002 Server Extensions
4-9
F-4-19
F-4-17
Action>New>Virtual Directory
Select Web Service Extensions.
Select WebDAV on the Web Service Extention list.
Put Allow Button.
F-4-20
Select Web Site of WebDAV(ex. 01).
Open Properties by mouse right button.
F-4-18
Select Read and Wite on the Viertual Directory Creation Wizard.
4
Maintenance > Notes when service > How to create WebDAV environment for verification > Add the FrontPage 2002 Server Extensions
4-9
4
Maintenance > Notes when service > How to create WebDAV environment for verification > Add the FrontPage 2002 Server Extensions
4-10
F-4-22
Select Directory Security Tab
Put Edit button on the Authentication and access control.
Open Virtual Directory Tab and Select Dierctory browsing.
F-4-21
F-4-23
The check is removed at the Enable anonymous access.
Select Basic suthentication for Windows domain servers on the Authenticated access.
4
Maintenance > Notes when service > How to create WebDAV environment for verification > Add the FrontPage 2002 Server Extensions
4-10
4
Maintenance > Notes when service > How to create WebDAV environment for verification > Add the FrontPage 2002 Server Extensions
4-11
F-4-26
If you have not ID for Web Server, you need make on the Web Server.
This is Web Server Operation.
Open Computer Management under Start > Setup > Control panel > Administration tool.
Select Local Users and Groups>User.
Open New User by mouse right button.
F-4-24
Input User name and Password.
Setup by Client
The check is removed at User must chenge password at next logon.
Open the My Network Places on the Desktop.
Select Password never expiers.
Select Add a network place.
F-4-27
F-4-25
Input Web Server Address on Add Network Place Wizard.
4
Maintenance > Notes when service > How to create WebDAV environment for verification > Add the FrontPage 2002 Server Extensions
4-11
4
Maintenance > Notes when service > How to create WebDAV environment for verification > Transmission Setup from the iR
■■Open WebDAV Folder
4-12
■■Transmission Setup from the iR
Open My Network Places on the Desk top.
At Send/Fax tab on the control panel of the iR, select Register > Register Address > New
Select WebDAV Folder(ex. 01 on 172.16.1.54).
address > File, and register the address.
Open WebDAV Folder(ex. 01 on 172.16.1.54).
Protocol: WebDAV
Host name: https://Server address
Path to Folder: Directory path after the Inetpub
User name: (Basic authentication of WebDAV server, Necessary user name for digest
authentication)
Password: (Basic authentication of WebDAV server, Necessary password for digest
authentication)
F-4-28
F-4-29
4
Maintenance > Notes when service > How to create WebDAV environment for verification > Transmission Setup from the iR
4-12
4
Maintenance > Notes when service > How to create WebDAV environment for verification > Reference:
4-13
■■Reference:
In IPv6 environmen:
When you input IPv6 address into a Host Name column with a URI(Uniform Resource
Identifier) format, it is necessary to surround the IPv6 address part with a bracket[ ].
When made the host name of the WebDAV address an example; an example:
ex:
fd00:0:ac18:9000:203:baff::80 then port 1234
->
http://[fd00:0:ac18:9000:203:baff::80]:1234/
When you transmitted a message without a bracket, the transmission of a message result
finishes failure in end cord #751.
4
Maintenance > Notes when service > How to create WebDAV environment for verification > Reference:
4-13
4
Maintenance > Notes when service > IPv6 settings > IPv6 address confirmation from a Windows Vista PC
IPv6 settings
■■IPv6 address confirmation from a Windows Vista PC
The following instructions pertain to connection confirmation when the IPv6 address has been
obtained passively, in a local area network with no DHCPv6 server.
communication status.
With IPv6, even without a DHCP server, automatic address settings can be set up as follows.
Multiple IPv6 addresses can be used at the same time.
Stateful
address
From Settings/Registration, go to Preferences > Network > TCP/IP Settings > IPv6 Settings >
Use IPv6
Set Use IPv6 to ON.
Refer to the following table to see which addresses can be used.
Manual
address
link local address with a Windows Vista PC and the unit, in a network environment with no
On the unit's touch panel, use an IPv6 automatically obtained link local address to confirm the
With IPv4, in order to make the address settings automatic, a DHCP server is required.
Stateless
address
The following instructions pertain to communication confirmation procedures with an IPv6
DHCPv6 server or router.
■■IPv6 address automatic settings
Address
type
Loop back
address
Link local
address
4-14
To change the status from OFF to ON, the unit needs to be rebooted.
Touch panel Settable
Address
Usage conditions
location
addresses characteristics
None
1
::1
Always active.Can only be used with Ping
on touch panel.
Uses IPv6. 1
Begins with
Automatically generated from unit's MAC
fe80.
address. Active until the main unit's power
is turned off. Can be used even if there is
a device on the network using the same
address.
Stateless
0-4
Router must be able to route Router
address
Advertise.Active until the main unit's power
settings
is turned off.Note, however, that there is a
time limit on the validity and the address will
become invalid once this period expires,
unless the validity is automatically renewed.
Manual
0-1
The following addresses cannot be
settings
registered.
- Multi-cast addresses [1111 1111]Addresses comprising all 0 [0000 0000]
- IPv4-compatible IPv6 addressesAddresses
in which the upper 96 bits are 0 and
the lower 32 bits are in IPv4 address
hexadecimal notation.
E.g. [0::1C10:0120] Addresses used
when IPv6 and IPv4 are using an IPv6
environment.
-IPv4 -mapped addressesAddresses in
which the upper 80 bits are 0, the following
16 bits are 1 and the lower 32 bits are in
IPv4 address hexadecimal notation.
E.g. [0::FFFF:1C10:0120] Addresses used
when IPv4 is using an IPv6 environment.
Uses
0-1
Begins with
DHCPv6 required
DHCPv6
ff02
F-4-30
T-4-2
4
Maintenance > Notes when service > IPv6 settings > IPv6 address confirmation from a Windows Vista PC
4-14
4
Maintenance > Notes when service > IPv6 settings > Local area connection confirmation from a Windows Vista PC
4-15
Make a note of the link local address in order to input the address from a Windows Vista PC.
E.g. fe80::200:85ff:fead:bac2
F-4-32
F-4-31
■■Local area connection confirmation from a Windows Vista PC
From START, go to Control Panel, then Network and Common Centre > Network Connections
and Management > Local Area Connections > Properties.
Open the Properties for Internet Protocol Version 6 (TCP/ IP). Select 'Obtain IPv6 Address
Automatically' then press OK.
From START, go to All Programmes > Accessories > Command Prompt.
Enter the following command and the IPv6 link local command displayed on the unit touch
panel, then press Enter.
At this time, if Ping does not work with only the link local address, enter the Scope ID.
< IPv6address > % <Scope ID >
E.g. fe80::200:85ff:fead:bac2%4
If the unit responds, a connection has been made.
4
Maintenance > Notes when service > IPv6 settings > Local area connection confirmation from a Windows Vista PC
4-15
4
Maintenance > Notes when service > IPv6 settings > IPv6 connection confirmation from the iR main unit touch panel
4-16
■■IPv6 connection confirmation from the iR main unit touch panel
Carry out the following procedures in order to check the IP address of a Windows Vista PC.
From START, go to All Programmes > Accessories > Command Prompt.
Enter the following command,
netsh interface ipv6 show address
The display illustrated below will appear.
This is a local network environment with no DHCPv6 server.
F-4-34
Reference:
Addresses that begin with "fe80" are called link local addresses.
These are used prior to making trunk LAN and Internet connections.
These addresses are used for single links or connection to single local networks only.
They cannot be relayed via a router.
Multi-cast addresses that begin with "ff02" are for use with DHCPv6 (DHCP IPv6 version).
IPv6 address notation samples:
Sample
1234:0234:0034:0004:0000:0005:00AB:0
DE0
IPv6 omitted 1234:234:34:4:0:5:AB:DE0
IPv6 compact 1234:234:34:4::5:AB:DE0
IPv6
F-4-33
In the case of the above example,
note down 'fe80::206:5bff:febd:3ad9' , then, from the main unit touch panel,
Settings/Registration > Preferences > Network > TCP/IP Settings > IPv6 Settings > PING
Command
Description
128 bits divided into 8 segments of 16
bits in hexadecimal notation.
First 0 may be omitted.
A compact notation where a series of
0 may be represented by [::], in one
location only.
T-4-3
Against IPv6 address, enter the IPv6 address of the Windows Vista PC written down earlier,
and press Start.
If 'Response from the host' is displayed, a connection has been made.
4
Maintenance > Notes when service > IPv6 settings > IPv6 connection confirmation from the iR main unit touch panel
4-16
4
Maintenance > Notes when service > Related Service Modes List
Related Service Modes List
4-17
Item
Disable iFax
Setting name
IFAX-OF
Delete a From Address When
Transmitting e-Mail
FROM-OF
Following is an overview of the service modes related to the SEND function.
There are Service modes Level 1 and 2.
Service modes Level 1
COPIER>OPTION>FNC-SW
Item
Setting name
iR Model Paper Size
MODEL-SZ
Destination(Country+Language CONFIG
+Destination+Size)
Description
0: AB, 1: Inch, 2: A, 3: AB/Inch
JIS X 0304(Two characters)+ISO 639(Two
characters)
T-4-6
T-4-4
COPIER>OPTION>NETWORK
Item
FTP transmission port number
Setting name
FTPTXPN
Description
TCP port number used by FTP transmission
(default:25)
T-4-5
Service modes Level 2
COPIER>OPTION>FNC-SW
Item
I-Fax reception raw data print
Setting name
RAW-DATA
PDF Reception/Transmission
PDF-RDCT
COPIER>OPTION>USER
Item
Disable e-Mail
Setting name
MAIL-OF
Disable File
FILE-OF
4
Description
Switch for prohibiting transmission to i-FAX
destinations
0: Transmission to i-FAX destinations is not
prohibited.
1: Transmission to i-FAX destinations is
prohibited.
Prohibit transmission of i-FAX destinations by
prohibiting the input of i-FAX addresses from
the address book.
0: do not delete
1: delete
Description
Transmission of e-mail may be disabled by
preventing input of e-mail addresses from an
address book.
0: enable e-mail transmission (default)
1: disable e-mail transmission
If an e-mail address has been registered and
yet the setting needs to be changed from
'0' to '1', it is desirable to delete the address
manually.
Switch for prohibiting transmission to file
destinations
0: Transmission to file destinations is not
prohibited.
1: Transmission to file destinations is
prohibited.
File addresses which are already registered
must be deleted manually since it is still
possible to use them even when '1' is set for
this item.
Maintenance > Notes when service > Related Service Modes List
Description
0: Ordinary reception mode(default)
1: Received I-Fax content printed out as is (in
order to judge whether data are correct).
0: compute PDF file CropBox to 2 decimal
places
1: do not compute PDF file CropBox beyond
decimal point
T-4-7
COPIER>OPTION>USER
Item
Setting name
Item Setting name Description IFAX-SZL
No limitation on file size for
I-Fax serverless transmission.
Divided page transmission in
I-Fax simple mode
IFAX-PGD
Add the Domain Name for
e-Mail Transmission
DOM-ADD
Description
0: Enables Limitation on file size for
serverless transmission.
1: Disables Limitation on file size for
serverless transmission.
(Default:1)
0: Does not allow divided page transmission
in I-Fax simple mode
1: Allows divided page transmission in I-Fax
simple mode
(Default:0)
0: do not add
1: add
T-4-8
4-17
4
Maintenance > Notes when service > Related Service Modes List
COPIER>OPTION>NETWORK
Item
Setting name
I-Fax reception output line count IFAX-LIM
limit
SMTP transmission port number SMTPTXPN
SMTP reception port number
SMTPRXPN
POP3 port number
FTP transmission port number
POP3PN
FTPTXPN
CRAM-MD5 authentication
restrictions with SMTP / POP
AUTH authentication
NS-CMD5
NTLM authentication restrictions NS-NTLM
with
SMTP / POP AUTH
authentication
GSSAPI authentication
NS-GSAPI
restrictions with SMTP / POP
AUTH authentication
PLAIN, LOGIN authentication
restrictions with SMTP POP
AUTH authentication when
communication packets are
encoded
NS-PLNWS
LOGIN authentication
restrictions with SMTP POP
AUTH authentication
NS-LGN
PLAIN, LOGIN authentication
NS-PLN
restrictions with SMTP POP
AUTH authentication when
communication packets are not
encoded
Description
When large volume data (error mail, etc.) are
received via I-Fax, the output line count is
restricted (default: 500).
NB: If the setting is 0, there is no restriction.
TCP port number used by SMTP transmission
(default:25)
TCP port number used by SMTP reception
(default:25)
TCP port number used by POP (default:110)
TCP port number used by FTP transmission
(default:25)
0: Permit CRAM-MD5 authentication when
performing SMTP / POP AUTH authentication.
(Default)
1: Prohibit CRAM-MD5 authentication when
performing SMTP authentication.
0: Permit NTLM authentication when performing
SMTP / POP AUTH authentication. (Default)
1: Prohibit NTLM authentication when performing
SMTP / POP AUTH authentication.
0: Permit GSSAPI authentication when
performing SMTP POP AUTH authentication.
(Default)
1: Prohibit GSSAPI authentication when
performing SMTP POP AUTH authentication.
When communication packets are encoded,
0: Permit PLAIN, LOGIN authentication when
performing SMTP POP AUTH authentication.
(Default)
1: Prohibit PLAIN, LOGIN authentication when
performing SMTP POP AUTH authentication.
0: Permit LOGIN authentication when performing
SMTP POP AUTH authentication. (Default)
1: Prohibit LOGIN authentication when
performing SMTP POP AUTH authentication.
When communication packets are not encoded,
0: Permit PLAIN, LOGIN authentication when
performing SMTP POP AUTH authentication.
(Default)
1: Prohibit PLAIN, LOGIN authentication when
performing SMTP POP AUTH authentication.
4-18
NOTE
With regard to the new SMTP authentication-related user modes, usually there is
no need to change these settings. These settings should be changed only when
a particular authentication system is to be prohibited, depending on the server
administrator's security policy.
T-4-9
4
Maintenance > Notes when service > Related Service Modes List
4-18
4
Maintenance > Notes when service > Service mode comparative table
Service mode comparative table
Mention below a list for old BODY of the Send function in this Model.
Item
MODEL-SZ
New Setting name
Old
1 FNC-SW >
2
MDEL-SZ
Destination(Country+
1 FNC-SW >
2
Language+Destinatio
CONFIG
n+Size)
I-Fax reception raw
2 FNC-SW > RAW2
data print
DATA
I-Fax reception output
line count limit
2
NETWORK >
IFAX-LIM
2
SMTP transmission
port number
2
NETWORK >
SMTPTXPN
2
SMTP reception port
number
POP3 port number
2
2
FTP transmission
port number
1
NETWORK >
SMTPRXPN
NETWORK >
POP3PN
NETWORK >
FTPTXPN
CRAM-MD5
authentication
restrictions with
SMTP / POP AUTH
authentication
2
NETWORK > NSCMD5
2
2
4
2
2
Setting name Description
MODEL-SZ
0: AB, 1: Inch, 2: A, 3: AB/
Inch
CONFIG
JIS X 0304(Two
characters)+ISO 639(Two
characters)
RAW-DATA
0: Ordinary reception
mode(default)
1: Received I-Fax content
printed out as is (in order
to judge whether data are
correct).
IFAX-LIM
When large volume data
(error mail, etc.) are received
via I-Fax, the output line
count is restricted (default:
500).
NB: If the setting is 0, there
is no restriction.
SMTPTXPN TCP port number used
by SMTP transmission
(default:25)
SMTPRXPN TCP port number used by
SMTP reception (default:25)
POP3PN
TCP port number used by
POP (default:110)
FTPTXPN
TCP port number used
by FTP transmission
(default:25)
NS-CMD5
0: Permit CRAM-MD5
authentication when
performing SMTP / POP
AUTH authentication.
(Default)
1: Prohibit CRAMMD5 authentication
when performing SMTP
authentication.
Maintenance > Notes when service > Service mode comparative table
4-19
Item
New Setting name
Old
NTLM authentication
2 NETWORK > NS- 2
restrictions with
NTLM
SMTP / POP AUTH
authentication
GSSAPI
authentication
restrictions with
SMTP / POP AUTH
authentication
2
NETWORK > NSGSAPI
2
PLAIN, LOGIN
authentication
restrictions with
SMTP POP AUTH
authentication when
communication
packets are encoded
2
NETWORK >
PLNWS
2
LOGIN authentication
restrictions with
SMTP POP AUTH
authentication
2
NETWORK > NSLGN
2
Setting name Description
NS-NTLM
0: Permit NTLM
authentication when
performing SMTP / POP
AUTH authentication.
(Default)
1: Prohibit NTLM
authentication when
performing SMTP / POP
AUTH authentication.
NS-GSAPI
0: Permit GSSAPI
authentication when
performing SMTP POP
AUTH authentication.
(Default)
1: Prohibit GSSAPI
authentication when
performing SMTP POP
AUTH authentication.
NS-PLNWS When communication
packets are encoded,
0: Permit PLAIN, LOGIN
authentication when
performing SMTP POP
AUTH authentication.
(Default)
1: Prohibit PLAIN, LOGIN
authentication when
performing SMTP POP
AUTH authentication.
NS-LGN
0: Permit LOGIN
authentication when
performing SMTP POP
AUTH authentication.
(Default)
1: Prohibit LOGIN
authentication when
performing SMTP POP
AUTH authentication.
4-19
4
Item
PLAIN, LOGIN
authentication
restrictions with
SMTP POP AUTH
authentication when
communication
packets are not
encoded
Maintenance > Notes when service > Service mode comparative table
New Setting name
Old
2 NETWORK > NS- 2
PLN
4-20
Setting name Description
NS-PLN
When communication
packets are not encoded,
0: Permit PLAIN, LOGIN
authentication when
performing SMTP POP
AUTH authentication.
(Default)
1: Prohibit PLAIN, LOGIN
authentication when
performing SMTP POP
AUTH authentication.
MAIL-OF
Transmission of e-mail may
be disabled by preventing
input of e-mail addresses
from an address book.
0: enable e-mail transmission
(default)
1: disable e-mail
transmission
If an e-mail address has
been registered and yet the
setting needs to be changed
from '0' to '1', it is desirable to
delete the address manually.
FROM-OF
0: do not delete
1: delete
Disable e-Mail
1
USER > MAIL-OF
2
Delete a From
Address When
Transmitting e-Mail
Add the Domain
Name for e-Mail
Transmission
PDF Reception/
Transmission
1
USER > FROMOF
2
2
USER > DOMADD
2
DOM-ADD
0: do not add
1: add
2
FNC-SW > PDFRDCT
2
PDF-RDCT
0: compute PDF file CropBox
to 2 decimal places
1: do not compute PDF file
CropBox beyond decimal
point
T-4-10
4
Maintenance > Notes when service > Service mode comparative table
4-20
4
Maintenance > Related Error code > Confirm method of error code
4-21
Related Error code
Confirm method of error code
The error code is displayed in the touch panel by the figure of # XXX.
There is an error message list in the user guide.
The corresponding content of the error is confirmed.
F-4-36
F-4-35
4
Maintenance > Related Error code > Confirm method of error code
4-21
4
Maintenance > Related Error code > E-mail Transmission errors
E-mail Transmission errors
Message
<E-mail transmission error message and error codes>
Message
No message
Error
code
#022
Transmission
#099
cancelled
The number of
#702
transmission
standby
documents must
be reduced.
The number of
#703
transmission
standby
documents and
BOX documents
must be reduced.
The address
#704
is not in the
address list.
Data size too big. #705
Address table not #706
available.
Cause
Remedy
Address deleted or invalidated • Retransmit deleted address.
• Check that a group address is
during transmission
specified as the transfer destination
reservation.
and that it contains a valid address.
• Check that a group address is
specified as the transfer destination
and whether it contains local print
or fax box only.
• Check whether the specified
transfer destination address has
been deleted.
A user canceled the
Check Address Book. If the error
transmission.
insists, turn the power off and on.
HD full (work area)
• Wait a while then retry.
• Stop broadcast transmission with
other protocols. This sometimes
helps to avoid this problem.
HD full (work area)
Address book search error.
• Wait a while then retry.
• Delete documents from the BOX to
free up HD space.
2GB file size restrictions of the PDF
make you transmit a short manuscript.
In addition, there is the case that you
can transmit normally when even
a case except the above is going
to transmit a message in Portable
Document Format when you set it in
file format except the PDF again.
Check the address book settings.
Transmission data size too big. • Reduce number of pages for
transmission or lower resolution.
• Reset user mode transmission
upper limit.
Address book locked.
• Address book cannot be referenced
as it is being used by remote UI.
• Address book cannot be referenced
as it is being used by other
transmission components.
4
4-22
Maintenance > Related Error code > E-mail Transmission errors
URL sending
error
Error
code
#713
No connection
#752
No response
#753
Check TCP/IP
#755
Check server
#801
Cannot find
server
#802
Check address
#806
POP server
#810
connection error
POP server
address error
#813
Cause
Remedy
The document stored in Mail
Box has been deleted before
the URL transmission.
DNS/SMTP server setting error
(SMTP connection error)
• Do not delete the document in Mail
Box.
• Send the document again.
Reprogramme the user mode settings.
(domain name, E-Mail address, DNS,
mail server)
Check cable and connectors.
Network error(Socket
Write,Selecterror, etc.)
- IP address set to 0.0.0.0. In
the following two situations, the
IP address is 0.0.0.0.
1) Address could not be
obtained from DHCP, BOOTP,
RARP.
2) Unit launched in IP fixed
mode(keys 1+7 to enter
FIXIPmode).
- TCP/IP protocol stack
resources insufficient. Even
with internal retry (5 times),
transmission failed.
SMTP protocol error/ command
timeout
DNS/SMTP setting error(DNS
error)
• Set the IP address correctly
or set DHCP, RARP, BOOTP
environments to operate properly.
• Turn power OFF/ON.
• Check mail server
• Check the network traffic.
Reprogramme the user mode settings.
(domain name, E-Mail address, DNS,
mail server)
Check address
Incorrect address (address
wrongly searched on SMTP
protocol)
Cannot connect to POP server • Reprogramme user mode settings
when attempting POP Before
(POP, DNS server name)
SMTP transmission.
• Check POP server operation.
• Check DNS server operation.
Password, user account error • Check POP user name, password.
when attempting POP Before • Check POP server account.
SMTP transmission.
4-22
4
Message
No display
Error
code
#830
Maintenance > Related Error code > E-mail Transmission errors
4-23
Cause
Remedy
Message
DSN error notification received.
The DSN error notification is
sent to the transmission source
by the SMTP server and the
iR machine programmed for
SMTP reception during an
ESMTP-enabled transfer path
whenever the destination
address and the other party's
conditions settings are wrong,
or when the transmitted
document's data size exceeds
the permitted SMTP server
range.
MDN error notification received.
The MDN error notification is
sent to the transmission source
as a transmission result in the
mail header when the final
processing of a mail sent in
I-Fax Full mode fails in the iR
reception machine.
• Check the destination address.
• Set the transmission data size so
that it does not exceed the SMTP
server's limit.
• Programme the transmission other
party's conditions so that they can
be processed by the receiver.
SSL encoding
error(POP)
No display
#834
SMTP server
authentication
error
#839
Error occurred with password, • Check SMTP authentication user
user name and/or account
name, password.
when attempting SMTP AUTH • Check SMTP server account.
transmission.
SSL encoding
error
#841
Because there is no encoding • Stop SSL encoded transmission.
algorithm in common with the • Change mail server settings and
mail server, error occurred
add encoding algorithm.
when attempting SSL encoded
transmission.
SSL encoding
error
#842
The mail server has requested • Change the mail server settings
client authentication, which
so that client authentication is not
is an unsupported function,
requested.
and an error was generated
• Stop using SSL encoded
when SSL transmission was
transmissions.
attempted.
SMTP
authentication
error
#843
In SMTP authentication using
GSSAPI, there is a significant
difference (more than 5
minutes) in the time set in the
KDC (Key DistributionCenter)
server and that set in the iR,
causing SMTP authentication,
using GSSAPI, to fail.
4
• Programme the transmission other
party conditions so that they can be
processed by the receiver.
• Check that the receiver memory is
not full.
• Correct the cause of reception
image decoding failure.
• Correct the time settings on the
machine.
• Check the time zone and summer
time settings.
• Correct the KDC server time
settings.
Maintenance > Related Error code > E-mail Transmission errors
Error
code
#844
Cause
Remedy
In a transmission using
POP Before SMTP, the
device attempted SSL
encryption communications
but an error occurred in the
communications and failed in
POP authentication.
• Check the settings for encrypted
SSL communications in the POP
server.
• Turn Allow SSL (POP) option
off in Additional Functions not to
use SSL encryption function for
communications with the POP
server.
• Turn POP Authentication before
Sending option off not to use POP
Before SMTP.
POP AUTH
authentication
error
#845
In an email or I-Fax
• Check POP Address and POP
transmission using POP Before
Password settings of Additional
SMTP, the device attempted
Functions.
POP Auth but an error occurred • Check the POP authentication
in the POP server and failed in
settings in the POP server.
POP authentication.
• Cancel the selection of POP AUTH
for POP AUTH Method.
• Turn POP Authentication before
Sending option off not to use POP
Before SMTP.
APOP
authentication
error
#846
In an email or I-Fax
• Check POP Address and POP
transmission using POP Before
Password settings of Additional
SMTP, the device attempted
Functions.
APOP of POP authentication
• Check the APOP settings in the
but an error occurred in the
POP server.
APOP authentication and failed • Cancel the selection of APOP for
in POP authentication.
POP AUTH Method.
• Turn POP Authentication before
Sending option off not to use POP
Before SMTP.
No display
#899
Operation completed normally. This error code indicates that
transmission as far as the SMTP
server was completed normally,
but delivery cannot be confirmed.
Except when delivery confirmation
is performed in I-Fax Full mode,
confirmation is displayed on the I-Fax/
E-Mail transmission side. The only
way to judge whether transmission
has been completed normally is to
see whether there has been an error
mail reception printout.
Cancelled.
#995
Transmission cancelled
-Retransmit as necessary.
4-23
4
Message
Error
code
Archive log is full #856
e-Signature
Certificate
Access Error
#761
Check to see if
the address is
correct.
#762
e-Certificate
Validity error
#766
Count Limit for
SEND Trial
(no message)
#769
#772
#773
Maintenance > Related Error code > E-mail Transmission errors
Cause
Remedy
In the case of using job archive
function, the disk of the archive
storage is full, causing the
send/receive job error.
The encryption code used
at time of PDF transmission
(bearing a user signature
prepared by MEAP
authentication) prevents
transmission.
e-mail is sent to an address
for which transmission is not
permitted.
Retrieve the archive log to the server.
4-24
Install the appropriate user certificate
or machine certificate properly.
Check to see if the target of
transmission is correct.
Check to see if the domain (in user
mode) is one for which transmission
is permitted.
Do not transmit to an address for
which transmission has not been
authorized..
The period of validity of the
Use a certificate whose period of
certificate used for signature
validity is still good.
transmission has passed.
If necessary, set the time correctly.
The count has reached its limit After the maximum number of SEND
at time of a SEND trail session. trial sessions has been exceeded,
(At time of reception, the
an attempt has been made for SEND
counter reading reaches the
transmission.
upper limit, causing an error
when transfer occurs.)
The connection error of Adobe Check the connection of server
Life Cycle Rights Management
server
Exclusive setting error of
Check the optional setting of PDF
choosing PDF
T-4-11
MEMO
This model does not have an E-Mail reception function, only an error mail reception
function. Therefore, it can only print out text and i-Fax compliant TIFF attachments.
PDF and JPEG files cannot be printed out.
4
Maintenance > Related Error code > E-mail Transmission errors
4-24
4
Maintenance > Related Error code > I-Fax Transmission errors
I-Fax Transmission errors
Message
Check TCP/IP
Error
code
#755
Check server
#801
Cannot find
server
#802
• Wait a while then retry.
• Stop broadcast transmission with other
protocols.
• Delete documents from the BOX to
free up HD space.
Check address
#806
<I-Fax transmission error message and error codes>
Message
Cause
Remedy
No display
Error
code
#022
Address deleted or
invalidated during
transmission reservation.
No display
#099
The number of
transmission
standby
documents must
be reduced.
The number of
transmission
standby
documents and
BOX documents
must be reduced.
The address is
not in the address
list.
Data size too big.
#702
A user canceled the
transmission.
HD full (work area)
• Retransmit deleted address.
• Check that a group address is
specified as the transfer destination
and that it contains a valid address.
• Check that a group address is
specified as the transfer destination
and whether it contains local print or
fax box only.
• Check whether the specified transfer
destination address has been deleted.
- Send the data again.
#703
HD full (work area)
4-25
• Wait a while then retry.
• Stop broadcast transmission with other
protocols.
POP server
#810
connection error
#704
Address book search error.
- Check the address book settings.
POP server
address error
#813
#705
Transmission data size too
big.
• Reduce number of pages for
transmission or lower resolution.
• Image data size for one page has
exceeded the user mode setting.
• Reset user mode transmission upper
limit.
-Wait a while then retry.
No display
#830
Address table not #706
available.
No connection
#752
No response
#753
Remote UI or other
transmission components
using address book, so it
cannot be referenced.
DNS/SMTP server setting
error (SMTP connection
error)
Network error(Socket
Write,Selecterror,etc.)
4
• Reprogramme the user mode settings.
(domain name, E-Mail address, DNS,
mail server)
• Check that the SMTP server is
operating properly.
Check cable and connectors.
Maintenance > Related Error code > I-Fax Transmission errors
Cause
Remedy
- IP address set to 0.0.0.0. In
the following two situations,
the IP address is 0.0.0.0.
1) Address could not be
obtained from DHCP,
BOOTP, RARP.
2) Unit launched in IP fixed
mode(keys 1+7 to enter
FIXIPmode).
- TCP/IP protocol stack
resources insufficient. Even
with internal retry (5 times),
transmission failed.
Error returned from SMTP
server during SMTP session.
Or, command timeout error
generated.
DNS/SMTP setting error(DNS
server connection error)
• Set the IP address correctly or set
DHCP, RARP, BOOTP environments
to operate properly.
• Turn power OFF/ON.
• Check mail server
• Check the network traffic.
Reprogramme the user mode settings.
(domain name, E-Mail address, DNS,
mail server)Check that the DNS server is
operating normally.
Check address
Address wrongly searched
on SMTP protocol.
Cannot connect to POP
• Reprogramme user mode settings
server when attempting POP
(POP, DNS server name)
Before SMTP transmission. • Check POP server operation.
• Check DNS server operation.
Password, user account error • Check POP user name, password.
when attempting POP Before • Check POP server account.
SMTP transmission.
DSN error notification
- Check the destination address.
received. The DSN error
- Set the transmission data size so that it
notification is sent to the
does not exceed the SMTP server's limit.
transmission source by the
- Programme the transmission other
SMTP server and the iR
party's conditions so that they can be
machine programmed for
processed by the receiver.
SMTP reception during an
ESMTP-enabled transfer path
whenever the destination
address and the other
party's conditions settings
are wrong, or when the
transmitted document's data
size exceeds the permitted
SMTP server range.
4-25
4
Message
No display
SMTP server
authentication
error
Error
code
#834
#839
SSL error(SMTP #841
Send)
SSL error(SMTP #842
Send)
SMTP
authentication
error
SSL error(POP)
#843
#844
Maintenance > Related Error code > I-Fax Transmission errors
4-26
Cause
Remedy
Message
MDN error notification
received. The MDN error
notification is sent to the
transmission source as a
transmission result in the
mail header when the final
processing of a mail sent in
I-Fax Full mode fails in the iR
reception machine.
Error occurred with
password, user name and/
or account when attempting
SMTP AUTH transmission.
Because there is no encoding
algorithm in common with the
mail server, error occurred
when attempting SSL
encoded transmission.
The mail server has
requested client
authentication, which is an
unsupported function, and
an error was generated
when SSL transmission was
attempted.
In SMTP authentication using
GSSAPI, there is a significant
difference (more than 5
minutes) in the time set in the
KDC (Key DistributionCenter)
server and that set in the iR,
causing SMTP authentication,
using GSSAPI, to fail.
In a transmission using
POP Before SMTP, the
device attempted SSL
encryption communications
but an error occurred in the
communications and failed in
POP authentication.
• Programme the transmission other
party conditions so that they can be
processed by the receiver.
• Check that the receiver memory is not
full.
• Correct the cause of reception image
decoding failure.
POP AUTH
encryption error
• Check SMTP authentication user
name, password.
• Check SMTP server account.
Error
code
#845
In an email or I-Fax
transmission using POP
Before SMTP, the device
attempted POP Auth but an
error occurred in the POP
server and failed in POP
authentication.
• Check POP Address and POP
Password settings of Additional
Functions.
• Check the POP authentication settings
in the POP server.
• Cancel the selection of POP AUTH for
POP AUTH Method.
• Turn POP Authentication before
Sending option off not to use POP
Before SMTP.
• Check POP Address and POP
Password settings of Additional
Functions.
• Check the APOP settings in the POP
server.
• Cancel the selection of APOP for POP
AUTH Method.
• Turn POP Authentication before
Sending option off not to use POP
Before SMTP.
This error code indicates that
transmission as far as the SMTP server
was completed normally, but delivery
cannot be confirmed. Except when
delivery confirmation is performed in
I-Fax Full mode, confirmation is displayed
on the I-Fax/E-Mail transmission
side. The only way to judge whether
transmission has been completed
normally is to see whether there has
been an error mail reception printout.
Retrieve the archive log to the server.
In an email or I-Fax
transmission using POP
Before SMTP, the device
attempted APOP of POP
authentication but an error
occurred in the APOP
authentication and failed in
POP authentication.
No display
Operation completed
normally.
#899
• Correct the time settings on the
machine.
• Check the time zone and summer time
settings.
• Correct the KDC server time settings.
Archive log is full #856
• Check the settings for encrypted SSL
communications in the POP server.
• Turn Allow SSL (POP) option off in
Additional Functions not to use SSL
encryption function for communications
with the POP server. - Turn POP
Authentication before Sending option
off not to use POP Before SMTP.
Remedy
APOP encryption #846
error
• Stop SSL encoded transmission.
• Change mail server settings and add
encoding algorithm.
• Change the mail server settings so that
client authentication is not requested.
• Stop using SSL encoded
transmissions.
Cause
Check to see if
the address is
correct.
#762
Cancelled.
#995
In the case of using job
archive function, the disk of
the archive storage is full,
causing the send/receive job
error.
e-mail is sent to an address • Check to see if the target of
for which transmission is not
transmission is correct.
permitted.
• Check to see if the domain (in user
mode) is one for which transmission is
permitted.
• Do not transmit to an address for which
transmission has not been authorized..
Transmission cancelled
Retransmit as necessary.
T-4-12
4
Maintenance > Related Error code > I-Fax Transmission errors
4-26
4
Maintenance > Related Error code > I-Fax Reception errors
I-Fax Reception errors
Message
<I-Fax reception error message and error code list>
Message
POP server UIDL error
POP server address
error
POP server address
error
POP server connection
error
Check TCP/IP.
Connect cable.
No response
Cannot receive
SSL Error (SMTP
Receive)
SSL Error (SMTP RX
Reject)
SSL Error (POP)
Error
code
Cause
Remedy
POP server UIDL commands
not supported
POP server error (account)
Change POP server.
• Reprogramme user mode
settings (account).
• Check POP server account.
POP server error (password) • Reprogramme user mode
settings (password).
• Check POP server account.
Cannot connect to POP server. • Reprogramme user mode
settings (POP, DNS server
name)
• Check POP server operation.
• Check DNS server operation.
Incorrect IP address.
• Reprogramme IP address and
turn power OFF/ON.
• Check DHCP, RARP, BOOTP
server operations and turn power
OFF/ON.
SMTP initialisation error
• Check network and network
card.
• Turn power OFF/ON.
Mail server error
Check mail server operation.
Reception refused
• Clear any operator call error,
such as no paper, etc.
• Receive reception JOBs into
memory reception BOX.
• Delete transmitting JOBs.
Error in encrypting SSL to
Mismatched SSL algorithm. Check
receive in SMTP
the server certificate and the
settings in the SSL client.
The option that allows only
• Change Allow SSL (SMTP
SSL communications is
Receive) setting from SSL to On
selected.
or Off in Additional Functions.
• Change the settings to use SSL
in the client.
The device attempted to
• Check the settings for encrypted
SSL communications in the POP
communicate with the POP
server in SSL but an error
server.
occurred in SSL encryption
• Turn Allow SSL (POP) option
communications and failed in
off in Additional Functions not to
POP authentication.
use SSL encryption function for
communications with the POP
server.
4
4-27
Maintenance > Related Error code > I-Fax Reception errors
Error
code
Cause
Remedy
POP AUTH Encryption
Error
The device attempted POP
Auth but an error occurred in
the POP server and failed in
POP authentication.
APOP Authentication
Error
The device attempted APOP
of POP authentication but an
error occurred in the APOP
authentication and failed in
POP authentication.
• Check POP Address and POP
Password settings of Additional
Functions.
• Check the POP authentication
settings in the POP server.
• Cancel the selection of POP
AUTH for POP AUTH Method.
• Check POP Address and POP
Password settings of Additional
Functions.
• Check the APOP settings in the
POP server.
• Cancel the selection of APOP for
POP AUTH Method.
Stop all jobs operating
simultaneously. Or, wait a while
until the HD area is freed up.
The number of
transmission standby
documents must be
reduced.
The number of
transmission standby
documents and BOX
documents must be
reduced.
Check server
#702
HD full(work area)
#703
HD full(work area)
Delete documents from the BOX
to free up HD space and decrease
number of transmission standby
documents in the BOX.
#801
Timeout (1KByte/ 10 sec.)
during SMTP data reception.
DNS/SMTP setting error(DNS
error)
• Check SMTP server operation.
• Check network traffic conditions.
Reprogramme the user mode
settings. (domain name, E-Mail
address, DNS, mail server)
• Check user mode POP server
settings.
• Check POP server operation.
• Check network traffic conditions.
Contact sender and arrange for
them not to transmit image data
that is not supported by I-Fax.
Nothing in particular.Contact the
sender and have them output the
error information and error dump.
Nothing in particular.Contact the
sender and have them output the
error information and error dump.
Nothing in particular.Contact the
sender and have them output the
error information and error dump.
Nothing in particular.Contact the
sender and have them output the
error information and error dump.
Cannot find server
#802
POP server connection #810
error
Timeout (1KByte/ 10 sec.)
during POP data reception.
No message. Error
reason given on
reception error report.
No message. Error
reason given on
reception error report.
No message. Error
reason given on
reception error report.
No message. Error
reason given on
reception error report.
No message. Error
reason given on
reception error report.
#818
File attachment is in
unprintable format.
#819
MIME information error
#820
BASE64 or uuencode error
#821
TIFF analysis error
#822
Image decode error
4-27
4
Message
Error
code
#827
No message. Error
reason given on
reception error report.
No message. Error
#828
reason given on
reception error report.
No message. Error
#829
reason given on
reception error report.
No message.
#831
No message.
#832
No message.
#833
No message.
#835
No message.
#838
No message.
#848
No message.
#99
Maintenance > Related Error code > I-Fax Reception errors
Cause
4-28
Remedy
Unsupported MIME
Contact sender and ask them not
to transmit data that cannot be
received.
HTML format file attachment
Contact sender and ask them not
to transmit data that cannot be
received.
Reception document exceeds Contact the sender and have them
1000 pages.
limit the number of pages in a
single transmission to 999.
SMTP connection cut by IP
Reprogramme the IP address of
block function.
the IP block function that allows
SMTP connection.
Problem with receiving unit's • Check the SMTP/DNS server,
transmission settings. DSN
domain name, host name, E-Mail
transmission failed.
address, IP address, netmask
and default gateway settings in
user mode.
• Check mail server/ DNS server
operation.
Problem with receiving unit's • Check the SMTP/DNS server,
transmission settings. MDN
domain name, host name, E-Mail
transmission failed.
address, IP address, netmask
and default gateway settings in
user mode.
• Check mail server/ DNS server
operation.
Text reception line count error. - Have the sender reduce the
number of lines in the text.
SEND license of MEAP
Purchase of license of SEND
function became invalid. The function
connection of I FAX SMTP
reception function was broken.
(Only the machine for MEAP)
Receive Divided
• The mail of Receive Divided
(Datamessage/partial)merge
Data BOX is not deleted.
error
• The time-out time is reviewed.
• Retransmission is requested to
those who transmit.
It deleted it without printing
Receive Divided Data by the
user operation.
T-4-13
4
Maintenance > Related Error code > I-Fax Reception errors
4-28
4
Maintenance > Related Error code > SMB Transmission errors
SMB Transmission errors
Message
<SMB transmission error message and error code list>
Message
No message
Error
code
#022
Cause
Remedy
Address deleted or invalidated • Retransmit deleted address.
during transmission reservation. • Check that a group address
is specified as the transfer
destination and that it contains
a valid address.
• Check that a group address
is specified as the transfer
destination and whether it
contains local print or fax box
only.
• Check whether the specified
transfer destination address
has been deleted.
Transmission
cancelled
#099/
#995
Transmission cancelled by user. Resend.
Address does not
appear in address
list.
#704
An error occurred when address Check address list settings. Or,
information was being obtained turn unit OFF/ON.
from the address list. (Address
deleted from list after scanning,
etc.)
HD full
#702
Operation stopped because HD • Wait a while then retry.
• Stop broadcast transmission
full (work area).
with other protocols. This
sometimes helps to avoid this
problem.
HD full
#703
Operation stopped because HD • Wait a while then retry.
full (image area).
• Stop broadcast transmission
with other protocols. This
sometimes helps to avoid this
problem.
2GB file size restrictions of the
PDF make you transmit a short
manuscript. In addition, there is
the case that you can transmit
normally when even a case
except the above is going to
transmit a message in Portable
Document Format when you set
it in file format except the PDF
again.
4
4-29
Maintenance > Related Error code > SMB Transmission errors
Error
code
#706
Cause
No response
#751
• Server has not booted up.
• Check transmission
• Network disconnected. (If
destination and network
connection cannot be made
settings.
with transmission destination, • Transmission jobs whose
connection is sometimes cut
processing has stopped for
mid-way.)
some reason or other are
• Reset caused by internal
forced to quit by assigning an
error. Processing interrupted. internal error code (#751). As
a result, after rebooting, the
job is not run.
TCP/IP error
#755
e-Signature
Certificate Access
Errore-Signature
Certificate Access
Error
#761
Check to see if the
address is correct.
#762
• IP address set to 0.0.0.0. In
the following two situations,
the IP address is 0.0.0.0.
• 1) Address could not be
obtained from DHCP, BOOTP,
RARP.
• 2) Unit launched in IP fixed
mode(keys 1+7 to enter
FIXIPmode).
• TCP/IP protocol stack
resources insufficient.
Even with internal retry (5
times),transmission failed.
The encryption code used
at time of PDF transmission
(bearing a user signature
prepared by MEAP
authentication) prevents
transmission.
e-mail is sent to an address
for which transmission is not
permitted.
Address table not
available
Remedy
• Address table being imported/ • Quit access from RUI.
exported from RUI.
• Wait a while and then retry
• Address book usage doubled
up with other transmission
component (Fax, etc.).
• Set the IP address correctly
or set DHCP, RARP, BOOTP
environments to operate
properly.
• Turn power OFF/ON.
Install the appropriate user
certificate or machine certificate
properly.
Check to see if the target of
transmission is correct.
Check to see if the domain (in
user mode) is one for which
transmission is permitted.
Do not transmit to an address for
which transmission has not been
authorized..
4-29
4
Message
e-Certificate Validity
error
Error
code
#766
Check server
#801
Cannot find server
#802
Check address
#804
Disk full on the
Server
Check address.
#805
No messag
#807
Maintenance > Related Error code > SMB Transmission errors
Cause
4-30
Remedy
The period of validity of the
certificate used for signature
transmission has passed.
Use a certificate whose period of
validity is still good.
If necessary, set the time
correctly.
• Error generated due to cause • Reset server.
on server side.
• Check server status and
• SMB server side file capacity
settings.
not sufficient.
• Check the network traffic.
• In WindowsNT/2000 server,
password was incorrect.
• In WindowsNT SMB, common
file name did not match.
• In SMB, a user exists but no
write privileges.
• SMB transmission made to
write-prohibited file of the
same name.
DNS/SMTP setting error(DNS Reprogramme the user mode
error)
settings. (domain name, E-Mail
address, DNS, mail server)
• -No match for specified
• Check that the destination
directory name.
directory name is correct.
• In SMB, a user exists but no • Set directory access privileges
in the server.
write privileges.
-Document deletion of server
#806
• Wrongly specified user name.
• Wrongly specified password.
(Excl. Windows NT.)
No access rights for the
specified directory
It is generated the
#808
error by the cause of
the servers end.
There is already files #809
of this name.
The Over write
prohibition is set.
#772
Change address book user
name or password.
Check the access rights to the
server.
The server is reset.
It sets it to possible Over write
on server.
The connection error of Adobe
Life Cycle Rights Management
server
Exclusive setting error of
choosing PDF
#773
Check the connection of server
Check the optional setting of
PDF
T-4-14
4
Maintenance > Related Error code > SMB Transmission errors
4-30
4
Maintenance > Related Error code > FTP Transmission errors
FTP Transmission errors
Message
Address table not
available
<FTP transmission error message and error code list>
Message
No message
Error code Cause
#022
Address deleted or
invalidated during
transmission reservation.
Transmission
cancelled
HD full
Remedy
• Retransmit deleted address.
• Check that a group address
is specified as the transfer
destination and that it contains
a valid address.
• Check that a group address
is specified as the transfer
destination and whether it
contains local print or fax box
only.
• Check whether the specified
transfer destination address has
been deleted.
Resend.
#099/ #995 Transmission cancelled by
user.
#702
Operation stopped because • Wait a while then retry. Stop
HD full (work area).
broadcast transmission
with other protocols. This
sometimes helps to avoid this
problem.
HD ful
#703
Operation stopped because • Wait a while then retry. Stop
HD full (image area).
broadcast transmission
with other protocols. This
sometimes helps to avoid this
problem.
2GB file size restrictions of the
PDF make you transmit a short
manuscript. In addition, there is
the case that you can transmit
normally when even a case except
the above is going to transmit a
message in Portable Document
Format when you set it in file
format except the PDF again.
Address does not
#704
An error occurred when
• Check address list settings. Or,
appear in address list.
address information was
turn unit OFF/ON.
being obtained from the
address list. (Address
deleted from list after
scanning, etc. )
4
4-31
Maintenance > Related Error code > FTP Transmission errors
No response
TCP/IP error
e-Signature
Certificate Access
Error
Check to see if the
address is correct.
Error code Cause
#706
• Address table being
imported/ exported from
RUI.
• Address book usage
doubled up with other
transmission component
(Fax, etc.).
#751
• Server has not booted
up.
• Network disconnected.
(If connection cannot be
made with transmission
destination, connection is
sometimes cut mid-way.)
• No Tree name entered.
• Reset caused by internal
error. Processing
interrupted.
#755
• IP address set to 0.0.0.0.
In the following two
situations, the IP address
is 0.0.0.0.
1) Address could not be
obtained from DHCP,
BOOTP, RARP.
2) Unit launched in IP fixed
mode(keys 1+7 to enter
FIXIPmode).
• TCP/IP protocol stack
resources insufficient.
Even with internal retry
(5 times), transmission
failed.
#761
The encryption code used
at time of PDF transmission
(bearing a user signature
prepared by MEAP
authentication) prevents
transmission.
#762
e-mail is sent to an address
for which transmission is
not permitted.
Remedy
• Quit access from RUI.
• Wait a while and then retry
• Check transmission destination
and network settings.
• Enter Tree name.
• Transmission jobs whose
processing has stopped for
some reason or other are forced
to quit by assigning an internal
error code (#751). As a result,
after rebooting, the job is not
run.
- Set the IP address correctly
or set DHCP, RARP, BOOTP
environments to operate properly.
- Turn power OFF/ON.
Install the appropriate user
certificate or machine certificate
properly.
Check to see if the target of
transmission is correct.
Check to see if the domain (in
user mode) is one for which
transmission is permitted.
Do not transmit to an address for
which transmission has not been
authorized..
4-31
4
Message
e-Certificate Validity
error
Check server
Cannot find server
Check address
Error code Cause
#766
The period of validity of the
certificate used for signature
transmission has passed.
#801
• Error generated due to
cause on server side.
• In NetWare,a user exists
but no read or write
privileges.
• Transmission made to
write-prohibited file of the
same name.
#802
• The IP address for DNS
server is not set up.
• DNS Server is not
running.
• No appropriate host
name is found in the DNS
server.
#804
• No match for specified
directory name.
• No access privileges for
that directory.
Disk full on the Server #805
Check address.
#806
No message
Maintenance > Related Error code > FTP Transmission errors
• Wrongly specified user
name.
• Wrongly specified
password.
• In NetWare, the host
name is incorrect.
No access rights for the
specified directory
#807
It is generated the
#808
error by the cause of
the servers end.
No connection
#815
Login is made from this unit
in NetWare's Pserver mode
(NDS/ Bindery common)
and login is attempted again
for NCP, while the server is
printing.
The connection error of
Adobe Life Cycle Rights
Management server
Exclusive setting error of
choosing PDF
#772
#773
4-32
Remedy
Use a certificate whose period of
validity is still good.
If necessary, set the time correctly.
• Reset server.
• Check server status and
settings.
• Check the network traffic.
• Check the DNS server.
• Check that the destination
directory name is correct.
• Set directory access privileges
in the server.
• Send to different directory with
access privileges.
Document deletion of server
-Change address book user name
or password.
Check the access rights to the
server.
The server is reset.
• Wait a while and try again.
• Change the destination
NetWare server.
• Stop Pserver.
Check the connection of server
Check the optional setting of PDF
T-4-15
4
Maintenance > Related Error code > FTP Transmission errors
4-32
4
Maintenance > Related Error code > Box Transmission errors
4-33
Box Transmission errors
<BOX transmission error message and error code list>
Message
No message
Error code Cause
#022
Address deleted or
invalidated during
transmission reservation.
Transmission cancelled #099
Address table not
available.
#706
No message
#711
No message
#712
- Transmission cancelled by
user.
- Address book locked.
Full in memory for User
Inboxes
The number of documents
for a box reaches to the
maximum
Remedy
• Retransmit deleted address.
• Check that a group address
is specified as the transfer
destination and that it
contains a valid address.
• Check that a group address
is specified as the transfer
destination and whether it
contains local print or fax box
only.
• Check whether the specified
transfer destination address
has been deleted.
Resend.
• It is not possible to refer
because RUI is using
Address book.
It is not possible to refer
because Other Transmississon
component is using Address
book.
Delete stored documents in
Mail Boxes.
Delete stored documents in Mail
Box that contains the maximum
number of documents.
T-4-16
4
Maintenance > Related Error code > Box Transmission errors
4-33
4
Maintenance > Related Error code > WebDAV Transmission errors
WebDAV Transmission errors
Message
The address is not
listed in the address
book
HDD is full
The address book
cannot be used
Error code Cause
#022
An error occurred when
obtaining address information
from the address book. In the
case of deleting the address
from the address book after
the scan
#703
There is no available space in
HD when processing image
conversion, causing the image
processing failed.
#706
Message
TCP/IP error
Remedy
Check the settings of the
address book. If this does not
work, turn off and then, on the
power
Leave it for a while, and then,
try to send again. It may be
possible to avoid this symptom
by not using other protocols at
sending.
2GB file size restrictions of the
PDF make you transmit a short
manuscript. In addition, there is
the case that you can transmit
normally when even a case
except the above is going to
transmit a message in Portable
Document Format when you set
it in file format except the PDF
again.
Leave it for a while, and then,
try to send again.
During importing/exporting
address book from RUI, other
transmission component used
the same address book.
-Network is down (2
Check the address and the
possibilities: in the case of
network
disabled transmission, in the
case that the communication is
interrupted in the middle of the
transmission)
-Server is not startup
-Server is lost
-Wrong host name of the
address
There is no response #751
4
4-34
Maintenance > Related Error code > WebDAV Transmission errors
SSL Error
Archive log is full
Transmission has
failed.
Error code Cause
#755
When the IP address on SRAM
is 0.0.0.0, the IP address is
determined as 0.0.0.0 by the
following 2 cases:
1. Obtaining address failed
because of DHCP, BOOTP,
and RARP.
2. It startup in IP fixed mode.
In the case that the
transmission failed even by the
5 times of internal retry due to
the resource shortage of the
TCP/IP protocol.
#770
The WebDAV server does not
support SSL.
#856
In the case of using job archive
function, the disk of the archive
storage is full, causing the
send/receive job error.
#870
The HTTP response is 403
(forbidden).
The execution of the method
is prohibited by the server
because of any of the
following:
Remedy
Make settings of the IP address
Check the server settings.
Retrieve the archive log to the
server.
Wait a while, and then try again.
Check the server settings.
1. No right to access has been
granted.
The server settings prevent
access from outside to the
target file itself or to the
directory as a whole.
2. There is much traffic to the
server.
Check the server.
#868
Check the address.
#869
The HTTP response is 305
(Use Proxy).
The WebDAV server is
requesting access by way of a
proxy.
The HTTP response is 401
(Unauthorized).
Authentication with the
WebDAV server has failed.
In user mode, check the proxy
settings.
Check the user name and
password of the address.
4-34
4
Message
Check the address.
Maintenance > Related Error code > WebDAV Transmission errors
Error code Cause
Remedy
#871
The HTTP response is 404 (Not Check the address.
Found).
The server could not find the
appropriate resource. It usually
occurs when the server wants
to reject the request without
indicating the reason or
when there is no appropriate
response.
4-35
Message
Transmission has
failed.
Check the server.
The HTTP response is 409
(Conflict).
The request is illogical, not
permitting completion.
Check the server.
The HTTP response is 410
(Gone).
The requested resource is no
longer available on the server,
and there is no appropriate
address for forwarding.
The HTTP response is 405
(Method Not Allowed).
The resource indicated in the
URI does not permit the use of
the method.
The HTTP response is
407 (Proxy Authentication
Required).
The attempt for authentication
with the proxy server has
failed.
The HTTP response is 411
(Length Required).
The server rejected a request
without a defined content
length.
It may also have rejected the
use of chunk transmission.
The HTTP response is 413
(Request Entity Too Large).
The request entity is larger
than that assumed by the
server or is capable of
processing, thus causing the
server to reject the request.
#872
#873
Transmission has
failed.
Transmission has
failed.
#875
#876
4
Check the server.
Check the server settings.
Check the server.
In user mode, check the proxy
settings.
Check the server.
In user mode, disable (OFF) the
following: 'use chunk division
transmission for WebDAV'.
Check the server.
Check the server settings.
Maintenance > Related Error code > WebDAV Transmission errors
Check the server.
Error code Cause
#877
The HTTP response is 414
(Request URI Too Long).
The request URI is longer than
that assumed by the server for
intermediate processing, thus
causing the server to reject the
request.
#878
The HTTP response is 500
(Internal Server Error).
The server has encountered
a situation that prevents the
execution of the request and
that it cannot predict.
HTTP response is 506(Variant
Also Negotiates).
HTTP response is 510 (Not
Extended).
#879
The HTTP response is 501 (Not
Implemented).
The request needs a function
that the server does not
support yet needed for
execution.
#880
The HTTP response is 502
(Bad Gateway).
The proxy has received an
illegal response from a server
located upstream.
#881
The HTTP response is 503
(Service Unavailable).
The server has a temporary
overload condition or is not
capable of handling a request
because of maintenance.
#882
The HTTP response is 504
(Gateway Timeout).
The proxy has sent the request
to the server located upstream,
but has failed to receive a
response.
#883
The HTTP response is 505
(HTTP Version Not Supported).
The server does not support
the HTTP protocol version
used by the request message,
or it has rejected the support in
question.
Remedy
Check the server settings.
Check the server settings.
Check the server settings.
Check the server settings.
Check the server settings.
Check the server settings.
Check the server settings.
4-35
4
Message
Check the server.
Check the server.
Transmission has
failed.
Check the address.
Service Call error
(E749-0003)
Maintenance > Related Error code > WebDAV Transmission errors
Error code Cause
#878
The HTTP response is 506
(Variation Also Negotiates).
The HTTP response is 510 (Not
Extended).
#884
The HTTP response is 507
(Insufficient Storage).
The server has failed to make
available a specific amount
of memory to process the
request.
#885
The WebDAV server or
the proxy has returned an
unexpected status code.
#886
The HTTP response is 400
(Bad Request).
There is a syntax error.
This response is indicated
when chunk transmission is
attempted to ISA in non-SSL
mode.
E749-0003 E749-003 boot command in
conjunction with an mAccele
configuration change
#772
The connection error of Adobe
Life Cycle Rights Management
server
#773
Exclusive setting error of
choosing PDF
4-36
Remedy
Check the server settings.
Check the server settings.
Check the address.
Check the proxy settings.
Check the server settings.
If it is a non-SSL communication
and is by way of a proxy,
disable (OFF) the following:
transmission/reception
setup>transmission setup.
Reset the power (by turning it
off and then back on).
Check the connection of server
Check the optional setting of
PDF
T-4-17
4
Maintenance > Related Error code > WebDAV Transmission errors
4-36
4
Maintenance > Related Service Mode > Invalidating the License for Transfer to a Different Device (Level 2) > Screen Design:
Related Service Mode
A
Invalidating the License for Transfer to a Different
Device (Level 2)
B
4-37
C
8245 2383 2489 1137 9802 2395
Service Mode Item Used to Invalidate a License for Transfer to a Different Device (Level 2)
■■Possible Situation
A license may be used on a different device through transfer, as when replacing the device
at the end of a lease agreement. To do so, the user must first invalidate the existing license
by performing a set of steps referred to as "invalidation of a license" using service mode. At
times, both source and target of transfer may be the same device, and a license therefore
may also be invalidated only temporarily. It is important to note that the user must contact
the Sales Company to make a license good regardless of whether it has been invalidated
intentionally or inadvertently.
F-4-37
■■Screen Design:
■■Invalidation Procedure
Invalidation consists in invalidating the license in service mode and generating an invalidation
certificate that proves the completion of invalidation. Invalidation may take place for individual
optional functions, and a specific function becomes no longer available as soon as an
invalidation certificate is issued. The user contacts the Sales Company and provides the
following: the invalidation certificate, the device serial number of the source of transfer, the
device serial number of the target of transfer, reason of transfer. In response, the Sales
SET-xxxx: indicates the license status. If installed, the option is identified as '1' under A.
To invalidate an option for transfer, select it, and type in '0' under B; then, click [OK] so that
the option will be invalidated and an invalidation certificate will be issued.
TR-xxxx: indicates any invalidation certificates that have been generated under C.
xxxx may be any of the following:
Company may issue a license key for new installation on a different device. The user must
TR-XXXX
SEND
Detail
SEND function
take note of the new license key in writing, and keep it as a record after registering it to the
ENPDF
Encrypted PDF
target device.
SPDF
Searchable PDF
EXPDF
PDF Expansion
PDFDR
Direct print PDF
■■Installation Procedure
SCR
Encrypted Secure Print
1. Start service mode, and activate Level 2 so that the following is true:
HDCLR
Data Erase(for Old model)
COPIER>OPTION>LCNS-TR
BRDIM
Barcode Printing for PCL
The following screen appears, showing the current status of various options:
VNC
Remote Operators Software
WEB
Web Access Software
HRPDF
High Compress PDF
WTMRK
Secure Watermark
TSPDF
Time Stamp PDF(JP Only)
USPDF
Digital User Signature PDF
4
Maintenance > Related Service Mode > Invalidating the License for Transfer to a Different Device (Level 2) > Screen Design:
4-37
4
Maintenance > Related Service Mode > Invalidating the License for Transfer to a Different Device (Level 2) > Screen Design:
TR-XXXX
DVPDF
Detail
Device Signature PDF
SCPDF
Searchable PDF
AMS
ACQ
ERDS
E-RDS 3rd pty expansion
PS
PS function
PCL
PCL function
PSLI5
PS/LIPS4/LIPS LX function(JP Only)
LIPS5
LIPS LX/LIPS4 function(JP Only)
LIPS4
LIPS4 function(JP Only)
PSPCL
PS/PCL function
PCLUF
PCL/UFR II function
PSLIP
PS/LIPS4 function(JP Only)
PSPCU
PS/PCL/UFR II function(JP Only)
LXUFR
UFR II function
HDCR2
HDD Initialize All Data/Settings
USB-M
Print/sabe from USB
MOBIL
Mobile link func(JP Only)
JBLK
Document Scan Lock
AFAX
Remote Fax
REPDF
Reader Extensions PDF
OOXML
Office Open XML
XPS
Direct print XPS
4-38
in response, may issue a new license key that may be registered on the target device.
6. Register the new license key to the target device, and check to make sure that the function
has been enabled.
T-4-18
MEMO
Not all foregoing options are available in all countries and regions.
2. If an option has already been installed, '1' will be indicated under A. If you want to invalidate
it, select it, and type in '0' so that the indication under B will change to '0'.
3. Thereafter, when [OK] is pressed, the indication under A will change to '0' and, at the same
time, an invalidation certificate will be indicated in the form of a number. Take note of it in
writing together with the serial number of the target device.
4. When the target device is ready, check its serial number.
5. Contact the Sales Company, and provide the following: invalidation certificate for transfer,
serial number of the source device, serial number of the target device. The Sales Company,
4
Maintenance > Related Service Mode > Invalidating the License for Transfer to a Different Device (Level 2) > Screen Design:
4-38