1
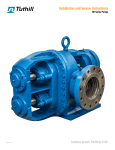
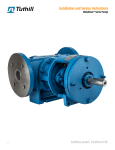
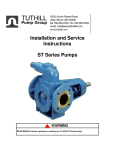
Service Instruction No. 72
INSTALLATION AND SERVICE
INSTRUCTIONS
HD SERIES PUMPS
STANDARD DUTY MODELS
v 1.4
Page 1 of 28
5.9.06
WARNING
WARNING
Read Manual before operating or working on a Tuthill HD pump.
Table Of Contents
Page 3:
Page 4:
Page 5:
Page 6:
Page 7:
Page 8:
Page 9:
Page 10:
Page 11:
Page 12:
Page 13:
Page 13:
Page 14:
Page 15:
Page 16-17:
Page 17-18:
Page 18-19:
Page 20:
Page 20:
Page 21:
Page 22:
Page 22:
Page 22:
Page 23-24:
Page 25:
Page 26:
Page 27:
Page 28:
v 1.4
Introduction
General Description / Pumping Principle / HD Models
HD Model Numbering System
Temperature Limits
Installation
Packing Adjustments
Lubrication Requirements / Recommended Lubricants
Inspection and Repair
Parts Diagram
General Parts List (5A, 10, 16, 25A, 65 & 125A Pumps)
Minor Disassembly Instructions (5A, 10, 16, 25A, 65 & 125A Pumps)
Minor Assembly Instructions (5A, 10, 16, 25A, 65 & 125A Pumps)
Pump Clearances (5A, 10, 16, 25A, 65 & 125A Pumps)
Major Disassembly Instructions (5A, 10, 16 & 25A Pumps)
Major Assembly Instructions (5A, 10, 16 & 25A Pumps)
Major Disassembly Instructions (65 & 125A)
Major Assembly Instructions (65 & 125A)
Disassembly of 3:1 Gear Reduction Unit (5A, 10 & 16)
Assembly of 3:1 Gear Reduction Unit (5A, 10 & 16)
Disassembly of Relief Valve (5A, 10, 16 & 25A)
Reassembly of Relief Valve (5A, 10, 16 & 25A)
Disassembly of Relief Valve (65, 125A & 125H)
Assembly of Relief Valve (65, 125A & 125H)
Packing Section
Serial Number Location
Common Pump Problems
Troubleshooting
Material Returns / Warranty / Contact Information
Page 2 of 28
5.9.06
Introduction
The HD Series pumps have been certified to the requirements of the ATEX Directive 94/9/EC for
use in Category II, Group 2 G applications. Read this manual before operating or working on the HD
Series pumps. If additional information is required to facilitate operation or maintenance, contact the
authorized Tuthill distributor shown at the back of this service manual.
HD Series pumps have been designed and manufactured to provide years of service under
normal operating conditions.
Illustrations used in this manual are for reference purposes only. Consult the factory or an
authorized Tuthill distributor for proper part identification.
When ordering replacement parts, provide as much detail as possible to ensure correct parts are
provided. Details should include the full model number (typically 12-13 digits but can be 18 digits), serial
number, name of part, part number (if known), and part material.
Service Manual # 72 for the HD Series pumps is available at www.tuthillpump.com
The materials furnished for each pump are selected to suit individual applications.
WARNING
WARNING
Failure to follow these instructions could result in serious bodily injury or death.
Do not attempt to work on any Tuthill pump installation before completing the steps below.
Disconnect the drive so that it cannot be started while work is being performed.
Review the Material Safety Data Sheet (MSDS) applicable to the liquid being pumped to determine
its characteristics and the precautions necessary to ensure safe handling.
Vent all pressure within the pump through the suction or discharge lines.
All Tuthill pumps contain residual hydraulic oil from the factory production test.
Determine if this is compatible with the fluid you are pumping. If the fluid is incompatible, then the pump
must be fully flushed prior to use.
If the pump is to be operated at elevated temperatures, the pump should be brought up to operating
temperatures gradually. Rapid or sudden introduction of liquids at elevated temperatures into the cold
liquid chamber of the pump could cause damage to pump externals, seals or other internal parts.
Pumps can run dry provided provisions are made for the mechanical seal if one is used. Failure to
comply with this could cause severe damage to the mechanical seal parts.
Pump needs to be earthed separately to avoid a buildup of electro-static charge.
v 1.4
Page 3 of 28
5.9.06
General Description
The design of the Tuthill Industrial Series incorporates externally timed impellers, which are
supported in the fluid chamber by double row, ball bearings located out of the product stream. This
design enables the Industrial Series to handle highly viscous abrasive slurries, corrosive acids or
suspended solids without degradation, aeration or contamination of the product.
PUMPING PRINCIPLE:
Here’s how it works:
Rotating impellers develop a vacuum at inlet, drawing material into the cavity…positive action of the
impellers displaces material, forcing discharge at pump outlet. Ports are always open; sealing action
between impellers and housing prevents fluid flow return.
HD Models
Material of
Construction
Size
Ductile Iron
5A
10
16
25A
65
125A
Max.
Speed
600
600
600
450
450
450
Stainless
Steel
5A
10
16
25A
65
125A
600
600
600
450
450
450
v 1.4
Max. Capacity
USGPM LPM
4.8
18.1
7.8
29.5
16.8
63.6
24.7
93.5
67.5
255
112
424
4.8
7.8
16.8
24.7
67.5
112
18.1
29.5
63.6
93.5
255
424
Max. Pressure
PSI
BAR
200
10.3
200
10.3
200
10.3
200
10.3
200
10.3
200
10.3
150
150
150
150
150
150
Page 4 of 28
10.3
10.3
10.3
10.3
10.3
10.3
Weight
LB
KG
35
16
40
18
45
20
65
29
180
81
215
97
Port Size
(External NPT)
1”
1”
1-1/2”
1-1/2”
2”
2-1/2”
35
40
45
65
180
215
Same As Above
Same As Above
Same As Above
Same As Above
Same As Above
Same As Above
16
18
20
29
81
97
5.9.06
HD PROCESS PUMP NUMBERING SYSTEM
1
2
3
4
5
6
DIGITS 1 & 2
O1-INDUSTRIAL DUTY (ID)
DIGITS 3 & 4
05 – Model 30
14 – Model 2A
16 – Model 70A
29 – Model 3A
31 – Model 120A
75 – Model 330
91 – Model 600
7
8
9 10 11 12 13
O2-STANDARD DUTY
(SD)
Ductile Iron Only
01 – Model 5A
02 – Model 10
03 – Model 16
05 – Model 25A
14 – Model 65
26 – Model 125A
DIGITS 5 & 6
04 – 316 Stainless Steel (O1 & O4 Models)
09 – Ductile Iron (O1 & O2 Models)
DIGIT 7
0 – Internal NPT (Std. on ID models)
1 – External NPT (Standard on SD models)
DIGIT 8
0 – No Relief Valve
1 – Relief Valve (Available on all SD models & ID models 30, 2A, 3A, 70A, 120A)
DIGITS 9 & 10
01 – Hot Clearance
02 – Special Shaft Material
05 – Special Packing
06 – Special Packing Configuration
08 – Mechanical Seals
09 – Special Bushings
10 – Special Clearances
13 – Steam Jacket/Tracing
19 – Special Ports (Flanged, etc.)
21 – Tutriding
26 – Interference Fit Gears
27 – Special U-Cup/Lip Seals
28 - Miscellaneous
DIGITS 11 & 12
01, 02, Etc. (Serialized at the factory)
DIGIT 13
(If Required)
v 1.4
O4-STANDARD DUTY
(SD)
Stainless Steel Only
D – Double Lobe (Available on ID models only)
T – Teflon housing and faceplate bushings (SD Models)
Page 5 of 28
5.9.06
100 °F
50 °F
0 °F
Note:
-
v 1.4
350 °F
300 °F
250 °F
200 °F
150 °F
Page 6 of 28
High Temperature APG 250
Gear Case Oil
Standard Gear Case Oil
Standard Packing
Bronze Bushings for Ductile Iron Pumps
Carbon Bushings
Used in Ductile Iron
Pumps
Teflon Oil Seals for Faceplate and
Gear Case
Standard Oil Seals for Faceplate and Gear Case
Standard DU Bushings for Ductile Iron Pumps
Viton Oil Seals for Faceplate and
Gear Case
Standard Oil Seals for Faceplate and Gear Case
Gore-Tex Rope Gaskets
Teflon-Glass Filled Gaskets
High Temp. Carbon Bushings in
S.S. Pumps
450 °F
Standard Gasket Material
400 °F
Class 1 Clearance Impellers
500 °F
Standard Carbon Bushings in S.S. Pumps
Standard Pump Materials
TEMPERATURE LIMITS OF HD PROCESS PUMP MATERIALS
600 °F
550 °F
-50 °F
-100 °F
Viton and Teflon oil seals can be used in place of standard oil seals upon request.
Teflon and Gore-Tex gaskets can be used in place of standard seals upon request.
5.9.06
WARNING
WARNING
Failure to follow these instructions could result in serious bodily injury or death.
Do not attempt to work on any Tuthill pump installation before completing the steps below.
Disconnect the drive so that it cannot be started while work is being performed.
Review the Material Safety Data Sheet (MSDS) applicable to the liquid being pumped to determine
its characteristics and the precautions necessary to ensure safe handling.
Vent all pressure within the pump through the suction or discharge lines.
All Tuthill pumps contain residual hydraulic oil from the factory production test.
Determine if this is compatible with the fluid you are pumping. If the fluid is incompatible, then the pump
must be fully flushed prior to use.
If the pump is to be operated at elevated temperatures, the pump should be brought up to operating
temperatures gradually. Rapid or sudden introduction of liquids at elevated temperatures into the cold
liquid chamber of the pump could cause damage to pump externals, seals or other internal parts.
Pumps can run dry provided provisions are made for the mechanical seal if one is used. Failure to
comply with this could cause severe damage to the mechanical seal parts.
Pump needs to be earthed separately to avoid a buildup of electro-static charge.
Installation
For optimum pump performance the suction line must be at least as large as the corresponding
pump port. It should be as short as possible in order to avoid excessive pressure drops and must be
airtight. Locate the pump as close to the source of supply as conditions permit, and if possible, below the
level of the liquid in the reservoir. When necessary to locate the pump in a pit, provisions should be made
to safeguard against flooding.
When handling high viscosity liquids, the speed of the pump must be reduced and the size of the
inlet lines increased to prevent cavitation. Refer to the NPSHr data for the pump.
Pumps should be filled with liquid at installation.
The placement of a strainer on the suction side of the pump will restrict any solids or abrasives
from entering the pump, which could cause internal damage.
Under no conditions should the pump be used to support external piping loads (weight or
expansion). Piping and other equipment should be independently supported. Piping strain can result in
misalignment, hot bearings, worn couplings, vibration, etc. It is important that the piping used be clean
and free of chips and scales.
The discharge line must be designed with the maximum pressure rating of the pump in mind.
Excessive pressure could cause damage to your motor and/or pump. If a pressure relief valve has not
been supplied with the pump, some other means of pressure protection must be utilized. This could
include in-line safety valves, pressure shutdown switches or other similar devices.
v 1.4
Page 7 of 28
5.9.06
Pumps are positive displacement pumps and must be used in conjunction with a pressure relief
mechanism.
Every pump installation should have a good foundation. Its structure should be sufficiently strong
to hold the pump rigid and to absorb any strain or shock that may be encountered. The installation should
be leveled, checked for proper piping alignment, and then fastened securely. The alignment should be
rechecked after the pump’s temperature has reached its operating temperature.
Direct drive through a traditional flexible coupling is recommended. However, do not expect the
coupling to compensate for misalignment. Contact the coupling manufacturer to determine the maximum
amount of misalignment that the coupling can be subjected to.
Never operate the pumps without all the guards in place.
Direction of Flow:
Tuthill Industrial Process Pumps may be operated in either direction. The direction of flow is
dependent on the direction of rotation of the pump drive shaft. When facing the drive shaft of the pump, a
clockwise rotation provides a left hand suction port and a right hand discharge port. Flow would be from
the left to right when facing the drive shaft.
Packing Adjustment
WARNING
WARNING
Packing is designed to leak. Therefore, when pumping hazardous liquids, a mechanical seal is
recommended to minimize any potential source of leakage that could result in a hazardous condition.
All packings must leak to perform properly. Their purpose is to control leakage—not to prevent it.
The slight leakage along the shaft provides proper lubrication to the packing. Pump packings
have a lubricant that acts as a primary sealant for the start-up and break-in phases, during which this
lubricant acts to reduce friction. Once the pump is on the line, external lubrication must be supplied to the
packing to keep it running properly and to attain longer life. If external lubrication is not supplied, the
lubrication in the packings will bleed out due to heat generation. Heat is a primary cause of packing
failure.
Pumps with packing will require periodic adjustment.
To accomplish this, gently and evenly tighten the packing gland nuts, which will further compress
the packing. Do not over tighten. Packing is designed to keep leakage to a slight weep. Normally 2-3
drops per minute is acceptable.
If excessive leakage persists after complete adjustment, consider re-packing the stuffing box or
using another packing type.
v 1.4
Page 8 of 28
5.9.06
Lubrication Requirements
Housing Bushing:
Housing bushings are fully lubricated by the pumped fluid and are maintenance free.
Gear Case Bearings:
Bearings are splashed lubricated. Bearings are designed to provide a minimum L10 life of 15,000
hours at maximum speed and pressure conditions and are splashed lubricated.
Lubrication Instructions For Tuthill Process Pumps
The oil used in the gear case of the process pumps is “Lubriplate” APG9. Lubriplate is a trade
name of Fiske Brothers Refining Company – Toledo, Ohio.
Oil specifications are as follows:
Viscosity at 100°F: 816 SSU
Viscosity at 212°F: 86 SSU
API Gravity: 26.5
Flash Point: 39°F
Fire Point: 440°F
Extreme Pressure Additives
Any 90-weight gear oil may be substituted if equivalent to above.
The grease used in the faceplate ball bearing of the Industrial Series pump is “Lubriplate” 1200-2.
Grease specifications are as follows:
Lithium Base
N.L.G.I. #2
Work Penetration: 280
A.S.T.M. Dropping Point: 450°F
Minimum Oil Viscosity at 100°F: 950SSU
Water resistant with rust and corrosion inhibitors added.
Any #2 bearing grease may be substituted if equivalent to above.
The following charts on lubrication requirements are offered as a guide only. Common sense
approach to preventative maintenance must be exercised for best pump service life. Ambient conditions
(temperature, humidity, dust, etc.) can alter schedule:
Model No.
Gear Case
Capacity - CC
First Oil
Change – Hrs.
Subsequent
Change – Hrs.
5A, 10 & 16
25A
65 & 125A
150
150
1650
500
500
500
3000
3000
3000
Above standard lubricants are adequate for operating temperatures between –100°F and +350°F.
If temperature exceeds 350°F, use the following:
Oil Specification: Lubriplate APG 250 or equal
Bearing Grease: 930-AA or equal
v 1.4
Page 9 of 28
5.9.06
Inspection and Repair
Should it be necessary to remove the pump from service for periodic inspection of components
and/or a major repair, the following steps should be taken. See following pages for exploded pump view
and instructions.
WARNING
WARNING
Failure to follow these instructions could result in serious bodily injury or death.
Do not attempt to work on any Tuthill pump installation before completing the steps below.
Only authorized personnel who are familiar with the repair of mechanical products should perform the
necessary repair work. You must familiarize yourself with the entire contents of this manual prior to
performing any work.
Disconnect the drive so that it cannot be started while work is being performed.
Review the Material Safety Data Sheet (MSDS) applicable to the liquid being pumped to determine
its characteristics and the precautions necessary to ensure safe handling.
Vent all pressure within the pump through the suction or discharge lines.
Ensure that the pump has cooled to a safe temperature prior to performing any work on the pump.
v 1.4
Page 10 of 28
5.9.06
v 1.4
Page 11 of 28
5.9.06
10
9
8
11
12
7
13
14
6
15
5
4
16
3
36
17
35
18
34
2
33
19
32
1
20
21
37
22
23
24
25
26
27
28
29
14
30
17
31
26
General Parts List For 5A, 10, 16, 25A, 65, and 125A Pumps
Item #
1
2
3
4
5
6
7
8
9
10
11
12
13
14
15
16
Note:
-
v 1.4
Description
Thrust Bearing
Timing Gears
Square Key
Gear Key
Drive Shaft (CI)
(SS)
Driven Shaft (CI)
(SS)
Impeller Key (CI)
(SS)
Impellers (CI) S.L.
(SS) S.L.
Locknut
Qty
2
2
1
2
1
1
2
2
2
21
22
23
24
25
26
27
28
29
Faceplate Bushing
SS Pumps Only
Wing Nut
Stud
Faceplate (CI)
(SS)
Gasket
Impeller Housing (CI)
(SS)
Housing Bushings
(CI) Bronze Bushing
(SS) Carbon Bushing
Item #
17
18
19
20
2
1
30
31
32
33
34
35
36
2
37
2
*
*
1
Description
Cap Screw
Dowel Pin
Packing
Packing Gland (CI)
(SS)
V-Ring
Stud
Washer
Nut
Gear Case Bushing
Lip Seal
Pipe Plug
Gear Case
Gear Case Cover
Bushing
Gear Case Cover
Expansion Plug
Vented Pipe Plug
Nametag
Drive Screw
Cap Screw
Pipe Plug
(CI)
(SS)
Shim---------------------.003”
.005”
Qty
*
4
2 sets
2
4
2
4
4
4
2
3
2
1
2
1
1
1
1
2
1
4
As Req.
As Req.
* Exact quantities will vary depending upon actual pump model.
(CI) are Cast Iron pumps that will have corresponding steel and/or ductile iron components.
(SS) are Stainless Steel pumps that will have corresponding stainless steel components.
Recommended spare parts are in bold text.
When ordering spare parts please specify pump model, serial number, part number & part name.
Page 12 of 28
5.9.06
Disassembly & Reassembly Instructions for 5A, 10, 16, 25A, 65, and 125A Pumps
Minor Disassembly For Fluid Chamber Inspection:
Refer to Parts Diagram on Page 11.
1. Remove six faceplate wing nuts (11).
2. Remove faceplate (13). If faceplate does not pull off easily, it may require a slight tap with a
mallet.
3. Remove lock nuts (9) from ends of shafts. To facilitate this operation, you can wedge a small
block of wood or other soft material between the impellers. Loosen both nuts in this manner
before removing
4. Slide impellers (8) from shafts. Mark impellers so they can be replaced on the same shaft.
The fluid chamber is now ready for inspection.
Reassemble In Accordance With Minor Reassembly Instructions:
Refer to Parts Diagram on Page 11.
1. Replace impeller (8) and impeller keys (7) on appropriate shafts.
2. Install lock nuts on end of shafts. Use piece of wood or other soft material wedged between the
impellers as described above. The torque required to lock the shaft nuts is listed below.
Standard Models
Torque (ft-lbs.)
5A, 10, 16, 25A
40 - 45
65, 125A
50 - 55
3. Check clearances between lobe face and housing bottom face (dimension B on page 14). If
clearances are incorrect, reset clearances according to reassembly instructions on the following
pages (Models 5A, 10, 16, 25A) or Section 6 (65, 125A).
4. Rotate driveshaft several revolutions to assure proper timing.
5. Clean housing gasket face of any burrs.
6. Place new gasket (14) on impeller housing. If original gasket is in good condition, it can be
reused.
7. Replace faceplate (13) and six faceplate wing nuts (11).
8. Rotate assembled pump driveshaft several revolutions to be certain that there is no interference
or rubbing. If no interference is apparent, the pump is ready to be put back in service.
v 1.4
Page 13 of 28
5.9.06
Chamber Clearances:
Faceplate gaskets are compressed to approximately .003 - .004 inches when pump bolts are tightened.
For impeller assembly settings and resultant clearances, see below.
A
IMPELLER
SETTING
(SIDE)
MODEL
MATERIAL
CLEARANCES
B
RESULTING SIDE
CLEARANCE
(OPPOSITE SIDE)
C
ON RADII
D
RESULTING
PASS OVER
MIN.
MAX.
MIN.
MAX.
MIN.
MAX.
MIN.
MAX.
.001
.002
.003
.004
.002
.003
.004
.005
*
.003
.005
.005
.004
.007
.009
.009
.002
.004
.004
.006
.004
.006
.006
.008
.001
.003
.006
.006
.003
.005
.008
.008
.001
.002
.004
.004
.002
.003
.005
.005
*
.003
.005
.005
.004
.007
.009
.009
.002
.004
.006
.006
.004
.006
.008
.008
.001
.003
.004
.004
.003
.005
.006
.006
.001
.003
.005
.007
.002
.004
.006
.007
*
.004
.006
.007
.004
.008
.010
.012
.002
.005
.005
.008
.004
.007
.007
.010
.001
.002
.006
.006
.004
.005
.009
.009
.002
.006
.007
.011
.003
.007
.007
.012
.003
.007
.007
.011
.008
.012
.013
.017
.004
.008
.008
.012
.006
.010
.010
.014
.001
.004
.004
.006
.005
.008
.008
.011
Models: 5A & 10
Non-Gall
Gall
Standard
Hot
Standard
Hot
Model: 16
Non-Gall
Gall
Standard
Hot
Standard
Hot
Model: 25A
Non-Gall
Gall
Standard
Hot
Standard
Hot
Models: 65, 125A & 125H
Non-Gall
Gall
Standard
Hot
Standard
Hot
C
SINGLE LOBE
IMPELLER
* Check to ensure that pump
still rotates freely
B
A
C
D
HOUSING
FACEPLATE
MATING IMPELLER
v 1.4
Page 14 of 28
5.9.06
Major Disassembly Instructions (Models: 5A, 10, 16, and 25A):
Refer to Parts Diagram on Page 11.
1. Remove six faceplate wing nuts (11).
2. Remove faceplate (13). If faceplate does not pull off easily, it may require a slight tap with a
mallet.
3. Remove lock nuts (9) from ends of shafts. To facilitate this operation, you can wedge a small
block of wood or other soft material between the impellers. Loosen both nuts in this manner
before removing.
4. Slide impellers from shafts. Mark impellers so they can be replaced on the same shaft.
5. Remove all burrs on drive shaft with a mill file or emery paper. Also remove any deposits of
paint. Special care should be taken around the keyway and shaft-end. This is where burrs are
most likely to be found.
6. Drain the oil from the gear case by removing lower drainpipe plug.
7. Remove six cap screws (17) from gear case cover (30). Remove gear case cover by sliding over
drive shaft.
8. Loosen packing gland nuts (24) and slide packing glands out of stuffing boxes. Note: Pumps
with mechanical seals require special handling and these instructions are shipped with the pump.
9. Examine gears for factory timing marks prior to removal. Timing marks should be visible at gear
tooth base and consist of two punch marks on the drive shaft gear and one punch mark on the
mating tooth cavity on the driven shaft gear. In the event these marks are not provided, gears
should be marked at this time.
10. Timing gears are press-fitted on the shafts, and this feature maintains pump clearance setting.
Use a gear puller to remove timing gears.
11. Remove gear keys.
12. Pull drive (5) and driven shaft (6) out through the faceplate side. V-rings (21) will also need to be
removed from the opposite end of the shafts at this time.
13. All parts should be inspected for wear and damage. Replace worn or damaged parts.
14. Bushings in the housing, gear case and gear case cover are removed by being pressed out.
15. Faceplate bushings (10), if supplied, are either carbon or glass-filled Teflon. To remove
excessively worn Teflon bushings, carefully slit them and remove. To remove excessively worn
carbon bushings, carefully break them and remove the pieces.
16. Lip seals (26) in gear case will be pressed out at the same time as the bushings.
17. Lip seal and expansion plug (31) in gear case cover will be pressed out at the same time as the
bushings.
v 1.4
Page 15 of 28
5.9.06
Major Reassembly Instructions (Models: 5A, 10, 16, and 25A):
Refer to Parts Diagram on Page 11.
1. Press new bushings into housing, gear case and gear case cover. Press lip seals into place.
Refer to diagram for proper installation. When replacing gear case bushings, make sure oil holes
line up with cast grooves in the hubs.
"X" (FACEPLATE)
"X" (HOUSING)
2.
3.
4.
5.
6.
7.
8.
9.
10.
11.
v 1.4
Pump Model
“X” Housing
“X” Gear Case
5A, 10 & 16
5/32” (4 mm)
5/32” (4 mm)
25A
5/32” (4 mm)
0
65 & 125
3/8” (10 mm)
0
Replace expansion plug (31).
Faceplate bushings (10), if supplied, are pressed in until bottomed.
Replace packing glands (20) and thread packing gland nuts loosely on studs.
Assemble impeller keys (7), impellers (8), and shaft nuts (9) on the shafts. Use a soft-faced vise
to hold shaft and impeller while the shaft nuts are torqued per Page 13.
Slide the shaft/gear assemblies through the housing, but not yet into the gear case.
Install the V-rings (21) on the shafts. V-rings should be staggered such that the bottom ring is
closer to the gear case. This is easily adjusted after pump is completely assembled by sliding the
rings on the shaft.
Continue sliding shaft/gear assemblies through the gear case until the impeller contacts the
housing.
Assemble timing gear keys (4).
Slide timing gears (2) over shafts until they are partially engaged with the keys.
Set the timing per the picture shown below. Gears that have been in service and marked may be
used, as timing will be correct. “X” and “Y” dimensions should be equal when meshing gears to
set timing. The normal identification method for timing is two punch marks on the drive shaft gear
tooth and one mark on the driven shaft gear-mating cavity. Rotate shaft one full revolution to
assure correct timing.
Page 16 of 28
5.9.06
12. Press both timing gears onto shafts.
13. Remove shaft nut and impeller from driven shaft. See Page 15, Steps 3 and 4 for proper
procedure.
14. Press or tap gear case end of drive shaft (5) to required setting clearance. Clearance is checked
with a feeler gage between impeller lobe face and impeller housing bottom face. This clearance
will vary with material of construction and pumping temperature (See Page 14). Hot clearances
are for pumps rated for applications in excess of 150°F (66°C). Hot clearance impellers have an
“H” stamped on hub face closest to impeller housing. Standard clearance impellers are not
stamped.
15. Replace impeller and nut on driven shaft and torque nut as required.
16. Remove shaft nut and impeller from drive shaft.
17. Repeat Step 13 for driven shaft.
18. Replace impeller and nut on drive shaft and torque nut as required.
19. Recheck clearance and timing.
20. Apply grease to gear case face and press gasket in place.
21. Assemble gear case cover and tighten screws. Rotate drive shaft to assure smooth operation.
22. Assemble housing gasket and faceplate and tighten nuts. Rotate drive shaft to assure smooth
operation.
23. Install drain pipe plug.
24. Remove oil level plug and fill plug. Fill with oil to level hole. See Lubrication Schedule on Pg. 9.
25. Install oil level plug and fill plug. Note: Use vented plug (32) for the fill hole.
26. Repack stuffing box. See Page 23 for proper installation of packing rings.
27. Snug up packing gland nuts.
28. Pump is now ready for service. Adjust packing leakage gradually for 2 to 3 drops a minute.
WARNING
WARNING
Coupling hubs or sheaves must be slip-fit on drive shaft. Shock loads from a hammer or mallet can upset
impeller clearances, resulting in immediate pump failure.
Major Disassembly Instructions (Models: 65 and 125A):
Refer to Parts Diagram on Page 11.
1. Remove six faceplate wing nuts (11).
2. Remove faceplate (13). If faceplate does not pull off easily, it may require a slight tap with a
mallet.
3. Remove lock nuts (9) from ends of shafts. To facilitate this operation, you can wedge a small
block of wood or other soft material between the impellers. Loosen both nuts in this manner
before removing
4. Slide impellers from shafts. Mark impellers so they can be replaced on the same shaft.
5. Remove all burrs on drive shaft with a mill file or emery paper. Also remove any deposits of
paint. Special care should be taken around the keyway and shaft end. This is where burrs are
most likely to be found.
6. Drain the oil from the gear case by removing lower drainpipe plug.
7. Remove six cap screws (17) from gear case cover. Remove gear case cover by sliding over
drive shaft.
8. Remove thrust bearings (1) and shims (37) and identify them so they can be correctly
reassembled later.
9. Examine gears for factory timing marks prior to removal. Timing marks should be visible at gear
tooth base and consist of two punch marks on the drive shaft gear and one punch mark on the
mating tooth cavity on the driven shaft gear. In the event these marks are not provided, gears
should be marked at this time.
10. Timing gears are press-fitted on the shafts, and this feature maintains pump clearance setting.
Use a gear puller to remove timing gears.
11. Remove gear keys.
v 1.4
Page 17 of 28
5.9.06
12. Remove any burrs on the shaft that may have occurred during gear removal.
13. Loosen packing gland nuts and slide packing glands out of stuffing boxes. Note: Pumps with
mechanical seals require special handling and these instructions are shipped with the pump.
14. Pull shafts out of pump from faceplate side. V-rings (21) will also need to be removed from the
opposite end of the shafts at this time.
15. All parts should be inspected for wear and damage. Replace worn or damaged parts.
16. Bushings in the housing, gear case and gear case cover are removed by being pressed out.
17. Faceplate bushings, if supplied, are either carbon or glass-filled Teflon. To remove excessively
worn Teflon bushings, carefully slit them and remove. To remove excessively worn carbon
bushings, carefully break them and remove the pieces.
18. Lip seals (26) in gear case will be pressed out at the same time as the bushings.
19. Lip seal and expansion plug (31) in gear case cover will be pressed out at the same time as the
bushings.
Major Reassembly Instructions (Models: 65 and 125A):
Refer to Parts Diagram on Page 11.
1. Press new bushings into housing, gear case and gear case cover. Press oil seals into place.
Refer to Page 16 for proper installation. When replacing gear case bushings, make sure oil holes
line up with cast grooves in the hubs.
2. Replace expansion plug.
3. Faceplate bushings, if supplied, are pressed in until bottomed.
4. Replace packing glands and thread packing gland nuts loosely on studs.
5. Assemble impeller keys, impellers and shaft nuts on the shafts. Use a soft-faced vise to hold
shaft and impeller while the shaft nuts are torqued per Page 13.
6. Slide the shaft/gear assemblies through the housing, but not yet into the gear case.
7. Install the V-rings on the shafts. V-rings should be staggered such that the bottom ring is closer
to the gear case. This is easily adjusted after pump is completely assembled by sliding the rings
on the shaft.
8. Continue sliding shaft/gear assemblies through the gear case until the impeller contacts the
housing.
9. Assemble timing gear keys.
10. Slide timing gears over shafts until they are partially engaged with the keys.
11. Set the timing per picture below. Gears that have been in service and marked may be used, as
timing will be correct. “X” and “Y” dimensions should be equal when meshing gears to set timing.
The normal identification method for timing is two punch marks on the drive shaft gear tooth and
one mark on the driven shaft gear-mating cavity. Rotate shaft one full revolution to assure correct
timing.
12. Press both timing gears onto shafts.
13. Remove shaft nut and impeller from driven shaft. See Page 17, Steps 3 and 4 for proper
procedure.
14. Press or tap gear case end of drive shaft to required setting clearance. Clearance is checked
with a feeler gage between impeller lobe face and impeller housing bottom face. This clearance
will vary with material of construction and pumping temperature (See Page 14). Hot clearances
are for pumps rated for applications in excess of 150°F (66°C). Hot clearance impellers have an
v 1.4
Page 18 of 28
5.9.06
15.
16.
17.
18.
19.
20.
21.
22.
23.
24.
25.
26.
27.
28.
29.
30.
“H” stamped on hub face closest to impeller housing. Standard clearance impellers are not
stamped.
Replace impeller and nut on driven shaft and torque nut as required.
Remove shaft nut and impeller from drive shaft.
Repeat Step 13 for driven shaft.
Replace impeller and nut on drive shaft and torque nut as required.
Recheck clearance and timing.
Apply grease to gear case face and press gasket in place.
Install thrust bearing and shims into timing gear counter-bore.
If necessary, add or remove shims to provide 0.0005" - 0.0010" (0.013 - 0.025 mm) axial shaft
play.
Assemble gear case cover and tighten screws. Rotate drive shaft to assure smooth operation.
Assemble housing gasket and faceplate and tighten nuts. Rotate drive shaft to assure smooth
operation.
Install drain pipe plug.
Remove oil level plug and fill plug. Fill with oil to level hole. See Lubrication Schedule on Pg. 9.
Install oil level plug and fill plug. Note: Use vented plug (32) for the fill hole.
Repack stuffing box. See Page 23 for proper installation of packing rings.
Snug up packing gland nuts.
Pump is now ready for service. Adjust packing leakage gradually for 2-3 drops a minute.
WARNING
WARNING
Coupling hubs or sheaves must be slip-fit on drive shaft. Shock loads from a hammer or mallet can upset
impeller clearances, resulting in immediate pump failure.
v 1.4
Page 19 of 28
5.9.06
Disassembly of 3:1 Gear Reduction Unit for Models 5A, 10 & 16
The following instructions pertain only to the Models 5A, 10 and 16 pumps with optional 3:1 gear
reduction unit. Refer to Page 21 for part identification.
1. Drain oil from gear case by removing lower drain plug.
2. Remove size screws (10) on face of gear reduction cover. Remove cover (9) by sliding over
shafts.
3. Remove cone bearing (8), long spacer (7), reduction gear (6), short spacer (5), and timing gear
from top gear reduction shaft. Also, remove cone bearing, spacer and timing gear from lower
gear reduction shaft. Note: Check timing gears for timing marks per Page 17, Step 9. If timing
gears are not marked, mark them before removing.
4. To replace pinion shaft assembly (1), press assembly out of hub. Oil seal (12) will remain on
shaft. Press new shaft assembly in place. Slip oil seal over shaft and press into oil seal bore.
5. To replace cup bearing, first remove adjusting plug (14) with spanner wrench. Insert new bearing
cup and screw adjusting plug partially in. Adjust plugs after reassembly of gear reduction unit.
All play should be removed from cone bearing.
6. To disassemble entire pump, see instructions on Page 15.
Reassembly of 3:1 Gear Reduction Unit for Models 5A, 10 & 16
The following instructions pertain only to the Models 5A, 10 and 16 pumps with optional 3:1 gear
reduction unit. Refer to Page 21 for part identification.
1. Assemble entire pump except for the gear reduction unit per Pages 16-17, Steps 1-17.
2. If timing is correct, place short spacer (4), reduction gear (6), a long spacer (7) and cone bearing
(8) on upper gear reduction shaft. Also, place spacer (5) and cone bearing (8) on bottom shaft.
3. Apply grease to housing gasket seal surface. Press gasket in place.
4. Slide gear reduction cover over shafts, revolving pinion shaft to mesh with gear reduction gears.
5. Tighten six screws holding cover in place.
6. Remove oil level plug and fill plug. Fill with oil to level hole. See lubrication recommendations on
Page 9.
1
2
3
4
5
7
8
9
6
v 1.4
10
11
15
13
Page 20 of 28
14
5.9.06
12
Item
Part Description
Qty.
1
2
3
4
5
6
7
8
9
10
11
12
13
14
15
Impeller Key
Gear Reduction Shaft
Gear Key
Short Upper Spacer
Lower Shaft Spacer
Reduction Gear
Long Upper Spacer
Cone Bearing
Gear Reduction Cover
Hex Cap Screw
Pinion Shaft Assembly
Pinion Shaft Seal
Bearing Cup
Adjusting Plug
Key
2
2
3
1
1
1
1
2
1
6
1
1
2
2
1
5A
P500-19-S4
10619300
10511700
10618700
10618800
10618600
10636500
P652-9
10618300
P101-6-H
10673700
P941-14
P652-10
10606300
12313700
Part Numbers
10
P500-19-S4
10619300
10511700
10618700
10618800
10618600
16
P500-19-S4
10619400
10511700
10618700
10618800
10618600
P652-9
10618300
P101-6-H
10673700
P941-14
P652-10
10606300
12313700
P652-9
10618300
P101-6-H
10673700
P941-14
P652-10
10606300
12313700
Disassembly of Relief Valve for Models 5A, 10, 16 & 25A
All Standard Duty pumps are available with optional pressure relief valves. The valve, when
supplied, is built into the faceplate. Therefore, servicing of the valve is a minor disassembly procedure,
which can be performed without disturbing the pump mounting, piping or installation. Note: The
adjustment end of the valve must be on the suction side of the pump for proper operation.
1.
2.
3.
4.
1
v 1.4
Remove locknut and O-ring.
Remove sanitary nut.
Plug and valve housing subassembly may then be removed and separated.
Remove spring and valve.
2
3
4
5
6
7
Item
Part Description
Material
Qty.
1
2
3
4
5
6
7
Locknut
Locknut O-Ring
Sanitary Nut
Threaded Plug
Valve Housing
Spring
Valve
8
Faceplate
9
Faceplate Bushing
Stainless Steel
Viton (std.)
Nickel Alloy
Stainless Steel
Stainless Steel
Stainless Steel
Stainless Steel
Cast Iron
Stainless Steel
Teflon
1
1
1
1
1
1
1
1
1
2
Page 21 of 28
8
9
Part Number
5A, 10 & 16
25A
10596800
10597500
P701-22-77
P701-26-77
P208-1-S
P208-2-S
10596700
10597400
10596500
10597200
10597000
10597700
10596400
10597100
13900901
13903401
42002601*
42004700*
10541800
10543300
5.9.06
* Includes bushings.
Reassembly of Relief Valve for Models 5A, 10, 16 & 25A
1.
2.
3.
4.
Check beveled end of valve for burrs or damage. If present, correct before assembly.
Install valve on seat in faceplate.
Place spring on valve stem.
Engage threaded plug approximately ¾” of the length of the valve housing. Place plug and valve
subassembly over valve stem.
5. Tighten sanitary nut to capture valve assembly.
6. Set valve for bypass pressure. To do this, first install a pressure gauge in the discharge line.
Turn valve housing clockwise until pressure stops increasing. More turns will cause the relief
valve to operate at higher pressure. The valve is now seated and pump is discharging at full
capacity.
7. Install O-ring and locknut.
Disassembly of Relief Valve for Models 65, 125A & 125H
1. Remove adjustment nut or hand wheel.
2. Remove spring, valve and O-ring subassembly.
1
2
3
4
5
6
Item
Part Description
Material
Qty.
1
2
3
Hand Wheel
Spring
Valve
4
O-ring
5
Faceplate
Stainless Steel
Stainless Steel
Stainless Steel
Buna (std.)
Viton (opt.)
Cast Iron
Stainless Steel
Carbon
1
1
1
1
1
1
1
2
6
Bushing
* Includes bushings.
Part Number
65, 125A & 125H
10592700
20386800
20339600
P701-36-37
P701-36-77
13904109
50314600*
50309600
Reassembly of Relief Valve for Models 65, 125A & 125H
1.
2.
3.
4.
5.
v 1.4
Check beveled end of valve for burrs or damage. If present, correct before assembly.
Place O-ring and valve assembly in valve seat.
Place spring over stem.
Engage hand wheel 2 full threads.
Set valve for bypass pressure. To do this, first install a pressure gage in the discharge line. Turn
hand wheel clockwise until pressure stops increasing. More turns will cause the relief valve to
operate at higher pressure. The valve is now seated and the pump is discharging at full capacity.
Page 22 of 28
5.9.06
Packing for HD Standard Duty Pumps
Installing Packing in Pumps:
1. Remove all old packing using a packing hook. Clean stuffing box and shaft thoroughly and
examine shaft for wear or scoring. Check bearings for wear as this can cause an eccentric shaft
rotation resulting in excessive leakage. Packings will not act as a bearing. If shaft surface is
worn, replace shaft or have seal surface area resurfaced.
2. Be certain the proper size packing is used. The following packing sizes will apply:
Pump Model
Packing Size
Shaft Diameter
No. of Rings
5A, 10 & 16
1/4” Square
3/4“
4
25A
1/4” Square
1”
4
65
1/4” Square
1-3/8”
4
125A
1/4” Square
1-3/8”
6
3. Always cut packings into separate rings. Never coil around shaft (standard factory packings are
pre-cut and pre-formed). If bulk packing is used, cut each ring on a mandrel the same size as the
pump shaft. Try rings in stuffing box to be certain that each ring fills the seal chamber and that
there is no gap between packing joints.
4. Install one ring at a time, seating each ring independently. Use clean oil to lubricate shaft and
inside of stuffing box. Joints should be staggered and kept at least 90° apart. Each individual
ring should be firmly seated with a tamping tool. Never depend entirely on the gland to seat a set
of packings. This practice will jam the last rings installed but leave the front rings loose. The
result is excessive and rapid wear.
5. After last ring is installed, tighten gland nuts finger tight. Then start pump and take up nuts until
leakage is decreased. Stopping leakage at this point will cause packing to burn. If temperature
rises in seal area, back off on packing nuts, as this indicates excessive gland pressure.
6. Allow packing to leak freely for at least one hour when starting up a newly packed pump. Take
up gland nuts gradually, 1/16 turn every 5-10 minutes, until leakage stabilizes at about 2-3 drops
per minute. If temperature in seal area increases, back off and start over.
Note:
-
Replace packing when leakage cannot be controlled by further take-up of gland.
Test results indicate that 70% of the wear occurs on the first two rings of packing nearest the
gland. Rings next to the gland work the hardest. The rings in the bottom of the stuffing box serve
to throttle some fluid pressure. On abrasive service the bottom ring takes most of the beating.
Therefore, this ring should be a firm ring.
How to Pack for Abrasive Liquids:
As used here “Abrasives” is a broad term intended to cover the problem of packing against
slurries, congealing liquids and the likes. They cause the greatest damage to equipment, and present
difficulties for packing. In general, this involves flush, purges and temperature control. Hard facing on the
shaft seal surfaces, such as stellite or ceramic, are also recommended.
When pumping slurries and abrasives an external source of clear or otherwise suitable liquid
must be force fed at a pressure higher than that existing in the stuffing box. This differential pressure is in
the area of 10-25 psi.
Suspended Solids:
Solids which are suspended in liquids and which are an inherent part of their structure would
include starch, clay slurry, muddy water and other similar slurries. This is best handled by an external
v 1.4
Page 23 of 28
5.9.06
flush of clear liquid through a lantern ring as shown. This arrangement will result in a small amount of
product dilution and is controlled by the differential pressure in the seal chamber.
Packing with Internal Flush
How To Pack For Congealing Liquids:
These liquids congeal either because of a change in temperature or as a result in drying out after
exposure to air. Clay coatings and latex fall into both categories. A good rule is to keep the fluid moving
before congealing can take place. Control with cooling or heat and/or by flush or purge.
Some products harden to a solid state when exposed to air. Clay coatings, latex and sugars are
examples. An effective flush is shown. Note that this type of flush does not enter the product, but only
mixes with the product leakage. This arrangement also tends to serve as a cooling medium for the seal
chamber.
Packing with External Flush
v 1.4
Page 24 of 28
5.9.06
Serial Number Location
The Serial Number Nameplate is located as shown in the Parts Diagram on Page 11, Item 33. In addition
to the nameplate, the serial number is also stamped on top of the impeller housing (15). This serial
number should be furnished to Tuthill whenever service parts are required and when questions regarding
pump design or construction arise.
v 1.4
Page 25 of 28
5.9.06
Common Causes of Pump Problems
9
9
9
9
9
9
Takes Too
Much Power
Low Flow
9
9
9
9
9
9
Fails to
Pump
Starts, Then
Loses Prime
Wear
Excessive
Heat
Noisy
Excessive
Gland
Leakage
Symptoms
Suggested Solution
Suction life high for
vapor pressure of liquid
Liquid too viscous for
pump speed
Air leakage in suction
piping
Reduce vacuum
requirements
Reduce pump
speed
Tighten and seal all
joints
Lengthen suction
pipe or add liquid to
supply tank
9
Suction pipe not
immersed in liquid
9
Suction strainer
clogged or of
insufficient area
9 9 9
9
Misalignment between
pump and driver
9 9 9
9
Rotating elements
binding
9 9 9
9
Pipe strain on pump
casing
9
9
9
9
9
9
9
9
Relief valve chattering
9
Excessive system
pressure
9
Stuffing box packed too
tightly
9
Pump speed to low
9
Pump parts worn
9
9
9
9
v 1.4
Possible Cause
9
9
Page 26 of 28
Obstruction in
discharge line
Wrong direction of
rotation
Suction line sized too
small
Torque control coupling
not adjusted
Clean strainer or
use larger size
Re-align. Check
coupling alignment
with dial indicator
Disassemble and
inspect
Disassemble pipe
and re-align before
reassembling
Check setting and
valve seating
Check for
obstructions in
discharge line
Repack and adjust
Check pump
impeller speed
Have pump
reconditioned or
replace worn parts
Check discharge
piping and valves
for obstruction
Reverse motor
Increase suction
piping size
Readjust coupling
5.9.06
Troubleshooting
1. Problem: No fluid is delivered.
a. Power is not on.
b. Net positive suction head available (NPSHa) is lower than required for the vapor pressure of the
liquid pumped. You should calculate NPSHa and redesign piping, if necessary.
c. There are leaks in suction line.
d. Direction of shaft rotation is incorrect.
e. Relief valve setting is too low (if the pump is equipped with a relief valve). Liquid is discharging
through the by-pass port.
2. Problem: Capacity is too low.
a. There are air leaks in suction line.
b. Suction losses are too high. The suction lift is too great or the suction line is too small or too long.
This can be detected by installing a vacuum gauge directly at the pump suction. The maximum
vacuum at the pump suction should never exceed 15” of mercury. Vaporization caused by higher
vacuums will generally result in capacity drop off. Redesign suction conditions.
c. Pump speed is too slow.
d. Strainer is too small or obstructed.
e. Suction pipe or port is not immersed in liquid deep enough
f. Piping is improperly installed permitting an air pocket to form in the pump.
g. Increased clearances or wear in the pump will sometimes cause the pump to deliver an
insufficient supply of liquid.
3. Problem: Pump works spasmodically.
a. Leaky suction lines.
b. Suction conditions vary.
c. Air or vapor is in the liquid.
4. Problem: Excessive power draw.
a.
b.
c.
d.
e.
Pressure is too high.
Liquid is more viscous than originally expected.
Suction or discharge line is obstructed.
There is insufficient horsepower.
There are mechanical defects:
i.
Drive shaft and pump are misaligned.
ii.
Pump is binding due to incorrect clearance setting.
iii.
Pump shaft is bent.
iv.
There is misalignment within pump due to bad piping or poor installation, causing strain
or distortion.
5. Problem: Pump is noisy.
a.
b.
c.
d.
e.
Pump is cavitating due to inadequate suction conditions.
There is misalignment of coupling.
Coupling is set too close to pump.
There is vibration of the pump due to a worn or bent shaft.
There are air leaks on suction side of pump or air entrainment in the fluid.
6. Problem: Pump leaks.
a. Bolts need tightening, allowing gaskets or O-rings to leak.
b. Gaskets or O-rings are damaged.
Note: Packings are designed to leak. Leakage should be at a rate that will prevent excessive heating on
the bracket at the packing area.
v 1.4
Page 27 of 28
5.9.06
Material Returns
If it becomes necessary to return a pump to the factory, a Return Goods Authorization (RGA) must be
obtained from either your local Authorized Distributor or our Alsip plant. No RGA can be issued until a
completed Material Safety Data Sheet (MSDS) has been forwarded to our Alsip plant and return of the
pump has been approved.
•
•
•
Tuthill pumps are precision-built and must be handled with care.
Pumps must be drained of all fluid and the ports plugged to prevent foreign material from getting into
the pump.
Pumps must be packaged securely to prevent damage while in transit.
WARRANTY
Tuthill Pump Group warrants its products against defective material and workmanship for 90 days
from the date of startup or one year from date of shipment from Tuthill's plant, whichever comes first.
This warranty does not include products damaged by tampering, improper installation, abuse, or wear.
Nor does it cover consequential damages, or other losses due to pump failure.
Because of the unpredictable nature of fluids encountered, pumps are not warranted for any
specific life.
Contact Information
If additional information is required to facilitate operation or maintenance, contact the authorized
Tuthill distributor shown below. Information on Tuthill contacts can also be obtained at
www.tuthillpump.com.
European Contact Info:
Tuthill Pump Group
Manners Industrial Estate
Ilkeston, Derbyshire DE7 8YA
England
[email protected]
North America Contact Info:
Tuthill Pump Group
12500 South Pulaski Road
Alsip, Illinois 60803
U.S.A.
www.tuthillpump.com.
v 1.4
Page 28 of 28
5.9.06