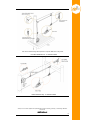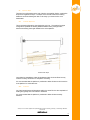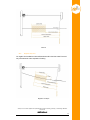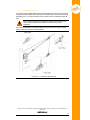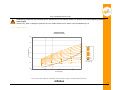
1
Installation, Operation and Maintenance Manual Model ZS125-08 NOTE TO INSTALLERS Always Read Instructions Before Use LEAVE THIS MANUAL ATTACHED TO THE ZIPSTOP BRAKE UNIT. THE INSTALLATION, OPERATION AND MAINTENANCE MANUAL CONTAINS INFORMATION RELATING TO THE SAFE USE OF THE ZIPSTOP AND INCLUDES ALL PRODUCT REGISTRATION AND WARRANTY INFORMATION. THIS DOCUMENT MAY ONLY BE REMOVED BY THE END USER. ENSURE USER MANUAL IS READILY AVAILABLE TO OPERATORS AT ALL TIMES P/N 7002-001-02 Always use the manual supplied with zipSTOP brake Kit when installing, operating or maintaining ZIPSTOP components www.thezipshop.com 0 Contents 1 SAFETY INFORMATION........................................................................ 4 1.1 SYMBOLS USED IN THIS MANUAL......................................................... 4 1.2 SAFETY AND INFORMATION LABELS ..................................................... 5 1.2.1 Location of Safety Labels ........................................................ 5 2 WARRANTY INFORMATION ................................................................. 6 2.1 WARRANTY CONDITIONS .................................................................... 6 2.1.1 Customers Responsibility ........................................................ 6 3 SPECIFICATIONS .................................................................................. 7 3.1 3.2 3.3 4 OPERATING PRINCIPLES .................................................................... 9 4.1 4.2 5 INTRODUCTION .................................................................................. 7 ZIPSTOP BRAKE UNIT ....................................................................... 7 ZIPSTOP BRAKE TROLLEY ................................................................. 8 GENERAL .......................................................................................... 9 ZIPSTOP OPERATION ........................................................................ 9 ZIPSTOP BRAKE ASSEMBLY .............................................................. 10 5.1 GENERAL .......................................................................................... 10 5.2 UNPACKING....................................................................................... 10 5.2.1 To unpack the zipSTOP:.......................................................... 10 5.3 LONG TERM STORAGE ....................................................................... 11 5.4 PARTS SUPPLIED ............................................................................... 11 5.5 ADDITIONAL PARTS REQUIRED............................................................ 12 5.5.1 General.................................................................................... 12 5.5.2 Redirection Pulleys.................................................................. 12 5.5.3 Minimum Hardware Requirements .......................................... 12 5.5.4 Reduction Line......................................................................... 13 5.5.5 Reduction Line Specification ................................................... 13 6 ZIPSTOP BRAKE ASSEMBLY CONFIGURATION ............................... 14 6.1 GENERAL .......................................................................................... 14 6.2 SETUP VARIABLES ............................................................................. 14 6.3 RIDER ARRIVAL SPEED ...................................................................... 14 6.4 RIDER WEIGHT .................................................................................. 14 6.5 REDUCTION LINE RATIO ..................................................................... 14 6.5.1 1:1 Ratio .................................................................................. 15 6.5.2 2:1 Ratio .................................................................................. 16 6.5.3 Possible System Configurations (Informative Only) ................. 17 6.6 ZIP LINE SLOPE ................................................................................. 19 6.6.1 Positive Slope Line .................................................................. 19 6.6.2 Flat Line................................................................................... 19 6.6.3 Negative Slope Line ................................................................ 20 6.7 CALCULATING ZIPSTOP BRAKING DISTANCES ..................................... 21 6.8 DEFINITION OF TERMS........................................................................ 22 6.9 ZIPSTOP BRAKING DISTANCE CHARTS ............................................... 24 6.10 CONFIGURATION NOTES:.................................................................... 24 6.11 ZIPSTOP CONFIGURATION WORKSHEET ............................................. 25 7 ZIPSTOP BRAKE ASSEMBLY INSTALLATION ................................... 26 7.1 7.2 GENERAL .......................................................................................... 26 SAFETY PRECAUTIONS ....................................................................... 26 Always use the manual supplied with zipSTOP brake Kit when installing, operating or maintaining ZIPSTOP components www.thezipshop.com 1 7.3 PRIMARY ANCHOR POINT ................................................................... 27 7.4 SECONDARY ANCHOR POINT .............................................................. 27 7.4.1 Position of Secondary Anchor Point ........................................ 27 7.5 REDUCTION AND SUPPORT LINES ....................................................... 28 7.6 FITTING ZIPSTOP BRAKE UNIT ........................................................... 29 7.7 FITTING THE BRAKE TROLLEY ............................................................. 31 7.8 FITTING TYPE I PULLEY ...................................................................... 33 7.9 FITTING THE TYPE II PULLEY............................................................... 34 7.10 FITTING REDUCTION LINE ................................................................... 35 7.10.1 1:1 Reduction Ratio ................................................................. 35 7.10.2 2:1 Reduction Ratio ................................................................. 37 8 OPERATION OF ZIPSTOP..................................................................... 40 8.1 8.2 8.3 9 SAFETY PRECAUTIONS ....................................................................... 40 OPERATION DURING EXTREME WEATHER CONDITIONS ........................... 40 RESETTING SYSTEM .......................................................................... 41 TROUBLESHOOTING............................................................................ 42 9.1 10 TROUBLESHOOTING GUIDE ................................................................. 42 RECERTIFICATION AND MAINTENANCE........................................ 43 10.1 GENERAL .......................................................................................... 43 10.1.1 Service Schedule..................................................................... 43 10.2 DAILY INSPECTIONS ........................................................................... 43 10.3 SPARE PARTS & ACCESSORIES .......................................................... 44 10.4 UNSCHEDULED SERVICE PROCEDURES ............................................... 45 10.4.1 zipSTOP Brake Unit Side Cover replacement ......................... 45 10.4.2 zipSTOP Brake Unit Nozzle replacement ................................ 45 10.4.3 Removing Nozzle assembly .................................................... 45 10.4.4 To refit the Nozzle Assembly: .................................................. 46 10.4.5 Braking Line Inspection ........................................................... 47 10.5 BRAKING LINE REPLACEMENT ............................................................. 48 10.5.1 Safety Precautions .................................................................. 48 10.5.2 Braking Line Replacement Procedure ..................................... 48 10.5.3 Brake Trolley Bump Stop Replacement ................................... 50 11 BRAKING DISTANCE CHARTS ........................................................ 51 11.1 11.2 11.3 11.4 11.5 HOW TO READ BRAKING DISTANCE CHARTS .......................................... 52 1:1 RATIO - METRIC ........................................................................... 53 2:1 RATIO - METRIC ........................................................................... 54 1:1 RATIO - IMPERIAL ......................................................................... 55 2:1 RATIO – IMPERIAL ........................................................................ 56 Always use the manual supplied with zipSTOP brake Kit when installing, operating or maintaining ZIPSTOP components www.thezipshop.com 2 IMPORTANT SAFETY NOTICE Zip Lining is a Dangerous Activity Failure by the installer or operator to heed any and all instructions, warnings and cautions for the correct installation, operation, care and maintenance of the zipSTOP may result in serious injury or death. The zipSTOP Brake Assembly, including zipSTOP Brake Unit Model ZB125-08B, zipSTOP Brake Trolley Model ZT125-17 and all associated equipment are designed and specified for use in the recreational zip line industry as the primary brake or as an Emergency Arrest Device (EAD) in a complete zip line braking system. Use of the zipSTOP components for any purposes other than that intended by the manufacturer is not permitted. The zipSTOP is designed to be utilized as a primary brake or Emergency Arrest Device (EAD). When using the zipSTOP as a primary brake, the installer must utilize an independent Emergency Arrest Device to protect against operator error and third party equipment failure. Design and installation of the zip line, including the complete braking system, is the responsibility of the installer or operator. Owners and Operators of zipSTOP devices are responsible for the safety and supervision of any person using the zipSTOP and are required to assure that proper installation and operation procedures are followed at all times. Proper installation requires careful design and planning using zipSTOP and non-zipSTOP components. Owners and Operators are encouraged to seek the advice of their zip line installer or a proper engineering professional regarding the instructions in this Manual. These instructions must be made readily available to the operator at all times. Prior to installation and use, all owners, installers and operators must have read and shown to have understood all instructions, labels, markings, and safety information pertaining to the installation, operation, care, and maintenance of the zipSTOP system, its component parts, and all associated hardware. Failure to do so may result in equipment damage, serious injury and death. Always use the manual supplied with zipSTOP brake Kit when installing, operating or maintaining ZIPSTOP components www.thezipshop.com 3 1 1.1 SAFETY INFORMATION Symbols Used in this Manual The following safety symbols are used throughout this manual to highlight potential danger to operators and equipment. One or more precautions may be associated with practices and procedures described within this manual. Failure to adhere to any precautions highlighted can result in equipment damage, serious injury and/or death. Ensure that you read and understand all safety related procedures related to the working environment and the task you are undertaking. DANGER Indicates a hazardous situation exists that, if not avoided, will result in serious injury or death. WARNING Indicates a potentially hazardous situation that, if not avoided, could result in serious injury or death. CAUTION Indicates a potentially hazardous situation that, if not avoided, may result in injury or equipment damage. NOTE: Indicates an action that must be taken to ensure personal safety and prevent damage to property or equipment. Care for the Environment Take care to minimize impact on the environment when carrying out this procedure. Always use the manual supplied with zipSTOP brake Kit when installing, operating or maintaining ZIPSTOP components www.thezipshop.com 4 1.2 Safety and Information Labels Safety and Information Labels located on the zipSTOP components are not to be removed. Ensure labels are in place and remain legible at all times 1.2.1 Location of Safety Labels Location of Labels – Brake Unit Location of Labels – Brake Trolley Always use the manual supplied with zipSTOP brake Kit when installing, operating or maintaining ZIPSTOP components www.thezipshop.com 5 2 WARRANTY INFORMATION 2.1 Warranty Conditions Manufacturers sole warranty. The zipSTOP Brake Assembly will be sold free from defects in materials and workmanship, excluding field replaceable wear parts, for a period of two (2) years from date of purchase. This warranty only applies to the original purchaser, and is contingent upon the owner/operator using and maintaining the device in accordance with the zipSTOP instructions, including the requirement to maintain annual recertification as described in the Installation, Operation and Maintenance Manual. THIS WARRANTY IS EXPRESSLY IN LIEU OF OTHER WARRANTIES, EXPRESS OR IMPLIED, AND ANY IMPLIED WARRANTY OF MERCHANTABILITY OR FITNESS FOR A PARTICULAR PURPOSE IS HEREBY EXPRESSLY EXCLUDED. The sole remedy for breach of said warranty or for any claim in negligence or strict liability in tort is the repair or replacement of any defective parts at the discretion of the manufacturer. Such parts claimed to be defective shall be returned to the zipSTOP licensed Service Center, transportation prepaid, for inspection by zipSTOP to determine to its satisfaction that said part(s) are defective. This warranty is null and void if other than genuine parts are used, or if any modifications are carried out to the zipSTOP Brake Assembly or zipSTOP components without the expressed written permission of the manufacturer. No person, Agent or Distributor is authorised to give any warranty, other than the one herein expressed, on behalf of the zipSTOP Company or to assume for it any liability pertaining to such products. The company makes no warranties in respect to trade accessories or component parts which are not manufactured by the company, same being subject only to such warranties, if any, as may be made by their respective manufacturers. 2.1.1 Customers Responsibility The following items are considered to be the responsibility of the Customer and, therefore, are non-reimbursable under the terms of the warranty. Normal maintenance/routine services. Normal replacement of service items. Replacements required because of abuse, misuse or incorrect operation of equipment by the installer or operator. Field replaceable wear parts such as the Nozzle, Braking Line, quick links, Reduction Line and pulleys, Brake Trolley sacrificial bump stops, and sheaves supplied as zipSTOP branded parts. Normal deterioration due to use and exposure. Strict adherence to the Installation, Operation and Service Manual supplied, manufacturer’s instructions and advice given by zipSTOP service technicians is also a condition of warranty. Always use the manual supplied with zipSTOP brake Kit when installing, operating or maintaining ZIPSTOP components www.thezipshop.com 6 3 SPECIFICATIONS 3.1 Introduction The zipSTOP Brake Assembly is a controlled braking force device designed specifically for use in the zip line industry as a Primary or Emergency Arrest Device (EAD) at the end of zip line runs. The zipSTOP caters to a range of rider weights and approach speeds, and offers a smooth, consistent braking force for all riders. The design of the zipSTOP allows for simple installation, and incorporates both an advanced self-regulating brake unit and an automatic line reset. The patented braking mechanism delivers smooth deceleration and is designed to minimize variations in the deceleration rate and stopping distance of both children and adults. There are no friction parts in the brake mechanism, ensuring reliability remains high while maintenance and operating costs are kept to a minimum. Installation, inspection, operation and maintenance must be carried out in accordance with the instructions in this manual to protect the longevity of the zipSTOP components. 3.2 zipSTOP Brake Unit Model: ZS 125-08B Classification: Zip line Braking Device Dimensions: 80 x 350 x 140 mm (15 x 12.6 x 5.5 in) Net Weight: 23.5 kg (52 lbs) Materials: Casing Aluminium alloy Internal parts Zinc plated steel Nozzle Modified Acetal plastic Line 20 mm Nylon Spectra Braking Line Maximum Line Extension: 12.5 m (41 ft) Rider Weight Range Maximum Speeds: 15 to 150 kg (33 - 330 lbs) 1:1 Reduction Ratio 36 kph (22 mph) 2:1 Reduction Ratio 60 kph (36 mph) Custom ratio* 60+ kph (36+ mph) *Higher speeds may be utilized with the custom Reduction Ratios, however braking distances will increase. When planning a custom ratio, note that the automatic line reset may become compromised, requiring the necessity for either manual reset or supplementary reset system. Always use the manual supplied with zipSTOP brake Kit when installing, operating or maintaining ZIPSTOP components www.thezipshop.com 7 3.3 zipSTOP Brake Trolley Models: Classification: Dimensions: Net Weight: Materials: Maximum Speed: Minimum Rider Weight: Maximum Rider Weight: ZT 125-17-1/2 – For use with ½” (12.7 mm) zip lines ZT 125-17-3/4 – For use with ¾” (19 mm) zip lines Zip line Brake Trolley 235 x 100 x 115 mm (15 x 12.6 x 5.5 in) 1.3 kg (2.8 lbs) Casing Aluminium Alloy Wheels Steel Bump Stop EPDM 72 kph (45 mph) 15 kg (33 lbs) 150 kg (330 lbs) Always use the manual supplied with zipSTOP brake Kit when installing, operating or maintaining ZIPSTOP components www.thezipshop.com 8 4 OPERATING PRINCIPLES 4.1 General The zipSTOP Brake Assembly is a controlled braking force device designed specifically for use as a Primary or Emergency Arrest Device (EAD) at the end of zip line runs. The zipSTOP caters to a range of rider weights and approach speeds and offers a smooth, consistent braking force for all riders. zipSTOP brake performance relies on operators using the correct equipment and operating the system in accordance with the instructions contained within this manual. 4.2 zipSTOP Operation The zipSTOP Brake Assembly system consists of a zipSTOP Brake Unit, zipSTOP Brake Trolley, redirection pulleys and associated Reduction Lines. Typical zipSTOP installation The zipSTOP Brake Unit is located at the zip line terminal end, normally adjacent to the landing area. It is connected via a redirection pulley and Reduction Line system to the zipSTOP Brake Trolley. The Brake Trolley is located on the zip line and when idle (zipSTOP Braking Line fully retracted) will be positioned at the start of the rider Arrest Zone (Reset Position). The approaching rider trolley contacts the Brake Trolley, moving it down the zip line. As the Brake Trolley moves into the Arrest Zone it extends the Braking Line out of the zipSTOP Brake Unit via the Reduction Line. As the Braking Line extends out of the zipSTOP Brake Unit, the eddy current brake in the unit is activated, controlling the rate of deceleration and slowing the rider in a smooth manner. Once the load is removed from the Brake Trolley, the spring return mechanism in the zipSTOP Brake Unit retracts the Braking Line, automatically returning the Brake Trolley to the start of the Arrest Zone (Reset Position) on the zip line, ready for the next rider. Note: When higher Reduction Ratios are employed retraction force is reduced and a manual reset of the Brake Trolley may be necessary. Always use the manual supplied with zipSTOP brake Kit when installing, operating or maintaining ZIPSTOP components www.thezipshop.com 9 5 ZIPSTOP BRAKE ASSEMBLY 5.1 General The zipSTOP Brake Assembly will be supplied as a kit of parts to aid in easy installation. Additional components are required to complete the braking system. 5.2 Unpacking Save Packaging For Reuse: Keep all zipSTOP packaging for reuse when returning the zipSTOP Brake Unit for annual recertification. Damages caused by shipping in improper packaging are not covered under warranty and will result in additional repair charges to the owner. 5.2.1 To unpack the zipSTOP 1. Upon receipt of the zipSTOP Brake Assembly Kit, inspect all parts for signs of shipping damage or contamination. If any components show signs of damage or mishandling, contact your zipSTOP distributor. 2. Check that all information and safety labels affixed to the zipSTOP are present and legible. Refer to Section 1.2 for label location. Do not use the zipSTOP after date shown here 3. Check the Certification Label on the zipSTOP Brake Unit for the ‘Next Recertification Required’ date. If the date shown has passed or the label is missing or illegible then the zipSTOP Brake Unit must not be put into service. 4. Register online at www.thezipshop.com/registration or fill out the Product Registration Card included with the zipSTOP Brake Assembly Kit, and return it to your zipSTOP distributor. Product Registration must be completed The Product Registration must be completed, either by registering online or by filling out and returning the Product Registration Card. This is critical for receiving product notifications and up-to-date information for the safe use of the zipSTOP Brake Assembly. 5. Read this entire Installation, Operation and Maintenance Manual supplied with the zipSTOP, and familiarize yourself with all aspects of installation, operation, care and maintenance. Always use the manual supplied with zipSTOP brake Kit when installing, operating or maintaining ZIPSTOP components www.thezipshop.com 10 5.3 Long Term Storage If the zipSTOP Brake Unit is to be placed into storage or left unused for longer than two weeks, ensure the unit is clean and dry and protected from the environment. Ensure the Braking Line is fully retracted into the unit. Do not store Brake Unit in a wet condition After exposure to water or damp conditions, thoroughly clean and dry the zipSTOP prior to storage. Ensure that the zipSTOP Brake Unit is not left with a wet Braking Line retracted inside the casing as this will result in corrosion of the unit and deterioration of the Braking Line. Always store in a clean and dry environment. When returning the zipSTOP Brake Assembly to operation after an extended period of inactivity, always carry out a full inspection and operational check of all components in the assembly. Refer to Section 10 for Inspection procedures. 5.4 Parts Supplied The following parts will be included in each Brake Assembly Kit: 1 x zipSTOP Brake Unit 1 x zipSTOP Mounting Bracket 1 x zipSTOP Brake Trolley zipSTOP Installation, Operation and Service Manual Brake Unit Brake Unit Mounting Bracket Brake Trolley Installation, Operation, and Service Manual zipSTOP Brake Assembly Kit Always use the manual supplied with zipSTOP brake Kit when installing, operating or maintaining ZIPSTOP components www.thezipshop.com 11 5.5 5.5.1 Additional Parts Required General Additional lines and equipment will be required to successfully install a zipSTOP Brake Assembly within individual zip line installations. All hardware, fasteners and accessories used in the installation of zipSTOP must meet or exceed the required loads and specifications, and must be made of materials compatible with all-season outdoor use. 5.5.2 Redirection Pulleys The following parts are not supplied as part of the zipSTOP kit and may be purchased separately from your zipSTOP distributor. The Type I Pulley is fitted to the Secondary Anchor Point, and provides both support and a means of redirection for the Reduction Line. The Type I Pulley is required for both 1:1 and 2:1 Reduction Ratio setups. A Type II Pulley is fitted between the zipSTOP Brake Unit and the Type I Pulley as required to provide support and redirection for the Reduction Line and connections to the Braking Line. The Type II Pulley is only required on the 2:1 Reduction Ratio setups. Example of Type I Redirection Pulley Example of Type II Redirection Pulley Redirection Pulleys 5.5.3 Minimum Hardware Requirements All hardware required is to be purchased separately. The following are minimum requirements for all hardware used for zipSTOP installation: Description Size Qty Notes zipSTOP Brake Unit mounting bolts, washers and lock-nuts M12 3 Grade 4.6 (M12) or ASTM A307 Grade A or B (1/2”) 1/2” Length to suit installation Suitable for all-season outdoor use. Type I Pulley mounting hardware To suit To suit Suitable for all-season outdoor use. Always use the manual supplied with zipSTOP brake Kit when installing, operating or maintaining ZIPSTOP components www.thezipshop.com 12 Carabiners, Snaps, Rings, Thimbles, Clevises 5.5.4 To suit Minimum load rating 15 kN Suitable for all-season outdoor use. Reduction Line The Reduction Line is required to connect the zipSTOP Brake Unit to the Brake Trolley and will transfer the braking force from the Brake Unit. The Reduction Line passes through the redirection pulleys and must meet minimum specification. 5.5.5 Reduction Line Specification Maximum Diameter 10.0 mm (0.394”) Minimum Strength 15 kN Stretch <3.0% at 15 kN Wear Resistance High abrasion resistance and UV resistance Water Resistance Dry, non-absorptive Type Kernmantle or single braid construction Typical Reduction Line Always use the specified Reduction Line Failure to utilize a Reduction Line of specified strength and quality can compromise zipSTOP brake operation, resulting in equipment damage, serious injury or death. Reduction Line will be subject to wear and abrasion Any Reduction Line selected for use will wear and must be replaced from time to time. Lines must be carefully inspected prior to use each day, and failure to do so may result in serious injury or death. When selecting a reduction line, the following considerations apply The line must meet the specifications described above. A lighter, smaller diameter line is preferred, to minimize resistance and weight, and maximize reliable reset. A waterproof line is required. Water absorption can add significant weight, allowing the line to sag which increases the likelihood of incomplete reset for Brake Unit and Brake Trolley Always use the manual supplied with zipSTOP brake Kit when installing, operating or maintaining ZIPSTOP components www.thezipshop.com 13 6 6.1 ZIPSTOP BRAKE ASSEMBLY CONFIGURATION General The zipSTOP Brake Assembly is designed to be utilized as part of a complete zip line braking system, and can be used for a wide range of zip line installations. The zipSTOP Brake Assembly is suitable for use in both existing and new zip line installations. Setup information contained within this manual relates only to the zipSTOP Brake Assembly – The design, installation and set up of other components comprising the complete braking system is the responsibility of the installer and/or operator. Always carry out unmanned testing to determine actual braking distance The information contained in this manual is intended for guidance only. Calculated braking distances for the zipSTOP Brake Assembly are estimates only and may differ from actual braking distances achieved on individual zip lines. As there are infinite possibilities regarding participant weights and arrival speeds, line slopes and environmental conditions, a safe and functional installation can only be achieved after careful consideration of all factors in advance of the zipSTOP installation. 6.2 Setup Variables A number of variables will influence the final braking distance and level of rider comfort, these include: Rider arrival speed Rider weight Reduction Line Ratio Zip line slope in the landing area System friction Environmental conditions (wind, rain, temperature) 6.3 Rider Arrival Speed Rider arrival speed is unique to each zip line installation and is a factor of line slope, zip line length, rider weight, rider descent position, wind and friction. It is necessary to know the acceptable minimum and maximum rider velocities prior to configuring the zipSTOP. 6.4 Rider Weight Suitable rider weight ranges will need to be determined by individual zip line operators. The zipSTOP Brake unit will accommodate riders between 15 and 150 kg (33 and 330 lbs). It is necessary to know the acceptable rider weight range before configuring the zipSTOP. 6.5 Reduction Line Ratio The Reduction Ratio is the most influential factor in the braking characteristics of the zipSTOP. The Reduction Ratio is the difference between the Brake Trolley travel and the zipSTOP Braking Line extension. The Reduction Ratio is achieved by passing the Reduction Line around a series of pulleys. This alters the ratio of Brake Trolley travel to Braking Line extension, allowing the installer to tailor the braking distances and deceleration rates, accommodating a wide range of arrival speeds and rider weights. Always use the manual supplied with zipSTOP brake Kit when installing, operating or maintaining ZIPSTOP components www.thezipshop.com 14 Various Reduction Ratios are possible: • 1:1 Ratio • 2:1 Ratio • 3:1 and higher ratios – contact your zipSTOP Distributor Systems shown are based on a single line zip line. Dual zip lines and side-by-side systems may also be accommodated. Please contact your zipSTOP Distributor for information on alternate set-ups. When higher Reduction Ratios are employed, retraction force is reduced and a manual reset of the Brake Trolley may be necessary. 6.5.1 1:1 Ratio Single Line – 1:1 Reduction Ratio The 1:1 Reduction Ratio directly connects the zipSTOP Brake Unit to the zipSTOP Brake Trolley via a single Type I Redirection Pulley. For every unit of Brake Trolley travel, the Braking Line extends an equal distance. Characteristics of the 1:1 ratio are: Suitable for low speeds Strongest braking force Short braking distances Higher rate of rider deceleration Maximum rider approach speed of 36 kph (22 mph) A 1:1 Reduction Ratio is used for zip line installations where low arrival speeds are common. Although suitable for speeds up to 36 kph (22 mph), typically a 1:1 ratio would be employed when approach speeds are less than 20 kph (12 mph). Always use the manual supplied with zipSTOP brake Kit when installing, operating or maintaining ZIPSTOP components www.thezipshop.com 15 6.5.2 2:1 Ratio Single Line – 2:1 Reduction Ratio The 2:1 Reduction Ratio connects the zipSTOP Brake Unit to the ZipSTOP Brake Trolley via both Type I and Type II pulleys. With a 2:1 ratio the Brake Trolley travels twice the distance that the zipSTOP Braking Line extends. Characteristics of the 2:1 ratio are: Suitable for medium to high speeds Best combination of stopping distance and braking force Optimum rider comfort Longer braking distances than a 1:1 setup Overhead support line recommended Maximum approach speed of 60 kph (36 mph) A 2:1 Ratio is used on zip line installations where medium to high approach speeds are common but a soft stop for the rider is desired. Although suitable for approach speeds up to 60 kph (36 mph), typically a 2:1 ratio is employed when approach speeds are less than 40 kph (24 mph). Always use the manual supplied with zipSTOP brake Kit when installing, operating or maintaining ZIPSTOP components www.thezipshop.com 16 6.5.3 Possible System Configurations (Informative Only) The zipSTOP Brake Assembly can be used with other zip line configurations and higher rider velocities. Please contact your zipSTOP distributor for more information. Some examples of alternative system configurations are shown below: Overhead Cable – 1:1 Reduction Ratio Overhead Cable – 2:1 Reduction Ratio Always use the manual supplied with zipSTOP brake Kit when installing, operating or maintaining ZIPSTOP components www.thezipshop.com 17 Note: Ensure sufficient height above platform for zipSTOP Brake Unit to fully extend Deck Mounted Brake Unit - 2:1 Reduction Ratio Beam Mounted Pulley - 2:1 Reduction Ratio Always use the manual supplied with zipSTOP brake Kit when installing, operating or maintaining ZIPSTOP components www.thezipshop.com 18 6.6 Zip Line Slope Three zip line configurations at the end of the line are possible: flat line, positive line slope and a negative line slope. The slope of the line will influence the braking distances as well as allowing the rider to roll slowly up or down the line once decelerated. 6.6.1 Positive Slope Line This is the ideal configuration when designing a zip line,. The positive line slope configuration equalizes the braking distance between heavy and light riders, therefore minimizing the length needed for the arrival platform. Positive Line Slope On positive line installations riders will decelerate within the Arrest Zone but may continue to slowly roll forward on completion of braking. It is recommended that the platform is positioned to allow all riders to roll forward on to the platform for a safe dismount. 6.6.2 Flat Line On a flat line participants will decelerate within the ‘Arrest Zone’ at the completion of braking but typically don't roll forward or backward. It is recommended that the platform is positioned to allow all riders to safely dismount. Always use the manual supplied with zipSTOP brake Kit when installing, operating or maintaining ZIPSTOP components www.thezipshop.com 19 Flat Line 6.6.3 Negative Slope Line On negative line installations riders will decelerate within the rider Arrest Zone and may roll backwards at the completion of braking. Negative Line Slope Always use the manual supplied with zipSTOP brake Kit when installing, operating or maintaining ZIPSTOP components www.thezipshop.com 20 6.7 Calculating zipSTOP Braking Distances To calculate braking distances for the zipSTOP Brake Assembly, follow the steps in the ‘Configuration Worksheet’ using the information contained in the ‘Braking Distance Charts’. Refer to Section 11. Always carry out unmanned testing to determine actual braking distance The information contained in this manual is intended for guidance only. Calculated braking distances for the zipSTOP Brake Assembly are estimates only and may differ from actual braking distances achieved on individual zip lines. Exceeding maximum recommended line speed can cause injury to participants and damage equipment. Before starting the zipSTOP configuration you will need to determine the rider weight range, rider arrival speed range and preferred Reduction Ratio for the zipSTOP installation. Information required for calculating zipSTOP braking distances: Rider weight range Arrival speed range zipSTOP Reduction Line ratio A number of other variables will affect the final performance of the system and must be taken into consideration when designing the complete zip line braking system. These include, but are not limited to: Line slope Emergency Arrest Device (EAD) design Friction Weather Conditions (e.g. wind, rain, humidity, temperature) Environmental factors Always use the manual supplied with zipSTOP brake Kit when installing, operating or maintaining ZIPSTOP components www.thezipshop.com 21 6.8 Definition of Terms The following terms are used when configuring and installing the zipSTOP Brake Assembly: Reduction Line Ratio Rider Arrival Speed ASmax = maximum rider arrival speed ASmin = minimum rider arrival speed Braking Distance BDmax = maximum braking distance BDmin = minimum braking distance RR ASmax ASmin Ratio of Brake Trolley travel to zipSTOP line extension (LEX) Speed at which rider enters the braking zone. Determined by: Slope of zip line Rider size and weight Wind speed and direction Rider trolley rolling resistance Distance required to decelerate a rider. BDmax BDmin Braking distance is determined by: Arrival speed Rider weight Reduction Ratio Slope of zip line at landing area. NOTE: Configurations that result in Braking distances that fall below the ‘BDmin’ line shown on the chart are not recommended. These short braking distances may be uncomfortable for the rider and may result in severe swinging up of rider when decelerating. Rider Braking Range BR Difference between maximum and minimum braking distances. Always use the manual supplied with zipSTOP brake Kit when installing, operating or maintaining ZIPSTOP components www.thezipshop.com 22 Roll Forward RF Distance riders may roll down the zip line once rider arrest is complete. The amount of roll forward is determined by: Line slope (positive) Rider weight System friction Roll Back RB Distance riders may roll back up the zip line once rider arrest is complete. The amount of roll forward is determined by: Line slope (negative) Rider weight System friction Landing Area LA Area below the zip line where riders are stopped or are travelling slow enough to be retrieved or safely dismount. NOTE: Landing Area will vary depending on rider arrival speed, stopping distances and line slope. Arrest Zone AZ Area in which riders are being decelerated at the end of the zip line descent. Reset Position RP The reset position defines the start of the Arrest Zone and is the location on the zip line the Brake Trolley will return to once the rider is removed. Buffer Zone BZ Distance from the end of the Arrest Zone (AZ) to any object that may impact the rider in the event the rider overshoots the landing area. The buffer zone must include the maximum distance required for the Emergency Arrest Device (EAD) to activate and arrest a rider. Pivot Height PH Straight line distance between Brake Trolley and the Type 1 Pulley. Changing pivot height will influence the stopping distance. Pivot Length PL Horizontal distance between zipSTOP Brake unit and Type I Pulley Line Extension LEX Distance that zipSTOP internal Braking Line extends from the zipSTOP Brake unit. Min. LEX = 0.40 m (15.5”) Max. LEX = 12.0 m (12’4”) Rider Weight RW The weight of the rider Always use the manual supplied with zipSTOP brake Kit when installing, operating or maintaining ZIPSTOP components www.thezipshop.com 23 6.9 zipSTOP Braking Distance Charts Charts for calculating braking distances are located at the back of this manual. These charts are to be used in conjunction with the zipSTOP configuration worksheet to optimize the zipSTOP installation. Always carry out unmanned testing to determine actual braking distance The information contained in this manual is intended for guidance only. Calculated braking distances for the zipSTOP Brake Assembly are estimates only and may differ from actual braking distances achieved on individual zip lines. Exceeding maximum recommended line speed can cause injury to participants and damage equipment. 6.10 Configuration Notes: 1. BDmin Line: BDmin line indicates the rate of deceleration that may be considered uncomfortable and result in severe rider swing up when stopping. It is not recommended to operate the zipSTOP with combinations of rider weights and arrival speeds that fall below the BDmin line. 2. Line Extension (LEX) – Line extension is the distance the Braking Line extends out of the zipSTOP brake Unit. If LEX is greater than 12.0m then reduce max. permissible approach speed (ASmax), Permissible rider weight (RWmax) or increase Reduction Ratio (RR). 3. Buffer Zone (BZ) – Buffer zone is the area after the Arrest Zone in which riders are safe from impacting the terminal end or any other object in the event they overshoot the landing zone. The buffer zone must include the maximum distance required for the Emergency Arrest Device (EAD) to arrest a wayward rider. Always use the manual supplied with zipSTOP brake Kit when installing, operating or maintaining ZIPSTOP components www.thezipshop.com 24 6.11 zipSTOP Configuration Worksheet Use this worksheet in conjunction with the braking distance charts at the back of this manual. Read the zipSTOP Brake Assembly configuration notes and definitions before completing the worksheet. Distances calculated by this worksheet are based on a flat line with no outside influences such as wind, friction etc. Actual braking distances can vary from these values. Always determine actual braking distances by completing unmanned test runs on final zip line installation prior to putting the installation into operation. 1 Select Reduction Ratio and go to braking distance chart for selected Reduction Ratio. If Reduction Ratio = 1:1, enter 1 If Reduction Ratio = 2:1, enter 2 RR = 2 Enter maximum expected rider arrival speed (ASmax) ASmax = Enter minimum expected rider arrival speed (ASmin) ASmin = 3 Enter maximum anticipated rider weight RWmax = 4 Enter minimum anticipated rider weight RWmin = 5 Determine pivot height Minimum pivot height = 1.0 m (40”) PH 6 Enter buffer zone length BZ 7 Go to braking distance chart for selected Reduction Ratio. Metric and Imperial charts are provided. 8 From relevant chart determine the braking distance for maximum anticipated rider weight (RWmax) BD1 = 9 Add pivot height to give maximum braking distance BDmax = BD1 + PVH BDmax = 10 Check maximum braking distance + buffer zone does not exceed maximum zipSTOP Braking Line extension. Line Extension (LEX) = (BDmax + BZ) / RR LEX must be less than or equal to 12. LEX = (see Note 1) 11 From relevant chart determine braking distance for minimum anticipated rider weight (RWmin) BD2 = 12 Add pivot height to give minimum braking distance. BDmin = BD2 + PVH BDmin = 13 Check stopping distance is not below the ‘BDmin’ line. Distances below this line will result in a severe deceleration for the rider Above BDmin line? 14 Calculate braking range: BR = BDmax – BDmin BR = 15 Calculate Reset Point (Arrest Zone Start Point): RP = BDmax + BZ RP = Y / N Always use the manual supplied with zipSTOP brake Kit when installing, operating or maintaining ZIPSTOP components www.thezipshop.com 25 7 7.1 ZIPSTOP BRAKE ASSEMBLY INSTALLATION General The zipSTOP Brake Unit is installed at the end of the zip line, usually on or adjacent to the terminal end. A Secondary Anchor Point is normally required upstream of the landing area to provide support for the Reduction Line pulleys. Alternately a fulllength secondary cable of sufficient capacity can be installed to provide support for the Reduction Line and associated pulleys. 7.2 Safety Precautions Proper design and testing of the complete braking system is always required. The Complete Brake System for zip Lines consists of all brakes employed, including Primary Brake and Emergency Arrest Device (EAD). All braking installations that include the zipSTOP as a component of the Braking System must be designed, tested and operated according to this Installation, Operation and Maintenance Manual and proper industry and engineering practices. Failure to do so may result in serious injury or death to participants. Exceeding maximum recommended line speed can cause injury to participants and damage equipment. Failure to correctly install or maintain a zipSTOP Brake Assembly may result in serious injury or death to participants. Always install an Emergency Arrest Device (EAD). An independent arrest device is required to safely stop riders in the event of operator error or third party equipment failure. Avoid contact between rider and rider trolley and/or Brake Trolley. Serious injury may result if rider contacts the rider trolley or Brake Trolley during the braking phase. Always design zipSTOP Brake Assembly installation to ensure rider cannot make contact with, or have any part of their body caught between, the rider trolley and Brake Trolley. Ensure all cables, attachment lines and pulleys are correctly attached and maintained to prevent tangling, snagging, binding and abrasion. Ensure that the Reduction Line is routed cleanly and in line through the pulley system, to prevent contact with any surface other than the pulley sheaves. All structures, supports and anchors must be evaluated and designed according to proper industry and engineering practices. Questions about structures, supports and anchors should be referred to your zip line’s engineer. The act of decelerating a rider at the termination of a zip line can generate extreme loads. Always use the manual supplied with zipSTOP brake Kit when installing, operating or maintaining ZIPSTOP components www.thezipshop.com 26 7.3 Primary Anchor Point The Primary Anchor Point provides support for the zipSTOP Brake Unit. The anchor point and associated fittings must be of sufficient strength to provide a secure mount and to support all applied loads sustained during zip line operation. Loads specified are for the zipSTOP Brake Assembly installation only and do not allow for any additional equipment or other loadings applied to the primary mount. The zipSTOP Brake Unit is attached to the Primary Anchor Point using three M12 or ½” fixing bolts. Loads at Primary Anchor Point In-line with Braking Line 6.0 kN Right angles to Braking Line Negligible The loads specified are applied loads for the zipSTOP Brake Unit only. These loads DO NOT allow for additional loads applied by other equipment or structures. Ensure sufficient factor of safety is applied in the structural design of all zip line installations. 7.4 Secondary Anchor Point The Secondary Anchor Point provides support for redirection pulleys and hardware used in the Reduction Line system. The design of the Secondary Anchor Point must be sufficient to withstand all applied loads experienced during zip line operation. Loads specified are for zipSTOP Brake Assembly installation only and do not allow for any additional equipment or other loadings applied to the secondary mount. Loads at Secondary Anchor Point Inline with Reduction Line 11.0 kN Right angles to Reduction Line 3.5 kN The loads specified are applied loads for the Reduction Line and Redirection Pulley only. These loads DO NOT allow for additional loads applied by other equipment or structures. Ensure sufficient factor of safety is applied in the structural design of all zip line installations. 7.4.1 Position of Secondary Anchor Point The Secondary Anchor Point is located in line with the start of the Arrest Zone (Brake Trolley Reset Point). It provides the location for the attachment of the Type I Pulley above the zip line and also attachment of any secondary or support lines that may be required. Ensure the Secondary Anchor Point and any supporting structure is a sufficient distance from the zip line to prevent contact with the rider. Always install pulleys so as to prevent any prevent tangling, snagging or binding with other lines or objects. Ensure that the Reduction Line is routed cleanly and in line through the pulley system to prevent contact with any surface other than the pulley sheaves. Always use the manual supplied with zipSTOP brake Kit when installing, operating or maintaining ZIPSTOP components www.thezipshop.com 27 7.5 Reduction and Support Lines Only use a double Figure-of-Eight knot or approved termination system for all rope connections. All terminations must be either sewn or spliced. Secure rope ends so they cannot untie. All Reduction Lines and support lines are to be manufactured to specified strength and are to be suitable for all-season outdoor use (Refer to Section 5.5.5 for specifications). When installing reduction and support lines, use a cable tidy or route lines to ensure that: All lines are installed in such a way as to prevent loose or sagging lines, tangling, snagging or binding with other zip line components. Lines are to be routed to eliminate abrasion and undue wear. All lines are laid out so as not to present a tripping or injury hazard to zip line staff or riders. If necessary use cable tidies. All lines are to be thimbled and whipped or tied with a Double Figure-of-Eight knot. Typical Figure-of Eight Knot (all terminations must be either sewn or spliced) Always use the manual supplied with zipSTOP brake Kit when installing, operating or maintaining ZIPSTOP components www.thezipshop.com 28 7.6 Fitting zipSTOP Brake Unit The zipSTOP Brake Unit may be mounted horizontally or vertically. The mounting bracket is designed for use with a flat or curved surface. Curved surfaces must have a minimum 150 mm (6“) diameter. Only install the zipSTOP Brake Unit oriented directly inline with the Type I Pulley. The Braking Line must feed from the device linearly, without twist, and centered within the Nozzle. Accelerated Braking Line wear may occur if the line bears onto the Nozzle edge. Do not reuse self-locking nuts. Always use new nuts, as reuse of self-locking nuts may compromise connection integrity. Fit the zipSTOP Brake Unit as follows: Installation Notes: Always orient the zipSTOP Brake Unit directly in line with Type I Pulley. Always use through bolts with large washers and self locking nuts. It is recommended that double helix spring washers are located under mounting nuts to allow for movement in primary mount point. Always mount the zipSTOP Brake Unit a sufficient distance from the zip line so that Reduction Lines and pulleys do not interfere with rider. Once the installation is complete, ensure that the zipSTOP Braking Line is not twisted and feeds linearly through the Nozzle. Attach the supplied mounting bracket to the primary support with three (3) M12 or ½” hex head through bolts. Check bolt head is correctly located in the zipSTOP Brake Unit mount. Secure with flat washers, double helix spring washers and self-locking nuts. Torque fasteners to maximum of 15 Nm (11 ftlb). Do not over-torque fasteners. Line up zipSTOP Brake Unit with the bottom mounting hole and insert the corresponding retaining pin and lynch pin. Always use the manual supplied with zipSTOP brake Kit when installing, operating or maintaining ZIPSTOP components www.thezipshop.com 29 Swing the zipSTOP Brake Unit up and apply a small amount of pressure against the compression rubber until upper mounting holes align. Fit the upper mounting pin and lynch pin. Check both lynch pins are correctly located and secure. In order to prevent tampering, insert a padlock or bolt in place of the lynch pin. Always use the manual supplied with zipSTOP brake Kit when installing, operating or maintaining ZIPSTOP components www.thezipshop.com 30 7.7 Fitting the Brake Trolley The Brake Trolley is installed on the zip line and is used to transfer the energy of the rider to the zipSTOP Braking Unit. Always use the correct Brake Trolley size for the zip line. Failure to use the correct size may prematurely wear the trolley or zip line. Ensure that the zipSTOP Braking Line is fully retracted into the zipSTOP device at Brake initiation. If any Braking Line is extended, braking force will be increased, resulting in participant injury or damage to the zipSTOP Brake Unit. To fit the Brake Trolley: Installation Notes: Check the correct size Brake Trolley for zip line is being used. Some disassembly is required to fit the Brake Trolley to zip line. The Brake Trolley is installed with the Bump Stop toward the direction of rider arrival. Ensure the two lower pulley wheels are located below the line and the single upper wheel is above the line. Check Brake Trolley is the correct size for the zip line. Trolley size is located on the label. Remove Reduction Line mount …>> >>…upper pulley…>> Always use the manual supplied with zipSTOP brake Kit when installing, operating or maintaining ZIPSTOP components www.thezipshop.com 31 >>…and top half of the Bump Stop from the Brake Trolley. Place the Brake Trolley on the zip line with the Bump Stop facing in the direction of the approaching rider. Refit the upper half of the Bump Stop rubber. Torque to 10Nm (7 lb-ft) Refit the Reduction Line mounting bush. Torque to 20 Nm (15 lb-ft) Refit the upper wheel to the Brake Trolley, ensuring that all spacers are correctly positioned. Secure the upper wheel with bolt, washer and self-locking nut. Torque to 20 Nm (15 lb-ft) Check all fasteners are tight. Do not over tighten Always use the manual supplied with zipSTOP brake Kit when installing, operating or maintaining ZIPSTOP components www.thezipshop.com 32 Check Brake Trolley rolls smoothly on zip line. 7.8 Fitting Type I Pulley The Type I Pulley is fitted to the Secondary Anchor Point, and provides both support and a means of redirection for the Reduction Line. The Type I Pulley is required for both 1:1 and 2:1 Reduction Ratio setups. The Type I Pulley may be fixed horizontally or vertically to a solid surface or be clamped to a cable. The Type I Pulley incorporates dedicated line attachment points for dead-end loops. Fit the Type I Pulley as follows: Installation Notes: Always position the Type I Pulley higher than the zip line. A minimum of 1.0 meter (40”) is recommended. Ensure the position of the pulley will not allow contact or interference between the rider and any lines or equipment. Ensure the change in angle of the Reduction Line as it passes through the pulley is minimized – this may require mounting the pulley assembly on an angle towards the Brake Trolley. Ensure the Type I pulley assembly is mounted on a load bearing surface capable of withstanding all applicable load bearing requirements. Ensure that the Reduction Line is routed cleanly and in line through the pulley system, to prevent contact with any surface other than the pulley sheaves. Always use the manual supplied with zipSTOP brake Kit when installing, operating or maintaining ZIPSTOP components www.thezipshop.com 33 7.9 Fitting the Type II Pulley The Type II Pulley is fitted between the zipSTOP Brake Unit and the Type I Pulley as required to provide support and redirection for the Reduction Line and connections to the Braking Line. The Type II Pulley is only required on the 2:1 Reduction Ratio setups. Fit the Type II Pulley so as to ensure the position of the pulley will not allow contact or interference between the rider and any lines or equipment. It is recommended that an overhead support line and link be used with the Type II Pulley to reduce the risk of line entanglement. Double Line – 2:1 Reduction Ratio Example Always use the manual supplied with zipSTOP brake Kit when installing, operating or maintaining ZIPSTOP components www.thezipshop.com 34 7.10 Fitting Reduction Line Only use a Double Figure-of-Eight knot or approved termination system for all rope connections. Ensure that the Reduction Line is routed cleanly and in line through the pulley system, Contact between Reduction Line and any surface other than the pulley sheaves must be prevented in order to eliminate abrasion and undue wear. Attachment of the Reduction Line will differ depending on the Reduction Ratio utilized for each zipSTOP installation. The length of the Reduction Line must be sufficient to reach between terminations with a single, continuous line. 7.10.1 1:1 Reduction Ratio Ensure the Type I pulley is securely fitted to the Secondary Anchor Point and is located higher than the adjacent zip line, and in line with the start of the Arrest Zone. 3 2 1 Single Line with 1:1 Ratio Shown Installation Notes: Check that the Reduction Line diameter is compatible with the redirection pulley size. Check that the Reduction Line meets the specified strength, diameter, wear resistance and UV resistance requirements. Ensure that the Reduction Line is routed cleanly and in line through the pulley system, to prevent contact with any surface other than the pulley sheaves. Ensure that the zipSTOP Braking Line is fully retracted into the zipSTOP device at Brake initiation. If any Braking Line is extended, braking force will be increased, resulting in Always use the manual supplied with zipSTOP brake Kit when installing, operating or maintaining ZIPSTOP components www.thezipshop.com 35 participant injury or damage to the zipSTOP Brake Unit. Ensure that the specified Reduction Line meets the specifications described in Section 4.5.5. Use of poor quality Reduction Line may lead to zip line brake system failure. Position the Brake Trolley at the start of the Arrest Zone (Reset Position) and temporarily secure it at that position. Connect the Reduction Line directly to the Brake Trolley using a Double Figure-of-Eight knot and an optional load rated link. If a load rated link is utilized, ensure the gate on the link is screwed tight and thread lock compound is applied to prevent it from loosening over time. Ensure the Type I pulley is correctly positioned and secure. Pass the Reduction Line through the Type I pulley ensuring it enters the pulley from underneath and passes over and around the sheave in the direction of the zipSTOP Brake Unit. Ensure zipSTOP Brake Unit is in the fully retracted position. Note: Braking Line extends approximately 400 mm (16”) from Nozzle in fully retracted position. Always use the manual supplied with zipSTOP brake Kit when installing, operating or maintaining ZIPSTOP components www.thezipshop.com 36 Tension the Reduction Line and connect directly to the end loop of the zipSTOP Braking Line using a Double Figure-Eight knot and suitable locking link. Ensure the gate on the locking link is screwed tight and thread lock compound is applied to prevent it from loosening over time. Following the installation of the Reduction Line: Remove temporary restraint from the Brake Trolley. Check the Reduction Line to ensure that the Brake Trolley is in the correct Reset Position when zipSTOP Braking Line is fully retracted. Ensure that the Reduction Line is routed cleanly and in line through the pulley system, to prevent contact with any surface other than the pulley sheaves. Tie back any loose ends and check that all lines are free and untangled. Push the Brake Trolley down the zip line and check that no binding or interference occurs between the Reduction Line and any other part of the zipSTOP installation. Check that the maximum travel that can be achieved by the Brake Trolley does not exceed the full Line Extension of zipSTOP Braking Line. 7.10.2 2:1 Reduction Ratio 2 3 4 1 2:1 with Double Line Shown Installation Notes: Check that the Reduction Line diameter is compatible with the redirection pulley size. Always use the manual supplied with zipSTOP brake Kit when installing, operating or maintaining ZIPSTOP components www.thezipshop.com 37 Check that the Reduction Line meets the specified strength, diameter, wear resistance, and UV resistance standards. When using a 2:1 ratio, it is recommended that a support cable be installed to provide support for the Type II Pulley. Ensure that the Reduction Line is routed cleanly and in line through the pulley system, to prevent contact with any surface other than the pulley sheaves. Ensure that the zipSTOP Braking Line is fully retracted into the zipSTOP device at Brake initiation. If any Braking Line is extended, braking force will be increased, resulting in participant injury or damage to the zipSTOP Brake Unit. Ensure that the specified Reduction Line meets the specifications described in Section 4.5.5. Use of poor quality Reduction Line may lead to zip line brake system failure. Position the Brake Trolley at the start of the Arrest Zone (Reset Position), and temporarily secure it at that position. Connect the Reduction Line directly to the Brake Trolley using a Double Figure-of-Eight knot and an optional load rated link. If a load rated link is utilized, ensure the gate on the link is screwed tight and thread lock compound is applied to prevent it from loosening over time. Ensure the Type I pulley is correctly positioned and secure. Pass the Reduction Line through the Type I pulley ensuring it enters the pulley from underneath and passes over and around the sheave in the direction of the zipSTOP Brake Unit. Always use the manual supplied with zipSTOP brake Kit when installing, operating or maintaining ZIPSTOP components www.thezipshop.com 38 Ensure zipSTOP Brake Unit is in the fully retracted position with the Type II pulley correctly positioned and secure on the zipSTOP Braking Line. Note: Braking Line extends approximately 400 mm (16”) from Nozzle in fully retracted position. Run the Reduction Line towards the zipSTOP Brake Unit, pass the Reduction Line around the Type II Pulley ensuring it enters the pulley from underneath, and passes over and around the sheave in the direction of the Secondary Anchor Point. Tension the Reduction Line and connect to the dedicated mounting point on the Secondary Anchor Point using an approved line termination system or Figure-of-Eight knot. Following installation of Reduction Line: Remove temporary restraint from Brake Trolley Check the Reduction Line to ensure that the Brake Trolley is in the correct Reset Position when zipSTOP Braking Line is fully retracted. Ensure that the Reduction Line is routed cleanly and in line through the pulley system, to prevent contact with any surface other than the pulley sheaves. Tie back any loose ends and check that all lines are free and untangled. Push the Brake Trolley down the zip line and check that no binding or interference occurs between the Reduction Line and any other part of the zipSTOP installation. Check that the maximum travel that can be achieved by the Brake Trolley does not exceed the full Line Extension of zipSTOP Braking Line. Always use the manual supplied with zipSTOP brake Kit when installing, operating or maintaining ZIPSTOP components www.thezipshop.com 39 8 8.1 OPERATION OF ZIPSTOP Safety precautions Always correctly install, maintain and operate the zipSTOP Brake Assembly. Failure to do so may result in serious injury or death to participants. Always operate a zipSTOP Brake Assembly with Emergency Arrest Device (EAD) system active. Failure to do so may result in serious injury or death to participants. Always use the correct zipSTOP Brake Trolley. Failure to use the correct trolley may compromise system operation and result in serious injury to rider. Avoid contact between rider and rider trolley and/or Brake Trolley. Serious injury may result if rider is in contact with trolley when it impacts the Brake Trolley. Always design the zipSTOP installation so rider cannot be in contact with, or have any part of their body caught between, the rider trolley and Brake Trolley. Ensure all cables, attachment lines and pulleys are correctly attached and maintained. Ensure that the Reduction Line is routed cleanly and in line through the pulley system, to prevent contact with any surface other than the pulley sheaves. Any tangling, snagging, binding and abrasion may compromise system operation and result in serious injury to rider. Ensure Brake Trolley always resets to the start of the Arrest Zone. Failure to reset the Brake Trolley will result in a reduction of braking force and distance and may result in serious injury and equipment damage. 8.2 Operation during extreme weather conditions zipSTOP equipment has been designed for use in a wide range of temperature and weather conditions. Extreme heat and cold weather will not alter the performance of the equipment, nor will operations in wet conditions, however, the following should be observed: Keep lines dry When operating in freezing temperatures, it is of critical importance that that all lines are kept dry. If lines become wet and subsequently freeze, normal retraction/extension may become limited, which may result in increased or dangerous rates of deceleration or an increased likelihood of reset failure. If lines become wet during freezing temperatures, or when normal extension/retraction becomes limited, cease all operation immediately. Fully extend Braking Line to allow drying When operating the zipSTOP in wet conditions, the Braking Line must be fully extended and allowed to completely dry in order to get the longest life from the lines. Always use the manual supplied with zipSTOP brake Kit when installing, operating or maintaining ZIPSTOP components www.thezipshop.com 40 Inspect line frequently in extreme weather conditions When operating in extreme wind, weather, temperature, humid conditions, and UV light exposure, increase line inspection frequency and replacement frequency. Under such conditions line must be replaced if any signs of deterioration are evident. 8.3 Resetting System Check Brake Trolley has correctly reset after every run. Failure to reset the Brake Trolley will result in an insufficient braking distance and may result in serious injury or death of rider. The zipSTOP Brake Trolley should automatically return to the start of the Arrest Zone (Reset Position) once the rider trolley is removed. With the Brake Trolley positioned in the Reset Position, the zipSTOP Braking Line will be fully retracted (refer Fig. 16). An arrival platform attendant should always check for the correct reset position of the Brake Trolley and the zipSTOP Braking Line at the completion of each run, prior to a subsequent run. If the Brake Trolley fails to reset, check that the zipSTOP Brake Unit is operating correctly and the Reduction Line is not tangled, snagging, or binding. zipSTOP Brake Unit fully retracted Always use the manual supplied with zipSTOP brake Kit when installing, operating or maintaining ZIPSTOP components www.thezipshop.com 41 9 TROUBLESHOOTING If problems occur during operation, check the troubleshooting guide. If a problem cannot be resolved, remove components from service and contact your zipSTOP Service Center. 9.1 Troubleshooting Guide Rider does not fully stop before reaching end of Arrest Zone Possible Cause Rectification Action Brake Trolley not correctly set at start of Arrest Zone. Check brake trolley reset, manually position trolley at start of Arrest Zone. zipSTOP braking initiates too late. Inspect and test zipSTOP Brake Unit for correct operation. Adjust Arrest Zone start point (Brake Trolley Reset Point) to be farther from the dismount area. Riders of all sizes brake too abruptly Possible Cause Rectification Action Incorrect Reduction Ratio. Change Reduction Ratio to increase braking distance. Reduction Line is binding, tangled or snagged. Inspect Reduction Line, remove any obstacles and check for smooth operation. Excessive friction in redirection pulleys. Inspect all Reduction Line pulleys for damage and smooth operation. Excessive friction in Brake Trolley. Inspect Brake Trolley for damage and smooth operation. Debris or foreign objects in brake trolley or pulleys. Inspect Brake Trolley and pulleys. Remove any foreign objects. Light weight riders brake too abruptly Possible Cause Rectification Action Incorrect Reduction Ratio. Change Reduction Ratio to increase braking distance. Increase the weight capacity of light weight riders. Brake Trolley does not reset correctly* Possible Cause Rectification Action Reduction Line is binding, tangled or snagged. Inspect Reduction Line, remove any obstacles and check for smooth operation. Excessive friction in redirection pulleys. Inspect all Reduction Line pulleys for damage and smooth operation. Excessive friction in Brake Trolley. Inspect Brake Trolley for damage and smooth operation. Debris or foreign objects in Brake Trolley or pulleys. Inspect Brake Trolley and pulleys. Remove any foreign objects. Insufficient return force in zipSTOP Brake Unit. Pull out zipSTOP Braking Line and check line operates smoothly and has good return force. Check for unusual noises. Reset by hand, or change Reduction Ratio. Braking Line or Reduction Line frozen. Install a clean, dry zipSTOP Braking Line assembly to Brake Unit,and/or Reduction Line. * If all above checked and line still does not reset correctly, disconnect line and test retraction force. If the line will not retract properly, return the Brake Unit to a licensed Service Center for maintenance. Always use the manual supplied with zipSTOP brake Kit when installing, operating or maintaining ZIPSTOP components www.thezipshop.com 42 10 RECERTIFICATION AND MAINTENANCE 10.1 General Complete inspection and servicing of the zipSTOP unit, Brake Trolley, and associated pulleys and lines in accordance with the Service Schedule. Service actions are detailed in their relevant sections. 10.1.1 Service Schedule zipSTOP Brake Unit Scheduled Service Actions Daily Weekly 6 Month 12 Month Inspect zipSTOP Brake Unit overall condition ■ ■ ■ ■ Check zipSTOP Brake Unit operation ■ ■ ■ ■ Inspection of Nozzle and Braking Line ■ ■ ■ ■ ■ ■ ■ ■ ■ Inspection of zipSTOP Brake Unit casing Inspection of Internal Drum Lead and the Shackle Annual Recertification ■ Brake Trolley and Reduction Line Scheduled Service Actions Daily Weekly 6 Month 12 Month Inspect Brake Trolley Condition and operation ■ ■ ■ ■ Inspect Reduction Line and Redirection Pulleys ■ ■ ■ ■ 10.2 Daily Inspections The zipSTOP Brake Unit and Braking Line, Brake Trolley, Reduction Line and associated pulleys must be inspected on a daily basis for condition and correct operation. Carry out the following inspections on a daily basis: 1. Visually inspect the zipSTOP Brake Unit for damage, corrosion, and loose fittings and fasteners. 2. Inspect the zipSTOP Brake Unit mounting bracket and pins for damage and ensure that it remains secured correctly. 3. Fully extend the Braking Line from the zipSTOP Brake Unit. Check the line condition for damage or discoloration. If worn or damaged, replace with a new Braking Line assembly. 4. Check that the Braking Line extension and retraction is smooth and maintains good resistance to extension throughout its range. 5. Inspect the zipSTOP Brake Trolley for damage, wear, and loose fittings and fasteners. 6. Check the Brake Trolley Bump Stops are secure and free from damage or wear. 7. Check the Brake Trolley operates smoothly throughout its operating range and that it correctly resets to the start of the Arrest Zone. Always use the manual supplied with zipSTOP brake Kit when installing, operating or maintaining ZIPSTOP components www.thezipshop.com 43 8. Inspect the Reduction Line and pulleys for freedom of movement. Inspect overall condition of line, and ensure it is in a safe and serviceable condition. Replace if necessary. 9. Check that all Reduction Line knots and terminations are secure. Check that all Quick Links and Carabiner Gates are locked and secure. 10. Inspect all Redirection pulleys are secure and ensure they are free from damage. Check that pulley wheels operate smoothly and without excessive play. 11. Check that the Reduction Line operation is smooth and line is free from wear, damage, tangles and snagging from foreign objects. 10.3 Spare Parts & Accessories The zipSTOP Brake Assembly is fitted with a number of user-replaceable parts that may be refitted without returning the device to an authorized zipSTOP service center. Always follow the manufacturer’s instructions as detailed in the Operation Manual and any Part Replacement Guide supplied when undertaking replacement of a part. Note – For optimal performance of your zipSTOP Brake Assembly, only use genuine zipSTOP spare parts and accessories. When ordering replacement parts, please specify the part number and description of the part. To order replacement parts or accessories contact your authorized zipSTOP distributor, or go online to www.thezipshop.com zipSTOP Spare Parts: Description Part # Qty Braking Line Replacement Kit 5101-000 1 zipSTOP Nozzle Replacement Kit 5102-000 1 zipSTOP Mounting Bush 5104-000 2 zipSTOP Bump Stop 5108-000 2 zipSTOP Side Cover 5103-000 2 zipSTOP Brake Trolley ½” (12.7 mm) ZT125-17-1/2 zipSTOP Brake Trolley ¾” (19 mm) ZT125-17-3/4 zipSTOP Box and Packing Kit 5105-000 1 Always use the manual supplied with zipSTOP brake Kit when installing, operating or maintaining ZIPSTOP components www.thezipshop.com 44 10.4 10.4.1 Unscheduled Service Procedures zipSTOP Brake Unit Side Cover replacement The zipSTOP Brake Unit side covers are removable and simply clip into place on the supporting casing. Remove side covers by placing a flat bladed screwdriver under the edge of the cover and carefully levering it up. Do not operate the zipSTOP Brake Unit with covers removed The zipSTOP contains moving parts and must not be operated with covers removed. Keep fingers clear at all times. 10.4.2 zipSTOP Brake Unit Nozzle replacement The zipSTOP Brake Unit Nozzle is located on the zipSTOP Brake Unit casing and provides guidance for the Braking Line when extending and retracting. The Nozzle is a wear part and will need to be inspected regularly. Replacement is on a conditional basis. 10.4.3 Removing Nozzle assembly To remove the Nozzle assembly: 1. Replacement of the Nozzle assembly may be carried out with the zipSTOP in place if safe secure access is available. 2. If the zipSTOP Brake Unit is to be removed from its mounting refer to Section 7.6 – Fitting zipSTOP Brake Unit. 3. If necessary secure the Brake Unit to prevent damage to side covers. 4. Hold Braking Line secure to prevent it retracing into the Brake Unit when the Nozzle is removed. 5. Extract the Nozzle Pin 6. Holding on to the Braking Line to prevent it retracting, lift out the two half sections of the Nozzle. Nozzle Assembly Remove Pin Always use the manual supplied with zipSTOP brake Kit when installing, operating or maintaining ZIPSTOP components www.thezipshop.com 45 Lift out top half Lift out bottom half 7. Inspect the Nozzle assembly for: 10.4.4 Splitting, cracking and deformation around slot and mounting flanges. Correct fitment in housing. To refit the Nozzle Assembly: Ensure that the Braking Line feeds squarely and without twists when retracting back into the brake unit. Failure to do so may result in equipment failure, serious injury, or death to participants Fit bottom half Fit top half Insert Pin Finished Nozzle Assembly 8. Refit the lower half of the Nozzle assembly into the recess on the casing. 9. Fit the upper half of the Nozzle assembly. Always use the manual supplied with zipSTOP brake Kit when installing, operating or maintaining ZIPSTOP components www.thezipshop.com 46 10. Remove Braking Line pin and allow the Braking Line to slowly rewind into the casing until fully retracted, ensuring the Braking Line is not twisted and lays flat. 11. Check zipSTOP for correct operation. 12. Return zipSTOP Brake Unit to service. 10.4.5 Braking Line Inspection Braking Line must be replaced immediately if it is worn or damaged or at 12 month intervals, whichever comes sooner. Failure to do so may result in equipment failure, serious injury or death to participants The Braking Line is the 12.5 m (41 ft) line that extends during the zipSTOP activation. The inside end of the Braking Line attaches to the zipSTOP Brake Unit via a Shackle Link to assist with ease of replacement. The Braking Line must be fully extended in order to complete Daily Inspection. To inspect the Braking Line: 1. With zipSTOP Brake Unit securely mounted, pull out the full extent of Braking Line. 2. Inspect the Braking Line by passing it slowly through your hands under a good light. Inspect the Braking Line for: Damage to stitching (cuts or abrasion). Cuts to Braking Line, especially to edges. Abrasion across the surface of the Braking Line, wear and fraying, especially to the edges and the Braking Line loops. UV degradation – although difficult to detect, visual indications are discoloration, fading and chalking of the Braking Line surface. Chemical attack, this can result in soft or weak fibers, color change or flaking of the surface. Heat or friction damage, indicated by hard fibers or glazing of the surface. Contamination from dirt, grit, sand or rust. Twisting, knotting or permanent deformation of Braking Line . 3. Slowly retract the Braking Line into the casing, checking the action is smooth and adequate spring resistance is felt. 4. Once line is fully retracted, pull out line a short distance using reasonable force and allow it to retract. Repeat two to three times to ensure line is firmly wound onto the drum. 5. Return zipSTOP Brake Unit to service and check for correct operation. Always use the manual supplied with zipSTOP brake Kit when installing, operating or maintaining ZIPSTOP components www.thezipshop.com 47 10.5 Braking Line Replacement If Braking Line shows signs of wear, damage or contamination then it will need to be replaced. Replace Braking Line as follows: 10.5.1 Safety Precautions Ensure that the Braking Line feeds squarely and without twists when retracting back into the brake unit. Failure to do so may result in equipment failure, serious injury, or death to participants Do not allow Braking Line or drum lead to retract into housing With Nozzle removed, take care not to permit uncontrolled retraction of Drum Lead or Braking Line into casing. Uncontrolled retraction will result in internal damage and require repair by the manufacturer. Use only genuine zipSTOP replacement parts 10.5.2 Braking Line Replacement Procedure To replace the Braking Line: 1. Remove the zipSTOP Brake Unit from service and place securely on the work bench. 2. Remove the Nozzle assembly – Refer to Section 10.4.3 ‘Remove Nozzle Assembly.’ 3. While holding zipSTOP Brake Unit securely, pull out the Braking Line until the end of the Drum Lead and the Shackle Link are exposed. 4. Locate the loop in the Drum Lead, approx. 150 mm (6 in) past the Shackle Link - Place a suitable Holding Pin through the loop in the Drum Lead to prevent it retracting back inside the casing. Braking Line Shackle Link Assembly parts 5. Unscrew the Shackle Pin. 6. Remove Braking Line and complete Shackle Link assembly from the Drum Lead. 7. Fit new Shackle Link supplied with the Braking Line – Ensure the loop part of the Link is fitted to the Drum Lead. Always use the manual supplied with zipSTOP brake Kit when installing, operating or maintaining ZIPSTOP components www.thezipshop.com 48 Ensure the factory applied thread locking compound is present on the Shackle Link Pin threads. 8. Fit the new Braking Line, passing the threaded Shackle Pin through the loop as shown. Correct shackle fitment 6. Tighten the Shackle Pin to 2 Nm (18 lb-in), ensuring the threads are fully engaged and the end of the pin is flush with the Shackle Link as shown. 7. Remove the Holding Pin and allow the new line to slowly retract until Drum Lead and Shackle Link are inside casing Ensure that the Braking Line feeds squarely and without twists when retracting back into the brake unit. Failure to do so may result in equipment failure, serious injury or death to participants 8. Refit Nozzle assembly – Refer ‘Refit Nozzle Assembly’. 9. Slowly retract the Braking Line into the casing, checking the action is smooth and adequate spring resistance is felt. 10. Once line is fully retracted, pull out line a short distance using reasonable force and allow it to retract. Repeat two to three times to ensure line is firmly wound onto the drum. 11. Return zipSTOP Brake Unit to service and check for correct operation. Always use the manual supplied with zipSTOP brake Kit when installing, operating or maintaining ZIPSTOP components www.thezipshop.com 49 10.5.3 Brake Trolley Bump Stop Replacement The Bump Stops may wear over time and should be replaced if they show signs of wear, cracking or splitting, hardening or deformation. The Brake Trolley Bump Stops may be replaced with the trolley in-situ on the zip line. To replace the bump stops: Remove the two self-locking nuts and washers securing the bump stop to the Brake Trolley. Fit new bump stops and secure with washers and new self-locking nuts. Torque to 10 Nm (7 ft-lb) Always use the manual supplied with zipSTOP brake Kit when installing, operating or maintaining ZIPSTOP components www.thezipshop.com 50 11 BRAKING DISTANCE CHARTS CAUTION Always complete unmanned testing is to determine actual braking distances and points of dismount. Calculated braking distances shown on charts are for guidance use only. Actual braking distances will vary due to site conditions, weather conditions and final configuration of zip line set-up Braking distances shown on charts refer to installations where zipSTOP Braking Line is fully retracted when Brake Trolley is positioned at the start of the Arrest Zone (Reset Position). If zipSTOP Braking Line is not fully retracted, or if static line extension is present when Brake Trolley is reset, then actual braking distance will be different to that that shown on the chart. Braking distances that fall below the ‘BDmin’ line will result in high level of braking force being felt by the rider, and may cause severe swinging up of the rider’s body during braking. The Braking Line must be fully retracted into the zipSTOP at the point of Brake initiation for the data in the following Braking Distance Charts to apply. Serious injury, death, or damage to equipment can occur if Brake initiation occurs without a fully retracted Braking Line. Always use the manual supplied with zipSTOP brake Kit when installing, operating or maintaining ZIPSTOP components www.thezipshop.com 51 The Braking Line must be fully retracted into the zipSTOP at the point of Brake initiation for the data in the following Braking Distance Charts to apply. Serious injury, death, or damage to equipment can occur if Brake initiation occurs without a fully retracted Braking Line. 11.1 How to read braking distance charts Always use the manual supplied with zipSTOP brake Kit when installing, operating or maintaining ZIPSTOP components www.thezipshop.com 52 How to read Braking Distance Charts The Braking Line must be fully retracted into the zipSTOP at the point of Brake initiation for the data in the following Braking Distance Chart to apply. Serious injury, death, or damage to equipment can occur if Brake initiation occurs without a fully retracted Braking Line. 1:1 Ratio – Metric BRAKING DISTANCE 1:1 Reduction Line Ratio 6.0 5.0 150 135 15 120 4.0 Braking Distance (m) 11.2 30 105 45 60 90 BDmin 75 3.0 75 90 105 60 120 135 45 150 2.0 BDmin 30 15 Rider Weight (kg) 1.0 0.0 0 10 20 30 Arrival Speed (kph) Always use the manual supplied with zipSTOP brake Kit when installing, operating or maintaining ZIPSTOP components www.thezipshop.com 53 The Braking Line must be fully retracted into the zipSTOP at the point of Brake initiation for the data in the following Braking Distance Chart to apply. Serious injury, death, or damage to equipment can occur if Brake initiation occurs without a fully retracted Braking Line. 2:1 Ratio – Metric BRAKING DISTANCE 2:1 Reduction Line Ratio 20 18 150 135 16 120 105 14 90 Braking Distance (m) 11.3 12 15 30 75 45 10 60 60 75 8 45 BDmin 6 30 4 15 90 105 120 135 150 BDmin Rider Weight (kg) 2 0 0 10 20 30 40 50 60 Arrival Speed (kph) Always use the manual supplied with zipSTOP brake Kit when installing, operating or maintaining ZIPSTOP components www.thezipshop.com 54 The Braking Line must be fully retracted into the zipSTOP at the point of Brake initiation for the data in the following Braking Distance Chart to apply. Serious injury, death, or damage to equipment can occur if Brake initiation occurs without a fully retracted Braking Line. 1:1 Ratio – Imperial BRAKING DISTANCE 1:1 Reduction Line Ratio 20 330 15 297 264 Braking Distance (ft) 11.4 33 231 66 99 198 10 132 165 BDmin 165 198 132 231 99 264 297 66 330 5 BDmin 33 Rider Weight (lbs) 0 0 9 18 Arrival Speed (mph) Always use the manual supplied with zipSTOP brake Kit when installing, operating or maintaining ZIPSTOP components www.thezipshop.com 55 The Braking Line must be fully retracted into the zipSTOP at the point of Brake initiation for the data in the following Braking Distance Chart to apply. Serious injury, death, or damage to equipment can occur if Brake initiation occurs without a fully retracted Braking Line. 2:1 Ratio – Imperial BRAKING DISTANCE 2:1 Reduction Line Ratio 60 330 297 50 264 231 33 198 40 Braking Distance (ft) 11.5 66 165 99 132 165 132 30 198 231 99 264 BDmin 20 297 330 66 BDmin 33 10 Rider Weight (lbs) 0 0 9 18 27 36 Arrival Speed (mph) Always use the manual supplied with zipSTOP brake Kit when installing, operating or maintaining ZIPSTOP components www.thezipshop.com 56