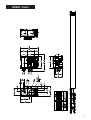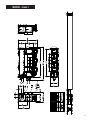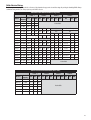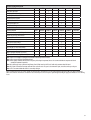
1
sm
Water Cooled
Flooded Chiller
Install and Operation Manual
R-410A and R-134a refrigerant
For Modules:
MS0060F, MS0075F, MS0090F, MS0120F, MS0150F, MS0180F, MS0210F, MS0240F, MS0270F,
MS0300F, MS0330F, MS0360F, MS0390F, MS0420F, MS0450F, MS0500F, MS0550F, MS0600F
Table of Contents
Model Nomenclature....................................................................... 4
Unit Nameplates.............................................................................. 5
Installation Overview....................................................................... 5
Shipping Summary.......................................................................... 5
Receiving......................................................................................... 5
Rigging............................................................................................ 5
Clearance Requirements.................................................................. 5
Mounting Requirements.................................................................. 5
Vibration Isolation............................................................................ 6
Piping Considerations...................................................................... 6
Evaporator Piping......................................................................... 6
Condenser Piping......................................................................... 6
Flow Protection................................................................................ 7
Water Quality and Treatment........................................................... 7
Chiller Application Guidelines.......................................................... 8
Table 1: Chiller Operational Limits.................................................... 8
Table 2: Permissible Entering Condenser Water Temperatures.......... 9
Chiller Dimensional Data................................................................ 10
One Compressor Chiller Reference Drawing.................................... 10
Two Compressor Chiller Reference Drawing................................... 11
Three Compressor Chiller Reference Drawing................................. 15
Four Compressor Chiller Reference Drawing................................... 17
Evaporator Flow Charts.................................................................. 18
Condenser Flow Charts................................................................... 20
Pressure Relief Piping..................................................................... 21
Electrical Data................................................................................ 22
460 Volt Flooded Chiller Model Data (Long Shells)......................... 23
460 Volt Flooded Chiller Model Data (Short Shells)........................ 23
575 Volt Flooded Chiller Model Data (Long Shells)......................... 24
575 Volt Flooded Chiller Model Data (Short Shells)........................ 24
Chiller Control System.................................................................... 27
FlexSys Default Field Connection and I/O Summary...................... 28
Unit Operation............................................................................... 30
Component Overview.................................................................... 30
Compressor................................................................................ 30
Evaporator.................................................................................. 30
Condenser.................................................................................. 30
Refrigerant Metering Devices..................................................... 31
Chiller Controls........................................................................... 31
Sequence of Operation for FlexSys Chiller Controller:..................... 31
Chiller Control Screens:.................................................................. 34
Home Screen.............................................................................. 34
Main Navigation Menu............................................................... 35
Trend Graphs.............................................................................. 35
I/O Overview.............................................................................. 36
Event Log................................................................................... 36
Manuals..................................................................................... 37
DTC Software.............................................................................. 37
Building Automation Interfaces................................................. 37
Maintenance Tasks......................................................................... 38
Appendix A: Assembly of Knocked Down Chiller............................ 40
Appendix B: Generator Operators Sequence................................... 41
Appendix C: List of Acronyms......................................................... 41
Legal Disclaimer............................................................................. 42
3
Water Cooled Flooded
Existing
MS300
F
New
MS 0300
1
F
L
C/N
2
1
W
L
2
H
2
1
W
R134a
2
H
1
A
A
1
1
-134a
Refrigerant
Condenser (entering)4
Evaporator (entering)3
Condenser Tube Type2
Evaporator tube type1
Version number of AHRI Certification
Voltage (H - 460/3/60, C for 575/3/60, E for 400/3/50)
Number of condenser water passes
Condenser Type (W for water cooled, R - remote air cooled, E - remote evap cooled)
Number of evaporator water passes
Shell Length (S - 6 foot, L - 12 foot)
Frame Style (1,2,3 or 4)
AHRI Certified (C - certified, N - Not certified)
Evaporator Type (F for Flooded)
Module Nominal Capacity (up to 4 digits)
Series
A - B4 copper, B- B4 Cu-Ni, C - B5 copper, D - C5 Cu-Ni, V - other
A - C4 copper, B- C4 Cu-Ni, C - C5 copper, D - C5 Cu-Ni, V - other
3
1- Standard water box left, 2 - Standard water box right, 3 - Marine water box left, 4 - Marine water box right
4
1- Standard water box left, 2 - Standard water box right, 3 - Marine water box left, 4 - Marine water box right
1
2
4
Unit Nameplates
On all Multistack MagLev Centrifugal Chillers, there are four nameplates: Evaporator, Condenser, Compressor and Unit.
Unit Nameplate
This nameplate is located on the right side of the FlexSys Control Panel. This nameplate provides the unit’s model and serial number, rated capacity, unit electrical
rating information, compressor type with electrical ratings, and total factory refrigerant charge.
Evaporator Nameplate
This nameplate is welded to the side of the evaporator and can be found on the opposite side of the main control panel. This nameplate contains the model and
serial of the heat exchanger, testing pressures, weights, and stamps of certification.
Condenser Nameplate
This nameplate is welded to the side of the condenser and can be found on the opposite side of the main control panel. This nameplate contains the model and
serial of the heat exchanger, testing pressures, weights, and stamps of certification.
Compressor Nameplate
This nameplate is riveted to the compressor and can be found under the bell cover.
Installation Overview
The following section of the IOM will provide detailed information on the proper receiving, handling, rigging, and site installation requirements for a MagLev
Centrifugal Chiller. All requirements must be followed to ensure that your MagLev Centrifugal Chiller will perform properly. Failure to follow these instructions can
significantly impact the chiller’s performance and reliability. In some cases, failure to follow the policies and procedures outlined in this document could have an
adverse affect on the equipment warranty.
Shipping Summary
All Multistack® MagLev™ Centrifugal Chillers are factory run tested prior to shipment to confirm proper operation of the equipment. The chiller will ship per the
shipping instructions located in Section 7 of the Chiller Submittal Verification Form in the job specific submittal. Shipping is set up by the Multistack expediter and
shipping department based on the information located in this form.
If the chiller is shipped complete, the machine will ship with the refrigerant charge in the chiller; if the chiller is shipped knocked down, the refrigerant will ship in
loose 125 lb. refrigerant cylinders.
Receiving
Upon receipt of your MagLev Centrifugal Chiller, please inspect the chiller for any visible signs of damage. If there is any appearance of damage, please contact
Multistack Immediately at (608)-366-2400. Any freight damage must be reported within 48 hours of receipt of equipment to Multistack.
Rigging
MagLev Centrifugal Chillers are available with an optional lifting frame which helps in moving the chiller. The lifting frame provides a single point of access for
moving the equipment. The lifting frame can remain if a chiller frame is required. When the lifting frame is not used, care must be exercised when moving the
chiller. Only properly trained and skilled rigging personnel should attempt to move this equipment. Please contact Multistack for additional information on lifting
frames.
On each heat exchanger, rigging eyes are provided at the top of the tube sheets plates. Lifting hooks can be attached on each of the four corners of the unit here.
Once the lifting hooks are attached, the hooks must be run to a lifting bar. Using a lifting bar to lift the chiller is required to prevent damage to the heat exchangers,
control panels, refrigerant piping, and compressors. The lifting bar should be equal in length to the distance between the tube sheet plates. The weight rating of the
lifting components including: the lifting bar, hooks, cables, and clevises should be 1.5 times greater than the shipping weight of the unit.
Clearance Requirements
Minimum Clearances- The unit must maintain a minimum of 36” clearance on all sides, including overhead height.
Recommended Clearances- Multistack recommends a minimum clearance of 42” around all sides, including overhead height. Consideration should be given to
allow for tube replacement if required on at least one side.
Electrical Clearances- The NEC, local, or regional building codes could require more clearance than listed above. Please consult your local governing agency to
ensure additional clearances are not required.
Mounting Requirements
The chiller must be mounted on a level concrete or steel base which provides adequate service clearance as listed above. Whether the mounting base is concrete or
steel, ensure that it has an adequate rating to support the full operating weight of the complete chiller unit. Multistack provides bolt holes on the mounting feet
of the heat exchangers. If it is decided to bolt the chiller to the concrete pad, Multistack recommends using these holes to do so. When the chiller ships with the
optional steel lifting frame from the factory, the chiller is bolted to the steel frame.
5
Vibration Isolation
Thanks to MagLev compressor technology, MagLev Centrifugal Chillers have virtually no vibration. Therefore, Multistack recommends the use of neoprene style
vibration pads underneath the mounting feet of each heat exchanger. Please see the picture below.
The pads can be obtained through United Refrigeration. The United Refrigeration part number for these pads is: SUPERWPAD. The pads come in 18” X 18” X ¾”
squares. These pads can be easily cut to match the required size for the chiller feet. The purpose of these pads is to reduce noise and vibration which could be
transmitted through rigid mounting of the chiller.
Spring isolators can be used if required. Spring isolators should be rated for 1.5 times the amount of the operating weight of the chiller. Please verify your local
building codes to ensure that additional vibration isolation is not required per seismic regulations. Precautions should be taken in the water piping with vibration
isolators for expansion, contraction, and movement. Please see the section on Piping Consideration, below.
Piping Considerations
The fluid inlet and outlet connections on the condenser must match the fitting/flange size on the barrel and cannot be reduced.
Evaporator Piping
The standard water side connections on the evaporator are mechanical groove type connectors on dished style heads. Marine box heads, flange connections, and
weld neck connections are optional. The entering chilled water connection is on the top while the leaving chilled water connection is on the bottom. Please refer to
the application specific product drawing to ensure all connection types and sizes are correct.
The evaporator on each MagLev chiller has a ½ NPT plug on the bottom of the chiller head. This plug is intended to be
replaced with a drain valve, provided in the field. The evaporator is not self draining. If a chiller is to be winterized to
prevent water freezing internally, the chiller must have the water blown out of the tubes.
The fluid inlet and outlet connections on the evaporator must match the fitting/flange size on the barrel and cannot be
reduced. Piping to and from the point of connections on the heat exchanger should be done to be sure the weight and
strain of the piping and accessories is removed from the heat exchanger.
A #20 mesh type strainer is required to be installed on the inlet of the evaporator barrel. This strainer should be cleaned
often enough to ensure proper fluid flow and prevent heat exchanger fouling.
The installing contractor must provide adequate evaporator valving to ensure that the heat exchangers can be isolated
and drained for service or maintenance.
The use of a flexible-type piping connector is recommended to reduce the sound transmitted into the pipe. In doing this, it also allows for expansion and
contraction in the piping.
All chilled water piping up to the point of connection on the evaporator should be properly insulated. Be sure to install the insulated covers over the lifting eyelets,
once chiller is set into place.
!
WARNING- If welding on the points of connection of the chiller, proper grounding of the unit must be followed or damage can occur to the compressors
or chiller control. Never attempt to directly weld to the heat exchanger shells or the ASME certification will become void. Only a properly authorized ASME
certified repair agency can weld on the shells. After this process, an “R” stamp would be required.
Condenser Piping
The standard water side connections on the condenser are mechanical groove-type
connectors on dished-style heads. Marine box heads, flange connections, and weld
neck connections are optional. The entering condenser water connection is on the
bottom while the leaving condenser water connection is on the top. Please refer to the
application specific product drawing to ensure all connection types and sizes
are correct.
Cont’d on next page…
6
The condenser on each MagLev chiller has a ½ NPT plug on the bottom of the chiller head. This plug is intended
to be field replaced with a drain valve, provided in the field. The condenser is not self draining. If a chiller is to be
winterized to prevent water freezing internally, the chiller must have the water blown out of the tubes.
The fluid inlet and outlet connections on the condenser must match the fitting/flange size on the barrel and cannot
be reduced. Piping to and from the point of connections on the heat exchanger should be done to be sure the
weight and strain of the piping and accessories is removed from the heat exchanger.
A #20 mesh type strainer is required to be installed on the inlet of the condenser barrel. This strainer should be
cleaned often enough to ensure proper fluid flow and prevent heat exchanger fouling.
The installing contractor must provide adequate evaporator valving to ensure that the heat exchangers can be
isolated and drained for service or maintenance.
The use of a flexible-type piping connector is recommended to reduce the sound transmitted into the pipe. In doing
this, it also allows for expansion and contraction in the piping.
!
WARNING- If welding on the points of connection of the chiller, proper grounding of the unit must be
followed or damage can occur to the compressors or chiller control. Never attempt to directly weld to the
heat exchanger shells or the ASME certification will become void. Only a properly authorized ASME certified
repair agency can weld on the shells. After this process, an “R” stamp would be required.
Note: Water side connections should never be reduced from the heat exchanger points of connection.
Doing so will create a higher localized velocity which can damage the tube sheets. If a reduction in water
connections is required, this should be done 5 to 10 pipe diameters from the point of connection to allow
any turbulence to stabilize before it enters the machine.
Flow Protection
All MagLev Centrifugal Chillers come with factory mounted and wired differential pressure transmitters for flow protection. Differential pressure transmitters allow
the FlexSys control system to provide accurate, reliable feedback for proof of flow on both the evaporator and condenser. This feature allows MagLev Centrifugal
Chillers the ability to provide low ∆P alarms, low ∆P faults, high ∆P alarms, and high ∆P faults. This ensures that the heat exchangers are protected against low flow
or too much flow.
!
CAUTION- The differential pressure transmitters are factory calibrated. Do not attempt to adjust the calibration of these transmitters in the field. Damage can
occur to the transmitters if the calibration is altered or if the transmitters are not properly bleed before powering up. Please reference the MagLev Centrifugal
Service Manual for proper air bleeding procedure.
Water Quality and Treatment
Water quality and how it affects heat exchangers in refrigeration components is a complicated issue. Multistack recommends that technicians work
with a water treatment professional that is familiar with the Langelier and Ryznar indexes. These indexes take into account the variables that affect
water quality and are used to help determine if the water will tend to be scale forming, neutral, or corrosive. Through extensive research, Multistack
has determined the following values to be acceptable for our shell and tube heat exchangers:
•pH- greater than 7, less than 9
•Total Dissolved Solids (TDS)- less than 2000 parts per million
• Hardness as calcium carbonate (CaCO3)- 30-500 parts per million
•Alkalinity as calcium carbonate (CaCO3)- 30-500 parts per million
In situations where the condenser water loop is open, contaminants including: debris, trash, mud, algae, sand, and scale can build up in the condenser causing
restrictions, erosion, or corrosion. Multistack cannot be responsible for heat exchangers that are damaged as a result of operating chillers in untreated/poorly
treated water conditions. Multistack does not recommend the use of acid to remove scale from heat exchangers. In the event acid is used to de-scale a heat
exchanger, the heat exchanger must be properly flushed and then tested for proper pH levels before being returned to normal operation. Heat exchangers damaged
due to improper acid cleaning are not covered under warranty.
In harsh environments where lake, river, or well water is used as the cooling fluid for the condenser, special precautions should be taken as these environments
could affect the tube and head material used on the condenser. As an option Multistack offers epoxy coating of the tube sheets and heads from the factory.
7
Chiller Application Guidelines
Please refer to Table 1 below, for operating limits of the MagLev Centrifugal Chiller.
Table 1: Chiller Operational Limits
Minimum Leaving Chilled Water Temperature without Glycol ¹
Maximum Leaving Chilled Water Temperature
Maximum Entering Chilled Water Temperature while operating
Permissible Operating Range for Leaving Chilled Water
Maximum Start Up Temperature @ Evaporator Inlet
Maximum Standby Temperature @ Evaporator Inlet
Maximum Rate of Change for Water Flow During Variable Flow Applications
Minimum Entering Condenser Water Temperature ²
Maximum Entering Condenser Water Temperature non-DHRC option³
Maximum Leaving Condenser Water Temperature non-DHRC option
Maximum Compressor Starts Per Hour⁴
38°F
60°F
65°F
38°F - 60°F
90°F
100°F
10% per min.
Table 3
105°F
115°F
10
Notes:
1. For applications below 38°F leaving chilled water temperature, please contact Multistack.
2. The permissible minimum entering condenser water temperature is a directly affected by the active leaving chilled water
temperature. A differential of 12°F from leaving chilled water temperature to entering condenser water temperature is
required. MagLev Centrifugal compressors are liquid refrigerant cooled and require a minimum pressure ratio to properly
cool the compressors power electronics. Please reference Table 2 on page 8 for permissible entering condenser water
temperatures with permissible leaving chilled water temperatures.
3. For Dedicated Heat Recovery Chiller, Condenser-less, and Condensing Unit options with MagLev Chillers, please contact
Multistack.
4. Maximum number of starts per hour is based on compressor not being in a critical fault condition. Each MagLev compressor protects against critical faults by a lockout if same critical fault occurs three times in 30 minutes. Current Fault and
Discharge Pressure faults create automatic compressor lockout faults per UL guidelines.
System Water Volume
Chilled water systems work to remove the thermal gain from the process in which they are cooling. In a properly sized chilled water system, the chiller will have
enough time to properly control, respond to changes in load, and prevent short cycling of the chiller. To ensure the system water volume is adequate, a general rule
of thumb is:
Acceptable Chilled Water Volume = Chilled Water Design GPM X 3
In the event the system components can’t hold the necessary chilled water volume, a properly sized chilled water storage tank should be added.
Pumping Considerations
To avoid the possibility of harmonic noise in the chilled water piping system, 4-pole 1800/1500 RPM system pumps should be used on the chilled water and
condenser water loops.
Never exceed the maximum GPM for the evaporator or condenser as published in the job specific submittal. Exceeding the maximum GPM of the heat exchanger
can result in damage to the heat exchanger.
Never attempt to run the chiller below minimum flow as published in the job specific submittal. Failure to do so can result in laminar flow which can lead to heat
exchanger damage.
System Control Considerations
Each MagLev Centrifugal Chiller can control one chilled water pump, one condenser water pump, and one cooling tower from the FlexSys chiller control system. If
the system has multiple pumps or towers, Multistack recommends that the BAS system control the pumps and towers. Control points can be sent from the FlexSys
to the BAS via hard wired points or communications bus to help the BAS make optimized control decisions. In an application where you have multiple chillers with
multiple pumps and towers, Multistack recommends a Central Plant Controller. Currently Multistack is in the development and testing process of a new central plant
controller called OPTIX. This controller is expected to be available for a full production release late in 2010. Contact Multistack for additional details, including the
preliminary OPTIX submittal data. OPTIX is powered by Optimum Loop™ technology.
8
Condenser Water/Cooling Tower Control Considerations
Properly controlling the condenser water loop is critical in maximizing the efficiency of your MagLev Centrifugal Chiller. Through testing and analysis, a 1°F change
in entering condenser water temperature will cause a 2% change in chiller efficiency. Multistack recommends running the coldest permissible entering condenser
water temperature possible for maximum chiller efficiency at all times. Multistack also recommends that condenser water flow only be regulated in an equal
marginal performance control strategy. To determine the coldest permissible entering condenser water temperature in which the MagLev Centrifugal Chiller, please
refer to Table 2, below.
Table 2: Permissible Entering Condenser Water Temperatures
Leaving Chilled
Min Entering Condenser
Leaving Chilled
Min Entering
Water Temperature
Water Temp
Water Temperature
Condenser Water Temp
38°F
50°F
50°F
62°F
39°F
51°F
51°F
63°F
40°F
52°F
52°F
64°F
41°F
53°F
53°F
65°F
42°F
54°F
54°F
66°F
43°F
55°F
55°F
67°F
44°F
56°F
56°F
68°F
45°F
57°F
57°F
69°F
46°F
58°F
58°F
70°F
47°F
59°F
59°F
71°F
48°F
60°F
60°F
72°F
49°F
61°F
*Running cold entering condenser water on the condenser can help chiller efficiency however can create a choke condition on
the compressors which could limit chiller capacity. Please contact Multistack for application specific details.
When running the chiller in cold ambient/cold entering condenser water temperatures, a chiller controlled three-way valve is required. The FlexSys controller
has the logic to run the chiller at the lowest maximum permissible entering condenser water temperature throughout the chiller’s operating range. This logic is
also used to help the chiller start in an inverted condition. An inverted condition occurs when the chilled water temperature is higher than the condenser water
temperature, thus meaning there is no pressure differential on the chiller when it starts. Please see the illustration below for a typical piping layout of a chiller
controlled condenser three-way valve.
Generally, it is more efficient to run the cooling tower fan harder to decrease the entering condenser water temperature as the energy consumed by the cooling
tower is a fraction of what is consumed by the chiller.
Chiller Dimensional Data
The chiller dimensional drawings provided on pages 9-16 are for frame one chillers only. All MagLev centrifugal chillers default to right hand water connections on
both the evaporator and condenser. Standard water connections from Multistack are mechanically groove connection. This is illustrated in the following drawings.
For chiller drawings on frames 2, 3, and 4 or chillers with different water connections, please contact your local Multistack sales representative.
Caution: Please note that by changing to a different compressor frame style (see Multistack document # F155FUDC1109 titled MagLev Flooded Chiller
! Catalog), the overall weight of the chiller can be affected. The change in weight comes from adding or subtracting a compressor and its associated piping,
electrical, and controls. The following tables are based on Frame 1 chillers.
9
MS090FS - Frame 1
10
MS180FS - Frame 1
11
MS180FL - Frame 1
12
MS240FL - Frame 1
13
MS300FL - Frame 1
14
MS390FL - Frame 1
15
MS450FL - Frame 1
16
MS600FL - Frame 1
17
Evaporator Flow Charts
The charts contained in this section are built from a logarithmic base to facilitate a linear comparison. Please note that for lower ∆T applications, a
heat exchanger that allows for more GPM (less passes) would be recommended. For applications where a higher ∆T is required or higher water side
turn down ratios, a higher pass configuration would be recommended.
18
Note: 1,2,3 pass charts based off 10°F ∆T. 4 pass based off 12°F ∆T 19
Condenser Flow Charts
The charts contained in this section are built off a logarithmic base to facilitate a linear comparison. Please note that for lower ∆T applications, a heat exchanger
that allows for more GPM (less passes) would be recommended. For applications where a higher ∆T is required or higher water side turn down ratios, a higher pass
configuration would be recommended.
20
Note: 1 and 2 pass charts based off 10°F ∆T. 3 pass based off 12°F ∆T.
For 4 pass condensers, please contact Multistack for additional details.
Pressure Relief Piping
Relief valves are required on pressure vessels in accordance with ASME Code and ANSI/ASHRAE 15
Standards. Pressure reliefs are a safety device used to relieve the refrigerant charge from the heat
exchanger in the event of the heat exchanger becoming over pressurized. Pressure reliefs must be
piped outside in accordance with ASHRAE 15 standards for machinery room ventilation.
Both the evaporator and condenser on MagLev Centrifugal Chillers have dual pressure reliefs with a
three-way, dual shut-off relief tree. This ensures that one relief is always active to the vessel and the
connected relief piping. Please see the relief tree with reliefs installed (pictured below).
The relief valves ship with a plastic plug (above) in
them to prevent moisture accumulation that must be
removed prior to piping to prevent restriction should the valve need to fire. Failure to do so could result in the relief
not firing properly and could result in to damage to the equipment, mechanical room or people.
Each relief has a flare connection. The relief valves can be piped either individually or piped together with the use
of a common header going to one main trunk line that goes outside. Please note that the piping requirements for
each relief by itself are different than the requirements of piping both reliefs together into a common header with
trunk line. The piping should be sized in accordance with ASHRAE 15 Standards.
ASHRAE 15 Standard uses a complicated formula that takes into account the total equivalent length of the pipe
run, including fittings, valve capacity, the internal diameter of the pipe, Moody friction factor, outlet pressure,
and the back pressure exerted on the relief. These formulas can be found in the ASHRAE 15 standard. The pipe size
connected to the relief can never be smaller than the outlet size of the relief.
To determine the proper header size used for piping relief valves together in a common header the formula is:
D common = (D₁² + D₂²….Dn²) ^0.5
In addition to relief piping, ASHRAE 15 requires a refrigerant monitoring system with powered ventilation to protect the mechanical room from refrigerant leaks.
The intent here is to ensure that the machinery room is not a confined space. MagLev Centrifugal Chillers have a dedicated contact that should be interlocked with
the refrigerant monitoring system supplied by others. This relay contact is used to shut the chiller down immediately in the event the refrigerant monitoring system
senses a refrigerant leak. The default position (either normally open or normally closed) contact is determined in the I/O set up menu of the FlexSys controller.
Always consult your local building code authority to ensure that your installation meets the requirements of ASHRAE 15.
21
Electrical Data
Overview
Field wiring should be done in accordance with all federal, state and local regulations. Breakers, fuses, wire, and wire size must be sized and installed per the
National Electric Code (NEC). Applied voltage to all MagLev Centrifugal chillers must be ± 10% of the unit’s nameplate voltage. The voltage imbalance between
phases must not exceed 2%. According to NEMA Standard MG-1-1998, a 2% voltage imbalance will cause a current imbalance of 6 to 10 times the voltage
imbalance. It is very important to keep the unbalance between electrical phases to a minimum.
Field Connection
All MagLev Centrifugal Chillers come standard with a single point of connection up to 800 amps. Above 800 amps, the machine will have dual points of electrical
connection. This feature simplifies the electrical install. Please note that all breakers use a through the door switching assembly for safety when energizing or
de-energizing the electrical load. It is intended that the main electrical conduit feeding the main chiller breaker be fed from the top, bottom, or left side of the
panel when looking at the panel. Please note that there is a dedicated chiller ground in this panel. This ground must reference a true earth ground. See the next
section of the IOM entitled “Grounding” for additional details on proper grounding techniques. Never use aluminum wire with a MagLev Centrifugal Chiller. All
fuses should be Littlefuse Type T rated at 600 VAC.
WARNING- Only qualified and licensed electricians should perform the wiring of MagLev Centrifugal Chillers. Severe injury or death
can result if the chiller is not properly wired due to a large electrical shock hazard. Please ensure only qualified technicians perform
this work with the proper personal protection equipment.
All control power is self contained on the chiller. A step down transformer located under the touch screen panel is fed from the high
voltage bus bar assembly. This provides the required 110 VAC and 24 VAC control power to the chiller. A dedicated control breaker is
provided on the left side of the transformer.
Grounding
Variable speed equipment has a tendency to create EMI noise. Proper grounding is crucial for a successful installation. A separate
ground conductor that is properly sized for the chiller’s rated ampacity is required. This ground must tie into the main chiller
ground in the main chiller breaker panel on one end and terminate with a ground that is a true reference to earth on the other.
All other grounds on the chiller are linked and designed
to travel back to this main ground. All electrical panels are
bonded together as well. Please note that electrical noise
cannot be destroyed. It can only be redirected from one path
to another.
VFD Harmonics
MagLev Centrifugal Chillers are composed of variable
speed compressors that use Silicon Controlled Rectifiers and Insulated Gate Bi-Polar Transistor
technology. Therefore, the load may not be considered linear. Multistack provides a 5%
line reactor with each MagLev compressor standard. The line reactor acts as an input buffer
between the motor drive power circuits and the AC line power. Line reactors add additional
circuit impedance that improves power factor, reduces line current harmonics, and dampens
the transient voltages on the incoming power line thereby helping to protect the motor drive
components.
Harmonic, EMI, and RFI Filtration
In today’s variable speed world, these three terms seem to get interchanged and confused easily. Harmonic filtration is associated with AC drives. Harmonic
filtration is used to dampen voltage and current harmonics created by the flattening of the sine wave by Variable Speed Drives.
EMI filtration is associated with the compressor line reactors ability to suppress any Electro Magnetic Interference created by the variable speed drive. EMI is an
unwanted high frequency that rides on the AC sine wave. Generally speaking, when EMI is present, items including communications disturbances on control
systems, computer system failures including a loss of transmitted data, disruption to radar or sonar systems, lighting ballasts will dim or flicker, or poor reception
on television or radio equipment can occur.
RFI filtration is used to suppress Radiant Frequency Interference. RFI filtration is a factory installed option. RFI filtration is a combination of inductive and
capacitance loads that work together to reduce noise in frequencies between 150 kHz thru 30 MHz frequency range.
In certain instances, specifications may call for the chiller to be IEE 519 compliant. To comply with IEE519 standards, additional equipment may be required. This
equipment can include: external harmonic filters, higher impedance line reactors, EMI filters, and RFI filters. With the exception of the harmonic filter, these are
all factory installed options. These items may be required for the MagLev Centrifugal Chiller to be IEE 5109 compliant. Please contact Multistack for additional
information on these options and IEE 519 compliance.
22
Chiller Electrical Ratings
The following electrical ratings are provided as a reference to help determine the proper wire size and fuse ratings for your MagLev Centrifugal Chiller. Always
confirm that wiring and fuses are sized per your site specific chiller selection.
460 Volt Flooded Chiller Model Data (Long Shells)
Frame 1
Model #
MS060FL
MS075FL
MS090FL
MS120FL
MS150FL
MS180FL
MS210FL
MS240FL
MS270FL
MS300FL
MS330FL
MS360FL
MS390FL
MS420FL
MS450FL
MS500FL
MS550FL
MS600FL
Nominal
Capacity
60 TONS
75 TONS
90 TONS
120 TONS
150 TONS
180 TONS
210 TONS
240 TONS
270 TONS
300 TONS
330 TONS
360 TONS
390 TONS
420 TONS
450 TONS
500 TONS
550 TONS
600 TONS
RLA
MCA MOP
Frame 2
RLA
MCA MOP
51.1
64 110
67.3
85 150
86.5 109 175
51.1 115 175 106.4 133 225
67.3 152 225 144.0 180 300
86.5 195 300
Contact Factory
Contact Factory
92.1 207 300
106.4 240 350
N/A
124.2 280 450 79.4 258 350
144.0 324 500 87.7 285 400
96.6 314 450
N/A
106.4 346 500 79.4 337 450
117.7 383 500 85.6 364 450
131.4 428 600 92.1 391 500
144.0 468 600 98.9 420 600
111.8 476 600 87.7 460 600
127.7 543 700 96.6 507 700
144.0 612 800 106.4 558 700
Frame 3
RLA
MCA
Frame 4
MOP
RLA
MCA
MOP
Not Available
51.1
61.5
73.7
86.5
67.3
76.9
86.5
71.0
79.0
86.5
78.1
N/A
N/A
166
200
239
281
286
327
368
373
415
454
488
225
300
350
400
400
450
500
450
500
600
600
Contact Factory
N/A
60/99
184
72/120
222
86.5/144
267
54.3/90.5
258
61/101.7
290
69/115
328
79/132
376
86.5/144
411
Contact Factory
65.7/109.5 422
79.5/132
509
300
250
450
350
400
450
600
600
600
700
Not Available
460 Volt Flooded Chiller Model Data (Short Shells)
Frame 1
Frame 2
RLA
MCA MOP RLA
MS060FS
MS075FS
MS090FS
MS120FS
MS150FS
Nominal
Capacity
60 TONS
75 TONS
90 TONS
120 TONS
150 TONS
51.1
67.3
86.5
51.1
67.3
64
85
109
115
152
110
150
175
175
225
MS180FS
180 TONS
86.5
195
300
Model #
MCA
Frame 3
MOP
RLA
MCA MOP RLA
Frame 4
MCA
MOP
Not Available
23
575 Volt Flooded Chiller Model Data (Long Shells)
Frame 1
Frame 2
Model #
Nominal
Capacity
RLA
MCA
MOP
MS060FL
MS075FL
MS090FL
MS120FL
MS150FL
MS180FL
MS210FL
MS240FL
MS270FL
MS300FL
MS330FL
MS360FL
60 TONS
75 TONS
90 TONS
120 TONS
150 TONS
180 TONS
210 TONS
240 TONS
270 TONS
300 TONS
330 TONS
360 TONS
40.9
53.8
69.2
40.9
53.8
69.2
49.2
58.9
69.2
53.8
61.5
69.2
52
68
87
92
122
156
160
192
225
229
262
295
90
110
150
150
175
225
225
300
300
300
350
400
RLA
Frame 3
MCA MOP RLA MCA MOP RLA
Frame 4
MCA MOP
Not Available
575 Volt Flooded Chiller Model Data (Short Shells)
Frame 1
Model #
MS060FS
MS075FS
MS090FS
MS120FS
MS150FS
MS180FS
Nominal
Capacity
RLA
60 TONS
75 TONS
90 TONS
120 TONS
150 TONS
180 TONS
40.9 52.0
53.8 68.0
69.2 87.0
40.9 92.0
53.8 122.0
69.2 156.0
MCA
Frame 2
MOP
RLA
Frame 3
MCA MOP RLA MCA MOP RLA
Frame 4
MCA MOP
90.0
110.0
150.0
Not Available
150.0
175.0
225.0
NOTE: RLAs listed are per compressor. For compressor combinations, see chart on page 15 of our product catalog.
24
TT-300 Electrical Drawing
The following is a typical line drawing of how a TT-300 compressor and its associated components tie into the main power distribution system on a MagLev
Centrifugal Chiller. Please note that the TT-300 compressor has built-in fast acting fuses to protect from short-circuits.
TT-350/400 Electrical Drawing
The following is a typical line drawing of how a TT-350/400 compressor and its associated components tie into the main power distribution system on a MagLev
Centrifugal Chiller. Please note that the TT-350/400 compressor does not have built-in fast acting fuses to prevent short-circuits. These fuses are required by the
compressor manufacturer. Multistack provides these fuses in each individual compressor high voltage electrical panel.
Control Power Distribution
The master control panel power for the FlexSys controller is fed off a self contained transformer. A master control breaker is mounted to the left of the transformer.
This breaker will de-energize all controls on the chiller, including the master control panel and compressor hubs.
25
High Voltage Chiller Electrical Drawing
Below is a typical electrical drawing of the high voltage power distribution of a MagLev Centrifugal Chiller. Please note that breaker, wire, and fuse sizes can change
based on capacity rating of the chiller.
26
Chiller Control System
The entire family of MagLev Centrifugal chillers uses the FlexSys touch screen industrial control system. The name FlexSys was developed by Multistack in an effort
to show the flexibility of allowing users to change control points, tag names, control logic, invert inputs or outputs, and much more all directly from the touch
screen. This is all achieved without any special software or custom codes.
The control system is broken up into two parts: Master Control Panel and Compressor Hubs. The master control panel is where all the chillers inputs and outputs
are contained. The compressor hubs are where the compressors inputs and outputs are contained. The hubs are linked to the master control panel via Etherbus
connections. This allows for all compressor communications to be isolated at the compressor and all control to be achieved via Etherbus.
When integrating the chiller control system into your central plant and BAS system, please consider the following points:
1.All Analog signals, whether an input or an output must utilize stranded, shielded, twisted pair-type wire. The shield must never be used as a conductor. The
shield must always be hooked up on one end to a control ground and left unattached on the other end. If both ends of the shield are hooked up, an antenna
for signal noise is created.
2.All Ethernet cables used must be a shielded-type. Most shielded Ethernet cables can be identified by a grey colored PVC jacket around them and have a metal
cat 5 connector on them—not plastic. The metal cat 5 connector is used to help ground the shield of the cable.
3.Field connections are attached directly to the Input/Output hardware through the use of spring captured terminals. The maximum conductor size a single
spring clamp can take is 12 AWG.
4.All digital inputs are to be dry contacts from the customer.
5.All digital outputs are rated for the following: Master Control Panel 24 VAC/DC@ 5 Amps. Compressor Hub Panel 230 VAC/ 30 VDC@ 2 AMPS
6.There are two types of analog inputs provided, self powered and differential inputs. There are four, self-powered 4-20 mA inputs used in situations where 24
VDC is applied and a current signal is returned. In addition, there are six 4-20 mA differential inputs used as feedback signals from VFD’s, BAS system etc.
7.All Analog Outputs are 0-10 VDC.
8.The temperature sensor inputs are 10K NTC Thermistor type.
The chiller comes with a standard hardware layout for I/O. A default point map is loaded into the chiller at the factory as well. The inputs and outputs can be
remapped to change their name, functionality, and the way they operate.
A default chiller I/O configuration is provided on pages 27 and 28 of this manual.
27
FlexSys Default Field Connection and I/O Summary
Tag Name
System Start / Stop
Emergency Stop
Freeze Stat
System Low Pressure
System High Pressure
Refrig Leak Detector
Spare
Spare
Comp #1 Low Pressure
Comp #1 High Pressure
Spare
Spare
Comp #2 Low Pressure
Comp #2 High Pressure
Spare
Spare
Comp #3 Low Pressure
Comp #3 High Pressure
Spare
Spare
Comp #4 Low Pressure
Comp #4 High Pressure
Spare
Spare
Chilled Water VFD Enable
Cond Water VFD Enable
Tower Fan VFD Enable
System Fault Contact
Liquid Line Valve
Spare
Spare
Panel Cooling Fans
Comp #1 Enable
Comp #1 Reactor Fan
Comp #2 Enable
Comp #2 Reactor Fan
Comp #3 Enable
Comp #3 Reactor Fan
Comp #4 Enable
Comp #4 Reactor Fan
28
I/O Type
Digital Input 1
Digital Input 2
Digital Input 3
Digital Input 4
Digital Input 5
Digital Input 6
Digital Input 7
Digital Input 8
Digital Input 9
Digital Input 10
Digital Input 11
Digital Input 12
Digital Input 13
Digital Input 14
Digital Input 15
Digital Input 16
Digital Input 17
Digital Input 18
Digital Input 19
Digital Input 20
Digital Input 21
Digital Input 22
Digital Input 23
Digital Input 24
Digital Output 1
Digital Output 2
Digital Output 3
Digital Output 4
Digital Output 5
Digital Output 6
Digital Output 7
Digital Output 8
Digital Output 9
Digital Output 10
Digital Output 11
Digital Output 12
Digital Output 13
Digital Output 14
Digital Output 15
Digital Output 16
Function
Chiller Enable/Disable from BAS System
Used to interlock chiller to e-stop switch or fire, life, safety system
Used to shutdown chiller in the event the leaving water temp is too low
Optional: Compressor Hubs manage individual pressure safeties
Optional: Compressor Hubs manage individual pressure safeties
Interlocks chiller to Refrigerant Monitoring System to shut down chiller in the event of a refrigerant leak
Customer Selectable Via FlexSys Interface
Customer Selectable Via FlexSys Interface
Individual compressor pressure safety, auto resets once pressure has increased above cut out setting
Individual compressor pressure safety, lock out mandatory, manual reset per UL
Customer Selectable Via FlexSys Interface
Customer Selectable Via FlexSys Interface
Individual compressor pressure safety, auto resets once pressure has increased above cut out setting
Individual compressor pressure safety, lock out mandatory, manual reset per UL
Customer Selectable Via FlexSys Interface
Customer Selectable Via FlexSys Interface
Individual compressor pressure safety, auto resets once pressure has increased above cut out setting
Individual compressor pressure safety, lock out mandatory, manual reset per UL
Customer Selectable Via FlexSys Interface
Customer Selectable Via FlexSys Interface
Individual compressor pressure safety, auto resets once pressure has increased above cut out setting
Individual compressor pressure safety, lock out mandatory, manual reset per UL
Customer Selectable Via FlexSys Interface
Customer Selectable Via FlexSys Interface
Used to enable chilled water VFD when chiller controls the speed drive
Used to enable condenser water VFD when chiller controls the speed drive
Used to enable tower fan VFD when chiller controls the speed drive
Used to provide indication of chiller fault to customer assigned input
Used to enable liquid line isolation valve when applicable
Customer Selectable Via FlexSys Interface
Customer Selectable Via FlexSys Interface
Used to control panel cooling fans, based off panel temperature
Independent, dedicated, digital output to enable compressor # 1
Used to control line reactor cooling fan, based off compressor rpm
Independent, dedicated, digital output to enable compressor # 2
Used to control line reactor cooling fan, based off compressor rpm
Independent, dedicated, digital output to enable compressor # 3
Used to control line reactor cooling fan, based off compressor rpm
Independent, dedicated, digital output to enable compressor # 4
Used to control line reactor cooling fan, based off compressor rpm
Tag Name
Chilled Water DP
Condenser Water DP
OSA Temperature
OSA Humidity
Level Sensor
Chilled Water Reset
Load Limit
Chilled Water Flow Meter
Spare
Spare
Chilled Water Out
Chilled Water In
Condenser Water Out
Condenser Water In
Liquid Line Temperature 1
Liquid Line Temperature 2
Spare
Panel Temperature
Chilled Water VFD
Cond Water VFD
Tower VFD
Cond 3 way Valve
Chiller Power
Chiller Capacity
Spare
Spare
I/O Type
Analog Input 1
Analog Input 2
Analog Input 3
Analog Input 4
Analog Input 5
Analog Input 6
Analog Input 7
Analog Input 8
Analog Input 9
Analog Input 10
Temperature Input 1
Temperature Input 2
Temperature Input 3
Temperature Input 4
Temperature Input 5
Temperature Input 6
Temperature Input 7
Temperature Input 8
Analog Output 1
Analog Output 2
Analog Output 3
Analog Output 4
Analog Output 5
Analog Output 6
Analog Output 7
Analog Output 8
Function
Used as a flow safety for the chiller in low flow and high flow situations
Used as a flow safety for the chiller in low flow and high flow situations
Optional: Used for reference or optional tower control
Optional: Used for reference or optional tower control
Feedback used to control electronic expansion valve/s
Customer provided input used to reset chilled water temperature
Customer provided input used to limit chiller’s capacity
Customer provided input used for chiller efficiency and capacity calculations
Customer selectable via FlexSys interface
Customer selectable via FlexSys interface
Used for measuring leaving chilled water temperature and as a safety for low leaving chilled water temp
Used for measuring entering chilled water temperature
Used for measuring leaving condenser water temperature
Used for measuring entering condenser water temperature
Used to measure liquid refrigerant temperature for subcooling calculations
Used to measure liquid refrigerant temperature for subcooling calculations
Customer selectable via FlexSys interface
Used for master control panel cooling fans
Used to control chilled water vfd when chiller controls chilled water speed drive
Used to control condenser water vfd when chiller controls condenser water speed drive
Used to control tower fan vfd when chiller controls tower fan speed drive
Used to control customer supplied 3 way valve for low ambient starts
Output to BAS system to provide chiller power
Output to BAS system to provide chiller capacity
Customer selectable via FlexSys interface
Customer selectable via FlexSys interface
Please note that the Master Controller hardware remains the same on all MagLev Centrifugal Chillers. Compressor hubs are added or removed to
match the number of compressor on the chiller.
29
Unit Operation
Introduction
MagLev Centrifugal Chillers represent the highest level of quality and performance in the oil-free centrifugal market. It is extremely important that the end user
have a thorough understanding of the system, chiller, and building controls before attempting to operate the system.
During the initial factory start-up, Multistack service personnel are available to answer any questions and offer guidance on proper operation of the MagLev
Centrifugal Chiller. Usually, start ups have time constraints which are not conducive to a proper training curriculum. It is recommended that all service and
operating personnel attend a Multistack MagLev Centrifugal Chiller training class, before the chiller is installed and started. Multistack training classes provide the
necessary training for technicians to properly care, operate and service a MagLev Centrifugal Chiller before the start up takes place. These sessions include classroom
instruction as well as hands on operating and troubleshooting exercises with operational equipment.
For information on this or any of the other Multistack training classes, please contact our service department at (608)-366-2400.
Component Overview
Compressor
The compressors used on MagLev Centrifugal Chillers are semi-hermetic, two stage, direct drive, oil-free, variable speed centrifugals manufactured by Danfoss
Turbocor Compressors Inc. The compressor is considered the heart of the refrigerant system as it is the main pump.
These compressors ARE NOT positive displacement. Centrifugal compressors operate on the principle of lift. Lift is achieved by moving refrigerant in a circular
motion. This circular motion uses centrifugal force to increase the pressure of the refrigerant by slinging the refrigerant from one impeller to the next. Through this
process, the low temperature, low pressure, superheated vapor entering the compressor goes through a change of state. As the refrigerant leaves the compressor,
the gas is now a high-temperature, high-pressure superheated vapor. The pressure contained at the compressor discharge outlet will be the highest temperature
and pressure located in the system.
Capacity control is achieved through the use of the compressors integrated variable speed drive and inlet guide vanes. The integrated variable speed drive is
liquid refrigerant cooled. Liquid refrigerant is metered through dual orifice assemblies in the compressor housing. Two solenoid valves, which are controlled by
temperature regulate the refrigerant flow to the orifices.
The rotating assembly on the MagLev compressor consists of one moving part which is the impeller of the motor. The impeller is suspended in a magnetic field
while in operation. The impeller is controlled by a five-axis digitally controlled magnetic bearing system.
Through the use of proximity sensors, the impeller shaft position is sensed and repositioned 6,000,000 times a minute. Due to the high speed nature of the
compressor, two failure safeties exist in the event of a power outage. The first fail safe is a mechanical touchdown bearing system that, in the event of an abnormal
shutdown such as a PCB failure uses an internal target sleeve to bring the rotating assembly to a safe stop. The second fail safe is a generator mode in the
compressor. In the event a power outage occurs, the compressors motor switches to generator mode. Using the kinetic energy of the rotating assembly, this energy
is pumped back into the capacitor assembly of the power electronics to allow for a safe shutdown of the compressor.
WARNING: MagLev compressors are not designed to pump liquid. Trace amounts of liquid refrigerant can be pumped without damage to the compressor. In the
event liquid slugging occurs, the compressor will become very quiet and will consume more power. In some instances, the compressors will trip on a “Front Radial
Displacement” fault. If the compressor is allowed to pump too much liquid over a given period of time, liquid refrigerant can erode the face of the impellers or damage to
the inverter can occur.
Evaporator
The evaporator on a MagLev Centrifugal Chiller is a high efficiency, horizontal, shell and tube, flooded heat exchanger. The tubes are ¾” O.D., enhanced and rifled
GEWA-B. The tubes are mechanically supported and baffled to prevent damage from vibration or sagging. The heat exchanger is equipped with a 2” sight glass at
the top of the tube bundle to view refrigerant liquid level. Water boxes can be removed for maintenance of the evaporator tubes.
The water passes through numerous, enhanced, copper tubes. Refrigerant surrounds the outside of the tube. Flooded heat exchangers are very efficient and are
historically known for low approaches while maximizing heat transfer.
Condenser
The condenser on a MagLev Centrifugal Chiller is a high efficiency, horizontal, shell and tube heat exchanger. The tubes are ¾” O.D., enhanced and rifled GEWA-C.
The tubes are mechanically supported and baffled to prevent damage from vibration or sagging. Water boxes can be removed for maintenance of the condenser
tubes.
The discharge gas from all compressors enters the top of the vessel and surrounds the tube bundle. As the cooling tower water passes through the tube bundle,
the refrigerant surrounding the tube bundle changes state from a high-temperature, high-pressure superheated vapor, to a high pressure, sub-cooled liquid. At all
times, the concept is to keep approximately 5 inches of liquid refrigerant volume in the bottom of the condenser. This ensures proper refrigerant quality and volume
to the EXVs while ensuring the refrigerant is not stacking which can decrease heat exchanger surface area leading to an increase in power consumption by the
compressors.
30
Refrigerant Metering Devices
All MagLev Centrifugal Chillers utilize electronic expansion valves for refrigerant metering between the
evaporator and condenser. On single compressor chillers, there is one EXV. For all chillers with two or more
compressors, a minimum of two EXVs are used.
The purpose of the electronic expansion valve is to decrease the pressure of the liquid refrigerant entering
the evaporator. All electronic expansion valve(s) are controlled by the FlexSys Control System. Each valve is
independently controlled by its own dedicated output.
Proper valve position is determined through the use of a high side float, located on the condenser. The
function of the high side float is to measure and feedback the current condenser refrigerant level to the
chiller controller to ensure proper sub cooling is maintained.
Chiller Controls
MagLev Centrifugal Chillers are equipped with an industrial grade CPU based controls system called FlexSys, featuring an Intel™ based processor. The control system
has a auxiliary mode that, if the windows operating system fails, the chiller still runs. All chiller and compressor I/O is controlled via Etherbus. With Etherbus, FlexSys
controls update at a rate of 50 microseconds. The FlexSys Controller features a 15-inch touch screen interface that can be disconnected and the chiller will still run.
The FlexSys Controller uses proprietary control logic to optimize loading, unloading, and control of multiple MagLev compressors. The end user is able to operate
chiller via the HMI located on chiller touch screen or via remote web connection. All system parameters including: compressor status, alarms, and faults, trend
graphing, fault logging, bas communication window, manuals, wiring diagrams, log book, and control set points are viewable. The FlexSys controller allows the
user the ability to fully commission and adjust all components on the chiller including the compressors without an auxiliary computer or software.
The chiller controller includes the following features:
•Hardware
•2 EXV Outputs
•Two Port Ethernet Switch
•2 (two) RS-45 Ports
•8 Digital Inputs
•8 Digital Outputs
•10 Analog Inputs
•8 Analog Outputs (0-10 VDC)
•8 Temperature Inputs
•1 Compressor hub per compressor including:
•Addressable Bus Coupler
•RS-485 Module
•RS-232 Module
•4 Digital Inputs
•2 Digital Outputs
Sequence of Operation for FlexSys Chiller Controller: Control Strategy
On initial power up of the controller, the HMI interface and PLC program will automatically load using Multistack Start Up. The purpose of this program is to ensure
that Windows properly loads all applicable drivers and programs before initializing the controls application. This screen remains on the desktop of the controller,
behind the interface and can be used for advanced programming.
Auxiliary devices such as chilled water pumps, condenser water pumps, cooling towers fans need to be defined before initializing control as this varies from job to
job.
These devices can be controlled by the BAS system, central plant controller, or by the FlexSys controller. The FlexSys controller can control the pumps via PID loops
internally, to maintain a fixed set point or can be set up to modulate the pumps based off the chillers flow curve in comparison to chiller demand. The second
strategy allows the user to balance pumping energy with chiller energy. Please note that FlexSys controlled chillers will not start without proper flow and will fault
or alarm if the flow is too low. The chillers will also alarm and fault if the flow gets too high.
Tower fan control can be accomplished by condenser water in temperature, compressor discharge pressure, or wet bulb control.
Prior to starting (when the chiller is off) the interface will read System Off.
The chiller will not enable until the BAS enable is energized. Once this occurs, the chiller will delay for a user defined period of time. The default value is 30 seconds.
This point is labeled as BAS de-bounce time and is located in the Edit Circuits tab.
During this delay, the chiller will check all required safeties to ensure the system is ready to start.
Cont’d on next page…
31
The required safeties are:
•Chilled Water Flow
•Condenser Water Flow
•Emergency Stop
•Freeze Stat
•C1 Low Pressure
•C1 High Pressure
•C2 Low Pressure
•C2 High Pressure
Please note that through the FlexSys drop down menus, points can be mapped for use or can remain inactive. If the point is active, it then becomes a required point
in the starting logic of the system. If it is inactive, it is ignored.
Please see the following example:
If any of the above conditions are False then the following will happen:
Chiller will go into Start Up Failed mode and a fault message populates under system summary. Based on the alarms and fault rules table, the next action will occur.
This could be to try and restart once the fault or alarm is cleared or lock out based on the fault.
If the chiller attempts to restart, a 300 second anti-recycle will occur before attempting to restart. If there are three faults in a 30 minute time span the chiller will
lock chiller out and require manual reset. If the fault is on one of the two compressors, it can still start the one compressor.
If all of these conditions are met, the chiller control will then look for the active set point. The active set point is a result of the following:
Active set point = Touch screen set point + Reset signal
Note- Reset signal can be generated via hard wired connection from BAS system, BAS network communication (Mod bus, Bac Net, or Lon), or Internal reset which is
programmed by the user.
Once the actual set point is defined and the BAS de-bounce timer has elapsed, a system demand signal will be created on the controller. Based off the system
demand, the difference between active set point and current median temperature, and the start priority of the compressors, the controller will either start one or
both to achieve set point, without creating an unnecessary delay for an additional staging sequence.
In this example, assume that when the chiller was started, it was five degrees above set point. Therefore based on internal staging rules of the PLC, it will only start
one compressor at this time.
From here, an individual demand and interlock signal is applied to each compressor that is going to start. A user defined minimum demand signal with a user
defined start up delay occurs. This minimum demand allows the user to match the minimum lift requirements with their specific application. The time delay is
required to allow the compressor to go through its internal start up sequence and get to its minimum lift. The minimum demand defaults to 10% and the time
delay defaults to 75 seconds.
Once the compressor has achieved minimum lift and reached its minimum speed, an adaptive timer called start step becomes active. In this time period, the goal is
to balance the requested motor power with actual motor power before applying any additional demand to each compressor. This prevents the PID loop from having
a rubber band effect. During this time, the control loop is initialized and based on the system demand and the operating limits programmed into the controller, the
highest available set point possible is sent to the compressors online.
32
The control loop architecture is as follows:
Once power is stable, based on the individual control loops set to each compressor, the compressor will load. The compressor demands will be altered as the total
system demand is altered to achieve the individual set points.
In the event that an additional compressor needs to be started, the following sequence of operation would occur:
Controller determines that it needs to stage the next compressor, the controller scans to see which compressor is the next available to start. This is based off either
run hours or start priority. Next it determines which compressor is next to start and the controller will go into a user defined stage up delay (which defaults to 300
seconds). Once this time delay elapses, the compressor(s) on-line will begin to open their load balancing valves while maintaining their current demand to lower
the operating pressure of the chiller. As the pressure ratio gets below the stage up set point, the demand signal and interlock is given to the lag compressor and
it begins to ramp up. Now the lag compressor begins to start and an adaptive start algorithm initializes to ensure the compressor will start against the minimum
lift required. As the lag compressor starts, the load balance valves of the compressor(s) on-line closes and the valve on the lag compressor opens. This provides
minimum flow to the lag compressor to prevent surge and check valve flutter. The lag compressor will immediately drive to the required minimum lift and will then
be released to its individual control loop.
To shut down a compressor, a timing sequence based on energy efficiency is observed. The controller sees a decrease in inlet guide vane position, so the control
system starts monitoring k/w consumed. Once it is determined that the load can be more efficiently carried by one compressor as opposed to two compressors, one
compressor is staged off.
EXV Logic- The EXV logic will consist of two controls strategies:
Flooded Chiller Level Control (Evaporator or Condenser)
Direct Expansion Control
In both modes, the initialization block is the same:
Control Loop to be enabled as initial compressor demand is applied. Once control loop is enabled, valve will assume a user defined start up position for a user
defined start time period. After the time delay expires, the valve(s) release to the control loops. Valve must have a user defined minimum close during control loop
operation as well as maximum open. These should be scaled in percentage to the valve type chosen as the step counts vary based upon the different types of valves.
Minimum valve % close = 0 max valve % open = 100%. User can set these values, both minimum and maximum from 0 to 100.
*Application Note- It is never recommended to fully close the expansion valve with a centrifugal compressor. A centrifugal compressor must have flow in order to
produce lift. If there is no flow through the compressor, the compressor will stall and not pump. When a centrifugal compressor stalls, bearing stability and compressor
damage can occur.
33
Chiller Control Screens:
Home Screen
Referred to as the dash board, this is where a general system summary for the entire chiller can be found.
Features of this page include:
•24 user defined text boxes which include hard wired points, Modbus points, virtual points and more.
•System On/Off switch
•Compressor Over Ride Controls
•Compressor Hub status information including status of compressor safeties
•Navigation Menus•Summary of four most recent events
•Power Bar and Capacity read out
•System Messages, System Faults, Alarms, and Status
•Compressor Messages, Faults, Alarms, and Status 34
Main Navigation Menu
The main navigation menu for the chiller is contained on the right side of the Home Screen. The navigation menu
consists of:
•System Switch- The system switch is used to start or stop the chiller. When the switch is pressed, the switch will change state. A
pop up box, confirming to the user that they want this action to occur must be accepted before it the switch will change state.
The system switch does not require a password.
•Change Set Point- When pressed, change set point will generate a keypad. The user can then use the keypad to set the desired
leaving temperature. The temperature cannot be set below 38°F or above 60°F. Set point adjustment does not require a
password.
•User Menu- When pressed, the user navigation bar will appear over the main navigation bar. The user menu does not require a
password.
•From the user navigation bar, users can access:
•Trend Graphs
•I/O Overview
•Event Log (alarm log can be accessed via the event log)
•Manuals
•Danfoss Turbocor Software
•Service Menu- When pressed, a password keypad will pop up on the screen. This screen should only be used by properly trained
service personnel.
Through the service menu, users can access:
•Edit System
•Edit Compressors
•Edit Valves
•Edit Condenser
•Edit Evaporator
•Edit Circuits
•Edit System
•Edit I/O
•Edit I/O Controls
•Modbus Set Up
•Edit Main Screen
Trend Graphs
This is the most powerful tool on the chiller. With over 17,280 lines of data collected daily in five second intervals, the trend graphing allows for comprehensive
detailed chiller and system analysis.
Features of this page include:
•Over 160,000 points of data stored daily
•All data logged in five second intervals
•32 GB of storage data
•Up to two years of data can be stored up to 10 compressors. The
time span increases with fewer compressors.
•Zoom in Zoom Out feature on data to pinpoint when changes
occur
•Jpeg export feature of all data shown on screen
•Different groupings for system points, compressors, I/O, energy
analysis
•User can define what points they want to view
•User can change color of trend lines
•Monitors system, hubs, and compressors
•Allows you accurately analyze system to identify problems
•Exportable via a .csv file to excel
35
I/O Overview
This page is actually five pages in one. Through the navigation bar on the top, the user can select to view all inputs and outputs or select Analog Inputs, Analog
Outputs, Digital Inputs, or Digital Outputs.
•Features of this page include:
•Ability to view all inputs and outputs side by side using the show all
feature.
•Ability to view each input or output type by group. Groups include:
•Analog Inputs/Temperatures
•Analog Outputs
•Digital Inputs
•Digital Outputs
•Color coded change of state on digital inputs and outputs. Red indicates
off, Green indicates on.
•Text boxes are populated with the same names that are input into I/O
map.
Event Log
The event log is where the user can determine what events have occurred with the chiller. Whether there was a system alarm, fault, or an operator change to
control points, the event log captures each change. Through the event log navigation window, users can also navigate to an alarm page where they can view the
system alarms. These alarms can be sorted by time, date, or alarm type.
Features of this page include:
•Color Coded messages
•Blue indicates out of Alarm condition
•Red indicates an Alarm or Fault condition exists
•Teal indicates an operator change to a control
setting
•Black indicates program has started
•Calendar feature to quickly recall events
•Data exportable to .csv file
•Ability to view alarms and faults by sorting
through date, time, or event type
36
Manuals
The manuals feature allows users to pull up the preloaded manuals or documents in the FlexSys controller. Once the manual button is pressed, a file menu will
appear. By using the file menu, select the document you want to view. Once you have located the document, double click on it and it will load in pdf format.
Through the use of the pdf reader you can scroll through and look at the document. Items loaded into the manual section include: Chiller submittal, IOM manual,
wiring diagrams, individual component details to aid in troubleshooting, pressure temperature charts, and more.
When you have completed viewing the document you want to see, simply close the document out using the X in the upper right hand corner of the pdf viewer.
DTC Software
Each FlexSys control system is loaded with the Danfoss Turbocor monitoring software program. This allows for advanced troubleshooting of compressors either
locally or remotely. To access the program, click on the Turbocor Software icon. Once pressed, the DTC software will load with a full on screen keyboard. Once the
software is loaded, the proper com port must be selected. The com ports are as follows:
Comp 1 = Com 11
Comp 2 = Com 12
Comp 3 = Com 13
Comp 4 = Com 14
Comp 5 = Com 15
Comp 6 = Com 16
Comp 7 = Com 17
Comp 8 = Com 18
There is no need to change the baud rate or slave ID from the default settings. The default settings are baud rate of 38400 and slave id of 1. Once the proper
compressor has been selected, push connect. If the connection is successful, it will say connection successful enabling you to click OK to start monitoring the
compressor. Please note that properly trained DTC service personnel can input the different service passwords into the monitoring software to obtain different levels
of access to the compressor.
If the connection is not successful, it will say connection failed. If the connection has failed, either the com port is already in use, the compressor is off, the
compressor hub has no power or is not communicating, or the RS-232 cable is disconnected.
Multiple compressors can be observed at the same time using this feature. When done viewing the compressor, please ensure the DTC software is closed out. Building Automation Interfaces
As a standard, MagLev Centrifugal Chillers provide a built in Modbus slave TCP/IP, Modbus slave serial RTU, BacNET/MSTP, and BacNET/IP server for interfacing to
the Building Automation System. Web control is standard, while Lonworks® is optional protocol. All interfaces are built around the BAS interface dashboard which is
pictured below.
Through the BAS interface server, these points can be sent to the BAS system or mapped to a BAS converter to achieve the required BAS protocol. The server features
a Modbus communication counter for each individual point as well as a Modbus communication counter odometer to show which points are communicating or
being written to.
Note: There are four methods for determining setpoint control with the FlexSys Controller. They are: 0 = Touch Screen; 1 = I/O Inputs; 2 = Modbus; 3 = Bacnet.
0 = Touch Screen: Touchscreen mode means that all setpoints will only be determined by the touch screen.
1 = I/O Inputs: I/O Input mode will use the attached analog inputs to reset temperature or load limit the chiller accordingly.
2 = Modbus: In Modbus modes all setpoints, and load limits must come from the BAS system. System start/stop is not writeable via a Communication Bus, it must be
a hard wired point. When in Modbus mode, you must write a value to the load limit point, or the chiller will not run. Modbus load limit and temperature setpoints are
multiplied by ten. Modbus load limit example: 1000 = 100% chiller demand, 500 = 50% chiller demand, 100 = 10% demand, 0 = chiller off; Modbus temperature
setpoint Example: 420 = 42.0° F, 543 = 54.3° F).
3 = Bacnet: In Bacnet modes all setpoints, and load limits must come from the BAS system. System start/stop is not writeable via a Communication Bus, it must be a
hard wired point. When in Bacnet mode, you must write a value to the load limit point, or the chiller will not run. Bacnet uses a floating point analog inputs and analog
outputs, all values are normal (100.0 = 100%, 54.3 = 54.3 F).
The BAS interface server points list is populated through the I/O map and assigned virtual points from the factory.
37
Maintenance Tasks
The following task list should be followed to ensure proper operation of your MagLev Centrifugal Chiller. If you should have any questions on the required
maintenance tasks or procedures, please contact the Multistack tech service department.
Please note that section one is intended to be completed by the chiller operator. Sections two thru six should be performed by Multistack Factory Certified Service
Technicians.
Section 1: Operator Responsibilities
TASK DESCRIPTION
Complete Daily Operational Chiller Logs
Review Chiller Control Event Log
Verify Chiller Operation and Performance
Water Treatment
Section 2: Compressors
TASK DESCRIPTION
Visual Inspection for Mechanical Damage
Check for Excessive Vibration
Check for oil logged in compressor
Check main power supply voltage
Check all electrical connections
Visual inspection of all wiring for hot spots
Check DC Voltages ( 5, 15, 17, 24, 250, and Buss)
Verify/Test all interlocks and safeties
Perform moisture prevention measure (see note 1)
Clean all PCB’s to remove dust build up
Replace DC capacitor assembly
Verify operation of IGV assembly
Inspect/Clean Motor cooling strainer
Review Internal Fault Logs
Replace BMCC Back Up battery (see note 2)
Section 3: Evaporator
TASK DESCRIPTION
Test Water Quality
Clean Evaporator Tubes (see note 3)
Eddy Current of Tubes
Seasonal Protection
Test Relief Valves or Replace
Epoxy Coat tube sheets and heads
Section 4: Condenser
TASK DESCRIPTION
Test Water Quality
Clean Condenser Tubes
Eddy Current of Tubes
Seasonal Protection
Test Relief Valves or Replace
Epoxy Coat tube sheets and heads
38
DAILY
√
√
√
MONTHLY 3 MONTHS 6 MONTHS 12 MONTHS 60 MONTHS AS REQUIRED
√
DAILY
MONTHLY 3 MONTHS 6 MONTHS 12 MONTHS 60 MONTHS AS REQUIRED
√
√
√
√
√
√
√
√
√
√
√ (10 years)
√
√
√
√
DAILY
MONTHLY 3 MONTHS 6 MONTHS 12 MONTHS 60 MONTHS AS REQUIRED
√
√
√
√
√
√
DAILY
MONTHLY 3 MONTHS 6 MONTHS 12 MONTHS 60 MONTHS AS REQUIRED
√
√
√
√
√
√
Section 5: Refrigerant System
TASK DESCRIPTION
Verify EXV/S Operation
Verify Liquid Level Sensor Operation
Verify Liquid Level Sensor Calibration
Visual Leak Check of Chiller
Leak Check Entire Chiller
Leak Check Compressors
Verify Check Valve Operation
Section 6: Controls
TASK DESCRIPTION
Review Trend Logs to verify chiller perf.
Download event logs and trend data
Replace USB thumb drive
Check all electrical connections
Verify Power Supply Voltages
Clean Touch Screen
Clean all PCB’s to remove dust build up
Replace CPU back up battery (see note 4)
DAILY
DAILY
MONTHLY 3 MONTHS 6 MONTHS 12 MONTHS 60 MONTHS AS REQUIRED
√
√
√
√
√
√
√
MONTHLY 3 MONTHS 6 MONTHS 12 MONTHS 60 MONTHS AS REQUIRED
√
√
√
√
√
√
√
√
Replace Compact Flash Drive (see note 5)
√
Replace Touch Screen Backlight (see note 6)
√
Note 1: Please refer to MagLev Centrifugal Service Manual for moisture prevention measures
Note 2: Please contact Multistack for additional details
Note 3: Water Quality standards will determine the frequency of cleaning the evaporator, however it is recommended that the evaporator be cleaned
annually for maximum heat transfer
Note 4: Use a battery by Sanyo or Panasonic only. Battery Part # CR2032 rated at 3.0 VDC at 225 mAh with a continuous load of 0.20 mA
Note 5: Life Span is a function of how many reads and writes to the drive occur. Five years is the minimum life span, some drives can last up to 10 years
Note 6: This is a recommendation based on the screen always being on
Please note that chiller service procedures, trouble shooting techniques, and instructions can be found in Multistack document # MLFC-003 MagLev Centrifugal
Chiller Service Manual. This manual is scheduled for release in January 2010 and can only be acquired through attending the appropriate Multistack Service Training
classes.
39
Appendix A: Assembly of Knocked Down Chiller
The following procedure is intended to be used by field personnel to reassemble a factory knocked down chiller in the field. Please read all steps carefully before
attempting to reassemble the chiller.
Once the heat exchangers have been set in place and anchored, final assembly can begin.
WARNING: DO NOT BEGIN TO REMOVE BLANKING PLATES OR UNBRAZE SOLDER CONNECTIONS UNTIL THE FACTORY NITROGEN CHARGE HAS BEEN RELIEVED FROM THE
CHILLER. FAILURE TO DO SO WILL RESULT IN DAMAGE TO THE EQUIPMENT OR PERSONAL INJURY.
Step 1- Once the pressure has been relieved from the vessels, please start by rigging the compressors into place. Align the compressors with the appropriate
isolation feet. Use the provided hardware to attach the compressors to the mounting feet.
Step 2- Locate the suction elbow, gasket for butterfly flange and O-ring for compressor flange. Please attach the suction elbow at the butterfly valve flange
utilizing the garlock gasket and at the compressor flange with the recessed O-ring.
Step 3- Locate the four bolt discharge flange that connects to the compressor. Please verify that the recessed O-ring is in the compressor discharge face and bolt
the flange to the compressor with the four bolts. Please note that all of the compressor threads are metric.
Step 4- Locate the respective discharge line, flanges, and discharge check valves. Start by fitting the 2 5/8” copper line to the point of connection on the heat
exchanger. This will involve brazing. Do not bolt the discharge flange with check valve together until the line has been brazed. Doing this will ensure the gaskets
are not compromised in the brazing process.
Step 5- Once the discharge line is brazed into place, locate the discharge check valve and install using the supplied flange hardware and garlock gaskets.
Please ensure that the arrow on the check valve is following the direction of refrigerant flow. Improper installation of the discharge check valve will result in the
compressor spinning backwards and will void the warranty. If for some reason the garlock gaskets need to be replaced, DO NOT USE DURABLA GASKET MATERIAL.
Step 6- Next locate the compressor motor cooling line. Locate the 3/8” flare nut on the side of the compressor housing, near the end bell of the compressor on
the service side. Please attach the flare. It is recommended that leak lock or PST is not used on this flare as there is an integral strainer built into the flare nut.
Step 7- Verify that all point of connections are now hooked up. Ensure that all isolation valves to the chiller on the refrigerant side are open. Pressurize chiller
with nitrogen and a trace amount of R-134A in accordance to ASHRAE Standards. It is recommended that the chiller is leak checked at 100 PSI. Do not exceed 125
PSI in the leak check process.
Note: Do not use any other refrigerant than R-134A for leak checking. Using a refrigerant other than R-134A can result in internal compressor damage, which could
affect the chiller warranty.
Step 8- Once the chiller has been properly leak tested, remove the nitrogen charge from the chiller. Hook up an R-134A specific vacuum pump with new oil.
Ensure that all hoses have O-rings in place. Verify that there are new drier cores in the main liquid line blocks.
Step 9- Begin the evacuation process. A MagLev compressor has no oil, so as long as the chiller has not been exposed to moisture, the pull down process will be
quicker in comparison to chillers in the same size range with oil. Please pull the chiller down to a minimum of 500 microns or less.
Step 10- Once 500 microns or less has been achieved; allow the chiller to stand for a minimum of 30 minutes at the recorded micron level. If after the time has
elapsed, and the micron level has not increased it is OK to start charging the chiller. If the micron level has raised 50 microns or more in that time period, the
likely hood of a leak exists.
Step 11- While the chiller is pulling down, hook up the high voltage electrical to the compressor terminal block. Depending on when the compressor was built,
the high voltage cover to the compressor will be either a #25 torx bit or a #2 Philips.
Step 12- Once the high voltage to the compressor is hooked up, route the compressor interface cable to the green Turbocor Interface Board located in the main
control panel. This attaches with 2 thumb screws, located on the cable.
Step 13- Replace all covers. Verify that there are no shorts with a volt meter.
DO NOT APPLY POWER TO THE CHILLER UNTIL REFRIGERANT HAS BEEN ADDED AND VOLTAGE HAS BEEN VERIFIED BY THE ELECTRICIAN ON SITE.
Step 14- The next step is to charge the chiller. There are two processes that can be used for charging the chiller:
Process 1: WATER HAS NOT BEEN CONNECTED TO THE CHILLER-
If the water side HAS NOT BEEN CONNECTED and THERE IS NO WATER STANDING IN THE CHILLER, it is OK to begin charging the chiller with liquid refrigerant until the
desired charge amount is reached.
Process 2: WATER HAS BEEN CONNECTED TO THE CHILLER-
If water has been connected to the chiller or there is standing water in the chiller, DO NOT ATTEMPT TO CHARGE THE CHILLER UNTIL WATER FLOW CAN BE
ESTABLISHED TROUGH THE HEAT EXCHANGER. Once water flow has been established to the chiller, charge the chiller with vapor refrigerant until the saturated
refrigerant temp in the heat exchangers is above the freezing point of water. At this point you can switch from vapor charge to liquid refrigerant charging. It is
recommended that the push pull method of charging be used.
40
Appendix B: Generator Operators Sequence
Stand By Power Sources/ Generators-
Due to the incredibly low inrush current used by the MagLev compressors to start, MagLev Centrifugal Chillers are ideal for use in applications where backup
generators may be used to power a critical load in the event of a local power outage. The following sequence must be observed when switching from local power to
generator power.
•In the event of a power outage, the chiller will detect the loss of power and shut the chiller down on a Generator Mode Active Fault.
•If power is to be switched to the generator via a transfer switch, turn the main breaker of the chiller off first before transferring. This will prevent any spikes
from the generator from being transferred.
•Upon establishing generator power, transfer the power source to the chiller.
•Energize the main breaker of the chiller. The chiller controller and compressors will reset. Upon the initialization, the chiller will perform its start up checks and
restart if all BAS points and safeties are okay.
•To transfer back to main power once it has been restored, cycle the chiller off and de-energize the main chiller disconnect.
•Once the chiller has been de-energized, transfer power back to the main power.
•Upon restoring main power, the chiller controller and compressors will reset. Upon the initialization, the chiller will perform its start up checks and restart if all
BAS points and safeties are okay.
WARNING- Failure to follow the above outlined procedure can result in severe equipment damage. It is critical that the chiller is electrically isolated before transferring
power to or from the generator.
Appendix C: List of Acronyms
EXV- Electronic Expansion Valve
DHRC- Dedicated Heat Recovery Chiller ™
PLC- Programmable Logic Controller
HMI- Human Machine Interface
MagLev- Registered trademark to Multistack describing Magnetic Levitation
Compressors
PID- Proportional Integral Derivative
VFD- Variable Frequency Drive
IGBT- Insulated Gate Bipolar Transistor
SCR- Silicon Controlled Rectifier
IGV- Inlet Guide Vanes
MCA- Minimum Circuit Ampacity
MOP- Maximum Operating Power
LRA- Locked Rotor Amps
RLA- Rated Load Amps
FLA- Full Load Amps
UL- Underwriters Laboratory
STD- Standard
CE- conformity mark for European economic area
NEMA- National Electrical Manufacturers Association
ASME- American Society of Mechanical Engineers
ASHRAE- American Society of Heating, Refrigeration, and Air Conditioning
Engineers
PSI- Pounds per Square Inch
GPM- Gallons Per Minute
F- unit of temperature measurement, short for degrees Fahrenheit
LBV- Load Balance Valve
BAS- Building Automation System
∆P- differential pressure measured in PSI
KW- kilowatts
I.D.- Internal Diameter
I/O- Inputs and Outputs
VDC- Volts of Direct Current
VAC- Volts of Alternating Current
PC- Personal Computer
USB- Universal Serial Bus
EMI- Electro Magnetic Interference
RFI- Radio Frequency Interference
TFT- Thin Film Transistor
GB- Giga Byte
41
Legal Disclaimer
This publication contains information that is proprietary, privileged, and confidential to Multistack LLC. Any reproduction, disclosure, or unauthorized use of this
publication, whether partial or whole, without the prior written consent of Multistack LLC is strictly prohibited.
Multistack LLC reserves the right to make any changes without prior notice. These changes are aimed to uphold our continuing efforts to further advance our
product lines. Changes can occur in engineering, manufacturing, or production processes. All changes are intended to benefit of our customers, by providing the
best product possible with the latest materials and components available.
Multistack LLC has exercised every possible effort to ensure the information contained in this manual is complete and accurate. No warranty of reliability or
accuracy is given with respect to the provided information. Multistack LLC shall not be held responsible or liable for the correctness of the information. This includes
information that has changed due to manufacturing processes, changes to products by our vendors, or for any information that is deemed inaccurate or omitted.
All brand and product names used in this manual are trademarks, registered trademarks, sales marks or trade names and remain the legal property of their
respective holders. Any use of these trademarks or sales marks is strictly prohibited without prior written consent.
Multistack LLC
P.O. Box 510
1065 Maple Ave.
Sparta, WI. 54656
Phone: (608)-366-2400
Fax: (608)-366-2450
For additional information including updates to sales, technical, and operational literature, please visit our website at: http://www.multistack.com
For technical support, please contact us @ (608)-366-2400
42
1065 Maple Avenue Sparta, Wisconsin 54656 • Phone: (608)366-2400 • Fax (608)366-2451
www.multistack.com
F161.062510