1
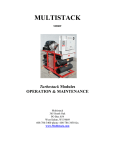
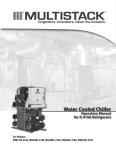
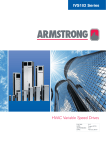
Air Cooled Packaged Module
Installation and Operations Manual
ASP010, ASP015, ASP020, ASP030, ASP060, PMP, FCP
AIR COOLED PACKAGED MODULE
Table of Contents
Product Introduction
Product Introduction.......................................................................................4
Model Number Nomenclature...........................................................................5
Module Description..........................................................................................7
Installation
Handling of Modules...................................................................................... 11
Site Preparation............................................................................................ 11
Installing Single and Multiple Modules........................................................... 13
Configuration Information............................................................................. 15
Installation of Free Cool and Pump Module..................................................... 16
Main Power................................................................................................... 16
Field Wiring................................................................................................... 16
ASP Start-Up Data Log.................................................................................... 19
Chilled Water Mode Readings......................................................................... 20
Installation Checklist..................................................................................... 21
Operation
1.Chiller Identification................................................................................... 22
2.Theory of Operation.................................................................................... 22
3.Fail to Run.................................................................................................. 22
4.Pressure Reading........................................................................................ 23
5.Strainer Cleaning........................................................................................ 23
6.Refrigerant Charge / Evacuation.................................................................. 23
7.Superheat / Sub Cooling.............................................................................. 23
8.Pressure Relief Valve................................................................................... 24
9.Filter Driers................................................................................................ 24
10.Compressor Oil Level................................................................................. 24
11.Daily Log Sheet......................................................................................... 24
12.Annual Maintenance................................................................................. 24
13.Annual Maintenance Checks...................................................................... 24
14. Compressor Failure................................................................................... 25
15.Heat Exchangers....................................................................................... 25
16. Low Ambient Option................................................................................. 26
17.Trouble Shooting ASP................................................................................ 26
3
AIR COOLED PACKAGED MODULE
Introduction
The Multistack® “ASP” is a modular air-cooled chiller system with a nominal capacity of 10, 15, 20, 30 and 60 tons per module. The chiller system could
consist of a master module (front module with controller), front and rear modules, free cooling module, and a pump module. This system utilizes a fully
hermetic scroll compressor, 316 stainless-steel-brazed plate heat exchanger, four or six row copper tube or microchannel, aluminum fin condenser coils
and a microprocessor– based control. Operating capacity is based on the entering chilled liquid temperature. Precise control and system reliability is best
served in this fashion.
This manual was created for the express purpose of assisting the owner or installing contractor of the Multistack ASP Packaged Air Cooled Product. Please
review the material contained in this document carefully before installing and operating this equipment. Additional inquires regarding installation and
operation should be directed to Multistack or its authorized agents. Failure to handle, install and operate this equipment in accordance with this manual
may result in damage to the equipment and/or personal injury. Failure to comply may void some or all of the Multistack warranty options.
Any questions regarding the content of this Installation Manual, the handling or installation of the Multistack Chiller components, should be directed
immediately to your authorized representative or to the Service Department at (608) 366-2400 or FAX (608) 366-2450.
4
AIR COOLED PACKAGED MODULE
Introduction
Model Number Nomenclature
The new model numbers will be effective for any new module ordered after July 1, 2011. Any existing orders will not change.
Air Cooled Packaged Module
Existing
ASP 30
New
ASP 030
X
X
1
C/N
H
1
1
1
A
0
R410A
H
1
A
L
1
A
A
1
S
-410A
Refrigerant
Fan Configuration6
Condenser Coating5
Condenser4
Evaporator3
Ambient ( L - Low, S - Standard, H - high, C - low & high)
Voltage (H - 460/3/60, C for 575/3/60, E for 400/3/50)
Application (A - Air Cooled, D - Cond Unit, H - Heat Recovery, R - Heat Pump)
Power Connection (1 - Direct Connect, 2 - Multiple Module Connections)
Voltage
2
Frame Designation 1 - 32 x 58, 2 - 36 x 72, 3 - 36 x 84, 4 - 72 x 84, 5 - other3 - 36 x 84, 4 - 72 x 84, 5 - other)
No. of Refrigerant Circuits ( 1 - single , 2 - dual, 4 - four)
AHRI Certified (C - certified, N - Not certified)
Compressor Type1
Module Nominal Capacity (10-75 tons, needs 3 digits)
Series
B - Bristol, C - Trane Cornerstone, R - Bitzer Screw, S - Trane Scroll, T - Danfoss Turbocor, Z - Copeland scroll (old elec), X - Copeland Scroll (ZP), A - Copeland Scroll (ZR)
A - 208/3/60, L - 230/3/60, H - 460/3/60, C - 575/3/60, D - 200/3/50, E - 400/3/50, F - 380/3/60, S - 220/230/1/60, V - Other
3
A - Brazed SS, B - Brazed SMO, C- S&T copper, D - S&T cu-Ni, Z - Other
4
A - Cu tube Al fin, B - Cu tube Cu fin, C- Microchannel, V - Other
5
A - None, B - Bronzeglow, H - Heresite, E - Electrofin, V - Other
6
S - Standard, H - High static, L -Low sound, V -Other
1
2
Pump Module
PMP
2
015
A
H
S
M
Y
Misc Other Comp (Y - Yes other comp., N - No other comp.)
Glycol Shot Feeder (M - Mini shot feeder & Exp tank, T - Exp tank, N - None)
Water Piping (C - Copper, S - Stainless, P - PVC, B - Black iron, V - Other)
Voltage1
Configuration (A - 100% Redundant, D - Dualarm configuration, S - Single pump)
Pump Horsepower (HP of one pump)( Three digits)
Frame Designation ( 1 - 32 x 58, 2 - 36 x 72, 3 - 36 x 84, 4 - 72 x 84, 5- other, 9 - Indoor)
Series (PMP, Pump Module)
1
A - 208/3/60, L - 230/3/60, H - 460/3/60, C - 575/3/60, D - 200/3/50, E - 400/3/50, F - 380/3/60, S - 220/230/1/60, V - Other
5
AIR COOLED PACKAGED MODULE
Introduction
Free Cool Module
FCP
2
H
C
A
A
S
Fan Config (S - Standard, V - Other)
Coil Coating (A - None, B - Bronzeglow, H - Heresite, E - Electrofin, V - Other)
Coil ( A - Cu tube Al fin, B - Cu tube Cu fin, C- Microchannel, V - Other)
Water Piping (C - Copper, S - Stainless, P - PVC, B - Black iron, V - Other)
Voltage
Frame Designation ( 1 - 32 x 58, 2 - 36 x 72, 3 - 36 x 84, 4 - 72 x 84, 5- other)
1
Series (FCP - FreeCool Module, DCP - Dry Cooler, RCP - Remote Condensing Unit)
1
A - 208/3/60, L - 230/3/60, H - 460/3/60, C - 575/3/60, D - 200/3/50, E - 400/3/50, F - 380/3/60, S - 220/230/1/60, V - Other
Accessory Module
ACP
2
H
C
180
M
B
S
C
Strainer materials of construction (B - Bronze, C - Copper, S - Stainless, V - Other)
Basket Strainer (S - Single, D - Duplex, L - Lakos, N- None)
Air Separator ( Y - Yes, N - None)
Glycol Shot Feeder (M - Mini shot feeder & Exp tank, T - Exp tank, N - None)
Tank Volume (Three digits)(Gallons)
Water Piping (C - Copper, S - Stainless, P - PVC, B - Black iron, V - Other)
Voltage
Frame Designation ( 1 - 32 x 58, 2 - 36 x 72, 3 - 36 x 84, 4 - 72 x 84, 5- other)
1
Series (ACP - Accessory Component Module)
1
A - 208/3/60, L - 230/3/60, H - 460/3/60, C - 575/3/60, D - 200/3/50, E - 400/3/50, F - 380/3/60, S - 220/230/1/60, V - Other
6
AIR COOLED PACKAGED MODULE
Introduction
Multistack ASP
The chiller will consist of modules (one master, front or back), with an optional
free cooling module (no compressors), an optional water pump module, optional
water holding tank module (not pictured) and optional glycol feeder module
(not pictured).
Master Module
The master module for each chiller is designated at the factory and is
equipped with the master microprocessor display.
Front Module
Front Modules contain the (4”, 6” or 8”) water header distribution pipes and
has a slave control board. This module will bolt together with the rear module.
Note: ASP-020X, -030X and -060X uses 6” header.
Rear Module
This module will be attached to the front module by vertical frame bolts and
the evaporator is connected by cross over pipes to the front modules water
header pipes. It also has its own slave board. (There is no rear module on
the ASP-060X)
Pump Package Module
This module contains a centrifugal dual-arm pump and water distribution
headers. This module is for installations where no pump is provided for the
chilled water system or when additional pumping capacity is required.
Note: Several configurations of pump modules are available. Typical
pump is shown.
Free Cooling Modules
This module has fin and tube coils for free cooling operation and no mechanical
refrigeration (no compressors). The module contains a three-way diverting
valve for either enabling free cooling or bypass for mechanical cooling.
Note: Free cool modules can come as fronts (with headers) or rears
(without headers).
7
AIR COOLED PACKAGED MODULE
Introduction
Standard ASP-010, -015, -020, -030 Diagrams
NUMBER OF MODULES X “A” + 4”
2”
ASP-010X, -015X ASP-020X
TOP VIEW
NOTES:
1. NO OBSTRUCTIONS ALLOWED ABOVE CONDENSER FANS.
2. REQUIRED SERVICE CLEARANCE AT MODULE ENDS: 36”.
3. REQUIRED AIR INTAKE CLEARANCE: 42”. (Unobstructed)*
4. REQUIRED CLEARANCE FROM ANY HIGH VOLTAGE PANEL: 42”
ASP-030X
“D”
“D”
DISCHARGE
DISCHARGE
CONDENSER COIL
ELECTRICAL PANEL
“C”
“C”
INTAKE
FRONT VIEW
INTAKE
FRONT VIEW
“B”
2”
“A”
2”
ASP-010X, -015X ASP-020X ASP-030X
“D”
NOTES:
1. NO OBSTRUCTIONS ALLOWED ABOVE CONDENSER FANS.
2. REQUIRED SERVICE CLEARANCE AT MODULE ENDS: 36”.
3. REQUIRED AIR INTAKE CLEARANCE: 42”.*
4. REQUIRED CLEARANCE FROM ANY HIGH VOLTAGE PANEL: 42”.
5. REQUIRED CLEARANCE FROM ANY GROUNDED WALL: 36”.
6. NO CLEARANCE REQUIRED FROM REAR.
DISCHARGE
CONDENSER COIL
ELECTRICAL PANEL
“C”
INTAKE
FRONT VIEW
RIGHT SIDE VIEW
*Note: If insullation is in a pit or near walls that are taller than modules, please contact Multistack for clearances.
8
REAR VIEW
AIR COOLED PACKAGED MODULE
Introduction
Standard ASP-060 Diagrams*
ASP-060X
NOTES:
1. NO OBSTRUCTIONS ALLOWED ABOVE CONDENSER FANS.
2. REQUIRED SERVICE CLEARANCE AT MODULE ENDS: 42”.
3. REQUIRED AIR INTAKE (FRONT) CLEARANCE: 42”.
4. REQUIRED CLEARANCE FROM ANY HIGH VOLTAGE PANEL: 42”.
ASP-060X (with single fan option)
NOTES:
1. NO OBSTRUCTIONS ALLOWED ABOVE CONDENSER FANS.
2. REQUIRED SERVICE CLEARANCE AT MODULE ENDS: 42”.
3. REQUIRED AIR INTAKE (FRONT) CLEARANCE: 42”.
4. REQUIRED CLEARANCE FROM ANY HIGH VOLTAGE PANEL: 42”.
*All ASP-060X units come standard with four multi-blade vane axial condenser fans. There is also a single fan unit available with a Low Sound (poly-resin reinforced) Blade or
Ultra Low Sound (fiberglass construction) Blade option. Testing has shown a sound reduction of 6dB with the Low Sound and an additional 4dB with the Ultra Low Sound design.
9
AIR COOLED PACKAGED MODULE
Introduction
ASP-060X (with single fan option)
NOTES:
1. NO OBSTRUCTIONS ALLOWED ABOVE CONDENSER FANS.
2. REQUIRED SERVICE CLEARANCE AT MODULE ENDS: 42”.
3. REQUIRED AIR INTAKE (FRONT) CLEARANCE: 42”.
4. REQUIRED CLEARANCE FROM ANY HIGH VOLTAGE PANEL: 42”.
5. REQUIRED CLEARANCE FROM ANY GROUNDED WALL: 42”, NON-GROUNDED WALL: 36”.
ASP-060X
NOTES:
1. NO OBSTRUCTIONS ALLOWED ABOVE CONDENSER FANS.
2. REQUIRED SERVICE CLEARANCE AT MODULE ENDS: 42”.
3. REQUIRED AIR INTAKE (FRONT) CLEARANCE: 42”.
4. REQUIRED CLEARANCE FROM ANY HIGH VOLTAGE PANEL: 42”.
5. REQUIRED CLEARANCE FROM ANY GROUNDED WALL: 42”, NON-GROUNDED WALL: 36”.
10
AIR COOLED PACKAGED MODULE
Installation
Handling of Modules
If the Multistack product is damaged in any way during shipping and handling by the transportation company or any of it’s agents, the owner, or installing
contractor should promptly file a claim with the transportation company and advise Multistack. It is very important to note any damage on the bill of
lading when signing for the delivery of the chiller. Digital photos are also helpful.
Fork Lift or Pallet Jack
The modules can safely be lifted and maneuvered
with a forklift or pallet jack. Forks can be
positioned under the evaporator and between the
tandem compressors.
Use of a Crane or Other Lifting Devices
If lifting modules by crane ensure the slings (do not use chains) do not
damage the modules. The lift points are at the corners of the base of the
chiller. The modules are shipped with the panels pre-fitted. The use of a
spreader bar will prevent damage.
Site Preparation
Below components are required to ensure proper performance of the AIRSTACK® ASP chiller. All piping must be properly supported at coupling
connections and suitable intervals. It is the responsibility of the installing contractor to ensure all water connections conform to local and national
codes. The drawing shows piping exiting on right end. Depending on location of master module, exit can be on either end.
*
Supplied by Multistack.
Supplied and installed by others.
*Install system ECHW sensor external to Master module if doing variable flow.
11
AIR COOLED PACKAGED MODULE
Installation
Pipe System Flushing Procedure
Prior to connecting the Multistack chiller to the water/glycol-piping loop, the system piping should be flushed with a detergent and hot water (110-130º F) to remove
previously accumulated dirt and/or other organic residue. After removal of organic residue, flushing should continue with a diluted phosphoric, sulfamic, or citric acid
mixture if inorganic scale is present in system. (Note: Cleaning chemicals such as Nu-Calgon “Imperial Grade” Scale Remover part number 4360-84 or equivalent suitable
for both organic residue and scale removal may be substituted). Any other detergents and acids shall not be combined unless approved by chemical manufacturers.
Only chemicals compatible with 316 stainless steel, copper and carbon steel shall be used. (Any concentrations of hydrochloric or sulfuric acid or chloride containing
chemicals shall not be allowed to come in contact with copper brazed 316 stainless steel evaporators.)
During the flushing, 30 mesh (max.) Y strainers (or acceptable equivalent) shall be in place in the system piping and examined periodically as necessary to remove
collected residue. The flushing process shall take no less than 6 hours, or until the strainers when examined after each flushing are clean. Old systems with heavy
encrustation shall be flushed for a minimum of 24 hours and may take as long as 48 hours before the filters run clean. Detergent and acid concentrations shall be used
in strict accordance with the respective chemical manufacturers instructions. After flushing, the system loop shall be purged with clean water for at least one hour to
ensure that all residual cleaning chemicals have been removed. Prior to supplying water to the Multistack chiller, the Water Treatment Specification shall be consulted
for requirements regarding the water quality during chiller operation. The Multistack service literature shall be available to the operator and/or service contractor and
consulted for guidelines concerning preventative maintenance.
Clearances
Required Service Clearance at Module...................... 36”
Required Air Intake Clearance................................... 42”
Required Clearance From Any High Voltage Panel..... 42”
Water Treatment/Specifications
Supply water for the evaporator water circuits shall be analyzed and treated by a professional water treatment specialist who is familiar with the operating conditions
and materials of construction specified for the heat exchangers, headers and associated piping. Cycles of concentration shall be controlled such that recirculated water
quality for modular chillers, using 316 stainless steel brazed plate heat exchangers and carbon steel headers, is maintained within the following parameters:
Modular Chiller Water Quality
ph >7 and <9
Total Dissolved Solids (TDS)
Less than 1000 ppm
Hardness as CaCO3
30 to 500 ppm
Alkalinity as CaCO
30 to 500 ppm
Chlorides
Less than 200 ppm
Sulfates
Less than 200 ppm
12
AIR COOLED PACKAGED MODULE
Installation
Installing Single and Multiple Modules
The modules should be mounted on a level surface with steel rails. This will ensure proper alignment of
all fittings.
Rails should run parallel with module water flow (headers). For maximum stability three rails should be
used, one rail for each outside edge and one rail to be shared in the center.
The outside rails should be placed flush with outside frame. Internal rail shares half the distance (2”) with
Rear and Front modules.
To ensure all warranties and a successful installation, a Factory Authorized Technician is required
to perform start-up of the Multistack Chiller. If start-up is to be performed directly by Multistack,
a minimum of two weeks notice is required. Please call the Multistack Service Department at
(608) 366-2400 to schedule.
1.Starting with the master front modules,
position on rails (27” center to center for
010X and 015X; 32.5” for 020X, 030X and
060X ).
2.Lubricate rails with solid vegetable shortening
(Crisco™) or other non-petroleum lubricant.
3.For rear modules, install the evaporator heat
exchanger connecting pipes. Also install the
provided CHW sensor into the leaving pipe.
The 60 ton module consists of a front and rear
portion for one module.
Note: Consult a qualified seismic expert for seismic restraint information.
5.Note: If the chiller has a single point power
box, the coiled wire and conduit should be run
to the power box as the modules are installed.
The conduit is marked.
4.Lubricate gaskets with a vegetable-based lubricant
and hand tighten only. Make sure the bottom
connector pipe and the sensor pocket is positioned to
accept the sensor for the rear module.
13
AIR COOLED PACKAGED MODULE
Installation
6.Termination of each module to the power box
should be done by the electrician.
7.Position the rear module on the rails. Align the
rear module with the front module.
8.Fit the connector pipes from the front module to the rear
module, lubricate the gasket, and tighten both front
and rear couplings at this time. You may need to slide
the evaporator mounting plate forward or backward to
accomplish this.
9.By loosening the four bolts on the plate you can slide
the evaporator to the correct distance. If further
adjustments are needed, you can loosen the header
pipes and front evaporator plate as well.
The Next Step
For installation of subsequent modules, follow the same procedure
as discussed previously, always begin with the front module.
Before installing further rear modules, align the water header
pipes, lubricate and install the gaskets and couplings connecting
to the previous modules header pipe. When bolting the second full
module to the first full module, align the three outer holes on each
end and install the 3/8” bolts provided.
10. To secure the front and rear modules, align the three holes on
both ends and install the (six) 3/8” bolts provided.
14
AIR COOLED PACKAGED MODULE
Installation
ASP-010X, 015X, 020X or 030X
IMPORTANT MODULE CONFIGURATION INFORMATION
CONFIGURATIONS SAMPLES
PMP: ASP Pump Module
1. When present, a Pump Module is only allowed in the Front position.
Tank
PF
FF
MF
SR
SR
SR
SR
SR
PF
MF
SF
SF
SF
SR
SR
PF
MF
SF
FR
FR
SR
SR
ACP: ASP Glycol Feeder Module
1. An ACP Glycol Feeder Module may be attached in any rear position.
PF
FF
MF
SF
SF
ASP-010X, 015X, 020X, 030X or 060X
Chiller Module
1. The maximum number of ASP-010X, 015X, 020X, 030X or 060X modules
with a single Master Module is 14 (i.e., (1) Front-Master, (6) Front- Slaves, and
(7) Rear-Slaves).
SR
GR
SR
SR
SR
MF
SF
SF
MF
SF
SR
SR
SR
PF
MF
SF
FR
SR
SR
SR
PF
FF
MF
SF
2. Incoming water to the chiller system must enter at the Pump Module.
3. Leaving water from the chiller system may be from either end of the chiller.
FCP: Free Cool Module
1. When present, incoming system water must enter through the Free Cool
Modules prior to entering an ASP-010X, 015X, 020X, 030X or 060X Chiller
Module.
2. You may not attach a Rear Free Cool Module to a Front ASP-010X, 015X,
020X, 030X or 060X Chiller Module.
2. You may have more than one Master Module in a single chiller bank.
3. Piping sides of an ASP-010X, 015X, 020X, 030X or 060X chiller without Free
Cool or Pump Modules attached are field selectable.
LEGEND
First Letter
M=Master Chiller Module (ASP-010X, 015X, 020X, 030X or 060X)
ASP-060X CONFIGURATION SAMPLES*
MC
S = Slave Chiller Module (ASP-010X, 015X, 020X, 030X or 060X)
SF
P= Pump Module (PMP)
SF
SF
F = Free Cool Module (FCP)
G = Glycol Feeder Module (ACP)
MC
Second Letter
F = Front Module
FF
R = Rear Module
Front of Chiller Bank is Facing the
Bottom of he Page
(Master Module location determines front of chiller)
Tank
For other configurations, contact your local Multistack® Representative.
PUMP
FF
SF
SF
MC
SF
SF
MC
PUMP
FF
FF
SF
*Rear modules are an invalid configuration for the ASP060X
15
SF
AIR COOLED PACKAGED MODULE
Installation
Free Cool and Pump Modules
Top Header: This header is for CHW water leaving the free cool coils. If return
CHW enter on the free cool module this should be capped on the CHW inlet side.
This header sends water from the free cool module to the mechanical modules
for additional cooling.
Middle Header: This connection is for the inlet water to the free cool module.
If the connection is to a mechanical module, the header end closest to the
mechanical module should be capped.
Bottom Header: This header is for CHW going to the building. If the LCHW
exits through a mechanical module on the opposite end, this header would not
be used.
Main Power
Locate the power distribution box on the specified end of the chiller. Wire and
conduit will need to be run from the distribution box to each module of the
chiller. The wire and conduit may be pre-sized and fabricated at the factory. It
is the responsibility of the installer to connect main power to modules before
start-up.
Field Wiring
It is the responsibility of the contractor to supply and install a flow switch in the
LCHW piping. The master module of the ASP chiller has inputs for the following
options: remote start/ stop, run status, system alarm, 0-10V or 4-20ma input, and
remote communication. Supply and return CHW sensors,module communication
plugs, and communication interface cables are all provided with the chiller. The
sensors and cables will be installed and tested by the Factory Authorized Start-Up
Technician. (See electrical diagrams for locations of all inputs/ outputs.)
16
AIR COOLED PACKAGED MODULE
Installation
Master Controller Communication
This is the computer controller that is installed on the master module and controls all connected modules.
Module Slave Board Communication
Each front and rear module has one of these. This board transfers communication from one module to the next.
Module Communication
All modules are linked together through a communication cable. The communication port is J11 on the module slave board.
17
AIR COOLED PACKAGED MODULE
Installation
Chilled Water Temperature Sensors
These sensors are factory supplied and field installed on the leaving chilled water header stubs. The master module also has a return water sensor
(top header stub). On Variable Flow applications, a return CHW sensor well must be supplied external and field installed as well.
Compressor Pressure Transducers
These are factory installed on the suction and discharge lines of each refrigeration circuit to monitor the suction and discharge pressures (circled).
Sensor Well
The factory supplied, and field installed, LCHW system sensor well should be installed near the master module. Sensor well is 1/2” pipe thread. The master
modules LCHW System sensor will should be installed in this well. On Variable Flow applications, a system ECHW sensor well is also provided.
18
AIR COOLED PACKAGED MODULE
Installation
START-UP DATE: ______________________________________ SHIP DATE:_____________________________________
JOB NAME:_______________________________________ JOB NUMBER:_____________________________________
ADDRESS:_____________________________________________________________________________________
MULTISTACK REPRESENTATIVE:_ ________________________________________________________________________
MODEL NUMBER:_ ________________________________________________________________________________
MODULE SERIAL NUMBERS (Indicate Master Controller with an X, Indicate “FC” if Free Cool, Indicate “P” if Pump Module)
1._ _________________________________________ 7._______________________________________________
2._ _________________________________________ 8._______________________________________________
3._ _________________________________________ 9._______________________________________________
4._ ________________________________________ 10._______________________________________________
5._ ________________________________________ 11._______________________________________________
6._ ________________________________________ 12._______________________________________________
Master Controller Program #_ _________________________________________________________________________
INSTALLATION CHECKLIST CIRCLE CORRECT RESPONSE
1. Chiller mounted on rails and isolators? YES NO
2. Any visible damage? YES NO
If yes, detail:_____________________________________________________________
3. Any obvious oil and/or refrigerant leaks? YES NO
If yes, detail:
4. Sensor pockets installed? YES NO
5. Chilled water flow or DP switch installed? Type YES NO
6. Chilled water system strainer installed? Type YES NO
7. Chilled water isolation valves installed? YES NO
ELECTRICAL AND CONTROLS CHECKLIST CIRCLE CORRECT RESPONSE
1. All electrical connections tight and correct? YES NO
2. Power wiring sufficient to carry RLA? YES NO
3. Voltage levels:
PHASES 1 + 2 ________________2 + 3_ __________ 1 + G_ __________ 2 + G ___________ 3 + G___________
4. Set system variables to site conditions? Yes No
Upset__________ Manual Range_ _________ Sequence_ _________
Loset__________ Manual Offset__________ Indexing___________
VSP___________ Fan Setpoint_ __________
TDiff_ _________ Fan Offset_____________
Load Limit_______ HP Cutout_____________
5. Set time and date? Yes No
6. Factory Set-Up variables:
q Standard
q Low Temp
q Low Ambient
Chiller type:
q Enabled
q Disabled
Variable Flow:
q Disabled
Min Flow Bypass: q Enabled
19
AIR COOLED PACKAGED MODULE
Air Cooled Supplement
Installation
Temperatures
ECHW
LCHW
Start Time:
Stop Time:
Module Circuit
1.
2.
3.
4.
5.
6.
CURRENT
PHASE A
PHASE B
TEMPERATURE
PHASE C
SUCTION
A.
B.
A.
B.
A.
B.
A.
B.
A.
B.
A.
B.
Observations
20
LOCHW
HIGH
PRESSURE
LOW
PRESSURE
AIR COOLED PACKAGED MODULE
Installation
CUSTOMER:________________________________________________________________________________________
JOB NAME:_ _______________________________________________________________________________________
JOB LOCATION:_____________________________________________________________________________________
CUSTOMER ORDER NUMBER:__________________________________________________________________________
The work checked below is in process and will be completed by: (Date)_ _____________________________________________ . The service
of a Multistack Authorized Start-up Engineer is requested on this date and it is understood that if the work checked below is not completed, the engineer’s time and
expenses will be billed to us by Multistack. Terms Net 30 days. Multistack to be notified at least ten (10) working days in advance of the start-up date.
Chilled Water
Piping complete and connected to Multistack units.
Water system filled and vented.
Pumps installed (Rotation checked).
Recommended strainers installed.
Controls (3-way valves & by-pass valves, etc.) operable.
Water system operated and flow balanced to meet unit design recommended.
Strainers checked for unusual debris.
Flow or differential pressure switch installed.
Remote Air Cooled Condenser
Yes
q
q
q
q
q
q
q
q
q
q
q
q
q
q
q
q
q
Electrical
Yes
Power wiring complete and in accordance with nameplate rating on
Multistack unit and prepared for connection in accordance with installation manual.
q
Note: No power is to be applied to unit prior to inspection by Multistack engineer.
All interlock wiring complete between control panel and complies with
Multistack specifications and with applicable codes.
q
Miscellaneous
Thermometer wells, thermometer gauges, control, etc. are installed.
A minimum system load of 50% of total building load is available for testing
and adjusting controls.
N/A
q
q
q
q
q
q
q
Yes
Piping complete and connected to Multistack module.
All piping in accordance with good engineering practice.
Hot gas and liquid lines installed correctly.
Low ambient (refrigerant head pressure controls) installed.
Condenser fans controlled on head pressure.
Condenser wired and operational. (correct rotation)
Control wires ran from Multistack module to remote condenser.
No
q
q
q
q
q
q
q
Yes
No
q
q
q
q
q
q
q
No
N/A
q
q
q
q
q
q
q
N/A
q
q
q
q
No
N/A
q
q
q
q
q
q
We understood that authorized representatives of the installing electrical and piping contractor must be available during the start-up period and that coordination is our
responsibility.
We further understand that the services of Multistack Authorized Start-Up Engineer will be furnished for a period of not more than sixteen (16) consecutive normal
working hours and we agree that a charge for time and expenses will be made by Multistack if services are required for longer than sixteen (16) consecutive normal
working hours or if repeat calls are required through no fault of Multistack.
Signed
Title
Company Telephone
Company Name
Job Location Telephone
Company Location
21
AIR COOLED PACKAGED MODULE
Operations
1. CHILLER IDENTIFICATION
More model numbers for related modules are available on page 5 of this manual. The new model numbers will be effective for any new module ordered after July
1, 2011. Any existing orders will not change.
Existing
ASP 30
New
ASP 030
X
X
1
C/N
H
1
1
1
A
0
R410A
H
1
A
L
1
A
A
1
S
-410A
Refrigerant
Fan Configuration6
Condenser Coating5
Condenser4
Evaporator3
Ambient ( L - Low, S - Standard, H - high, C - low & high)
Voltage (H - 460/3/60, C for 575/3/60, E for 400/3/50)
Application (A - Air Cooled, D - Cond Unit, H - Heat Recovery, R - Heat Pump)
Power Connection (1 - Direct Connect, 2 - Multiple Module Connections)
Voltage
2
Frame Designation 1 - 32 x 58, 2 - 36 x 72, 3 - 36 x 84, 4 - 72 x 84, 5 - other3 - 36 x 84, 4 - 72 x 84, 5 - other)
No. of Refrigerant Circuits ( 1 - single , 2 - dual, 4 - four)
AHRI Certified (C - certified, N - Not certified)
Compressor Type1
Module Nominal Capacity (10-75 tons, needs 3 digits)
Series
B - Bristol, C - Trane Cornerstone, R - Bitzer Screw, S - Trane Scroll, T - Danfoss Turbocor, Z - Copeland scroll (old elec), X - Copeland Scroll (ZP), A - Copeland Scroll (ZR)
A - 208/3/60, L - 230/3/60, H - 460/3/60, C - 575/3/60, D - 200/3/50, E - 400/3/50, F - 380/3/60, S - 220/230/1/60, V - Other
3
A - Brazed SS, B - Brazed SMO, C- S&T copper, D - S&T cu-Ni, Z - Other
4
A - Cu tube Al fin, B - Cu tube Cu fin, C- Microchannel, V - Other
5
A - None, B - Bronzeglow, H - Heresite, E - Electrofin, V - Other
1
2
6
S - Standard, H - High static, L -Low sound, V -Other
2. THEORY OF OPERATION
The Airstack ASP chiller provides chilled water to an external load based on the return water temperature as measured by the ASP master control. When the temperature
of the returning water rises above the set point as calculated by the upper set point, the lower set point and the VSP the master controller starts compressors, one at
a time, to produce chilled water. The number of compressors that will start is determined by the program in the master controller based on the temperature being
returned.
When the return chill water approaches the correct set point the master controller starts to turn off compressors as needed. When the return chilled water reaches the
set point or a little below, the master controller will have turned off all the compressors.
During operation of the compressors, the controller will cycle on one or both of the condenser fans in a module according to the refrigerant high pressure.
Some systems have a large heat exchanger which uses a main chiller to chill the return water/glycol. When the chilled water from the main system is cold enough, the
heat exchanger valves open and chill the return water/glycol through the smaller chiller enough that the compressors will not run. If the Heat Exchanger does not chill
the return water/glycol enough, the 3 heat exchanger valves close and the compressors will start and chill the discharge water to the set-point.
3. Fail to Run
Airstack ASP systems designed for critical needs have a design that will allow individual modules to run in the event that the master module fails or goes offline or if
certain System Faults occur that would otherwise disable the entire chiller. Each module must be in the Auto mode of operation in order for this OVERRIDE condition to
occur. If the Master Control comes back online and all System Faults are cleared then the control of the compressors will automatically shift back to the master control.
AIR COOLED PACKAGED MODULE
Operations
4. Pressure readings
The operating suction and discharge pressures in the modules are directly related to the temperature of the water flow, condenser temperatures, the ambient
temperature and the cleanliness of the system. If a module is faulting on a High Pressure (HP) fault, you should first check to see that the fans are operating. If both
fans are working check the cleanliness of the condenser coil.
All ASP modules have both, a high pressure and low pressure (LP) cut out setting. Each module will cut out on HP or LP when the programmed limit in the master
control is met. In addition a back up manual HP cut out switch is installed on each module.
A LP fault is an indication of low refrigerant charge in the system. If a module is going out on a LP fault, check the static pressure of the system while the module
is in the off mode. It will be necessary to wait for the system to warm up before checking the pressures by the gauge. If pressures are low, check the circuit for
possible leaks. Call the Multistack service department for leak testing procedures.
A further possible cause of a low suction temperature fault could be insufficient water flow. The strainers, filters and pump and valve settings should be checked.
5. Strainer Cleaning
All ASP modules have a 30 mesh filter cartridge in the chilled water inlet header. The purpose of the filter cartridge is to keep debris from entering the heat
exchanger. An external “Y” or basket type strainer should also be installed as a pre-filter to the factory supplied strainers.
There is no set time for cleaning the filter cartridges. The factory recommendation is that the internal filters be removed and cleaned once per year. Sometimes the
filter must be removed more often if the water in the closed loop system has particulates. A good indicator that the strainers need to be cleaned is a “low leaving
water temperature” fault in the module(s) near the discharge side of the chiller.
a. In order to remove the in-line strainers the following steps must be performed.
b. Shut down the chiller and stop the chill water pump
c. Close the inlet and outlet water valves to the chiller
d. Drain the water-glycol from the system and dispose properly. When the water/glycol level is below the top header the system can be safely opened.
e. Remove the 4” Victaulic end cap on the last module on the discharge side. On systems with 2 banks of modules, the upper crossover pipe will also have
to be removed to access the strainer in the second bank of modules. Care should be taken to close the isolation valve for that header.
f. Remove the strainers and clean immediately. A hooked tool may be required to remove the strainers further in the system. This tool can be manufactured
on site.
g.Slowly open the bottom water isolation valve and fill the unit from the bottom up to prevent air from being trapped in the headers. Care should be
taken to check for leaks.
h.Restart the chill water pump and again check for possible leaks, bleed any trapped air from the system and start the chiller.
6. Refrigerant charge / Evacuation
All ASP modules come from the factory charged with the recommended refrigerant volume. Prior to charging, each unit is evacuated to a maximum of 150 microns
and held 15 minutes. The proper refrigerant charge for each module can be found on the module data plate.
On air cooled machines the proper charging procedure is by a calculated weigh-in method. Charging to a full sight glass on air cooled machines will likely result in
over charging as the elbows in the liquid line as well as the liquid line solenoid valve still produce some flashing even with the correct charge. As fans are cycling
the sight glass will also display some bubbling.
7. Superheat / Sub cooling
All ASP modules use a mechanical type expansion valve. By turning the valve adjustment clockwise superheat is increased.
On each module, superheat is set at the factory during the run test. Superheat is set for 10-12°F during the test run. No further adjustments should be necessary
after the module is shipped.
Sub cooling is necessary in the system to prevent flash gas as the refrigerant enters the expansion valve. ASP condensers are sized and charged so that sub cooling
of the liquid refrigerant will take place with no separate sub-cooler being needed. The range of sub cooling is 7-15° F.
23
AIR COOLED PACKAGED MODULE
Operations
8. Pressure Relief Valve
Each module has a 650 psig pressure relief valve installed. The relief valve is installed on the receiver of the module and has a 3/8” flare connection.
9. Filter Driers
ASP modules are built with a factory installed liquid line filter drier. The filter driers are a solid core sweat fitting replaceable type. Some modules have a flare
connection system for the filter drier. In the case of a compressor failure, heat exchanger failure or water contamination in the system, it is always required to
replace the drier.
10. Compressor MOUNTING AND Oil Level
It is very important that the compressors remain tightened on the rubber isolators and base plate in the same manner as shipped. This will prevent any damage
to the refrigerant piping from excess vibration. If replacing a compressor make sure the isolators and mounting brackets get re-installed in the same manner.
The compressors used on ASP modules are oil charged by the compressor manufacturer. Most models have an oil sight glass. Correct oil level should be between
1/8 to 7/8 full on the glass. To ensure no liquid is present in the oil the crankcase heaters should be on a minimum of 24 hours before starting of the compressors.
The factory oil charge volume for each compressor can be found in the Product Data Catalog. The oil used in R-410A compressors use an esther based oil, not a
petroleum based oil. Please do not mix oils when adding oil to a system since they are not compatible and will cause damage
11. Daily log Sheet
On the back page of this manual is a chiller information log sheet. The log sheet can be used daily, weekly or as desired to record operation characteristics of the
chiller. The information recorded on the log sheet can also be very helpful for diagnosing potential problems in the system.
12. Annual Maintenance
Most of the annual maintenance requirements for ASP Chillers involve proper shut-down of the system and if needed cleaning of the heat exchangers. Preventive
Maintenance bulletin #F125 and Heat Exchanger Cleaning Procedures bulletin #F130 describe the recommended procedures for both processes. Airstack has
available the 151A Cleaning Kit to assist with this process. Please see the 151A Cleaning Kit bulletin #F126 for more details. All of these bulletins are part of the
standard O&M manual package.
13. ANNUAL MAINTENANCE CHECKS
a. Electrical components
b. Check all external interlocks
c. Inspect compressor terminals
d.Check compressor crankcase heater operation
e. Tighten all electrical terminals, high voltage and low
f. Check and calibrate all compressor safety controls
g.Check and record voltages and amperages for compressors
h.Check and record amperages for pumps and condenser fans
Update Your Maintenance Log Book!
i. Check and calibrate low ambient fan cycling controls
j. Inspect relay contacts for damage or pitting, replace if required
13.1 Refrigeration Circuits
a. Analyze refrigerant with tube type moisture/acid analyzer
b. Check and record refrigerant sub cooling and superheat
c. Check liquid solenoid valves
d.Check expansion valve and sensing bulb connections
24
AIR COOLED PACKAGED MODULE
Operations
13.2 Chilled Water System
a. Clean pump strainers and system strainers
b. Remove header caps and clean the ECHW strainers. Please see the 151A Cleaning Kit bulletin #F126 for more details.
c. Check glycol, inhibitor content in system chilled water
13.3 Cabinet and Related Hardware
a. Dry clean electrical panels, remove debris
b. Apply protective coatings or wax if required
c. Remove rust and apply primer and paint if required
14. Compressor Failure
With any chiller system there is always the chance of a compressor failure. In the event of a failure, proper steps should be taken to determine the cause of the
failure.
a. A motor burn out due to a fault in the motor insulation is quite rare. Most burnouts are actually caused by a mechanical condition or lubrication
problems. In the event of a burnout, proper clean up procedures should be followed.
b. Check all electrical components of the circuit (contactors, fuses, wires, etc.)
c. If necessary perform a system clean up. Nu-Calgon RX-11 Flush or Sporlan System Cleaner work well. Follow the cleaning solutions manufacturers
direction
d.Replace the liquid line filter drier with a burnout core.
e. Evacuate the system to a minimum of 500 microns and hold for 20 minutes
f. Charge the circuit with virgin refrigerant. Charge with liquid into the discharge side of the compressor. See refrigerant charge on nameplate data of
unit for proper amount
g.Run the system 2-3 weeks with the burnout filter core. With the King Valve on the receiver closed, replace with standard core drier. Consideration
should be given that the pipe loop will have refrigerant under pressure and consideration must be given to safety.
15. Heat Exchangers
Airstack® uses brazed plate stainless steel heat exchangers for all evaporators. Without proper water treatment or due to abuse, heat exchangers can corrode over
time and eventually develop an internal leak. In such an event it would become necessary to replace the heat exchanger.
Following are steps for field replacement of a failed evaporator heat exchanger:
a. If the refrigerant has not been lost on the failed circuit, you should first do a standard refrigerant recovery
b. Begin by isolating the chiller and draining the water/glycol form the loop
c. Remove the 4” round header pipes that attach to the evaporator (if you have a front module). If rear module remove the crossover pipes from the front
module.
d.Cur the refrigerant lines below the elbows and sweat off remaining pipe
e. Remove old evaporator and replace with new one
f. Fit in copper connections and braze, using a minimum 45% silver solder. Purge with Nitrogen while brazing
g.After brazing first perform a pressure check with Nitrogen. Charge the system to 110 psig and hold for 20 minutes. If the system passes the pressure
test, evacuate to a minimum of 500 microns and hold for 20 minutes. Charge the circuit according to the name plate charge.
If the evaporator heat exchanger has caused water to enter into the refrigerant side, the compressor and condenser should also be checked for possible
contamination. If water has entered into the compressor it is recommended the compressor be replaced as removing all the moisture from the oil is very difficult.
Replacement of the condenser, the expansion valve and installation of a liquid line filter drier with a water core cartridge is also recommended. Evacuate the
circuit to a maximum of 500 microns and let stand for 20 minutes. Charge the circuit and run 2-3 weeks with the high water core cartridge and the replace with
a standard core.
Standard condensers on the ASP module are copper coil with aluminum fin type, however other construction materials may be used. Periodic cleaning of the fins
should be done to keep air-born debris from plugging up the fins and causing high pressure conditions. Confirm the specific material used in construction of the
condenser before cleaning to avoid any possible damage. A coil cleaner suitable for copper and aluminum can be used for the standard condensers.
25
AIR COOLED PACKAGED MODULE
Operations
16. LOW AMBIENT OPTION
For applications requiring operation below 20° F, modules should be ordered with the “Low Ambient” option. “Low Ambient” modules can be operated down to
-20° F. These modules will be equipped with additional refrigerant charge, a larger liquid receiver, and head pressure control valves. The valves used to control
head pressure are the adjustable electronic CDS Stepper Valve along with the fixed setting ORD valve. The CDS Valve holds refrigerant in the condenser to “flood”
the coils by reducing surface area and therefore building the condenser head pressure. The ORD valve will open based on a differential between the compressor
discharge pressure and the receiver liquid pressure. As the differential between pressures increases, the ORD valve will open, allowing hot gas into the liquid line
increasing the liquid pressure. To set the chiller for low ambient operation and to set the CDS valves please see the ASPX Master Controller User Manual.
17. TROUBLE SHOOTING AIR COOLED PACKAGED MODULES
ASP modules use the Carel PCO2 master control. The user manual for the PCO2 controller is located in the O&M package. The user manual details the different
status screen and explanations of system or module faults.
WARNING: Most of the following repairs to the system should only be performed or attempted by a qualified service technician. Failure to adhere to
proper safeguards and safety rules could cause damage to the system and serious injury to personnel.
FAULT
SOLUTION
FAULT
• Check main disconnect for power
No Display on • Check circuit breakers in module and J-Box
Master Module • Check transformer in modules
• Check for 24v at J1 on board
• Check appropriate interlock component
EX 1, 2 interlock
• Check jumpers on TS2 in master module
• Check for proper rotation, phasing
EX 4 interlock
• Check PPM device
• Check CHW pump
Waiting For • Check flow switch operation
Chilled Water • Check filter strainers, Basket strainers and Y
Flow
strainers
• Check TS2 inputs #3 and #5
• Check LCHW sensor
Low Chill Water
• Check set points in system variables
Temp
• Check for flow restrictions, system and module
• Check entering CHW sensor
No Demand • Check set points in system variables
• Check sensor location
100% Demand • Check entering CHW sensor
all the time • Check set points in the system variables
100% Demand, • Turn chiller on
chiller won’t • Check sensors
load
• Check load limit setting in system variables menu
SOLUTION
• Check VSP setting in system variables
• Check entering CHW sensor location
• Check fan operation
High discharge • Check coil condition
Pressure (HP) • Compare analog pressure reading with digital
• Check fan settings in system variables
• Check refrigerant charge / leaks
Low Suction • Compare analog pressure reading to digital
Pressure (LP) • Check expansion valve
• Check solenoid valve
Check suction sensor
Check set points in system variables
Low Suction
Check expansion valve
Temperature
Check solenoid valve
Check for water flow restrictions
Communication Check settings in system variables
Error/
Check cables at J11 communications ports
pLan Error
Check components in control circuit
Circuit Fault
Check wire crimps in the control circuit
Excessive
Cycling
26
sm
1065 Maple Avenue Sparta, WI • Phone (608)366-2400 • Fax (608)366-2450
www.multistack.com
Made in U.S.A.
F122IUM0511