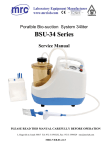
1
Companion Portables Technical Service Manual 1I Preface Companion Portables SERVICE MANUAL Companion Portables CAIRE, Inc. 2200 Airport Industrial Dr., Ste. 500 Ball Ground, GA 30107 www.cairemedical.com Customer/Technical Service: North and South America Phone (US Only): 800-482-2473 US: 770-721-7759 Asia, Australia, Pacific Rim Phone: 770-721-7759 Europe Phone: +44 (0) 1189 367080 Fax: 888-932-2473 Fax: 770-721-7758 Fax: 770-721-7758 Fax: +44 118 9799245 The following document contains additional information useful in servicing this equipment: For Customer or Technical Service needs (product assistance, ordering, part numbers, specifications, unexpected events, etc.) contact: CAIRE Inc. 2200 Airport Industrial Dr., Ste. 500 Customer & Technical Service: 1-800-482-2473 www.cairemedical.com NOTE: CAIRE Reservoir and Portable units are intended only for the delivery of medical grade oxygen as prescribed by a physician. NOTE: SI pressure values expressed in manual are referenced to atmosphere. HELiOS™, Companion®, and Teleview™ are trademarks of CAIRE INC. SNOOP® is a trademark of the SWAGELOK Co. Teflon® and Krytox® are trademarks of E. I. DUPONT DE NEMOURS & Co. Kel-F® and Scotch-Brite™ are trademarks of the 3M Co. Magnehelic® is a trademark of the DWYER INSTRUMENT Co. QUICK-GRIP® is a trademark of the AMERICAN TOOL Co. Sporicidin® is a trademark of SPORICIDIN INTERNATIONAL. Disclaimer This manual is intended for use by experienced personnel only. No attempt should be made to fill or maintain this equipment until both this manual and the Patient Operating Instruction booklet have been read and fully understood. Companion Portable Technical Service Manual • PN 20562220 Rev B 1 I Preface FCV Flow Control Valve LED Light Emitting Diode LOX Liquid Oxygen LPM Liters Per Minute NER Normal Evaporation Rate POI Patient Operating Instructions N2 Nitrogen Gas TF Top Fill DF Dual Fill DISS Diameter Index Safety System PRV QDV RMA RP RR SRV O2 SF PTFE Primary Relief Valve Quick Disconnect Valve Return Materials Authorization Repair Procedure Removal and Replacement Secondary Relief Valve Oxygen Gas Side Fill Polytetrafluoroethylene (“Teflon”) Companion Portables Abbreviations Definition of Terms WARNING Description of a condition that can result in personal injury or death. CAUTION Description of a condition that can result in equipment or component damage. NOTE A statement containing information important enough to emphasize or repeat. (ITEM) Item numbers used throughout this manual are shown on the illustrations. Definition of Product Symbols Table 1: Definition of Product Symbols Symbol Definition Symbol Read instruction manual The unit contains liquid oxygen which is extremely cold, almost -300°F. Exposure to such a low temperature can cause severe frostbite. Do not touch frosted parts Liquid and gaseous oxygen are nonflammable. However, they cause other materials to burn faster than normal. This hazard, along with the low temperatures of liquid oxygen, warrants certain safety precautions. Do not smoke near unit or while operating unit Definition Name and address of manufacturer Authorized representative in the European Community or Caution, consult accompaning documents Non-flammable gas Oxidizing substances Portable Full Keep unit well ventilated at all times Portable Empty Keep unit in upright position For use by doctor’s prescription only. Drip Proof Type BF (Electrical Safety) WEEE and RoHS This symbol is to remind the equipment owners to return it to a recycling facility at the end of its life, per Waste Electrical and Electronic Equipment (WEEE) Directive. Our products will comply with the restriction of Hazardous Substances (RoHS) directive. They will not contain more than trace amounts of lead or other hazardous material content. Companion Portable Technical Service Manual • PN 20562220 Rev B 2 II Table of Contents I.Preface . . . . . . . . . . . . . . . . . . . . . . . . . . . . . . . . . . . . . . . . . . . . . . 1 II. Table of Contents. . . . . . . . . . . . . . . . . . . . . . . . . . . . . . . . . . . . 3 III.Safety. . . . . . . . . . . . . . . . . . . . . . . . . . . . . . . . . . . . . . . . . . . . . . . . 4 IV. Equipment Description. . . . . . . . . . . . . . . . . . . . . . . . . . . . . . 10 V. Theory of Operation. . . . . . . . . . . . . . . . . . . . . . . . . . . . . . . . . 11 Companion Portables VI.Specifications. . . . . . . . . . . . . . . . . . . . . . . . . . . . . . . . . . . . . . . 13 VII. Saturation Principles . . . . . . . . . . . . . . . . . . . . . . . . . . . . . . . . 14 VIII. Unpacking and Setup . . . . . . . . . . . . . . . . . . . . . . . . . . . . . . . 17 IX.Operation. . . . . . . . . . . . . . . . . . . . . . . . . . . . . . . . . . . . . . . . . . . 18 X.Maintenance. . . . . . . . . . . . . . . . . . . . . . . . . . . . . . . . . . . . . . . . 20 XI. Troubleshooting & Repair Procedures. . . . . . . . . . . . . . . . 24 XII. Parts List. . . . . . . . . . . . . . . . . . . . . . . . . . . . . . . . . . . . . . . . . . . . 42 XIII. Ordering Information. . . . . . . . . . . . . . . . . . . . . . . . . . . . . . . . 43 XIV. Return & Restocking Policy . . . . . . . . . . . . . . . . . . . . . . . . . . 44 XV. Service Tools/Equipment/Supplies. . . . . . . . . . . . . . . . . . . 45 Companion Portable Technical Service Manual • PN 20562220 Rev B 3 III Safety Oxygen, as it exists at standard atmospheric pressure and temperature, is a colorless, odorless, and tasteless gas. Oxygen constitutes 21% of the atmosphere, by volume. Aside from its welldocumented ability to sustain life, oxygen also supports combustion, even though it is nonflammable. Many substances which will burn in air, burn at a faster rate and at a higher temperature in an oxygen enriched atmosphere. Other materials that do not burn in air will burn as oxygen concentration increases. Additionally, many greases and liquid solvents become extremely hazardous materials when placed in an oxygen-enriched environment. In its liquid form, oxygen is still odorless and tasteless, but is pale blue in color. At an operating pressure of 1,4 bar /20 psig, the temperature of liquid oxygen is about -173°C/-280° F. Skin exposed to such a low temperature can become severely frostbitten. Contraindications While CAIRE, Inc. equipment is designed and built to the most rigid standards, no piece of mechanical equipment can ever be made 100% foolproof. Strict compliance with proper safety practices is necessary when using any CAIRE unit. We recommend that our distributors emphasize safety and safe handling practices to their employees and customers. While safety features have been designed into the unit and safe operations are anticipated, it is necessary that all distributor personnel carefully read and fully understand WARNINGS, CAUTIONS, and NOTES throughout the manual. Periodic review of this information is recommended. These hazards require certain safety precautions to be taken when working around gaseous and/or liquid oxygen. WARNING: Never permit combustible substances such as greases, oils, solvents, or other compounds not oxygen compatible to contact any component of the unit exposed to higherthan atmospheric concentrations of gaseous or liquid oxygen. This especially applies to tubing, fittings, and valves. WARNING: Keep oxygen equipment away from open flames or electrical appliances such as heaters, stoves, toasters, and other devices with heating elements. WARNING: Never permit smoking in an area where oxygen equipment is repaired, filled, or used. WARNING: Do not modify equipment without authorization from the manufacturer. WARNING: These devices are not intended for life supporting applications nor do they provide patient monitoring capabilities. WARNING: In certain circumstances, the use of non-prescribed oxygen can be hazardous. These devices should only be used when prescribed by a physician. WARNING: Not for use in the presence of flammable anesthetics. Companion Portables Safety Guidelines and Operational Safety WARNING: Excess accumulation of oxygen creates an oxygen-enriched atmosphere (defined by the Compressed Gas Association as an oxygen concentration above 23%). In an oxygen-enriched atmosphere, flammable items may burn vigorously and may explode. Certain items considered noncombustible in air may burn rapidly in such an environment. Keep all organic materials and other flammable substances away from possible contact with oxygen; particularly oil, grease, kerosene, cloth, wood, paint, tar, coal dust, and dirt which may contain oil or grease. DO NOT permit smoking or open flame in any area where oxygen is stored, handled, or used. Failure to comply with this warning may result in serious personal injury. WARNING: In the event a unit is dropped, tipped over, or unreasonably abused, immediately, but cautiously, raise the container to its normal vertical position. If substantial container damage has occurred, remove the liquid oxygen from the vessel in a safe manner (RP3). Purge the unit with an inert gas (nitrogen) and promptly return it to CAIRE for inspection. The container should be prominently marked “CONTAINER DROPPED, INSPECT FOR DAMAGE.” Failure to comply with these procedures may result in personal injury and can seriously damage the container. WARNING: Personnel must remove liquid oxygen and depressurize the unit before removing parts or loosening fittings from a unit. Failure to do so may result in personal injury from the extreme cold of liquid oxygen and/or the pressure in the vessel. WARNING: During transfer of liquid oxygen, components will become extremely cold. Care should be used to avoid any contact with these components, as serious frostbite may result. WARNING: Always wear goggles, a face shield, and insulated gloves when working with or around liquid oxygen. Companion Portable Technical Service Manual • PN 20562220 Rev B 4 III Safety WARNING: The possibility of fire exists when the combination of a fuel, source of ignition, and oxygen is present. High concentrations of oxygen (air is approximately 21% oxygen) greatly enhance the possibility of combustion. NOTE: Figure 1 below is referred to as the fire/combustion triangle. This triangle describes the three factors required for fire/ combustion to occur. WARNING: Extreme high pressure can rupture container or plumbing components. Be sure specified pressure relief devices are present, in the proper location, and functioning properly. WARNING: During transfer of liquid oxygen gas blow off from the vent valve creates a loud horn-like noise. Ear protection is recommended. NOTE: Liquid oxygen at atmospheric pressure expands at a ratio of approximately 860:1 (at 0 bar/ 0psig) when vaporizing into a gas. This can occur very rapidly when exposed to the heat in the atmosphere. See Figure 2 for comparison. Companion Portables WARNING: When using concentrated oxygen, the risk of fire is increased. GAS LOX Figure 1: Fire/Combustion Triangle 1 NOTE: To reduce the risk of combustion/fire when dealing with LOX, please refer to the following suggestions 860 Figure 2: LOX to Gas ratio • Obtain all replacement parts for medical oxygen equipment from the manufacturer. WARNING: Do not smoke or keep burning tobacco near this equipment. Death or injury may occur. • Keep the reservoir upright at all times. Secure liquid oxygen equipment when transporting to prevent accidental tipover and spillage. WARNING: Keep flammable materials away from this equipment. Oils, grease, including facial creams and petroleum jelly, asphalt, and synthetic fibers ignite easily and burn rapidly in the presence of concentrated oxygen. If needed, use only specified oxygen compatible lubricants as directed. • Use only recommended oxygen compatible cleaning and leak detection products. • If a liquid oxygen spill occurs indoors, open doors and windows to ventilate the area. Avoid sources of ignition and do not walk on or roll equipment over the affected area. • Any clothing or porous material that is splashed with liquid oxygen or otherwise absorbs high concentrations of oxygen should be removed and aired for at least one hour away from any source of ignition. WARNING: Liquid oxygen vessels periodically release small amounts of oxygen gas that must be ventilated to prevent pressure buildup. Do not store liquid oxygen equipment in a car trunk, closet, or other confined area. Do not place bags, blankets, draperies, or other fabrics over the equipment when it contains liquid oxygen. Companion Portable Technical Service Manual • PN 20562220 Rev B 5 III Safety Guidance and Manufacturer’s declaration—electromagnetic emissions The Companion 1000/T is intended for use in the electromagnetic environment specified below. The customer or the user of the Companion 1000/T should assure that it is used in such an environment. Emissions test Compliance RF emissions CISPR 11 Group 1 Electromagnetic environment—guidance The Companion 1000/T uses RF energy only for internal function. Therefore, its RF emissions are very low and are not likely to cause any interference in nearby electronic equipment. RF emissions CISPR 11 Harmonic emissions The Companion 1000/T is suitable for use in all establishments, IEC 61000-3-2 including domestic establishments and those directly connected to the Voltage fluctuations/ public low-voltage power supply network that supplies buildings used flicker emissions for domestic purposes. IEC 61000-3-3 Class B Not applicable Not applicable Companion Portables Table 2 • Medical Electrical Equipment needs special precautions regarding EMC and needs to be installed and put into service according to the EMC information provided in this manual. • Portable and mobile RF communications equipment can affect Medical Electrical Equipment. • The use of Accessories, transducers, and cables other than those specified, with the exception of transducers and cables sold by the Manufacturer of this device as replacement parts for internal components, may result in increased Emissions or decreased Immunity of the Companion 1000/T. • The Companion 1000/T should not be used adjacent to or stacked with other equipment and that if adjacent or stacked use is necessary, the Companion 1000/T should be observed to verify normal operation in the configuration in which it will be used. Companion Portable Technical Service Manual • PN 20562220 Rev B 6 III Safety Guidance and manufacturers declaration—electromagnetic immunity The Companion 1000/T is intended for use in the electromagnetic environment specified below. The customer or the user of the Companion 1000/T should assure that it is used in such an environment. Immunity test Electrostatic discharge (ESD) IEC 60601 test level Compliance level ±6 kV contact ±6 kV contact ±8 kV air ±8 kV air Electromagnetic environment—guidance Floors should be wood, concrete or ceramic tile. If floors are covered with synthetic material, the relative IEC 61000-4-2 humidity should be at least 30%.* Electrical fast ±2 kV for power Not applicable Not applicable transient/burst supply lines DC powered device IEC 610004-4 ±1 kV for Surge IEC 61000-4-5 Not applicable input/output lines No data input/output lines ±1 kV line(s) to line(s) Not Applicable ±2 kV line(s) DC powered device <5% UT (>95% dip short interruptions in UT) for 0,5 cycle and voltage 40% UT (60% dip variations on in UT) for 5 cycles Not Applicable power supply 70% UT (30% dip DC powered device input lines in UT) for 25 cycles IEC 61000-4-11 <5% UT (>95% dip Power frequency (50/60 Hz) magnetic field Not Applicable to earth Voltage dips, Companion Portables Table 3 Not Applicable in UT) for 5 sec 3 A/m 3 A/m Power frequency magnetic fields should be at levels characteristic of a typical location in a typical commercial or hospital environment. IEC 61000-4-8 Note: UT is the a.c. mains voltage prior to application of the test level. * This statement indicates that the required testing was performed in a controlled environment and the Companion 1000/Ts are found to be compliant with regulations. Companion Portable Technical Service Manual • PN 20562220 Rev B 7 III Safety Guidance and manufacturers declaration—electromagnetic immunity The Companion 1000/T is intended for use in the electromagnetic environment specified below. The customer or the user of the Companion 1000/T should assure that it is used in such an environment. Immunity test IEC 60601 test level Compliance level Conducted RF 3Vrms Not Applicable IEC 61000-4-6 150kHz to 80 MHz Battery powered device Radiated RF 3 V/m 3 V/m IEC 61000-4-3 80 MHz to 2,5 GHz Electromagnetic environment—guidance Portable and mobile RF communications equipment should be used no closer to any part of the Companion 1000/T, including cables, than the recommended separation distance calculated from the equation applicable to the frequency of the transmitter. Recommended separation distance d = 1.2 √P d = 1.2 √P 80 MHz to 800 MHz d = 2.3 √P 800 MHz to 2,5 GHz Field strengths from fixed RF transmitters, as determined by an electromagnetic site surverya, should be less than the compliance level in each frequency rangeb. Interference may occur in the vicinity of equipment marked with the following symbol: Companion Portables Table 4* where P is the maximum output power rating of the transmitter in watts (W) according to the transmitter manufacturer and d is the recommended separation distance in meters (m). NOTE 1 At 80 MHz and 800 MHz, the higher frequency range applies. NOTE 2 These guidelines may not apply in all situations. Electromagnetic propagation is affected by absorption and reflection from structures, objects and people. a Field strengths from fixed transmitters, such as base stations for radio (cellular/cordless) telephones and land mobile radios, amateur radio, AM and FM radio broadcast and TV broadcast cannot be predicted theoretically with accuracy. To asses the electromagnetic environment due to fixed RF transmitters, an electromagnetic site survey should be considered. If the measured field strength in the location in which the Companion 1000/T is used exceeds the applicable RF compliance level above, the Companion 1000/T should be observed to verify normal operation. If abnormal performance is observed, additional measures may be necessary, such as reorienting or relocating the Companion 1000/T. b Over the frequency range 150 kHz to 80 MHz, field strengths should be less than 3 V/m. * This table is included as a standard requirement for equipment which has been tested to specific test levels and over specific frquency ranges and been found compliant with regulations. Companion Portable Technical Service Manual • PN 20562220 Rev B 8 III Safety Recommended separation distances between portable and mobile RF communications equipment and the Companion 1000/T The Companion 1000/T is intended for use in an electromagnetic environment in which radiated RF disturbances are controlled. The customer or the user of the Companion 1000/T can help prevent electromagnetic interference by maintaining a minimum distance between portable and mobile RF communications equipment (transmitters) and the Companion 1000/T as recommended below, according to the maximum output power of the communications equipment. Rated maximum outputSeparation distance according to frequency of transmitter power of transmitter W 150 kHz to 80 MHz Companion Portables Table 5* m 80 MHz and 800 MHz 800 MHz to 2,5 GHz d=1.2√P d=1.2 √P d=2.3 √P 0,01 0.12 m 0.12 m 0.23 m 0,1 0.38 m 0.38 m 0.73 m 1 1.2 m 1.2 m 2.3 m 10 3.8 m 3.8 m 7.3 m 100 12 m 12 m 23 m For transmitters rated at a maximum output power not listed above, the recommended separation distance (d) in meters (m) can be estimated using the equation applicable to the frequency of the transmitter, where P is the maximum output power rating of the transmitter in watts (W) according to the transmitter manufacturer. NOTE 1 at 80 MHz and 800 MHz, the separation distance for the higher frequency range applies. NOTE 2 These guidelines may not apply in all situations. Electromagnetic propagation is affected by absorption and reflection from structures, objects and people. * This table is included as a standard requirement for equipment which has been tested to specific test levels and over specific frquency ranges and been found compliant with regulations. Companion Portable Technical Service Manual • PN 20562220 Rev B 9 IV 1 Equipment Description The CAIRE Companion C1000 and C1000T units are the portable components of a supplemental oxygen system. The Companion 1000 provides continuous oxygen flow up to 6LPM, and the Companion 1000T provides continuous oxygen flow up to 15LPM. The C1000 and the C1000T are nearly identical in features and operational characteristics. The difference in the two units is primarily the oxygen flow delivery rate capabilities. Enclosed in a plastic case, the C1000/T incorporates a stainless steel cryogenic container with the valves, plumbing, and associated hardware necessary to deliver gaseous oxygen to a patient at or near room temperature. The Companion portable units are composed of four major assemblies, grouped according to function: 1. Cryogenic Container This assembly is a double walled vacuum insulated Dewar for storing liquid oxygen (LOX) at approximately -173°C/-280°F. The inner vessel is designed to safely hold liquid oxygen and is protected from over pressurization by the primary relief valve. Vacuum insulation between the inner and outer vessel keeps outside heat from causing the cold liquid inside to evaporate. 2. Plumbing System The plumbing system consists of the warming coils, vent valve, PRV, SRV, FCV and QDV (fill connector). It is responsible for filling the unit with liquid oxygen, as well as removing the liquid oxygen from the cryogenic container and warming it to a gas for delivery to the patient. Companion Portables NOTE: Throughout this manual the CAIRE Companion 1000 and CAIRE Companion 1000 T will be referred to as the Companion 1000/T whenever information that is applicable to both models is presented. 3. Case Assembly The C1000/T side covers are molded polycarbonate plastic. When assembled, they form a clam-shell enclosure of the plumbing and cryogenic container. 4. Liquid Content/Level Indicator The system uses a weight scale system to measure the level of LOX remaining in the cryogenic container. It is activated by suspending the unit by one end of the carrying strap and reading the needle gauge built into the top cover. Figure 3: Companion portables components Companion Portable Technical Service Manual • PN 20562220 Rev B 10 V Theory of Operation The C1000/T portable units are designed to be filled from any top-fill (TF) reservoir with a compatible male QDV. The following CAIRE reservoirs are compatible with the C1000/T for filling: • Liberator (TF/DF) 10, 20, 30, 37, 45, 60 • Companion C21, C31, C41 • Low Loss (TF/DF) 31, 42 • HELiOS Universal U36, U46 As with all vacuum-insulated cryogenic containers, the liquid oxygen in the C1000/T is always evaporating into a gas. The rate of generation of this gas (called “head gas”) is called the normal evaporation rate (NER). When the flow control knob is in the off position, this gas will build up pressure in the headspace above the liquid oxygen. When the pressure reaches the PRV setting, this gas is released through the primary relief valve into the atmosphere. The vented gas represents the system’s NER loss. Oxygen Withdrawal The C1000/T is filled by coupling its female quick disconnect valve (QDV) with the male QDV on the reservoir and opening the vent valve. With oxygen in the unit, and the vent valve closed, the pressure in the inner vessel will remain at or near the primary relief valve opening pressure. At operating pressure and with the flow control valve open, pressure forces liquid oxygen up the liquid withdrawal tube and into the warming coils. In the warming coils, liquid oxygen absorbs heat and vaporizes, warming to almost ambient temperature by the time gas is dispensed by the flow control valve to the patient. Once the QDV’s have been connected, the vent valve on the portable unit must be opened to initiate flow of liquid into the unit. When the vent valve is opened, it vents the contents of the inner container to the atmosphere. A moisture collection pad is an internal component of the C1000, and a moisture collection cup is externally attached to the C1000T. These collect the additional condensed water that is created when the Companion is operated at higher flow-rates. Venting the gas inside of the container creates a pressure drop inside of the C1000/T. This pressure differential causes liquid oxygen to flow up the reservoir fill tube, through the coupled QDV’s, and into the inner container of the C1000/T Liquid Contents/Level Indicator Operation NOTE: The Companion T moisture cup must be removed from the unit before filling. At the beginning of a fill, the liquid oxygen that leaves the reservoir will vaporize into a gas because the inside of the C1000/T container is relatively warm. This gas is discharged through the vent valve. After a short time, the container cools and liquid oxygen is contained. Companion Portables Filling The C1000/T is equipped with a spring scale liquid level measurement system. The spring scale is incorporated into the strap assembly of the portable and the display is built in to the top bezel. Suspending the unit from the carrying strap closest to the contents indicator activates the weight-scale mechanism. The needle on the weight scale display moves an amount proportional to the amount of LOX in the unit. When the unit is full, liquid oxygen is expelled through the vent valve. The venting sound also changes and the liquid oxygen creates a dense vapor cloud coming from under the reservoir’s shroud. Closing the vent valve and separating the C1000/T from the reservoir terminates the fill process. The saturation pressure (explained in section VII of this manual) of the liquid oxygen in a reservoir can seriously affect the overall efficiency and operation of the C1000/T. Standby/Normal Evaporation Rate When the C1000/T contains liquid oxygen, the vent valve is closed, and there is no flow demand, the pressure in the system will remain at or near its PRV pressure. The liquid oxygen maintains saturation at this pressure due to the normal evaporation rate (NER) of the system. The NER is a function of the rate at which ambient heat “leaks” into and warms the liquid oxygen in the inner container. Companion Portable Technical Service Manual • PN 20562220 Rev B 11 V Theory of Operation Each C1000/T is identified by a unique serial number. The serial number is crucial if a problem arises with the unit or support is ever needed through CAIRE Customer or Technical Service. Prior to June 2010, the serial number for the C1000/T was etched on the vent valve mounting bracket. The vent valve is pulled down to view the serial number when the side covers of the unit are in place. As of June 2010, the serial number location has changed. The serial number is now found on a white, rectangular sticker placed on the outside of the cryogenic container. It can be seen through the vents on the side of the outer case. Figure 4 shows a history of the serial number structure for Companion portables. Portables Manufactured prior to January 1985 4 - 6 - 25 - 1 Designates Year (4 represents 1984) Designates Month Designates Day of Month Designates Number of Specific Unit Produced that Day Portables Manufactured in and after January 1985 and prior to October 1994 Companion Portables Figure 4 Portable Serial Number Identification 88 06 25 01 Designates Year Designates Month Designates Day of Month Designates Number of Specific Unit Produced that Day Portables Manufactured in and after October 1994 95 176 001 Designates Year (4 represents 1984) Designates Sequential Day of Year (Jan 1 = 001, Dec 31 = 365) Designates Number of Specific Unit Produced that Day Portables Manufactured after June 2010 CB B30 10 29 0964 Designates Designates Portable Manufacturing Product Code Location Designates Designates Designates Year Week of Number of the Year Specific Unit Produced that Week Companion Portable Technical Service Manual • PN 20562220 Rev B 12 VI 1 Specifications Companion C1000 Companion C1000T Volume of LOX (Typical) 1.23 L / 0.04 ft3 1.23 L / 0.04 ft3 Weight of LOX (typical) 1.41 kg / 3.1 lb 1.41 kg / 3.1 lb Gaseous Oxygen Equivalent 1058 L / 37.36 ft3 1058 L / 37.36 ft3 Height 35 cm / 13.8 in 36.8 cm / 14.5 in Empty Weight 2.3 kg / 5.0 lb 2.5 kg / 5.6 lb Full Weight 3.7 kg / 8.1 lb 3.9 kg / 8.7lb Outlet Pressure 1.28 – 1.62 bar / 18.5 – 23.5 psi 1.28 – 1.62 bar / 18.5 – 23.5 psi Primary Relief Valve Opening Pressure <1.62 bar / <23.5 psi <1.62 bar / <23.5 psi Primary Relief Valve Reseat Pressure >1.28 bar / >18.5 psi >1.28 bar / >18.5 psi Secondary Relief Valve Opening Pressure 1.97-2.17 bar / 28.5-31.5 psi 1.97-2.17 bar / 28.5-31.5 psi Secondary Relief Valve Reseat Pressure >1.86 bar / >27 psi >1.86 bar / >27 psi 0.59-0.68 kg/day 1.3 - 1.5 lb/day 0.0, 0.25, 0.5, 0.75, 1.0, 1.5, 2.0, 2.5, 3.0, 4.0, 5.0, 6.0 0.59-0.68 kg/day 1.3 - 1.5 lb/day 0.0, 0.5, 1.0, 1.5, 2.0, 3.0, 4.0, 5.0, 6.0, 8.0, 10.0, 15.0 Normal Evaporation Rate (NER) (typical) Selectable Flow Rates (LPM) Contents Indicator Mechanical, Spring Scale Companion Portables Table 6 Mechanical, Spring Scale Operating Temperature -20°C to 40°C / 95% max relative humidity -20°C to 40°C / 95% max relative humidity Storage Temperature -40°C to 70°C / 95% max relative humidity -40°C to 70°C / 95% max relative humidity Companion Portable Technical Service Manual • PN 20562220 Rev B 13 VII Saturation Principles Oxygen, like most gases, will condense into a liquid with an increase in pressure or decrease in temperature. As a liquid, oxygen is pale blue in color and is about 860 times as dense as its gaseous form. At atmospheric pressure (14.7 psia), oxygen condenses into its liquid form at a temperature of about -297°F (-184°C). Liquid oxygen (LOX) is an efficient form of oxygen to meet a patient’s portable, ambulatory oxygen needs. A volume of liquid oxygen, when vaporized, yields about 860 volumes of gaseous oxygen (Figure 1). As you can see, a relatively small volume of liquid oxygen provides a much larger volume of gaseous oxygen for a patient to use. In medical liquid oxygen systems, liquid oxygen, and the gaseous oxygen resulting from its vaporization or boiling, is stored under pressure. The elevated pressure, typically 1.52 bar (22 psi), enables oxygen to flow to the patient at a selected, prescribed rate. To sustain this oxygen flow to the patient, the liquid oxygen must be in a state that allows vaporization to readily occur. In other words, the liquid oxygen must be in a state of saturation. Let’s take a look at what liquid saturation is all about. Companion Portables Oxygen, in its normal state, is a colorless, tasteless, and odorless gas that is non-flammable, although it greatly accelerates combustion in high concentrations. It constitutes about 21% of the Earth’s atmosphere by volume. Oxygen in higher concentrations is medically beneficial to patients suffering from certain respiratory diseases. A saturated liquid is one that absorbs the maximum amount of heat possible at a given pressure without vaporizing into a gas. If additional heat is added, the saturated liquid begins to vaporize (boil) while remaining at a constant temperature until all of the liquid is vaporized. A common example of a saturated liquid is water at its boiling point of 212°F (100°C) at sea level. The constant addition of heat to the boiling water does not cause it to become hotter, but instead causes part of the liquid water to turn to water vapor (Figure 5). Figure 5: Saturated (Boiling) Water at Sea Level The saturation (boiling) point of a liquid depends not only on temperature but also on pressure. If the pressure in a container of saturated liquid increases, the temperature required for saturation to occur will also increase. This leaves the liquid unsaturated, that is, capable of accepting more heat before it will boil (Figure 6). Figure 6: Saturated (Boiling) Water at Higher Pressure Companion Portable Technical Service Manual • PN 20562220 Rev B 14 VII Saturation Principles Companion Portables If the pressure in a container of saturated liquid decreases, the temperature required for saturation to occur will decrease. This leaves the liquid “super saturated” or too warm. When this occurs, rapid boiling and vaporizing of some of the liquid occurs. The rapid boiling and evaporation of the liquid dissipates the excessive heat until the remaining liquid cools down to the new saturation temperature associated with the decreased pressure (Figure 7). Figure 7: Saturated (Boiling) Water at Lower Pressure Oxygen, which is normally a gas at atmospheric pressure, changes into liquid form when it is cooled to about -297°F (-183°C) at atmospheric pressure. It is saturated at this temperature (and pressure) which means it will remain a liquid as long as no additional heat is added. However, the large quantity of heat present in the atmosphere constantly enters the liquid oxygen and causes it to boil and vaporize back into a gas. Since it is virtually impossible to keep all of the heat in the atmosphere from entering the liquid oxygen, constant boiling and vaporization occurs. Now when liquid oxygen is placed in a closed container, the vaporizing gas is trapped and begins to build pressure. As pressure increases above atmospheric pressure, more heat is needed for boiling to occur at the higher pressure. The heat that is constantly available from the atmosphere warms the liquid to a higher temperature where boiling again occurs. The vaporizing gas builds pressure and the process continues. As the pressure on liquid oxygen builds, the related saturation temperature of the liquid increases proportionally (Figure 8). Figure 8: Liquid Oxygen Saturation Curve It is important to maintain liquid oxygen saturation (boiling) at the specified operating pressure of a liquid oxygen system. As an oxygen flow demand is put on the system, a slight decrease in pressure occurs due to oxygen withdrawal. The saturated liquid oxygen in the system vaporizes enough gaseous oxygen to maintain system operating pressure. This ensures proper oxygen flow to the patient. If the liquid oxygen saturation temperature is too low, the corresponding lower saturation pressure causes low oxygen flows to the patient. Companion Portable Technical Service Manual • PN 20562220 Rev B 15 VII Saturation Principles • Increased product loss and evaporation rate • Decreased durations • High flow rates • Venting from relief valves • Relief valves frozen open If the saturation pressure of the liquid in the portable unit is lower than 1.2 bar (18 psi) the following symptoms may occur: • Decreased evaporation rates • Low flow rates • No oxygen flow • Portable will not fill Companion Portables If the saturation pressure of the liquid in the portable unit is greater than 1.93 bar (28 psi) the following symptoms may occur: High saturation pressure in portables can be prevented by always ensuring that the reservoir being used to fill the portable is filled according to its respective service manual. The saturation pressure of a portable unit is equal to the saturation pressure of the LOX inside of the reservoir used to fill the portable. Companion Portable Technical Service Manual • PN 20562220 Rev B 16 VIII Unpacking and Setup 1. Inspect carton for shipping damage. Report any damage to the freight company before signing the bill of lading. 2. Check description on carton against your order. 3. Unpack unit, including all accessories and documentation. 4. Set aside packing materials in case unit must be returned to the factory. Transport The C1000/T are designed with carrying straps. Portable units may be moved about or transported in a vehicle while full without damage. However, they should not be dropped, placed on their side, or handled roughly to prevent physical damage. Maintain unit in the upright position at all times. Setup 1. Locate and record the C1000/T serial number. Companion Portables Unpacking 2. Visually inspect the C1000/T for damage from improper handling. Note any dents in the container, cracks in the case, missing or loose hardware, and bent or damaged components. 3. Check the vent valve for smooth operation by moving the vent valve lever down to the open position. Verify that the lever moves smoothly when opening and closing the valve. 4. Move the flow control knob to each flow setting. Verify that the knob moves smoothly and encounters a detent at each setting. 5. If possible, connect the portable to a reservoir to check for smooth coupling, and to make sure the portable unit is in proper alignment with the reservoir when mated and there is no interference with the shroud or case of the portable unit. 6. Verify operation of the liquid level contents indicator by suspending the portable. Hold the C1000/T on a table and carefully pull up on the end of the carrying strap nearest the contents indicator. Verify that the indicator mechanism moves smoothly. If the unit is empty, the contents should display empty. 7. Inspect the carrying strap and buckle for abnormal wear. 8. Companion 1000 T Only: Inspect the moisture cup for cracks. Verify the presence of a clean moisture pad in the moisture cup. Verify that the quarter-turn fastener operates properly and secures the moisture cup to the bottom of the Companion T. 9. Check all labels for damage and wipe away any dust on unit with a clean, dry, lint-free cloth. Companion Portable Technical Service Manual • PN 20562220 Rev B 17 IX Operation 1. Fill Source Preparation a. Ensure that the liquid reservoir contains a sufficient amount of liquid oxygen to completely fill the portable. b. Ensure the liquid oxygen in the fill source is properly saturated according to its technical manual filling instructions. WARNING: Fill source must be in a well ventilated area to prevent development of an oxygen enriched atmosphere. NOTE: Reference section VII for information on the effects of an improperly saturated reservoir on the C1000/T 2. Fill Procedure a. Companion T Only: Remove the moisture cup from the bottom of the unit b. Using a clean, dry, lint-free cloth, dry the male QDV on the reservoir and the female QDV on the C1000/T. WARNING: The fill connectors must be clean and dry before filling the C1000/T. Moisture on the fill connectors can lead to leakage of liquid oxygen. Moisture can also cause the units to freeze together, and can lead to malfunctions of the portable or reservoir. CAUTION: Do not depress or disturb the plastic poppet in the center of the reservoir fill connector. This will cause an uncontrolled release of liquid oxygen from the fill connector. c. Hold the C1000/T with both hands and position its female QDV over the male QDV of the reservoir. d. Lower the C1000/T carefully into place, ensuring the fill connectors are properly aligned. CAUTION: Do not leave the Companion 1000/T unattended during the filling operation. Excessive liquid oxygen discharge can occur e. Place one hand on top of the C1000/T and press straight down. This will lower the unit about 3/8 in, properly engaging the fill connectors. f. While holding the C1000/T in this position, move the vent lever to the open position. A hissing sound will be heard indicating liquid flowing into the portable. i. When you notice a change in the sound of the venting gas, followed by the emission of a dense, white vapor around the reservoir shroud, close the vent valve to terminate the fill. j. Disengage the C1000/T from the reservoir by holding the carrying strap above the unit and pressing the release button on the reservoir. Should the units not disengage easily, they may be frozen together. Do not use force. Allow a few moments for the frozen parts to warm. Disengage the units after the ice has melted. k. Check the liquid oxygen contents indicator to verify that the C1000/T is full of liquid oxygen. Companion Portables Filling CAUTION: If the vent valve fails to close and the hissing continues, remove the Companion 1000/T by pressing the release button on the stationary. Keep the Companion 1000/T in an upright position. The unit will stop venting in a few minutes. Allow the unit to warm until you can close the vent valve. It may require as much as two to three hours with the flow control off for the Companion 1000/T to restore adequate pressure for accurate oxygen delivery. CAUTION: Liquid oxygen discharge from the fill connector can occur. When disconnecting the Companion 1000/T, never stand directly over the reservoir QDV. If the reservoir QDV stays open and minor liquid oxygen discharge occurs, carefully re-engage and disengage the Companion 1000/T to help dislodge any ice or other obstruction. If major liquid oxygen discharge (steady stream) occurs, open the reservoir vent valve (if safely possible) to vent pressure and stop the release of liquid oxygen. Open windows and doors to ventilate the room. Do not walk on areas exposed to liquid oxygen for 60 minutes after frost disappears. NOTE: The pressure in the Companion 1000/T may be slightly lower than normal for up to 20 minutes after filling the unit. This may cause actual oxygen flows to be slightly lower than normal. Liquid Level Measurement 1. Suspend the C1000/T by the strap nearest the liquid level gauge. 2. Observe the location of the needle on the liquid level gauge. 3. The green section of the color coded gauge indicates a full unit. g. During the filling operation, maintain a slight downward pressure on the C1000/T with one hand to ensure stability and proper filling position. h. Approximately 20-30 seconds into the fill, close and reopen the vent valve one or more times to prevent the vent valve from freezing open. Companion Portable Technical Service Manual • PN 20562220 Rev B 18 IX Operation 1. Verify that there is enough liquid oxygen to meet anticipated needs by checking the liquid level indicator. 2. Attach the oxygen cannula tube to the oxygen outlet connector. 3. Properly position the nasal cannula on the patient’s face. 4. Turn the flow control knob to the prescribed oxygen flow rate. Verify that oxygen is indeed flowing from the nasal cannula. 5. To stop oxygen flow, turn the flow control knob to a setting of “0”. TABLE 7: Recommended Cleaning and Disinfectant Solutions Cleaning Disinfecting Sporicidin Disinfectant Solution Mild dish washing detergent/warm water solution Sporicidin Disinfectant Solution Household Bleach (1:10 dilution with water, freshly made within 24 hours) NOTE: After performing the cleaning/disinfecting process, it is suggested to preform the following inspections and testing. Companion Portables Operation Inspection Cleaning & Disinfecting To ensure proper functioning and end-user safety, CAIRE portables should be cleaned whenever dirt or grime is visually apparent. The unit should be disinfected if required by applicable local regulations or the home healthcare distributor’s own decontamination schedule. Preparation Prior to cleaning or disinfecting, the unit should be completely purged of LOX. The technician should wear appropriate safety gear when performing the following procedures. Cleaning 1. Remove the front and rear cover (RP4). 2. Spray an approved cleaner (Table 7) onto a clean, dry, lintfree cloth. 3. Clean the interior and exterior of each cover with the cloth. Use cotton swabs in tight places. 4. Wipe the covers dry with a towel. 5. Use a Scotch-Brite pad lightly with detergent to remove scuff marks on the case. 6. Clean the plumbing with water. 7. Dry the plumbing with a towel and oil-free compressed gas. 1. Inspect the case for cracks, warpage, and discoloration. 2. Verify that all warning labels are present and legible on the unit 3. Verify that the fill connector is not worn or damaged and that the poppet is not broken. 4. Verify that the vent valve moves smoothly when opening and closing the valve. 5. Verify that the contents indicator works properly and reads empty when the strap is suspended. Testing 1. Perform Leak Test 2. Perform Liquid Oxygen Functional Tests 3. Perform Gaseous Oxygen Functional Tests End of Life At the end of the unit’s service life, all portable units must be returned to a recycling facility in compliance with the Waste Electrical and Electronic Equipment Directive (WEEE), or other applicable codes and regulations. Alternatively, CAIRE may be contacted for disposal information. 8. Inspect the C1000/T moisture pad and replace if necessary. NOTE: Make sure that the fill connector and vent valve shaft are thoroughly dry before proceeding. Companion Portable Technical Service Manual • PN 20562220 Rev B 19 X Maintenance (Schedule A, Biennial) 4. Prepare for Use a. Empty Contents (RP3) b. Clean and/or disinfect the unit following instructions set forth in the Operation section. Schedule A—Biennial Maintenance Introduction Routine maintenance is a series of steps used to assure that the equipment is functioning properly. 1. If a unit fails a given test, one of two things may be done: Companion Portables There are two schedules for routine maintenance which the home health care distributor may follow. These schedules allow the distributor maximum flexibility while assuring that equipment is operating properly. The healthcare distributor may follow either Schedule A or Schedule B, or a combination of the two schedules. Maintenance Checklists are provided for each schedule. See Below. a. Refer to Troubleshooting section of this manual. -or- b.Return the unit to CAIRE, Inc. for repair. 2. Schedule – Maximum of two years between routine maintenance testing. Unit should be tested whenever a problem is suspected. Procedure Follow the steps in order listed. If the unit fails any step, refer to Troubleshooting section of this manual. 1. Visual Inspection a. Remove all LOX prior to maintenance (RP3). c. Verify the contents indicator reads empty and that the spring scale moves freely. b. Look for damaged or missing parts 2. Component Test a. Remove Case (RP4) c. Preform PRV Test (RP9) b Perform Leak Test (RP2) d. Preform SRV Test (RP11) e. Pressure Retention Test (RP13) f. Replace Case (RP4) g. Liquid Contents/Level Indicator Test (RP7) h. Flow Rate Test (RP19) 3. Check Efficiency of Unit: a. Inspect the unit for cold or sweaty condition and for excessive venting from relief valve (some venting may be normal). b. Perform NER Test (RP23) Companion Portable Technical Service Manual • PN 20562220 Rev B 20 X Maintenance (Schedule A, Biennial) Step 10 Year Service Life Year 2 1 LOX Purged From Reservoir (Repair Procedure RP3) Performed or Verified By/Date 2 Inpection for Damaged/Missing Parts Performed or Verified By/Date 3 Contents Indicator Reads Empty and Spring Scale Moves Freely Performed or Verified By/Date 4 Remove Cover (Repair Procedure RP4) Performed or Verified By/Date 5 Perform Leak Test (Repair Procedure RP2) Performed or Verified By/Date 6 Perform PRV Test (Repair Procedure RP9) Performed or Verified By/Date Year 4 Year 6 Year 8 Year 10 Companion Portables Schedule A (Biennial) Maintenance Checklist PRV Crack Pressure PRV Reseat Pressure 7 Perform SRV Test (Repair Procedure RP11) Performed or Verified By/Date SRV Crack Pressure SRV Reseat Pressure 8 Pressure Retention Test (Repair Procedure RP13) Performed or Verified By/Date Internal Pressure at initial reading Internal Pressure after 8-9 hours 9 Replace Case (Repair Procedure RP4) Performed or Verified By/Date 10 Liquid Contents/Level Indicator Test (Repair Procedure RP7) Performed or Verified By/Date Color-Coded gauge reads red when empty and green (1/1) when full. 11 Flow Rate Test (Repair Procedure RP19) Performed or Verified By/Date C1000 C1000T Flow Rate at: 0.25 0.5 Flow Rate at: 0.5 1.0 Flow Rate at: 0.75 1.5 Flow Rate at: 1.00 2.0 Flow Rate at: 1.50 3.0 Flow Rate at: 2.00 4.0 Flow Rate at: 2.50 5.0 Flow Rate at: 3.00 6.0 Flow Rate at: 4.00 8.0 Flow Rate at: 5.00 10.0 Flow Rate at: 6.00 15.0 12 Inspect for Cold or Sweaty conditon/ Excessive Venting from RV Performed or Verified By/Date 13 Perform NER Test (Repair Procedure RP23) Performed or Verified By/Date NER Results 14 Empty Contents from Portable (Repair Procedure RP3) Performed or Verified By/Date 15 Clean and/or Disenfect Outside of Unit Performed or Verified By/Date Companion Portable Technical Service Manual • PN 20562220 Rev B 21 X Maintenance (Schedule B, Continuous) Companion Portables Schedule B – Continuous Pre and Post Fill Inspection A.Introduction Continuous maintenance is a set of tests and inspections done periodically to ensure equipment is functioning properly. It can be performed by drivers or other personnel while the equipment is in service. 1. If a unit fails a given test, it should be taken out of service and sent to the Repair Center/Department for further inspection. 2. Schedule – Checks should be made before and after the driver fill the reservoir at a patient location. B. Pre Fill Procedure 1. Visually Inspect For: a. Cracks, warping, or discoloration on the case, bezel, flow knob, and vent lever. b. QDV deformation. Verify that the poppet is not worn or damaged and that the lip seal is not cracked or worn. c. Liquid Contents/Level Indicator functionality d. Cryogenic container damage (dents, dings). e. Visible dirt or contaminants inside or outside of the case. f. Cracks on the moisture cup (C1000T only). Verify the presence of a clean moisture pad in the moisture cup. Verify that the fastener opens properly and secures the moisture cup to the bottom of the C1000T. g. Presence of all required labels f. If LOX is still present in the unit, inspect for heavy frost or condensation. h. Vent vale functionality (opens and closes smoothly) i. FCV knob moves smoothly and encounters a detent at each setting. j. Abnormal wear to the carrying strap and buckle. C. Post Fill Procedure 1. Visually Verify a. QDV poppet is closed and not leaking c. No heavy frost or condensation is present on the exterior of the unit b. Vent valve is completely closed and not leaking d. Liquid Level Contents Indicator reads the accurate amount. Companion Portable Technical Service Manual • PN 20562220 Rev B 22 X Maintenance (Schedule B, Continuous) Pre Fill Visual Inspection 1 Cracks, warming or discoloration Verified By/Date 2 QDV Deformation Verified By/Date 3 Liquid Contents/Level Indicator Functionality Verified By/Date 4 Cryogenic Reservoir Damage (Dents,Dings) Verified By/Date 5 Visible Dirt or Contamination Verified By/Date 6 Presence of All Required Labels Verified By/Date 7 If LOX is present in Unit, Inspect for Heavy Frost or Condnesation on the Exterior of the Unit Verified By/Date 8 Vent Valve Functionality Ensuring that All Parts are Present and the Valve Functions as it Should Verified By/Date 9 FCV knob moves smoothly and encounters a detent at each setting Verified By/Date 10 Abnormal wear to carrying strap & buckle Verified By/Date Companion Portables Schedule B (Continuous Pre and Post Fill Inspection) Maintenance Checklist Post Fill Visual Inspection 1 QDV Poppet is Closed and Not Leaking Verified By/Date 2 Vent Valve is Not Leaking Verified By/Date 3 No Heavy Frost or Condensation is Present on the Exterior of the Unit Verified By/Date 4 Liquid Level Contents/Indicator Reads the Accurate Amount Verified By/Date Companion Portable Technical Service Manual • PN 20562220 Rev B 23 XI 1 Troubleshooting & Repair Procedures A. B. C. Introduction------------------------------------------------------------------------------------------ 24 Troubleshooting Chart------------------------------------------------------------------------------ 25 Repair Procedures RP1 General----------------------------------------------------------------------------------- 30 RP2A Leak Test (Warm & Empty Unit)---------------------------------------------------- 30 RP2B Leak Test (Unit Containing Oxygen)------------------------------------------------ 31 RP3 Emptying/Warming Portable RR----------------------------------------------------- 31 RP4 Side Cover RR-------------------------------------------------------------------------- 31 RP5 Top Bezel RR--------------------------------------------------------------------------- 31 RP6 Carrying Strap RR---------------------------------------------------------------------- 32 RP7 Liquid Contents/Level Indicator Test------------------------------------------------ 32 RP8 Liquid Contents/Level Indicator RR------------------------------------------------- 32 RP9 PRV Test--------------------------------------------------------------------------------- 33 RP10 PRV RR---------------------------------------------------------------------------------- 33 RP11 SRV Test--------------------------------------------------------------------------------- 34 RP12 SRV RR---------------------------------------------------------------------------------- 34 RP13 Pressure Retention Test---------------------------------------------------------------- 34 RP14A Warming Coil Assembly RR (C1000)----------------------------------------------- 35 RP14B Warming Coil Assembly RR (C1000T)--------------------------------------------- 35 RP15 Vent Valve Test------------------------------------------------------------------------- 35 RP16 Vent Valve RR-------------------------------------------------------------------------- 36 RP17 QDV Assembly RR-------------------------------------------------------------------- 37 RP18 Lip Seal RR------------------------------------------------------------------------------ 37 RP19 Flow Rate Test Test-------------------------------------------------------------------- 38 RP20 FCV RR---------------------------------------------------------------------------------- 39 RP21 Back Flushing the FCV---------------------------------------------------------------- 39 RP22 Operating Pressure Test---------------------------------------------------------------- 39 RP23 NER Test-------------------------------------------------------------------------------- 40 RP24 Manifold RR---------------------------------------------------------------------------- 40 RP25 Cryogenic Container RR--------------------------------------------------------------- 41 Companion Portables Table of Contents Introduction 1. These procedures are designed to be performed only by qualified personnel with proper equipment. 2. Any failure during routine maintenance checks will refer you to this section. See troubleshooting chart for appropriate procedure. Companion Portable Technical Service Manual • PN 20562220 Rev B 24 XI Troubleshooting & Repair Procedures When more than one probable cause is identified, the causes are listed in order of most likely to least likely reasons for the problem. Table 8 - Troubleshooting 1) Symptom Unable to start fill or ex- a) cessively long fill times Probable Cause Corrective Action QDV not properly engaged on the reservoir Make sure the QDV on the portable and reservoir are properly aligned and ensure that a downward force is being applied to the portable. b) Reservoir is empty Swap or re-fill the reservoir c) Vent valve not open g) Ensure that the vent valve lever is fully in the open position. The lever must be open to begin a fill. FCV is open Be sure that the FCV knob is in the off (“0”) position. If the valve is open, fill times can increase. Reservoir saturation pressure is Swap reservoirs or allow the reservoir time to stabilize and too low build pressure Vent valve is obstructed Inspect the vent tubes for blockages. Clean by blowing out with compressed gas or replace parts if necessary. Leak in the system Check the portable for leaks (RP2) and repair if needed. h) QDV damaged or faulty i) Faulty vent valve a) Worn or damaged lip seal Replace the QDV lip seal (RP18) Ensure that the pop-off assembly on the reservoir is being used. Do not use force to separate the QDVs. Leave the units coupled with the vent valve closed and let them sit until they warm up enough to disconnect. Always ensure that male and female QDV’s are cleaned and dried prior to each fill. d) e) f) Inspect the QDV and be sure the poppet opens properly and smoothly. If necessary, replace the QDV (RP17) Replace the vent valve (RP16) 2) Liquid leaks from the coupled QDVs during the fill 3) Unable to disconnect the a) poratble from the reservoir b) Pop-off assembly not being utilized QDVs are frozen together 4) Liquid leaks from the a) QDV poppet after filling Ice crystal preventing the QDV Engage and disengage the portable onto the reservoir several from closing properly. times to dislodge the ice crystal. Always be sure that the male and female QDVs are wiped clean and dry before filling. b) Companion Portables Table 5 below provides troubleshooting procedures for the Companion Portables. This guide is not all-inclusive but is intended to serve as a general outline for solving operational problems. The table describes symptoms, identifies probable causes, and suggests corrective actions. Dirty or damaged QDV poppet Replace the QDV (RP17) Companion Portable Technical Service Manual • PN 20562220 Rev B 25 XI 1 Troubleshooting & Repair Procedures 5) 6) Symptom Liquid leaks from a) the vent valve tube/ outlet b) Excessive venting from relief valves (hissing sound) No Flow Vent valve is not fully closed Corrective Action Ensure that the vent valve lever is fully in the closed position. The portable has been Return the portable to an upright or acceptable operating position and transported or laid in an im- allow several minutes for stabilization. proper operating position c) Vent valve is frozen open Allow the portable to warm until the vent valve can close. After the warm up, allow up to 60 minutes for the portable to stabilize and build pressure before operating. d) Faulty vent valve Replace the vent valve (RP16) b) Saturation pressure too high. Inspect the saturation pressure of the reservoir used for filling. Allow at least 30 minutes at no flow for the portable to saturate properly. c) Relief valve frozen open Allow the portable to warm and thaw. Attempt to re-fill the portable. d) Faulty relief valve Test the relief valve (RP9) and replace if necessary (RP10) a) Portable is empty Check the contents indicator/level gauge and fill the portable if needed. b) Flow control valve turned off Ensure the flow control knob is not in the off (“0”) position. Nasal cannula kinked or disconnected Ensure proper nasal cannula functionality and positioning e) Saturation pressure is too low Inspect the saturation pressure of the reservoir used for filling. Allow at least 30 minutes at no flow for the portable to saturate properly. f) Leak in the system g) Relief valve is open Perform a leak check on the plumbing (RP2). Repair leaks as necessary. h) Vent valve is open Ensure that there is no venting from the vent valve outlet/tube. If there is refer to the corrective actions for “Liquid leaks from the vent valve tube/outlet” i) FCV inlet filter is obstructed Blockage in the liquid withdrawal circuit Clean or replace (RP20) the filter screen. FCV Faulty Replace the FCV (RP20) a) e) 7) Probable Cause c) j) k) Companion Portables Table 8 (cont.) The portable has been Return the portable to an upright or acceptable operating position and transported or laid in an im- allow several minutes for stabilization. proper operating position Partial or complete loss of vacuum Conduct the NER test (RP23) and return the unit to CAIRE, Inc. if necessary. Ensure that there is no venting from the relief valves. If there is refer to the corrective actions for “Excessive venting from relief valves (hissing sound)” Check the warming coils and withdrawal tubes for blockages. Replace if necessary. Companion Portable Technical Service Manual • PN 20562220 Rev B 26 XI 1 Troubleshooting & Repair Procedures 8) 9) Symptom Low flow at all LPM settings Increased NER Probable Cause Corrective Action a) Nasal cannula kinked or leaking Inspect the functionality of the nasal cannula. b) Saturation pressure is too low Inspect the saturation pressure of the reservoir used for filling. Allow at least 30 minutes at no flow for the portable to saturate properly. c) Leak in the system Perform a leak check on the plumbing (RP2). Repair leaks as necessary. d) Flow control valve inlet filter screen dirty Clean or replace (RP20) the filter screen. f) Blockage in the liquid withdrawal circuit Check the warming coils and withdrawal tubes for blockages. Replace if necessary. e) PRV faulty Test the PRV (RP9) and replace (RP10) if necessary. g) FCV faulty Replace the FCV (RP20) a) Saturation Pressure is too high Inspect the saturation pressure of the reservoir used for filling. Allow at least 30 minutes at no flow for the portable to saturate properly. b) Leak in the system Perform a leak check on the plumbing (RP2). Repair leaks as necessary. c) Relief valve open Ensure that there is no venting from the relief valves. If there is refer to the corrective actions for “Excessive venting from relief valves (hissing sound)” d) Partial or complete loss of vacuum 10) Excessive Frost a) Frost is acceptable NOTE: Minimal frost on the case and on the plubming is normal. This sympb) High humidity level tom applies to frost that is much greater c) Saturation pressure is too high than what is normally observed. d) Leak in the system e) Relief valve open f) Partial or complete loss of vacuum 11) Unit will not main- a) Saturation pressure is out tain acceptable presof specification sure when in use Companion Portables Table 8 (cont.) Conduct the NER test (RP23) and return the unit to CAIRE, Inc. if necessary. Some frost on the outer case and on the plumbing is acceptable, especially at high flow rates during continuous use. This is due to the evaporation of LOX to gas and the temperature difference between the LOX and room temperature. High humidity levels can increase frost accumulation. Inspect the saturation pressure of the reservoir used for filling. Allow at least 30 minutes at no flow for the portable to saturate properly. Perform a leak check on the plumbing (RP2). Repair leaks as necessary. Ensure that there is no venting from the relief valves. If there is refer to the corrective actions for “Excessive venting from relief valves (hissing sound)” Conduct the NER test (RP23) and return the unit to CAIRE, inc. if necessary. Inspect the saturation pressure of the reservoir used for filling. Allow at least 30 minutes at no flow for the portable to saturate properly. b) Leak in the system Perform a leak check on the plumbing (RP2). Repair leaks as necessary. c) PRV faulty Test the PRV (RP9) and replace (RP10) if necessary. Companion Portable Technical Service Manual • PN 20562220 Rev B 27 XI Troubleshooting & Repair Procedures Companion Portables Companion Portable Technical Service Manual • PN 20562220 Rev B 28 XI Troubleshooting & Repair Procedures Companion Portables (RP23) To use the Troubleshooting Chart: • Start at the upper left corner. • The top line shows the steps of routine maintenance. • Unless otherwise noted by the arrows, the flow through the chart is down or to the right. Companion Portable Technical Service Manual • PN 20562220 Rev B 29 XI Troubleshooting & Repair Procedures The following procedures have been carefully prepared to allow proper removal and replacement of defective components and should be used in conjunction with the Troubleshooting Chart and the tests in this section. WARNING: Make sure the unit is empty and vent valve is open before replacing any component, except seals. WARNING: Parts that are welded in place must not be replaced in the field. Should these parts fail, return complete assembly or sub-assembly to factory for repair. DO NOT use solder or silver solder to repair broken welds. RP2A - Leak Test (Warm & Empty Unit) 1) Remove the covers (RP4). 2) Set the flow control valve to 0 LPM (Off). 3) Pressurize the C1000/T portable to approximately 1.52 bar (22 psi) with gaseous oxygen using the portable pressurizing setup and gaseous oxygen supply (Figure 9). Close the vent valve after pressurizing the unit and remove the pressurizing setup from the vent tube. 4) Connect the test pressure gauge to the oxygen outlet barbed fitting and set the flow control valve to its highest setting. Place the C1000/T in the portable test fixture (Figure 10). Companion Portables RP1 – General CAUTION: When replacing components, make sure the new part is oriented exactly the same as the original part prior to installation. CAUTION: Some components require a specific amount of torque when assembling. Follow torque requirements where specified. NOTE: All replacement parts must be factory approved, cleaned for oxygen service, and stored in sealed plastic bags. The repair area must be clean and separate from other areas. Room air should be filtered, and free from dust, soot, and other contaminants. NOTE: When replacing components with pipe threads, use PTFE tape thread sealant. Apply two rounds of PTFE tape to threads near end of component, avoiding first thread. NOTE: When assembling new compression fittings, tighten 1/8”, 1/4” and 1/2” nuts eight flats past finger tight and 3/16” nuts five flats past finger tight. When reassembling previously used compression fittings, tighten nuts one to two flats past finger tight. Figure 9: Pressurizing the Companion Portable Companion Portable Technical Service Manual • PN 20562220 Rev B 30 XI Troubleshooting & Repair Procedures 1) Turn the FCV knob to the highest flow setting. 2) Allow unit to sit for 24 hours before proceeding. RP4 – Side Cover RR 1) C1000T only: Remove the moisture cup by turning the quarter-turn fastener counter clockwise and pulling the cup away from the unit. 2) Place the unit on its side with the back side cover facing you. Use a 7/64 in Allen wrench to remove five socket head cap screws located underneath the vent valve lever and the corners of the side cover. Figure 10: Pressure Gauge Connection 5) Wet a finger with leak detector and lightly place it against the open end of the vent tube located near the bottom of the unit. If bubbling occurs, replace the vent valve (RP16). 6) Use SNOOP liquid leak detector to test all fittings and connections. Verify that the unit maintains 1.52 bar (22 psi) pressure during the leak test. 7) With pressure remaining in the unit, place a small amount of SNOOP on the tip of the C1000/T QDV. A small amount of leakage around the poppet of the fill connector is acceptable, provided that the total leakage rate of the unit is not greater that the NER. 8) Blow dry with compressed gas the QDV poppet and the vent valve. RP2B - Leak Test (Unit Containing Liquid Oxygen) 1) Remove the case (RP4). 2) Connect the test pressure gauge to the oxygen outlet barbed fitting and set the flow control valve to the highest setting. 3) Place the C1000/T in the portable test fixture (Figure 10). 4) Wet a finger with leak detector and lightly place it against the open end of the vent tube located near the bottom of the unit. If bubbling occurs, replace the vent valve (RP16) 5) Use SNOOP liquid leak detector to test all fittings and connections. Verify that the unit maintains 1.52 bar (22 psi) pressure during the leak test. Companion Portables RP3 – Emptying/Warming Portable RR 3) Carefully separate the two side covers from each other. 4) Use a 7/64 in Allen wrench to remove the two socket head cap screws and the two lockwashers located in the tables on the bottom of the container. 5) Use a 1/16 in Allen wrench to loosen the set screw in the flow control valve knob. 6) Remove the flow control valve knob and the decal. If the knob does not use a set screw, insert the Allen wrench into the hole in the knob. 7) Simultaneously push in and pull up on the Allen wrench to remove the knob. 8) Use a small flat-blade screwdriver to loosen and remove the two flat-head screws from the flow plate. Remove the flow plate. 9) Remove the front side cover. 10)Install the side covers by reversing the above procedure. RP5 – Top Bezel RR 1) Remove the side covers (RP4) 2) Use a 7/16 in deep well socket and a T-handle or ratchet wrench to remove the oxygen outlet barbed fitting. Do not lose the O-ring 3) Remove the top bezel. 4) Install the top bezel by reversing steps 1-3. 6) With pressure remaining in the unit, place a small amount of SNOOP on the tip of the C1000/T QDV. A small amount of leakage around the poppet of the fill connector is acceptable, provided that the total leakage rate of the unit is not greater that the NER. 7) Blow dry with compressed gas the QDV poppet and the vent valve. Companion Portable Technical Service Manual • PN 20562220 Rev B 31 XI Troubleshooting & Repair Procedures 1) Remove the covers (RP4) and top bezel (RP5). 2) Use a small screwdriver to remove the outermost E-clip from the pivot shaft. Remove the pivot shaft. 5) Use a medium-blade screwdriver to remove the four pan head screws from the indicator. Remove the four screws and the four upper spacers from the indicator. NOTE: Some older models may contain hitch pins in place of the E-clips. If the unit has hitch pins, it will also contain a different pivot shaft. 3) Remove the carrying strap from the portable Companion Portables 4) Remove the lever spacer, the spring, and the spring rod. RP6 – Carrying Strap RR 4) Install the carrying strap by reversing steps 1-3. RP7 - Liquid Contents/Level Indicator Test NOTE: Disconnect the plastic buckle in the carrying strap before performing the following steps. The C1000/T side covers must be in place when performing this test. 1) Place the C1000/T on a table and hold it down while gently pulling up on the end of the carrying strap nearest the contents indicator. 2) Verify that the indicator operates smoothly and without binding 3) C1000T Only – Verify that “Transport” is present on the indicator dial. 4) Suspend the unit by the end of the carrying strap nearest the contents indicator. Verify that the needle appears in the red EMPTY region at the end of the indicator window. 5) Fill the unit with liquid oxygen. Suspend the unit by the end of the carrying strap nearest the contents indicator. Verify that the needle is in the upper portion of the green FULL region. Figure 12 6) Pry the lens cap away from the base. 7) Remove the indicator needle from the base Figure 13 8) Use a small screwdriver to remove one E-clip from the pivot shaft. Remove the lever. RP8 - Liquid Contents/Level Indicator RR 1) Remove the carrying strap (RP6). 2) Loosen and remove the four socket head cap screws from the base of the contents indicator weight scale mechanism. Remove the contents indicator assembly. 3) While holding the lever down, remove the hitch pin from the end of the spring rod. Figure 14 9) Reassemble and install the contents indicator by reversing steps 1-8. NOTE: Be sure to lubricate the O-ring with a small amount of Krytox grease. This allows the helix to easily rotate in the indicator. Figure 11 NOTE: Be sure to put the weight scale mechanism in the proper orientation. The slotted hole in the mounting bracket should be next to the flow control valve. Companion Portable Technical Service Manual • PN 20562220 Rev B 32 XI Troubleshooting & Repair Procedures RP10 – PRV RR 1) Remove the covers (RP4). 2) Loosen and remove the silencer from the end of the primary relief valve (Figure 15). Figure 16: PRV Removal Companion Portables RP9 - PRV Test 1) Remove the covers (RP4). 2) Connect the pressurizing setup to the C1000/T as shown in Figure 9. 3) Place one drop of SNOOP on the PRV or PRV silencer. 4) Slowly pressurize the unit with gaseous oxygen by adjusting the oxygen regulator until tiny, foam-like bubbles begin to form to indicate that the PRV has opened. You can also listen for an audible hissing sound. 5) Verify that the PRV opens (bubbles appear on the silencer) at a pressure less than 1.62 bar (23.5 psi). 6) If the opening pressure is not within the specified range, repeat the procedure. If the PRV fails to open in the specified range a second time, replace the PRV (RP10). 7) Slowly reduce the gaseous oxygen source pressure until the stream of bubbles begins to diminish. 8) Verify the PRV closes (bubbles begin to diminish) at a pressure greater than 1.28 bar (18.5 psi). 9) If the closing pressure does not meet the acceptable range,repeat the procedure. If the PRV fails to close at the specified range a second time, replace the PRV (RP10). 10) Remove the pressurizing setup and reinstall the covers (RP4). NOTE: Inspect the relief valve adapter for cracks caused from overtightening. Replace as necessary. NOTE: Some older models contain a blue, anodized relief valve adapter. Some of these adapters may be susceptible to cracking. The blue relief valve adapter has been replaced by a clear anodized adapter that has a longer thread engagement length. NOTE: The primary relief circuit tubing on some older models consists of a “pig-tailed” section of aluminum tubing. The current primary relief circuit tube is a long, U-shaped section of aluminum tubing. NOTE: Some older models may not be equipped with a silencer. These units may be retrofitted with a silencer, but this will require replacing the primary relief valve. Figure 15: Removing the PRV Silencer 3) Use a 1/2inch open-end wrench to loosen and remove the primary relief valve while simultaneously holding the relief valve adapter stationary with another 1/2inch open-end wrench. 4) Install the PRV by reversing steps 1-3. Companion Portable Technical Service Manual • PN 20562220 Rev B 33 XI Troubleshooting & Repair Procedures 1) Remove the covers (RP4). 2) Connect the pressurizing setup as shown in Figure 9. 3) Remove the silencer from the PRV. 4) Hold the PRV closed while pressurizing the portable. 5) Slowly pressurize the C1000/T by adjusting the gaseous oxygen source regulator. 6) Verify that the SRV opens (audible hiss) at 1.97-2.17 bar (28.5-31.5 psi). 7) If the SRV does not open within these specified ranges, repeat the procedure. If it fails to open the second time, replace the SRV (RP12). 8) Slowly reduce the pressure of the gaseous oxygen source until the audible hissing noise is no longer heard, indicating that the SRV has closed. 9) Verify that the SRV closes at a pressure greater than 1.86 bar (27 psi). 10) If the SRV does not close within this specified range the first time, repeat the test. If it fails to open in an acceptable range the second time, replace the SRV (RP12). NOTE: Do not release the PRV poppet unit pressure in the unit is reduced below 1.52 bar (22 psi) by removing the pressurizing setup and opening the vent valve. Replace the PRV silencer. RP13 – Pressure Retention Test 1) Empty the unit and remove the covers (RP4). NOTE: Perform RP13 only on warm, empty portable units. Performing this test on Portable units containing liquid oxygen will yield inaccurate results. 2) Set the flow control valve to 0 LPM (Off). 3) Use the pressurizing setup show in Figure 9 to pressurize the C1000/T until the PRV vents (approximately 1.52 bar/22psi). This is indicated by an audible hissing noise. Companion Portables RP11 – SRV Test 4) Close the vent valve and remove the pressurizing setup. Connect the test pressure gauge to the oxygen outlet barbed fitting and set the flow control valve to the highest setting. Record the pressure gauge reading and the time. 5) Set the flow control valve to 0 and remove the test pressure gauge from the oxygen outlet. 6) Do not disturb the C1000/T for 8 to 9 hours. 7) At the end of this period, verify that the unit maintains at least 1.04 bar (15 psi). Should the pressure be less, re-pressurize the unit to approximately 1.52 bar (22 psi) and locate the leak by testing all components, fittings, and tubing with liquid leak detector (RP2). Make repairs as needed, taking care not to over tighten connections. RP12 – SRV RR 1) Remove the covers (RP4) 2) Use a 1/2 inch open-end wrench to loosen the 3/16inch tube nut connected between the secondary relief valve and the secondary relief valve adaptor. Simultaneously, hold the relief valve adapter stationary with another 1/2inch open-end wrench while removing the secondary relief valve. 3) Install the SRV by reversing steps 1-2. NOTE: Before installing the SRV, wrap the SRV threads with Teflon tape, starting two threads back from the end. Companion Portable Technical Service Manual • PN 20562220 Rev B 34 XI Troubleshooting & Repair Procedures 1) Remove the covers (RP4). 2) Use side-cut pliers to cut the two wire ties from the warming coil. 3) Use a 5/8inch open-end wrench on the vent valve body hex flats to hold the body stationary. Use a 11/16inch open-end wrench to loosen the jam nut that holds the vent valve to the mounting bracket. 4) Use a 9/16inch open-end wrench to disconnect the 1/4inch tube nut where the vent tube connects to the manifold. Remove the vent valve and tube assembly (Figure 17). NOTE: Do not overtighten the tube nuts on the warming coil. Overtightening may result in a cracked fitting. Only a slight increase in torque is required to seal a compression fitting that has already been made up. When making up a new fitting, three-quarters of a turn from finger-tight is required for 3/16inch tubing. RP14B – Warming Coil Assembly RR (C1000T) 1) Remove the covers (RP4) 2) Use side-cut pliers to cut the wire tie from the warming coil. 3) Use a 1/2inch open-end wrench to disconnect the 3/16inch tube nuts where the warming coil connects to the two brass tees. Remove the warming coil. Companion Portables RP14A – Warming Coil Assembly RR (C1000) 4) Use a 9/16inch open-end wrench to disconnect the 1/4inch tube nut where the fill tube connects to the female fill connector adapter. 5) Use a 9/16inch open-end wrench to disconnect the 1/4inch tube nut where the fill tube connects to the manifold. Remove the fill tube. 6) Use a 1/2inch open-end wrench to disconnect the 3/16inch tube nut where the warming coil connects to the flow control valve. Figure 17: Warming Coil Removal 5) Use a 1/2inch open-end wrench to disconnect the 3/16inch tube nut where the warming coil connects to the flow control valve. 6) Use a 1/2inch open-end wrench to disconnect the 3/16inch tube nut where the warming coil connects to the manifold. Remove the warming coil (Figure 18). Figure 18:Warming Coil Removal 7) Use a 1/2inch open-end wrench to disconnect the 3/16inch tube nut where the warming coil connects to the brass tee. Remove the warming coil. 8) Use a 1/2inch open-end wrench to disconnect the 3/16inch tube nut where the spined tube connects to the manifold. 9) Use a 1/2-in open-end wrench to disconnect the 3/16inch tube nut where the spined tube connects to the brass tee. Remove the spined tube. 10)Install the warming coils by reversing steps 1-9. NOTE: Be sure to replace the wire tie after reinstalling the warming coil. RP15 – Vent Valve Test 1) Remove the covers (RP4) and set the FCV to off (0 LPM). 2) Connect the pressurizing setup to the C1000/T as shown in Figure 9 and pressurize the unit to approximately 1.52 bar (22 psi), or fill the unit with liquid oxygen. 3) Wet a finger with leak detector and lightly place it against the open end of the vent tube located near the bottom of the unit. Verify that no leaks are present and no bubbling occurs. 4) Open the vent valve and listen for a sudden exhaust of gaseous oxygen. 7) Install the warming coils by reversing steps 1-6. NOTE: Be sure to replace the wire ties after reinstalling the warming coil. The wire ties hold the warming coil away from any moisture that may accumulate in the moisture pad at the bottom of the unit. Companion Portable Technical Service Manual • PN 20562220 Rev B 35 XI Troubleshooting & Repair Procedures Companion Portables RP16 - Vent Valve RR 1) Remove the covers (RP4). 2) Use a 9/16 inch open-end wrench to disconnect the 1/4inch tube nut that connects the vent extension tube to the vent valve (Figure 19). Figure 21: Vent Valve Removal 5) Slide the vent valve out of the mounting bracket. 6) Position the new vent valve in the mounting bracket slot. Do not tighten the jam nut at this time. Figure 19: Vent Extension Tube Removal 3) Use a 9/16inch open-end wrench to disconnect the 1/4 inch tube nut that connects the long vent tube to the vent valve (Figure 20). NOTE: The mounting bracket should be between the jam nut and the valve body hex flats. The valve flow direction arrow should point downward. 7) Align the short vent tube and long vent tube with the proper vent valve ports. Thread the tube nuts onto the valve and tighten. NOTE: Do not over tighten the vent tube nuts. Over tightening may result in a cracked fitting. Only a slight increase in torque is required to seal up a compression fitting that has already been made up. For 1/2 inch tubing, 1/4 turn from finger-tight is required when making up a new fitting. Figure 20: Vent Tube Removal 4) Use a 5/8inch open-wrench on the vent valve body hex flats to hold the body stationary. Use a 11/16 inch open end wrench to loosen the jam nut that holds the vent valve to the mounting bracket (Figure 21). 8) Push the vent valve fully into the slot in the mounting bracket. Hold the valve in this position with a 5/8 inch openend wrench placed on the valve body hex flats. Use a 11/16 inch open-end wrench to tighten the jam nut. NOTE: Check for proper vent valve lever operation after installing the side cover. Adjust the vent valve horizontally by shifting the valve in the mounting bracket. Adjust vertically by loosening the two socket head cap screws mounted in the tabs on the bottom of the bottle and shifting the entire bottle assembly up or down. Make sure that the vent extension tube outlet is centered in the corresponding side cover clearance hole. 9) Install the side covers (RP4). Companion Portable Technical Service Manual • PN 20562220 Rev B 36 XI Troubleshooting & Repair Procedures 1) Remove the covers (RP4). 2) Use a 9/16inch open-end wrench to disconnect the tube nut at the female adaptor (Figure 22). RP18 – Lip Seal RR 1) Remove the QDV (RP17). 2) Hold the QDV body with an adjustable wrench placed on the machined flats. Use a second adjustable wrench to remove the lip seal retainer sleeve. 3) Pull the lip seal out of the fill connector body. Companion Portables RP17 – QDV Assembly RR Figure 22: QDV Tube Nut Removal 3) Use a 7/8inch open-end wrench to loosen the jam nut (earlier models may have a 5/8inch jam nut) that holds the female adapter to the mounting bracket. Pull the fill connector assembly down slightly to clear the fill tube and then slide it out of the mounting bracket (Figure 23). Figure 24: Lip Seal Removal 4) Insert the stepped (spring) end of the new lip seal into the corresponding recess in the large end of the QDV body. Make sure that it is squarely seated. 5) Thread the lip seal retainer onto the large end of the fill connector body and tighten to a torque of 35 lb/ft (511 n/m). 6) Replace the QDV assembly (RP17). Figure 23: QDV Removal 4) Install the QDV assembly by reversing steps 1-3. Figure 25: Lip Seal Replacement Companion Portable Technical Service Manual • PN 20562220 Rev B 37 XI Troubleshooting & Repair Procedures 1) Fill the C1000/T with liquid oxygen. Allow approximately one hour for the system pressure to stabilize. Verify that the PRV is venting and that the system pressure is 1.28 – 1.62 bar (18.5 – 23.5 psi). 2) Attach a calibrated flow meter to the oxygen outlet barbed fitting. 3) At each flow setting, check the flow control valve. Acceptable flow ranges are given below in Table 9 and 10. NOTE: Data listed in Table 9 and 10 is based on an operating pressure range of 1.41-1.66 bar (20.5-24 psi). If the flow measurements are out of specification, check the pressure in the unit. A combination of high or low pressure and the tolerance of the particular flow meter you are using can result in inaccurate readings. Nominal Setting (LPM) Allowable Range (LPM) 1.00 0.83 - 1.17 0.50 1.50 2.00 3.00 0.33 - 0.67 1.18 - 1.82 1.61 - 2.43 2.55 -3.51 4.00 3.43 - 4.62 6.00 5.14 -6.92 5.00 8.00 10.00 15.00 Companion Portables Table 10 C1000T FCV RP19 - FCV Test 4.33 - 5.77 6.72 - 9.28 8.42 - 11.53 12.97 - 17.28 Table 9 C1000 FCV Nominal Setting (LPM) 0.12 0.25 0.50 0.75 1.00 1.50 2.00 2.50 3.00 3.50 4.00 5.00 6.00 Allowable Range (LPM) 0.02 - 0.22 0.08 - 0.42 0.33 - 0.67 0.58 - 0.92 0.83 - 1.17 1.18 - 1.82 1.61 - 2.43 2.08 - 2.97 2.55 - 3.51 2.92 - 4.04 3.43 - 4.62 4.33 - 5.77 5.14 - 6.92 Companion Portable Technical Service Manual • PN 20562220 Rev B 38 XI Troubleshooting & Repair Procedures WARNING: Liquid oxygen discharge from the FCV can occur if a 0-15LPM C1000T FCV is installed on a C1000. Always check the flow rating decal on the FCV before installing the valve on a portable. DO NOT install a 0-15LPM valve on a C1000. 1) Remove the top bezel (RP5). 2) Use a 1/2 inch open-end wrench to loosen the 3/16inch tube nut on the back of the flow control valve. Remove the tube and nut from the flow control valve. 1) Remove the FCV (RP20) and its filter screen. 2) Temporarily reinstall the oxygen outlet barbed fitting in the flow control valve. Connect 3.45-5.18 bar (50-75 psi) oxygen to the valve’s outlet barbed fitting. Temporarily install the valve knob on the rotor shaft. 3) Slowly rotate the valve knob through all flow settings (Figure 28). Gas flow should be audible at each flow position, indicating that the appropriate orifice is open. Companion Portables RP21 – Back Flushing the FCV RP20 – FCV RR 3) Use a 1/16 inch Allen wrench to loosen the set screw in the flow control valve knob. Remove the flow control valve knob and decal. If the knob does not use a set screw, insert the Allen wrench into the hole in the knob. Simultaneously push in and pull up on the Allen wrench to remove the knob. 4) Use a small flat-blade screwdriver to loosen and remove the two flat-head screws from the flow plate. Remove the flow plate and the flow control valve. 5) Use a dental pick or similar tool to carefully remove the inlet filter screen from the flow control valve. Be careful not to scratch any part of the flow control valve inlet port when removing the screen (Figure 26). Figure 28: Backflushing the FCV 6) Install the FCV by reversing steps 1-5. RP22 – Operating Pressure Test 1) Fill the C1000/T with liquid oxygen from a properly saturated reservoir. 2) Attach the test pressure gauge w/ tubing (B-701732-00) to the cannula outlet barb on the top of the C1000/T. 3) Open the FCV to the highest flow setting. 4) Read the operating pressure on the gauge. The pressure should be between 1.28 – 1.62 bar (18.5 – 23.5 psi). Figure 26: Removing the Filter Screen Figure 27: FCV Assembly Companion Portable Technical Service Manual • PN 20562220 Rev B 39 XI Troubleshooting & Repair Procedures RP24 – Manifold RR 1) Perform a leak test (RP2) and verify that the results are acceptable. 2) Perform the PRV test (RP9) and verify that the PRV is functioning properly. 3) Set the flow control valve to 0LPM and fill the unit from a properly saturated liquid oxygen source. 4) Allow 30 minutes for the unit to stabilize. 5) Record the initial weight of the unit and the time (w1). 6) After an elapsed time of 18 to 24 hours, record the weight and time (w2). 7) Calculate the NER using the following formula. NER = (24 hrs.) x (w1 - w2) (Time between w1 and w2 in hrs.) 8) Verify that the NER is less than 1.5 lb/day (0.7 kg/day). 1) Remove the covers (RP4). 2) Remove the top bezel (RP5). 3) Loosen and remove the four socket head cap screws from the base of the contents indicator assembly. Remove the assembly. 4) Use a 1/2inch open-end wrench to disconnect the 3/16inch tube nut where the warming coil connects to the manifold. 5) Use a 9/16inch open-end wrench to disconnect the 1/4inch tube nut where the vent tube connects to the manifold. 6) Use a 9/16inch open-end wrench to disconnect the 1/4inch tube nut where the fill tube connects to the manifold. Companion Portables RP23 – NER Test 7) Use a 1/2inch open-end wrench to disconnect the 3/16inch tube nut where the primary relief valve tube connects to the manifold. 8) Use a 1/2inch open-end wrench to disconnect the 3/16inch tube nut where the secondary relief valve tube connects to the manifold. 9) Use a 3/16inch nut driver to remove the four standoffs from the manifold (Figure 29). Remove the manifold. Figure 29: Manifold Removal NOTE: To prevents contaminants from entering the cryogenic container, place a clean plastic bag over the neck of the container and seal tightly. 10)Install the manifold by reversing steps 1-9. 11)Use the specified torque wrench to the standoffs of 10in-lb (115 N-cm) in an alternating sequence (Figure 30). Companion Portable Technical Service Manual • PN 20562220 Rev B 40 XI Troubleshooting & Repair Procedures 1) Remove the manifold (RP24). 2) Use a 5/8inch open-end wrench on the vent valve body hex flats to hold the body stationary. Use an 11/16inch open-end wrench to loosen the jam nut that holds the vent valve to the mounting bracket. Remove the vent valve and tube assembly from the mounting bracket. 3) Use side-cut pliers to cut the wire tie from the warming coil. Figure 30: Manifold Torque Sequence 12)Follow up by torquing the standoffs to 22 in-lb (253 N-cm) in an alternating sequence. NOTE: Verify that the O-ring seal between the manifold and the container does not have any nicks, scratches, or tears. Also, check to see that the O-ring is not flat-spotted. Replace as necessary. 4) Use a 7/8inch open-end wrench to loosen the jam nut (some earlier models may have a 5/8inch jam nut) that retains the female adapter to the mounting bracket. Remove the female fill connector and tube assembly from the mounting bracket. Companion Portables RP25 – Cryogenic Container RR 5) Install the cryogenic container by reversing steps 1-4. NOTE: To prevent contaminants from entering the cryogenic container, place the container in a clean plastic bag and seal tightly. NOTE: When installing the manifold, position the vacuum port of the bottle between the secondary relief valve and warming coil ports on the manifold. NOTE: Do not overtighten the tube nuts of a compression fitting. Over-tightening may result in a cracked fitting. Only a slight increase in torque is required to seal a compression fitting that has already been made up. When making up a new fitting, tighten 3/4 turn from finger-tight for 3/16inch tubing; 11/4 turns from fingertight for 1/4inch tubing. NOTE: Before installing the side covers, pressurize the system with gaseous oxygen and test for leaks according to the Leak Test (RP2). Companion Portable Technical Service Manual • PN 20562220 Rev B 41 XII Parts List Companion Portable Technical Service Manual • PN 20562220 Rev B Companion Portables Contact Customer Service or visit www.cairemedical.com to obtain your parts list. 42 XIII Ordering Information The following steps should be used when ordering a new C1000/T or replacement parts for an existing unit: 1. Compile a list of all equipment and replacement parts to be ordered. 2. Fill out a purchase order containing the following information: a. Purchase order number. b. Name and address of billing location. c. Name and address of shipping location. d. Quantity, part number, description, and unit cost for each item ordered. 3. Telephone or fax CAIRE Inc. at one of the numbers listed below to begin immediate processing of the order: USA Toll Free Phone: 800 48 CAIRE (800 482 2473) Toll Free Fax: 888 WE CAIRE (To place an order):(888 932 2473) Phone:770 257 1299 Fax: 770 257 1300 4. E-Mail or fax the completed purchase order for confirmation to: North and South America/Asia/Pac Rim email to: [email protected] Africa/Europe/Middle East email to: [email protected] North and South America fax to: 888-932-2473 Companion Portables Ordering Information Asia/Pac Rim fax to: 770-721-7758 Africa/Europe/Middle East fax to: +44 118 9799245 All new equipment will be shipped either “prepaid”,, F.O.B. from the factory, or collect via your specified carrier. All replacement parts will be sent by UPS “prepaid”, and the shipping charges for equipment and parts will be added to the final invoice. Payment for replacement parts are located on CAIRE, Inc.’s, invoice with payment date indicated. All shipments will originate from the factory. If a particular carrier or method of shipment is desired, specify when placing order. Asia, Australia, Pacific Rim Phone: +61 297 494333 Fax: 888 932 2473 Europe Phone: Fax: +44(0) 1189 367080 +44 118 9799245 For additional ordering and contact information, visit www.cairemedical.com. Companion Portable Technical Service Manual • PN 20562220 Rev B 43 XIV Return & Restocking Policy If a problem with the unit should be encountered, reference should be made to the Troubleshooting Chart in Section XII. If these procedures do not provide a solution for the problem, the following steps should be taken: 1. Call CAIRE, Inc. Customer Service. North and South America/Asia/Pac Rim: Phone (US Only) Phone Africa/Europe/Middle East: Phone 2. State the problem with the unit. 800-482-2473 770-721-7759 +44 (0) 1189 367080 3. If it is determined that the problem cannot be solved by the distributor, a Return Material Authorization (RMA) number will be assigned to the unit or part(s). 4. If a Purchase Order Number is to be referenced, please give this number to the Customer Service Representative at that time. 5. Carefully package the parts, or repack the unit in its original shipping container, precisely as shipped. 6. Write the Return Authorization Number on the top of the shipping container. 7. Customer Service will provide the correct shipping location once the RMA is provided Restocking Policy If it becomes necessary to cancel an order with CAIRE Inc. after the shipment has been received, use the following “Restock Policy” procedure: 1. Call CAIRE, Inc. Customer Service. 2. When contacting Customer Service personnel, it will be necessary to relay the following information: a. State the quantity and description of equipment to be returned. b. Give the Serial Number of each unit to be returned. Companion Portables When a CAIRE unit is received, it should be inspected immediately, as outlined in Section VII, Unpacking and Setup Instructions. c. State the equipment purchase date. 3. An RMA number will be issued in the name of the distributor by CAIRE, Inc. for the equipment to be returned. 4. When the equipment is shipped to the factory, the RMA number must appear on the packing slip and shipping boxes. 5. Customer Service will provide the correct shipping location once the RMA is provided 6. Finally, a “Credit Memo”, minus a 15% restocking fee, will be issued to the distributor when all equipment has been received, inspected, and restocked by CAIRE, Inc Return of Unused Non-Defective Merchandise CAIRE Inc., at its discretion, charges a 15% restocking fee for unused non-defective merchandise that is returned. An RMA number must be obtained from CAIRE Inc. Customer Service prior to return of any goods. Merchandise cannot be returned for credit after sixty (60) days. Customer to pay all freight charges. Tracking capability and insurance on all returned goods is advised. CAIRE Inc. will not be responsible for misdirected shipments. Companion Portable Technical Service Manual • PN 20562220 Rev B 44 XV Service Tools/Equipment/Supplies Tools and Accessories available from Caire Hex Wrenches (various sizes) Description Flat Blade Screwdriver Needle Nose Pliers Adjustable Wrench—8 inch Open End Wrenches (various sizes) Socket Wrench – 5/16 inch deep well Socket Wrench – 1/4 inch drive Required Fixtures/Equipment Calibrated Flow Meter Calibrated Weight Scale Gaseous Oxygen Source 0-6.89 bar (0-100 psi) Liquid Oxygen Source Portable Test Fixture Test Pressure Gauge (0-60 psi) w/ Tubing Required Supplies Household Glass Cleaner Lint-Free Cloth Item Number Backpack C1000/T 10018138 Erie Liter Meter (0-8 LPM) 97200076 Erie Liter Meter (6-15 LPM) 10995620 Fluoro-Lubricant CA200071 Krytox Lubricant (2 oz tube) B-775239-00 Oxygen Compatible Tubing – 3/16 in (0.48 cm) Diameter B-778214-00 Portable Test Fixture B-778202-00 Pressure Gauge (0-60 psi) 97403577 Rolling Cart C1000/T B-775295-00 Shipping Carton C1000/T B-775095-00 Shipping Insert – Top B-778068-00 Shipping Insert – Sides B-778069-00 Teflon Tape SNOOP Liquid Leak Detector (8 oz bottle) B-775272-00 SNOOP Leak Detection Fluid Tee Connector B-778211-00 Teflon Tape B-775036-00 Test Pressure Gauge w/ Tubing B-701732-00 Wheelchair Basket C1000/T B-775538-00 Scotch-Brite Adhesive Pad Isopropyl Alcohol Cotton Swaps Krytox Lubricant Companion Portables Required Tools For a complete list of accessories, see catalog #401-038-901. Companion Portable Technical Service Manual • PN 20562220 Rev B 45 Chart Industries, Inc. Caire Inc., BioMedical Group 2200 Airport Industrial Dr., Ste. 500 Ball Ground, GA 30107 Ph 770-721-7700 • Toll Free 1-800-482-2473 Fax 770-721-7701 www.cairemedical.com CAIRE Inc. reserves the right to discontinue its products, or change the prices, materials, equipment, quality, descriptions, specifications and/or processes to its products at any time without prior notice and with no further obligation or consequence. All rights not expressly stated herein are reserved by us, as applicable. Chart BioMedical, Ltd. Unit 2, Maxdata Centre Downmill Road, Bracknell Berks RG12 1QS, United Kingdom Ph +44(0) 1189 367080 Fax +44(0) 1344 429224 Copyright © 2013 Ref 20562220 Rev B