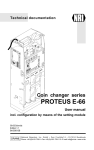
1
Technical Documentation Service tool HENRI Short reference guide for proceeding internal HENRI functions 06.10 JMo/Roe Version 2.0 KA.HENRI-EN National Rejectors, Inc. GmbH • Zum Fruchthof 6 • D-21614 Buxtehude Phone: +49 (0) 41 61-729-0 • Fax: +49 (0) 41 61-729-115 • E-mail: [email protected] • Internet: www.nri24.com SRG – Internal HENRI functions Table of contents Tabel of contents 1 2 3 4 About this short reference guide 5 Text conventions 5 Additional technical documentationen 6 About HENRI 7 HENRI features 7 Scope of delivery 7 Accessories 8 Safety instructions 9 Proper use 9 Protecting yourself and equipment 10 Design 11 Operating elements 11 Functions of the operating keys Multifunction keys A to F c2 menu key MENU General menu key HENRI 12 12 12 12 Navigating in the menus Main menu currenza c² General main menu HENRI Switching between the main menus 13 13 13 14 From the general HENRI main menu to the c2 main menu From the c2 main menu to the general HENRI main menu Display help texts National Rejectors, Inc. GmbH, Buxtehude 14 14 14 3 Table of contents 5 6 7 SRG – Internal HENRI functions Connection 15 Connecting HENRI on site 15 Connecting HENRI in the workshop 16 Start screens when connecting a ... ... currenza c2 ... E-66/A-66 ... G-46 17 17 17 Basic settings 18 Setting menu language 18 Setting date and time 19 Altering display contrast 20 Setting baud rate 21 Service work 22 17 Function tests 22 Testing keys, system time, memory 22 Testing keys, system time, memory and HENRI/c2 interfaces 23 Firmware update Calling up current firmware version Updating firmware 25 25 25 G-46/E-66/A-66 Configuration 29 The basics 29 Key functions in the G-46/E-66/A-66 mode 29 Accessing Dis menu 30 Downloading the new firmware and FW updating PC application from the internet 26 Installing HenriFlash 26 Installing new firmware in HENRI tool/Uploading new c2 firmware in HENRI tool 26 8 How to return to the G-46/E-66/A-66 mode, if I had pressed the HENRI key by mistake? 31 9 4 Technical data 32 Device data 32 CE certification 33 National Rejectors, Inc. GmbH, Buxtehude SRG – Internal HENRI functions 1 About this short reference guide About this short reference guide This short reference guide provides all information about • operating elements and menu structure of the HENRI service tool. • connection and start-up of the HENRI service tool on an NRI coin payment system. • basic settings and service work on the HENRI service tool. • the basic operation of the HENRI service tool in the G-46 and E-66/ A‑66 configuration mode. This short reference guide does not describe the entire functional range of the service tool, but rather the internal HENRI functions. In order to be able to use the service tool’s entire functional range safely and to adjust all possible settings, all short reference guides for the HENRI service tool, the NRI coin changer currenza c2 and for a G‑46 or E-66/A-66 configuration the G-55.0460 manual for the old service tool must be read carefully (PDF download at www.nri24.com). Text conventions To make it easier for you to navigate within these instructions and to operate the devices, the following accentuations were made in the text: Safety instructions, which you must observe in order to protect operators and equipment. Notes, which you must observe in order to protect the environment. Special notes, which are to facilitate the use of the devices. At the beginning of a chapter you will find a short "guide", which summarises the content of the chapter. 1 2 3 ... Requests to perform an action are numbered in another typeface. Display texts are set in small capitals. [1/2] Buttons and menu items are shown in bold capitals. Reference to a figure. The number before the slash refers to the figure number, the number behind the slash to the item number within the figure. National Rejectors, Inc. GmbH, Buxtehude 5 About this short reference guide SRG – Internal HENRI functions Additional technical documentationen Apart from the short reference guide you already have there is further documentation for the service tool and the NRI coin changers. All product descriptions are available in a compressed PDF format at www.nri24.com (→ Download). 6 National Rejectors, Inc. GmbH, Buxtehude SRG – Internal HENRI functions 2 About HENRI About HENRI The HENRI service tool is used to operate, diagnose and configure the NRI coin changers currenza c2, G‑46.F4xxx, and E-66/A-66 on site at the machine. It reads out the programmed device data of the connected changer and displays them on its display for control or configuration purposes. Using HENRI you can: • operate, configure NRI coin changers • inspect optional audit data of NRI coin changers • perform error diagnostics on NRI coin changers • update firmware of NRI coin changers • read out statistical data of the coin changer currenza c2 This short reference guide only describes the general operation and proceeding of internal HENRI functions (cp. further manuals). HENRI features • One configuration tool for the NRI changers currenza c2, G‑46.F4xxx and E-66/A-66 with different vending machine interfaces • Simple connection on site at the machine using 8‑pole RJ-45 interface • Can be used immediately as a plug-and-play solution • Diagnostics options by means of status and error messages being displayed • Display of all audit data (optional) in service cases • Useful service functions Scope of delivery In addition to the HENRI service tool you are supplied with a USB cable. National Rejectors, Inc. GmbH, Buxtehude 7 About HENRI SRG – Internal HENRI functions Accessories The following accessories can be ordered for the HENRI service tool: • WinSPT basic kit (MDB) –– with EURO plug (ordering code 24688) –– with USA plug (ordering code 24854) • WinSPT accessory kit –– BDV/Executive (ordering code 26218) –– JVI/VCCS (ordering code 26215) • SIM card (ordering code 32845) –– for automatic c2 data block & firmware updates –– as licence for currenza heartbeat PC configuration software 8 National Rejectors, Inc. GmbH, Buxtehude SRG – Internal HENRI functions 3 Safety instructions Safety instructions Before operating the device for the first time, please read through these short reference guide carefully at least once, and most importantly the safety instructions.This is to ensure you have understood the contents of these instructions as well as how to operate the device. Proper use The HENRI service tool is used for operation, diagnostics, configuration and general service work on the NRI coin changers currenza c2, G‑46. F4xxx and E-66/A-66. Only use the service tool for this purpose. Under no circumstances can the manufacturer be held liable for any damage or loss resulting from improper use of the device. The service tool has been constructed in compliance with the state of the art and the recognised safety regulations. Nevertheless this equipment can be a source of danger. Therefore please observe the following safety regulations. National Rejectors, Inc. GmbH, Buxtehude 9 Safety instructions SRG – Internal HENRI functions Protecting yourself and equipment The service tool may only be used, if the device and connecting cable are not damaged. Only use the service tool according to proper use. Under no circumstances can the manufacturer be held liable for any damage or loss resulting from improper use of the device. Please make sure that after each configuration of an NRI changer the label of the changer has been adapted to the new settings or the new settings are written down in another way for the workshop and the installation place. The coin validator, changer and HENRI PCBs are fitted with components which may be damaged beyond repair by electrostatic discharge. Please observe the handling instructions for components exposed to the risk of electrostatic discharge. Do not alter the construction of the device. Keep water and other liquids away from the device. 10 If the device is no longer required, please dispose of it correctly. We reserve the right to make technical modifications to the device which are not covered by these instructions! National Rejectors, Inc. GmbH, Buxtehude SRG – Internal HENRI functions 4 Design Design This chapter describes: • design and operating elements of the HENRI service tool • the functions of the operating keys of the HENRI service tool • the menu structure of the HENRI service tool Operating elements 1 7 6 5 4 3 2 Fig. 1: Operating elements 1 General menu key HENRI (for general functions) 4 USB port – PC 2 c2 menu key MENU (for internal c2 functions) 6 Display 3 Slot – SIM card 5 Multifunction keys A–F 7 Connecting cable (RJ-45 plug (8-pole)) – payment system To operate and service the coin changer connected, the service tool is equipped with a display [1/6], six multifunction keys [1/5] and two menu keys [1/1, 2]. It can be connected to an NRI payment system (e.g. coin changer) using the connecting cable installed with RJ-45 plug [1/7]. For, e.g., firmware updates the service tool can be connected to a PC using the USB port [1/4]. National Rejectors, Inc. GmbH, Buxtehude 11 Design SRG – Internal HENRI functions Functions of the operating keys The HENRI keypad [1/1, 2, 5] can be divided in three groups: • Multifunction keys A to F [1/5] • c2 menu key MENU [1/2] • General menu key HENRI [1/1] Multifunction keys A to F The multifunction keys A to F [1/5] are arranged around the display [1/6]. The functions which can proceed using the keys depend on the: • payment system connected (currenza c2 or other NRI payment systems) • active menu (for internal c2 or general functions) c2 menu key MENU Pressing the MENU key [1/2] you enter the main menu for operation, configuration and service work on the coin changer currenza c². Using this main menu you are able to select the internal c2 functions. The menu is only available if HENRI is connected to a currenza c². If not, the key has no function. This short reference guide only describes the general operation and proceeding of internal HENRI functions (cp. further manuals). General menu key HENRI Pressing the HENRI key [1/1] you enter the main menu for • work on the NRI coin changer currenza c2 which require an external data media (e.g. reading out statistical data, updating firmware). • basic settings and service work on the HENRI service tool. • service work and configuration of the NRI coin changers G-46.F4xxx and E-66/A-66. 12 National Rejectors, Inc. GmbH, Buxtehude SRG – Internal HENRI functions Design Navigating in the menus HENRI distinguishes between functions that are proceeded in the coin changer currenza c² and functions that are proceeded either in other NRI payment systems or in the HENRI itself. Accordingly there are two independent menus. This short reference guide only describes the general operation and proceeding of internal HENRI functions (cp. further manuals). Main menu currenza c² In the main menu for the coin changer currenza c² you select the submenu required by pressing the multifunction key with the character A, B, C, D, E or F on the left-hand side of the menu. In the submenu you navigate with the or up-arrow keys to select a certain menu item. • down-arrow to enter the menu selected. • OK key to return to the superordinate menu. • Exit key • MENU key to switch over to the c² main menu. General main menu HENRI In the general main menu HENRI you navigate with the • multifunction keys A, B, C, D, E or F to select a menu, submenu and menu item. to enter the (sub)menu selected. • OK key to return to the superordinate menu. • Exit key National Rejectors, Inc. GmbH, Buxtehude 13 Design SRG – Internal HENRI functions Switching between the main menus While you are in one of the both main menus you cannot switch over to the other main menu direct by pressing the appropriate menu key. If you try to switch over direct to the other menu, the connection between changer and service tool will be interrupted. In this case pull the HENRI plug out of the c² socket and wait for approx. 30 sec. until a new connection has been set up. From the general HENRI main menu to the c2 main menu • With theExit key back to the HENRI main menu • With the menu key MENU to the c2 start screen first and then • With the menu key MENU to the c2 main menu From the c2 main menu to the general HENRI main menu • With the Exit key back to the c2 main menu • With the menu key MENU to the c2 start screen • With the menu key HENRI to the HENRI main menu Display help texts The bottom display line is intended for help texts and offers you key instructions for possible courses of action, e.g. leaving a (sub)menu. 14 National Rejectors, Inc. GmbH, Buxtehude SRG – Internal HENRI functions 5 Connection Connection The HENRI service tool can either be connected to the payment system on site in the vending machine or in the workshop by using a tester. Connecting HENRI on site In order to connect HENRI to a coin changer, plug the RJ-45 connector (western plug) of the connecting cable into the socket on the top right of the coin changer (see Fig. Fig. 2: Connecting HENRI on site As HENRI identifies the connected payment system automatically the display shows device specific data after the connection with the payment system has been established. National Rejectors, Inc. GmbH, Buxtehude 15 Connection SRG – Internal HENRI functions Connecting HENRI in the workshop If the NRI payment system has been removed from the vending machine for, e.g., update purposes, it has to be powered by a tester. The tester of the WinSPT PC test station along with the appropriate power pack and cable are used to supply the payment system with voltage (see Fig. 3): Fig. 3: Connecting HENRI in the workshop Using the complete WinSPT PC test station all of the vending machine functions can be simulated in order to test a serial NRI payment system. For further information regarding the WinSPT PC test station and all ordering codes please refer to our product accessory pages on the internet (www.nri24.com). 1If necessary, connect 24V-power pack to appropriate power cable. 2Connect WinSPT tester to power pack using the DC interface. 3Connect WinSPT tester to, e.g., coin changer using the MDB inter- face and the machine connecting cable (if necessary, by means of the adapter cables which are part of the accessory kits for other machine interfaces). 4Connect the power pack to the power supply using the power cable. The display of the WinSPT tester shows "SPT (C)NRI vx.x_". 5Plug the HENRI connector into the socket on the top right of the coin changer (see Fig. 2). 16 As HENRI identifies the connected payment system automatically the display shows device specific data after the connection with the payment system has been established. National Rejectors, Inc. GmbH, Buxtehude SRG – Internal HENRI functions Connection Start screens when connecting a ... HENRI identifies the payment system connected automatically. Thus the start screen is device-dependent. ... currenza c2 If HENRI is connected to a currenza c², HENRI displays two start screens: and switches then over to the c² mode automatically in order to display the selected status message, if there is no error, e.g.: ... E-66/A-66 If HENRI is connected to an E-66/A-66, HENRI displays two start screens: E-66 / A-66 ... G-46 If HENRI is connected to a G-46, HENRI displays two start screens: G-46 National Rejectors, Inc. GmbH, Buxtehude 17 Basic settings 6 SRG – Internal HENRI functions Basic settings This chapter describes how to adjust basic settings, which HENRI saves as presettings for all further applications: • Menu language • System time • Display contrast • Baud rate Setting menu language HENRI supports the following languages: • English • French • German • Italian • Dutch (option) • Spanish (option) Default language is English when HENRI is delivered. If another language is to be set: 1Press HENRI key. You enter the main menu: 2Press C key to open the Settings menu: 3Press A key to open submenu Language. 4Press A or B key to select the language. 5Use Exit key to return to the main menu. 18 National Rejectors, Inc. GmbH, Buxtehude SRG – Internal HENRI functions Basic settings Setting date and time To set time and date for HENRI: If HENRI has already been connected to a PC, e.g., for a firmware update, HENRI has already saved the PC system time. In this case time setting is not necessary. 1Press HENRI key. You enter the main menu: 2Press C key to open the Settings menu: 3Press C key again to open submenu Date/Time. 4Set date (format: day/month/year) and time (format: hour:minute:second): • use D or C key (reight arrow/left arrow) to mark data to be changed • use A key (up-arrow) to increase data selected. • use B key (down-arrow) to decrease data selected. 5Use Exit key to return to the main menu. National Rejectors, Inc. GmbH, Buxtehude 19 Basic settings SRG – Internal HENRI functions Altering display contrast The default setting of the display contrast is "46". To alter the contrast: 1Press HENRI key. You enter the main menu: 2Press C key to open the Settings menu: 3Press B key to open submenu Contrast. 4• Use A key (up-arrow) to increase the contrast. • Use B key (down-arrow) to decrease the contrast. 5Use Exit key to return to the main menu. 20 National Rejectors, Inc. GmbH, Buxtehude SRG – Internal HENRI functions Basic settings Setting baud rate By default the baud rate is set to 57600. In case the baud rate must be adapted manually, e.g., for a coin changer firmware update: 1Press HENRI key. You enter the main menu: 2Press A key to open the Update menu: 3Press E key to open submenu CC baud rate: 4Use A/B/C key to select the baud rate. 5Use Exit key to return to the main menu. National Rejectors, Inc. GmbH, Buxtehude 21 Service work 7 SRG – Internal HENRI functions Service work This chapter describes how to service the service tool: • Function tests • Firmware update Function tests You can test either the service tool's keys, system time and memory chips or in addition all HENRI interfaces as well as the c2 vending machine interface. Testing keys, system time, memory To test the operational capability of the service tool: 1Connect HENRI to a voltage source (see Chap. 5 "Connection"). In case HENRI is connected to a PC, it switches over to the main menu automatically, if not 2Press HENRI key. You enter the main menu: 3Press B key to open the menu Extended functions: 4Press B key again to open submenu Function test: 22 National Rejectors, Inc. GmbH, Buxtehude SRG – Internal HENRI functions Service work 5Press A key to start HENRI function test: • Keys after having pressed the relevant key A to F, HENRI, MENU • System time • EPROM • Flash memory The results of the function tests are displayed with: • OK if HENRI components are free from defects • ERR if at least one component is defective In this case please contact your service technician. 6Use Exit key to return to the main menu. Testing keys, system time, memory and HENRI/c2 interfaces To additionally test the HENRI interfaces as well as the currenza c2 vending machine interface: 1Connect HENRI to a voltage source (see Chap. 5 "Connection"). In case HENRI is connected to a PC, it switches over to the main menu automatically, if not 2Press HENRI key. You enter the main menu: 3Press B key to open the menu Extended functions: 4Press B key again to open submenu Function test: National Rejectors, Inc. GmbH, Buxtehude 23 Service work SRG – Internal HENRI functions 5Press B key to start HENRI and interface function test: • Keys after having pressed the relevant key A to F, HENRI, MENU • System time • EPROM • Flash memory • SIM card slot • currenza c² vending machine interface (CX2 slave, CX2 master) • RJ-45 interface • USB port The results of the function tests are displayed with: • OK if HENRI components are free from defects • ERR if at least one component is defective In this case please contact your service technician. 6Use Exit key to return to the main menu. 24 National Rejectors, Inc. GmbH, Buxtehude SRG – Internal HENRI functions Service work Firmware update Before updating the firmware (FW) you can call up the current FW version. If the FW is finally supposed to be updated, it is loaded from the hard disc of your PC into the service tool. Calling up current firmware version To determine the current HENRI FW version: 1Press HENRI key. You enter the main menu: 2Press C key to open the Settings menu: 3Press D key to call up the current FW version of the service tool in submenu Firmware no.: SxxBxx, 9200382xxxx. 4Use Exit key to return to the main menu. Updating firmware For updating the FW you will require the PC application HenriFlash which you can download along with the current FW from the NRI website (www.nri24.com) using your customer password. National Rejectors, Inc. GmbH, Buxtehude 25 Service work SRG – Internal HENRI functions Downloading the new firmware and FW updating PC application from the internet HenriFlash can be downloaded from the NRI website (www.nri24.com, Internal) either as zipped file along with the latest FW or as .exe file using your customer password. Should you have any further questions, please do not hestitate contacting our sales staff at any time. Installing HenriFlash To install the program onto the hard disc of your PC: 1If necessary, unpack zipped file. In addition to HenriFlash this directory also contains the HENRI firmware "xxx.hen" The directory may also contain files with the extension .cxb/.mot./dsp. These files represent the current FW for the currenza c2 coin changer (cp. separate c2 service manual). 2Sart .exe file and follow the installation wizard. HenriFlash is installed. Installing new firmware in HENRI tool/Uploading new c2 firmware in HENRI tool There are two aspects to consider, using the HenriFlash application A Installing a new HENRI firmware itself or B Loading the currenza c2 firmware in the HENRI tool. 1Launch the HenriFlash application. The start screen along with a selection box will come up. 2Select the firmware required: ACheck the Flash Henri box if the HENRI firmware needs to be updated. Conversely, Bcheck the box for the corresponding coin changer firmware if the coin changer firmware has to be loaded in HENRI and updated later on (cp. c2 service manual). Individual or all coin changer firmware (Get all updates) can be checked. 26 National Rejectors, Inc. GmbH, Buxtehude SRG – Internal HENRI functions Service work 3Click the OK button. Now you can set the menu language required by selecting the Language menu. 4In the left field File selection and in the line of the appropriate firmware, enter the path of the directory started during installation and firmware file using the folder button. After having selected all firmware files required, HenriFlash is ready for a firmware update or simple upload. 5First, connect the USB cable provided to a PC USB port. Then: AIf the HENRI firmware is to be updated, (Installation) • Press and hold the Menu button on the HENRI tool while connecting the free end of the USB cable to HENRI. • Wait until the HENRI tool has started the bootloader mode. • Release the Menu button. BIf c2 coin changer firmware is to be loaded, (simple storage) • Connect the free end of the USB cable to HENRI The HENRI tool shows the main menu. National Rejectors, Inc. GmbH, Buxtehude 27 Service work SRG – Internal HENRI functions 6Click on the Update button on the HenriFlash screen to start the firmware installation/upload. HenriFlash displays the data transfer status in the right-hand Output field. 28 Please refer to the c2 service manual to install new c2 firmware. National Rejectors, Inc. GmbH, Buxtehude SRG – Internal HENRI functions 8 G-46/E-66/A-66 configuration G-46/E-66/A-66 Configuration This chapter provides you with all information you need to configure a G-46 or E-66/A-66 coin changer using the new HENRI service tool and the manual for the old setting module G-55.0460: • The basics • Key functions in the G-46/E-66/A-66 mode • Accessing Dis menu • How to return to the G-46/E-66/A-66 mode, if I had pressed the HENRI-key by mistake? The basics The old G-46/E-66/A-66 setting module G-55.0460 has been displaced by the new service tool HENRI. As the HENRI tool, in the first instance, has been developed to operate and maintain the c2 coin changers, HENRI provides an extra G-46/E‑66/A-66 mode offering the same menu structure and navigation as the old setting module. The only difference in operating the tool is the key functions: Key functions in the G-46/E-66/A-66 mode G-55.0460 HENRI or or So if you press the ↑-key instead of the -key and the ↓-key instead of the -key, you can just follow the familiar function descriptions and instructions in the manual for the old setting module (www.nri24.com → Download). National Rejectors, Inc. GmbH, Buxtehude 29 G-46/E-66/A-66 configuration SRG – Internal HENRI functions Accessing Dis menu Depending on whether you want to start configuring the coin changer directly or you made basic settings using the HENRI main menu beforehand the way to the Dis menu can differ: 1aConnect HENRI to the coin changer (cp. Chap. 5 "Connection"). HENRI changes to the G-46/E-66/A-66 mode automatically: G-46 E-66 / A-66 or 1b• Press HENRI key. You enter the main menu: HENRI menu A← FW update B← Exten. funkt. C← Settings D← Changer modes E← DB update MENU← CC menu • Press -key to open the Changer modes: Changer modes A← c2 B← E/A-66/G-46 C← Palm settings EXIT← Exit • Press -key to access the G-46/E-66-/A-66 mode: G-46 E-66 / A-66 or 2Proceed as normal and press the -key (if necessary hold down for 2s). You enter the Dis menu: Dis Audit G-46 E-66 / A-66 Dis or Audit 3Follow the instructions in the manual for the old setting module. 30 National Rejectors, Inc. GmbH, Buxtehude SRG – Internal HENRI functions G-46/E-66/A-66 configuration How to return to the G-46/E-66/A-66 mode, if I had pressed the HENRI key by mistake? If you pressed the HENRI-key by mistake, you enter either the A main menu or the B Changer modes menu. To return to the G-46/E-66/A-66 mode, just press (the the -key: HENRI menu A A← FW update B← Exten. funkt. C← Settings D← Changer modes E← DB update MENU← CC menu E-66 / A-66 Changer modes A← c B← E/A-66/G-46 C← Palm settings -key and then) 2 EXIT← Exit E-66 / A-66 Changer modes A← c B← E/A-66/G-46 C← Palm settings 2 B National Rejectors, Inc. GmbH, Buxtehude EXIT← Exit 31 Technical data 9 SRG – Internal HENRI functions Technical data This chapter provides • all relevant device data • information about the CE certification Device data Supply voltage Via USB or RJ-45 interface Temperature range 10°C to 50°C Rel. humidity Up to 90% Interfaces PC: USB NRI coin changer:RJ-45 Device dimensions Height:157mm (without cable) Width: 83mm (without cable) Depth: 21mm Connecting cable Length: approx. 100cm Mark of conformity CE (see next section) 32 National Rejectors, Inc. GmbH, Buxtehude SRG – Internal HENRI functions Technical data CE certification The CE certificate (CE = Communautés Européennes) confirms that our products comply with specified basic requirements of the applicable directive. The CE certificate is not a quality assurance certificate in terms of the quality expected by the manufacturer but only in terms of the quality demanded legally. It is a pure administrative certificate and is intended only as proof of compliance with the directives for the monitoring authorities and not directed at clients or final customers. Which directives were applied can be seen in the declaration of conformity. The manufacturer must keep this declaration available for the monitoring authorities only (for a minimum period of 10 years after the last product has been introduced to the market). However, upon request we can provide copies of this declaration for our customers. The following directives and their subsequent changes can be applied to our devices: 1. The EMC Directive (2004/108/EC) for devices which cause electromagnetic interference or are interfered with by such. 2. The Low Voltage Directive (2006/95/EC) for electrical equipment that is used with a nominal voltage of 50–1000 V AC and 75–1500 V DC. 3. The CE Certificate Labelling Directive (93/68/EEC) Modification directive regarding the application and use of CE labels. 4. The directive on Radio Equipment and Telecommunications Terminal Equipment (1999/5/EC). National Rejectors, Inc. GmbH, Buxtehude 33