1
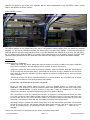
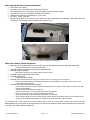
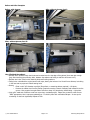
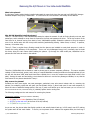
RReem moovviinngg tthhee AA//CC PPlleennuum m iinn YYoouurr LLaattee--m mooddeell W Weessttffaalliiaa What is the plenum? It is the large, plastic-molded ducting installed underneath the upper bed, above the rear seat in all 1986-1991 Vanagon Westfalia campers and pop-top “weekenders”. It is referred to as a vent channel in the Bentley Service Manual. Why did VW/Westfalia install the plenum? Theory 1: The main theory is that VW/Westfalia wanted to reduce the amount of cold air flowing directly onto rear seat passengers, and to attempt to move more air forward for the front seat passenger & driver. The tin-top versions of the vans have an air channel running from back to front; VW/Westfalia possibly created the plenum to bring the campers more in line, airflow-wise, with the tin-tops while remaining aesthetically pleasing. Makes sense, in theory. In practice, however, it is another story. Theory 2: There is another theory floating around that the plenum was installed to create back pressure in order to increase the cooling efficiency of the evaporator. True or not only Volkswagen knows, but I, personally, tend to doubt this theory being the main reason behind adding the plenum. Up through the 1985 model year, Westfalias had no plenums and the vents sat center in the cabinet: Therefore, VW/Westfalia did not decide to install a plenum just to increase evaporator efficiency. This was a complete redesign of the blower/vent system, and in doing so required Westfalia to make two different overhead cabinets (as you can see with the above 1985, what would have been a cabinet door in a non-A/C camper was simply filled in with a vent plate). Raising the main vent and adding a vent channel to deliver air over the rear passengers indicates, to me, that the main reason for the plenum stands with Theory 1. Why remove the plenum? Provided you don’t have regular rear seat passengers, particularly ones who cannot tolerate cold air, removing the plenum is a wonderful project that will grant you four fantastic things: 1) More head room for rear seat occupants; 2) about 18 inches of additional storage space in the tray; 3) much more airflow up to the front seats (the word “hurricane” has been used to describe the new, unrestricted airflow) ; 4) relatively quicker interior cooling time. The following readings are the main reasons for removing the plenum. Temperature readings (courtesy of EvilDNA on TheSamba): 65°F/18°C at the intake (backside of the A/C cabinet) 45°F/7°C at the main vent (at the front of the A/C cabinet) 55°F/13°C at the plenum vents As you can see, the plenum takes that freshly cooled air and actually heats it back up, in Evil’s case it was 10°F, making the system work all that much harder. To be fair, as the plenum cools it reduces this negative effect; but how long it © 2011 KamzKreationz Page 1 of 4 Removing Westy Plenum takes for the plenum to get to that point, especially with an interior temperature of over 100°F/38°C, plays a serious factor in the efficiency of the A/C system. Airflow readings (in mph): The airflow readings at the plenum vents vary due to the plenum’s internal baffles (they also double as mounting brackets). As you can see, without the plenum, the airflow at the front seats nearly doubles! I should also note that the underside plenum vents (the two aimed at the floor) in my 1990 Westfalia were blocked off; don’t know if it was factory, but it is apparent that either the factory or a previous owner wanted more air to be diverted through the upper vents. Therefore, those plenums with the two underside vents open will have slightly lower plenum vent airflow readings. Cooling times: EvilDNA reported on TheSamba: “Starting cabin temps 112 degrees. Ending cabin temps 82 degrees. From sensor in middle of van (edge of folded bed bunk). Distance traveled 7.2 miles. Half highway, half not. Duration: 12 minutes. Fan Speed: 3 Things that I noticed: First, before I even hit the highway (3 blocks), things were bearable. Short trips with the plenum on did not yield such relief that quick. Why? I could actually feel the breeze. It helps. A stagnant 90 sure feels worse than a breezy 90. I was in the 80s before I got off the highway. 82 degrees as I turned off the van. That is a 30 degree drop in 12 minutes.” “Over the late summer, sans plenum, I put about 8K miles on my beloved multivan. SLC to VA back to SLC to Oregon, etc. So here is the final word on the whole plenum/no plenum debate. IT MOTHERF$^*ING WORKS BETTER WITHOUT THE PLENUM! We got cool cabin temps FASTER without the plenum. I won't say COOLER, because in a closed loop system, EVENTUALLY, you'll get down to the systems inherently capable lowest possible temps per that whole mumbo jumbo pertaining to THERMODYNAMICS. You know, presssure vs. temp, delta T, CFMs, etc. PDXWesty hits on a few of the variables a few posts back. Yes, Mechanical Engineering with focus on HVAC is a Big Deal. Here is the lowdown. As much as I've profited from TK's input, as we all have (I even bought his AC Manual), the reality is very plain. The plenum restricts airflow and ANY restriction to airflow slows the CFM. You slow the CFM and you slow the rate at which you turn over (recycle) the cabin's volume of air. Thereby increasing the time it takes to get the cabin temps down. (This assumes of course that your A/C variables are tuned up and working properly) Interestingly enough, I stumbled onto another cooling system in the van that increased cooling BTUs once the airflow was felt up front. My own skin. Yep, that thing called the largest human organ has a built in AC system. Once I could feel the air circulating upfront, my secondary AC became more efficient . . . all because of . . . bom bom bom . . . AIRFLOW.” Test your own van’s interior cool-down times (and your body’s!) and compare them to Evil’s. © 2011 KamzKreationz Page 2 of 4 Removing Westy Plenum After removing the plenum, what is left behind? Small holes in the ceiling A routed groove in the cabinet where the plenum fits into Two nickel-sized holes in the cabinet (what the speaker wires are routed through) Five metal wire clips on the cabinet (mounted with adhesive) Speaker wires encased in electrical tape (or wire loom) 13-3/16” x 3-5/16” vent hole Possible black marks on the ceiling if your blower fan has regurgitated the evaporator’s foam filter guts and whatnot (Mr. Clean Magic Erasers *should* clean most of it off) The gap above the closet is typical of even non-A/C Westfalias (Above photo is courtesy of Typhon2222 on TheSamba) What does it take to remove the plenum? Basic hand tools: Philips screwdrivers, 10mm wrench, tiny flathead screwdriver (for removing screw caps) o power/cordless screwdriver will make things easier Removal of about two dozen screws and their decorative caps Removal of upper bed pads Removal of upper bed bracket, kitchen side Removal of closet door Removal of the cross-bar trim (this is the gray metal trim at the front of the rear portion of the upper bed) o o o held in place only by the cover snaps; pads are easy to remove it simply lifts off the brackets there are four bolts located on the underside of the bed; upon reinstallation, keep a finger on the T-nuts as you screw the bolts back into place Removal of storage tray/curtain track assembly o o o o o o there are three screws in the center, behind the curtain track; be sure these are lined up with the holes in the metal bracket when reinstalling there is one bolt at the closet-end (10mm nut) there is one screw at the very front, behind the driver’s seat headrest there are four screws on top, where the pop-top lifting frame sits there are two screws on top, mounting the bed hinge to the van’s body place a couple of boxes on top of the stove and rear table to support the assembly while you work; the light’s wires will prevent the assembly from dropping far enough for the whole assembly to rest on the stove Tip: Remove half of the screws out of the plenum (every other one works well), remove the screws from the baffles/brackets on the top-side of the bed board, then remove the remaining screws while supporting the plenum with your hand, your head, a helper’s hands, etc. © 2011 KamzKreationz Page 3 of 4 Removing Westy Plenum Before and After Examples Before, with plenum: After, without plenum, Part I: After, without plenum, Part II: How I finished the cabinet: Speaker wires: pulled through their holes and rerouted over the top edge of the cabinet (there was just enough gap, after loosening the mounting bolts, between the cabinet and ceiling to stuff the wire loom into it) Speaker wire holes: filled in with matching bolts and finishing washers Ceiling holes: reinstalled the original screws with caps; leaving the holes as-is isn’t bad from a distance, but sitting in the rear seat my eyes can’t handle seeing holes Groove: o Filled in with 3/8” diameter rope light (fits perfect, no mounting devices required) – left photo. o Remove the rubber trim from the plenum (requires removing a bunch of staples) and reinstall it into the groove. Mine required a couple dabs of silicone to keep it in place during hard braking – right photo. Vent grille: made out of leftover wood from a previous, unrelated project. Edges were routed to create a more "OEM" appearance; then it was spray painted gray. It's held in place with removable 3M tape. In case you're wondering: It does not significantly impact air flow. © 2011 KamzKreationz Page 4 of 4 Removing Westy Plenum