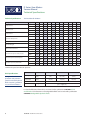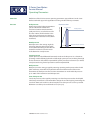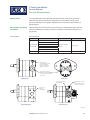
1
D Series Gear Motors ™ OpenCircuitGear MEMBER OF THE SAUER-DANFOSS GROUP Service Manual ™ OpenCircuitGear D Series Gear Motors Service Manual Revisions MEMBER OF THE SAUER-DANFOSS GROUP History of Revisions Table of Revisions Date Page Changed Rev. November 2010 March 2010 February 2010 April 2009 all 19 last - Turolla colors Added shaft seal kit number Fix Osaka address First edition BB AC AB AA © 2010 Turolla OpenCircuitGear™. All rights reserved. Turolla OCG accepts no responsibility for possible errors in catalogs, brochures and other printed material. Turolla OCG reserves the right to alter its products without prior notice. This also applies to products already ordered provided that such alterations can be made without affecting agreed specifi cations. All trademarks in this material are properties of their respective owners. Sauer-Danfoss, Turolla, Turolla OpenCircuitGear, Turolla 2 L1022962 • Rev BB • November 2010 ™ OpenCircuitGear D Series Gear Motors Service Manual Contents MEMBER OF THE SAUER-DANFOSS GROUP Introduction Overview............................................................................................................................................................ 4 Warranty............................................................................................................................................................. 4 Safety Precautions.......................................................................................................................................... 4 Unintended Machine Movement......................................................................................................... 4 Flammable Cleaning Solvents............................................................................................................... 4 Fluid Under Pressure................................................................................................................................. 4 Personal Safety........................................................................................................................................... 4 Hazardous Material................................................................................................................................... 4 Symbols Used in Sauer-Danfoss literature............................................................................................. 5 General Description....................................................................................................................................... 6 The System Circuit.......................................................................................................................................... 6 Design................................................................................................................................................................. 7 Technical Specifications Technical Specifications................................................................................................................................ 8 Fluid Specifications......................................................................................................................................... 8 Operating Parameters Overview............................................................................................................................................................ 9 Pressure............................................................................................................................................................... 9 Temperature and Viscosity.........................................................................................................................10 Hydraulic Fluid...............................................................................................................................................10 Pressure Measurements Required Tools................................................................................................................................................11 Port locations and Gauge Installation...................................................................................................11 Initial Start-Up Procedures General . ...........................................................................................................................................................12 Start-Up Procedure.......................................................................................................................................12 Fluid and Filter Maintenance Recommendations........................................................................................................................................13 Fan Speed Locked High at High Engine Speed (cold conditions)...............................................14 Troubleshooting High Stand-by Fan Speed (cold conditions)........................................................................................14 Fan Speed Not Controlled by Current to Coil......................................................................................14 Fan Does Not Turn.........................................................................................................................................15 Fan Too Slow at High Engine rpm...........................................................................................................16 Improper Modulation of Control Module.............................................................................................16 System Noise...................................................................................................................................................17 Hydraulic System Operating Hot.............................................................................................................17 Leaking Motor Shaft Seal ..........................................................................................................................17 Minor Repair Shaft Seal Replacement..............................................................................................................................18 Shaft Repair Parts..........................................................................................................................................20 Coil Replacement..........................................................................................................................................21 Valve Replacement.......................................................................................................................................21 Repair Parts Valves.................................................................................................................................................................22 L1022962 • Rev BB • November 2010 3 ™ OpenCircuitGear D Series Gear Motors Service Manual Introduction MEMBER OF THE SAUER-DANFOSS GROUP Overview This manual includes instructions for the installation, maintenance, and minor repair of D Series Motors. It includes a description of the units and their individual components, troubleshooting information, and minor repair procedures. A worldwide Authorized Service Center network is available for major repairs. SauerDanfoss Authorized Service Centers are trained by the factory and certified on a regular basis. You can locate your nearest Authorized Service Center using the distributor locator at www.sauer-danfoss.com. Warranty Performing installation, maintenance, and minor repairs according to the procedures in this manual does not affect your warranty. Major repairs requiring the removal of a unit’s rear cover or front flange voids the warranty. Only a Sauer-Danfoss Authorized Service Center may perform major repairs. Sauer-Danfoss trains ASC and certifies their facilities on a regular basis. Safety Precautions Always consider safety precautions before beginning a service procedure. Protect yourself and others from injury. Take the following general precautions whenever servicing a hydraulic system. Unintended Machine Movement W Warning Unintended movement of the machine or mechanism may cause injury to the technician or bystanders. To protect against unintended movement, secure the machine or disable/ disconnect the mechanism while servicing. Flammable Cleaning Solvents W Warning Some cleaning solvents are flammable. To avoid possible fire, do not use cleaning solvents in an area where a source of ignition may be present. Fluid Under Pressure W Warning Escaping hydraulic fluid under pressure can have sufficient force to penetrate your skin causing serious injury and/or infection. This fluid may also be hot enough to cause burns. Use caution when dealing with hydraulic fluid under pressure. Relieve pressure in the system before removing hoses, fittings, gauges, or components. Never use your hand or any other body part to check for leaks in a pressurized line. Seek medical attention immediately if you are cut by hydraulic fluid. Personal Safety W Warning Protect yourself from injury. Use proper safety equipment, including safety glasses, at all times. Hazardous Material W Warning Hydraulic fluid contains hazardous material. Avoid prolonged contact with hydraulic fluid. Always dispose of used hydraulic fluid according to state and federal environmental regulations. 4 L1022962 • Rev BB • November 2010 ™ OpenCircuitGear D Series Gear Motors Service Manual Introduction MEMBER OF THE SAUER-DANFOSS GROUP Symbols Used in SauerDanfoss literature WARNING may result in injury Tip, helpful suggestion CAUTION may result in damage to product or property Lubricate with clean hydraulic fluid Reusable part Non-reusable part, use a new part Non-removable item Option – either part may exist Superseded – parts are not interchangeable Apply grease/petroleum jelly Apply locking compound Inspect for wear or damage Clean area or part Be careful not to scratch or damage Note correct orientation Measurement required Mark orientation for reinstallation Flatness specification Torque specification Parallelism specification Press in – press fit External hex head Pull out with tool – press fit Internal hex head Cover splines with installation sleeve Torx head O-ring boss port Pressure measurement/gauge location or specification The symbols above appear in the illustrations and text of this manual. They are intended to communicate helpful information at the point where it is most useful to the reader. In most instances, the appearance of the symbol itself denotes its meaning. The legend above defines each symbol and explains its purpose. L1022962 • Rev BB • November 2010 5 ™ OpenCircuitGear D Series Gear Motors Service Manual Introduction MEMBER OF THE SAUER-DANFOSS GROUP General Description A Sauer-Danfoss electrohydraulic proportional fan drive system consists of a combination of fixed or variable displacement open circuit hydraulic pump and an D gear motor with or without proportional relief valve or standard relief valve and check valve to control fan speed. The engine control module or Sauer-Danfoss control module drives the proportional relief valve using a Pulse-Width Modulated (PWM) signal. Sauer-Danfoss fan drives work with engines produced by all the major North American and European engine manufacturers. The System Circuit The pump receives fluid directly from the reservoir through the inlet line. The output of the pump is connected to a fixed displacement gear motor, which has an electrohydraulic proportional valve mounted in the motor’s rear cover. The valve setting determines the maximum pressure in the system by passing oil around the motor’s gear set directly to the return port of the motor. The proportional valve is normally closed and requires the application of an electrical current to reduce the bypass pressure from a predetermined, customer selected, maximum pressure setting. In a hydraulic fan drive system, the predetermined maximum pressure setting determines the maximum pressure to the motor, and maximum trim speed of the fan. Applying an electrical current to the valve allows the fan to run at speeds below its maximum trim speed, regardless of the flow supplied to the pump. Oil exiting the motor is directed back to the reservoir through a filter and a heat exchanger. Oil returning to the reservoir must enter the reservoir well below the fluid level to minimize air entrainment. Baffles in the reservoir diffuse the oil to an acceptable level, mix it with the fluid in the reservoir, and prevent the oil from flowing immediately back to the pump inlet. The return oil remains in the reservoir long enough to allow any entrained air in the fluid to rise to the surface and dissipate. 6 L1022962 • Rev BB • November 2010 ™ OpenCircuitGear D Series Gear Motors Service Manual Introduction MEMBER OF THE SAUER-DANFOSS GROUP CANBUS J1939 System Illustration Microcontroller (PLUS+1TM) RESERVOIR Filter Temperature sensors case drain T1 DIESEL ENGINE D Series gear pump T2 D Series gear motor T3 P107 929E Design Sauer-Danfoss fixed displacement open circuit gear motors convert hydraulic power into mechanical power. Supply flow determines shaft speed. Load torque results in system pressure between the pump and motor. Bushings at the front and rear of the motor support the shaft. The volume between the gear teeth and the pump body defines the displacement of the motor. A shaft seal and dust protector at the front of the motor prevents leakage where the shaft exits the motor housing. Cutaway Drawing Optional proportional control valve Specially designed thrust plates Case drain port SAE A 2-bolt or SAE B 2-bolt mounting flange Dust protector SAE O-ring boss side ports (other port options available) Heavy duty low friction steel backed bronze sleeve bushings Heat treated alloy steel integral gears and shaft Viton ® seals standard P107 920E L1022962 • Rev BB • November 2010 7 ™ OpenCircuitGear D Series Gear Motors Service Manual Technical Specifications MEMBER OF THE SAUER-DANFOSS GROUP Technical Specifications Ratings Displacement Rated pressure Peak pressure Speed at rated pressure Start speed at 1000 PSI Standard Weight Mass moment of inertia Theoretical torque at rated pressure Theoretical power at rated speed Case drain pressure (maximum) Technical data for D Motors Units 17 19 21 23 25 29 32 36 38 41 45 cm3/rev 17.0 19.0 20.5 22.5 25.4 29.0 31.8 36.1 38.0 41.0 45.0 in3/rev 1.04 1.16 1.25 1.37 1.55 1.77 1.94 2.20 2.32 2.50 2.75 Bar 276 276 276 276 276 276 276 276 276 241 210 psi 4000 4000 4000 4000 4000 4000 4000 4000 4000 3495 3045 Bar 303 303 303 303 303 303 303 303 303 265 231 psi 4400 4400 4400 4400 4400 4400 4400 4400 4400 3843 3350 maximum 3400 3400 3400 3400 3400 3400 3400 3400 3400 3000 3000 minimum* 600 600 600 600 600 600 600 600 600 600 600 rpm 400 400 400 400 400 400 400 400 400 400 400 kg 8.53 8.66 8.80 8.94 9.07 9.38 9.53 9.84 9.93 10.16 10.43 lb 18.8 19.1 19.4 19.7 20.0 20.7 21.0 21.7 21.9 22.4 23.0 x10⁻⁶ kg•m² 127 138 146 156 172 191 206 228 239 255 276 94 102 107 115 127 141 152 168 176 188 204 N•m 65.7 73.4 79.2 87.0 98.2 112.1 122.9 139.6 146.9 138.4 132.4 lbf•ft 48.5 54.2 58.4 64.2 72.4 82.7 90.7 102.9 108.3 102.1 97.6 kW 23.4 26.1 28.2 31.0 35.0 39.9 43.8 49.7 46.1 43.5 41.6 hp 31.2 34.9 37.6 41.3 46.6 53.2 58.4 66.3 61.1 58.0 55.5 Bar 5.0 5.0 5.0 5.0 5.0 5.0 5.0 5.0 5.0 5.0 5.0 psi 72.5 72.5 72.5 72.5 72.5 72.5 72.5 72.5 72.5 72.5 72.5 x10⁻⁶ slug•ft² * minimum speed at maximum pressure Fluid Specifications Ratings are based on operation with premium petroleum-based hydraulic fluids containing oxidation, rust, and foam inhibitors. Parameter Unit Viscosity mm2/sec (cSt) [SUS] Temperature °C [°F] Cleanliness Filtration efficiency Minimum Continuous Maximum 8 [36] 10 - 100 [50 - 212] [7500] 110 [230] 115 [239] -40 [-40] 1600 ISO 4406 Class 22/18/13 or better charge filtration β15-20 =75(β10≥10) For detailed filtration information, see Sauer-Danfoss publication 520L0463 Fluids and Filtration. For information on biodegradable fluids see Sauer-Danfoss publication 520L0465 Biodegradable Hydraulic Fluids. 8 L1022962 • Rev BB • November 2010 ™ OpenCircuitGear D Series Gear Motors Service Manual Operating Parameters MEMBER OF THE SAUER-DANFOSS GROUP Overview Definitions of the D Series motors operating parameters appear below. Consult SauerDanfoss technical support for applications running outside of these parameters. Pressure Peak pressure Peak pressure is the highest intermittent pressure allowed. The relief valve overshoot (reaction time) determines peak pressure. It is assumed to occur for less than 100 ms. The illustration to the right shows peak pressure in relation to rated pressure and reaction time (100 ms maximum). Rated pressure Rated pressure is the average, regularly occurring operating inlet pressure that should yield satisfactory product life. The maximum machine load at the motor shaft determines rated pressure. Pressure Pressure vs. time Peak pressure Rated pressure Reaction time (100 ms max) Time P107 861E System pressure System pressure is the differential between the inlet and outlet ports. It is a dominant operating variable affecting hydraulic unit life. High system pressure, resulting from high load at the motor shaft, reduces expected life. System pressure must remain at, or below, rated pressure during normal operation to achieve expected life. Back pressure Back pressure is the average, regularly occurring operating outlet pressure that should yield satisfactory motor life. The hydraulic load demand downstream of the motor determines the back pressure. The Fan Drive Gear Motor can work with back pressure up to 100% of the maximum rated inlet pressure. Case drain pressure Case drain pressure is the regularly occurring case drain line pressure that should yield satisfactory motor life. It is recommended to design the case drain piping connecting the case drain direct to the tank in order to keep the case drain pressure as low as possible. Maximum case drain pressure allowed is 5 bar [72.5 psi]. L1022962 • Rev BB • November 2010 9 ™ OpenCircuitGear D Series Gear Motors Service Manual Operating Parameters MEMBER OF THE SAUER-DANFOSS GROUP Temperature and Viscosity Temperature and viscosity requirements must be concurrently satisfied. Use petroleum/mineral-based fluids. Temperature High temperature limits apply at the inlet port of the motor. The motor should run at or below the maximum continuous temperature. Cold oil, generally, doesn’t affect the durability of motor components. It may affect the ability of oil to flow and transmit power. For this reason, keep the temperature at 16°C [60 °F] above the pour point of the hydraulic fluid. Minimum (cold start) temperature relates to the physical properties of component materials. Continuous temperature is the temperature at or below the temperature which normal motor life can be expected. Maximum temperature is the highest temperature that is tolerable by the machine for a transient/limited time. (Duty cycle 1% or less) Viscosity Minimum viscosity occurs only during brief occasions of maximum fluid temperature and severe duty cycle operation. It’s the minimum acceptable viscosity to guarantee the motor life. (Duty cycle 1% or less) Maximum viscosity occurs only during cold start at very low temperatures. It is the upper limit of viscosity that allows the motor to start. Continuous viscosity: The viscosity range at which normal motor life can be expected. Hydraulic Fluid Ratings and data for gear motors are based on operation with premium hydraulic fluids containing oxidation, rust, and foam inhibitors. These fluids must possess good thermal and hydrolytic stability to prevent wear, erosion, and corrosion of internal components. Use only clean fluid in the motor and hydraulic circuit. C Caution Never mix hydraulic fluids. For more information on hydraulic fluid selection, see Sauer-Danfoss publications 520L0463 Hydraulic Fluids and Lubricants, Technical Information, and 520L465 Experience with Biodegradable Hydraulic Fluids, Technical Information. 10 L1022962 • Rev BB • November 2010 ™ OpenCircuitGear D Series Gear Motors Service Manual Pressure Measurements MEMBER OF THE SAUER-DANFOSS GROUP Required Tools You can perform the service procedures described in this manual using common mechanic’s hand tools. Special tools, if required are shown. When testing system pressures, calibrate pressure gauges frequently to ensure accuracy. Use snubbers to protect gauges. Port locations and Gauge Installation For economical reasons, the motors do not contain any designated gauge installation ports. Use tee fittings to obtain pressure measurements. The table lists locations and gauge sizes. D Series Motor Port information Port identifier Inlet and outlet ports A and B Drain port L1 Size 3/4-16 SAE J 1926/1 O-ring boss 7/8-14 SAE J 1926/1 O-ring boss 1 1/16-12 SAE J 1926/1 O-ring boss 1 5/16-12 SAE J 1926/1 O-ring boss 1 inch split flange 1 1/4 split flange 9/16-18 SAE Pressure obtained Gauge size, bar [psi] System and return pressure 600 [10 000] Case drain 10 [100] External drain L1 9/16-18 SAE Straight thread for 3/8 inch O.D. tube (Note: Location can be on opposite side of motor) Inlet port and outlet port SAE ORB ports sized identically sizes are 3/4-16, 7/8-14, 1 1/16-12, and 1 5/16-12 Radial ports Axial ports Inlet port and outlet port sized identically External drain - drive side L1 (Note: Location can be on opposite side of motor) Inlet port and outlet port sized identically Split flange ports Fan drive ports P107 962E L1022962 • Rev BB • November 2010 11 ™ OpenCircuitGear D Series Gear Motors Service Manual Initial Start-Up Procedures MEMBER OF THE SAUER-DANFOSS GROUP General Follow this procedure when starting-up a new motor installation or when restarting an installation in which the motor has been removed. Prior to installing the motor, inspect for damage incurred during shipping. Make certain all system components (reservoir, hoses, valves, fittings, heat exchanger, etc.) are clean prior to filling with fluid. Start-Up Procedure 1. Ensure that the machine hydraulic oil and system components (reservoir, hoses, valves, fittings, and heat exchanger) are clean and free of any foreign material. 2. Install new system filter element(s) if necessary. 3. Install the gear motor. 4. Fill the reservoir with hydraulic fluid of the recommended type and viscosity. Use a 10-micron reservoir filler filter. After start-up the oil level in the reservoir may drop due to filling of the system components. Check the oil level in the reservoir to maintain the full level throughout the start-up. CCaution If reservoir is low, damage to hydraulic components may occur. Maintain sufficient oil in the reservoir at all times. 5. Use a common method to disable the engine to prevent the engine from starting. Crank the engine starter for several seconds. Do not to exceed the engine manufacturer’s recommendation. Wait 30 seconds and then crank the engine a second time as stated above. This operation helps remove unwanted air from the pump outlet line and lubricates the gear motor prior to engine start up. Refill the reservoir to recommended full oil level. 6. Enable engine to start. Start the engine. Let the engine run for a minimum of 30 seconds at low idle to allow the air to work itself out of the system. Check for leaks at all line connections and listen for cavitation. CCaution Cavitation damages hydraulic components. Take steps to avoid air entrainment in the system. 7. After initial air removal and ensuring the hydraulic reservoir oil level is correct, raise the engine speed enough to increase fan speed to a moderate level but not enough to open the bypass relief valve. 8. With the engine at high rpm disconnect the PWM wire or a sensor to ensure the motor is going to full speed. 9. Check that the reservoir is full. The motor is now ready for operation. 12 L1022962 • Rev BB • November 2010 ™ OpenCircuitGear D Series Gear Motors Service Manual Fluid and Filter Maintenance MEMBER OF THE SAUER-DANFOSS GROUP Recommendations Gear motors are manufactured using a process known as cut-in, during which the gears, motor body, and bearing blocks are allowed to establish a unique relationship to each other. Opening a motor and replacing components is not recommended. Removal or replacement of some internal components will modify their critical dimensions. Because motors are cut-in at a specific pressure to ensure maximum efficiency, removal or replacement of internal components may be detrimental to motor efficiency. Motor conversions are not allowed. To ensure optimum life, perform regular maintenance of the fluid and filter. Contaminated fluid is the main cause of unit failure. Take care to maintain fluid cleanliness when servicing. Check the reservoir daily for proper fluid level, the presence of water, and rancid fluid odor. Fluid contaminated by water may appear cloudy or milky or free water may settle in the bottom of the reservoir. Rancid odor indicates the fluid has been exposed to excessive heat. Change the fluid immediately if these conditions occur. Correct the problem immediately. Inspect vehicle for leaks daily. Change the fluid and filter per the vehicle/machine manufacturer’s recommendations or at these intervals: Fluid and filter change interval Reservoir type Sealed Recommended oil change interval 2000 hours 500 hours Breather Change the fluid more frequently if it becomes contaminated with foreign matter (dirt, water, grease, etc.), or if the fluid is subjected to temperature levels greater than the recommended maximum. Dispose of used hydraulic fluid properly. Never reuse hydraulic fluid. Change filters whenever the fluid is changed or when the filter indicator shows that it is necessary to change the filter. Replace all fluid lost during filter change. L1022962 • Rev BB • November 2010 13 ™ OpenCircuitGear D Series Gear Motors Service Manual Troubleshooting MEMBER OF THE SAUER-DANFOSS GROUP Fan Speed Locked High at High Engine Speed (cold conditions) To determine minimum fan speed at high engine rpm, connect coil to battery voltage to lock coil in open position. Follow steps 1 - 3. If fan is still not operating properly, follow steps 4 - 5. Item 1. Wire disconnected or shorted 2. Faulty electronics 3. Faulty input signal to control module (sensors, switches, PWM signal) 4. Faulty valve 5. Faulty solenoid coil. Description Any wire on the controller, switches, or temperature sensors that is disconnected, cut, or shorted will lock the fan to full speed. The control module is not sending a current signal to the solenoid. No feel of magnetics on proportional relief valve coil. Sensors either not functioning properly or not properly engaged in mounting. Improper or No PWM signal from engine. Valve is stuck in closed position. Coil is either shorted or open. No feel of magnetics on coil Action Re-connect wires or re-wire the wiring harness. Replace the control module. Consult engine repair manual; verify 12 or 24 VDC is going to the coil. Replace or re-mount sensor. Determine why engine is sending faulty signal and fix. Verify 12 or 24VDC going to controller. Check for 5VDC across sensors. Replace valve or complete motor assembly. Replace coil. Torque coil nut to 4 to 6 N•m [3 to 4.5 lbf•ft]. High Stand-by Fan Speed (cold conditions) Item Description Blockage in main valve flow Blockage in valve flow passages will increase fan passages speed and system pressure. Faulty electronics, sensor bad or disconnected, PWM signal missing. Faulty solenoid coil. Controller is not sending full current signal to the solenoid. Sensor bad or disconnected, PWM signal missing Coil is either shorted or open. No feel of magnetics on coil Action Replace valve. Torque to 45 N•m [33 lbf•ft]. Torque coil nut to 4 N•m to 6 N•m [3 to 4.5 lbf•ft]. Replace bad sensor or connect wire. Determine reason for missing PWM signal. Replace the controller. Replace coil. Torque coil nut to 4 to 6 N•m [3 to 4.5 lbf•ft]. Fan Speed Not Controlled by Current to Coil Item Fan speed proportional to engine speed at all times 14 Description Blocked or stuck valve causes fan speed to be proportional to engine speed at all times. L1022962 • Rev BB • November 2010 Action Replace valve. Torque to 45 N•m [33 lbf•ft]. Torque coil nut to 4 N•m to 6 N•m [3 to 4.5 lbf•ft] ™ OpenCircuitGear D Series Gear Motors Service Manual Troubleshooting MEMBER OF THE SAUER-DANFOSS GROUP Fan Does Not Turn Item Not enough flow through motor. Description If engine is left at idle at start-up of machine, there is not enough flow or pressure to turn fan motor. Delta pressure across proportional valve too low Delta pressure across motor ports should measure approximately 50 psi minimum at engine idle. Check motor case drain flow Check proportional relief valve Check fan speed Replace proportional relief valve Check pump Check fan speed and system pressure Inadequate fan system flow If pump or motor lose efficiency, there may not be coming from pump enough flow to move the motor System with Priority Flow Divider (PFD) for steering may be sending too much flow to steering Fan system flow coming Proportional relief valve in motor is stuck in open from pump is bypassing the position motor L1022962 • Rev BB • November 2010 Action Rev engine a couple times to get flow through motor. If the fan begins to turn, and continues to turn when the engine returns to idle, the pump and motor are OK. Measure delta pressure across motor ports. If it is greater than 150 psi and the motor does not turn, replace motor. If the delta pressure is between 50 psi and 150 psi and the motor does not turn, rev the engine a couple of times to get flow through the motor and check current to the solenoid. If current is greater than recommended maximum, adjust controller parameters to reduce the current. If increasing the engine rpm makes the fan turn, adjust controller parameters to reduce the current. Consult Sauer-Danfoss controller documentation. Consult engine service manual. Is motor case drain flow greater than 1.2 l/min [US 0.3 gal/min] YES - Replace motor. NO - Check proportional relief valve Is there 12 or 24 VDC to coil. NO - Find out why and repair. YES - Disconnect coil. Did fan speed increase? NO - Replace proportional relief valve. YES - Check controller After replacing proportional relief valve, is there adequate fan speed? YES - System is OK. NO - With solenoid disconnected, measure and record system pressure and fan speed at increasing engine speed (i.e.700, 1200, 1500, 1800, full throttle). Is the fan speed and system pressure increasing with engine speed? NO - Replace pump. Disconnect a sensor wire or battery wire to controller, if the fan does not turn, check motor bearing flow out of motor case drain line (maximum 1.2 l/min [US 0.3 g/min]) and / or with the solenoid disconnected verify system pressures and fan speed while increasing engine speed. If the fan does not turn replace the pump, if it does turn, Repeat troubleshooting chart from the top of this chart. Check engine idle. Check flow to steering unit. Replace pump. Disconnect solenoid coil. Fan should go to full speed. If fan does not go to full speed, replace relief valve. 15 ™ OpenCircuitGear D Series Gear Motors Service Manual Troubleshooting MEMBER OF THE SAUER-DANFOSS GROUP Fan Too Slow at High Engine rpm Disconnect coil to send fan to maximum speed at high engine rpm. If problem remains, follow steps 1 thru 8 below. If fan attains maximum speed, follow step 9 . Item 1. Low oil level in reservoir 2. PRV set to wrong crack pressure 3. Faulty PRV Description Not enough oil to maintain full system flow. PRV may be holding pressure below specifications. The PRV controls the maximum speed of the motor. Fan runs at low engine speed at all times 4. Hydraulic oil temperature High oil temperature decreases viscosity and too high affects efficiency. 5. Aeration of oil 6. Damaged motor, low system pressure 7. Inadequate fan system flow coming from pump. 8. Inadequate flow coming from the reservoir due to restrictions 9. Faulty electronic control module. Action Fill reservoir to recommended level. Consult operator’s manual. Replace PRV with one set to appropriate crack pressure. Pressure setting is not externally adjustable. Replace valve. Torque to 45 N•m [33 lbf•ft] Torque coil nut to 4 N•m to 6 N•m [3 to 4.5 lbf•ft] Maintain hydraulic oil at normal operating temperatures (110°C [230°F] max). Ensure cooler is operating properly. High oil temperature can also be caused by aeration (see below). Find location where air is entering into the system and fix. Check inlet line to pump and repair any leaks. Fill reservoir to recommended level. Consult operator’s manual. Measure system pressure between pump and motor. Vary engine speed low to high. Does system pressure change? Check motor case drain flow. Should be maximum 1.2 l/min [US 0.3 gal/min]. If case drain flow exceeds limits, replace motor. If pump loses efficiency, it may not produce enough Compare performance when oil is hot and cold. Measure flow flow to turn the motor. A damaged pump may entering motor. Measure steering flow. Replace pump if flow is provide flow when oil is cold and viscous but may insufficient. not when oil warms up. Systems equipped with steering PFD may be sending too much flow to steering. May be sending too much flow to steering. Restriction in inlet of the pump, Strainer or filter in Clean strainer or replace filter in reservoir. the reservoir plugged. Check inlet vacuum at pump inlet. Maximum Inlet vacuum 0.7 bar absolute [10 inches Mercury vacuum] The control module is sending too high of a current Readjust or replace the control module. Verify control module signal to the solenoid. is working properly. Troubleshoot control module according to manufacturers instructions. Replace control module if necessary. Air in system decreases efficiency of units and controls. Noise, foaming, and hot oil are signs of aeration. Proportional relief valve spool sticking open may prevent full flow from going through motor. Not enough flow from pump. Improper Modulation of Control Module Item Faulty input signal to control module (sensors, switches, PWM signal) Faulty electronic control module Faulty proportional relief Description Sensors either not functioning properly or not engaged into mounting properly. Improper PWM signal from engine. Control module sending improper current to solenoid. Action Replace or re-mount sensor. Determine why engine is sending faulty PWM signal and fix. Valve not shifting properly with current signal from Replace valve assembly. valve control module. Verify proper current signal to valve. Torque to 45 N•m [33 lbf•ft]. Torque coil nut to 4 N•m to 6 N•m [3 to 4.5 lbf•ft]. 16 L1022962 • Rev BB • November 2010 Consult engine service manual. Replace the control module. ™ OpenCircuitGear D Series Gear Motors Service Manual Troubleshooting MEMBER OF THE SAUER-DANFOSS GROUP System Noise Item Aeration of the oil Cold oil Fan hitting shroud. Description Low oil in reservoir Air in system decreases efficiency of units and controls. Air in system is indicated by excessive noise in pump, foaming in oil, and hot oil. Low oil temperature increases viscosity and can cause cavitation, resulting in system noise. Check fan shroud and hydraulic motor mountings. Action Find location where air is entering into the system and fix. Problem is often found in inlet line to pump. Fill reservoir Allow the oil to warm up to its normal operating temperature with engine at idle speed. Consult owner’s manual for proper fastener torques. Hydraulic System Operating Hot Item Low oil level in reservoir and low supply to pump. Faulty or blocked heat exchanger (if equipped). Description Insufficient amount of hydraulic fluid will not meet the cooling demands of the system. If the heat exchanger fails, or becomes obstructed, it may not meet the cooling demands of the system. Action Fill the reservoir to the proper level. Ensure that heat exchanger is receiving adequate air flow and that the heat exchanger is in good operating condition. Repair or replace as necessary. Faulty PRV If a system relief valve becomes unseated for an extended Replace malfunctioning relief valves and verify that the period of time or fails for any other reason, the system loads on the machine are not excessive. could become overheated. Torque to 45 N•m [33] Torque coil nut to 4 N•m to 6 N•m [3 to 4.5 lbf•ft] Fan system flow coming Proportional relief valve in motor is stuck in open Disconnect solenoid coil. Fan should go to full speed. If from pump is bypassing the position fan does not go to full speed, replace relief valve. Proportional valve installed into end cover supply port. Install valve into endcover port on return side of motor motor Leaking Motor Shaft Seal Item Excessive pressure in case drain line. Description Case drain line (from rear of motor) restricted. No other return lines are tied into motor case drain. L1022962 • Rev BB • November 2010 Action Verify case drain line is routed directly to reservoir with no restrictions. Maximum case pressure limit is 5 bar [72 psi]. Replace motor. 17 ™ OpenCircuitGear D Series Gear Motors Service Manual Minor Repair MEMBER OF THE SAUER-DANFOSS GROUP Shaft Seal Replacement Tools needed; snap ring pliers, hammer, awl, (2) sheet metal screws, (2) wire cutting pliers, installation sleeve (PVC tube approximately 0.5 mm [0.02 in] smaller than flange hole diameter), wide cellophane packaging tape, and grease. Replacing the shaft seal Dust protector Seal Remove the shaft seal 1. Remove key from shaft. 2. Clean shaft area of all rust, dirt and grime. 3. Use a needle nose pliers or sharp screwdriver to remove the dust protector. E101 262 Use the following instructions to carefully pry out the shaft seal. 4. Using a sharp punch or awl, punch two holes in the shaft seal. Punch holes in seal Do not drill holes. Drilling holes produces contamination. P107 971E 5. Turn two sheet metal screws, one or two turns, into the seal. sheet metal screws 18 L1022962 • Rev BB • November 2010 P107 972E ™ OpenCircuitGear D Series Gear Motors Service Manual Minor Repair MEMBER OF THE SAUER-DANFOSS GROUP Shaft Seal Replacement (continued) P107 973E 6. Using side cutting wire pliers, remove the seal by prying it out as shown. Take care not to damage the shaft. 7. Discard the seal. Inspect the components Inspect the new seal, the motor housing seal bore, and the sealing area on the shaft for rust, wear, and contamination. Polish the shaft and clean the housing if necessary, being careful not to allow contamination to fall into the motor. Seal Kit Kit P/N 11078459 Install the new shaft seal 1. Cover the shaft keyway and exposed threads with a shaft cover or packaging tape to protect the shaft and seal during installation. 2. Lubricate the inside of the seal. Installation sleeve 0.5 mm [0.02 in] smaller than housing Dust protector Seal Seal Kit 3. Start the shaft seal into the housing with the cupped side of the seal facing the motor. 4. Use an installation sleeve to press the seal slowly in place. 5. Stop when the seal is seated.. 6. Using the installation sleeve, install the dust protector until it is flush with the motor. P107 974E 7. Re-install the key into the shaft. Ensure the top of the key does not interfere with the bottom of the keyway in the fan hub when the fan is installed. 8. Thoroughly inspect the operation of the motor after it is installed to ensure no leakage occurs. L1022962 • Rev BB • November 2010 19 ™ OpenCircuitGear D Series Gear Motors Service Manual Minor Repair MEMBER OF THE SAUER-DANFOSS GROUP Shaft Repair Parts TY shaft option PB shaft option TK shaft option PB key TK key 3 1 2 P107 964E Hexagon socket 15/16 inch P107 969E Torque 50 N•m [37 lbf•ft] Item 1 2 3 20 Description Shaft nut (5/8-18 UNF) Locking washer Key Part number 163M2013 163M2428 29620-17 L1022962 • Rev BB • November 2010 Description Part number PB Key 163M4001 Tapered 1:8 3/8-24 x 0.64 inch internal thread163M4007 TK Key with 1/4 inch key 7/8 inch diameter shaft ™ OpenCircuitGear D Series Gear Motors Service Manual Minor Repair MEMBER OF THE SAUER-DANFOSS GROUP Coil Replacement Refer to the valve drawings on the following pages for wrench sizes and torque specifications. Remove the coil 1. Disconnect the electrical connection from the coil. 2. Remove the plastic nut holding the coil to the valve. 3. Remove the O-ring and coil. Install the coil 1. Install new coil. 2. Install O-ring on the valve stem. 3. Install the plastic nut. Torque coil nut to 4 N•m to 6 N•m ( 3 to 4.5 lbf•ft) W Warning Do not overtorque plastic nut. Overtoruque will damage valve. 4. Install the wire connector to the coil. Valve Replacement Remove the valve Remove the valve from the motor. Install the valve Install new valve into motor. Torque to 45 N•m [33 lbf•ft]. W Warning Do not overtorque valve. Overtoruque will damage valve. L1022962 • Rev BB • November 2010 21 ™ OpenCircuitGear D Series Gear Motors Service Manual Repair Parts MEMBER OF THE SAUER-DANFOSS GROUP Valves Proportional Relief Valve Hexagon 22 mm or 28 mm Torque 45 N•m [33 lb•ft] 12 point socket 26mm Torque 4 N•m [2.95 lbf•ft] A A Anti-cavitation check valve Section A-A P107 965E Fixed Relief Valve Hexagon 22 mm or 28 mm Torque 45 N•m [33 lbf.ft] Anti-cavitation check valve A Section A-A A P107 966E 22 L1022962 • Rev BB • November 2010 ™ OpenCircuitGear D Series Gear Motors Service Manual Repair Parts MEMBER OF THE SAUER-DANFOSS GROUP Valves (continued) Valve Repair Parts Coil Proportional Relief Valve Fixed Relief Valve Pilot Seal kit Seal kit P107 968E Seal kit Description Coil 12 VDC, P1, P2 Coil 24 VDC, P3, P4 Seal Kit, P2, P4 Seal Kit, P1, P3 Pilot seal kit P107 967E Part number 11057054 11057053 11057060 11057061 11057166 Description Seal Kit, F Seal Kit, G Part number 11057062 11057063 Model Code example: Fan drive motor: A, B, C, D, E 12 VDC proportional relief valve, 25 GPM or less at 172 Bar curve, F. A B1 B2 C D1 D2 F G J K E1 E2 P1 –––– –––– Above example shows a 12 volt proportional relief valve (P1) in the E1 position of the model code. L1022962 • Rev BB • November 2010 23 ™ OpenCircuitGear MEMBER OF THE SAUER-DANFOSS GROUP Our Products Turolla OpenCircuitGear™ Aluminum Gear Pumps Turolla OCG, with more than 60 years of experience in designing and manufacturing gear pumps, gear motors and fan drive motors of superior quality, is the ideal partner ensuring robustness and reliability to your work functions. Aluminum Gear Motors Cast Iron Gear Pumps Cast Iron Gear Motors Fan Drive Gear Motors Aluminum Fan Drive Gear Motors Cast Iron the most experienced in providing technical knowledge and support for fan drive solutions. shortest lead time in the market. Turolla OCG is member of the Sauer-Danfoss Group. Local address: Turolla OpenCircuitGear Via Villanova 28 40050 Villanova di Castenaso Bologna, Italy Phone: +39 051 6054411 Fax: +39 051 6053033 Turolla OpenCircuitGear Kukučínova 2148-84 01701 Považská Bystrica, Slovakia Phone: +421 424 301 544 Fax: +421 424 301 626 Turolla OpenCircuitGear 2800 East 13th Street Ames, IA 50010 USA Phone: +1 515 239 6000 Fax: +1 515 239 6618 www.TurollaOCG.com L1022962 • Rev BB • November 2010