1
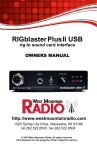
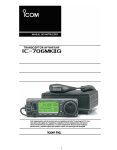
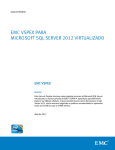
Icom 706 Mk2G Page and Homebrew Projects
Home
Technical Index
Site Map
Sida 1 av 28
ARES/Traffic
Scouts
2m Nets
HF Nets
Photo Index
Roster
Repeaters
KV5R's Icom IC-706MkIIG Mods and Tips Page
KV5R Web Designs
Web Designer/Developer - kv5r(at)kv5r(dot)com
I can build you a real nice Ham radio web site, or do an extreme makeover on your existing site!
KV5R.com - Rockwall Community Church - Bee-Line USA - Lake Palestine Chamber of
Commerce
Advantage Homes - Athens ARC - Texas Traffic Net - Lake Athens Baptist Church
Dan Taylor & Associates - East Texas Cable - Southwest Traffic Net
(c) 2003-2006 by Harold Melton, KV5R. All Rights Reserved. Rev.06/11/05
Everything for 706 Lovers in One Place.
Introduction
Handheld
802.11BANG Wi-Fi
2.4 + 5GHz
Spectrum/Packet
Analysis 802.11n
802.11b/g 802.11a
Analysis
www.bvsystems.com
Page Index
Brand New Setup
Frequency Calibration
Locating
Computer Interface
Tune Control
CW McCall
Få CW McCall
Ringsignaler för
Mobilen! (Skynda
Dig)
Ladda-Ringsignaler.com
Frequency Expansion
Filters
Microphone
Preamp
Headset Adapter
Hand-Footswitch
Fix cw.exe
Download a Free
Scan Tool & Fix
cw.exe Instantly!
www.TuneupAdvisor.com
DC Buss
LF Converter
Noise Bridge
Key Base
Links
ATC Radios
Install antennas
without coax ATC
antennas up to
10km away
www.SyntonicsCorp.com
How to connect a 706
to an SGC- PDF
How to connect a 706
to an amp - Web Page
or PDF file by K6XX
Ah, the li'l 706: What can I say? I like it! It performs like big radio, but it's
small. It sounds good, and it's well made. You can add the remote kit and put
http://www.athensarc.org/706.asp
2007-10-28
Icom 706 Mk2G Page and Homebrew Projects
Sida 2 av 28
the control head and the radio box where ever you want them. The price is
right.
This article is a handy compilation of most of the mods and stuff I have
developed or found on the web for the 706MkIIG, plus a chronicle of the little
accessory kits that I have built to enhance my enjoyment of the 706.
Disclaimer: The author assumes absolutely no responsibility, under any
circumstances, for what the reader may do with this information. Building and
connecting circuits, and performing adjustments or modifications, may damage
your radio, void your warranty, and/or cause it to operate in violation of FCC
rules and Type Acceptance, etc, unless you are VERY CAREFUL.
Notice: This page contains several schematics and kits designed by others.
They are fully credited and I make no claims upon them by copyrighting this
page. Such copyright only applies to my original writing and photos.
Brand New 706 Setup
The 706 comes with some power-on factory defaults that you will want to
change. The recommended changes make the radio easier to operate. First,
let's set up the power-on defaults.
Go to Initial Set Mode by power off, hold Lock button and power on. Refer to
the initial setup items on pages 50-55.
Item 1: You can turn off modes that you don't want the Mode button to select
in its rotation: Unless you have an external FSK RTTY system connected, turn
off RTTY mode. Most of us on RTTY are now operating AFSK RTTY via a
computer, where you'll be running on SSB.
Items 2 and 3: When you get tired of hearing it beep, turn beeps off.
Items 4 and 5: When operating the radio in the house, Low lighting is sufficient.
Daytime mobile operation will benefit from High lighting of the display.
Item 7: RF/SQL: This requires some explanation! Set to RF/SQL, the knob will
act as RF gain from 7-12-O'clock, and Squelch from 12-7-O'clock. Set item 7 to
RF/SQL and set the knob to about 12:30 and you'll never have to mess with it
again. If set to Auto, you'll have to crank it around every time you switch from
SSB/CW to FM modes. The "RF/SQL" setting is the most convenient.
Item 8: Sub-dial: Set it to RIT if you operate HF. This makes the Memory
Channel knob operate as a RIT while in VFO-A/B modes. Regardless of where
you set this setting, the knob will still operate as Memory Channel while in the
MEMOry mode.
Items 9 and 10: Optional Filters: Set to "No" if you have not purchased optional
filters. If you add one filter, I recommend the FL-232 in slot 1, and set the "Opt.
Fil 1" setting to FL-223. This will (1) give you an effective CW filter and (2) let
you select "N" (narrow) while on SSB, giving you the 350 Hz filter for digital
modes like PSK-31. Installing the 232 but selecting the 223 fools the radio, so
you can use it on SSB. See the Section below on Filters.
Item 20: Auto Repeater: This should definitely be changed from the default. Set
it to "On 2" and the 2 meter band will automatically set the right offset when
you are in the range of the usual repeater bands -- 600 negative below 147,
and 600 positive when above 147. This will save you a lot of extra offset-setting
while you are programming your repeater channels. Also sets the usual +5.00
http://www.athensarc.org/706.asp
2007-10-28
Icom 706 Mk2G Page and Homebrew Projects
Sida 3 av 28
MHz offset for 440 repeaters.
Item 24: AM NB: Set to "off" and the Noise Blanker will be disabled on AM
reception, where it will otherwise cause distortion to strong AM signals.
Item 30: VSend Sel: Set to "off," the HSend line on the Acc'y jack will key the
radio on all bands; Set to "on" (the default), HSend will key the radio on HF/6,
while VSend will key it on V/UHF bands. "Off" is useful if you will key the radio
from a computer interface for all bands. "On" is useful of you will key the radio
with a computer on HF, but with an external TNC for V/UHF. You'll need to
study the book and do some fancy wiring on the 13-pin DIN plug...
To operate the computer digital modes, see the interface section below, as well
as my big article on the digital modes at www.athensarc.org/digital-modes.asp .
The rest of the initial settings are usually OK -- by preference, or as-needed.
Now power off, and on, and go to the Q menu, by holding in the Display button.
Set the mike gain to 4-5: i.e., just where it changes from a 4 to a 5.
Notes:
1. The supplied HM-103 hand mike contains a 1-inch broadcast-type
condenser element designed by Bob Heil for Icon, and has excellent quality
-- better than most HF radios. Never talk flat into the mike -- talk across
it, about an inch away. This large-diaphragm mike element is too sensitive
to use flat against the mouth. The HM-103 hand mike, and the Heil iCM
series, are the only mikes you should use with a 706. Do not attach other
mikes to the 706, or you will be disappointed!
2. The mike gain setting is the same for all bands and modes Mike settings
are NOT stored by band, modes, nor memory channel.
3. Setting the mike gain at 4-5 and talking across it is sufficient for all bands
and modes.
4. Do not use the processor (CMP) except in extremely marginal conditions!
The supplied hand mike is so clear that the added "punch" of the processor
is rarely needed. Also, the processor will add substantial bandwidth and
splatter on SSB, drawing complaints form nearby QSOs.
5. The output power level is NOT stored in memories. There is one setting for
HF and one for V/UHF. Output power will need to be adjusted manually as
you move from nearby to distant repeaters, or from strong to weak SSB
stations.
6. Icon radios seem to use the ALC circuit to control power output. When you
are at high power, you'll see little or no ALC meter indication; when at low
power you will see full ALC indication. This is normal operation! Do NOT
adjust the mike gain to set ALC levels, as with most other radios. Leave
the mike gain at 4-5, set the power as needed, and don't worry about the
ALC meter.
7. If you do install a different mike, you'll need to determine a new "best"
mike gain setting.
Setting up your memory channels
It is important to set up your memory channels in a table before committing to
fully programming the 706. I recommend you:
1. Group all your FM channels together, from 50-99 (or so);
http://www.athensarc.org/706.asp
2007-10-28
Icom 706 Mk2G Page and Homebrew Projects
Sida 4 av 28
2. Group all your other non-FM channels together, from 1-49 (or so);
3. Use a Word table to develop your channel list; sort it by frequency, then
install it.
4. Take your time! The better your list, the less fragmentation will develop
over time.
5. If you perform the Frequency Expansion modification (below), it will erase
ALL settings and memories and return the radio to factory settings. If you
REALLY want to use 60 meters and/or MARS, do it NOW and save the long
process of programming everything twice.
Frequency Calibration
Unlike older radios, the 706 uses only one crystal oscillator (called the Master
Oscillator). All other frequencies in the radio (L.O., 3-4 I.F. stages, VFO, and
CW-offset) are computer-derived from the Master Oscillator. This makes it
relatively simple to frequency-align the radio, so that it agrees with the
Frequency Display in all modes.
NOTE! Various 706 models use different parts to calibrate the Master Oscillator.
Refer to your Instruction Manual. Additionally, the lower diagram on page 63
(11: Internal Views) in my Instruction Manual is wrong:
1. In the position shown as R602 is a trimmer capacitor (coarse adjustment),
and
2. Just above it is R602, the variable resistor (fine adjustment), and
3. Adjustment of L623 is not necessary.
It is possible, if you are very careful, to calibrate the radio to +-1 Hz at 15 or 20
MHz (WWV as reference). Use the highest WWV frequency you can receive,
usually 20 MHz in the middle of the day. Note: This is not the procedure used
by Icon and the Service Manual. I consider this procedure more accurate
because it uses WWV directly, bypassing the possible error of the Service
Monitor, which is supposedly calibrated to WWV.
This procedure only applies to radios without the optional TXCO (high-stability
unit CR-282). Also, this procedure is only for radios like mine -- having a
trimmer cap and a VR nearly under the 60 MHz gray coax in the lower (front)
right-hand (radio inverted) corner. These lie just to the right of the encased
(shielded) master oscillator.
You will need:
1. #1 Phillips screwdriver;
2. Jeweler's Screwdriver set;
3. 3.5 X headband magnifier and a bright light;
4. Air Conditioner and/or heater, and digital thermometer to control room
temperature;
5. And for greatest precision, a computer running MixW in the PSK mode -read the audio frequency on the status line with 0.1 Hz resolution.
Not Necessary: Oscilloscope, Service Monitor, or Frequency Counter (thank
goodness!).
http://www.athensarc.org/706.asp
2007-10-28
Icom 706 Mk2G Page and Homebrew Projects
Sida 5 av 28
Procedure:
1. Measure your normal room temperature. The radio (inside) runs about 10
degrees F above ambient, while closed and receiving.
2. Increase your room temperature 10 degrees above normal and stabilize it.
3. Lay the radio upside-down on a pad, front facing you.
4. Connect power and antenna.
5. Remove the bottom cover and set it aside.
6. Verify the room temperature is 10 degrees above normal, and stable.
7. Turn the radio on and let it receive for 30 minutes or so.
8. Set and lock the VFO to the highest WWV signal you can hear -- usually
20.000.000 Hz.
9. Set Mode to CW. You will hear the 600 Hz receiver offset tone beating the
WWV carrier.
10. Press and hold (1 second +) the Mode button repeatedly, switching
between CW and CW-Reverse.
11. Compare the two tones. If there is any shift in the CW and CW-R tones,
you need to calibrate the Master Oscillator.
12. Don the magnifier and adjust the lighting.
13. Get the jeweler's screwdriver that precisely fits the slot in the trimmer
capacitor.
14. Wrap a band of electrical tape around the handle of the screwdriver until is
it 1/2 to 3/4 inch in diameter, This allows you much more precise control.
15. NOTE: Touch the tiny components with the lightest possible pressure!
16. Set the VR to its mid-point.
17. Adjust the trimmer cap as close as possible (coarse adjustment). Use the
lightest possible touch!
18. Remember to remove the screwdriver from the trimmer cap when
comparing CW/CW-R tones.
19. DO NOT adjust any of the coils! (L623 or L601).
20. Finally, adjust the VR (fine adjustment) until you hear no frequency shift
between CW and CW-R.
High-Precision Adjustment:
1. Connect the radio's audio output to the audio line-in of a computer (set the
volume low).
2. Run a program such as MixW that has a continuously averaging audio
frequency display in the status line.
3. Repeatedly adjust the VR, very carefully, until no frequency shift is seen on
the computer. It is possible to get within 1 Hz.
4. Note: Your computer soundcard clock may not be calibrated, so you may
not see 600.0 Hz on the status line frequency readout. Simply adjust the
VR until the numbers are equalized between CW and CW-R modes.
Afterward, you can adjust your soundcard clock (in MixW) to make it
http://www.athensarc.org/706.asp
2007-10-28
Icom 706 Mk2G Page and Homebrew Projects
Sida 6 av 28
alternate 599.9/600.0 (in AM mode) and then your computer will also be
calibrated.
5. When satisfied, replace the cover and return the room to normal
temperature.
Testing the Frequency Calibration, Notes:
1. Accuracy increases on lower frequencies and decreases on higher
frequencies. For example, if it is off 1 Hz at 20 MHz, it will be off 0.5 at 10,
or 0.25 at 5 -- or 10 Hz at 200 MHz and 20 at 400. Hence, Icon Service
(and the Service Manual) will tell you to calibrate the radio using a labgrade Service Monitor or Frequency Counter at 60 MHz or higher.
However, even the best lab-grade equipment is calibrated to WWV, the
National Atomic Time and Frequency Standard, so I recommend just
bypassing the Service Monitor and using WWV directly, at its highest
frequency, 20 MHz, and getting the Master Oscillator within 1 Hz in a
temperature stabilized room.
2. Many do not know that the modulated audio tones on WWV are also
Frequency Reference Standards. The "beep" at the top of each minute is
exactly 1000 Hz; the continuous tones (when on) alternate between 500
and 600. Thus, you can listen to WWV on AM and get an exact 500 or 600
Hz tone, then switch to LSB and USB and compare them with the true tone
heard on AM. You can also beat a 500 or 600 Hz offset tone against the
500 or 600 Hz modulation, when available, but this beat is hard to hear
below a few Hz...
3. To periodically test the calibration, simply return to 15 or 20 MHz (exactly)
and repeatedly switch between CW and CW-R, comparing the tones. You'll
see it go off a little when the room temperature is not normal, and when
the radio is heated up from lots of transmitting, but it shouldn't be more
than 2-3 Hz off, at 20 MHz.
4. You can determine your exact error by connecting to a computer and
reading the frequency differential between CW and CW-R. Divide the
differential by two and that will be your error (readable to within +- 0.01
Hz using MixW.) If you then QSY down, divide the new frequency by the
old (to get the ratio) then divide the error by that. Using this technique, I
was able to win the 2004 ARRL FMT award certificate by getting within
0.04 Hz!
5. You can determine the frequency error of other people's radios. Have them
set to some exact reading and transmit a carrier for 10 seconds or so.
Switch your mode to CW and alternate between CW and CW-R, while
adjusting your VFO to equalize the tones (set tuning step TS to 1 Hz
resolution). Compare your readout with theirs. The differential will be their
radio's display error, plus or minus your own error, which is, hopefully,
within 1 Hz, referenced to WWV. I have observed that a high percentage of
Hams are running an error of 40-60 Hz... This may be "acceptable" on
older, pre-PLL radios, but modern radios with PLL and a Master Oscillator
can be calibrated much closer. Also, I have also observed that new,
factory-fresh radios are typically off up to 50 Hz. This may not sound like
much, but remember if you're off 50 Hz on 40 meters, you'll be off a
whopping 1 kHz on 2 meters and 3 kHz on 440! --not acceptable. Since
you have the time, you can do much better than the factory.
http://www.athensarc.org/706.asp
2007-10-28
Icom 706 Mk2G Page and Homebrew Projects
Sida 7 av 28
Locating the Giblets
The best thing about the 706 is being able to put the control head where you
want and need it. This is not only handy in mobile installations, but at home as
well. In my case, it's essential, as illness forces me to stay in bed most of the
time. The head's by the bed and the shack's in the back...
Since I live in a 30-foot trailer, my station must be small - just 2 shelves. The
radio and power supply are mounted below the lower shelf. Not shown: MFJ949E replaced with MFJ-993 IntelliTuner. (Note the crystal radio on the left,
and the 25-1300 MHz scanner on the right...)
http://www.athensarc.org/706.asp
2007-10-28
Icom 706 Mk2G Page and Homebrew Projects
Sida 8 av 28
First position: The control head was mounted on coffee table beside bed.
The 9-inch-high mount is a PanaVise cell phone mount.
My latest bedside operating desk. Middle shelf slides out for use. 706 head
mounted underneath top shelf on PanaVise cell phone mount.
http://www.athensarc.org/706.asp
2007-10-28
Icom 706 Mk2G Page and Homebrew Projects
Sida 9 av 28
Left: Another idea for control head placement.
Right: The radio, and major bird nest, is located under the desk, out of the
way. Power supply and computer interface under there, too. Mounting reardown enhances cooling and prevents cable strain. Also, it's less than 3 feet
from the ground rod!
Computer Control and Soundcard Interface
Interfacing the radio to your PC has too many "way-cool" advantages.
Computer-enhanced radio control and programming, automated logging, and a
multitude of digital soundcard modes. See my Getting Started in PC Soundcard
Digital Modes page.
The 706 has the usual 1/8th-inch CI-V remote control jack. To connect to a
computer, you must purchase the Icon interface for $140, and a soundcard
http://www.athensarc.org/706.asp
2007-10-28
Icom 706 Mk2G Page and Homebrew Projects
Sida 10 av 28
interface for $100 - OR NOT! This circuit will cost perhaps $25 (with case and
cables and plugs) and does all these neat things:
1. CI-V to RS-232 data interface for radio computer control
2. RTS to PTT switching
3. DTR to CW Key switching
4. Audio to/from computer soundcard (not shown in schematic)
Notes:
1. No one but you are responsible for mistakes/damage! This circuit, if
improperly built or connected, could damage your radio and/or your
computer! Work carefully! Double-check everything! All I can say is, mine
works fine -- no guarantee yours will.
2. Chop a 6-foot serial (RS-232) cable in half and use it for connections. Ring
out and document the appropriate RS-232 pins to wire colors. Attach wires
to PCB. This saves having to solder the RS-232 plug.
3. See page 6 of instruction manual. Use the 13-pin DIN plug that comes with
the radio.
4. Get a Radio Shack 6-foot patch cord with stereo 1/8th-inch mini-jack on
both ends. Cut in half and use for audio lines from PCB to computer
soundcard. This saves having to solder the 1/8th-inch plugs. Tie both
channels together or leave ring floating.
5. Get a 2x3x5 plastic box. Dremel-grind mouse holes along top edge, three
per end, for cables. Put cable ties on cables. Pinch them into mouse holes
with lid. This is much easier than running cables through drilled holes (they
will always be twisted, Murphy, 100% of the time, before you get done).
6. Make a cable with a 1/8th-inch mono jack for the CI-V connection.
7. Make a cable with a 1/4th-inch mono jack for the CW-KEY connection.
8. Dress all shielded cables at PCB connections with heat-shrink (avoid a lot
of shorts)
9. Dress both cable bundles with black plastic spiral-wrap (R/S has it).
10. If you run QRO and/or a lot of RF in the shack, you'll probably need
isolation transformers, and perhaps ferrite chokes, in the audio lines. Try
chokes first.
You'll end up with something line this:
Computer side cables:
5 conductors to RS-232 9pin plug:
Pin 2 - DRX
Pin 3 - DTX
Pin 5 - Gnd
Pin 7 - RTS
Pin 4 - DTR
1 audio line to soundcard
line-in. From ACC #12 Lt
Blue
1 audio line from soundcard
speaker out To ACC #11
http://www.athensarc.org/706.asp
Radio side cables:
A black box (with PCB
inside) in the middle of a
6-foot assembly
5 conductors to 13-pin ACC
plug: Ground to pin 2 (red)
PTT to pin 3 (orange)
13.8 to pin 8 (gray)
MOD-in to pin 11 (pink)
AF-out to pin 12 (light blue)
2 conductors to 1/8th-inch CIV plug
2 conductors to 1/4th-inch
KEY plug
2007-10-28
Icom 706 Mk2G Page and Homebrew Projects
Sida 11 av 28
Pink, via 50k PCB pot
CI-V Interface with PTT and CW Keying, by G3VFP - Own Risk. Audio Lines not
shown - see below.
Building this circuit will save you over $150.
My second interface includes CI-V, PTT, KEY, and Soundcard.
http://www.athensarc.org/706.asp
2007-10-28
Icom 706 Mk2G Page and Homebrew Projects
Sida 12 av 28
If you don't want CI-V interface, use this simple, non-isolated schematic in
shacks with low RF density.
* Rx should probably be 600 ohms to match mic input of radio.
My first interface - does not include CI-V.
Tune Control Activator
The 706 has circuitry built-in to control an automatic antenna tuner. This is
activated by the "Tune/Call" button. If there is no tuner connected, the button
does nothing. If one is detected, pressing the Tune button causes the radio to
switch CW and transmit carrier at 10 watts. This functionality is also useful for
those who use a manual tuner, but to use it we must make the 706 "think" that
it has an antenna tuner connected. Commercially-made tune control modules
are available - for $30. We can build one for $3.
The following circuit, by G4FZN, activates the tune control. Pressing the Tune
button once turns carrier on, pressing again turns it off. If you don't turn it off,
this circuit will time it out in about 10 seconds. If the circuit times out, the
http://www.athensarc.org/706.asp
2007-10-28
Icom 706 Mk2G Page and Homebrew Projects
Sida 13 av 28
carrier goes off but the Tune function stays on (red LED lit ont he Tune button).
Press the Tune button twice quickly to turn Tune function off. If you leave Tune
function on, the radio will emit carrier anytime it thinks it needs to retune the
autotuner -- such as, when you switch bands, or when it detects high SWR.
Therefore, when using a Tune Control Activator (not a real autotuner), you
always want to turn Tune mode off.
Notes:
1. You can lay the circuit out about like the schematic.
2. C1 sets the timeout time: 100uf = 10 sec, 50uf = 6 sec, 33uf = 4 sec
(appx). I used 33uf. Make sure it's 16v or more.
3. You can buy the 4-pin Molex, or just make your own pins. See photo. My
pins are #12AWG wire. Round on both ends with bench grinder, then
emory cloth. Progressively mash with Vice-Grips until they fit snugly into
the radio's female connector. Solder to wires. Add heat-shrink tubing.
Make sure you get them plugged in correctly.
4. Wrap tape around the PCB, plug it in, and let it dangle.
5. The $30 commercial units are much more tidy, having a little plastic case
that's molded onto a Molex plug.
Here is the easy, one-afternoon circuit. NOTE: As always, no one but you are
responsible for mistakes/damage!
-- Own Risk --
http://www.athensarc.org/706.asp
2007-10-28
Icom 706 Mk2G Page and Homebrew Projects
Sida 14 av 28
My tune activator. You can make a Molex by grinding one corner off of a
computer power supply plug.
2005 Update: I no longer use the Tune Control Activator, because I now use
the MFJ-993 IntelliTuner.
I'm very happy with it.
Frequency Expansion
NOTE: The author
does NOT advocate
any
illegal
operation.
It
is
YOUR responsibility
to stay within your
authorized
bands.
NOTE: This is for
the MkIIG ONLY.
Earlier models use
an entirely different
procedure.
NOTE:
This procedure WILL
RESET the radio to
a
factory-new
condition.
All
memories
and
settings
will
be
cleared.
This
modification
will allow the MkIIG
to transmit on most
of the frequencies
that it receives on.
It is useful for:
1. Accessing the
new
Amateur
60-meter
channels
2. Authorized
MARS
and/or
CAP operation
http://www.athensarc.org/706.asp
2007-10-28
Icom 706 Mk2G Page and Homebrew Projects
Sida 15 av 28
3. Authorized Maritime and/or Aviation SSB operation
4. Authorized VHF and UHF public service (police, fire, etc) operation
5. Authorized Land Mobile radio operation
6. Authorized VHF marine operation
7. Unauthorized operation on any frequency, only in immanent life/death
emergency, only when no other means of communication are possible
(legal but still legally risky)
8. NOTE: Amateur Radios are NOT FCC TYPE-ACCEPTED to operate in other
services -- even if you have the license to do so! Don't goof around in the
legal gray area unless your leg is mashed under an 11-ton boulder!
Remember that other (non-Amateur) radio services require not only a
license, but also a radio that is FCC Type Accepted for that service!
Tools: The 706 uses components that are extremely tiny. You will need at least
the following tools:
1. 2.5x to 3.5x headband visor magnifier or jeweler's loupe
2. Bright light
3. 15 watt pencil iron with a clean, lightly tinned, needle sharp point
4. Fine-point tweezers
5. Extremely steady hand
How to remove it (D2030):
(IC-706MkIIG ONLY - Top PCB - Red Arrow Indicates tiny SMT Diode to
Remove.)
1. Some people just crush it with needle-nose. I don't like that idea since it
might damage the PCB.
2. Take the tip out of your 15-watt iron. Chuck it in a drill. Turn it against a
grinding stone, to a needle point.
3. Reinstall the tip. Heat and re-tin it. Tap off the excess solder.
4. Remove power cable from radio. Remove top cover slowly. Carefully
unplug speaker.
5. Using visor magnifier and bright light (and a very steady hand), catch one
end of the diode with tip of iron (very lightly tinned).
6. Gently pull upward with the iron. The diode will either rotate upward on it's
other lead - or it'll break off.
7. If you lift one end just a little, you can leave the diode there in case it ever
needs to be reattached.
8. Plug in speaker. Reinstall cover. Power up. Reprogram all your memories
and settings.
http://www.athensarc.org/706.asp
2007-10-28
Icom 706 Mk2G Page and Homebrew Projects
Sida 16 av 28
The removed diode. The rod is a 0.5 millimeter mechanical pencil lead.
You can see the diode is about ¾ x 1 millimeter.
Filters
If you run CW or narrowband digital modes like PSK-31, you need a narrow
filter. I recommend the FL-232, 350Hz CW-RTTY filter. It is available from all
Icom dealers. Look for the best price online. I have seen them as low as $79.95
(Universal Radio), and HRO sold me one for the rock-bottom price of $78. Many
vendors sell them for $95-$105. Don't pay too much!
Pop the filter in, then go into setup and tell the radio it's an FL-223 (not 232).
This will allow you to select the filter in SSB mode, as well as CW and RTTY.
This will allow you to select Narrow on SSB and have about a 450Hz wide
bandwidth on your waterfall.
How it acts:
1. 1. In CW and CW-Reverse, it acts as expected, setting itself at 600 Hz. The
IF shift will move it around about 600 Hz.
2. 2. In SSB, it'll act like a RTTY filter. In USB, it centers at about 2150 Hz.
The IF shift will pull it down to about 1000 Hz for PSK use. But in LSB, it
positions itself low. The IF shift will move it down through zero to the other
sideband, or up to about 2k.
3. 3. Though called a 350 Hz filter (+-6db), my waterfall shows it to be about
500 Hz wide on moderate signals. Kicking in the attenuator or rolling down
the RF gain will narrow it just a bit. As with all narrow filters, it works best
when lightly loaded, so keep the signal level fairly low when running digital
modes.
4. 4. When running PSK at 1000 Hz with a strong signal, an harmonic image
can be seen (barely) at 2000 Hz. It's not a problem at all (it may be
generated in my computer, not the radio).
http://www.athensarc.org/706.asp
2007-10-28
Icom 706 Mk2G Page and Homebrew Projects
Sida 17 av 28
How to use:
1. Run setup (Lock+Power) and select FL-223 for the slot in which the FL-232
is installed. That will make the radio think it's a 223 (a narrow SSB filter)
so that you can then select it while in SSB.
2. For the usual computer soundcard digital modes (PSK, FSK, MFSK, etc),
set USB, start with no filter, set the signal at 1000 Hz, select the narrow
filter (Fil N), and crank the IF shift all the way right and that'll center it at
1000 Hz in USB..
3. Or, simply leave the IF centered (filter at 2150) and then tune your desired
signals there. However, if you set your PSK software to copy at 2150, it
will also transmit at 2150 and this may confuse other users who are
accustomed to using 1000 Hz only.
4. When a strong signal overloads your receiver, just shift the IF until your
desired weak signal is right on the edge and the filter will wipe out the
nearby strong signal. If the offending signal is splattering, complain!
Micorphone Tips
Note: The supplied HM-103 hand
mike is the best one you can run
on the 706. I do NOT recommend
using other mikes on the 706,
except the Heil iCM series. Other
mikes,
including
Icom
desk
mikes, will have a sound clarity
that is inferior to the stock hand
mike (yes, really)... The HM-103
sounds best when you talk across
it. Never place it flat against the
mouth
as
this
will
cause
considerable distortion.
If you really want to connect
another mic:
The 706 uses an 8-pin "modular"
RJ connector for the microphone.
This is the same as used by CAT5 computer LAN (network) cables.
The connector costs $4+ each
and requires a rather expensive
assembly/crimp tool. My way is, of course, much better.
1. Go to office/computer supply store.
2. Buy a nice soft CAT-5a LAN patch cable, one with nice molded strain relief
plugs. Get a 10-footer.
3. Cut off one end, or cut in half to make two mic cables.
4. Ring out and document pin numbers to wire colors.
5. Solder the conductors into your mic or other audio accessory.
You can find an old, classic mike and replace the element in it with a modern
http://www.athensarc.org/706.asp
2007-10-28
Icom 706 Mk2G Page and Homebrew Projects
Sida 18 av 28
electret condenser. (See photo) ElectroVoice Mercury and Shure Unisphere A.
The Shure has been modified with a dual-element electret, PTT switch, and
CAT-5a cable.. I don't use it because the sound quality is inferior to the stock
mic...
Notes:
1. Rewire the mic's on-off switch for PTT.
2. Wire the element always "hot" or you won't be able to use VOX.
3. On the other hand, a mic off switch is useful when running SSTV where
you need to talk then transmit SSTV.
4. Obtain a quality electret condenser mic assembly, designed for 8 volts DC
phantom power. A setreo mike element, used on cam-corders, may be
wired in parallel, and you'll get lots of output that's needed by the "prePro" Icom radios. These will not sound as good as the stock hand mike.
5. Bob Heil will not sell you a bare iCM element, even if you beg!
Headset Adapter
Everybody got one
because they were
free. The CueCat
barcode
scanner
was fun for a few
minutes, but then
what? I kept mine,
knowing
that,
somehow, someday,
it just might be
useful.
This project fills the
need for a '706
mic/headphone/PTT
adapter. The guts of
the
'Cat
are
discarded. A large,
sturdy, momentary
pushbutton and two
1/8th-inch jacks are
installed
in
his
hindquarters.
The
keyboard plug is chopped and replaced with an eight-pin modular plug. The
adapter will then provide the ability to use any common electret headset with
the 706. The PTT button may be used in the hand, on the desk, or on the floor
as a footswitch. Also, it makes it easy to connect a tape recorder or other audio
equipment to the 706.
Operation: You'll need to enable compression and increase the mic gain to
accomodate most headset electret mics. Inexpensive computer headsets will
work but the audio quality will be substantially inferior to the stock mic.
http://www.athensarc.org/706.asp
2007-10-28
Icom 706 Mk2G Page and Homebrew Projects
Sida 19 av 28
Note: You do not really need a fancy (expensive) crimping tool to install the
modular plug. Simply clamp the plug in a hobby vise with the catch down, and
drive each pin with a medium-sized jeweler's screwdriver. Make sure they are
all fully seated (use your 3.5 x magnifier). The cable crimp may be pressed
down and locked with a large screwdriver. If you don't want to tackle this, just
get a computer network patch cable and chop it in half. I decided to use the
CueCat's cord because it's small and soft, and it has one shielded lead.
Refer to your Icom manual for mic plug wiring. Make sure to use the cord's
shield wire as the mic ground, to prevent RF pickup.
It's a snug fit - melt away unnecessary plastic in the base plate until it fits.
Double the cord around, put a cable tie on it, and run it out the tail hole.
Finally! A useful CueCat! Mark the bottom as to which jack is which.
Mic Preamp
Text and schematic by Anthony Gargasz, KB8WOW
This nifty little audio preamp can be used for just about anything you can
dream up, from microphones, QRP rigs, even guitars.
An emitter resistor value of 390 ohms works well in most cases.
All resistors should be 1/8 watt, 5% tolerance. Regular carbon composition
types are OK. Use metal film types if you require ultra-low noise operation.
The emitter bypass capacitor can be eliminated for low source impedance
devices such as dynamic microphones and guitar pickups. High impedance
devices such as crystal and electric condenser mics will require the capacitor.
Although a 10 mfd. electrolytic is a good starting value, you may use up to 100
mfd. to get maximum AC gain. Be judicious, however, too much gain in a single
stage invites hum and oscillation instabilities. The capacitor should have a 35
VDC rating.
Want to experiment with the frequency response? For low impedance sources
try reducing the value of the input capacitor (not past 0.01) for more treble.
Increasing the output capacitor (up to 4.7 mfd.) will boost the bass. There is
allot of gain interaction when you change the capacitor values, so be prepared
for some trade-offs.
Construction is not critical, perf board works great. There is only one rule-of-
http://www.athensarc.org/706.asp
2007-10-28
Icom 706 Mk2G Page and Homebrew Projects
Sida 20 av 28
thumb, keep all component leads that attach to the transistor as short as
possible.
DC Buss Box
Like so many other things in ham radio, you can spend $50-$100 for it, or
make it yourself for less than $10. This DC buss distribution box uses two sets
of 30-amp banana jacks, and four sets of 15-amp banana jacks.
The feed wire is #10 stranded, soldered between the 30-amp jacks. The buss
wire is #14. The box is from
an old laptop computer power supply. It has a steel body and a plastic top perfect for this application.
http://www.athensarc.org/706.asp
2007-10-28
Icom 706 Mk2G Page and Homebrew Projects
Sida 21 av 28
Ain't tat PURDY?!
LF Converter
I always wanted to check out the basement -- that's what the LF crowd calls the
frequency spectrum below 300kHz. One of the things that attracted me to the
706 was the claimed specification of 30kHz. But, alas, the 706's sensitivity in
the basement is in the toilet -- the radio is nearly useless below about 400kHz.
So I poked around online and learned that what I needed was an LF converter - a simple IF oscillator/mixer that you add between the radio and the antenna.
Palomar makes a nice one -- $100 -- far too much "nice" for my wallet... More
searching yielded this little kit from Jackson Harbor Press (WB9KZY), which
comes delivered for $12. Now that's more like it! The kit includes the PCB and
http://www.athensarc.org/706.asp
2007-10-28
Icom 706 Mk2G Page and Homebrew Projects
Sida 22 av 28
all components except case and jacks. Also, you have to download the
assembly manual online. You can visit them and read about it and order it here.
The kit's PCB takes under an hour to assemble, and it you're like me, 4-5 more
hours to get it installed in a box...
The kit is on two boards - they may be soldered together. Mount everything as
low as possible. Lay down the larger caps. The chip is the oscillator-mixer. The
crystal is 10 MHz. The tuning capacitor can set the oscillator to within 10-20
Hz (beat it against WWV). Power is 13.8 VDC - the board contains an 8-volt
regulator. The toroids are part of the input low pass filter.
http://www.athensarc.org/706.asp
2007-10-28
Icom 706 Mk2G Page and Homebrew Projects
Sida 23 av 28
The bottom.
Operation: Connect the LF converter to your radio. Tune to 10.000.000 MHz and
you'll hear the oscillator at about S9+60db. Zero-beat the oscillator. Now
connect the antenna and start tuning upwards. Mostly you will hear the grinding
of triacs, SCRs, and switch-mode power supplies. After fighting that mess for
awhile, you will want to build a nice shielded loop receiving antenna. Search
online for plans and interesting frequencies.
Warning: If you key the radio, you will fry the converter's output amp transistor,
and probably the chip, too. Disconnect the mic! Don't hit that Tune button or
CW key!
Note: To zero-beat most accurately, tune the radio to 10.000.600 (600 Hz
high), LSB, then wait for a minute in which WWV is transmitting a 600 Hz audio
tone (the higher of the two they alternate between -- the lower is 500). Now
you can beat your 600 Hz carrier offset against their 600 Hz tone, which is a lot
easier than trying to beat at zero where you can't hear it. Another way is if your
radio has a 600 Hz CW sidetone -- you can beat their 600Hz audio against that.
Still another way is to tune 600 Hz low USB, listen and switch to 600 Hz high
LSB, and compare the tones. When they are equal, you're exact. Yet another
way is use the CW-Reverse feature. Tune 10.000.000 then push CW. You'll hear
the offest beat as it shifts the radio 600 Hz. Now push and hold Mode to switch
to CW-R and compare the tone. Continues switching between CW and CW-R and
adjusting the 10 MHz oscillator of the LF converter until the tones equalize.
Noise Bridge Tuner-Tuner
Here's yet another case of buy for $100 or build for $20... Dave Benson,
http://www.athensarc.org/706.asp
2007-10-28
Icom 706 Mk2G Page and Homebrew Projects
Sida 24 av 28
K1SWL, of Small Wonder Labs, sent me this neato noise bridge circuit. I put it
in a little box and added battery, switches, and connectors. The PCB and its
parts were $17 delivered My box isn't very pretty, but it works great! I use it to
tune up the antenna tuner on 60, where it's not legal to transmit dead carrier.
What it does: A noise bridge makes broadband noise and feeds it through a
bridge circuit to a receiver. It is first calibrated to a known, desired resistance,
(say, 50 ohms) then the "unknown" load is connected. Now it starts to get
interesting. By tuning the receiver and listening for the null, you can determine
the resonant (or notch) frequency of various tuned circuits like traps, antennas,
or even antenna tuners, without transmitting! I built mine primarily as a "tunertuner" to use for Field Day, so I can tune the tuner without creating QRM or
desensing the other radios in the Field Day operation. It will also come in handy
to prune my multiwire fan dipole. Besides all that, it's just plain neato because
it's old-fashioned, cool, useful, and not everybody has one!
Top:
Has both banana jacks and coax connector. Inside: The NEQRP noise bridge
circuit from Small Wonder Labs. Bottom: Power switch, output to receiver, and
bypass switch.
CAUTION!!
If you transmit into the noise bridge, it might FRY it! Always make sure the
bypass switch is on "Bypass" before transmitting!
Notes:
1. If you get a three-pole double-throw switch you can eliminate one switch.
2. The bypass should handle at least a couple hundred watts.
3. The chassis is ground for everything.
4. The battery fit inside but it's so tight I had to wrap it with tape. I attached
the battery to the lid with a cable-tie through two holes. It's too tight a fit
for a battery clip! If you do this project, use a little bit larger box!
http://www.athensarc.org/706.asp
2007-10-28
Icom 706 Mk2G Page and Homebrew Projects
Sida 25 av 28
5. Get the kind of banana jacks that will accept lugs, tinned wires, and
banana test leads. Handy.
6. The board doesn't have any mounting holes! I squeezed one between R4
and R6, and another one at the extreme right edge (see photo above).
(Photo above) The "bulge" is in the cheapo camera lens, not the box... I had to
grind about 1/4-inch off the PCB to get it in this tiny box.
OKAY! So a coat of white paint and computer-printed labels would make it look
nice.. I was in a hurry!
To use as a tuner-tuner: First, calibrate the bridge to 50 ohms resistive, with no
reactance:
1. Connect it to your receiver, set at 10 or 15 MHz (or about mid-range of
were you plan to use it).
2. Turn on/inline.
3. Connect it to the antenna tuner with a patch cable (and always use same
one thereafter).
4. If the tuner has an internal dummy load, select it (on the "Bypass" side of
the dial). If not:
5. Solder two 100-ohm precision resistors together in parallel and install
them in a PL-259. Place this at the Antenna jack of your tuner.
6. Adjust the trimmer cap and the pot very carefully for the best possible null
in the noise. When perfect, you can turn the bridge power off-on with no
change in sound. The bridge is now balanced to 50 ohms resistance and no
reactance. By placing the pure resistance at the antenna connector of the
tuner, you have balanced the bridge for both resistance and stray
http://www.athensarc.org/706.asp
2007-10-28
Icom 706 Mk2G Page and Homebrew Projects
Sida 26 av 28
capacitance of the coax patch cable and the antenna tuner (make sure the
tuner is in "bypass" to the dummy load!).
7. Now remove the resistor and connect the Ant side to the antenna tuner.
8. Adjust the tuner for the null.
9. You have now adjusted the tuner so that it looks like a 50-ohm resistance
with no reactance( i.e., exactly what your radio wants to see).
10. Turn OFF and BYPASS the bridge. ( !! )
11. Transmit with low power and fine tune the settings on the antenna tuner if
necessary.
Pros and Cons:
1. After some practice, you'll find that tuning the tuner by ear is much faster
and more intuitive than watching SWR needles. You may even discover
more tuner combinations with better (wider) Q, as I did on several bands.
2. The Q of the bridge isn't very high. That means it's fairly easy to calibrate,
but doesn't give a very sharp null.
3. It works much better on 20 meters and above than on 17 and below. On
80 meters, you can ballpark it but may still have to transmit to fine-tune
the tuner.
4. This bridge has it's pot and trimmer on the pcb. Converting to external
ones, with big pointer knobs, would allow it to be scaled to show resistance
and reactance. As-is, the unit is more than sufficient to allow one to
ballpark his tuner, traps, and driven elements -- without the high expense
of antenna analyzers! It's well worth the $24 I have in it, and replaces
units costing four times as much.
Thanks, Dave!
CW Key Base
Lightweight keys and paddles may be great for backbacking, but what if all you
want is the darn thing to stay reasonably still on the desk? Make a base as wide
as desired and about nine inches long. Put some tacky non-slip rubberized
material onthe bottom. Between that, and the weight of your hand, it'll stay
put! the non-slip material is available in little rolls from R.V. dealers.
http://www.athensarc.org/706.asp
2007-10-28
Icom 706 Mk2G Page and Homebrew Projects
Sida 27 av 28
Mount one or more keys on a piece of Melamine. Glue R.V. shelf non-slip pad
to the bottom.
Note: This material may gradually damage certain finishes.
Alas --This is so much better!
Links to Other Great '706 Places
Amateur Radio Technical Articles and Tables from KV5R- Technical Index
Icom America - Amateur Radios - IC-706MKIIG Main- they made it
http://www.rigpix.com/icom/ic706mkiig_service.pdf Download and print
the official IC-706MkIIG ServiceManual and Save $25. Shows you how and
where to align and tweak everything (advanced users only!)
http://www.athensarc.org/706.asp
2007-10-28
Icom 706 Mk2G Page and Homebrew Projects
Sida 28 av 28
Google Search: 706MkIIG OR 706Mk2G- 2100+ hits
G3VFP's Fantastic List of Schematics, Circuits, and Software- too cool!
www.mods.dk- Frames: Click 'Icom' then click 'IC-706Mkii' then click 'view
all mods' then save it.
Yahoo! Groups : ic706 Messages- Users discuss all the details
eHam.net Reviews - ICOM IC-706 - All flavors- read what hundreds of
users say about it
CI-V Information pages by DF4OR- Lots of CI-V radio control software
Big list of radio control software from QRZ
Broke, add, improve, comment? Email
Copyright (c) 2002, 2007 by Harold Melton, KV5R. All Rights Reserved.
May not be copied without express written permission. Feel free to link to
this page.
http://www.athensarc.org/706.asp
2007-10-28