1
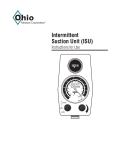
MiniOX® 1 Oxygen Analyzer Operation Manual WARNING THIS MANUAL MUST BE READ CAREFULLY PRIOR TO THE OPERATION OF THIS DEVICE. THIS DEVICE WILL PERFORM AS DESIGNED ONLY IF USED IN ACCORDANCE WITH THE MANUFACTURER’S INSTRUCTIONS. IMPROPER USE MAY CAUSE THE DEVICE TO FAIL TO PERFORM AS DESIGNED AND MAY CAUSE INJURY TO THE PATIENT AND/OR HEALTHCARE PROFESSIONAL. The warranties made by Ohio Medical Corporation® with respect to these products are voided if the products are not installed, used and serviced in accordance with the instructions in this manual. Please protect yourself and your patients by following them. We encourage our customers to write or call regarding this equipment prior to use or for any additional information relative to use or repairs. This product is not intended as a life-sustaining or life-supporting device. FEDERAL (USA) LAW RESTRICTS THIS DEVICE TO SELL BY OR ON THE ORDER OF A PHYSICIAN Ohio Medical Corporation® | 1111 Lakeside Drive | Gurnee, IL 60031 USA 1-866-549-6446 | fax: 1-847-855-6218 | www.ohiomedical.com P/N 474618 [Rev.1] 09/2010 NOTES: P/N 474618 [Rev.1] 09/2010 Ohio Medical Corporation® Medical Instrument Warranty This product is sold by Ohio MedicalTM under the warranties set forth in the following paragraphs. Such warranties are extended only with respect to the purchase of this product directly from Ohio Medical or Ohio Medical’s Authorized Dealers as new merchandise and are extended to the first Buyer thereof, other than for purpose of resale. For a period of twelve (12) months from the date of original delivery to Buyer, to Buyer’s order, or to an Ohio Medical Authorized Dealer, this product, other than its expendable parts, is warranted to be free from functional defects in materials and workmanship and to conform to the description of the product contained in the service manual and accompanying labels and/or inserts, provided that the same is properly operated under conditions of normal use, that regular periodic maintenance and service is performed and that replacements and repairs are made in accordance with the instructions provided. This same warranty is made for a period of sixty (60) days with respect to the expendable parts. The foregoing warranties shall not apply if the product has been repaired other than by Ohio Medical or in accordance with written instructions provided by Ohio Medical, or altered by anyone other than Ohio Medical, or if the product has been subject to abuse, misuse, negligence, or accident. Ohio Medical’s sole and exclusive obligation and Buyer’s sole and exclusive remedy under the above warranties is limited to repairing or replacing, free of charge, at Ohio Medical’s option, a product, which is telephonically reported to the nearest Ohio Medical Regional Service Office and which, if so advised by Ohio Medical, is thereafter returned with a statement of the observed deficiency, not later than seven (7) days after the expiration date of the applicable warranty,to the designated Ohio Medical Service Office during normal business hours, transportation charges prepaid, and which, upon Ohio Medical’s examination, is found not to conform with the above warranties. Ohio Medical shall not be otherwise liable for any damages including, but not limited to incidental damages, consequential damages, or special damages. There are no express or implied warranties which extend beyond the warranties herein above set forth. Ohio Medical makes no warranty of merchantability or fitness for a particular purpose with respect to the product or parts thereof. P/N 474618 [Rev.1] 09/2010 MiniOX® 1 Oxygen Analyzer General WARNINGS and CAUTIONS General WARNINGS and CAUTIONS WARNING ® 1. The MiniOX 1 Oxygen Analyzer will perform to specifications only if it is used and serviced in accordance with the manufacturer’s instructions. This instrument is to be used only by qualified, trained personnel who have carefully read the operating manual and labels and who have observed the information set forth. If this instrument does not perform as described in this manual, the instrument must not be used until the condition is rectified. 2. The MiniOX® 1 Oxygen Analyzer must be calibrated prior to each use. A two point calibration check must be performed weekly. See Section 4, Operation. If the instrument cannot be calibrated, the sensor must be replaced. If the instrument still is unable to be calibrated, the instrument must be serviced. 3. The oxygen sensor has a minimal response to certain gases other than oxygen. Be aware of these gases and their interference levels. See Section 3, Performance Specifications. 4. The oxygen sensor is affected by changes in barometric pressure. See Section 4, Effects of Pressure, for the effects of pressure. 5. The sensor is a sealed unit containing a potassium hydroxide electrolyte. If the sensor should develop a leak, dispose of it immediately, as the sensor contains caustic material. It must be disposed of in accordance with all applicable federal, state, and local regulations. Should contact occur with skin or clothing, rinse area immediately with large quantities of water. In case of eye contact, immediately flush eyes with water for at least 15 minutes, holding eyes open. Call a physician. 6. Ensure a tight fit exists between the sensor and the tee adapter. Ohio Medical tee adapters are engineered to fit securely with Ohio Medical sensors. However, the sensor retaining strap must be used to prevent accidental separation of sensor and tee adapter. 7. Never operate the MiniOX® 1 Oxygen Analyzer if it is suspected that water or other liquids have entered into the case. If this occurs, immediately turn the unit OFF and contact your nearest Ohio Medical Service Center for additional information. 8. Use of devices generating or emitting electro magnetic radiation near the MiniOX® 1 Oxygen Analyzer may interfere with the proper operation of the product, causing it to fail to perform as designed. Particularly, the electromagnetic radiation from the interfering device may cause the product to display incorrect/erratic values or to stop operating. Special attention should be paid to the patient if this occurs. 9. Never use the MiniOX® 1 Oxygen Analyzer in combustible atmosphere, such as occurs with flammable anesthetics. Such use could result in ignition of atmosphere. 10. Never allow an excess length of cable near the patient’s head or neck, as such could result in strangulation. Secure excess cable to the bed rail or other suitable object. FAILURE TO COMPLY WITH THESE WARNINGS CAN RESULT IN SERIOUS INJURY OR DEATH OF THE PATIENT. CAUTION 1. Remove internal battery if unit is to be nonoperational for extended periods of time. 2. Observe polarity when inserting a new battery. Incorrect connection may cause damage to the instrument. 3. The MiniOX® 1 Oxygen Analyzer must never be immersed in any cleaning solution, autoclaved, or exposed to temperatures greater than 70oC. 4. Use only Ohio Medical Corporation replacement parts and accessories listed in Section 3, Accessories of this manual. Analyzers can only be used with Ohio Medical Corporation sensors. Failure to do so may seriously impair the instrument’s performance. 5. Improper mounting of the sensor in a breathing circuit may result in inaccurate readings. The sensor MUST be mounted with the deflector pointing downward to prevent moisture collection on the sensor membrane (see Figure 4-1 in Section 4, Operation). Install the sensor upstream from the humidifier to minimize its exposure to moisture. 6. Never use a MiniOX® 1 Oxygen Analyzer with a cable that appears worn, cracked, or has damaged insulation FAILURE TO COMPLY WITH THESE CAUTIONS CAN RESULT IN INSTRUMENT DAMAGE. WC-1 P/N 474618 [Rev.1] 09/2010 MiniOX® 1 Oxygen Analyzer General WARNINGS and CAUTIONS Definition of WARNINGS and CAUTIONS WARNING Statement citing a potential safety hazard and possible injury to yourself or others. CAUTION Statement citing a possibility of damage to the instrument or other property. NOTE: Advisory on instrument function. WC-2 P/N 474618 [Rev.1] 09/2010 MiniOX® 1 Oxygen Analyzer Table of Contents Section 1 Introduction................................................................................. 1-1 WARNING ........................................................................................................................... 1-1 WARNING ........................................................................................................................... 1-1 Figure 1-1. MiniOX® 1 Oxygen Analyzer ........................................................................ 1-1 Section 2 Principal of Operation. ............................................................... 2-1 Section 3 Specifications ............................................................................ 3-1 Performance Specifications . .................................................................................................. 3-1 Interferent Gases and Vapors ................................................................................................ 3-1 Instrument Replacement Parts ............................................................................................. .3-1 Accessories............................................................................................................................. 3-1 Servicing ................................................................................................................................. 3-1 Section 4 Operation..................................................................................... 4-1 Set-up Procedures . ................................................................................................................ 4-1 Calibration .............................................................................................................................. 4-1 Two-point Linearity Check ..................................................................................................... .4-1 Instrument Operation .............................................................................................................. 4-1 Sensor Operation .................................................................................................................... 4-2 Figure 4-1. Sensor Mounting in a Breathing Circuit ...................................................... 4-2 WARNING ...................................................................................................................... 4-2 WARNING ...................................................................................................................... 4-2 Retaining Strap Installation ..................................................................................................... 4-2 Figure 4-2. Retaining strap installation .............................................................................. 4-2 Effects of Pressure, Humidity and Temperature...................................................................... 4-2 CAUTION ....................................................................................................................... 4-2 Effects of Pressure .................................................................................................................. 4-3 CAUTION ....................................................................................................................... 4-3 Effects of Humidity .................................................................................................................. 4-3 Effects of Temperature ............................................................................................................ 4-3 CAUTION ....................................................................................................................... 4-3 CAUTION ....................................................................................................................... 4-3 TOC-1 P/N 474618 [Rev.1] 09/2010 MiniOX® 1 Oxygen Analyzer Table of Contents Section 5 Maintenance and Care .............................................................. 5-1 WARNING ...................................................................................................................... 5-1 Battery Replacement .............................................................................................................. 5-1 Sensor Replacement .............................................................................................................. 5-1 Deflector Replacement ........................................................................................................... 5-1 Cable Replacement ................................................................................................................ 5-1 Cleaning, Disinfection and Sterilization................................................................................... 5-2 CAUTION ....................................................................................................................... 5-2 Instrument .............................................................................................................................. 5-2 Sensor and Cable ................................................................................................................... 5-2 Sensor Deflector, Retaining Strap and Tee Adapter................................................................ 5-2 Section 6 Technical Information ................................................................ 6-1 Technical Description .............................................................................................................. 6-1 Figure 6-1. Block Diagram ................................................................................................. 6-1 Appendix A Home Care Kit .............................................................................A-1 Installation ............................................................................................................................... A-1 Figure A-1. MiniOX® 1 Home Care Kit Installation ............................................................. A-1 TOC-2 P/N 474618 [Rev.1] 09/2010 MiniOX® 1 Oxygen Analyzer Section 1, Introduction The MiniOX® 1 Oxygen Analyzer (Figure 1-1): Section 1 Introduction The MiniOX® 1 Oxygen Analyzer is designed to provide continuous analyzing or spot checking of oxygen for: • ventilators • incubators • emergency transports • oxygen tents • concentrators • various other respiratory therapy uses • • • Operates by a single push of a button. Calibrates with the turn of a dial. Features an easy-to-read digital display. For sensor connection, a tee adapter is provided with each instrument. The galvanic oxygen sensor measures oxygen concentrations from 0 to 100%. The sensor is maintenance-free and will operate for one year, in normal medical use. WARNING WARNING This instrument is not equipped with an alarm, and is therefore not for use in a lifesupport system. Failure to comply with this warning can jeopardize patient well-being. Users must familiarize themselves with the contents of this manual before using the MiniOX® 1 Oxygen Analyzer. Failure to do so can cause misuse of the instrument, and jeopardize patient well-being. Figure 1-1 MiniOX 1 Oxygen Analyzer ® 1-1 P/N 474618 [Rev.1] 09/2010 MiniOX® 1 Oxygen Analyzer Section 2, Principal of Operation Section 2 Principal of Operation Each MiniOX® 1 Oxygen Analyzer uses a galvanic oxygen sensor which is long-lived and maintenancefree. The sensor consists of two electrodes: • • a cathode an anode The gold cathode is exposed to the atmosphere through a fluoropolymer membrane. The lead anode is submersed in a potassium hydroxide solution. When oxygen diffuses through the membrane, the electrochemical reduction of oxygen on the cathode and the corresponding oxidation of the anode generate an electrical current. The current produced is proportional to the partial pressure of oxygen in the sample atmosphere. The resulting electrical current is monitored, temperature compensated, and amplified to drive the display. The sensor is self-zeroing; when no oxygen is present to be chemically reduced and oxidized, minimal current is produced. Thus, zero percent oxygen is displayed. 2-1 P/N 474618 [Rev.1] 09/2010 MiniOX® 1 Oxygen Analyzer Section 3, Specifications Section 3 Specifications Performance Specifications Interferent Gases and Vapors Range 0-100% O2 Display Resolution 0.1% O2 increments Linearity +2% of full scale Accuracy +2% of full scale Low Battery Indicator “LO BAT” appears on the display Warm-Up Time None required Operating Temperature Range 0o to 40oC (32o to 104oF) o o % BY VOLUME (DRY GAS) INTERFERENT EQUIVALENT OF PERCENT O2 Helium 80% <0.2% Methoxyflurane 4% <2.3% Nitrogen 80% <0.2% Nitrous Oxide 80% <0.8% INTERFERENT o Instrument Replacement Parts o Storage Temperature range -20 to 55 C (-4 to 131 F) Humidity 0 to 95% RH Power Requirements One 9-volt alkaline battery Battery Life Approximately 1,400 hours Instrument 4-5/8” x 2-1/2” x 1-1/2” Dimensions Sensor ITEM Case Screw 637408 Dovetail Mounting Bracket 474606 Screws, 4-40x3/8” stainless steel (set of 4) 450000 1-1/5” OD x 1-3/4” long Accessories Instrument 7 oz (198.5 gm) Weight Sensor PART NUMBER ITEM 1-1/4 oz. (35 gm) PART NUMBER Alkaline battery, 9-Volt 628817 Coiled Cable 472045 Deflector 470687 Cable Length 10 Ft. (3m) fully extended Sensor Type Galvanic fuel sensor 0-100% O2 One year in normal medical conditions Home Care Kit (see Appendix A) 474682 Sensor Life Mounting Bracket, Pole 474664 Mounting Bracket, Wall 10023945 Shelf Life Sensors, as shipped, can be stored for a maximum of 6 months without degradation of life Operation Manual CD 600700 Oxygen Sensor 406931 Sensor Retaining Strap 634249 Tee Adapter 473021 Response Time measured with deflector and mounted in a 22 mm tee adapter @ 25oC FLOW RATE LITERS/MIN. 80% OF CHANGE (SECONDS) 97% OF CHANGE (SECONDS) Operation Manual (Printed) 464618 2 13 21 Carrying Case 710462 5 12 20 Sleeve Adapter 474667 10 11 19 Interferent Gases and Vapors INTERFERENT %BY VOLUME (DRY GAS) INTERFERENT EQUIVALENT OF PERCENT O2 Carbon Dioxide 12% <0.1% Cyclopropane 50% <0.1% Diethyl Ether 20% <1.5% Enflurane 4% <0.5% Halothane 5% <0.9% Servicing Inspection and Servicing SVC-101 Cleaning, Calibration and Testing SVC-102 Enclosure Replacement SVC-103 Circuit Board Replacement SVC-104 Connector Replacement SVC-105 3-1 P/N 474618 [Rev.1] 09/2010 MiniOX® 1 Oxygen Analyzer Section 4, Operation oxygen concentrations less than 100% or with room air is less desirable but still acceptable. Section 4 Operation 1. Press the green ON/OFF button on the front panel to turn on the instrument. Set-up Procedures 1. Remove the contents from the shipping carton and verify that you have one each of the following items: • MiniOX® 1 Oxygen Analyzer • 9-Volt Alkaline Battery • Oxygen Sensor and Deflector in Sealed Package • 10’ Coiled Cable with twist collar • Sensor Retaining Strap • MiniOX® 1 Operating Manual CD • Tee Adapter 3. Wait for a least one minute, or until the reading has stabilized. 4. If the reading on the display is other than the known oxygen concentration, adjust the reading using the calibration dial. Turn clockwise to increase the reading, or counter clockwise to decrease the reading. 5. If the reading cannot be adjusted to the known concentration value, the sensor or instrument is malfunctioning and must be serviced. Two-point Linearity Check 2. Remove the sensor from the sealed package and attach it to the coiled cable. • Firmly press the connector until it snaps into place; tighten the twist collar. • Insert the opposite end of the coiled cable into the jack on the side panel of the instrument; tighten the twist collar. 3. Remove the deflector from the package. • 2. Place the sensor in a flow of air with a known oxygen concentration or in room air. Insert the gasket into the open end of the deflector, ensuring that the gasket is properly seated within the deflector. The purpose of a two-point check is to determine the linearity of the sensor. Serious deviation from linearity (+2%) indicates the sensor is nearing endof-life. To perform a two-point linearity check: 1. Place the sensor in a stream of a known oxygen concentration between 90-100% until the reading stabilizes. 2. Calibrate to match this concentration. 4. Attach the coiled cable to the instrument in the same manner. 3. After calibration, measure room air; the reading should be 20.8% +2%. (A +2% linearity variation is allowed for differences due to the method of sample introduction, the accuracy of gas concentration, and the precision of initial setting.) If the variation is greater than 2%, repeat the two-point linearity check. If the variation remains greater than 2%, replace the sensor. 5. Remove the four screws holding the back panel in place. Instrument Operation • Gently screw the deflector onto the sensor. For monitoring in a breathing circuit, see Figure 4-1, Sensor Mounting in a Breathing Circuit. 6. Install the battery. 7. Replace the back panel and screws. 8. After installing the sensor, allow to equilibrate prior to calibration. 9. Proceed to Calibration procedures. Calibration The best method to calibrate the MiniOX® 1 Oxygen Analyzer is with 100% oxygen. Calibrating with The MiniOX® 1 Oxygen Analyzer has a low battery indicator. When the Low Battery indicator is activated, LO BAT appears on the top left of the display. The instrument functions normally for approximately eight hours; however, replace the battery as soon as possible. If the sensor becomes disconnected while the instrument is in use, the instrument displays between -0.1 and +0.2. 4-1 P/N 474618 [Rev.1] 09/2010 MiniOX® 1 Oxygen Analyzer Section 4, Operation The instrument is designed to read in percent from 0 to 100%; however, if incorrectly calibrated, it displays up to 199. Retaining Strap Installation To maximize battery life, turn OFF the MiniOX® 1 Oxygen Analyzer when not in use. 1. Remove the coiled cable from the sensor (Figure 4-2). Sensor Operation The oxygen sensor has a minimal response to certain gases other than oxygen. Be aware of these gases and their interference levels. See Section 3, Interferent Gases and Vapors. Coiled Cable To install the retaining strap: Coiled Cable Sensor Tee Adapter Deflector Sensor Deflector Sensor Retaining Strap Tee Adapter Figure 4-2 Retaining Strap Installation Figure 4-1 Sensor Mounting in a Breathing Circuit WARNING The sensor is a sealed unit containing a potassium hydroxide electrolyte. If the sensor should develop a leak, discard it immediately. Should contact occur with skin or clothing, rinse area with large quantities of water. In case of eye contact, immediately flush eyes with water for at least 15 minutes, holding eyes open. Call a physician. When using the sensor in a breathing circuit,mount the sensor with the deflector pointing downward (see Figure 4-1). This prevents moisture from draining on to the sensor membrane (See Section 5, Maintenance and Care). WARNING Ensure a tight fit exists between the sensor and the tee adapter. Ohio Medical tee adapters are engineered to fit securely with Ohio Medical sensors. However, the sensor retaining strap must be used to prevent accidental separation of the sensor and tee adapter. 2. Firmly insert the sensor into the tee adapter with the deflector pointing downward; ensure a tight fit exists. 3. Install one end of the strap over a post on the tee adapter. 4. Loop the strap around the sensor, inserting the strap center hole over the sensor cable jack. 5. Install the remaining strap end over the other tee adapter post. 6. Attach the coiled cable to the sensor. 7. Tighten the twist collar. The sensor is now secured in place. Effects of Pressure, Humidity and Temperature CAUTION To ensure accurate and reliable oxygen analysis, a thorough understanding of the effects of pressure, humidity, and temperature on the sensor is necessary. 4-2 P/N 474618 [Rev.1] 09/2010 MiniOX® 1 Oxygen Analyzer Section 4, Operation Effects of Pressure Effects of Humidity The sensor actually senses partial pressure of oxygen, not percentage. Changes in barometric pressure changes the reading, even if the percent of oxygen in the sample remains constant. The presence of humidity in an oxygen sample decreases the actual concentration of oxygen. Humidity in a sample has the same effects as diluting the sample with another gas. Partial pressure of oxygen (PO2) equals the percent of oxygen (%O2) times (x) the pressure at which the sample is measured (mmHg-mercury): For example: PO2 = (%O2) (mmHg) If 100% oxygen is saturated with 100% humidity, the actual concentration of oxygen drops from 100% to 96-97%. The instrument indicates this drop in concentration. For example: At sea level the pressure equals 760 mmHg and dry air contains 21% O2. Therefore; PO2 = (21%) (760 mmHg) PO2 = 160 mmHg If the instrument is calibrated to read 21% at 160 mmHg partial pressure, then take the instrument to an area above sea level, where the atmospheric pressure is 700 mmHg; a lower reading is found due to a lower partial pressure. PO2 = (21%) (700 mmHg) PO2 = 147 mmHg The percent reading on the instrument is derived by the following formula: PO2 Actual = X , 147 mmHg = X or, PO2 Sea Level 21% 167 mmHg 21% X= If moisture condenses on the diffusion membrane of the sensor face, the oxygen path is physically blocked and a lower oxygen concentration is indicated. This is typical of all oxygen gas sensors, and is more likely to occur when the sensor is located downstream from the humidifier. Mount the sensor, when used in a breathing circuit, so the deflector points downward to prevent moisture from draining onto the diffusion membrane (see Figure 4-1). Also, mount the sensor, when possible, upstream of the humidifier. Effects of Temperature Each MiniOX® sensor is desensitized to temperature changes using a thermistor (temperature variable resistor) located within the sensor. Variations in the sensor reading due to temperature changes are less than 3% when used or calibrated between 0 to 40 degrees centigrade. By using the instrument close to the temperature at which it is calibrated, variations can be minimized. Operating Temperature Range: 0o to 40oC (32o to 104oF) (21%) (147 mmHg) = 19.3% (160 mmHg) Therefore, to eliminate error caused by pressure changes, the instrument must be calibrated at the pressure it is to be used. CAUTION Do not expose the sensor to pressure outside the range of 600 to 900 mmHg (23.62 to 35.43” Hg.) as this can produce instrument errors. CAUTION Do not use instrument outside operating temperature range. CAUTION Do not handle the sensor more than necessary during calibration or use. Body heat can cause the sensor’s thermistor to change disproportional to the change in gas sample temperature at the sensing electrode. This can produce some error, until thermal equilibrium is restored. 4-3 P/N 474618 [Rev.1] 09/2010 MiniOX® 1 Oxygen Analyzer Section 5, Maintenance and Care Section 5 Maintenance and Care 1. Verify the instrument is turned OFF. If it is ON, press the green ON/OFF button on the front panel to turn the instrument OFF. 2. Remove the old sensor from the coiled cable. WARNING Use only genuine Ohio Medical Corporation replacement parts when performing any maintenance procedures included in this manual. Failure to do so may seriously impair the analyzer’s performance. Repair or alteration of the MiniOX® 1 Oxygen Analyzer beyond the scope of the maintenance instructions or by anyone other than an authorized Ohio Medical Corporation service person could cause the product to fail to perform as designed. Battery Replacement The MiniOX® 1 Oxygen Analyzer requires one 9-volt alkaline battery. To replace the battery: 1. Verify the instrument is turned OFF. If it is ON, press the green ON/OFF button on the front panel to turn the instrument OFF. 3. Attach a new sensor to the coiled cable. Tighten the twist collar. 4. Recalibrate the instrument. See Section 4, Calibration. Deflector Replacement To replace the deflector: 1. Gently unscrew the old deflector and remove the gasket. 2. Insert a new gasket into the large end of the new deflector. Carefully screw the new deflector onto the sensor, making sure that the new gasket is properly seated. See Figure 4-1 for proper sensor and deflector assembly. Cable Replacement 2. Remove the back panel, which is held in place by four small screws. To replace the coiled cable: 3. Remove and discard the old battery; replace with a new battery. 1. Verify that the analyzer is turned OFF. The display should be blank. 4. Replace the back panel and reinstall the screws. 2. Disconnect the old cable from the sensor. 5. Recalibrate the instrument. See Section 4, Calibration. 3. Disconnect the old cable from the instrument. Sensor Replacement To ensure safe and effective use of your device, the sensor must be replaced with a MiniOX® sensor as this sensor is manufactured for this instrument. Use of other types of sensors has not been tested and is not endorsed by Ohio Medical Corporation. Use of other sensor types will void your warranty. 4. Attach the new cable to the sensor. Firmly press the connector until the sensor snaps into place. Tighten the twist collar. 5. Attach the new cable to the instrument. Firmly press the connector until it snaps into place. Tighten the twist collar. 6. Recalibrate the instrument. There are no serviceable parts in the sensor or cable assemblies; the entire unit must be replaced. When the MiniOX® 1 Oxygen Analyzer is unable to be calibrated, or gives erratic readings, the sensor must be replaced. To replace the sensor: 5-1 P/N 474618 [Rev.1] 09/2010 MiniOX® 1 Oxygen Analyzer Section 5, Maintenance and Care Cleaning, Disinfection and Sterilization Sensor Deflector, Retaining Strap and Tee Adapter CAUTION Never autoclave, immerse, or expose the MiniOX® 1 Oxygen Analyzer (including sensor) to high temperatures (>70°C). Never expose the device to pressure, irradiation, vacuum, steam, or chemicals (other than alcohol or mild cleaning agents). Clean the instrument and sensor by wiping with a cloth lightly dampened with Isopropyl Alcohol or mild detergent. Make sure that no moisture seeps into the instrument case or cable jack port. Instrument When cleaning or disinfecting the instrument, care must be taken to prevent entry of solutions into the instrument case. Cleaning The external surfaces of the unit may be cleaned by wiping them with a cloth moistened with a mild detergent solution. Disinfection The external surfaces of the unit may be disinfected by wiping them with a cloth moistened with ethanol or Cidex. The instrument is not designed to withstand the conditions imposed by steam, ethylene oxide or radiation sterilization. Sensor and Cable Cleaning The external surfaces of the oxygen sensor and of the cable may be cleaned by wiping them with a cloth moistened with a mild detergent solution. Cleaning The sensor deflector, retaining strap and tee adapter may be cleaned by wiping them with a cloth moistened with a mild detergent solution. The parts must be thoroughly dry before they are used. Disinfection The sensor deflector, retaining strap and tee adapter may be disinfected by washing them with ethanol or Cidex (per manufacturer’s instructions).The parts must be thoroughly dry before they are used. Sterilization The sensor deflector, retaining strap and tee adapter may be sterilized using Cidex (per manufacturer’s instructions), steam or ethylene oxide. Due to the varying conditions imposed on materials during sterilization, it is not possible to determine the exact number of times sterilization processes can be carried out. Therefore, the operator must carefully examine the sensor deflector, retaining strap and tee adapter after sterilization and prior to use to verify that the item is fit for use. The operator must verify that the items are free from tears and cracks and that the items have not undergone any materials changes that may compromise their fitness for use (e.g.,brittleness and dimensional changes). The operator must also examine the items to verify that the items are free of chemical residuals resulting from the sterilization process. Because of the variability of cleaning, disinfection and sterilization processes, Ohio Medical Corporation cannot provide specific sterilization instructions, nor can the sterility of an item be ensured Disinfection The external surfaces of the oxygen sensor housing and of the cable may be disinfected by wiping them with a cloth moistened with ethanol or Cidex. The instrument is not designed to withstand the conditions imposed by steam, ethylene oxide or radiation sterilization. 5-2 P/N 474618 [Rev.1] 09/2010 MiniOX® 1 Oxygen Analyzer Section 6, Technical Information Section 6 Technical Information Technical Description The MiniOX® 1 Oxygen Analyzer is designed to provide continuous analyzing or spot checking of oxygen for ventilators, incubators, emergency transports, and various other respiratory therapy uses. Each MiniOX® 1 Oxygen Analyzer instrument uses an external Galvanic oxygen sensor with its coiled cord to provide an analog voltage signal proportional to the percentage of oxygen being sensed. Oxygen Cell The oxygen cell provides an eight (8) to seventeen (17) millivolt signal (at 20.8% oxygen), which is amplified by a fixed gain instrumentation amplifier. The output of this amplifier is fed into a potentiometer which allows for manual control, by the operator, of the signal fed to the Analog to Digital/Liquid Crystal Driver section. The operator will manually adjust the control in a known oxygen concentration so the displayed value matches the ambient oxygen concentration. Supervisory circuits are present to provide a stable voltage reference for the A/D circuitry,provide battery level monitoring, regulators to keep the DC supply voltages on the devices constant and an ON/OFF switch press monitor circuit. Fixed Gain Amplifier Coil Cord Liquid Crystal Display (LCD) A/D Converter & LCD Driver Calibration Potentiometer A/D Voltage Reference On/Off Switch On/Off Switch Monitor Dead Battery Circuit 9 Volt Battery Low Battery Circuit Regulator MiniOX® 1 Technical Block Diagram To Entire Instrument Figure 6-1 Block Diagram 6-1 P/N 474618 [Rev.1] 09/2010 MiniOX® 1 Oxygen Analyzer Appendix A, Home Care Kit Appendix A Home Care Kit 4. Using the standard oxygen tubing provided, connect the oxygen sensor to the nipple adapter on the oxygen concentrator. Installation 5. Proceed to analyze the oxygen concentration. (Ensure the flow rate does not exceed four litersper-minute). (Figure A-1) 1. Remove the concentrator. humidifier from the oxygen 2. Thread the universal nipple adapter onto the oxygen concentrator. 6. When the oxygen analysis is complete, remove the sampling apparatus and reinstall the humidifier. 3. Place the sleeve adapter on the oxygen sensor. Oxygen Tubing Oxygen Concentrator CR Oxygen Analyzer Universal Nipple Adapter Sleeve Adapter Oxygen Sensor Figure A-1 MiniOX® 1 Home Care Kit Installation A-1 P/N 474618 [Rev.1] 09/2010 NOTES: P/N 474618 [Rev.1] 09/2010 NOTES: P/N 474618 [Rev.1] 09/2010 Ohio Medical Corporation® 1111 Lakeside Drive Gurnee, IL 60031 USA Phone: 1-866-549-6446 Fax: 1-847-855-6218 www.ohiomedical.com P/N 474618 [Rev.1] 09/2010