1
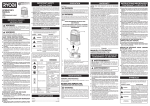
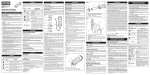
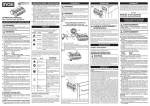
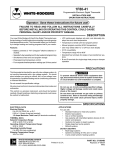
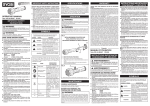
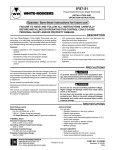
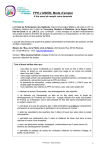
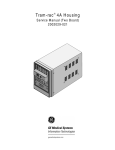
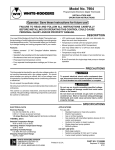
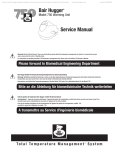
OPERATION, SERVICE, AND
REPAIR MANUAL
FOR TSURUMI EPT3-SERIES
TRASH PUMPS
MODELS
EPT3-50HA
EPT3-80HA
EPT3-100HA
LIMITED WARRANTY
TSURUMI MANUFACTURING CO., LTD. (“TSURUMI”) warrants to the original end purchaser during
the warranty period, every new TSURUMI pump or product to be free from defects in material and
workmanship under normal use and service, when properly installed, used, and maintained (in accordance with Tsurumi’s Operation, Service, and Repair Manual) for a period of two years from the date
the unit was first installed or twenty six months from the date of shipment by TSURUMI to wholesaler,
whichever comes first.
TSURUMI’S sole obligation under this warranty is to repair or replace at TSURUMI’S option, with new
or remanufactured parts, any part(s) that fail or that are found to be defective during the warranty period. No allowance will be made for shipping charges, damages, labor, or other charges due to failure,
repair or replacement.
This warranty does not apply to any TSURUMI product that has been disassembled without prior
approval of TSURUMI nor does it apply to any product that has been subjected to misuse, neglect,
alteration, misapplication, accident or act of God.
TSURUMI assumes no responsibility for compliance with any regulations, codes, standards, or ordinances applicable to the installation, location, operation or maintenance of its products.
No other warranty, expressed or implied, is authorized by, or applicable to, the seller. No person,
agent or dealer is authorized to enlarge upon this warranty.
TSURUMI expressly disclaims liability for consequential or incidental damages or breach of expressed
or implied warranty; and any implied warrant of fitness for a particular purpose and merchantability
shall be limited to the duration of the expressed warranty.
Some states do not allow limitations on the duration of an implied warranty, so the above limitation or
exclusion may not apply to you. Some states do not allow the exclusion or limitation of incidental or
consequential damages, so the above limitation of exclusion may not apply to you.
This warranty gives you specific legal rights and you may also have other rights, which vary from state
to state.
Tsurumi Manufacturing Co., Ltd.
TABLE OF CONTENTS
Section/Title
1.
Introduction . . . . . . . . . . . . . . . . . . . . . . . . . . . . . . . . . . . . . . . . . . . . . . . . . . . . . . .
1-1.
Using Your Tsurumi Operation, Repair and Service Manual . . . . . . . . . . . . . . . . . . .
1-2.
Precautions . . . . . . . . . . . . . . . . . . . . . . . . . . . . . . . . . . . . . . . . . . . . . . . . . . . . . .
1-3.
Safety Precautions . . . . . . . . . . . . . . . . . . . . . . . . . . . . . . . . . . . . . . . . . . . . . . . . .
1-4.
Specifications / Key Features . . . . . . . . . . . . . . . . . . . . . . . . . . . . . . . . . . . . . . . . . .
1-5.
Performance Curves . . . . . . . . . . . . . . . . . . . . . . . . . . . . . . . . . . . . . . . . . . . . . . . .
2.
Operating Instructions . . . . . . . . . . . . . . . . . . . . . . . . . . . . . . . . . . . . . . . . . . . . . . .
2-1.
Operating Controls . . . . . . . . . . . . . . . . . . . . . . . . . . . . . . . . . . . . . . . . . . . . . . . . .
2-2.
Check the Engine Oil Level . . . . . . . . . . . . . . . . . . . . . . . . . . . . . . . . . . . . . . . . . . .
2-3.
Check Engine Fuel . . . . . . . . . . . . . . . . . . . . . . . . . . . . . . . . . . . . . . . . . . . . . . . . .
2-4.
Check Fuel Level . . . . . . . . . . . . . . . . . . . . . . . . . . . . . . . . . . . . . . . . . . . . . . . . . .
2-5.
Pre-Start Checks . . . . . . . . . . . . . . . . . . . . . . . . . . . . . . . . . . . . . . . . . . . . . . . . . .
2-6.
Starting and Operating the Engine . . . . . . . . . . . . . . . . . . . . . . . . . . . . . . . . . . . . . .
2-7.
Using the Trash Pump . . . . . . . . . . . . . . . . . . . . . . . . . . . . . . . . . . . . . . . . . . . . . .
2-8.
Stopping the Trash Pump . . . . . . . . . . . . . . . . . . . . . . . . . . . . . . . . . . . . . . . . . . . .
2-9.
Oil Alert . . . . . . . . . . . . . . . . . . . . . . . . . . . . . . . . . . . . . . . . . . . . . . . . . . . . . . . . .
3.
Troubleshooting . . . . . . . . . . . . . . . . . . . . . . . . . . . . . . . . . . . . . . . . . . . . . . . . . . .
3-1.
Troubleshooting Charts . . . . . . . . . . . . . . . . . . . . . . . . . . . . . . . . . . . . . . . . . . . . . .
4.
Maintenance . . . . . . . . . . . . . . . . . . . . . . . . . . . . . . . . . . . . . . . . . . . . . . . . . . . . . .
4-1.
Maintenance Schedule . . . . . . . . . . . . . . . . . . . . . . . . . . . . . . . . . . . . . . . . . . . . . . .
4-2.
Changing Engine Oil . . . . . . . . . . . . . . . . . . . . . . . . . . . . . . . . . . . . . . . . . . . . . . . .
4-3.
Air Cleaner Service . . . . . . . . . . . . . . . . . . . . . . . . . . . . . . . . . . . . . . . . . . . . . . . . .
4-4.
Sediment Cup Cleaning . . . . . . . . . . . . . . . . . . . . . . . . . . . . . . . . . . . . . . . . . . . . .
4-5.
Cleaning and Adjusting Spark Plug . . . . . . . . . . . . . . . . . . . . . . . . . . . . . . . . . . . . .
4-6.
Trash Pump Exploded Views . . . . . . . . . . . . . . . . . . . . . . . . . . . . . . . . . . . . . . . . .
4-7.
Description of Mechanical Seal . . . . . . . . . . . . . . . . . . . . . . . . . . . . . . . . . . . . . . . .
4-8.
Replacement of Mechanical Seal . . . . . . . . . . . . . . . . . . . . . . . . . . . . . . . . . . . . . . .
4-9.
Replacing of Check Valve . . . . . . . . . . . . . . . . . . . . . . . . . . . . . . . . . . . . . . . . . . . .
5.
Storage Instructions . . . . . . . . . . . . . . . . . . . . . . . . . . . . . . . . . . . . . . . . . . . . . . . . .
5-1.
Procedures for Storing Pump . . . . . . . . . . . . . . . . . . . . . . . . . . . . . . . . . . . . . . . . . .
6.
Replacement Parts . . . . . . . . . . . . . . . . . . . . . . . . . . . . . . . . . . . . . . . . . . . . . . . . .
6-1.
Introduction . . . . . . . . . . . . . . . . . . . . . . . . . . . . . . . . . . . . . . . . . . . . . . . . . . . . . . .
6-2.
Ordering Parts . . . . . . . . . . . . . . . . . . . . . . . . . . . . . . . . . . . . . . . . . . . . . . . . . . . . .
Appendix A - Wheel Kit Model PGWK-200 . . . . . . . . . . . . . . . . . . . . . . . . . . . . . . . . . . . . . .
Page
1
1
1
2
3
3
6
6
6
8
8
9
9
10
10
10
11
11
12
12
13
14
14
14
15
15
15
20
22
22
23
23
23
A-1
Tsurumi’s Operation, Service, and Repair Manual
INTRODUCTION
1-1 Using Your Tsurumi Operation, Repair and Service Manual
We thank you for purchasing a Tsurumi trash pump. We are sure that the trash pump you have selected will meet your portable pumping needs.
This manual applies to the Tsurumi trash pumps listed below. Specifications for the trash pumps are
provided in the SPECIFICATIONS section. Key features of the trash pump are shown in the
DESCRIPTION section.
EPT3-50HA
EPT3-80HA
EPT3-100HA
This manual provides instructions for operation, service, and repair of your trash pump. We strongly
recommend that those who operate the trash pump become familiar with the trash pump’s features
and controls, and read the operating instructions before using the trash pump.
The Operation, Repair, and Service Manual also provides instructions to service, checkout, and repair
the trash pump. This manual also provides replacement parts information.
Repair and service information for the Honda engine is provided in the Owner’s Manual for Models
GX160, GX240, and GX340. A copy of the Owner’s Manual has been provided in the trash pump’s literature package. Parts information for the Honda Engine is available in Honda’s Parts Catalogs.
When there are differences between trash pump models, separate instructions are provided. The separate instructions are provided to make sure the correct procedures are used on the affected trash pumps.
All information in the Tsurumi manuals is based upon the latest production configuration of the trash
pump at the time of approval for printing.
If you have a problem with your trash pump that cannot be resolved using the Operation, Repair, and
Service Manual, or if you have questions about the operation, service, repair, or maintenance of your
trash pump, contact your local Tsurumi trash pump dealer.
1-2 Precautions
Pay special attention to precautionary notes preceded by the words WARNING, CAUTION, and
NOTE.
WARNINGS indicate that there is a strong possibility of personal injury or loss of life if the procedure
is not followed, or if cleaning, lubricating, adhesives, and other materials are not used properly.
CAUTIONS indicate that there is a possibility of equipment damage if instructions are not followed.
NOTES are used in procedures to provide additional or supplemental information to make the procedure easier or more efficient.
WARNING:
• The trash pump is designed to give safe and dependable service when operated according
to the instructions in the technical manual provided with the trash pump.
• Do not operate the trash pump before you have read and understand the instructions and
the engine manufacturer’s manual. Failure to do so could result in personal injury or equipment damage.
Introduction
Page 1
Tsurumi’s Operation, Service, and Repair Manual
1-3 Safety Precautions
WARNING:
• IN ORDER TO ASSURE SAFE AND EFFICIENT OPERATION OF THE TRASH PUMP, OPERATOR’S SHOULD READ AND COMPLY WITH THE FOLLOWING SAFETY PRECAUTIONS.
• Do not operate the trash pump near gasoline or gaseous fuels because of the potential danger from explosion or fire.
• Do not fill the fuel tank with fuel while the engine is running. Be careful not to spill fuel during
refueling. If fuel is spilled, wipe it off and let it dry before starting the engine.
• Do not smoke or use open flame near the fuel tank.
• Do not place flammable materials near the trash pump. Be careful not to place fuel, matches,
gunpowder, oily cloths, straw, trash, or any other combustibles near the trash pump.
• Do not operate the trash pump inside a room, cave, tunnel, or other insufficiently ventilated
area. Always operate the trash pump in a well-ventilated area. The engine may become overheated, and the poisonous carbon monoxide gas contained in the exhaust gases will endanger human
lives.
• Keep the trash pump at least 1 meter (3 feet) away from any structure or building during use.
When a trash pump is located close to a building or nearby equipment, heat and exhaust from the
engine will cause the surrounding temperature to rise. This will degrade the engines cooling efficiency, causing overheating.
• Do not enclose the trash pump nor cover it with a box. The trash pump has a built-in, forcedair cooling system, and may become overheated if it is enclosed.
• Operate the trash pump on a level surface. It is not necessary to prepare a special foundation
for the trash pump. However, the trash pump will vibrate on an irregular surface. Therefore, choose
a level place without surface irregularities.
• Shutoff the trash pump when moving the trash pump to another work site. It the trash pump
is tilted or moved during operation, fuel may spill and/or the trash pump may tip over, causing a hazardous situation. Proper lubrication cannot be expected if the trash pump is operated on a steep
incline or slope. In such a case, the piston may seize; it may seize even if the oil is above the upper
level.
Page 2
Introduction
Tsurumi’s Operation, Service, and Repair Manual
1-4 Specifications / Key Features
• Heavy-duty Honda Engine— proven reliability—quiet operation—efficient fuel consumption
• Oil Level Sensor—prevents engine operation when oil level is low
• New Design Clean Out Cover— cover removes quickly for clean-out without the need to remove
the suction hose
• New Design—larger pump casing for increased durability
• Mechanical Seal—silicon carbide seal element for long life
• Rubber Vibration Isolation Mounts—isolates pump/engine vibration from the frame for maximum
protection and noise reduction.
• Durable Rolled Steel Frame—for strength and durability
• High Chrome Impeller—increase ability to withstand the impact of debris passing through the pump
• Cast Iron Volute Casing/Stainless Steel Wear Plate/Galvanized Steel Hose Couplings.
PUMP
MODELS
Pump Output
Gal./Min-to-Total Head
EPT3-100HA
See Performance Curve
Inches
2 NPT Male
3 NPT Male
4 NPT Male
Discharge Size
Inches
2
3
4
GX160K1VED2
GX240K1VED2
GX340K1ED6
5.5 (3600 rpm)
8.0 (3600 rpm)
11.0 (3600 rpm)
163 (10)
242 (15)
337 (21)
0.95
1.6
1.7
64 dB
68 dB
72 dB
----
Max. HP (rpm)
ENGINE
EPT3-80HA
See Performance Curve
Suction Size
Engine Models (Honda)
SET
EPT3-50HA
See Performance Curve
hp/rpm
3
Displacement
CC (In )
Fuel Tank Capacity
Gals.
Noise Level (Rated Load)
dB
Starting System
---
Dimensions (L x W x H)
Shipping Weight
Recoil
Inches
23
Lbs.
82
x 18
x 17
Recoil
Recoil
27
30 _ x 20
x 20 _ x 25
136
x 26
160
1-5 Performance Curves
Refer to the performance curves for the pumping capacity of NPT3 series trash pumps.
GROUP
PERFORMANCE
MODELS
EPT3-50HA
EPT3-80HA
EPT3-100HA
TOTAL HEAD(ft.)
100
EPT3-80HA
80
EPT3-100HA
60
40
20
EPT3-50HA
0
0
100
200
300
400
500
600
QUANTITY(g.p.m.)
Introduction
Page 3
Tsurumi’s Operation, Service, and Repair Manual
100
INDIVIDUAL
PERFORMANCE
MODEL
EPT3-50HA
TOTAL HEAD(ft.)
80
60
MODEL EPT3-50HA
40
20
0
0
100
200
300
400
500
600
QUANTITY(g.p.m.)
100
INDIVIDUAL
PERFORMANCE
MODEL
EPT3-80HA
TOTAL HEAD(ft.)
80
60
MODEL EPT3-80HA
40
20
0
0
100
200
300
400
500
600
400
500
600
QUANTITY(g.p.m.)
100
INDIVIDUAL
PERFORMANCE
MODEL
EPT3-100HA
TOTAL HEAD(ft.)
80
60
40
MODEL EPT3-100HA
20
0
0
100
200
300
QUANTITY(g.p.m.)
Page 4
Introduction
Tsurumi’s Operation, Service, and Repair Manual
Engine Air
Filter
Priming
Plug
Discharge
Fitting
Engine
Muffler
Suction
Fitting
Vibration
Isolation Mounts
Casing
Cover
Clamping
Knobs
PUMP END
Fuel Tank
Tubular
Frame
Honda
Engine
Recoil
Starter
Engine
Controls
ENGINE END
Figure 1: Key Features of the Trash Pump
Introduction
Page 5
Tsurumi’s Operation, Service, and Repair Manual
OPERATING INSTRUCTIONS
2-1 Operating Controls
A.
The trash pump operating controls are located on the engine.
B.
The controls consist of a throttle lever (for speed control), choke lever (for cold weather
starting), fuel shutoff lever (to prevent fuel spills), and a recoil starter (to turnover engine by
hand). (Refer to Figure 2-1.)
Throttle
Lever
Choke
Lever
OFF
ON
Fuel Shutoff
Valve
ON/OFF Switch
Recoil
Starter
Hand Grip
(Located on Recoil
Starter Shroud)
Figure 2-1: Operating Controls
2-2 Check the Engine Oil Level
CAUTION:
•
ENGINE OIL IS A MAJOR FACTOR AFFECTING PERFORMANCE AND SERVICE LIFE.
NON-DETERGENT OILS AND 2-STROKE OILS ARE NOT RECOMMENDED BECAUSE
THEY HAVE INADEQUATE LUBRICATING CHARACTERISTICS
•
CHECK THE OIL LEVEL WITH THE ENGINE ON A LEVEL SURFACE AND THE ENGINE
STOPPED.
A.
The trash pump is controlled by the engine operating controls.
B.
Use Honda 4-stroke oil, or use an equivalent high detergent, premium quality motor oil certified to meet or exceed U.S. automobile manufacturer’s requirements for Service
Classification SG, SF. Motor oils classified SG, SF will show this designation on the container. SAE 10W/30 is recommended for general, all-temperature use.
C.
Other viscosity grades shown in Figure 2-2 may be used when the average temperature in
your area is within the indicated range.
Page 6
Operating Instructions
Tsurumi’s Operation, Service, and Repair Manual
Figure 2-2: Oil Viscosity Grade-to-Temperature Recommendations
D.
When checking oil, observe the following (refer to Figure 2-3): (Make sure the engine is in a level
position.)
(1)
(2)
Remove the oil filler cap/dipstick and wipe it clean.
Insert the filler cap/dipstick into the oil filler neck, but do not screw it in.
(3)
Remove the filler cap/dipstick and check the oil level.
(4)
If the level is low, fill to the top of the oil filler neck with the recommended oil.
(5)
Reinstall the oil filler cap/dipstick.
Operating Instructions
Page 7
Tsurumi’s Operation, Service, and Repair Manual
2-3 Check Engine Fuel
WARNING
•
MAKE SURE YOU REVIEW EACH WARNING IN ORDER TO PREVENT FIRE HAZARD.
•
DO NOT REFILL TANK WHILE ENGINE IS RUNNING OR HOT.
•
CLOSE FUEL SHUT OFF VALVE BEFORE REFUELING WITH FUEL.
•
BE CAREFUL NOT TO GET DUST, DIRT, WATER OR OTHER FOREIGN OBJECTS
INTO FUEL.
•
WIPE OFF SPILLED FUEL THOROUGHLY BEFORE STARTING ENGINE.
•
KEEP AWAY FROM OPEN FLAMES.
•
DO NOT USE SMOKING MATERIALS WHEN FILLING THE FUEL TANK.
•
DO NOT REFUEL WHILE SMOKING OR NEAR OPEN FLAME OR OTHER SUCH POTENTIAL
FIRE HAZARDS. OTHERWISE FIRE ACCIDENT MAY OCCUR.
•
AVOID REPEATED OR PROLONGED CONTACT WITH SKIN OR BREATHING OF VAPOR.
•
KEEP OUT OF REACH OF CHILDREN.
2-4 Check Fuel Level
A.
If fuel level is low, refill with unleaded automotive gasoline.
B.
Fuel tank capacities are provided below:
EPT3-50HA . . . . . . . . . . . . . . . .0.95 gal.
EPT3-80HA . . . . . . . . . . . . . . . .1.60 gal.
EPT3-100HA . . . . . . . . . . . . . . .1.70 gal.
Page 8
Operating Instructions
Tsurumi’s Operation, Service, and Repair Manual
2-5 Pre-Start Checks
WARNING:
•
MAKE SURE YOU REVIEW EACH WARNING IN ORDER TO PREVENT FIRE HAZARD.
•
KEEP AREA CLEAR OF FLAMMABLES OR OTHER HAZARDOUS MATERIALS.
A.
Check the following items before starting the engine.
(1)
Fuel leakage from (fuel hose, sediment cup, etc.).
(2)
Bolts and nuts for looseness.
(3)
Components for damage or breakage.
(4)
Check trash pump surroundings.
(a)
Keep trash pump at least three (3) feet (one [1] meter) away from buildings or
other structures.
(b)
Only operate trash pump in a dry, well-ventilated area.
(c)
Keep exhaust pipe clear of foreign objects.
(d)
Keep trash pump away from open flame.
(e)
Keep trash pump on a stable and level surface.
(f)
Do not block trash pump air vents with paper or other material.
2-6 Starting and Operating the Engine
A.
Refer to the Honda engine owner’s manual.
B.
Put the fuel valve in the ON position.
C.
Move the choke lever to the closed position.
Operating Instructions
Page 9
Tsurumi’s Operation, Service, and Repair Manual
NOTE:
•
The choke may not be needed if the engine is warm or the air temperature is high.
D.
Set the ON/OFF switch to ON (the ON/OFF switch is mounted on the recoil shroud).
E.
Move the throttle lever slightly to the left.
F.
Pull the starter grip lightly until resistance is felt, then pull briskly.
NOTE:
•
Do not allow the starter grip to snap back against the engine. Return it gently to prevent damage
to the starter.
G.
As the engine warms up, gradually move the choke lever to the OPEN position.
2-7 Using The Trash Pump
A.
Connect suction and discharge hoses. Make sure suction hose is fitted with a strainer.
B.
Remove priming plug from top of pump and fill chamber with water.
C.
Operate the engine at idle speed for 3 to 5 minutes.
D.
After engine warm up, move the throttle lever to the operating speed.
2-8 Stopping The Trash Pump
A.
Move the throttle lever fully to the right.
B.
Set the ON/OFF switch to OFF.
C.
Turn the fuel valve to the OFF position.
2-9 Oil Alert
A.
Page 10
The oil alert sensor detects the lowering of the oil level in the crankcase and automatically stops the engine when the oil level falls below the predetermined level.
(1)
When the engine stops automatically, check the oil level. Refill engine oil to the upper
level and restart the engine.
(2)
If the engine does not start by usual starting procedures, check the oil level.
Operating Instructions
Tsurumi’s Operation, Service, and Repair Manual
TROUBLESHOOTING
The troubleshooting tables below can be used as a guide to isolate trash pump faults. Refer to these
tables when the engine fails to start after several attempts. If, after following these procedures, the pump
fails to start, contact the nearest Tsurumi generator dealer.
Table 3-1: Troubleshooting Table
Fault
Pump does not pump.
Discharge flow or pump
pressure too low.
Probable Cause
Remedy
Insufficient priming water.
Add more water through priming plug.
Mechanical seal chipped or broken.
Replace mechanical seal.
Check valve damaged.
Replace check valve.
Suction hose damaged or strainer
clogged.
Replace hose. Clean strainer.
Air leaks caused by O-ring
damage.
Replace O-rings.
Air leaks caused by O-ring
damage.
Replace O-rings.
Suction hose or strainer clogged.
Replace hose.
Clean strainer.
Pump primes too
slowly.
Excessive impeller clearance.
Disassemble to obtain casing cover and
impeller. Determine clearance and reshim as required (refer to Replacement
of Mechanical Seal).
Engine rpm too low.
Check rpm and reset throttle as
required.
Lift head too high.
Lower lift head.
Insufficient priming water.
Add more water through priming plug.
Mechanical seal chipped or broken.
Replace mechanical seal.
Check valve damaged.
Replace check valve.
Suction hose damaged or strainer
clogged.
Replace hose.
Clean strainer.
Noise or vibration.
Air leaks caused by O-ring
damage.
Replace O-rings.
Engine rpm too low.
Check rpm and reset throttle as
required.
Lift head too high.
Lower lift head.
Faulty mounting.
Pump/engine attaching parts loose.
Tighten as required.
Damaged vibration isolation mounts.
Replace mounts.
Troubleshooting
Page 11
Tsurumi’s Operation, Service, and Repair Manual
MAINTENANCE
4-1 Maintenance Schedule
To maintain the trash pump in peak operating condition, observe and implement the maintenance and
adjustment schedule in Table 4-1. Inspect and/or service the trash pump at the intervals shown in
Table 4-1.
WARNING:
•
SHUT OFF THE ENGINE BEFORE PERFORMING ANY MAINTENANCE. IF OPERATION OF
THE ENGINE IS REQUIRED, MAKE SURE THE AREA IS WELL VENTILATED; THE ENGINE
EXHAUST CONTAINS POISONOUS CARBON MONOXIDE GAS.
CAUTION:
•
REFER TO THE HONDA ENGINE OWNER’S MANUAL FOR OTHER MAINTENANCE
REQUIREMENTS.
Table 4-1: Maintenance Schedule
Frequency
Daily
Maintenance Action
Check oil level.
Check all components according to the PRE-OPERATIONAL
CHECKS section.
50 Hours
Wash cleaner element.
Check spark plug and clean if necessary.
100 Hours
Change engine oil.
200 Hours
Adjust spark plug gap.
Clean fuel strainer.
500 Hours (12 Months)
Replace spark plug and cleaner element.
Clean and adjust carburetor, valve clearance, and valve seat
along with cylinder head.
1,000 Hours (24 Months)
Check rotor and stator.
Replace engine isolation mounts.
Overhaul engine.
Change fuel lines.
Page 12
Maintenance
Tsurumi’s Operation, Service, and Repair Manual
4-2 Changing Engine Oil
A.
An initial oil change should be performed after the first twenty- (20) hours of use.
Thereafter, change oil every 100 hours.
B.
Before changing the oil, check for a suitable way to dispose of the used oil. Do not pour it
down sewer drains, onto garden soil or into open streams. Refer to your local zoning and
environmental regulations for disposal and handling requirements.
C.
Drain the oil while the engine is still warm to assure rapid and complete draining.
D.
Remove the oil filler dipstick/cap and drain plug. Allow oil to drain from the engine (refer to
Figure 4-1).
Figure 4-1: Draining Engine Oil
E.
Install the drain plug, and tighten it securely.
F.
Refill with the recommended oil (refer to Figure 2-2).
G.
After filling with oil, check the oil level.
H.
When oil reaches the upper limit, install the oil filler dipstick/cap (Figure 4-2).
NOTE:
•
Engine oil capacity: 1.1 liters (1.16 U.S. Quart)
Figure 4-2: Checking Oil Level
Maintenance
Page 13
Tsurumi’s Operation, Service, and Repair Manual
4-3 Air Cleaner Service
WARNING
•
Never use gasoline or low flash point solvents for cleaning the air cleaner element. A fire
or explosion could result.
A dirty air cleaner will restrict airflow to the carburetor. To prevent degraded engine operation, service
the air cleaner regularly. Service more frequently when operating the engine in extremely dusty areas.
NOTE:
•
Never run the engine without the air cleaner. Rapid engine wear will result from contaminants,
such as dust and dirt, being drawn through the carburetor and into the engine.
4-4 Sediment Cup Cleaning
WARNING:
•
Gasoline is extremely flammable and is explosive under certain conditions. Do not smoke
or allow open flames or sparks in the area.
A.
Turn the fuel valve to OFF (refer to Figure 2-1).
B.
Remove the sediment cup and O-ring. Wash both parts in nonflammable or high flash point
solvent.
C.
Wipe the sediment cup and O-ring dry, then reinstall.
WARNING:
•
After installing the sediment cup, check for leaks, and make sure the area is free of residual fuel spills or seepage before starting the engine.
D.
Set the fuel shutoff valve (Figure 2-1) to ON. Check for leaks.
4-5 Cleaning and Adjusting Spark Plug
Recommended spark plugs: BPR6ES (NGK)
W20EPR-U (NIPPONDENSO)
A.
To ensure proper engine operation, the spark plug must be properly gapped and free of
deposits.
B.
Remove the spark plug cap.
C.
Clean any dirt from around the spark plug base.
D.
Use the proper size spark plug wrench to remove the spark plug.
WARNING
•
THE MUFFLER BECOMES VERY HOT DURING OPERATION AND REMAINS HOT FOR A
WHILE AFTER STOPPING THE ENGINE. BE CAREFUL NOT TO TOUCH THE MUFFLER
WHILE IT IS HOT.
E.
Visually inspect the spark plug. Discard it if the insulator is cracked or chipped. Clean the
spark plug with a wire brush if it is to be reused.
Page 14
Maintenance
Tsurumi’s Operation, Service, and Repair Manual
F.
Measure the plug gap with a feeler gauge. Adjust the gap as necessary by bending the side
electrode (refer to Figure 4-3).
G.
The gap should be 0.7 - 0.8 mm (0.028 - 0.031 inch) as shown.
4-6 Trash Pump Exploded Views
A.
Exploded views of the trash pump components are provided in the MAINTENANCE section for parts identification purposes.
B.
The item numbers (numbers in parentheses) correspond with the item numbers in the parts
list illustrations located in the REPLACEMENT PARTS section.
4-7 Description of the Mechanical Seal
A.
The mechanical seal (6) is a two part seal. The seal consists of a fixed element and a rotating element.
B.
The fixed element is installed in the center bore of the pump casing. The fixed element is
sealed between the seal and the center bore that is provided by a strip of sealant on the
outside diameter of the seal.
C.
The rotating element is installed in the center bore of the impeller. The rotating element
consists of a silicone-carbide mating ring and a close-fitting rubber cushion. Water is used
as an assembly aid when installing the cushion and mating ring.
4-8 Replacement of Mechanical Seal
WARNING:
•
THE SHIPPING WEGHT OF THE MODEL EPT3-SERIES PUMPS RANGES FROM 80 TO 160
POUNDS. TO AVOID PERSONAL INJURY, USE AN OVERHEAD LIFTING DEVICE OR GAIN
THE ASSISTANCE OF ANOTHER PERSON TO LIFT THE PUMP ON AND OFF THE BENCH.
•
IT IS RECOMMENDED THAT THE PUMP BE ASSEMBLED AND DISASSEMBLED ON A
BENCH OR SIMILAR STRUCTURE WITH THE ENGINE SHROUD FACING DOWN. IN ADDITION, WOODEN BLOCKS IN A VARIETY OF LENGTHS AND THICKNESS SHOULD BE
AVAILABLE FOR SUPPORT OF THE ENGINE AFTER PUMP REMOVAL.
NOTE:
•
The item numbers in the procedures that follow correspond with the item numbers listed in the
REPLACEMENT PARTS section of the manual.
A.
Refer to exploded views Figures 4-4 and Views A, B, and C.
Maintenance
Page 15
Tsurumi’s Operation, Service, and Repair Manual
(3) Impeller
(4) Inner
Casing
(1) Casing
(2) Casing
Cover
(5) Liner
(23) Holder
(15) O-Ring
(10/11) Plug
and O-Ring
(24) Knob
(16) O-Ring
Figure 4-4: Exploded View of Internal Components
View A: Remove casing cover
to gain access to impeller — the
rotating member of the
mechanical seal is in the
impeller.
Page 16
View B: If liner is damaged,
remove 2 screws and
separate inner casing from
casing cover. Replace liner
during re-assembly.
View C: Remove 3 screws
to remove liner. Discard
old liner.
Maintenance
Tsurumi’s Operation, Service, and Repair Manual
B.
Loosen two casing holder knobs (24). Pivot the casing holders (23) to the side and away
from the casing cover (2). Pull casing cover (2) out of pump casing (1).
NOTE:
•
When you first attempt to remove the casing cover (2), you may feel resistance caused by O-ring
drag.
C.
Position the frame (32) so the pump is facing up (with the engine shroud facing down).
D.
Using a hard plastic hammer, rap on the hex of the impeller to loosen the impeller (3). Then
remove the impeller by turning counterclockwise.
NOTE:
•
The hex is cast into the impeller and is not a separate removable part.
E.
Remove two nuts (34) securing pump anti-vibration mounts to the pump casing.
F.
Remove four bolts and washers (18 and 19) securing the pump casing (1) to the engine.
G.
Remove fixed element of the old seal using a driver similar to the driver in Figure 4-6. The
tool should be sized to have a slip fit with the bore (the sealant used on the mechanical
seal has a strong bond in the casing bore - it will take considerable driving force to remove
the seal - use of an arbor press is recommended).
H.
Clean bore in pump casing to remove all traces of sealant residue.
(1) Pump Casing
(6) Mechanical Seal
(41) Shim
(18) Flange Bolt
(34) Spring Nut
(37) (38) Screw
(19) AL Washer
Figure 4-5: Replacing Rotating Seal Member
Maintenance
Page 17
Tsurumi’s Operation, Service, and Repair Manual
NOTE:
•
Refer to View D for an illustration depicting the mating ring. Lubricate mating ring and cushion
with water. Make the measurements that need to be taken for calculating the thickness of shaftmounted shims.
I.
Measure and record dimensions A and B. Subtract dimension B from dimension A. The
resultant dimension is the shim thickness required to provide the required clearance
between the rotating and fixed seal elements.
J.
Select the combination of shims (41) that will provide clearance of 0.020 inch to 0.040 inch
(0.508 mm to 1.016 mm).
K.
If the liner (5) was damaged, remove two screws (25) and separate casing cover (2) from
inner casing (4).
L.
Remove three screws from liner (5) and inner casing (4). Separate liner (5) from inner
casing (4)
M.
Secure liner (5) to inner casing (4) using three screws (25).
IMPELLER
IMPELLER
O-RINGS
MATING
RING
FRONT
COVER
CUSHION
View D: Use water as a
lubricant on mating ring
and cushion. Put side of
mating ring with white
mark facing downward.
Page 18
View E: Install seal in
pump casing (refer to
Figure 4-5) with seal
driving tool driver.
Replace O-Rings if
damaged.
Maintenance
Tsurumi’s Operation, Service, and Repair Manual
(1) CASING
(4) VOLUTE CASING
(6) MECHANICAL
SEAL
(5) WEAR PLATE
(3) IMPELLER
(41) IMPELLER
SHIM
(6-3) MECHANICAL SEAL
-FIXED ELEMENT
(3) IMPELLER
(6-1) RUBBER
CUSHION
(1) CASING
(6-2) MATING
RING-ROTATING
ELEMENT
REMOVED VIEW
Figure 4-5: Shimming Of Mechanical Seal
Maintenance
Page 19
Tsurumi’s Operation, Service, and Repair Manual
Model Number
Shim Thickness
OD x ID
Part Number
EPT3-50HA
0.3 mm (0.012 Inch)
0.6 mm (0.024 Inch)
20 x 18 mm
(0.787 x 0.709 inch)
801-037
801-038
EPT3-80HA
0.3 mm (0.012 Inch)
0.6 mm (0.024 Inch)
1.0 mm (0.039 Inch)
24.2 x 20.0 mm
(0.952 x 0.787 inch)
1001-043
1001-044
1001-045
EPT3-100HA
0.3 mm (0.012 Inch)
0.6 mm (0.024 Inch)
1.6 mm (0.063 Inch)
0.3 mm (0.091 Inch)
* 22.2 mm (0.874 inch)
1001-040
1001-041
1001-042
1001-043
* Noted shim is a disk and does not have an inside diameter. OD = Outside Diameter / ID = Inside Diameter
Figure 4-6: Shim Dimensions
A
E
D
B
C
LEGEND
A = B + C (Tool length)
B = Overall uninstalled height of mechanical seal.
C = Depth of pump casing center bore to face of installed seal multiplied by 2.
D = Diameter of pump casing center bore (slip fit).
E = Inside diameter of mechanical seal.
Figure 4-7: Mechanical Seal Installation Tool
4-9 Replacement of Check Valve
A.
Remove three bolts (17), check valve (14), and suction case (7).
B.
Discard damaged check valve (14).
C.
Align bolt holes in replacement check valve (14) and suction case (7).
D.
Attach suction case (7) to pump casing (1).
Page 20
Maintenance
Tsurumi’s Operation, Service, and Repair Manual
(13) Priming Plug
and (12) O-Ring
(14) Check Valve
(7) Case
(1) Casing
(21) Rivet
(17) Bolt
(11) Plug and
(10) O-Ring
(23) Holder
(24) Knob
(20) Pin
(22) Bolt
Special Orientation:
Make sure tab on check
valve is at zero degrees
(at top).
Figure 4-7: Replacement of Check Valve
Maintenance
Page 21
Tsurumi’s Operation, Service, and Repair Manual
STORAGE
5-1. Procedures for Storing Pump
WARNING
•
To avoid severe burns or fire hazards, let the engine cool before transporting it or storing
it indoors.
•
When transporting the pump, turn the fuel shutoff valve to the OFF position and keep the
engine level to prevent fuel spillage. Fuel vapor or spilled fuel may ignite.
A.
Page 22
The following procedures should be followed before storing your pump for periods of 6
months or longer.
(1)
Carefully drain fuel from the fuel tank; gasoline left in the fuel tank will eventually deteriorate making engine start difficult.
(2)
Remove the carburetor float chamber and also drain the carburetor.
(3)
Change engine oil.
(4)
Check for loose bolts and screws; tighten if necessary.
(5)
Clean pump thoroughly with oiled cloth. Spray with preservative if available. NEVER
USE WATER TO CLEAN PUMP!
(6)
Pull starter handle until resistance is felt, leaving handle in that position.
(7)
Store pump in a well-ventilated, low humidity area.
Storage
Tsurumi’s Operation, Service, and Repair Manual
REPLACEMENT PARTS
6-1 Introduction
This section provides exploded view illustrations that show the replacement parts for Tsurumi Trash
Pumps, Models EPT3-50HA, EPT3-80HA, and EPT3-100HA. Also provided are parts listings that provide part number, description, and quantity. The item numbers shown on the illustrations correspond
with the item numbers in the facing parts listing.
6-2 Ordering Parts
Order replacement parts from:
Tsurumi (America), Inc.
845 North Dillon Drive
Wood Dale, IL 60191
Tel: 1-888-878-7864
Fax: 1-630-766-6445
E-mail: [email protected]
Replacement Parts
Page 23
Tsurumi’s Operation, Service, and Repair Manual
Exploded View - Model EPT3-50HA Trash Pump
Page 24
Replacement Parts
Tsurumi’s Operation, Service, and Repair Manual
Parts Listing- Model ETP3-50HA Trash Pump
Ref.
No.
1
2
Part
Number
200 201 140
200 201 240
3
4
5
6
821-004
200 210 810
521-007N
521-008
7
501-013A
8
521-038A
9
10
11
12
13
--------501-022
501-021
122 030 13
200 500 110
14
15
16
17
501-015
821-017
501-002
501-014
18
203 000 600
19
501-006N
20
21
22
23
521-034
521-014
521-013
521-016
24
25
521-015
203 000 630
26
203 100 110
Replacement Parts
Description
Casing (STH-50)
Cover, Casing
(Tsurumi Logo)
Impeller
Casing, Inner
Liner
Seal, Mechanical
(2-In., 3-In. Sic)
Case, Check Valve
(NPT 3)
Fitting, Pipe
(2B NPT-NPT)
--------O-Ring (P-24)
Plug Assembly
O-Ring (P-30)
Plug Assembly,
Priming
Valve, Check
O-Ring (G-230)
O-Ring (W1517-45)
Bolt, Hex
(M8 X 25 P = 2)
Bolt, Flange
(M8_50)
Washer, Aluminum
(8.2 x 17 x 3.0)
Pin, Snap (_10)
Rivet (_10)
Bolt, Cover (M12)
Holder, Casing
Cover
Knob (M12)
Bolt, Hex Socket
(M6 X 15 SUS)
Washer, Spring
(M6 SUS)
Qty
1
1
1
1
1
1
1
1
---2*
2
1**
1
1
1
1
3
4
4
2
2
2
2
2
3
Ref.
No.
27
Part
Number
203 000 650
Description
Qty
Bolt, Hex Socket
2
(M8 X 20 SUS)
28 203 100 130
Washer, Spring
2
(M8 SUS)
29 200 500 230
Handle, Drain
2
Cover
30 203 000 530
Bolt, Hex
4
(M6 X 25 SUS)
31 19W0 3906000 Plain Washer (M6)
4
32 200 101 160
Frame (Black)
1
33 200 900 520
Mount, Anti Vibration
4
34 1001-024
Nut, Spring (M8)
4
(Mount to Frame)
35 203 000 250
Bolt, Hex
2
(M8 X 35 P = 1)
(Engine to Mount)
36 1001-024
Nut, Spring (M8)
2
(Engine to Mount)
37 501-041
Bolt, Hex
2
(M8 X 20 P = 2)
(Pump to Mount)
38 801-037
Shim, Impeller
AR
20.0 x 18.0 x 0.3T
801-038
Shim, Impeller
AR
20.0 x 18.0 x 0.6T
-39 13310-ZE1-630 Crankshaft ***
1
-40 Honda GX160 Engine, 5.5 HP ****
1
AR = As Required: quantity determined at assembly.
*
Plug assembly (11) includes O-ring (10).
**
Priming plug assembly (13) includes O-ring (12).
*** Crankshaft (-39) has special metric thread. Order
Tsurumi replacement crankshaft (-39) (not Honda).
**** Contact Honda distributor for Honda engine parts.
(-) Items prefixed with a dash are not illustrated.
3
Page 25
Tsurumi’s Operation, Service, and Repair Manual
Exploded View - Model ETP3-80HA Trash Pump
Page 26
Replacement Parts
Tsurumi’s Operation, Service, and Repair Manual
Parts Listing- Model ETP3-80HA Trash Pump
Ref.
No.
1
2
Part
Number
200 201 150
200 201 250
3
4
5
6
200 210 170
200 210 690
821-007N
821-008
7
801-013A
8
821-038
9
10
11
12
13
--------501-022
501-021
122 030 13
200 500 110
14
15
16
17
801-015
200 800 060
200 800 240
203 000 081
18
203 000 600
19
501-006N
20
21
22
23
821-034
821-014
821-013
821-016
24
25
821-015
203 000 630
26
203 100 110
27
203 000 650
Replacement Parts
Description
Casing (STH-80)
Cover, Casing
(Tsurumi Logo)
Impeller
Casing, Inner
Liner
Seal, Mechanical
(3-In., 4-In. T)
Case, Check Valve
(NPT 3)
Fitting, Pipe
(3B NPT-NPT)
--------O-Ring (P-24)
Plug Assembly
O-Ring (P-30)
Plug Assembly,
Priming
Valve, Check
O-Ring (G-240)
O-Ring (W1517-46)
Bolt, Hex
(M10 X 30 (17) P=2)
Bolt, Flange
(M8_50)
Washer, Aluminum
(8.2-17-3.0)
Pin, Snap (_12)
Rivet (_12)
Bolt, Cover (M16)
Holder, Casing
Cover
Knob (M16)
Bolt, Hex Socket
(M6 X 15 SUS)
Washer, Spring
(M6 SUS)
Bolt, Hex Socket
(M8 X 20 SUS)
Qty
1
1
1
1
1
1
1
1
---2*
2
1**
1
1
1
1
3
4
4
2
2
2
2
2
3
3
Ref.
No.
28
Part
Number
203 100 130
Description
Qty
Washer, Spring
2
(M8 SUS)
29 200 500 230
Handle, Drain
2
Cover
30 203 000 530
Bolt, Hex
4
(M6 X 25 SUS)
31 19W0 3906000 Plain Washer (M6)
4
32 200 101 170
Frame (Black)
1
33 200 900 520
Mount, Anti Vibration
4
34 1001-024
Nut, Spring (M8)
4
(Mount to Frame)
35 203 000 130
Bolt, Hex
2
(M10 X 40 P = 2)
(Engine to Mount))
36 203 200 070
Nut, Spring (M10)
2
(Engine to Mount)
2
37 203 000 660
Bolt, Hex
(M10 X 25 P = 2)
(Pump to Mount)
38 1001-043
Shim, Impeller
AR
24.2 x 20.0 x 0.3T
1001-044
Shim, Impeller
AR
24.2 x 20.0 x 0.6T
1001-045
Shim, Impeller
AR
24.2 x 20.0 x 1.0T
-39 13310-ZE2-630 Crankshaft ***
1
-40 Honda GX240 Engine, 8.0 HP ****
1
AR = As Required: quantity determined at assembly.
*
Plug assembly (11) includes O-ring (10).
**
Priming plug assembly (13) includes O-ring (12).
*** Crankshaft (-39) has special metric thread. Order
Tsurumi replacement crankshaft (-39) (not Honda).
**** Contact Honda distributor for Honda engine parts.
(-) Items prefixed with a dash are not illustrated.
2
Page 27
Tsurumi’s Operation, Service, and Repair Manual
Exploded View - Model ETP3-100HA Trash Pump
Page 28
Replacement Parts
Tsurumi’s Operation, Service, and Repair Manual
Exploded View - Model EPT3-100HA Trash Pump
Ref.
No.
1
2
Part
Number
200 201 160
200 201 250
3
4
5
6
200 210 500
200 210 510
1021-007N
821-008
7
1001-013A
8
1021-038A
9
10
11
12
13
--------501-022
501-021
122 030 13
200 500 110
14
15
16
17
1001-015
821-017
200 800 240
203 000 081
18
1021-026A
19
203 100 190
20
21
22
23
821-034
821-014
821-013
821-016
24
25
821-015
203 000 380
26
203 100 100
27
203 000 670
Replacement Parts
Description
Casing (STH-100)
Cover, Casing
(Tsurumi Logo)
Impeller
Casing, Inner
Liner
Seal, Mechanical
(3-In., 4-In. T)
Case, Check Valve
(NPT 4)
Fitting, Pipe
(4B NPT-NPT)
--------O-Ring (P-24)
Plug Assembly
O-Ring (P-30)
Plug Assembly,
Priming
Valve, Check
O-Ring (G-240)
O-Ring (W1517-46)
Bolt, Hex
(M10 X 30 (17) P=2)
Bolt, Flange
(UNC3/8_45)
Washer, Aluminum
(10.2-20-3.0)
Pin, Snap (_12)
Rivet (_12)
Bolt, Cover (M16)
Holder, Casing
Cover
Knob (M16)
Bolt, Hex Socket
(M5 X 4 SUS)
Washer, Spring
(M5 SUS)
Bolt, Hex Socket
(M8 X 20 SUS)
Qty
1
1
1
1
1
1
1
1
---2*
2
1**
1
1
1
1
3
4
4
2
2
2
2
2
3
3
Ref.
No.
28
Part
Number
203 100 130
Description
Qty
Washer, Spring
2
(M8 SUS)
29 200 500 230
Handle, Drain
2
Cover
30 203 000 530
Bolt, Hex
4
(M6 X 25 SUS)
31 19W0 3906000 Plain Washer (M6)
4
32 200 101 180
Frame (Black)
1
33 200 900 520
Mount, Anti Vibration
4
34 1001-024
Nut, Spring (M8)
4
(Mount to Frame)
35 203 000 130
Bolt, Hex
2
(M10 X 40 P = 2)
(Engine to Mount))
36 203 200 070
Nut, Spring (M10)
2
(Engine to Mount)
2
37 203 000 660
Bolt, Hex
(M10 X 25 P = 2)
(Pump to Mount)
38 1001-040
Shim, Impeller
AR
22.2 x 0.3T
1001-041
Shim, Impeller
AR
22.2 x 0.6T
1001-042
Shim, Impeller
AR
22.2 x 1.0T
1001-043
Shim, Impeller
AR
22.2 x 2.3T
-39 13310-ZE3-630 Crankshaft ***
1
-40 Honda GX340 Engine, 11.0 HP ****
1
AR = As Required: quantity determined at assembly.
*
Plug assembly (11) includes O-ring (10).
**
Priming plug assembly (13) includes O-ring (12).
*** Crankshaft (-39) has special metric thread. Order
Tsurumi replacement crankshaft (-39) (not Honda).
**** Contact Honda distributor for Honda engine parts.
(-) Items prefixed with a dash are not illustrated.
2
Page 29
WHEEL KIT
PGWK-200
FITS TSURUMI PUMPS & GENERATORS
Installation Instructions
Product Features
Safety Guidelines
■ DESIGNED FOR LIFELONG
DURABILITY
■ STATE-OF-THE-ART ADJUSTABLE
SLIDING AXLE SYSTEM
■ FITS MOST GENERATOR SIZES AND
PUMPS
■ HIGHEST QUALITY METAL TUBING
■ ALL BRACKETS ARE PRECISION FIT
■ WIDE ANGLE HANDLE BARS FOR
EASY PORTABILITY
■ EASY COMFORTABLE GRIP
■ DOUBLE BALL BEARINGS ON EACH
AIRLESS TIRE
■ IMPOSSIBLE TO PUNCTURE
■ SMOOTH SLEEK DESIGN
This manual contains information that is
very important to know and understand.
This information is provided for SAFETY and
to PREVENT EQUIPMENT PROBLEMS.
To help recognize this information, observe
the following symbols.
Danger indicates an
DANGER
imminently hazardous
situation which, if not avoided will result in
death or serious injury.
Warning indicates a
WARNING potentially hazardous
situation which, if not avoided COULD
result in death or injury.
Caution indicates a situCAUTION ation which, if not avoided, MAY result in minor or moderate injury.
Notice indicates imporNOTICE
tant information that if
not followed, may cause damage to
equipment.
Unpacking
Upon receiving the wheel kit, it should be
inspected for damage or parts shortages
(See Fig. 1). If damage has occurred, file a
claim immediately with the carrier that
delivered the wheel kit.
If the manual is removed from the
packaging, do not lose or misplace.
DANGER
Wheel Kit Parts Include
6 7
5
4
3
8
2
1213
1
10
QTY
1
1
1
1
2
4
4
4
2
2
16
1
1
Never run the pumps or generator in an
enclosed area. Pump or generator should
only be operated in well ventilated areas
Engines produces exhaust gas containing
odorless and poisonous carbon monoxide
gas. Provide adequate ventilation and prevent fire hazards, by
9
11
Fig. 1
Ref#
1
2
3
4
5
6
7
8
9
10
11
12
` 13
1. Read product manual carefully prior to
wheel kit assembly to pump or
generator frame. Proper assembly and
installation to pump or generator provides carefree service.
2. Know the typical limitations and potential hazards associated with operating
and transporting gasoline engine driven
pump or generator equipment.
Description
AXLE ASSY, RIGHT
AXLE ASSY, LEFT
HANDLE, RIGHT WITH GRIP
HANDLE, LEFT WITH GRIP
TIRE
U-BOLT FOR AXLE ASSY, SHORT
U-BOLT FOR HANDLE, LONG
HANDLE BRACKET
PLAIN WASHER FOR TIRE
COTTER PIN FOR TIRE
SPRING NUT
BOLT (M8-20)
NUT (M8) #3
HANDLE
LEFT WITH GRIP
U-BOLT
FOR AXLE ASSY,
SHORT
Operate the pump or
generator on a level
surface to prevent fuel spills.
DANGER
Before
installation,
ensure that there are
no fluids in the pump, generator or engine
prior to the wheel kit installation. Engine oil
and gasoline should be properly drained
from the engine. Ensure that there is no
gas in the fuel tank and/or carburetor bowl.
Drain all water from the pump housing.
Draining all fluids from the engine and
pump or generator will eliminate the
hazards from fluid spills. Keep children and
pets away from he installation work site.
WARNING
Ensure that the wheel
kit
contains
the
appropriate parts (See Fig. 1) before
assembly to pump or generator. Assembly
of an incomplete wheel may cause damage
to the wheel kit, the pump, and generator.
This installation is best performed by two
people. A sturdy and stable block should
support the underside of the cart during
installation. A damaged or incomplete kit
may cause injury or property damage.
CAUTION
PERSONAL SAFETY
1. Wear safety glasses at all times when
installing wheel kit to pump or generator.
2. Keep work area clean, uncluttered and
properly lighted; replace all unused tools
and equipment.
3. Keep visitors at a safe distance from the
work area.
4. Make workshop childproof with padlocks,
master switches, and by removing starter
keys.
TIRE
AXLE ASSY,
RIGHT/LEFT
HANDLE
RIGHT WITH GRIP
TIRE
U-BOLT
FOR HANDLE,
LONG
Fig. 2
STEP 1 - AXEL AND WHEEL INSTALLATION
1. Elevate pump or generator with a block
to allow enough clearance to assemble
axle and wheels. Place the block
between the ground and the bottom of
the pump or generator frame.
2. Place the axle assembly (A) beneath the
frame (B) and secure, using two short Ubolts (Ref. No. 8) and four nuts (Ref. No.
11) on each side of the frame along with
axle assembly left (Ref. No 2.). See
Fig.3. In total, the axle assembly will
require both the right (Ref. No. 1) and left
(Ref. No. 2) axle assemblies, four short
U-bolts (Ref. No. 8) and eight nuts (Ref.
No. 11) to complete the assembly of the
axle to the pump or generator frame.
Note: The axle assembly is an adjustable
sliding axle system. It allows for minimum
widths of 13h and maximum widths of 21h.
Engine driven pumps or generators with
frame dimensions smaller or larger than
those noted above will not fit properly with
this wheel mounting kit. Do not use this
wheel mounting kit unless pump or generator frame dimensions are within the range
state above.
3. There are eight holes in each axle
assembly (Ref. No. 1 and 2). Use the
four holes furthest apart as possible for
your installation to secure each axle
assembly (Ref. No. 1 and 2) to the pump
or generator frame. The axle assembly
(Ref. No. 1 and 2) may be positioned in
different locations along the tubular
pump or generator frame rails than the
position shown below to accommodate
assembly to different pump or generator
frames.
4. Tighten Nuts (Ref. No. 11) to 75-95 inlbs.
5. Once axle assembly (Ref. No. 1 and 2)
is in place, secure width adjustment by
tightening bolt (Ref. No. 12) and nut
(Ref. No. 13)
6. Install each tire (Ref. No. 5) to the axle
(Ref. No. 1 and 2). The inside of the tire
(Ref. No. 5) is the side of the wheel that
has the four nuts. Install each tire (Ref.
No. 5) so that the side of the wheel that
has the nuts is facing the pump or generator frame. See Figure 3.
7. After the tires (Ref. No. 5) are placed on
the axle (Ref. No. 1 and 2), place one
plain washer (Ref. No. 9) over the axle
(Ref. No. 1 and 2) on each side of the
axle (Ref. No. 1 and 2). A total of two
washers. (Ref. No. 9) are required, one
on each side of the axle (Ref. No. 1 and
2). After the washers (Ref. No. 9) are
installed over the ends of the axle (Ref.
No. 1 and 2), insert the hairpin sprint
pins (Ref. No. 10) into the holes on each
side of the axle (Ref. No. 1 and 2). One
hair pin style cotter pin is required one
each side of the axle (Ref. No. 1 and 2)
for a total of two pins. (Ref. No. 10). Pins
must be installed properly (See Figure
3), as improperly installed pins may
cause washer and tires to come off during pump or generator transport.
STEP 2 - INSTALL HANDLES
1. The pump or generator and frame, with
the axle and wheels installed, will need
to be tilted forward slightly to assemble
the handles (Ref. No. 3 and 4). Carefully
block and secure the pump or generator
and axle assembly so that pump or generator will not fall forward during handle
assembly.
(D)
(C)
Fig. 4
2. The handles (Ref. No. 3 and 4) should
be installed on the pump or generator
and frame assembly (See Fig. 4).
3. Place each handle (Ref. No. 3 and 4) on
the bottom tubular support frame as
shown (Item C) in Figure 4.
Note: Handles should tilt slightly outwards,
not inwards, when assembled to pump or
generator frame. This allows for easy
access and maneuver ability of operator
during pump or generator transport.
4. Attach each handle (Ref. No. 3 and 4) to
the pump or generator frame using two
of the longer U-bolts (Ref. No. 7), two
handles (Ref. No. 6) and two nuts (Ref.
No. 11) See Fig. 4, and reference items
(C) and (D).
5. Each handle (Ref. No. 3 and 4) requires
two long U-bolts (Ref. No. 7), two handle
brackets (Ref. No. 6) and four nuts (Ref.
No. 11).
6. Tighten nuts (Ref. No. 11) to 75 - 95 inlbs.
Maintenance
Bolt & Nut
Inside
(B)
(A)
Outside
TSURUMI (AMERICA), INC.
845 N. Dillon Drive, Wood Dale, IL 60191
tel: 1-888-878-7864 fax: 1-630-766-6445
1. Inspect pump or generator frame and
wheel kit prior to every use for loose
nuts and bolts. Tighten as needed.
2. Inspect tires for damage and replace as
necessary.
3. Keep unit clean.
4. Wheel bearings are sealed ball
bearings. No grease or oil is required to
lubricate wheeling bearing.