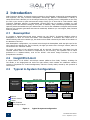
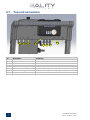
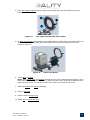
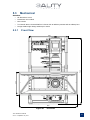
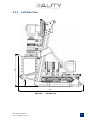
1
3FLEX™ TS-2-Studio
Beam Splitter
Stereo Camera Platform
User Manual
V1.5.0
COPYRIGHT © 2011 3ality TECHNICA LLC. ALL RIGHTS RESERVED.
TS-2-Studio User Manual
V1.5.0 – September 14, 2011
1
Authors
AnEs – Andreas Eser
GaUs – Gary Ushino
MaBe – Martin Beck
JiSm – Jill Smollin
Revision History
Revision
0.5.0
0.6.x
1.0.0
1.1.1
1.2.0
1.3.0
1.4.0
1.5.0
Date
March 8, 2010
March 9, 2010
March 17, 2010
March 19, 2010
March 22, 2010
March 25, 2010
May 18, 2010
September 14, 2011
Authors
Changes
AnEs, GaUs
Initial Draft to 3ality
MaBe
3ality Look´n´feel, Legal notes, CE/FCC conformity
MaBe
Approved by TUV
MaBe, GaUs
Added mechanical Sketches
MaBe
Added electrical Harnesses
GaUs, MaBe, JiSm Added Beamsplitter stuff and rotational adjustment
GaUs, MaBe
Added anti-backlash bracket
JiSm
General corrections
Intended Readers
Users, Operators
Subject
How to setup the TS-2-Studio
Document Version/Date
V1.5.0 – September 14, 2011
Applicable for Device Version
TS-2-Studio Rev A and Rev B
Filename
V1.5.0 – September 14, 2011
2
TS-2-Studio User Manual
V1.5.0 – September 14, 2011
Preface
This document contains instruction and reference information for the operation and use of the
3FLEX™ TS-2-Studio Beamsplitter Stereo Camera Platform
Trademarks
3FLEX, 3PLAY and 3ACTION are trademarks of 3ality Technica LLC. All other brand and product names
mentioned herein are used for information purposes only and may be trademarks or registered
trademarks of their respective companies.
3FLEX™ TS-2-Studio Beamsplitter Stereo Camera Platform User Manual
Copyright © 2009 3ality Technica Systems LLC. All rights reserved.
Reproduction, adaptation or translation of this document without prior permission is prohibited, except as
allowed under copyright laws.
Note: The information in this document is subject to change without notice or obligation.
Technical Support
Telephone:
+1 (818) 333-3010
Fax:
+1 (818) 333-3001
Email:
[email protected]
Web:
www.3alitytechnica.com/support
Address:
Customer Service
3ality Technica Systems LLC.
55 E. Orange Grove Ave
Burbank, CA 91502
United States of America
Hours: 9:00am to 6:00pm Pacific Time • Monday through Friday
TS-2-Studio User Manual
V1.5.0 – September 14, 2011
3
United States of America (USA)
Federal Communications Commission (FCC) Notice
This equipment has been tested and found to comply with the limits for a Class A
digital device, pursuant to Part 15 of the FCC Class rules. These limits are designed to
provide reasonable protection against harmful interference when the equipment is
operated in a commercial environment. This equipment generates, uses, and can
radiate radio frequency energy and, if not installed and used in accordance with the
instruction manual, may cause harmful interference to radio communications.
Operation of this equipment in a residential area is likely to cause harmful interference
which the user will be required to correct at his expense. To assure continued
compliance follow the attached installation instructions and do not make any
unauthorized modifications.
European Commission (EC)
Waste Electrical and Electronics Equipment (WEEE) Directive
Do not dispose of this device. At the end of its life-cycle, this device must be properly
recycled by a specialized recycling firm or returned to the manufacturer or vendor for
proper disposal.
Finland
Laite on liitettävä suojamaadoituskoskettimilla varustettuun pistorasiaan.
Norway
Apparatet må tilkoples jordet stikkontakt.
Sweden
Apparaten skall anslutas till jordat uttag.
WARNING:
TO REDUCE THE RISK OF FIRE OR SHOCK HAZARD, DO NOT EXPOSE THIS EQUIPMENT TO RAIN OR
MOISTURE.
CAUTION:
TO REDUCE THE RISK OF FIRE OR SHOCK HAZARD AND ANNOYING INTERFERENCE, USE THE
RECOMMENDED ACCESSORIES ONLY.
4
TS-2-Studio User Manual
V1.5.0 – September 14, 2011
Table of Contents
Page
1
Official Notices ....................................................................................................... 6
1.1
1.2
1.3
1.4
1.5
2
3
Limitation of Liability ............................................................................................................. 6
Software License Agreement .................................................................................................. 6
3ality Technica Hardware Warranty ........................................................................................ 6
3ality Technica Software Warranty ......................................................................................... 7
Obtaining Warranty Service and Customer Support .................................................................. 7
Introduction ........................................................................................................... 8
2.1 Beamsplitter ......................................................................................................................... 8
2.2 Height/Pitch-Unit ................................................................................................................... 8
2.3 Typical In-System Configuration ............................................................................................. 8
2.4 Rig Overview ........................................................................................................................ 9
2.5 Base connectors .................................................................................................................. 10
2.6 Height/Pitch unit connectors ................................................................................................ 11
2.7 Top unit connectors............................................................................................................. 12
2.8 Internal Harnesses .............................................................................................................. 13
2.8.1
Power ......................................................................................................................... 13
2.8.2
Video.......................................................................................................................... 13
2.8.3
Control ....................................................................................................................... 13
Before you start ................................................................................................... 14
3.1 Safety ................................................................................................................................ 14
3.1.1
General Safety Instructions .......................................................................................... 14
3.1.2
Specific Safety Instructions .......................................................................................... 15
3.1.3
Safety Measures .......................................................................................................... 16
3.2 Parts needed ...................................................................................................................... 17
4
Preparing the Stereo Camera Platform ............................................................... 18
4.1
4.2
4.3
4.4
4.5
4.6
4.7
5
Camera/Lens sled assembly ................................................................................................. 18
Anti-Backlash Motor Bracket Mounting .................................................................................. 21
Mounting Camera Lens Sled to 3FLEX TS-2-Studio 3D Camera Platform .................................. 24
Image Rotation Adjustment ................................................................................................. 26
Beamsplitter Removal .......................................................................................................... 27
Cleaning the Beamsplitter .................................................................................................... 28
Installing the Beamsplitter ................................................................................................... 29
Specifications ....................................................................................................... 31
5.1 Physical .............................................................................................................................. 31
5.2 Connectors and Interfaces ................................................................................................... 32
5.2.1
Lens-Motors ................................................................................................................ 32
5.2.2
SPC/SIP I/O ................................................................................................................ 32
5.2.3
Power Input ................................................................................................................ 33
5.2.4
Power Output Right Camera ......................................................................................... 34
5.2.5
Power Outputs Left Camera ......................................................................................... 34
5.3 Mechanical.......................................................................................................................... 35
5.3.1
Front View .................................................................................................................. 35
5.3.2
Rear View ................................................................................................................... 36
5.3.3
Left Side View ............................................................................................................. 37
5.3.4
Right Side View ........................................................................................................... 38
5.3.5
Top View .................................................................................................................... 39
5.3.6
Bottom View ............................................................................................................... 40
6
Appendix .............................................................................................................. 41
6.1 Declarations of Conformity ................................................................................................... 41
6.1.1
CE .............................................................................................................................. 41
6.2 Table of Figures .................................................................................................................. 42
TS-2-Studio User Manual
V1.5.0 – September 14, 2011
5
1 Official Notices
1.1
Limitation of Liability
3ality Technica LLC shall not be liable for indirect, special, incidental or consequential damages; for
damages that directly or indirectly arise from the use of, or inability to use, the system; for commercial
loss of any kind; for the procurement of substitute goods – whether arising in tort, contract or any other
legal theory, even if 3ality Technica LLC has been advised of the possibility of such damages. In any
event, 3ality Technica LLC’s liability shall be limited to the amount actually paid for the system giving rise
to any such damage. This limitation is intended to limit 3ality Technica LLC’s liability and shall
notwithstanding any failure of essential purpose of any limited remedy.
1.2
Software License Agreement
IMPORTANT – READ CAREFULLY: This Software License Agreement is a legal agreement between
3ality Technica’s Customer and 3ality Technica LLC. This system contains certain 3ality Technica software,
hardware, associated media, printed materials and electronic documentation. By using the system
described in this manual, the customer agrees to be bound by the terms of this Software License
Agreement. If the customer does not agree to the terms of this Software License Agreement, 3ality
Technica LLC is unwilling to license the software to the customer. In such case, the customer may not
use or copy the software.
License: 3ality Technica LLC grants an exclusive, nontransferable, limited license to use the installed
software exclusively on hardware on which 3ality Technica has installed the software, or on hardware on
which 3ality Technica has authorized it to be installed, for the period of time that the software is licensed.
Such software may only be enabled, activated, modified or updated by 3ality Technica or its authorized
agent. 3ality Technica and its licensors retain the right, title and interest in and to all software. Title to
the media on which the software is delivered is transferred to the Customer.
Restrictions: The software is copyrighted and may contain material that is protected by patent, trade
secret or other laws pertaining to proprietary rights. No copies of the software may be made, except for a
single copy for archival purposes. You may not modify the Software or permit or assist any third party in
doing so. You may not decompile, reverse engineer, disassemble, or otherwise reduce the Software to
source code or other human-readable form, or attempt or permit any third party to do so. Any violation
of this Software license shall be a material breach and shall immediately entitle 3ality Technica LLC to
exercise any remedy that may exist at law or in equity.
Copyright: All title and copyrights in the Software (and any copies thereof) and the accompanying
printed materials are owned by 3ality Technica LLC. All rights not specifically granted under this Software
License Agreement are reserved by 3ality Technica LLC.
1.3
3ality Technica Hardware Warranty
(a) Company warrants to the original purchaser of Equipment that for the Warranty Period (as defined
below), the Equipment will be free from material defects in materials and workmanship. The foregoing
warranty is subject to the proper installation, operation and maintenance of the Equipment in accordance
with installation instructions and the operating manual supplied to Customer. Warranty claims must be
made by Customer in writing within sixty (60) days of the manifestation of a problem. Company's sole
obligation under the foregoing warranty is, at Company's option, to repair, replace or correct any such
defect that was present at the time of delivery, or to remove the Equipment and to refund the purchase
price to Customer.
(b) The "Warranty Period" begins on the date the Equipment is delivered and continues for 12 months.
(c) Any repairs under this warranty must be conducted by an authorized Company service representative
at an authorized repair facility. The customer is responsible for costs associated with shipping the
equipment to and from an authorized repair facility.
(d) This warranty is for the hardware and hardware sub-systems of the equipment and specifically
excluded from the warranty is all software, (which is covered under the software warranty), problems
due to accidents, misuse, misapplication, storage damage, negligence, or modification to the Equipment
or its components.
6
TS-2-Studio User Manual
V1.5.0 – September 14, 2011
(e) Company does not authorize any person or party to assume or create for it any other obligation or
liability in connection with the Equipment except as set forth herein.
(f) The warranty in section (a) above is exclusive and in lieu of all other indemnities or warranties,
whether express or implied, including the implied warranties of merchantability and fitness for a
particular purpose.
Limitation of Liability. In no event shall company be liable for any indirect incidental, punitive, special or
consequential damages, or damages for loss of profits, revenue, or use incurred by customer or any third
party, whether in an action in contract, or tort, or otherwise even if advised of the possibility of such
damages. Company’s liability for damages arising out of or in connection with this agreement shall in no
event exceed the purchase price of the defective equipment. The provisions of this agreement allocate
risks between company and customer. Company’s pricing reflects this allocation of risk and but for this
allocation and limitation of liability, company would not have entered into this agreement.
1.4
3ality Technica Software Warranty
3ality Technica represents and warrants that the Software shall perform substantially as represented in
the Documentation.
WARRANTY LIMITATION: THE FOREGOING WARRANTY IS IN LIEU OF ALL OTHER WARRANTIES,
EXPRESSED OR IMPLIED, INCLUDING BUT NOT LIMITED TO, IMPLIED WARRANTIES OF FITNESS FOR A
PARTICULAR PURPOSE AND WARRANTIES OF MERCHANTABILITY. EXCEPT FOR THE WARRANTY
EXPRESSLY ACKNOWLEDGED HEREUNDER, 3ality Technica HEREBY DISCLAIMS AND CUSTOMER
HEREBY WAIVES ALL WARRANTIES, EXPRESS OR IMPLIED, INCLUDING BUT NOT LIMITED TO ALL
IMPLIED WARRANTIES OF FITNESS FOR A PARTICULAR PURPOSE AND IMPLIED WARRANTIES OF
MERCHANTABILITY.
Limitation of Damages: 3ality Technica shall not be liable to Customer under the Warranty for any
consequential, exemplary, incidental or punitive damages, regardless of whether 3ality Technica has been
advised of the possibility of such damages in advance or whether such damages are reasonably
foreseeable.
Force Majeure: 3ality Technica shall not be liable to Customer for failing to perform its obligations under
the Agreement because of circumstances beyond the control of Customer. Such circumstances shall
include, but not be limited to, any acts or omissions of any government or governmental authority,
natural disaster, act of a public enemy, riot, sabotage, dispute or differences with workmen, power failure,
delays in transportation or deliveries of supplies or materials, acts of God, terrorism, or any events
reasonably beyond the control of Customer.
Indemnification: Customer shall release, defend, indemnify and hold harmless 3ality Technica from and
against any claims, damages and liability arising from use of the Software or Documentation by Customer.
1.5
Obtaining Warranty Service and Customer
Support
The following information describes our current warranty support procedures. These procedures are
subject to change without notice and are expressly excluded from the Limited Warranty.
•
Our Customer Support Representatives are available to provide telephone support during
business hours (M-F, 9am-6pm Pacific Time), and after these hours for urgent “emergency”
technical support.
•
Customer Support will be provided only for products under warranty or those covered under a
valid Support Agreement.
•
Before returning the Product for repair, it is necessary to obtain a Return Merchandise
Authorization (RMA) number by calling (818) 333-3000. You will be asked to provide the system’s
serial number.
•
The non-functioning part should be properly packed and shipped pre-paid to 3ality Technica with
the RMA number clearly displayed on the outside of the package and on the accompanying RMA
form. We will refuse to accept any package without a valid RMA number.
•
Repairs outside the scope of the Limited Warranty require a valid and valid Support Agreement
prior to any repairs. 3ality Technica does not offer time and materials based repair services.
TS-2-Studio User Manual
V1.5.0 – September 14, 2011
7
2 Introduction
3ality Technica’s 3FLEX™ TS-2-Studio restores creativity to the filmmaker. Designed by cinematographers
and engineers, this fully motorized beamsplitter stereoscopic platform accommodates a variety of
cameras and lenses. Whether you are shooting a feature film, sporting event or wild gazelles on the veld,
the TS-2 is your answer to quick and accurate setups, freeing you to shoot 3D on a 2D schedule. 3ality
Technica’s calibration software is sophisticated, powerful and easy to navigate, providing you with
matching zooms and smooth tracking for every shot. In addition, 3ality Technica’s proprietary software
captures positional metadata every six milliseconds. You can use the metadata to integrate actual camera
data into your computer generated environments seamlessly. Whatever you can imagine, 3ality Technica
makes it possible.
2.1
Beamsplitter
In contrast to classical side-by-side stereo camera rigs, the 3FLEX™ TS-2-Studio Platform utilizes a
beamsplitter to allow for narrow Inter-Axials. This beamsplitter is sometimes also called mirror. In
classical side-by-side stereo camera rigs, the minimum Inter-Axial is limited by the width of the camera or
the diameter of the lens.
With beamsplitter configurations, one camera looks through the beamsplitter while the light rays for the
other camera are reflected. For the TS-2-Studio, the right-eye camera it the “through”-camera, while the
left camera is the “reflected”-camera.
Of course, the image of the reflected camera will be mirrored. Therefore the video-data from this
reflected camera must be corrected to compensate for this mirroring. This operation can be either
performed in a realtime-solution, such as the 3FLEX™ SIP Stereo Image Processors, or in the
postproduction workflow.
2.2
Height/Pitch-Unit
A unique feature of all 3FLEX™ stereoscopic camera platforms from 3ality Technica, including the
TS-2-studio, is the height/pitch-unit under the right camera, which enables the calibration softwaresystem to compensate for vertical misalignments, which are usually mainly caused by the operation of
zoom-lenses.
Typical In-System Configuration
3FLEX SIP
Stereo Image
Processor
HD-SDI Video
Camera R
SPC #n
SPC #0
3FLEX SPC
Stereo Platform
Controller
3FLEX SPC
Stereo Platform
Controller
3FLEX TS-2-s
Stereo Camera
Platform
Hand-Control
(F, I, Z, Ia, C)
Hand-Control
(F, I, Z, Ia, C)
12VDC
Power-Supply
Power
Motion-Control
Video
XXX 3ality Technica
Systems
XXX Third Party Products
Figure 1.
8
Camera L
2.3
Typical In-System Configuration
TS-2-Studio User Manual
V1.5.0 – September 14, 2011
2.4
Rig Overview
Figure 2.
Right-hand side view. No cameras and no lenses mounted.
No.
A
B
C
D
Description
Top Handle
Base plate handles
Aluminum frame
SPC box
E
F
G
H
J
K
L
M
N
O
Left-eye camera mount
Three left-eye lens motors
Right-eye camera mount
Three right-eye lens motors
Height/pitch unit
Convergence unit
Mirror unit
MRCU board with power switch
Right-eye sock
Left-eye sock
TS-2-Studio User Manual
V1.5.0 – September 14, 2011
Comment
Stereoscopic Platform Controller. Contains triangulöation
math and motion intelligence; The SPC box is not
necessarily included with the rig and therefore only shown
in the drawings as sample.
shown without camera adaptor
with camera/lens sled
with camera/lens sled
Contains motor drivers and controls
with lens support bracket inside
with lens support bracket inside
9
2.5
Base connectors
X1 X2 X3
Figure 3.
No.
X1
X2
X3
X4
X5
X6
X7
Description
SPC in
VF in
Left out
Right out
Right in
Power out
Power in
X4 X5
X6 X7
Rear view
Comment
Lemo10. Internally wired to “SPC remote” at top unit
BNC Viewfinder input
BNC Video from left-eye camera
BNC Video from right-eye camera
BNC Right-eye camera video connects here
XLR4 female
XLR4 male. Input from power supply
Note: All “power out” jacks stay on when the MRCU power switch is turned off! Disconnect
the “power in” connector for a safe off-state.
10
TS-2-Studio User Manual
V1.5.0 – September 14, 2011
2.6
Height/Pitch unit connectors
X10 X11 X12
Figure 4.
No.
X10
X11
X12
X13
Description
Right Iris motor supply
Right Zoom motor supply
Right Focus motor supply
Drag Chain connector
X13
Height/Pitch unit
Comment
Lemo7 receptacle
Lemo7 receptacle
Lemo7 receptacle
Not to be disconnected by user
Note: The motor order on the lens rods is usually the same as the connectors order at the H/P unit.
TS-2-Studio User Manual
V1.5.0 – September 14, 2011
11
2.7
Top unit connectors
X20 X21
X22
Figure 5.
No.
X20
X21
X22
X23
X24
X25
X26
X27
12
Description
Left in
VF out
SPC local
SPC remote
Left Focus motor supply
Left Zoom motor supply
Left Iris motor supply
Three power outputs
X23
X27
X24 X25 X26
Top unit connectors
Comment
BNC. Left-eye camera video connects here
BNC. Internally wired to “VF in” at base
Lemo10. Connects SPC box to MRCU board
Lemo10. Internally wired to “SPC in” at base
Lemo7 receptacle (shown with plug inserted)
Lemo7 receptacle (shown with plug inserted)
Lemo7 receptacle (shown with plug inserted)
XLR4 female. Left-eye cam and viewfinder
TS-2-Studio User Manual
V1.5.0 – September 14, 2011
2.8
Internal Harnesses
To ease installation and cabling, internal harnesses have been built into the TS-2-Studio.
2.8.1
Power
TS-2-Studio Stereo Camera Platform
REAR BASE PANEL
(Right Camera)
X6: XLR4 Female:
POWER OUT
TOP UNIT PANEL
(Left Camera)
MRCU: Internal
Electronics
X27: XLR4 Female:
POWER OUT
X7: XLR4 Male:
POWER IN
Figure 6.
2.8.2
Internal Power Harness
Video
TS-2-Studio Stereo Camera Platform
X5: BNC RIGHT IN
REAR BASE PANEL
(Right Camera)
TOP UNIT PANEL
(Left Camera)
X4: BNC RIGHT OUT
X3: BNC LEFT OUT
X20: BNC LEFT IN
X2: BNC VF IN
X21: BNC VF OUT
Figure 7.
2.8.3
Internal Video Harness
Control
TS-2-Studio Stereo Camera Platform
REAR BASE PANEL
(Right Camera)
TOP UNIT PANEL
(Left Camera)
MRCU: Internal
Electronics
X1: Lemo10 Female:
SPC IN
X23: Lemo10 Female:
SPC REMOTE
Figure 8.
TS-2-Studio User Manual
V1.5.0 – September 14, 2011
X22: Lemo10 Female:
SPC LOCAL
Internal Control Harness
13
3 Before you start
3.1
3.1.1
Safety
General Safety Instructions
1. Operating the camera platform may be done by qualified personnel only.
2. Read these instructions.
3. Keep these instructions.
4. Heed all warnings.
5. Follow all instructions.
6. Do not use this apparatus near water.
7. Clean only with dry cloth.
8. Do not install near any heat sources such as radiators, heat registers, stoves, or other apparatus
(including amplifiers) that produce heat.
9. Protect the power cord from being walked on or pinched particularly at plugs, convenience
receptacles, and the point where they exit from the apparatus.
10. Only use attachments/accessories specified by the manufacturer.
11. Unplug this apparatus during lightning storms or when unused for long periods of time.
12. Refer all servicing to qualified service personnel. Servicing is required when the apparatus has
been damaged in any way, such as power-supply, its cord or its plug is damaged, liquid has been
spilled or objects have fallen into the apparatus, the apparatus has been exposed to rain or
moisture, does not operate normally, or has been dropped.
14
TS-2-Studio User Manual
V1.5.0 – September 14, 2011
3.1.2
Specific Safety Instructions
1. The TS-2-studio camera platform is designed to be used indoors only. In case of outdoor usage,
make sure that it is not exposed to moisture or rain. Use appropriate covers in case of moist or
wet weather-conditions!
2. In order to prevent overheating, make sure that the device is properly vented, especially when
used under protective covers!
3. Use only certified power-supplies with an internal current-limiter (fuse or trip-switch). Set this
limiter to 6 Ampere max. Make sure that the voltage of your power-supply has a nominal voltage
of 12VDC with a tolerance of not more than -10% / +25% (10.8-15VDC)!
4. Ensure that the TS-2-Studio is always firmly standing on a table or safely mounted on a tripod,
fluid-head, remote-heat, etc. with sufficient load capacity!
5. Beware of the fact that the beamsplitter is made of glass and is therefore very fragile and
delicate. Handle with extreme care and avoid cutting yourself with glass-splinters, in case of a
damaged beamsplitter!
6. Make sure, that your connector of the power-supply “power in” (female 4pin XLR) is always easily
accessible!
7. Disconnect this “power in” connector before any assembly or service work!
Be highly attentive when reaching into the camera platform while
in use, to prevent injuries from (unpredictable) movement.
Do not grab under the Height/Pitch Unit at any time.
See picture below for motorized movement areas.
Convergence Unit will move
sideways on the top rail.
Height/Pitch Unit
will move sideways on the
front-rail and back-rail,
as well as up and down.
Figure 9.
TS-2-Studio User Manual
V1.5.0 – September 14, 2011
Moving Parts (Parts of the frame removed in this picture)
15
3.1.3
Safety Measures
The two parts highlighted in red in the following picture prevent from injuries on fingers and hands from
Convergence Unit movement and may not be removed.
Figure 10.
Safety Measures on Convergence Unit
The parts highlighted in yellow in the following picture prevent from injuries on fingers and hands from
movement of the Height/Pitch Unit and should not be removed.
Figure 11.
Safety Measures on Right-Eye Camera
Removal of any safety-measures is on the users´ own risk. 3ality Technica
can not be held responsible for any injuries caused by disregard of safetyinstructions or removal of safety-measures.
16
TS-2-Studio User Manual
V1.5.0 – September 14, 2011
3.2
Parts needed
Necessary part amounts are printed bold; Part names are underlined.
Pos
Quantity
Description
1.
1
3flex TS2 Studio 3D Camera Platform
2.
2
3flex TS2 Studio 3D Camera Platform Lens cover socks
3.
2
3flex TS2 Studio 3D Camera Platform Camera/Lens Sleds
One Camera/Lens Sled consists of
•
a lens support bracket,
•
2 – 15mm iris rods,
•
an iris rod support bracket,
•
a camera support,
•
3 – Heden lens motors,
•
3 – Heden lens motor mounts for 15mm iris rods.
4.
2
Cameras or Camera T-Head optical blocks
5.
2
Camera mount adaptors appropriate to camera type
6.
2
matching zoom lenses with donut spacers if necessary to fit lens into lens bracket
7.
6
Heden lens motor interface cables (7pin Male Lemo)
8.
1
SPC motor control interface box
9.
1
SPC motor control interface box cable. (10pin Male Lemo)
10.
1
12 volt “Y” power cable. (4pin Female XLR to 2 – 4pin Male XLR
Attention! “blue” part label numbers in this chapter are not consistent with the “yellow” labels in other
chapters or in the service manual!
TS-2-Studio User Manual
V1.5.0 – September 14, 2011
17
4 Preparing the Stereo Camera Platform
4.1
Camera/Lens sled assembly
Attention! Numbers in brackets refer to blue part labels. These numbers are not necessarily consistent
with the “yellow” labels in other chapters or in the service manual!
1. Disconnect platform power. Attach camera adaptor mounts (#2) to cameras (#1) with
appropriate hardware. (Dove tail pointing toward lens). Mounts may look different for other
camera models.
Figure 12.
Camera on Camera adaptor mount with dove tail base
2. Attach camera to camera support (#3) fitting dove tails together.
Figure 13.
Camera support with dove tail cut-out
3. Tighten lock, using the black knob (#4) at the rear of the camera support until firm. (HAND
TIGHTEN ONLY!)
18
TS-2-Studio User Manual
V1.5.0 – September 14, 2011
4. Open lens support bracket (#5) by releasing lens bracket latch (#6) and swinging top half of
bracket open.
Figure 14.
Lens support bracket with donut spacer
5. All Heden lens motors (#8) should be in an upright position to start. Make sure that the pitches of
the snap-on-gears on the Heden lens motors match with the pitch on the gears of the lansbarrels on your lens.
Figure 15.
Heden Lens Motors
6. Test fit lens to camera.
Note: where motor gears and brackets should line up for good contact and good support. (If the
space between the lens gears is too close to align the motors, motor gears can be attached at the
other side of the motor. You can also move a whole motor to the other side lens rod).
7. Adjust all brackets and motors accordingly.
8. Remove Lens caps.
9. Remove camera lens port cap.
10. Attach lens to camera lens port.
TS-2-Studio User Manual
V1.5.0 – September 14, 2011
19
11. Loosen lens support bracket screws (#9).
Figure 16.
Lens support bracket screws
12. Fit the lens end into the lens support bracket. If needed, use lens spacer donut (#7) around end
of lens, filling the space between lens and bracket.
13. Close top of lens support bracket, insert ball into slot and close lock (#6) until snaps shut.
14. Re-tighten the lens support bracket screws (#9).
15. Mate lens motor gears to lens gears and lock motors in place with knobs (#10) on lens motor
brackets.
Figure 17.
Mating gears
16. Camera/Lens Sled is now assembled.
Repeat step 1 to 16 for second Camera/Lens Sled.
20
TS-2-Studio User Manual
V1.5.0 – September 14, 2011
4.2
Anti-Backlash Motor Bracket Mounting
Figure 18.
Anti-Backlash Motor Bracket
This is a specific instruction set for those users of the TS-2-Studio, which have procured the optionally
available Anti-Backlash Motor Brackets (ABB).
The ABB was developed to fill the need of extreme accuracy of lens motor position during a shoot in 3D.
3D requires that lens motor position in relation to lens gear engagement does not change once all LUTs
(Look Up Tables) have been loaded. Once set, the position and changing backlash associated with long
duration shooting should remain constant or unchanging during an event until the motor is manually
loosened or otherwise deliberately moved by the user.
There is a quick release feature that allows the quick, gross movement of the lens motor in or out of
position for lens changes etc. And more valuably, there is a fine adjustment to precisely engage the lens
motor gear to the lens gear. Finally there is a lock screw that secures the position of the ABB to the iris
rod and the ABB lens motor position.
Quick-Release Lever
Adjustment Screw
Lock Screw
Figure 19.
TS-2-Studio User Manual
V1.5.0 – September 14, 2011
Controls of the ABB
21
1. Loosen the ABB threaded nut lens motor clamp.
2. Slide the lens motor onto the ABB motor receiver and using the threaded nut, lock the lens motor
in the vertical position you desire for good lens gear contact. This may be easier said than done
due to limited space restrictions, so do your best.
3. Make sure the lower lock screw is loosened and position the lens motor bracket as you would any
other in order to achieve alignment of the lens motor to the lens gear.
4. Cannot clear the lens with the lens motor?
a. Option 1, back off the upper screw knob and pull lens motor away from the lens. Continue
this procedure until the clearance you desire has been achieved.
b. Option 2, open the quick release lever and pull back the lens motor a large amount.
Threaded Nut
Lock Screw
Figure 20.
ABB in Open Position
Note: A new ABB can be very stiff. If so, you may need to loosen the ABB lower lock screw and
or open the upper adjustment screw a slight amount to relieve pressure on the lever before you
can release the quick release lever.
5. With the lens motor gear aligned with the lens gear which you wish to engage, make sure that
your quick release lever is closed, and start to turn your upper adjustment screw to move the
lens motor gear toward the lens gear.
Figure 21.
22
Engaging the motor with an ABB
TS-2-Studio User Manual
V1.5.0 – September 14, 2011
6. As the gears begin to make contact, rotate the lens gear back and forth with one hand while
simultaneously slowly, carefully turning the upper adjustment screw toward full engagement with
the other hand. You should be able to see hear and feel the gear lash of the gear engagement
while it is still loose and sloppy. The gear slop condition should lessen as you tighten the
engagement of the gears with the adjustment screw. You should stop the adjustment just as all
gear slop or backlash is removed. No tighter! Warning! Over-tightening will result in the
undesirable condition of binding. This binding condition can cause rough uneven
movement or even full stop of the motor as well as excessive wear on the lens cams,
lens bearings, lens motor bearings and lens motor overheating! If you suspect such a
situation has occurred, back off the motor and try again. It’s easy.
7. Repeat the procedure for all lens motors.
TS-2-Studio User Manual
V1.5.0 – September 14, 2011
23
4.3
Mounting Camera Lens Sled to 3FLEX TS-2Studio 3D Camera Platform
1. Loosen 3 – Camera/Lens Sled Locks (3 – rotating KIPP handle knobs (#11))
Figure 22.
KIPP handle knobs
2. From back to front carefully slide the Camera/Lens Sled onto the Height/Pitch (H/P) Unit dove
tail base. Carefully hold open the spring loaded safety lock knob (#12) while sliding on.
Figure 23.
Height/Pitch Unit dove tails
3. All 3 – KIPP handle locks need to fit onto the dove tail base.
24
TS-2-Studio User Manual
V1.5.0 – September 14, 2011
4. Carefully push the front of the H/P unit to the left and the back of the H/P unit to the right as far
as mechanically possible, to achieve the biggest possible angle of the unit in respect to the
platform’s viewing direction.
Figure 24.
Manual motion of the H/P Unit
5. Slide the Camera/Lens Sled to the front of the dove tail base until contact is made with the
mirror box lens opening, being sure that the Lens sock is open and not obstructing the lens.
(This assures a non-binding or frictionless position is achieved)
6. Now back up the Camera/Lens Sled about 3.0 mm. Tighten all the 3 – KIPP handle locks (#11)
and connect cables for Heden lens motors and camera.
7. Close the Lens Sock around the Lens support bracket and secure with elastic lock. This
Camera/Lens Sled mounting is complete.
Proceed and duplicate steps 1 to 7 for second Camera/Lens Sled on the vertical position.
PROCEED WITH CAUTION WHEN MOUNTING CAMERA VERTICALLY.
Note that only one convergence rail needs to be moved on the vertical position to mount and achieve
non binding position (Step 4).
TS-2-Studio User Manual
V1.5.0 – September 14, 2011
25
4.4
Image Rotation Adjustment
It may be necessary to correct the image rotation of the cameras in relationship to the rig and to each
other. These are non motorized, mechanical adjustments that need to be performed with simple hand
tools, a video monitor, a bubble level and when possible, image analysis.
Note: 3ality Technica highly recommends the use of the 3FLEX™ SIP2XXX Stereo Image Processor.
Tools: Allen wrench (4.0 mm), video monitor, image processor (3FLEX™ SIP2XXX), small bubble level.
After cameras and lenses have been properly mounted to the TS-2-Studio sleds, use your image
processor to correctly orient images. Continue to step 1.
1. Level the TS-2-Studio on a stable platform, table or camera support head using the bubble level.
2. Observe the images of the cameras on your monitor and use your judgment to determine if
either camera is level to the horizon that agrees with your bubble.
3. If neither camera horizon agrees, adjust one camera horizon to the bubble reference using your
judgment and the monitor. (skip to step 5)
4. If one camera horizon agrees with the bubble, then adjust the other camera to match.
Note: If you are moving on to the second camera to match rotation between the 2 cameras, we
recommend the use of an image analyzer to get pixel accurate measurements of rotational match.
6
18
19
Figure 25.
Details of Lens-Sled
5. Unlatch the lens bracket clamp (#6) to allow rotation of the lens within it.
6. Using the 4.0 mm Allen wrench, loosen the rotation locking clamp screws (#18) at the back of
the sled unit. ½ turn at the most is all that is necessary and recommended.
7. There are 4x 4.0 mm Allen head screws for adjustment of the rotation (#19); 2x of 4.0 mm Allen
screws on each side of the camera sled. Loosen 2 screws on one side of the sled by one full turn.
Do not over loosen or remove the screws.
8. Tighten the 2x 4.0 mm Allen screws on the other side of the camera sled to affect rotation
adjustment. (These screws are used for pulling the rotation of the sled when tightened.) The
adjustment is limited by the amount you have loosened the screws on the other side.
9. When you are satisfied, retighten the 2x 4.0 mm locking clamp screws (#18) at the back of the
camera sled. Do not over torque.
Note: Please remember that you are not tightening the bolts on your car!
10. Gently re-tighten the 4x 4.0 mm adjustment screws (#19) on the camera sled, so not to change
the adjustment.
11. Re-clamp the lens bracket lock #6. (repeat step 4 through 10 for second camera if necessary)
12. If you are satisfied with the rotational match between the cameras, reboot the TS-2-Studio
Stereo Camera Platform.
26
TS-2-Studio User Manual
V1.5.0 – September 14, 2011
4.5
Beamsplitter Removal
Note: Beamsplitter / Mirror removal and installation is not for the faint of heart. It requires great care
and confidence. Do not hurry this process!
You may occasionally need to remove the mirror to clean the inside of the mirror box or the back
side/anti-reflective side of the mirror surface. Also, while the glass is extremely durable at 6 mm thick,
you might want to remove the glass prior to shipping if you anticipate very rough handling of your
equipment. More often than not, however, you will be able to leave the glass in the rig mount during
transport.
Tools: Soft cotton disposable gloves, safe and non-abrasive mirror holding location.
Always use soft cotton disposable gloves when handling the mirror. Never save and re-use the gloves.
They may collect debris getting caught in the fibers which will scratch the surface coatings of the mirror.
They will also be collecting oil and moisture that may be deposited onto the mirror surfaces.
Prepare a safe and non-abrasive location on which to place the mirror. If available, the mirror’s original
wooden crate is a perfect location. If the original wooden crate is not available, look for clean, dry towels
or paper on a stable table surface.
1. Before beginning, ensure that the TS2 is relatively level to the earth and that the mirror’s surface
is free of potentially damaging debris.
2. Establish a safe and accessible location for all screws and clamps removed during this process.
3. Remove the two lower clamp safety screws #14.
15
13
14
Figure 26.
Outer Details of the Mirrorbox
4. Remove the 2 mirror clamps (#14) by pulling on the bottom of the clamp forward in an upward
swinging motion. The mirror is still safely captured within the walls of the mirror box.
5. Wearing the cotton gloves – and being extremely carefully not to contaminate them – release the
red levered upper mirror clamp (#15).
6. Insert one gloved finger from each hand into the cut out area at the bottom edge of the mirror
box.
7. While applying pressure with your fingers toward the top of the mirror, lift the bottom edge of
the mirror up and out of the walls of the mirror box.
8. Carefully maneuver your hands to be able to grab the mirror while continuing to apply pressure
toward the top of the mirror for support until you have secured your manual hold on the mirror.
9. Slowly withdraw the mirror from the box.
10. Set the mirror down on the previously prepared safe location.
TS-2-Studio User Manual
V1.5.0 – September 14, 2011
27
4.6
Cleaning the Beamsplitter
Note: Beamsplitter / Mirror removal and installation is not for the faint of heart. It requires great care
and confidence. Do not hurry this process!
A clean beamsplitter is a prerequisite for premium quality images. There are many ways to achieve this,
but here is our recommendation:
At 3ality, we prefer lens cleaners that contain Isopropyl Alcohol and not much else. Pancro lens cleaning
fluid is our favorite. http://www.filmtools.com/panlencleanf.html. Also we prefer the Kimtech Kimwipes,
part number 34256. www.kimtech.com. The normal lens tissues, while non abrasive, are far too small for
such a large piece of glass and are not absorbent enough for such a large task.
We also recommend the use of white cotton disposable inspection gloves for the handling of the glass.
However, we discourage the reuse of the gloves as they collect dirt and oil very quickly.
First use clean and dry pressurized air of some type to clear any hard deposits that might scratch the
surface of the glass while wiping. When you are satisfied that any hard debris has been cleared, you may
proceed to spray the glass cleaner on the mirror. The Pancro fluid is a fine mist spray. We recommend
the spraying of the entire surface of the glass. Usually 3 to 4 pumps of spray should cover the glass.
Using the Kimwipes, We recommend that you crumple the large tissue into a loose ball. Always use the
Kimwipes wet. Never use them completely dry, as they may still be abrasive to the coating. Wipe the
surface gently with the crumpled Kimwipe until dry. Discard the used Kim wipe. Inspect the mirror for
further cleaning. Start over again if needed. It may take several applications of cleaner and wipes before
you are satisfied depending on amount of dirt and oil accumulated on the mirror.
The same applies to the anti reflective side of the glass. At 3ality, we clean the anti reflective side before
installation. However, over time or exposure to smoke and dirty environments, you will need to remove
and clean the anti reflective side again.
Tip: For determining the reflective side of the glass, use a non abrasive object (rubber eraser, cotton
gloved finger, etc.) and touch the surface of the mirror. If you can touch your own reflection, it is the
reflective side of the mirror. If there appears to be a gap between your object and the reflection, it is the
anti-reflective side of the mirror.
Always discard the wipe after first use. NEVER reuse the Kimwipe. You will reapply the dirt to the glass.
28
TS-2-Studio User Manual
V1.5.0 – September 14, 2011
4.7
Installing the Beamsplitter
Note: Beamsplitter / Mirror removal and installation is not for the faint of heart. It requires great care
and confidence. Do not hurry this process!
Tools: Soft cotton disposable gloves, clean compressed air or photo grade canned air, sticky tape style
lint roller brush.
16
15
14
13
Figure 27.
Inner Details of the Mirrorbox
1. The lower mirror clamps (#14) and safety screws (#13) must be removed. (keep screws and
clamps safe and accessible)
2. Open the upper mechanical mirror clamp (#16) by releasing the red lever (#15).
3. Eliminate any lint and dust particles that have accumulated on the black velvet mirror box interior.
Use the compressed air and lint roller tools to accomplish this.
4. Clean the inside aka the anti-reflective side of the mirror. (See previous section about cleaning
the beamsplitter)
Tip: For determining the reflective side of the glass, use a non abrasive object (rubber eraser, cotton
gloved finger, etc.) and touch the surface of the mirror. If you can touch your own reflection, it is the
reflective side of the mirror. If there appears to be a gap between your object and the reflection, it is the
anti-reflective side of the mirror.
5. Using the soft cotton gloves, hold the mirror with 2 hands, reflective side up, from the bottom or
the edge of the mirror. The bottom edge is the widest edge of the trapezoid shape.
6. Carefully insert the glass into the mirror box and into the upper clamp (#16) of the mirror box
frame. Be careful to not scrape the rubber tip (#17) off the upper clamp. You can dislodge and
lose this piece if not careful.
7. Carefully keeping pressure against the top edge of the mirror in the top of the mirror box frame,
slowly lower the bottom edge of the mirror into the lower frame. Maneuver one finger from each
hand into the slots at the bottom edge of the mirror box frame so you can lower the mirror into
the frame without dropping it in.
8. Once the mirror is in place, replace the lower mirror clamps (#14) first. This is done best by
contacting the surface of the mirror with the rubber tip (#17) of the clamp and partially pushing
the clamp into place. Next place your first finger into the open section of mirror box support
structure behind the lower mirror clamp. Place your thumb on the front of the clamp and squeeze
the clamp on by pinching your thumb and finger together.
TS-2-Studio User Manual
V1.5.0 – September 14, 2011
29
17
Figure 28.
Beamsplitter Clamps with Rubber Tips
9. Repeat the previous step for the second lower mirror clamp (#14).
10. Close the upper mirror clamp (#16) with the red lever (#15).
11. Clean the front or reflective side of the mirror. (See previous section about cleaning the
beamsplitter)
30
TS-2-Studio User Manual
V1.5.0 – September 14, 2011
5 Specifications
5.1
Physical
Dimensions
(without
cameras and lenses)
Frame Width
Weight (without
cameras and lenses)
Operating Height
L = 680 mm or 26inches
W = 600 mm or 24 inches
H = 720 mm or 29 inches
400 mm or 16 inches
34 kg (75 lbs)
< 3000 m above sea level
Operating Conditions
Temperature 0 °C to 45 °C or 32 to 113°F
Rel. Humidity 20% … 80% (non condensing)
Storage Conditions
Temperature -10 °C to 55 °C or 15 to 131°F
Rel. Humidity 0% … 80% (non condensing)
Power-supply
12V DC • 2 x 6Amax
Used power-supplies must be compliant with the regulations in the countries
used and must be current-limited to 6Amax by means of fuses, circuit-breakers
or trip-switches!
Tolerance of
Power-Supply
Ingress protection
RoHS compliance
Interaxial Range
+25 %
−10 % (10.8 to 15V)
IP20. Designed for indoor usage only! If used outdoors, use appropriate
protection measures to prevent exposure of the device to moisture and rain!
YES
Right eye camera movement 0 to 150 mm or 6 inches
Convergence Range
Convergence each camera -1° to 3°
Currently supported
Camera Types
Sony HKC-T950, Sony HKC-T1500, Sony HKC-T1500-R
RED Epic, RED Scarlet, Wige CUNIMA, SI2K
Height of optical center
+ camera mount
Lens Type
96 mm
Max. Front Lens Diameter 114 mm
Focal Lengths
2/3” Imager 6.5 mm to + 125 mm
Super 35 Imager 18 mm to + 250 mm
Height / Pitch
Adjustment
Height Range ± 10.8 mm
Pitch Range ± 3.8°
Rotation
Beamsplitter
Dimensions
Plane Flatness
Positional Accuracy
Feeback Method
Drive Speed
Tripod Head Mount
TS-2-Studio User Manual
V1.5.0 – September 14, 2011
Camera roll axis (turn round centerline) ± 2°
Max. Diameter of raw glass 558 mm
Glass Thickness 6 to 6.5 mm
Mirror Box Width 600 mm or 24 inches
Absolute rail deviation end to end ± 0.05 mm
Drive Accuracy 3
m, Encoder Accuracy 1
m
Linear encoder, on fi nal stage (post gearing, etc.)
Interaxial 50 mm/s or 2 inch/s
Multiple UNC3/8-16 female threads
31
5.2
5.2.1
Connectors and Interfaces
Lens-Motors
Applicable for connectors X10,
Pin
Lemo 7pin
1
female receptacle
2
assignment
3
4
5
6
7
Connector on TS-2-s
ATTENTION:
5.2.2
X11, X12, X24, X25, X26
Function
Direction
Motor MOutput
Motor M+
Output
Encoder A
Input
+5VDC
Output
GND
Encoder B
Input
n.c.
-
Rear-view on TS-2-s: Female Lemo7 receptacle
LEMO 7pin, female receptacle, Size 1B
Use shielded cables only!
SPC/SIP I/O
Applicable for connectors X1, X22. X23
Lemo 10pin
female receptacle
assignment
Connector on TS-2-s
ATTENTION:
32
Pin
1
2
3
4
5
6
7
8
9
10
Function
+12VDC
GND
TA+
TBRA+
RBn.c.
n.c.
+12VDC
GND
Direction
Output
Output
Output
Input
Input
Output
-
Rear-view on TS-2-s: Female Lemo10 receptacle
LEMO 10pin, female receptacle, Size 1B
Use shielded cables only!
TS-2-Studio User Manual
V1.5.0 – September 14, 2011
5.2.3
Power Input
Applicable for connector X7
+25 %
Voltage
12VDC −10 % (10,8-15VDC)
XLR pin assignment 1. 0V / GND for electronics, internal
motors and power-output X6 at right
camera
2. 0V / GND for power-outputs X27 at
left camera
3
2
4
1
3. +12V for power-outputs X27 at left
camera
Rear view on TS-2-s:
4. +12V for electronics, internal motors
and power-output X6 at right camera
Current
Connector TS-2-s
ATTENTION:
2 x 6Amax, externally limited
NEUTRIK XLR 4pin, male
Use only power-supply or battery-pack, which is compliant with the regulations in
your country and make sure, that the current of your power-supply is internally
limited to 6Amax by means of fuses or circuit-breakers!
The usage of the following Y-cable is recommended:
GND :1
XLR 4pin male:
From Power-Supply
For Motors and Right Camera (X6) +12VDC :4
GND :1
XLR 4pin male:
From Power-Supply
For Left Camera (X27) +12VDC :4
Figure 29.
TS-2-Studio User Manual
V1.5.0 – September 14, 2011
1:
2:
3:
4:
GND
XLR 4pin female:
GND
To TS-2-Studio
+12VDC
+12VDC Stereo Camera Platform
Please use cable with at least 0,75mm² or AWG 18.
Please keep the cables as short as possible.
Do not exceed a length of 5 meters / 16 ft.
Recommended Y-Power Cable
33
5.2.4
Power Output Right Camera
Applicable for connector X6
Voltage
+25 %
12VDC −10 % (10,8-15VDC)
XLR pin assignment 1. 0V / GND
2. n.c.
2
3
1
3. n.c.
4
Rear view on TS-2-s:
4. +12V
Current
Connector TS-2-s
5.2.5
4Amax
NEUTRIK XLR 4pin, female
Power Outputs Left Camera
Applicable for connectors X27
Voltage
+25 %
12VDC −10 % (10,8-15VDC)
XLR pin assignment 1. 0V / GND
2. n.c.
3. n.c.
4. +12V
Current
Connector TS-2-s
34
2
1
3
4
View on TS-2-s:
Total current for all Power-outputs (OUT1, OUT2, OUT3) together: 6Amax
NEUTRIK XLR 4pin, female
TS-2-Studio User Manual
V1.5.0 – September 14, 2011
5.3
Mechanical
Attention:
•
All dimensions in mm
•
Dimensions are rounded
•
Not to Scale
•
TS-2-Studio Stereo Camera Platform is shown with an arbitrary camera and an arbitrary lens
•
Design details might change without prior notice
5.3.1
Front View
250
720
400
600
Figure 30.
TS-2-Studio User Manual
V1.5.0 – September 14, 2011
Front View
35
5.3.2
Rear View
Figure 31.
36
Rear View
TS-2-Studio User Manual
V1.5.0 – September 14, 2011
Left Side View
85
345
5.3.3
680
Figure 32.
TS-2-Studio User Manual
V1.5.0 – September 14, 2011
Left Side View
37
Right Side View
425
5.3.4
Figure 33.
38
Right Side View
TS-2-Studio User Manual
V1.5.0 – September 14, 2011
5.3.5
Top View
Figure 34.
TS-2-Studio User Manual
V1.5.0 – September 14, 2011
Top View
39
5.3.6
Bottom View
400
Mouting Threads: 3/8-16 UNC
Grid: 1“ – 25,4mm
680
370
195
600
Figure 35.
40
Bottom View
TS-2-Studio User Manual
V1.5.0 – September 14, 2011
6 Appendix
6.1
6.1.1
Declarations of Conformity
CE
Figure 36.
TS-2-Studio User Manual
V1.5.0 – September 14, 2011
CE Declaration of Conformity
41
6.2
Figure
Figure
Figure
Figure
Figure
Figure
Figure
Figure
Figure
Figure
Figure
Figure
Figure
Figure
Figure
Figure
Figure
Figure
Figure
Figure
Figure
Figure
Figure
Figure
Figure
Figure
Figure
Figure
Figure
Figure
Figure
Figure
Figure
Figure
Figure
Figure
42
Table of Figures
1.
2.
3.
4.
5.
6.
7.
8.
9.
10.
11.
12.
13.
14.
15.
16.
17.
18.
19.
20.
21.
22.
23.
24.
25.
26.
27.
28.
29.
30.
31.
32.
33.
34.
35.
36.
Typical In-System Configuration ..................................................................................... 8
Right-hand side view. No cameras and no lenses mounted. .............................................. 9
Rear view ................................................................................................................... 10
Height/Pitch unit ......................................................................................................... 11
Top unit connectors ..................................................................................................... 12
Internal Power Harness ............................................................................................... 13
Internal Video Harness ................................................................................................ 13
Internal Control Harness .............................................................................................. 13
Moving Parts (Parts of the frame removed in this picture) .............................................. 15
Safety Measures on Convergence Unit .......................................................................... 16
Safety Measures on Right-Eye Camera .......................................................................... 16
Camera on Camera adaptor mount with dove tail base ................................................... 18
Camera support with dove tail cut-out .......................................................................... 18
Lens support bracket with donut spacer ........................................................................ 19
Heden Lens Motors ...................................................................................................... 19
Lens support bracket screws ........................................................................................ 20
Mating gears ............................................................................................................... 20
Anti-Backlash Motor Bracket ......................................................................................... 21
Controls of the ABB ..................................................................................................... 21
ABB in Open Position ................................................................................................... 22
Engaging the motor with an ABB .................................................................................. 22
KIPP handle knobs ...................................................................................................... 24
Height/Pitch Unit dove tails .......................................................................................... 24
Manual motion of the H/P Unit ..................................................................................... 25
Details of Lens-Sled ..................................................................................................... 26
Outer Details of the Mirrorbox ...................................................................................... 27
Inner Details of the Mirrorbox ...................................................................................... 29
Beamsplitter Clamps with Rubber Tips .......................................................................... 30
Recommended Y-Power Cable ...................................................................................... 33
Front View .................................................................................................................. 35
Rear View ................................................................................................................... 36
Left Side View ............................................................................................................. 37
Right Side View ........................................................................................................... 38
Top View .................................................................................................................... 39
Bottom View ............................................................................................................... 40
CE Declaration of Conformity........................................................................................ 41
TS-2-Studio User Manual
V1.5.0 – September 14, 2011