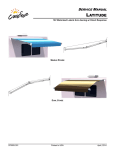
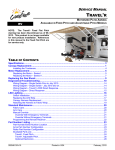
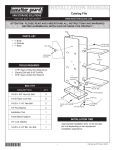
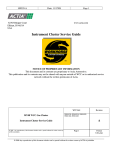
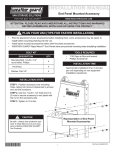
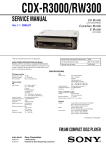
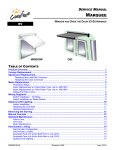
1
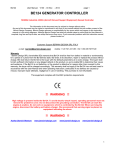
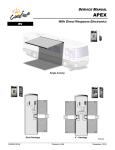
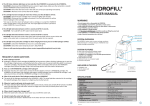
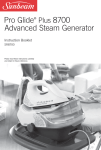
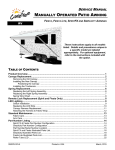
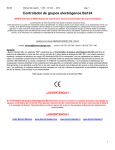
SERVICE MANUAL LED ROLLER LIGHTING RV SPECIFICATIONS MOUNTING: LENGTH: LED light strip is factory mounted in a specially designed roller tube. Wire is concealed in canopy hem. Available for awnings 10' – 21'* * Maximum LED strip length is 16' 5". For awnings greater than 18', strip is centered in the roller tube. POWER: CONTROLS: 1A, 12VDC Single pole, single throw switch (SR0101) Note: The Switch kit is ordered separately. Kit includes in-line fuse holder and 2A spade type fuse. For an installer furnished control switch, see notes in "Switch Installation". TABLE OF CONTENTS Switch Installation ......................................................................................................................... 1 Replacing the LED Strip – Springless Rollers ............................................................................ 2 Replacing the LED Strip –Rollers with Springs .......................................................................... 3 Canopy Wire Harness Replacement ............................................................................................ 4 Attaching the Harness to Fabric Wrap .................................................................................................... 5 LED Components .......................................................................................................................... 6 This manual covers basic LED lighting for factory mounted LED strips in the roller tube. For additional information please refer to the appropriate product service manual. 052584-301r4 Printed in USA April, 2015 PROPRIETARY STATEMENT The LED Roller Tube Lighting is a product of Carefree of Colorado, located in Broomfield, Colorado, USA. The information contained in or disclosed in this document is considered proprietary to Carefree of Colorado. Every effort has been made to ensure that the information presented in the document is accurate and complete. However, Carefree of Colorado assumes no liability for errors or for any damages that result from the use of this document. The information contained in this manual pertains to the current configuration of the models listed on the title page. Earlier model configurations may differ from the information given. Carefree of Colorado reserves the right to cancel, change, alter or add any parts and assemblies, described in this manual, without prior notice. Carefree of Colorado agrees to allow the reproduction of this document for use with Carefree of Colorado products only. Any other reproduction or translation of this document in whole or part is strictly prohibited without prior written approval from Carefree of Colorado. SAFETY INFORMATION WARNING A WARNING INDICATES A POTENTIALLY HAZARDOUS SITUATION THAT, IF NOT AVOIDED, COULD RESULT IN DEATH OR SERIOUS INJURY AND/OR MAJOR PROPERTY DAMAGE. CAUTION A caution indicates a potentially hazardous situation that may cause minor to moderate personal injury and/or property damage. It may also be used to alert against unsafe practices. NOTE: A note indicates further information about a product, part, or step. Tip: A tip provides helpful suggestions. Safety Notes: Always disconnect battery or power source before working on or around the electrical system. Always wear appropriate safety equipment (i.e. goggles). Always use appropriate lifting devices and/or helpers when lifting or holding heavy objects. When using fasteners, use care not to over tighten. Soft materials such as fiberglass and aluminum can be "stripped out" and lose the ability to grip and hold. Carefree of Colorado 2145 W. 6th Avenue Broomfield, CO 80020 a Scott Fetzer company Carefree of Colorado Service Manual LED ROLLER TUBE LIGHTING SWITCH INSTALLATION NOTE: Installers may choose to furnish the control switch. The installation requires that the power line (+12VDC) be attached to a dedicated 2A circuit breaker or a 2A in-line fuse must be installed between the switch and power source. For easy access, locate the fuse close to the switch. 1. Determine the location of the switch. 2. At the switch location, cut a 1 1/8" x 1 1/2" hole. 5. Press the in-line fuse, wires and switch into the mounting hole. Secure the switch using two (2) #6 x 1/2" screws. 6. Snap the switch bezel over the switch frame. 052584-301r4 1.13" 2A In-line Fuse (+12VDC Line) #6 x 1/2” Screw (x2) ON 1.5" 2.9" OFF 1.88" +12VDC 2A In-line Fuse 18-24awg Female Disconnect (x2) Red 18awg Wire (minimum) Single Pole Single Throw Switch GND Vehicle Wall Red Black 3. Wire the switch as shown below. Wire terminals at the switch are .187, 18-24 awg female disconnects. NOTE: Allow adequate slack in the 12VDC power line so that the in-line fuse (installed in step 4) can be accessed from behind the switch. 4. Install the in-line fuse: 4.1. Near the switch, cut the red 12VDC power line to the switch. Do not strip the insulation. 4.2. Insert a wire end into one of the wire channels until it butts up against the stop. 4.3. Fold that half of the connector body over until the element contacts the wire. Use pliers to crimp the connector closed. 4.4. Repeat for the second wire end. 4.5. Slide the fuse into the fuse port. Ensure that is firmly seated. LED Strip in Roller Tube Connector in Roller Tube Wire Sewn in Canopy Hem LED002b 1 LED ROLLER TUBE LIGHTING Service Manual Carefree of Colorado REPLACING THE LED STRIP – SPRINGLESS ROLLERS These instructions apply to Travel'r, Eclipse, Pioneer and Pioneer Lite installations with LED's in the roller tube. 1. Extend the awning out completely. 2. Disconnect power. Clamp the Canopy Harness in this locaion 3. Use a non-permanent marker to mark the location of the ends of the LED strip. LED Slot 4. Clamp the canopy harness in the canopy to prevent the wire from pulling up into the seam of the canopy. This can be done with a paper clip or similar device that will not damage the wires or canopy. 5. Remove the slot covers from the ends of the LED strip and set aside. LED Strip Canopy Harness 6. Carefully pull the wires and connectors out of the roller tube through the hole that is located behind the slot cover location. Disconnect the connectors. 7. Remove the existing LED strip. Slot Cover Cut Between Pads to Adjust Length LED005a 8. Clean the slot to remove any dirt and tape residue. 9. Starting at the reference mark made previously, remove the release paper from the back of the new strip and press the strip into the LED slot. 10. At the end of the roller tube, cut the LED strip to match the mark made previously. To trim the LED strip, always cut between the 4-pad cluster as shown. 11. Connect the canopy harness connector and LED connector. Then carefully push the connectors into the roller tube. 12. Press the slot covers into the LED slot. 13. Restore power and test. 2 052584-301r4 Carefree of Colorado Service Manual LED ROLLER TUBE LIGHTING REPLACING THE LED STRIP –ROLLERS WITH SPRINGS These instructions apply to Fiesta and Fiesta Lite installations with LED's in the roller tube. 14. Extend the awning out completely. 15. Disconnect power. 16. Use a non-permanent marker to mark the location of the ends of the LED strip. 17. Clamp the canopy harness in the canopy to prevent Clamp the Canopy the wire from pulling up into the seam of the canopy. Harness in this locaion This can be done with a paper clip or similar device that will not damage the wires or canopy. LED Slot 18. Remove the slot covers from the ends of the LED strip and set aside. Old LED Strip 19. Remove the existing LED strip from the LED slot. 20. Cut the old LED wires close to the LED strip. Tape or secure the wires on the outside of the roller tube. Cut LED Wires Close to LED Strip Slot Cover 21. Clean the slot to remove any dirt and tape residue. Canopy Harness 22. Starting with the wire leads at the reference mark made previously, remove the release paper from the back of the new strip and press the strip into the LED slot. 23. At the end of the roller tube, cut the LED strip to match the mark made previously. To trim the LED strip, always cut between the 4-pad cluster as shown. Split Grommet Old LED Wires New LED Wires Tape Wires Together 24. Tape the old LED wires to the new LED wires and connector. 25. Locate and remove the split grommet from the roller tube. 26. Carefully pull the wires and connectors out of the roller tube. Disconnect the connectors. Cut Between Pads to Adjust Length LED005b 27. Carefully feed the new LED connector through the hole in the slot 28. Use the old LED wire to pull the new connector out of the grommet hole. Remove the tape and old wire and discard. 29. Connect the canopy harness connector and new LED connector. Then carefully push the connectors back into the roller tube. 30. Place the split grommet around the canopy harness and press the grommet into the hole of the roller tube. 31. Press the slot covers into the LED slot. 32. Restore power and test. 052584-301r4 3 LED ROLLER TUBE LIGHTING Service Manual Carefree of Colorado CANOPY WIRE HARNESS REPLACEMENT NOTE: Acrylic canopies uses a soft rivet in the hem next to the metal wrap to hold the harness in place. Dual tapered canopies do not use the rivet. If replacing a harness in a tapered canopy, skip steps 6 and 11.1. Split Grommet LED Wires Seal Harness Seal Harness Route Wire With 3" Loop Attach Ring Terminal with Soft Rivet Canopy Harness Vinyl Canopy (shown with Weatherguard) Route Wire With 3" Loop Acrylic Canopy (shown with Alumaguard) LED007 1. Extend the awning out completely. 2. Locate and remove the split grommet from the roller tube. 3. Carefully pull the wires and connectors out of the roller tube. Disconnect the connectors. 4. Clamp the LED harness connector outside the roller tube to prevent it from falling back into the roller tube. This can be done with a paper clip or similar device that will not damage the wires. 5. At the awning rail, clip the harness close to the canopy. Clamp the harness going into the vehicle to prevent it from falling in the vehicle wall. 6. For acrylic canopies only: Remove the rivet from the canopy. This is a soft rivet and can be cut off with side cutters. 7. At the roller tube, cutoff the connector from the old canopy harness. 8. Securely tape the new harness to the old harness. 9. Carefully use the old harness to pull the new harness through the hem of the canopy. 10. After the new harness has been routed in the canopy hem: 10.1. Connect the canopy harness connector and LED connector. Then carefully push the connectors into the roller tube. 10.2. Place the split grommet over the canopy harness and press the grommet into the hole of the roller tube. 11. At the vehicle wall: 11.1. For acrylic canopies only: Attach the new harness terminal ring to the canopy using a new rivet. 11.2. If the canopy has a metal wrap, attach the wire to the inside of the wrap (see page 5) then proceed with the next step. 11.3. At the vehicle wall, route the new canopy harness through the wall to the switch. Tip: Tie the new harness to the old harness that was cut previously. Use the old harness to pull the new harness through the wall to the desired location. 11.4. At the vehicle wall, provide a 3" loop of harness between the canopy and wall. Seal the wall entrance hole and harness with a quality silicone sealant. 11.5. Connect the new harness to the switch. Two (2) .187, 18-24 awg female disconnects are provided if connecting to a switch. 11.6. Alternate method: At the wall, splice the new harness to the existing harness using 24 awg butt connectors. Push the connectors into the vehicle wall. Seal the wall entrance hole and wires with a quality silicone sealant. NOTE: Be sure to allow enough harness from the canopy to provide a 3" loop of harness and adequate length for the connectors to be pushed inside the wall before sealing the hole and harness with a quality silicone sealant. 4 052584-301r4 Carefree of Colorado Service Manual LED ROLLER TUBE LIGHTING ATTACHING THE HARNESS TO FABRIC WRAP When replacing the canopy only or replacing the canopy harness, it is necessary to attach the cable to the inside of the wrap. For vinyl canopies with Weatherguard, the harness is routed in the seam of the Weatherguard, no additional attachment is necessary. For other wraps follow the directions below: 1. Open the awning to access the inside surface of the wrap. 2. Clean the inside surface of the wrap. 1" x 2" Velcro "Loop" ALUMAGUARD 2" x 8" Velcro "Loop" UNIGUARD 1" x 6" Clear Tape Position Wire 3/8" From Edge FLXguard LED008 3. Attach the harness to the inside surface. 3.1. For Alumaguard: Use 1" by 2" pieces of Velcro (loop) taping the harness on each slat between the joints. 3.2. For Uniguard: Tape the harness to the inside surface using a 2" x 8" piece of Velcro (loop). 3.3. For FLXguard: Position the harness approximately 3/8" from the edge of the material. Attach using a 1" x 6" piece of clear tape (the tape is a special bond tape available from Carefree). 052584-301r4 5 LED ROLLER TUBE LIGHTING Service Manual Carefree of Colorado LED COMPONENTS WHITE LED Factory Installed Power Harness 3 ON 7 OFF 1 2 LED Single Color Dimmer (RED) (BLACK) (BLACK) 8A 9 8 (RED) INPUT:DC12-24V OUTPUT 4 COLOR (RGB) LED External Power Harnesses (used with SR0106 & SR0107) 11 10 5 OFF R G B ON W FLASH STROBE FADE SMOOTH 6 12 LED504 Item Part Number Description Notes White LED R001714 LED Strip, White, 16' Length, 8" Lead For awnings 18' or less 1 1a R001715 LED Strip, White, 16' Length, 26" Lead For awnings 19' or longer 1 1b R001736 LED Strip, White, 49" Length. 8" Lead Used w/ Marquee 66" or less 1 1c SR0101 Switch and Fuse Kit (includes item 3) used with White LED 2 R019493-001 Fuse Kit (includes fuse holder and 2A fuse) 3 SR0100 Remote and Controller Kit use with White LED 3 4 RGB (Color) LED R060733-001 LED Strip, RGB, 16' Length, 8" Lead For awnings 18' or less 1 5a R060733-002 LED Strip, RGB, 16' Length, 26" Lead For awnings 19' or longer 1 5b R001763 Remote and Controller Kit, RGB 3 6 R060740-001 Harness, Factory Installed LED Roller Assy, 16' Length vinyl canopy 7a R060718-001 Harness, Factory Installed LED Box Awning,22' Length 7b R001718 Harness, Factory Installed LED Roller Assy single flare (acrylic) canopy 7c R060715-001 Harness, Factory Installed LED Roller Assy used on Latitude, Longitude 7d R040616-206 Wire Channel 43" Length 8 R001716 Slot Cover 24" Length 9 R060275 Power Socket, 12V External Power Supply 10 R060724-001 Power Cord, 12V External Power Supply 11 R060725-001 AC/DC Power Supply 110AC to 12Vdc External Power Supply 12 SR0107 White LED Upgrade Kit Not Shown 4 13 SR0106 RGB LED Upgrade Kit Not Shown 5 14 Notes: 1. LED Strips (items 1 & 5) are sent on rolls and cut to length during installation. 2. White and RGB strips and components are NOT interchangeable. 3. Remotes are not available separately. It is necessary to replace the remote and controller. 4. White LED upgrade kit (SR0107) contains items 1a, 3, 4, 10, 11 & 12. 5. RGB LED upgrade kit (SR0106) contains items 5a, 3, 6, 10, 11 & 12. 6 052584-301r4