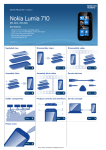
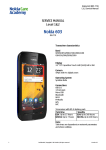
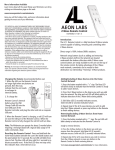
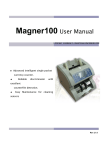
1
Nokia X7-00 / X7-00.1
RM-707 / RM-659
Service Manual Level 1&2
9. DISASSEMBLY INSTRUCTIONS
1) Nokia X7-00 disassembly.
2) You must use the Nokia Standard Toolkit version
2.
3) Protect the A-COVER TOUCH ASSEMBLY with
protective film.
4) Push from the shown place to open the MICRO SD
TRAY.
5) Pull out and remove the MICRO SD TRAY.
6) Push from the shown place to open the SIM TRAY.
Pull out and remove the SIM TRAY.
12
Confidential | Copyright © 2011 Nokia | All rights reserved
Version 1.0
Nokia X7-00 / X7-00.1
RM-707 / RM-659
Service Manual Level 1&2
7) Slide the SRT-6 to directions shown to release the
BOTTOM END FACE PLATE. Do not use it again. Discard
it.
8) Note that this step is for Level 3 only! In case the
BOTTOM END CAP or the ENGINE BOARD is to be
replaced, use the dental tool to release the second
TYPE LABEL. Remove it with tweezers. Discard it. Be
careful not to injure yourself with the sharp end of
the dental tool.
9) Release the AV FACE PLATE with the SRT-6. Be
careful not to damage the MICRO USB connector. Do
not use the AV FACE PLATE again. Discard it.
10) Release the LOCK KEY FACE PLATE with the SRT-6.
Do not use it again. Discard it.
Unscrew the two Torx+ size 4 screws in the order
shown. Do not use them again. Discard them.
11) Unscrew the two Torx+ size 4 screws in the order
shown. Do not use them again. Discard them.
13
Confidential | Copyright © 2011 Nokia | All rights reserved
Version 1.0
Nokia X7-00 / X7-00.1
RM-707 / RM-659
Service Manual Level 1&2
12) Pull the TOP END CAP to the direction shown and
remove it.
13) Unscrew the two Torx+ size 4 screws in the order
shown. Do not use them again. Discard them.
14) Remove the SIDE LOCKING PIN on the left side
with the serrated nose tweezers. Be careful not to
damage the A-COVER TOUCH ASSEMBLY while
removing the SIDE LOCKING PIN.
15) Remove the SIDE LOCKING PIN on the right side
with the serrated nose tweezers. Be careful not to
damage the A-COVER TOUCH ASSEMBLY while
removing the SIDE LOCKING PIN.
16) Open and turn aside the TOUCH FLEX connector
with the SRT-6. Be careful not to damage the
connector.
17) Lift slightly up the top end of the A-COVER TOUCH
ASSEMBLY. Be careful not to damage the TOUCH FLEX
connector.
14
Confidential | Copyright © 2011 Nokia | All rights reserved
Version 1.0
Nokia X7-00 / X7-00.1
RM-707 / RM-659
Service Manual Level 1&2
18) Lift up the sides and the bottom end of the ACOVER TOUCH ASSEMBLY. Push the A-COVER TOUCH
ASSEMBLY to direction shown to safely remove the
TOUCH FLEX connector from its place.
19) Separate the A-COVER TOUCH ASSEMBLY.
20) Remove the MENU / HOME KEY with the tweezers.
Do not use it again. Discard it.
21) Protect the inner side of the A-COVER TOUCH
ASSEMBLY with the protective film.
22) Protect the DIPRO LED with the protective film to
avoid short circuit.
23) Protect the DISPLAY with the protective film.
15
Confidential | Copyright © 2011 Nokia | All rights reserved
Version 1.0
Nokia X7-00 / X7-00.1
RM-707 / RM-659
Service Manual Level 1&2
24) Lift up the DISPLAY with the SRT-6 tool carefully
from the shown place. Be careful not to bend the
DISPLAY.
25) Push the SS-93 carefully under the DISPLAY to
loosen the DISPLAY CONDUCTIVE ADHESIVE. Be careful
not to bend the DISPLAY.
26) Turn the DISPLAY over. Be careful not to damage
the DISPLAY connector.
27) Remove the DISPLAY CONDUCTIVE ADHESIVE with
the tweezers. Do not use it again. Discard it.
28) Release the DISPLAY CONNECTOR RETENTION CLIP
with the dental tool from the shown place.
29) Remove the DISPLAY CONNECTOR RETENTION CLIP
with the tweezers. Do not use it again. Discard it.
16
Confidential | Copyright © 2011 Nokia | All rights reserved
Version 1.0
Nokia X7-00 / X7-00.1
RM-707 / RM-659
Service Manual Level 1&2
30) Open the DISPLAY connector with the SRT-6 as
shown. Be careful not to damage the DISPLAY
connector.
31) Remove the DISPLAY.
32) Unscrew the three Torx+ size 4 screws in the
order shown. Do not use them again. Discard them.
33)Unscrew the three camera cross screws in the
order shown. Do not use them again. Discard them.
34) Protect the VOLUME KEY with the protective film.
35) Protect the CAMERA KEY with the protective film.
17
Confidential | Copyright © 2011 Nokia | All rights reserved
Version 1.0