Transcript
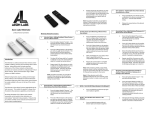
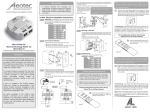
slow to fast. The blue LED will stay solid for 2 seconds to in-
Warning: Do not dispose of electrical appliances as unsorted municipal
dicate successful reset. If the blue LED does not stay solid,
waste; use separate collection facilities. Contact your local government for
this indicates
thatthea collection
reset did
not occur.
information
regarding
systems
available.
Charging
the Remote
(recommended before use)
More
Information
Available
1.
When
the
LEDs
on
the
Remote
Control
Learn more about all the great
things
your Minimote can do by
no
longer
light
when
any
buttons
visiting our information page on the are
web:
pressed, then this may
indicate that the unit needs
www.zwaveproducts.com/minimote
to recharge its
Here
you battery.
will find videos, links, and more information about
internal
getting the most out of your Minimote.
2. To charge the
Remote
internal
FCC
NOTICEControl’s
(For USA): THE
MANUFACTURER IS NOT RESPONSIBLE FOR ANY
RADIO
OR
TV
INTERFERENCE
battery, plug the USB CAUSED BY UNAUTHORIZED MODIFICATIONS TO
THIS EQUIPMENT. SUCH MODIFICATIONS COULD VOID THE USER’S AUTHORITY
Charge Cable (B) into the
TO OPERATE THE EQUIPMENT. This device complies with Part 15 of the FCC
mini-USB
port
of theto the following two conditions:
Rules.
Operation
is subject
may not cause
harmful
1.
This device
Remote
Controller,
and
pluginterference,
the otherand
end into a computer
2. This device must accept any interference received, including interference that
USB
port.
may cause undesired operation. This equipment has been tested and found to
comply with the limits for a Class B digital device, pursuant to part 15 of the FCC
3. When
Control
is charging,
a red LED
willharmturn
Rules.
Thesethe
limitsRemote
are designed
to provide
reasonable protection
against
This equipment
uses and
ful
a residential
oninterference
near the inUSB
port ofinstallation.
the Remote
Control.generates,
When the
can radiate radio frequency energy and, if not installed and used in accordance
Remote
Control may
is fully
the red toLED
will
turn blue.
with
the instructions,
causecharged,
harmful interference
radio
communications.
However, there is no guarantee that interference will not occur in a particular
installation.
equipmentcan
doesoperate
cause harmful
interference
to radio orbefore
Note: TheIf this
Minimote
for about
5 months
television reception, which can be determined by turning the equipment off and
requiring
a
recharge
(based
off
a
typical
daily
usage
of 10
on, the user is encouraged to try to correct the interference by one or more of
radio
commands
the
following
measures:a day).
• Reorient or relocate the receiving antenna.
the Remote
Press
hold both the
•Resetting
Increase the separation
betweenControl
the equipment
andand
receiver.
•lower-most
Connect the equipment
an outletthe
on acover
circuit different
from button
that to and
buttonsinto
beneath
(the blank
which the receiver is connected.
The red
LED will
blink from
jointhe
button)
seconds.
technician
for help.
•the
Consult
dealer orfor
an 10
experienced
radio/TV
slow to fast. The blue LED will stay solid for 2 seconds to in-
Warning: Do not dispose of electrical appliances as unsorted municipal
dicate successful reset. If the blue LED does not stay solid,
waste; use separate collection facilities. Contact your local government for
this indicates
thattheacollection
reset did
not occur.
information
regarding
systems
available.
1. Press the button marked with a “+” sign. The blue LED
will blink slowly to indicate that the Remote Control is ready
to add Z-wave devices.
2. Press the Z-Wave button on the device you wish you add
into the network. The blue and red LED will blink quickly to
indicate detection of the Z-Wave device being added.
3. Solid blue LED (2 seconds) indicates success.
Solid red LED (2 seconds) indicates failure.
AEON LABS
4.Z-Wave
Repeat step
#2 for allControl
Z-wave devices you wish to add
Remote
into theDSA03202
Z-Wave network
or press any button on the Remote
v1 (G1.1)
to finish adding devices.
Removing/Excluding Z-Wave Devices from Home
Introduction:
Control Network
The G1.1 Remote Control is a fully functional Z-Wave remote
1. Presscapable
the button
markedremoving
with a “-”and
sign.
The red LED
will
control
of adding,
controlling
other
blink
slowly
to
indicate
that
the
Remote
Control
is
Z-Wave devices.
This part cuts off - finished size 5.5 x 8.25
Remote
internal
FCC
NOTICEControl’s
(For USA): THE
MANUFACTURER IS NOT RESPONSIBLE FOR ANY
RADIO
OR
TV
INTERFERENCE
battery, plug the USB CAUSED BY UNAUTHORIZED MODIFICATIONS TO
THIS EQUIPMENT. SUCH MODIFICATIONS COULD VOID THE USER’S AUTHORITY
Charge Cable (B) into the
TO OPERATE THE EQUIPMENT. This device complies with Part 15 of the FCC
mini-USB
portis subject
of theto the following two conditions:
Rules.
Operation
1.
This device
may not cause
Remote
Controller,
andharmful
pluginterference,
the otherand
end into a computer
2. This device must accept any interference received, including interference that
USB
port.
may cause undesired operation. This equipment has been tested and found to
comply with the limits for a Class B digital device, pursuant to part 15 of the FCC
3. When
Control
is charging,
a red LED
will harmturn
Rules.
Thesethe
limitsRemote
are designed
to provide
reasonable protection
against
ful
a residential
This equipment
uses and
oninterference
near the inUSB
port ofinstallation.
the Remote
Control.generates,
When the
can radiate radio frequency energy and, if not installed and used in accordance
Remote
Control may
is fully
the red to
LED
will
turn blue.
with
the instructions,
causecharged,
harmful interference
radio
communications.
However, there is no guarantee that interference will not occur in a particular
installation.
this equipmentcan
doesoperate
cause harmful
interference
to radio or
Note: TheIf Minimote
for about
5 months
before
television reception, which can be determined by turning the equipment off and
requiring
a
recharge
(based
off
a
typical
daily
usage
of
10
on, the user is encouraged to try to correct the interference by one or more of
radio
commands
the
following
measures:a day).
• Reorient or relocate the receiving antenna.
the Remote
Control
Press
hold both the
•Resetting
Increase the separation
between
the equipment
andand
receiver.
•lower-most
Connect the equipment
an outletthe
on acover
circuit (the
different
from button
that to and
buttonsinto
beneath
blank
which the receiver is connected.
jointhe
button)
seconds.
The red
LED will
blink from
•the
Consult
dealer orfor
an 10
experienced
radio/TV
technician
for help.
Adding/Including Z-Wave Devices into the Home
Control Network
ready to
remove
devices.
Direct
range
is 100ft.
indoors/300ft. outdoors.
2. Press the Z-Wave button on the device you wish you
Network
setup
(such
adding
removing
remove from
thebuttons
network.
Solidasblue
LED and
(2 seconds)
Z-Wave
products
to/from
the
network)
are
located
indicates success. Solid red LED (2 seconds) indicates failure.
underneath the bottom-slide door while Z-Wave scene
3. Repeat
step #2are
foreasily
all Z-wave
devices
youuser
wishon
to the
remove
control
buttons
available
to the
top of
from
the
Z-Wave
network
or
press
any
button
on
the
the remote control. By taking advantage of the Z-Wave
Remote Control to finish removing devices.
mesh network, commands can be routed to their
destination
via intermediary “listening” Z-Wave
Visit www.zwaveproducts.com/minimote
for moreproducts.
information.
Adding/Including Z-Wave Devices into the Home
Control Network
1. Press the button marked with a “+” sign. The blue LED
will blink slowly to indicate that the Remote Control is ready
to add Z-wave devices.
2. Press the Z-Wave button on the device you wish you add
into the network. The blue and red LED will blink quickly to
indicate detection of the Z-Wave device being added.
3. Solid blue LED (2 seconds) indicates success.
Solid red LED (2 seconds) indicates failure.
AEON LABS
4.Z-Wave
Repeat step
#2 for allControl
Z-wave devices you wish to add
Remote
into theDSA03202
Z-Wave network
or press any button on the Remote
v1 (G1.1)
to finish adding devices.
Removing/Excluding Z-Wave Devices from Home
Introduction:
Control Network
The G1.1 Remote Control is a fully functional Z-Wave remote
1. Presscapable
the button
markedremoving
with a “-”
sign.
The red LED
will
control
of adding,
and
controlling
other
blink
slowly
to
indicate
that
the
Remote
Control
is
Z-Wave devices.
ready range
to remove
devices.
Direct
is 100ft.
indoors/300ft. outdoors.
2. Press the Z-Wave button on the device you wish you
Network
setup
(such
adding
removing
remove from
thebuttons
network.
Solidasblue
LED and
(2 seconds)
Z-Wave
products
to/from
the
network)
are
located
indicates success. Solid red LED (2 seconds) indicates failure.
underneath the bottom-slide door while Z-Wave scene
3. Repeat
step #2
all Z-wave
devices
youuser
wishontothe
remove
control
buttons
areforeasily
available
to the
top of
from
the
Z-Wave
network
or
press
any
button
on
the
the remote control. By taking advantage of the Z-Wave
Remote Control to finish removing devices.
mesh network, commands can be routed to their
destination
via intermediary “listening” Z-Wave
Visit www.zwaveproducts.com/minimote
for moreproducts.
information.
This part cuts off - finished size 5.5 x 8.25
Charging
the Remote
(recommended before use)
More
Information
Available
1.
When
the
LEDs
on
the
Remote
Control
Learn more about all the great
things
your Minimote can do by
no
longer
light
when
any
buttons
visiting our information page on theare
web:
pressed, then this may
indicate that the unit needs
www.zwaveproducts.com/minimote
to recharge its
Here
you battery.
will find videos, links, and more information about
internal
getting the most out of your Minimote.
2. To charge the