1
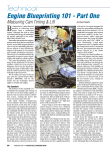
Technical
Servicing
Suspension
Linkages
How To Maintain
These Important
But Hidden Bearings
by Mark Barnes
T
Shock linkages usually live in crowded, nasty places. They don’t present the most inviting DIY prospects, but they’re essential to good rear suspension performance, and their
actual maintenance needs are fairly simple. Most of the work is just getting to them.
on most modern motorcycles
employ a linkage to make shock movement progressive.
In other words, as the swingarm moves through its arc,
leverage afforded by the linkage transfers that movement at an
accelerating rate to the shock. The goal is to provide relatively
light and supple damping at the beginning of suspension travel
and firmer resistance to bottoming at the deepest extreme. This is
the best of both worlds. The rear wheel is allowed to rise easily
to hug the contours of small surface irregularities, maximizing
traction and ride plushness. But it can’t just blow through the
shock’s full stroke in response to larger impacts, such as squareedged bumps or potholes on the road, or landings off big jumps
on a supercross track.
A quick reminder about fluid dynamics: Liquids are non-compressible. Think of a shock as two chambers connected by a set
of orifices. During compression, oil is forced from one chamber
to another, with the orifices limiting the speed of this transition. The faster the shock is compressed, the harder it is for the
oil molecules to crowd through those orifices—picture Black
Friday shoppers struggling to squeeze through a store entrance
that would normally present little resistance to lighter traffic. A
linkage produces this same effect as the shock approaches its bottoming point. It rushes and “crowds” the oil at an increasing rate
as travel is used up, thereby maintaining an ever-firmer cushion
to slow down suspension movement, rather than transmitting a
sudden jolt at travel’s end. Linkages can be designed to deliver a
steeper or shallower progression rate to suite their intended use.
Some rear suspensions try to address the need for progressive
damping by other means. Instead of a linkage, they utilize valving
in the shock that allows oil to flow more freely at full extension,
and less freely at full compression. You’ll probably never read
an article that says this solution is equivalent to a linkage setup;
at best, they perform well “for a non-linkage system.” One such
example is KTM’s enduro lineup. Fans of these bikes value the
ease of shock R&R (literally a two-bolt, three-minute affair), the
lack of linkage maintenance, the reduced vulnerability to damage,
and the lower equipment cost. Also, unlike motocrossers, these
riders don’t need their suspensions to cope with hard landings
from high-altitude; the limitations of progressive damping shocks
are less problematic without the demands of aerial acrobatics.
Linkages contain bushings and bearings to manage friction
at their joints. Because they’re almost always located near the
shock’s lower end, usually hanging down below the swingarm,
they’re regularly exposed to lots of abuse. Off-road bikes often
subject their undersides to impact, and all motorcycles pelt this
36
he rear suspensions
OCTOBER 2013 // MOTORCYCLE CONSUMER NEWS
area with dust, water and gritty crud. Of course, even if they
were completely shielded from such threats, the friction-bearing
surfaces would wear from use alone.
Linkages Need Love, Too!
Unfortunately, linkages are often neglected, even by otherwise
conscientious owners. They’re not highly visible, wear and tear
is totally invisible, and they can be awkward to access. Special
tools are listed in shop manuals for bearing removal and installation, and these are invariably quite expensive (keep reading for
a super-cheap alternative). Also, the bike must be supported in
such a way that the rear is completely unweighted, which can
be a challenge on some street bikes.
Still, none of these factors make linkages any less needy or
worthy of attention. To check the condition of yours, first suspend
the swingarm and rear wheel. If you have a centerstand that naturally lifts the rear wheel off the ground, this part is a cinch. If your
centerstand tends to lift the front, you can have an assistant push
down on the bars for this part to get the rear end up. Barring either
of those possibilities, you’ll have to lift the bike by its frame. This
is accomplished easily for off-road machines by hoisting them onto
a stand that supports them from underneath their motors, with their
frame rails bearing the weight. Some street bikes can be raised
off the ground in this same way. When this isn’t possible, there’s
another method available to the home mechanic without a hoist.
Use a workstand to lift the rear of the motorcycle off the
ground. This is only a means to an end; it won’t work for rear
suspension maintenance because it doesn’t remove any load from
the swingarm. Now, get two tall jackstands ready near a sturdy
place in the frame where you can slide a stout pipe through. The
idea is to have the bike’s weight supported by this pipe on the
jackstands, once the workstand is removed. Of course, the area of
the frame used must be strong enough to bear the bike’s weight,
and should be free of finished surfaces that could get scuffed
(place towels between the pipe and the frame in any event). This
sounds more challenging than it really is on many bikes, though
some will be tricky. Consider the juncture of the rear sub-frame
and the passenger peg supports. Although it might require the
removal of some plastic, you can probably slip the pipe straight
through above the wheel here, and the bike will rest securely on
it with little risk of tipping or front-to-back movement.
With the rear suspension unloaded, grasp the ends of the
swingarm and try to wiggle them. Check for side-to-side movement, which likely indicates worn swingarm bearings/bushings.
Then check for vertical free-play—between where the swing-
arm comes to rest and where the suspension’s resistance is first
encountered. While this can also result from swingarm component wear, it’s most likely the result of worn linkage parts
(especially in the absence of lateral movement). Don’t make this
assessment by tugging at the wheel; slop detected there could
be a wheel bearing issue. Still, while it’s convenient, check your
wheel bearings, too.
Note: If you do detect problems with the wheel bearings or
swingarm pivots, these warrant your immediate attention. Both
will detract from suspension performance, and a full-blown failure of either could result in loss of control while riding. On many
bikes, lubricating or replacing swingarm bearings is the same
in principle as those operations on linkage bearings, although
disassembly is obviously more involved. We won’t cover it here,
though, because swingarm removal can be so different on different motorcycles. Review the procedure in your service manual,
and see if you’re up to it. Wheel bearing replacement involves
different procedures and tools; see them in our April, 2006 issue.
Even if you detect no slack in the system, linkage bearings
still require regular cleaning and lubrication. A few models come
with fittings to allow the use of a grease gun without disassembly;
unfortunately, the vast majority do not. Consult your owner’s
manual for a schedule of chassis lubrication, but keep in mind
that riding in wet/dusty/harsh conditions is apt to shorten the
service life of bearing lubricants—and subsequently, the bearings
themselves. Also, it’s not uncommon to find that a brand-new
motorcycle may have been assembled with precious little grease
in these (and other) load-bearing components. The good news
is that getting your bike’s rear end off the ground may be the
hardest part of this process, depending on your linkage’s design.
Our example bike actually had only a small amount of tell-tale
swingarm free play. However, its linkage bearings were in much
worse condition than that assessment suggested. All had a gritty,
notchy feel when turned by hand, and two were very hard to turn at
all. They were packed with dense sludge, as though mud had been
substituted for grease. It was a wonder the rear suspension moved
at all! But so much weight and leverage are involved, and so little
rotation is actually required at each individual pivot, that movement was preserved—just not smooth, supple movement. Action
out back was much improved with new, well-lubricated bearings.
To do any actual service, you’ll need to not only support the
bike’s frame, but also the rear wheel/swingarm. Off the ground,
those parts weigh on the linkage and try to extend the shock, making bolt extraction difficult and even more awkward than it already
is due to location. The rear end will also fall to the ground when
you remove something. So, prop up the rear wheel slightly to
neutralize this reverse tension before beginning any disassembly.
Doing the Deed
First of all, get the necessary supplies ready before you begin,
as your bike will be disabled for the duration of this project. A
shop manual, torque wrench, chassis grease, all the appropriate
socket and wrench sizes, and new parts (if indicated by rear end
wiggle room) should be handy—along with a bearing removal/
installation tool if you’re going to replace worn components.
Such tools can cost hundreds of dollars, which may be worthwhile if you’re a tool connoisseur with some money to burn;
no doubt they’re more elegant and probably a tad easier to use
than what we’re about to offer as a low-cost alternative. But, if
you’d prefer to spend less than ten bucks on something you’ll
rarely use, all it takes is a quick trip to your local hardware store.
Special bearing tools use the mechanic leverage of a screw
to apply concentrated force against press-fit parts. Said leverage
can be obtained with a simple piece of all-thread and a few nuts
and washers, along with some sockets borrowed from your tool
Ironically, All-Balls makes needle bearings, too. This kit includes all
the bushings, seals and bearings shown here for our example bike,
along with the lower shock joint and its seals (not shown), which
we deemed unnecessary at this point and saved for the future.
For rear suspension service, the bike must be supported from under
the engine, frame or sub-frame; the swingarm cannot bear weight. It
will, however, need to be supported to relieve extension pressure on
the shock and linkage, thereby allowing their removal. Ugly old rugs
come in handy when playing mechanic in the kitchen.
This linkage is extremely compact to save weight and stay tucked out
of harm’s way—relatively speaking. It has actually taken quite a bit of
abuse on this trials bike. Linkage systems can include more segments,
but the principles involved remain the same.
WWW.MCNEWS.COM // OCTOBER 2013
37
Technical
The mounting points at
both ends of this shock
(top shown) look like
they might contain needle bearings, same as
the other pivots in the
system, or perhaps
just plain bushings…
We treated the shock joints to a good cleaning and some fresh
grease, replaced their seals, and turned our attention to the linkage.
…but with the seals,
bushings, and old
grease removed,
they’re actually
spherical joints,
held in place with
circlips. Ours were
snug and swiveled
smoothly, so we
left them in.
box. Basically, you’ll run the all-thread through the bearing,
the part housing it, and a couple of sockets. The sockets will be
squeezed against the bearing on one side, and the host part on
the other side, using nuts on the all-thread.
On the bearing side, the socket’s outer diameter will be slightly
smaller than the bearing’s outer diameter, thus allowing it to
press the bearing through the bore and out the other side. The
other socket’s internal diameter will be large enough to allow the
exiting bearing free egress, but small enough to maintain level
contact with the linkage piece or swingarm/frame boss. It’s just a
matter of lining everything up and turning the nut on either side;
a pair of nuts forced together (like any lock-nut arrangement) will
provide purchase for a wrench to hold the all-thread still against
the turning of the nut on the opposite side. Washers spread the
load evenly and keep the nuts from getting caught in the sockets’
38
OCTOBER 2013 // MOTORCYCLE CONSUMER NEWS
recesses. Choose all-thread that is as large/strong as possible, but
that will still fit through the holes in your sockets. The all-thread
can be cut to an appropriate length with a hacksaw.
Actually, this very same process can be carried out with a
table vice in many cases. Obviously, this won’t work on a frame
boss underneath the motorcycle. But for linkage parts that are
removed from the bike, it’s even easier than using all-thread.
However, during installation, it may also be easier with a vice
to apply great force with the bearing slightly cocked in its bore,
which will ruin the bearing and damage the bore, which is likely
soft aluminum. In any case, proceed slowly and carefully. While
substantial pressure is required, you shouldn’t have to apply
Herculean force if everything is lined up properly.
Also, there are several ways to ease both insertion and
extraction. First, recall that hot metals expand, while cold metals contract. Getting bearings in and out is easier when there’s
a temperature differential between the parts. Use a heat gun,
propane torch, or even just a bath of hot water (seal the part in a
plastic bag and immerse it in a pot of boiling water) to heat the
piece a bearing is to enter, and leave the bearings in a plastic bag
in your freezer for a few hours. Then, smear the bearing outer
surface with a lubricant before pressing it into place. Likewise,
heating the outer surface of the part housing the bearing prior to
extraction will create a (smaller) heat differential between them.
Not only does this reduce the press-fit tension, but it may also
break the grip of rust and corrosion at a microscopic level, as
the surfaces pull away from each other.
Speaking of rust and corrosion, you may need to apply some
penetrating oil to the edges of bearings that refuse to come out.
If stronger persuasion is necessary, you can cut the bearing race
with a silicone-carbide Dremel bit. Just a small cut will probably
suffice once pressure is reapplied. Be careful not to dig into the
bore, although a little of this is likely to be unavoidable (and
will be of no real consequence, as long as there are no raised
surfaces). Once such a bearing is out, use fine grit sandpaper or
Scotchbrite to remove corrosion remnants from the bore.
DO NOT try to hammer bearings into or out of place with a
punch; this will damage the bearing’s race and cock the bearing in
its bore. Also, a slip will gouge the bore. The resulting trench will
not cause problems, but the metal berm raised around it will. New
bearings pressed into such a defaced bore will be squeezed out of
Here’s our tool
in action on the
swingarm boss.
As that wrench
gets turned, the
bearings are
pressed from
the far side into
the near socket.
The whole thing
must be held
still at the allthread connector, visible just
inboard of the
chain. To maximize visibility,
the wrench for
holding it isn’t
shown here.
Here’s our all-thread bearing tool, clamped onto the linkage
dog-bone. The narrow socket is set to press the bearings out into
the wider socket braced against the dog-bone. We used a long allthread connector as our second nut on the left side; the increased
surface area made holding it still a bit easier.
This seal and
bearing were
corroded and
so tenaciously
stuck to the dogbone that we
had to cut into
their edge with
a Dremel tool
to break them
loose. Patience
and a steady
hand help minimize damage to
the bore.
For parts that can be pulled off the bike, a vice works very efficiently
to press the narrow socket through the bore, extracting the bearings.
It’s easier than using our tool, although a third hand might be needed
to get everything lined up; take care to avoid accidental damage.
round by the raised surface, rendering them useless. If you have
trouble slipping a bushing into a newly installed bearing, the bearing may well have been deformed by such a surface irregularity.
We found out the hard way on our project bike that someone
who’d serviced the linkage previously had done quite a bit of
damage to the bore in the swingarm boss; there were several
big gouges on one side. This boss is in an extremely awkward
location, which is probably what prompted the person to abandon
good technique. It also made visual inspection difficult, and we
didn’t spot the problem before ruining a replacement bearing.
We had to pull the new bearing back out and smooth the bore’s
surface with a grinding tool and sandpaper. Although the bore’s
condition is still less than ideal, it no longer interferes with bearing function (a snug fit with no race deformation), and this fix
was much cheaper than buying a new swingarm!
The earlier bearing’s movement was certainly far from smooth,
but it did rotate, even with its race deformed, because some of
its needle bearings were pulverized. The first new bearing we
installed naively wouldn’t even admit a bushing. We can only
assume that the prior replacement involved hammering the
then-new bushing into place. Yikes! So, always carefully feel
the bore’s interior, especially if you can’t see directly into it, and
ensure there are no protrusions.
In many cases, it may be possible to safely hammer a bearing out of its bore using a socket and its extension. Although a
bearing can, at least theoretically, also be installed via this same
method, the risk of getting it cocked in the bore is high. We recommend using a screw-action tool over a hammer and socket,
especially for installation.
If a rebuild is in order, OEM parts must be ordered individually, including bearings, bushings and seals. Aftermarket parts, on
the other hand, are usually sold in kits that include all the necessary items. These are often less expensive than OEM parts, and
in some cases may offer superior performance and durability. For
our example, we chose All-Balls brand, as they have an excellent
reputation, but we can’t say whether our kit’s components are
actually better than their OEM counterparts. Another respected
name is Pivot Works. When installing new bearings, note that
one side will be flat, with a square shoulder and numbers etched
into it, while the other side will have a rounded shoulder. The
WWW.MCNEWS.COM // OCTOBER 2013
39
Technical
Smear or brush fresh grease onto
the new or cleaned bearings. Most of
this will get pushed out by the bushing, so there’s no need to go overboard. Insert the seals, and fill the
space between their lips with grease;
this not only provides lubrication,
but it also presents an additional
barrier to moisture and debris seeking entry. Install the bushings, and
wipe off the excess grease to avoid
creating a dirt trap.
While you’ve got the linkage off,
shock removal will require pulling
just one more bolt: the shock’s top
mount. Do this now, while it’s convenient, and clean/lube the shock’s
This old bearing was packed with mud and
With our new bearings and seals installed, it’s
bearings. Some linkage bearing kits
rust; its needles barely turned at all.
time to pack those needles and seal lips with
will include a replacement for the
fresh grease before reassembly.
lower shock bearing; note that its
removal may require different procelatter goes in first; the numbers should face outward.
dures or tools, so check your owner’s manual for details. Of course,
If your bearings don’t require replacement, then you’ll just if you discover that a shock bearing is in bad shape, replace it.
be cleaning and relubricating what’s already there. Be aware,
Your suspension is now ready for reassembly. Consult your
though, that seals can wear out before the bearings they protect. shop manual for the proper sequence, as doing things out of
If a seal doesn’t pop out easily, or if it shows signs of wear (e.g. order may leave you without access to a bolt or nut hidden
cracked or ragged lips), it should be replaced with a fresh one. behind a part that you should have waited to install. DouThese are so cheap that you should just get a new set ready before ble-check all torque values; this is not a part of the motorcydisassembly. Note that these seals go in with their lips facing cle you want to come apart—or bind—during operation! With
outward and their flat backs against the bearing races.
everything buttoned up, your rear suspension should be silky
With the linkage pieces removed from the bike and the seals smooth and subtly responsive.
popped out, spray contact cleaner into the bores and bearings to
wash out the old grease and accumulated grit. A towel passed
through and rotated within each bearing may help. Bearings may
be of the “caged” or “uncaged” variety. Caged bearings hold
their needles in place behind a perforated plate. An uncaged
bearing’s needles are only held in place at their very tips by a
small lip around the race’s edge. If a needle gets cocked, its tips
will no longer be retained and it will fall out, making it easier
for others to do the same.
So, when cleaning an uncaged bearing, keep in mind that the
old grease may play a large part in holding the needles in place;
when you rinse it away, the needles will be more likely to get loose.
This isn’t a big deal, as long as you’re ready to catch any escapees.
Actually, with the needles out, the race will be much easier to clean
thoroughly. But it is quite a tedious process to replace them. Get
into a meditative state, smear a little grease in the empty race, and
use tweezers to install the needles, one by one. If you’re careful
(and lucky), they’ll tolerate gentle cleaning without evacuating.
This old bearing
was in pretty good
shape. Stripped
of its grease by
solvent, it released
its needles readily.
Note that each
needle has a small
cone on each end
that is normally
retained by the
race’s edge.
40
OCTOBER 2013 // MOTORCYCLE CONSUMER NEWS
This linkage-less rear suspension is worlds simpler and easier to maintain, but its PDS (Progressive Damping System) only
approximates the progressive feel of a linkage. KTM owners take
heed: The heim joint at the lower end of your shock should NEVER
be lubricated; its Teflon surface will be destroyed by the resulting
grit accumulation.