1
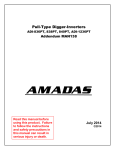
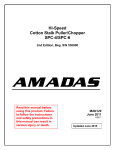
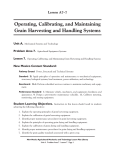
AMADAS Self-Propelled Peanut Combine Diagnostics and Service Manual MAN137 July 2013 Table of Contents Anatomy of an Amadas Self Propelled Peanut Combine Amadas Self Propelled Diagnostics and Repair Field Performance Warranty Information Anatomy of an Amadas Self Propelled Peanut Combine Amadas Specific • Header • Main Chassis • Threshing and Separation System • Peanut Basket • Unloading Conveyor • Auxiliary Hydraulics Anatomy of an Amadas Self Propelled Peanut Combine • • • • • • • John Deere Supplied Steering System Cab Major Drive Train System Engine Platform Main Hydraulic System HVAC System Electrical System Differences in the John Deere Supplied Systems as used in the SP Peanut Combine • Steering System: Some hose lengths are specific to Amadas. The rear axles with two steering cylinders are identical to a Deere CWS combine. Rear axles with a single steering cylinder use an Amadas center and Deere STS components. • Cab: The cab is a Deere production cab with minor changes. These are: 10% engine speed control, Amadas labeling for certain switches or displays, and a switch for header reversing either internal (9970) or external (all other models). • Major Drive Train System: These components, such as the hydrostat, transmissions, final drives, etc., are completely Deere items. Hose, cables, and steel lines that support these are custom for Amadas. The shafts that connect the final drives to the transmission are also specific to Amadas combines. • Engine Platform: Includes the engine, main gear case, coolant system, and the platform they are mounted on. Through the 9960 model combines these were CWS (Walker) combine units. The 9970 uses a Deere engine platform and the 9970(s) uses a S550 engine platform but retains the 9570 engine harness and separator engage valve. In addition, the STS rotor drive is not used. All engines use an Amadas specific ECU program. Differences in the John Deere Supplied Systems as used in the SP Peanut Combine • Main Hydraulic System: The hydrostat system is identical to Deere although most hose lengths are specific to Amadas. The main pump stack is the same as a grain combine. Up through the 9960 combines, the pumps were used as the same function as the grain combine. The 9970 uses the HillMaster version header lift pump to power the OCS conveyor (if equipped). The valve stack pump is flow divided and used to power both the valve stack and header lift. All other pumps on the 9970 are used for the original Deere purpose. The main valve stacks are Deere supplied on combines up to 9960s. Beginning with the 9970 combines, the valve stack is Amadas specific. • HVAC System: Except for some hose lengths, the system is the same as a Deere combine. • Electrical System: All Amadas SP combines use the Deere electrical system from the equivalent Deere combine. All major components such as relay boards, controllers and engine harness panels are Deere products. Main harnesses are Amadas specific. The controls are all Deere, although some circuits are used to control different items on the Amadas combine. All controllers on the 9960 use Deere 9560 STS programs. The 9970 payloads are all Deere 9570 STS payloads except the ADU, which is specific for Amadas. Amadas Self Propelled Diagnostics and Repair • • • • • Amadas/John Deere Comparable Machines Available Information and How to Access it Diagnosing Electrical Problems Hydraulic Diagnostics Basic Mechanical Repairs Amadas/John Deere Comparable Machines Comparable Machines Amadas Model Number John Deere Grain Combine Model Number 9970(S) 9570 STS (6.8L) * 9970 9570 STS (6.8L) 9960 9560 CWS (6.8L) 9900 9510 CWS (8.1L) 9865 9500 CWS (7.6L) 9665 9500 CWS (7.6L) NOTE: The 9970 (S) uses a Deere S550 Engine platform but the engine harness and separator valve are 9570 components. Available Information and How to Access it • Parts Catalogs • Front pages identifies the equivalent Deere combine • Hydraulic hose routing • Combine shaft speeds • Listing of John Deere Filters • Operators Manuals • General Operation instructions • Basic DTC’s • Electrical Manuals • • • • • Function cross reference Circuit code listings Connector Information Schematics Machine Settings • Operators Quick Reference • Technical Information • Information on specific topics • 9970 Payloads • Access: www.amadas.com www.amadas.com Select Product Catalogs & Manuals NOTE: The Amadas website is being updated, the content in the Catalogs and Manuals section will not change but the access may vary from what is illustrated here. Product Catalogs & Manuals Select “Agricultural Technical Information” for additional information Select “Amadas Agricultural Equipment Catalogs” for parts catalogs or manuals Agricultural Equipment Catalogs & Operator Manuals Select “Self Propelled Peanut Combine” for parts catalogs or manuals Self-Propelled Combines Parts Catalogs & Operators Manuals Diagnostics of the Electrical System • Using the Electrical Manuals • 9970 Electrical Manual (MAN 111) • 9960 Electrical Manual (MAN 132) • How to Access, Select and Load 9970 payloads into Service Advisor • Diagnosing Header Engage and Reversing Problems Using the Electrical Manuals • Determining use of a circuit • Using the schematics to follow a • • • • circuit and see differences (if any) from Deere Circuit wire color and harness connector location Connector illustration and circuit locations Machine settings OCS timer box schematic Circuit Code Numbers with John Deere Amadas 9970 Functions Use to determine function of a circuit and what page(s) the circuit is found in the schematic Circuit Code Numbers with John Deere Functions and Amadas 9960 Functions Use to determine function of a circuit and what page(s) the circuit is found in the schematic 9970 Electrical Schematic Use to follow a circuit and determine differences if use is not the same as Deere 9960 Electrical Schematic Use to follow a circuit and determine differences if use is not the same as Deere 9960 Electrical Schematic For the 9960, if the schematic directs you to another page, always use the SE #’s to follow the circuit 9960 Electrical Schematic If the circuit code matches vertically and horizontally then the function is the same as Deere. If Amadas-specific use, then the vertical circuit code name will be the Deere use and the horizontal name will be the Amadas use. Circuit Codes within the Amadas 9970 Harness with Wire Color, Connector ID, and Pin Numbers Used to identify the wire color and connector locations of a circuit. Circuit Codes within Amadas 9960 Harnesses with Wire Color, Connector ID, and Pin Numbers Used to identify the wire color and connector locations of a circuit. 9970 Main Harness Connectors and Terminal Information Illustrates connectors and position of circuits within it. Note: The 9970 uses one main harness. SP 9960 Connector Terminals for 16371 Harness Illustrates connectors and position of circuits within it Note: The 9960 uses Left and Right Hand Main Harnesses 9970 Machine Settings This section of the 9970 manual identifies by controller the payload used and the Machine Settings that must be set or verified when a controller is replaced 9960 Machine Settings These are the 9960 Amadas Machine Settings by controller and address. Unless equipped with OCS, only the Cornerpost controller (C03) requires any machine setting changes. If equipped with OCS, then controller E01 addresses 100 & 101 must be set as well. O.C.S. Timer Box Drawing Illustration, parts listing and schematic of systems that the conveyor and basket auger valves. NOTES: cc# 38 supplies power for valves, cc#319 controls both relays, the resistors are used to meet minimum amp draw requirement of cc# 319 If timer relay fails and replacement is unavailable a short term repair can be made by using two jumpers. One between terminals 2 & 3, the second between 6 & 7 Selecting and Installing 9970 Payloads into the Service Advisor • Go to Technical Information • Selecting Payloads • General • Autotrac • How to download and install payloads into Service Advisor Note: This is under the Technical Information Section Selecting Payloads for 9970 SP Combines The payload selected depends on the Control Unit as follows: For the following controller: Use payload file: CAB AH234251A CDU AH231068A_9101 LC1 AH234513A RCU AH233044A LC2 AH233046A SSU AH234469A NOTE: SSU payload shown is for a combine with a Serial number of 500003 or higher with a one connector SID for all other applications use AH234469A. For additional information refer to “How to Select the Correct Autotrac Payload for 9970 SP Combines” Chart. How to Select the Correct Autotrac Payload for 9970 SP Combines There are two Autotrac Payload files available. The serial number of your combine and/or the number of SID connectors determine which file to use. NOTE: The SID is located under the cab near the bottom of the steering column. If the combine: Has a serial number of 500002 or LOWER OR The SID has 2 connectors Has a serial number of 500003 or HIGHER OR The SID has 1 connector Use payload file: AH234469A AXE17165A (Use generic serial # HQ98705735000) How to Install a Payload into the Service Advisor NOTE: The payload file is in a zipped folder. If your operating system is Windows Vista or 7, clicking on the folder will automatically unzip it. If your operating system is Windows XP or an earlier version, you will need WINZIP software to unzip the folder. 1. Use the “How to Select Payloads for 9970 SP Combine” chart to select the correct payload. 2. Click the appropriate payload file from the menu. 3. When the “File Download” screen displays, click Save 4. When the Directory screen displays, save the file as follows: Open your C:\ directory. Locate the folder labeled sds; then open the folder labeled payloadsn OR Save the file to whatever directory you generally save downloads, but note that you will need to copy the file to the payloadsn directory. How to Install a Payload into the Service Advisor Page 2 5. Once you have selected the directory, click Save 6. When “Download Complete” displays, click Close. 7. Open the directory in which you saved the folder. If the folder was not saved to the payloadsn folder, copy the folder to it. 8. Click the folder; the payload file is listed with a .pld extension. NOTE: You must click on the zipped folder to open it or use WINZIP, depending on your operating system. The payload file will not work if you do not see a file with the .pld extension in the payloadsn folder. 9. Close all folders. NOTE: If you are unable to download the file successfully after several attempts, you may send an email to [email protected] to request the file be sent as an email attachment. In the email, you must indicate that you are requesting a payload file, the name of the specific file, and the email address to which the file is to be sent, if different than the requesting email address. Diagnosing Header Engage and Reversing Problems • Will header engage in either forward or reverse ? NO! • Make sure there is hydraulic flow. Check for pump belt (except 9970). Increase header valve flow to maximum. • Make sure header motor(s) chain(s) are in place. • If hydraulics and chain are good then disconnect, clean, inspect and reconnect header connector. • Have someone engage separator and header and test both header valve coils for magnetism. • Perform same test while trying to reverse header. • If strong magnetism, hydraulic flow, and chains are present then problem is likely the header valve is seized. • If no magnetism is present then either both coils have failed, the reverse switch has failed, or header engage circuit has failed. • Test resistance on both coils. It should be 3 -3.5 ohms. • The valve can also be tested by disconnecting one of the square connectors and apply 12 VDC to the coil with the separator engaged. If the header turns in one direction then the problem is either the reverse switch has failed or the header engage power is not present. Diagnosing Header Engage and Reversing Problems • Will header engage in either forward or reverse but not both? • Yes! • Swap square connectors on header valve and see if problem reverses. If so then either a coil or reversing switch is the problem. • Test resistance on both coils. It should be 3 -3.5 ohms • If resistance is good then swap position of the coils and retest. If reverse switch has failed (in one position) then no change should occur. • Note: On both 9960 and 9970 combines you cannot test for header engage power without it being connected to a good coil. The combine will not sense current draw and will remove power from the circuit. Hydraulic Diagnostics • Troubleshoot Header Problems • Test and Set Header Relief Pressure • Test and Set OCS Conveyor Pressure • Diagnosing loss of valve stack functions How to Troubleshoot and Correct Header Power Problems • Check the belt tension on the drive to the pump. • Inspect the sheaves for excessive wear or heat. • Test header pressure (See next page) • Make sure the system has enough oil in it. • Inspect the header for damage, making sure the teeth are not being run in the dirt too low. If a large number of pickup teeth are missing then replace. • Inspect the picking cylinders for broken or missing teeth. If a large number are missing, especially in one area, this will cause the header to feed incorrectly. • Check the clearance between the auger and the header concave. If the auger has worn or the clearance is high, this will cause too much material to be pulled in at one time. If the header has run for some time and is still set at the factory setting, it will need to be adjusted. • Make sure the header is being run as fast as possible for the conditions. (The slower the header is run, the more oil is bypassed, creating heat and reducing horsepower.) How to Test and Set Header Relief Pressure • The test port is the same as used on Deere equipment and teed in at the Header speed control valve. • The header speed control valve for the 9970 is located in the engine platform area over the main engine gear case. • On all other model combines the header speed control valve high is on the left side behind the air lift duct. • The 9970 uses a direct coupled header pump. All other models use a belt drive. This must be in good condition (belt tight, sheaves not worn) before testing the pressure. • Connect a 5000 psi rated gauge to the test port. • Disconnect one of the two hoses going to the header. This will “dead head” the system. • Before starting, ensure no one is near the combine. • Start the combine and engage the separator just long enough to take a reading. • The pressure should be set between 3400 - 3600 psi with warm oil. • If this reading is not achieved, adjust the pressure relief valve as needed. (clockwise to increase pressure, counter clockwise to decrease) • If the above pressure cannot be met, then either the relief valve or pump is faulty. How to Test and Set OCS System Pressure • The test port is the same as used on Deere equipment and teed in on the pressure side of the valve block that controls the conveyor and the augers. This is at the rear of the basket on the right hand side. • The 9970 uses a direct coupled pump. All other models use a belt drive. This must be in good condition (belt tight, sheaves not worn) before testing the pressure. • Connect a 5000 psi rated gauge to the test port. • Disconnect one of the two hoses going to the conveyor. This will “dead head” the system. • Before starting, ensure no one is near the combine. • The pump will start with the engine. Start the combine just long enough to take a reading. • The pressure should be set between 2800 - 3000 psi with warm oil. • If this reading is not achieved, adjust the pressure relief valve as needed. (clockwise to increase pressure, counterclockwise to decrease) • If the above pressure cannot be met, then either the relief valve or pump is faulty. Diagnosing Loss of Valve Stack Functions • • • • • • • • The valve stacks controls, Header Raise/Lower, Basket Up/Down, Cylinder Speed, and, if equipped, Conveyor Swing or Bin Lip Extension. If a customer reports the loss of one function, have them check the remaining. If all functions have stopped functioning, the problem is likely loss of oil pressure signal. For safety, the combine controls will not allow any valve stack functions to work unless the engine is running which is determined by the oil pressure switch being close to ground. This problem can exist without a low oil pressure alert though typically it will present as such: Start by testing the oil pressure switch. It should close when the engine is started. If it doesn’t, then replacing the switch should resolve the problem. If it does, try adding an additional ground to the black wire side of the oil pressure switch connector. If neither resolves the problem, then troubleshoot the circuit as described by Service Advisor. This system is identical to a Deere combine. Note: On combines up to the 9960, the oil pressure switch provides ground for the Engine Run relay. On 9960 and 9970 combines, the oil pressure signal is connected to the ECU then transmitted via the Can Bus. Basic Mechanical Repairs • Change the No. 1 Disc Separator Shaft • Adjust the Shaker Arms • 9970 Header Clutch Changes How to Change the Number 1 Disc Separator Shaft SP Combines and PT Combines up to 2005 only • Remove any ductwork on the machine that is in the way. • Remove the snubber idler, main chain, small chain sprocket, and both upper disc shaft shields from the machine. • Take the lock collars off of the bearings of the number one shaft. • On the right side of the machine, cut the machine below the shaft so that the entire shaft can be removed assembled. • Install the new shaft assembled, centering it in the machine and locking the bearings down. • Weld the side of the machine back together and paint it AMADAS blue. A piece of flat bar can be welded to one side of the cut and bolted to the other instead of welding. This will allow access in the future. • Replace the sprockets, chains, disc shields, and ductwork, and snubber idler. • Make sure the blades bisect the number two shaft blades; refer to the number three shaft as an example. The first and third shafts should match. • Run the machine to check that it is properly installed. Illustration on where to cut to change #1 Disc Separator Shaft Make cut in frame below 2nd bearing hole. How to Adjust the Shaker Arms Make sure the stemmer bottom is running as squarely as possible. If a stemmer is striking, it will damage the stemmer bottom. This contact can be caused by several things, such as mud build up, over speed (more than 110% on PT’s only), loose or lost bolts on the stemmer bottom hinges, worn grommets on the stemmer pegs, and cracked and damaged rubber hinges. • With only one arm connected, stroke the machine forward (toward the tongue or cab) as far as possible. If the pegs are striking the machine side, lengthen the arm until you have ½ to ¾ of an inch of clearance. • Once the stroke is set, install the bolt attaching the arm to the eccentric on the opposite side. Do not force the bolt to line up; instead, adjust the rod end in or out until the bolt lines up. • Stroke the machine all the way to the rear and make sure it does not strike. If there is no striking, then ensure that both arms are tightened (including adjusting rod jam nuts). • For older PT combines without cross augers, check for clearance in front and back of the peanut funnel. • If all looks well, then run the machine starting at a slow speed listening for any striking noises. If there are none, then increase to operating speed. If no striking noise is heard, the repair is complete. 9970 Header Clutch Changes Stronger, independent springs for each paw. Requires new springs, clips and 90 degree cotter pins Field Performance • Theory of Operation • Performance Troubleshooting • Shaft Speeds Value and Use • Basic Things to check on Service Call Theory of Operation Theory of Operation • The header pickup lifts the peanuts and vines off of the ground. The header auger feeds them into the spring tooth cylinders. • The spring tooth cylinders strip the peanuts from the vines. Large amounts of dirt and foreign material are removed by the cleaning area of the cylinder dirt removal screens under each cylinder. • The first and fourth spring tooth cylinders have sets of adjustable overhead teeth which increase picking aggressiveness when engaged. An adjustable retention board controls the time that the vines remain in the fourth cylinder. • Optional adjustable concave teeth are available for the first, second, and third cylinders for increased harvesting aggressiveness. • Peanuts and vine material fall through the extraction holes in the fourth cylinder concave onto the disc separator, or travel back into the walker cylinders. • The walker cylinders separate the good peanuts from the coarse vine material and carry the vine material out of the machine. Peanuts sift out of the cam actuated walker cylinders and are swept down to the disc separator for final separation. • At the disc separator, the good peanuts are separated from vine material and other light trash. • The cleaning fan agitates the material on the disc separator to aid in separation and blows light material such as leaves, pops, and other light trash over the tail board and out of the back of the combine. • The higher density good peanuts fall through to the stemmer section, while vine material and sticks advance across the disc separator and out of the back of the combine. As the good peanuts fall into the stemmer saws, their stems are removed. Cleaned peanuts fall into the collection auger and are conveyed into the elevator air system, which sends them up to the peanut dump bin. Performance Troubleshooting Performance Troubleshooting Page 2 Performance Troubleshooting Page 3 Basic Things to Check on Service Call • Ensure belts are properly tightened and sheaves are not severely worn. • Make sure drive chains are tightened correctly. • Check for failed bearings. • Inspect and clean as needed area above #1 disc separator shaft. Any build up or obstruction can affect cleaning system. • Check for broken or missing picking cylinder teeth. • Look for cleaning fan blades that are not cracked, bent or worn badly. • For air lift problem ensure elevator lift fan blades are not badly worn or missing. • Inspect for missing or broken header pickup springs. • If harvesting in mud, make sure the cleaning fan and housing are clean. Small amounts of mud disturb air flow and the combine will not clean or cause fan failures. • Look for bent or missing cylinder bars. If any, also check for bent lower concaves. • Check for mud and/or foreign objects in the ductwork, stemmer bottom and cross auger. This can affect both cleaning and shelling. • Check ratchet clutch (drives back of machine) to see if it is seized due to repeated jamming or lack of lubrication. Why Use Amadas Parts? • Ensures the parts have been matched to the application. • You typically “get what you pay for.” • Using inferior parts can cause premature failure, resulting in a dissatisfied customer. • Amadas stands behind its product. But when incorrect or inferior parts are used, problems can be created that using Amadas parts would have prevented. Critical Places to Use the Correct Parts • Bearings: • All combine bearings should be Timken • Substituting other brands may create frequent failures due to inadequate seals or bearing type for the application. • For example: The elevator and cleaning fans both have high speed seals. The cleaning fan uses wide inner race for stability and the main jack shaft must be well sealed. • Belts: • We use belts with backings rated for reverse bending where ever an idler is used. • Do NOT substitute single belts in place of banded belts as a long term fix. A banded belt is made up of multiple belts with a common backing. • It is impossible to keep multiple singe belts at the same tension so the total amount of horsepower will not be transmitted. This will lead to speed fluctuation and/or belt failure. • Chains: • We use only domestic high quality chain, typically Diamond, on our combines. • On all applications of #80 chain or higher, it is imperative to use this chain. • Lower grade chain will stretch or break, which can cause tooth wear on sprockets or failure that can damage and/or plug the machine. Warranty Information • SP 9970 Combine Warranty • Product Identification Number • Warranty Terms and Period • Amadas Warranty Claim Form SP 9970 Warranty Product Identification Number Model Number Serial Number For Amadas purposes, use the Serial Number: XXXXXX Machine ID Number For Amadas “New Machine Warranty Registration Form”: Example above: 510007 XXXXXXX-X Example above: A9970SU-4 For John Deere, use the Model + Serial Number: XXXXXXXXXXXXXXXXX Example above: 1H09970TCDO510007 Dealer Warranty Policy 20% . Amadas Warranty Claim Form Requesting an Amadas Warranty Claim Form: • Request a claim form from the Amadas Territory Sales Manger • If not available, request a form from Willie Branch or Roger Mercer at 1-757-539-0231 Completing an Amadas Warranty Claim Form: • Refer to the example on the next page to properly complete an Amadas Warranty Claim Form. Submitting a Warranty Claim Form: • Once properly completed, return your Warranty Claim Form to: Amadas Industries, Inc. Attn: Willie Branch 1100 Holland Road Suffolk, VA 23434 Example Amadas Warranty Claim Form