1
Instruction / Service Manual
NAPCO®
Microprocessor Controlled Automatic
Water Jacketed CO2 Incubators
Series 6101-0 and 6301-0
2
Precision
170 Marcel Drive
Winchester, VA
USA
Phone: 540-869-9892
Toll Free: 800-621-8820
FAX: 540-869-0130
Manual P/N 36100105
Rev. D Dated 14MAY02
This symbol marks chapters and sections of this instruction manual which are
particularly relevant to safety.
When attached to the unit, this symbol draws attention to the relevant
section of the instruction manual.
This symbol indicates hazardous voltages may be present.
NOTICE
THE MATERIAL IN THIS MANUAL IS FOR INFORMATION
PURPOSES ONLY. THE CONTENTS AND THE PRODUCT IT
DESCRIBES ARE SUBJECT TO CHANGE WITHHOUT NOTICE.
NAPCO MAKES NO REPRESENTATIONS OR WARRANTIES WITH
RESPECT TO THIS MANUAL. IN NO EVENT SHALL NAPCO BE
LIABLE FOR ANY DAMAGES, DIRECT OR INCIDENTAL, ARISING
OUT OF OR RELATED TO THE USE OF THIS MANUAL.
For repair information or replacement parts assistance from the manufacturer,
call Customer Service using our toll free telephone number.
800-621-8820
540-869-9892
(FAX) 540-869-0130
REVISION STATUS
INDEX
DATE
AMENDED PAGES
NOTES
A
6/99
B
12/99
40-42
Update parts list for new kit #'s
C
6/00
19
Correction to changing the value of
"Uar" section
D
05/02
40-42,43-45
Update for coved corner configuration
Initial release
Contents
1.0 Introduction .................................................................................................................. 1
2.0 Unpacking and Damage ............................................................................................... 1
3.0 General and Maintenance Information ....................................................................... 2
4.0 Environmental Conditions and Specifications .......................................................... 3
5.0 Installation .................................................................................................................... 4
6.0 Explanation of Controls ............................................................................................... 6
7.0 Cleaning and Decontamination ................................................................................... 9
8.0 Set-up .......................................................................................................................... 10
9.0 Connecting External Supplies .................................................................................. 12
10.0 Initial Operation & Calibration ................................................................................. 14
11.0 Operation .................................................................................................................. 17
12.0 RS232 Communications .......................................................................................... 22
13.0 Care and Cleaning of Stainless Steel ..................................................................... 28
14.0 Troubleshooting Procedures .................................................................................. 30
15.0 Part Replacement Procedures ................................................................................ 37
Replacement Parts ........................................................................................................... 40
Drawings ........................................................................................................................... 43
Warranty ............................................................................................................................ 57
Manual P/N: 6101C9601
2.0 Unpacking and Damage
1. 0 Introduction
2.01 This product was carefully packed and
thoroughly inspected before leaving our
factory. Save all packing material if apparatus
is received damaged.
1.01 Your satisfaction and safety are important to
NAPCO and a complete understanding of
this unit is necessary to attain these
objectives.
2.02 Responsibility for safe delivery was assumed
by the carrier upon acceptance of the
shipment; therefore, claims for loss or
damage sustained in transit must be made
upon the carrier by the recipient as follows:
1.02 As the ultimate user of this apparatus, you
have the responsibility to understand its proper
function and operational characteristics. This
instruction manual should be thoroughly read
and all operators given adequate training
before attempting to place this unit in service.
Awareness of the stated cautions and
warnings,
and
compliance
with
recommended operating parameters
together with maintenance requirements
are important for safe and satisfactory
operation. The unit should be used for its
intended application; alterations or
modifications will void the warranty.
Visible Loss or Damage: Note any external
evidence of loss or damage on the freight bill
or express receipt, and have it signed by the
carrier's agent. Failure to adequately describe
such external evidence of loss or damage
may result in the carrier's refusing to honor
your claim. The form required to file such
claim will be supplied by the carrier.
Concealed Loss or Damage: Concealed
loss or damage is any loss or damage which
does not become apparent until the
merchandise has been unpacked and
inspected. Should either occur, make a
written request for inspection by carrier's
agent within 15 days of the delivery date; then
file a claim with the carrier.
WARNING
AS A ROUTINE LABORATORY PRECAUTION,
ALWAYS WEAR SAFETY GLASSES WHEN
WORKING WITH THIS APPARATUS.
1.03 This product is not intended, nor can it be
used, as a sterile or patient connected device.
In addition, this apparatus is not designed for
use in Class I, II, or III locations as defined by
the National Electrical Code.
2.03 If you follow the above instructions carefully,
NAPCO will guarantee our full support of
your claim to be compensated for loss or
damage in transit.
DO NOT for any reason return this
unit to NAPCO without first obtaining return
authorization. In any correspondence with
NAPCO please supply the nameplate data,
including catalog number and serial number.
1
3.0 General Information
3.06 An optional RS232 communications port
allows remote monitoring and control of the
incubator.
3.01 NAPCO ® 6001 series water jacketed,
microprocessor controlled CO2 incubators are
ideal for applications requiring precise and
uniform control of temperature and CO2. They
provide a controlled environment for the growth
of culture common in virology, physiology and
microbiology. These instructions are applicable
to all models listed in Table 3.1.
TABLE 3.1
3.07 Your incubator is supplied with five shelves
per chamber and can hold a maximum of ten
shelves per chamber. The entire stainless
steel shelf system can be assembled and
disassembled without the use of tools for
ease of cleaning.
Model 6001
Single Chamber
Model 6001H
Dual Chamber
Single Chamber
Model 6001C
Dual Chamber
Single Chamber
Dual Chamber
Parameters
Displayed:
Temperature
CO2
Temperature
CO2
Relative Humidity
Temperature
CO2
Relative Humidity
Parameters
Controlled:
Temperature
CO2
Temperature
CO2
Temperature
CO2
Relative Humidity
Catalog
Number
115VAC
TC Sensor
51200067
IR Sensor
51200068
TC Sensor
51200069
IR Sensor
51200070
TC Sensor
51200071
IR Sensor
51200072
TC Sensor
51200073
IR Sensor
51200074
TC Sensor
51200075
IR Sensor
51200121
TC Sensor
51200077
IR Sensor
51200078
"R" suffix added to Model Number denotes right-hinged door
3.02 The solid state digital control panel houses all 3.08 NAPCO® Incubators are available in both
functions necessary to operate the incubator.
single chamber and double chamber
The push button switches and individual LED
configurations. The double units contain two
displays allow the operator to adjust
independent sets of controls enabling
temperature, CO2, optional R.H. control and
operation of a single chamber even when the
calibration via a single set of controls. No
other is turned off.
adjusting of trim pots is required for operation.
3.03 The proportional integral derivative (PID) 3.09 Single chamber units are easily stackable
with NAPCO® incubators. See Section 5.04.
temperature control allows precise temperature
°
°
control from 5 C above ambient to 50 C. The
patented NAPCO® internal air heater located 3.10 Maintenance: Add water to the water jacket
within the chamber provides rapid temperature
when the red low water light is lit. Refer to
recovery unparalleled in the industry.
Section 8.06. For cleaning see Section 13.0.
No other maintenance is required.
3.04 A digital hi-limit safety switch is provided which
can be easily set through the control panel to
prevent thermal runaway in the event of
temperature control failure.
3.05 Visible and audible Hi and Lo alarms are
provided for temperature and CO2 and R.H..
Contacts are also provided on the rear of the
unit for connection to a central monitoring
system.
2
4.0 Specifications
4.01 The following table lists the performance
specifications for these CO2 incubators:
TABLE 4.1
Model 6001
Single Chamber
Catalog
Number
115VAC
Chamber
Volume:
TC Sensor
51200067
IR Sensor
51200068
5.4 cu. ft.
153.5 liters
Model 6001H
Dual Chamber
TC Sensor
51200069
IR Sensor
51200070
10.8 cu.ft.
307.0 liters
Single Chamber
TC Sensor
51200071
Dual Chamber
IR Sensor
51200072
TC Sensor
51200073
5.4 cu. ft.
153.5 liters
Chamber
Dimensions:
(usable)
Exterior
Dimensions:
Model 6001C
IR Sensor
51200074
10.8 cu.ft.
307.0 liters
Single Chamber
TC Sensor
51200075
IR Sensor
51200121
Dual Chamber
TC Sensor
51200077
IR Sensor
51200078
5.4 cu. ft.
153.5 liters
10.8 cu.ft.
307.0 liters
(Lx W x H)
29 x 24.5 x 36 in.
737 x 623 x 914 mm
(Lx W x H)
29 x 24.5 x 71.5 in.
737 x 623 x 1816 mm
(Lx W x H)
17.3 x 17.5 x 25 in.
439 x 445 x 635 mm
(Lx W x H)
29 x 24.5 x 36 in.
737 x 623 x 914 mm
(Lx W x H)
29 x 24.5 x 71.5 in.
737 x 623 x 1816 mm
Temperature
Range:
Control:
Stability:
Uniformity:
(Lx W x H)
29 x 24.5 x 36 in.
737 x 623 x 914 mm
(Lx W x H)
29 x 24.5 x 71.5 in.
737 x 623 x 1816 mm
Ambient +5.0°C to 50.0°C *
0.1°C
±0.1°C
±0.25°C
CO2
Range:
Control:
Stability:
Uniformity:
0 to 20% *
0.1%
±0.1%
±0.25%
Humidity
Range:
Control:
Source:
65% to 98%
n/a
Pan (supplied)
65% to 98%
1.0%
Integral steam generator
Shelves:
5 (supplied)
10 (maximum)
10 (supplied)
20 (maximum)
5 (supplied)
10 (maximum)
10 (supplied)
20 (maximum)
5 (supplied)
10 (maximum)
10 (supplied)
20 (maximum)
Shelf Capacity:
(maximum)
20 sq. ft.
1.84 sq. meter
40 sq. ft.
3.66 sq. meter
20 sq. ft.
1.84 sq. meter
40 sq. ft.
3.66 sq. meter
20 sq. ft.
1.84 sq. meter
40 sq. ft.
3.66 sq. meter
(all units 50/60 Hz)
550 watts, 4.7 amps
(all units 50/60 Hz)
1100 watts, 9.4 amps
(all units 50/60 Hz)
550 watts, 4.7 amps
(all units 50/60 Hz)
1100 watts, 9.4 amps
(all units 50/60 Hz)
650 watts, 5.5 amps
(all units 50/60 Hz)
1300 watts, 11.1 amps
Maximum
BTU Output:
1,876
3,753
1,876
3,753
2,217
4,435
Net Weight:
188 lbs., 85 kg
376 lbs., 171 kg
188 lbs., 85 kg
376 lbs., 171 kg
188 lbs., 85 kg
376 lbs., 171 kg
Shipping
Information
Dimensions:
(L x W x H)
Weight:
Volume:
36 x 33 x 43 in.
915 x 838 x 1092 mm
265 lbs., 120 kg
29.5 cu. ft., 0.83 cu. meter
36 x 33 x 78 in.
915 x 838 x 1981 mm
456 lbs., 207 kg
53.76 cu. ft.,1.52 cu.
meter
36 x 33 x 43 in.
915 x 838 x 1092 mm
265 lbs., 120kg
29.5 cu. ft., 0.83 cu. meter
36 x 33 x 78 in.
915 x 838 x 1981 mm
456 lbs., 207 kg
53.76 cu. ft.,1.52 cu.
meter
36 x 33 x 43 in.
915 x 838 x 1092 mm
265 lbs., 120kg
29.5 cu. ft., 0.83 cu. meter
36 x 33 x 78 in.
915 x 838 x 1981 mm
456 lbs., 207 kg
53.76 cu. ft.,1.52 cu.
meter
Electrical
Service
115V~
Overvoltage
Category II +/10% 50/60Hz
Environmental Conditions
Indoor Use Only
Maximum Altitude 2000 meters
Operating Ambient: 5° to 40°
Relative Humidity: 80% for temperatures to 31°
50% for temperatures to 40°
Pollution Degree: 2
3
5.0 Installation
electric shock hazard from this apparatus.
The user should have the wall receptacle
and circuit checked by a qualified electrician
to make sure the receptacle is properly
grounded.
NOTE
DO NOT SUPPLY POWER OR TURN ON INCUBATOR
UNTIL AFTER READING EXPLANATION OF
CONTROLS (SECTION 6.0) AND START UP
(SECTION 8.0).
2.
Where a non-grounding wall receptacle is
encountered, it is the personal responsibility
and obligation of the user to have it replaced
with a properly grounded wall receptacle. Do
not, under any circumstances, cut or
remove the third (ground) prong from
the power cord. Do not use a two-prong
adapter plug.
3.
Determine the total amount of current being
used by other apparatus connected to the
circuit that will be used for this apparatus. It
is critical that the added current demand
(see nameplate) of this and other equipment
used on the same circuit does not exceed
the rating of the fuse or circuit breaker. See
Table 4.1 for a list of utility requirements.
5.01 Materials Supplied - A packing list has
been included with the incubator. Please
check the list to verify that all materials listed
have been supplied with the incubator. Should
any of these items be missing, contact your
dealer representative or Precision .
5.02 The most uniform operating conditions and
results will be obtained by placing the
incubator on a level surface in an area remote
from drafts, ventilating outputs, radiators,
and other areas where rapidly changing
ambient conditions may be present. If at all
possible, leave at least two (2) feet of space
around the incubator to allow access to power,
gas inlets, and remote alarms located on the
back of the unit. Position the incubator in
proper place prior to filling with water. Once
filled with water, the incubator is extremely
heavy and should not be moved. There are
four (4) adjustable levelling legs on the bottom
of the incubator to accommodate any
unevenness of the floor or table top. The
levelling feet should be adjustable by hand
using a 1-3/8 wrench.
CAUTION
BE SURE THAT THE POWER SUPPLY IS OF THE
SAME VOLTAGE AS SPECIFIED ON THE
NAMEPLATE.
5.04 Stacking two single chamber units.
Single units can be easily stacked in any
combination and may also be stacked with
any other NAPCO® 5400, 6001, or 7001 series
single chamber incubator.
5.03 Electrical Connections - Important, please
read the following information carefully. Failure
to follow instructions may result in personal
injury.
NOTE
WHEN STACKING WITH A NAPCO® 5400 SERIES
SINGLE CHAMBER INCUBATOR, THE 5400 MUST
BE PLACED ON TOP.
WARNING
FOR PERSONAL SAFETY, AND FOR BEST
PERFORMANCE, THIS APPARATUS MUST BE
PROPERLY GROUNDED.
1.
1.
The power cord provided on this unit is
equipped with a three connector (grounding)
plug, which mates with a standard grounding
wall receptacle to minimize the possibility of
The water jackets of both single chamber
units must be empty. If the water jackets of
either chamber contain water, stop and empty
the water jackets using the water fill/siphon
assembly which came with the unit.
Remove shelves, shelf slides, shelf slide
supports, humidity pans and air ducts from
both units prior to stacking.
4
2.
Select the bottom chamber unit. Position the
bottom chamber in the desired location
following the guidelines in Section 5.02. Level
the bottom chamber by adjusting the four
leveling feet on the bottom of the unit.
10. Reach inside the bottom chamber control
panel housing area and fasten the top
chamber's four leveling feet. Tighten the
leveling feet by hand.This will secure the top
chamber to the bottom.
3.
Verify that the intended power source is
capable of supporting two incubators. See
Table 4.1 for utility requirements.
11. Reinstall the insulation to the top housing of
the bottom chamber.
4.
Remove the control panel from the bottom
chamber unit. Disconnect the nut from the
gas sample port and remove three screws
from the bottom of the control panel. Pull the
control panel slightly out from the housing (a
small amount of force may be required).
5.
12. Reinstall the bottom chamber control panel.
Remember to reconnect the keyboard ribbon
cable and gas sample port prior to installing
the control panel.
13. Install the air duct and shelving system
following the guidelines in Section 8.0.
Disconnect the flexible tubing from the water
fill port. Disconnect the keyboard ribbon cable
connector and completely remove the control
panel. See drawing on page 45.
6.
Remove the insulation from the top of the
incubator chamber.
7.
Remove the four black plastic plugs from the
top of the chamber.
8.
Remove the four leveling feet from the top
chamber unit.
9.
Position the top single chamber unit on top of
the bottom chamber. Align the top chamber's
leveling feet screw holes with the four holes
located on top of the bottom chamber.
14. Fill the water jackets with water.
WARNING
THE BOTTOM CHAMBER WATER JACKET MUST BE
FILLED FIRST.
5
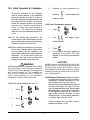
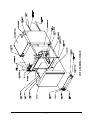
6.0 Explanation of Controls
6.01 Front Panel
Depending on options installed, your
incubator will have one of the following
control panels installed.
FIG. 6.1 - Basic unit with Temperature and CO2 .
FIG. 6.2 - Same as FIG 6.1, but with optional R.H. Display installed
(R.H. Pump located behind left panel)
FIG. 6.3 - Same as FIG 6.1, but with optional R.H. Control installed
6
Selects temperature, CO2 , O2 or R.H.
control setpoint. Use to select R.H. display
for "ON" or "OFF" entry.
Increments displayed value. As button is
pressed, displayed value scrolls up through
values in the range. As button is held
pressed, scroll rate accelerates.
Matches displayed value of temperature,
CO2, O2 or R.H. display to actual
measured chamber conditions.
Decrements displayed value. As button is
pressed, displayed value scrolls down
through values in the range. As button is
held pressed, scroll rate accelerates.
Sets chamber high temperature limit.
Initiates a self-diagnostic check of the
microprocessor controller. Pressing TEST
from within another function will return unit
to normal operating mode.
Temporarily silences audible alarm.
Stores the newly entered values.
Locks SETPOINT and CALIBRATION
values to protect against unauthorized or
inadvertent changes, and to unlock controls
once locked.
6.01.4 Front Panel Indicator Lamps
6.01.2 Front Panel Displays
"Temp. °C":Displays actual chamber temperature
during operation. May be used for other
display purposes during setup and
calibration.
"% CO2":
Displays actual chamber CO2 during
operation. May be used for other display
purposes during setup and calibration.
"%R.H.":
Displays actual chamber relative humidity
during operation.
"H2O"
Indicates that water in the water jacket is
below normal operating level.
"Lock"
Illuminates when control panel settings
have been locked.
"R.H."
Illuminates when R.H. distilled water
supply is empty.
"Door
Ajar"
6.01.3
Front Panel Fittings and
Connectors:
Indicates that chamber door is open or has
recently been opened. It will go out a short
time after the door is closed.
"High"
Indicates that the current displayed value is
above SETPOINT.
"Fill Port:" Used to fill or to siphon drain the chamber
water jacket.
"Low"
Indicates that the current displayed value is
below SETPOINT.
"CO2
Sample:" Provides a direct connection for sampling
the chamber atmosphere for calibration of
the CO2 displayed value.
"On"
Indicates that controller is regulating this
parameter.
6.01.5 Front Panel: Access to Water Pump
and Filter
(on models equipped with R.H.
Controlled Unit)
Thumbscrews
7
6.02
Rear Panel
Depending on options
installed, your incubator
will have one of the
following rear control
panels installed:
"CO2 /N2
Inlet:"
"Tank
No. 1:"
"Tank
No. 2:"
Fuses:
Provides 1/4" I.D. tubing connectors for
connection to one or two CO2 /N2 cylinders
(tanks). There is one set of CO2 /N2 input
connectors per incubator.
"Line:"
"R.H.
H20 Level
Switch:"
The tubing connector for the CO2 /N2 supply
cylinder (or the primary cylinder if two are
connected).
The tubing connector for the secondary
CO2 /N2 supply cylinder when two cylinders
are connected.
"Water Inlet
Relative
Humidity" The tubing connector for supplying water to
the steam generator. Used only in Relative
Humidity Control models.
6.03
Left Side Panel
"Power:"
Primary electrical power switch. There is
one power switch for each chamber.
"AC Input:" IEC standard connector for connection to
electrical service line. There is one "AC
Input" per incubator.
"Temp Recorder:" Used to connect a recording device
(10mv DC/°C) to monitor chamber
temperature if desired. "+" and "-"
connectors indicate signal polarity. There
is one recorder output per chamber.
"CMS Alarm Output:" Used to connect to a central
monitoring system if desired. Connection
is Form "C" contacts. May be wired NC
(Normally Closed) or "NO" (Normally
Open) with isolated ground ("COM"
connection).
"RS232:"
This optional accessory port provides twoway serial communications for printers or
other computer devices.
8
The two line fuses provides protection
for the primary incubator power line.
T3.15AL250V
Optional with R.H. Control
This jack is a receptacle for an external
level
switch from the R.H. water supply
(optional).
7.0 Cleaning and Decontamination
7.04 Thoroughly clean and disinfect chamber(s),
air duct(s), shelves, supports, shelf slide
brackets, shelf slides, humidity pan(s), glass
door, gasket, latch, and any other objects
which will be placed inside the chamber. All
stainless steel parts may be autoclaved for
thorough sterilization.
NOTE
THIS INCUBATOR IS MANUFACTURED IN AN
INDUSTRIAL ENVIRONMENT. WHILE EVERY
EFFORT IS MADE TO KEEP THIS INCUBATOR AS
CLEAN AS POSSIBLE DURING MANUFACTURE AND
TRANSIT, IT IS NOT STERILE.
7.05 Blower wheel may be removed and cleaned.
The blower wheel is fastened to the motor
axle by a firm press fit. Some force may be
required for removal.
7.01 To ensure optimal growth conditions, we
strongly recommend you thoroughly clean
and disinfect the incubator prior to use.
NOTE
7.02 Open the incubator doors and remove any
packaging or accessory items.
HANDLE ALL STERILIZED PARTS CAREFULLY TO
REDUCE POSSIBILITY OF INTRODUCING
CONTAMINANTS INTO THE INCUBATOR
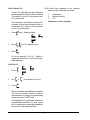
7.03 Remove the air duct from each chamber
7.06 Re-install blower wheel and air duct.
1. Loosen Nut.
Press the blower wheel firmly onto the axle
until the blower wheel rests against the axle
stop. Place the plastic spacer on the long
stud located on the fan motor plate. Reinstall the air duct and fasten the plastic wing
nut. Check for free rotation of the blower
wheel by turning the wheel clockwise using a
finger. If the blower wheel rubs against the air
duct: a) verify that wheel is pushed back
against the axle stop, and b) loosen the wing
nut slightly.
2. Carefully tilt top of air duct forward and toward
either side.
3. Remove air duct from chamber.
Nut
Air Duct
Blower Wheel
9
8.0 Set-up
1. Refer to the following illustration and insert
the shelf slide into a rear keyway of your
choice in the rear shelf slide bracket on either
side of the chamber. Next insert the shelf
slide into the matching front keyway. Attach
another slide on the opposite side of the
chamber at the same elevation. Repeat for
the remaining shelf slides.
8.01 Ensure that the incubator is level. Adjust the
4 corner leveling feet as needed.
8.02 Ensure that the incubator is plugged into a
properly grounded outlet of the correct supply
voltage, and that the power switch is in the off
position.
8.03 Ensure that the blower wheel and air duct are
properly installed (See Section 7.06).
8.04 Install front shelf slide supports by sliding
the keyed slots of each support into place
over the buttons located near the top and
bottom of each side wall of the chamber. Note
that the keyed mounting slots should be at the
edge of the shelf slide support which faces
the front of the chamber.
2. Slide a shelf into each pair of shelf slides. The
shelves are designed so that they may be
used with the lip facing either up or down.
8.06 Fill each chamber's water jacket with distilled
water.
WARNING
WHEN SETTING UP VERTICALLY STACKED
INCUBATORS, THE LOWER CHAMBER WATER
JACKET MUST BE FILLED FIRST.
8.05 Install shelves. The incubator is provided
with five (5) shelves per chamber, and will
accommodate up to ten (10) shelves per
chamber. Each shelf rides on a pair of shelf
slides for ease of access to samples. Shelf
height may be adjusted by installing the slides
into the proper keyways in the shelf slide
supports. Additional shelf kits (which include
one (1) shelf and one (1) pair of shelf slides)
are available through your laboratory
equipment dealer or from Precision Scientific.
CAUTION
TO AVOID BUILD-UP OF MINERAL DEPOSITS AND
TO PREVENT CORROSION, USE ONLY DISTILLED
WATER (50-K OHMS TO 1-M OHMS) IN THE WATER
JACKET.
DO NOT USE ULTRA-PURE
OR DEIONIZED WATER.
1. Turn the power switch on. The digital displays
will light, and the H2O low water jacket water
level indicator will be illuminated. Verify that all
setpoints are set to "0" or "OFF." See Section
10.03.
Note that the shelf slides are keyed differently
at each end the end which installs into the
rear slide support bracket has a key which is
parallel to the length of the slide, while the end
which installs into the front slide support
bracket has a key which is perpendicular to
the length of the slide.
2. Unscrew the cap from the water jacket fill port
and replace the cap with the threaded hose
barb connector provided in the accessories
kit.
10
3. Connect one end of the clear vinyl tubing
provided in the accessory kit to the hose barb
connector. Add Quaternary Ammonium Type
germicide (provided in the accessory kit) into
the waterjacket through the tube opening as
recommended with the sanitizer provided in
the accessory kit.
4. Connect the other end of the vinyl tubing to a
source of distilled water. A faucet adapter is
provided in the accessories kit for your
convenience in connecting to an in-house
central distilled water system.
CAUTION
WHEN FILLING WATER JACKET BE CAREFUL NOT
TO OBSTRUCT THE WATER CHAMBER VENT PORT.
5. Fill the water jacket until the associated H2O
indicator lamp extinguishes (approximately
11 gallons (40 Liters).
11
9.0 Connecting External Supplies
9.03.3
9.01 Type of gasses required
1. Only medical grade 100% CO2 should be
used as gas supply for this incubator. The
gas source may be either a cylinder or an
in-house central gas supply equipped with
shut-off valves and a pressure regulator.
WARNING
DO NOT USE CO2 THAT HAS BEEN MIXED WITH
OTHER GASSES OR AIR AS THIS WILL CAUSE
POOR GAS CONTROL PERFORMANCE OR POSSIBLE
HAZARDS.
9.04 Gas Connection
9.02 Gas shuttle valves
The accessory kit supplied with your incubator
contains gas filters, hose clamps, and an
ample length of tubing for connecting the
incubator with gas.
1. This incubator is equipped with an internal
CO2 shuttle valve for connection of two
CO2 cylinders. The shuttle valves will
automatically switch from a primary gas
cylinder to a secondary cylinder when the
primary cylinder empties. The secondary
cylinders are optional and do not have to
be connected. If the secondary cylinders
are not connected, the gas ports will not
leak.
Connect the gas supply to the incubator as
follows:
1.
2.
9.03 Gas Pressure Regulation
9.03.1
9.03.2
When using an in-house central gas
supply, either a 1-stage or 2-stage
pressure regulator will be required
depending on the pressure level of the
in-house source. Check with your
facilities personnel and with your
regulator vendor to ensure that the
regulator will provide adequate pressure
control at the 15 - 25 PSI (1.0 - 1.7 BAR)
recommended operating pressure. The
regulator should be installed near the
incubator. When using an in-house
supply, there is no benefit to connecting
to both CO2 inlets. Use only the Tank
1 connector.
When using cylinders as the gas supply,
a 2-stage pressure regulator is required
to reduce the tank pressure to the 1525 PSI (1.0 - 1.7 BAR) recommended
operating pressure. A 2-stage regulator
must be used for each cylinder
connected.
Cut the supply hose to the length
required.
Slide two hose clamps over the hose
and connect one end of the hose to the
pressure regulator and the other end to
the incubator. Tighten the hose clamps
at each connection.
CAUTION
DO NOT OVERTIGHTEN THE ADJUSTABLE HOSE
CLAMPS. OVERTIGHTENING MAY DAMAGE THE
HOSE.
3.
When using two cylinders for CO2 , the
primary (Tank 1) cylinder should be set
3-5 PSI (.2 - .4) BAR) higher than the
secondary (Tank 2) cylinder. This will
allow proper operation of the gas shuttle
valve.
12
Cut through the gas supply hose
approximately 1-2 feet from the
incubator gas inlet. Place one hose
clamp over both open ends of the gas
tubing.
NOTE
9.06 R.H. H2O Level Switch
OBSERVE GAS FLOW DIRECTION ON THE CO2
FILTER.
4.
5.
A jack on the rear panel will accept input from
a water level switch. The switch contacts will
close when the water level drops low. This will
turn on the R.H. light on the control panel.
On a double chamber unit only the upper
R.H. light will come on.
Connect a gas filter to the gas supply
hose.
Tighten the hose clamps to the gas
filter.
Repeat the above for each gas supply
used.
An optional water reservoir supply with level
switch is available. See parts list.
9.05 Optional Relative Humidity Water Supply
Connection
The following applies to units equipped with
R.H. Control.
To use the relative humidity control features
of this incubator, the operator must connect a
supply of distilled water.
CAUTION
IT IS IMPERATIVE THAT DISTILLED WATER BE
USED. OTHER TYPES OF WATER MAY RESULT IN
CONTAMINATION, CORROSION, CLOGGED LINES
AND FILTERS, AND EXCESSIVE WEAR AND TEAR
ON THE STEAM GENERATOR.
1.
2.
Use the R.H. supply hose assembly which
came with the incubator.
Drop the end with the sinker into a carboy
or flask filled with distilled water. Keep the
opening of your vessel shielded from
debris but open to atmosphere. The level
of the water supply must be at or below
the level of the pump.
CAUTION
DO NOT USE A PRESSURIZED WATER SUPPLY.
3.
Attach the luer fitting to the connector on
the rear panel.
13
10.0 Initial Operation & Calibration
4.
Successful operation of the incubator
requires careful attention to the calibration
procedures listed in this section. Failure to
follow the calibration procedures will result in
poor operation of the incubator. This section
should be repeated anytime the incubator
has been out of service for more than 24
hours or when poor performance is
suspected. The calibration procedure
requires a minimum stabilization period of 24
hours.
pressing
10.04 Enter Temperature Setpoint.
Use
until display shows
3.
Press
4.
The incubator will begin heating as
indicated by the green "ON" LED
indicator to the left of the temperature
display.
10.05 Calibrate Temperature. Allow the incubator
to operate for a minimum of 24 hours before
attempting to calibrate temperature. Do not
open the glass door during this period.
After the incubator has stabilized at the desired
operating temperature (at least 24 hours),
open the exterior door only. Do not open
the glass door. Compare the temperature
of the digital display with the reference
thermometer inside the chamber. If, these
readings match, no temperature calibration
is required. Skip to Section 10.06.
10.03 Verify that all setpoints are set to "0".
3.
2.
NEVER OPERATE UNIT WITHOUT WATER IN THE
WATER JACKET(S). OPERATION WITHOUT WATER
IN THE WATER JACKET MAY RESULT IN POOR
PERFORMANCE FROM THE INCUBATOR, OR MAY
DAMAGE INCUBATOR COMPONENTS AND WILL
VOID THE WARRANTY
WHEN USING MERCURY THERMOMETERS, HANDLE
WITH THE UTMOST CARE. VERY SMALL AMOUNTS
OF MERCURY FROM A BROKEN THERMOMETER
MAY CAUSE DAMAGE TO THE CHAMBER BY
ELECTROLYSIS. MERCURY ALSO CREATES A
TOXIC ENVIRONMENT IN THE CHAMBER,
RENDERING THE INCUBATOR USELESS.
Press
Press
CAUTION
WARNING
2.
1.
desired setpoint.
10.02 Place a reference thermometer on the center
shelf of each chamber (Note: thermometers
are not provided with the incubator). This
thermometer will be used to verify temperature
calibration. The thermometer should be
positioned such that it can be easily read
through the incubator's inner glass door.
Press
until the appropriate
display is active.
10.01 Fill the humidity pan (provided in the
accessories kit) with distilled water one inch
deep, and place pan on the floor of the chamber,
at least two inches from the air duct.
1.
Repeat for other parameters by
until
If these readings do not match, continue
reading this section (10.05).
Press
14
NOTE
10.07 Set Relative Humidity.
DO NOT OPEN GLASS DOOR DURING THIS
PROCEDURE
The following applies to units equipped with
R.H. control.
To calibrate temperature display:
1.
2.
The humidity pan should now be removd
from the chamber.
display will show
Press
Using
Set the R.H. control to the desired control
setpoint. Allow at least one hour for the R.H.
pump to pull the distilled water through the
lines to the steam generator.
keys,matchdisplayedtemperature
with reference thermometer reading.
3.
Press
1. Press
three times, display will show:
2. Use
to set desired R.H. level.
Allow at least one hour for temperature to
stabilize after calibration.
After allowing incubator temperature to
stabilize, verify that displayed temperature
matches the reference thermometer within
the chamber. If not, repeat the above steps.
10.06 Calibrate Humidity.
3. Press
The following applies to units equipped with
either R.H. display or R.H. control.
Perform humidity calibration only after
temperature calibration has been completed
and a humidity pan with distilled water has
been in the chamber with the glass door shut
for at least 24 hours.
1.
Press
three times
2.
Use
to set R.H. display to 98%.
3.
Press
15
.
10.12 Check each calibration in the following
sequence and recalibrate as needed.
10.08 Calibrate CO2
Perform CO2 calibration only after calibrating
temperature and humidity. Failure to calibrate
Temp.and R.H. prior to CO2 will result in poor
CO2 performance.
1.
2.
3.
Calibration is now completed.
The temperature and relative humidity must
be stable at their desired setpoints prior to
calibration of CO2. Failure to do so will result
in poor CO2 performance.
1.
Press
2.
Using
3.
Press
twice. Display will show
set CO2 display to 0.0%.
Do not be alarmed if the CO2 display is
negative or far from zero. This is normal upon
initial calibration.
10.09 Set CO2
1.
Press
2.
Use
3.
Press
or
Temperature
Relative Humidity
CO 2
to set desired CO2 level.
After the incubator has stabilized at operating
CO2 level for at least 30 minutes, measure
actual chamber CO2 using a CO2 gas sampling
device such as a FYRITE® tester.
If the displayed CO2 level does not match the
measured actual chamber CO2 level, repeat
the CO2 calibration by matching the displayed
value to the actual measured value.
16
11.0 Operation
1.
2.
3.
Each controlled function has 3 modes of operation;
"OFF", "0" and "Setpoint".
OFF
When "OFF" is displayed in the window,
the controlled function is inactive.
0
When "0" is displayed in the window, the
controlled function only monitors and
displays concentrations in the chamber.
Setpoint
FAILURE TO DO SO MAY RESULT IN POOR
INCUBATOR CONTROL
11.03 Temperature Hi-Limit Safety
When a setpoint is entered, the unit
will control to the entered value.
1.
Press
2.
Use
11.01 Changing Setpoints.
1.
Press
until desired Hi-Limit
safety is displayed.
3.
until the desired setpoint
Press
.
The temperature Hi-Limit safety has a range
from 26°C to 57°C. The temperature HiLimit safety can not be set nearer than 0.5°C
above temperature setpoint.
will
window is active. The word
appear above or below the active window.
Temperature
Temperature
Relative Humidity (if option is installed)
CO2
R.H.
When the temperature setpoint is changed
upward or downward, the Hi-limit safety will
automatically change a like amount to
prevent the hi-limit safety from being set
below the temperature setpoint.
CO2
11.04 Alarms
2.
Press
This incubator provides both visible and
audible alarms to alert the operator to a
variance in chamber conditions from
SETPOINT operating conditions.
to set desired setpoint.
11.04.1 "High" and "Low" Alarms
3.
Press
4.
Press
Each controlled incubator function features
"High" and "Low" alarms to indicate when the
parameter's actual value rises above or falls
below a fixed band around setpoint. See
Table11.1 for a listing of the alarm bands for
each parameter.
at any time to return to
normal operating mode.
11.02 Calibration
If an alarm condition exists, the appropriate
red "High" or "Low" indicator lamp will light to
the left of the display and an audible alarm
will sound continuously. The alarms will
remain active until the actual value returns to
within the normal operating setpoint band.
NOTE
TO ENSURE PROPER OPERATION OF THE
INCUBATOR, CALIBRATION MUST BE
COMPLETED PER SECTION 10 IN THE
FOLLOWING SEQUENCE:
17
See Table 11.1 for a listing of the factory
default alarm delays and the maximum
amount they can be adjusted. See section
11.04.3 on how to change alarm delays.
4.
Alarm
Delay
Default
Alarm
Delay
Limits
HIGH
TEMP
LOW
+0.5°C
5m
0m-5m
-0.5°C
10m
0m-20mm
HIGH
CO2
LOW
+0.5%
5m
0m-5m
-0.5%
10m
0m-20m
11.04.2
1.
incubator is now in communication
parameter setup mode.
2.
Press
Repeat for CO2 and R.H. high and low
alarm delays.
Muting audible alarm
.
If an alarm is currently muted, the presence of
an additional alarm condition will override the
MUTE and the audible alarm will sound.
If an alarm has been muted and the alarm
condition is removed and returns the audible
alarm will sound again regardless of when
MUTE was pressed.
11.04.5 Door Heater Duty Cycle
The control circuitry has the capability of
controlling the incubators door heater semiseparately for the purpose of eliminating any
condensation build up along the outer
perimeter of the inner glass door. There is a
parameter "Uar" which is accessible through
a configuration display where the user can
change its value.
several times to cross
through the communication parameter
setup until the alarm delays are reached.
3.
7.
Muting will silence the audible alarms for 15
minutes. The visual red "High" or "Low"
indicator will continue to be displayed until
the alarm condition is corrected. If the
condition is not corrected within 15 minutes,
the audible alarm will sound again.
Changing Alarm Delays
simultaneously. The
Repeat for temperature low alarm delay.
The display will show
To silence any audible alarm press
Alarm Delays
Press
to store the new value and
6.
11.04.4
Each alarm has an associated delay to prevent
nuisance alarms. The alarm delays have been
optimized and factory preset to prevent
nuisance alarms under normal operating
conditions. If these alarm delay settings are
not appropriate for your application, they may
be adjusted from the keyboard.
11.04.3
Press
cross to the next parameter.
Table 11.1 Alarm Bands and Delay Times
Alarm
Band
to change the temperature
high alarm delay.
5.
Parameter
Press
The display will show
The value of "Uar" has a range of 1.0 to 3.0.
When "Uar" is 1.0, the door heater is controlled
18
in the same manner as the other heaters in
the incubator. When "Uar" is increased above
1.0, the door heater remains on proportionally
longer than the other heaters when the
chambers temperature is within the
proportioning band. For example, when "Uar"
is set to 2.0, the door heater will be on twice
as long as the other heaters.
3. Press
until "7" is displayed in the
temperature window and then press
The displays will show:
The factory setting for "Uar" is 1.0. This value
allows condensation to form on the glass
door. Certain applications require that the
glass door be free from condensation. Set
"Uar" to an initial value of 1.8. Allow the
incubator to stabilize for 24 hrs. Check the
condition on the glass door. Increase the
"Uar" value by 0.1 if the condensation is more
than required. Decrease the "Uar" value by
0.1 if the condensation is less than required.
The determination of the value for "Uar" is
one of trial and error. Allow 24 hours for the
incubator to stabilize before adjusting "Uar"
to a new value.
4. Use the
and
keys to select the
desired value of "Uar" and then press
.
The displays will flash and then return to
their normal operating states.
11.04.6 Alarm Disable
To change the value of "Uar":
1. Press
once. Display will begin
to flash. Press and hold
then press
All alarms may be disabled for a period of up
to 99 hours.To disable or change the alarm
disable time:
and
and
1.
Press
2.
Using
twice. Display shows
.
2. The displays will show:
keys, enter the new alarm
disable time in hours.
3.
Press
The display will flash and a beep tone will
confirm that the new value has been stored.
4.
To check alarm disable time remaining,
press
19
twice at any time.
11.05 Using the Keyboard Lock
safety. The control panel will automatically
re-lock after a new value has been entered.
To temporarily unlock the keyboard:
The keyboard may be locked to prevent
inadvertent changes to previously stored
values.
1.
Press
2.
Using
display will show
11.05.1 To lock the keyboard:
1.
Press
display shows
keys, enter your
numerical password.
2.
3.
keys, enter a numerical
Using
Press
.
The keyboard will automatically re-lock
after any of the following actions:
The display will flash and a beep tone will
confirm that the new value has been stored.
Ten seconds elapse with no buttons
pressed.
Your password is stored, the control panel
is now locked, and the red Lock indicator
illuminates to indicate the locked condition.
After
is pressed whether a value
was changed or not.
NOTE
RECORD YOUR PASSWORD IN A SAFE LOCATION
WHILE THE KEYBOARD IS LOCKED, SETPOINTS,
CALIBRATION AND HI-LIMIT SAFETY VALUES MAY
BE OBSERVED BUT NOT CHANGED.
.
The red LOCK light will now blink on
and off. Previously stored values may
now be changed. The keyboard will relock after the new value is entered.
password of your choice.
3.
Press
After
is pressed.
11.05.3 Permanently unlocking the keyboard.
The control panel can be permanently
unlocked to allow operation without restricting
keyboard entry.
If an attempt is made to change a previously
stored value while the keyboard is locked,
the keyboard will beep and the display will
show
When the control panel is unlocked, the
incubator will accept changes to previously
stored values. To permanently unlock the
incubator:
1.
11.05.2 Temporarily unlocking the keyboard
The control panel can be temporarily unlocked
to change a setpoint, calibration, or Hi-Limit
20
Press
display will show
2.
Using
keys, enter your numerical
2.
Press
3.
Press
until display reads
password.
3.
Press
to temporarily unlock the
keyboard. The red LOCK light will now
blink on and off.
4.
Press
a second time, display will show
.
The incubator will beep, display
and return to initial factory settings.
5.
keys, re-enter your numerical
Using
password.
6.
Press
Parameter
.
Temp. Setpoint
The red LOCK light will extinguish and
the incubator will be permanently unlocked.
IF YOU HAVE FORGOTTEN OR LOST YOUR
PASSWORD, ENTER 257
FOLLOWING A FACTORY RESET, THE INCUBATOR
MUST BE RE-CALIBRATED PRIOR TO USE. FOLLOW
THE INITIAL OPERATION & CALIBRATION
PROCEDURE, SECTION 10.0.
The incubator can be reset to initial factory
conditions at any time. To reset the incubator:
Press
simultaneously,
display will show
Temp. Hi-Limit Safety
50°C
CO2 Setpoint
0
0%
0
R.H. Calibration Offset
0%
Temp. Lo Alarm Delay
10 Minutes
Temp. Hi Alarm Delay
5 Minutes
CO2 Lo Alarm Delay
10 Minutes
CO2 Hi Alarm Delay
5 Minutes
R.H. Lo Alarm Delay
20 Minutes
R.H. Hi Alarm Delay
10 Minutes
Door Heater Pulse Rate
21
0
0°C
R.H. Setpoint
NOTE
Reset Value
Temp. Calibration Offset
CO2 Calibration Offset
11.05.4 Factory Reset
1.
The following table lists all parameters
that are reset and their reset values.
1.0
12.0 RS232 Communications
SETTING UP THE INCUBATOR COMMUNICATION
PARAMETERS
INSTALLATION PROCEDURE
1.
Disconnect the incubator from its A/C power
source. Position the incubator for access to
the rear of the unit. Remove the screws
attaching the rear cover. Remove the cover.
2.
Remove the knockout, located on the right
side of the auxiliary bracket: tap the upper and
lower tabs slightly from the inside until they
bend about 1/8". Using a pair of pliers, rock
the knockout back and forth until it breaks off.
3.
Mount the RS232 printed circuit board
assembly using the screws or standoffs
provided. See Fig. 3A at the end of this section.
4.
Connect one end of the cable to J8 (labeled
RS232) located on the left of the printed
circuit board. Be careful of alignment.
5.
Connect the other end of the cable to cable
connector J2 on the RS232 PCB assembly.
See Fig. 3A at the end of this section.
6.
Reinstall the rear cover and secure with
screws.
Your Napco CO2 Incubator will require the selection
of 6 parameters for communications. The first four
are communication parameters. Your selections
should be noted, so you will have them when
setting up the communication you plan to use.
DESCRIPTION
2
3
7
TXD
RXD
GND
Serial Transmitted Data
Serial Received Data
Signal Ground (O V)
B)
Parity (PAr) - There are three choices for
this parameter and are as follows:
No parity is the most commonly used.
The RS232 PCB utilizes one of the users computer
serial ports, such as COM1 or COM2. The
communication software must be configured to
the selected port. The serial port is an IBM PC ATstyle port. The cable that connects to it must end in
a DB-25 (25-pin) male connector. The cable is a
one-to-one wiring format. The pin assignments for
the serial port are:
SIGNAL
Baud Rate (bAU) - This is the speed of
communication between the Napco CO2
Incubator and computer. Whatever is
selected for the incubator must also be
selected in the communication software
that is planned to be used.
No
(No) - No Parity
Even (EVN) - Even Parity
ODD (Odd) - Odd Parity
The RS232 PCB provides a bi-directional
communication port that will allow the user to
monitor the performance or the change the
operating parameters of the Napco CO2 Incubator
from a remote computer. RS232 Communication
will require a communication program such as a
modem program installed in your computer which
will allow the storage of data within your files.
PIN
A)
22
C)
Bits Per Character (bPC) - There are two
choices for this parameter, 7 or 8. 8 is the
more common of the two.
D)
Stop Bits (StP) - There are two choices for
this parameter, 1 or 2. 1 is the most
commonly used.
E)
Print Time (Prt) - This is the time between
communication transmissions and it is in
seconds. The range is from 0 to 999
seconds.
F)
Print Format (PFt) - There are three choices
for this parameter, 1, 2, or 3. They are as
follows:
SELECTION
DESCRIPTION
Used for a multi-line format with English headings with continuous screen
1
DATE:
TEMP:
CO2:
R.H.:
O2:
18:47
37.00°C
5.0%
97%
10%
Actual
24/June/1993
37.0
5.0%
97%
10%
Setpoint
Used for a raw, one-line status output suitable for importing into a spreadsheet
2
3
20:36 22.0
TIME ACTUAL TEMP
37.0
SET TEMP
5.6
10.0
43.0
ACTUAL CO2 SET CO2 ACTUAL RH
Is an extension of 2 and is not recommended for customer use
Please read the following steps before performing
any of them. It will allow you to familiarize yourself
with the procedure and to determine the values you
want beforehand.
2.
displayed. Using
and
and
, make your
selection of No, Even, or Odd. Keep in mind
With the incubator on, simultaneously press
the
The display should change to the following:
Note: No might not be the selection
Please note: In the following setup mode there is
a thirty (30) second time out feature that is active
following each entry. If the thirty (30) seconds has
been exceeded, the unit will return to the normal
operation mode. If the time out occurs before the
value was entered, start over.
1.
50.0
21.5
25.0
ALARM
SET RH ACTUAL O2 SET O2 ALARM STATUS
that No is used the most. Press
3.
buttons. The letters bAU
.
The display should change to the following:
will appear in the lower display and the baud
Note: 8 might not be the number that is
displayed.
rate value in the upper display.
Note: 96 might not be the number that is
displayed.
Using
Choose the number appropriate for the Baud
Rate desired.
or
, make your selection of 7 or
8. Keep in mind 8 is used most. Press
OFF = OFF
3 = 300
12 = 1200
24 = 2400
48 = 4800
96 = 9600
192 = 19200
Press the
or
4.
.
The display should change to the following:
Note: 1 might not be the number that is
displayed.
Using
arrow until the display
reads your selection. Press
or
, make your selection of 1 or
2. Keep in mind 1 used the most. Press
The baud
rate has been entered.
23
.
5.
The display should change to the following:
have to select the COM serial port you chose
when you connected the cable from your computer
to the incubator. The software may ask what format
the data is in. You should choose ASCII.
Note: 15 might not be the number that is
displayed.
Using
or
, make your selection. Keep in
mind the units for this are in seconds. Press
.
6.
The display should change to the following:
Note: 1 might not be the number that is
displayed.
Using
or
or 3. Press
Settings
Baud Rate:
Baud Rate value selected
earlier in Step 1.
Parity:
None (0)
Data Bits:
Eight (8)
Stop Bits:
One (1)
COM Port:
Selected by user
Format:
ASCII
USING THE COMMUNICATIONS:
The incubator transmits information on its RS232
Port as long as your selection for Prt is not 0.
, make your selection of 1, 2,
If you start your communication software with the
incubator on, most likely you will see the error
messages as follows:
. The unit will return to normal
operation.
7.
Parameter
? NO SUCH TASK
The display should change to the following:
Wait for the Prt duration you selected to complete,
and the communications will correct itself.
Besides having the incubator transmit information
in one of the two formats, the user can monitor
other values or even change some of these from
their computer.
Note: 20 might not be the number that is
displayed.
This parameter is not for communications
and should not be changed. All the
communication parameters have been set.
At this point, either let the unit timeout for 30
seconds or press the TEST button to get
back to the normal operating mode.
The incubator can be queried or controlled via the
RS232. To query the incubator, type the appropriate
command, a question mark, and press Enter. To
control the incubator, type the appropriate
command, the new value, and press Enter. For a
listing of available commands, see the following
table.
SETTING UP THE COMPUTER:
Your communications software will most likely
have a setup routine to set the parameters listed
below. These are the values the incubator is using,
so you must match your computers software
parameters accordingly. Also, you will probably
Example: Change CO2 setpoint to 10%. CS10
(Enter)
CO2 setpoint will change to 10%.
24
Example: Query actual temperature. TA? (Enter)
The actual temperature of the incubator will be
displayed on the computer monitor.
The incubator will accept both uppercase and
lower case commands.
The following table lists the available commands
for monitoring or controlling your incubator.
Table 12.3 Communication Commands
Temperature
CO2
R.H.
(If option is
installed)
System
(If option is
installed)
Actual
TA
Query Only
Setpoint
TS
Query and Control
Offset
TO
Query and Control
Safety
TF
Query and Control
High Alarm Delay
TW
Query and Control
Low Alarm Delay
TL
Query and Control
Actual
CA
Query only
Setpoint
CS
Query and Control
Offset
CO
Query and Control
High Alarm Delay
CW
Query and Control
Low Alarm Delay
CL
Query and Control
Actual
RA
Query only
Setpoint
RS
Query and Control
High Alarm Delay
RW
Query and Control
Low Alarm Delay
RL
Query and Control
Hours
SH
Query and Control
Minutes
SM
Query and Control
Day
SD
Query and Control
Month
ST
Query and Control
Year
SY
Query and Control
Print Rate
SR
Query and Control
Print Format
SF
Query and Control
25
Typing ? (Enter) will display a help screen on the
monitor showing all available commands. The help
screen is reproduced below.
Task (Task Code): Actual
Setpnt
Offset
H Delay L Delay
Safety
Temperature (T):
A
S
O
W
L
F
CO2 (C):
A
S
O
W
L
N/A
R.H. (R):
A
S
O
W
L
N/A
O2 (O):
A
S
O
W
L
N/A
System (S):
Hours
Minutes
Day
Month
Year
Rate
Format
H
M
D
T
Y
R
F
Alarm Delay
Alarm
Status
The following diagnostic format is output every
time
is pressed.
Precision
Date:
Function
Model
Time
Version
Current Current Sensor
Display Setpoint Reading
Offset
High
Low
Temp
37.0°C
37.0°C
5247
0.0°C
0M
10M
None
CO2
5.0%
5.0%
16730
0.0%
0M
10M
None
26
27
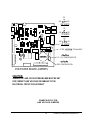
Fig. 3A
REAR VIEW WITH COVER REMOVED
13.0 Care and Cleaning of
Stainless Steel
bisulfate to decrease pH to a 7 to 9 value. Avoid
adding harsh alkalines or acids since they may
cause localized corrosion and result in unstable
pH.
Please note: The following is a general write
up intended as information. It can be used on
incubators or water baths.
Anti-Fungal/Anti-Bacterial Additives
These additives are permissible to use as long as
the pH of the aqueous solution is kept within the
range of 7 to 9. Some of these are available through
your supply dealer. Be sure they are not harmful to
stainless steel.
Stainless steel is an alloy of steel with chromium
and nickel which increase the metal's resistance
to rust and corrosion. However, if not properly
cared for it can rust and corrode. Exposure to air
provides the passivations for clean stainless steel.
This exposure produces a thin, durable chromiumoxide film that forms rapidly on the alloy surface
and gives stainless steel its characteristic
"stainless" quality. Exposure of the surface to
water and other oxidizing environments also
produces this passivating film. However, if free
oxygen is not available due to scale or contamination
buildup the metal surface may become vulnerable
to attack.
Prevention of Scale Buildup
Additives commonly available for use in swimming
pools and spas may be acceptable in circulating
baths only. In static baths these are generally not
effective. This is why it is best to clean the
bath(especially around immersion heaters) and
replace water as soon as practical.
Other Water Additives
Proper maintenance of the stainless steel bath
chamber will help assure many years of service.
Maintaining a neutral pH and frequent cleaning
with detergent and water will give you years of
trouble free service for your incubator or water
bath. The following are some guidelines to consider.
It should be cleaned regularly with mild soapy water
and rinsed with distilled water. Always thoroughly
dry the chamber after cleaning.
Water
IMPORTANT: If it is necessary to use the following
chemicals, limit the exposure time to a maximum
of four hours. Clean surfaces immediately after
use.
Distilled water is recommended. Maintain pH
between 7 and 9 to minimize corrosion of the
stainless steel.
Deionized or reverse-osmosis water may be used.
However, if this water is very pure it may be
corrosive to stainless steel; and in such cases
always add 20-40 ppm (20 to 40 mg/liter)
disodium phosphate or sodium bicarbonate.
Adjust dosage to give a pH of 7 to 9. See "pH
Control" below.
Aluminum Chloride
Chlorinated Lime
Dakin's Solution
Citric Acid (Boiling)
Phenol
Potassium Permanganate
Carbonic Acid
Stannous Chloride
Mercuric Chloride
If the above water is not available you may use
clean, aerated soft tap water provided the total
solids concentration is <500 ppm.
Barium Chloride
Calcium Chloride
Ferrous Chloride
Mercury Salts
Dichloride of Mercury
PotassiumThiocyanate
Sodium Hypochlorite
Tartaric Acid
NEVER USE THE FOLLOWING:
pH Control
Aqua Regia
Ferric Chloride
Sodium Azide Bromine
Iodine
Be sure to check pH regularly. If pH is <6.0, add
disodium phosphate to increase pH to a 7 to 9
value. Sodium carbonate or sodium bicarbonate
may be used but tend to form scale which must be
rinsed out regularly. If pH is >10.0 add sodium
28
Fluorine
Sulfuric Acid
Cleaning
Spills of any chemical, especially those listed
above should be removed as soon as possible
and the stainless steel surface cleaned with mild
soapy water followed by copious rinse with clean
water. Do not use soap filled or any metallic pads.
Even stainless steel pads are to be avoided as
they may destroy the passive film on the surface
of the metal and create crevices that may harbor
contamination. If stubborn stains persist use a
plastic light duty cleansing pad and rub gently in
the direction of the metal grain. If stains continue to
persist use one of the following methods.
THE FOLLOWING CHEMICAL METHODS HAVE
PROVEN SUCCESSFUL BUT EXTREME CARE MUST
BE TAKEN WHEN HANDLING THESE MATERIALS.
ALWAYS WORK IN AN AREA WITH ADEQUATE
VENTILATION. USE THE PRECAUTIONS OUTLINED
IN THE MATERIAL SAFETY DATA SHEET (MSDS)
AND MANUFACTURER'S INSTRUCTIONS FOR THE
PRODUCT YOU ARE WORKING WITH. FOLLOW
THE PERSONAL PROTECTION INDEX FOUND IN
THE HAZARDOUS MATERIALS IDENTIFICATION
SYSTEM (HMIS) SECTION OF THE MSDS.
*Household Bleach
*Glutaraldehyde
*Alcohol
Consult with your staff chemist for advice on using
these chemicals.
CAUTION
Always rinse with copious amounts of clean water.
Air dry and/or fill with fresh water and follow the
guidelines in "WATER" above.
Any of a variety of "scale removers"
available at your local supermarket or
hardware store. Generally sold for
cleaning coffee makers, humidifiers and
vaporizers.
Citric acid based cleaners. Contact your
lab supply dealer.
4.
A 15 to 35% phosphoric acid solution.
Available form chemical supply dealers
for scale and rust removal. Allow solution
to soak the surface affected until rust and
scale is loosened. Immediately rinse with
copious amounts of clean water.
A mixture of 20% nitric acid and 1.5%
hydrofluoric acid (or hydrochloric acid).
Swab solution on surface allowing it to
remain until rust is loosened. Immediately
flush with copious amounts of clean
water.
Materials known to be effective in disinfecting are:
Bathroom tub and tile cleaners. Available
at supermarkets.
3.
6.
Chamber Disinfecting
The use and disposal of these chemicals may be
regulated by your local municipality. Consult the
regulations before disposing of these materials.
2.
Oxalic Acid 2% to 5% in warm water.
Swab solution on surface allowing it to
remain until rust is loosened. Immediately
flush with copious amounts of clean
water.
The above are ranked in order of mild to strong
cleaning agents. Items 5 and 6 should only be
used if severe rust and scale stains have developed
and cannot be removed by any other method. In
any case the chemical should be allowed to do the
cleaning with minimal scrubbing. Always follow
the manufacturer's instructions.
WARNING
1.
5.
DISCLAIMER
The above information is the result of limited
investigation and Precision Scientific makes no
claims as to the suitability to your particular
application. These are intended to be guidelines
only. Consult your staff chemist to determine what
works best in your lab.
29
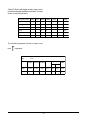
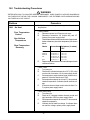
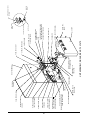
14.0 Troubleshooting Procedures
WARNING
REFER SERVICING TO QUALIFIED SERVICE PERSONNEL. WHEN POWER IS APPLIED DANGEROUS
VOLTAGES EXIST WITHIN THE CHASSIS COMPONENTS. USE EXTREME CARE WHEN MEASURING
VOLTAGES ON A LIVE CIRCUIT.
Problem
Procedure
1.
Verify that setpoint temperature is greater than actual
temperature.
2.
Check heaters.
A.
Disconnect power cord. Remove rear cover.
B.
Disconnect connectors J16 (bottom left) and J17
(bottom) from power supply board.
C.
Check heater resistances with an ohmmeter. Approximate
heater resistances (at ambient temperature) are shown
below:
14.01 No Heat
Poor Temperature
Control
Non-Uniform
Temperature
Slow Temperature
Recovery
Heater
Connections Resistance (in ohms)
115V
Air
Water #1
Water #2
Aux.
J16 Pins 6 & 7
J17 Pins 6 & 7
J17 Pins 7 & 8
J17 Pins 9 & 10
J17 Pins 10 & 11
J17 Pins 1 & 2
Door
D.
129 - 151
129 - 151
129 - 151
502 - 583
502 - 583
114 - 132
Replace any heater that does not match the approximate
resistances above.
3.
Check TRIAC
A.
Turn power on.
B.
Place an AC voltmeter between pins 6 & 7 (115V-units)
on wire side of connector J16 on power supply board.
C.
Set temperature setpoint below actual chamber temperature. Voltmeter should read 0 VAC.
D.
Set temperature setpoint to at least 5°C above actual
chamber temperature. Voltmeter should read line voltage.
E.
If voltmeter does not show correct values in either C or
D, replace power supply board.
4.
Check Safety Relay
A.
Turn power on.
B.
Place an AC voltmeter between chassis ground and
right hand side of R53 on power supply board.
C.
Set temperature setpoint to at least 5°C above actual
chamber temperature.
D.
Voltmeter should read line voltage. If voltmeter does
not read line voltage, replace power supply board.
30
Procedure
Problem
14.01 No Heat (cont.)
14.02 Poor CO2 Control
(TC - CO2 Sensor)
5.
Check temperature sensor.
The temperature sensor used in this unit is a solid state style
which does not lend itself to simple ohmic testing. Problems
with the temperature sensor are identified by characteristic
codes on the temperature display. An open sensor creates
"n n n" on the display and short circuit conditions create "U
U U" on the display. The audible alarm for Hi temperature
and Lo temperature visible alarm prompt or the Lo
temperature visible alarm prompt in the absence of these
actual conditions in the chamber may also indicate the need
for temperature sensor replacement.
A.
Turn power on.
B.
Place a DC voltmeter between pins 1 and 3 on
temperature sensor connector (J7) on power supply
board.
C.
Voltage should read 5 VDC. If not, replace power
supply board.
D.
Place a DC voltmeter between pins 2 and 3 on
temperature probe connector. Verify that the output of
the temperature probe is 10 MV/°C.
1.
Verify that incubator is stable at setpoint temperature and
R.H. levels. Calibrate the TC - CO2 Sensor when the
incubator is stable at setpoint temperature and R.H. levels.
See section 10.
2.
Check power supply board.
A.
Turn power on.
B.
Check voltage between TP1 and TP2 on power
supply board using a DC voltmeter. Voltage should
read 7.00±.05V.
C.
Adjust R5 (pot at upper-right corner) until potential
between TP1 and TP2 reads 7.00 ± 0.05V.
3.
Check power supply board
A.
Check resistance between TC - CO2 connector (J5)
Pin #1 and TP1 with TC - CO2 sensor removed.
B.
Check resistance between TC - CO2 connector (J5)
Pin #3 and TP1 with TC - CO2 sensor removed.
C.
Both resistances should be 150 ohms. If not, replace
power supply board.
4.
Check gas flow lines. Assure that gas is getting to solenoid
valve inlet.
5.
Check Solenoid
A.
Turn CO2 setpoint up until CO2 setpoint is 3 to 5%
above the displayed actual CO2 value. The green
"on" light should be on.
B.
Place a DC voltmeter between Pin 2 on the solenoid
connector J12 and TP2 on power supply board.
Voltmeter should read 5 VDC. If not, replace power
supply board.
31
Procedure
Problem
C.
14.02 Poor CO2 Control
(TC - CO2 Sensor)
D.
6.
Place a DC voltmeter between Pins 1 & 2 on
solenoid connector J12 on power supply board. The
voltmeter display should be cycling between 0 V
and less than one volt. If not, replace power supply
board.
There should be an audible "click" from the solenoid
each time the valve is actuated. If not, replace
solenoid.
Check CO2 Sensor
The CO2 sensor used in this unit is a thermal conductivity
thermistor type. Two thermistors are connected in series
and have a common connection.
The approximate in-circuit voltage across each junction at
37°C is 2.1 VDC and at 25°C is about 2.5 VDC. The
resistance of the sensor thermistors will vary with temperature but a general range of resistance, as measured
between Pins 1 & 2 or between Pins 2 & 3 should be
between 2K ohms to 4K ohms. Each junction will have
about 1.5K ohms of resistance at 37°C.
14.03 Poor CO2 Control
(IR - CO2 Sensor)
1.
Actual CO2 percent does not agree with displayed CO2
percent, displayed CO2 percent drifts or will not inject CO2,
unit will not hold a calibration. May signal possible problems with the IRCO2 sensor.
2.
After following the CO2 calibration procedure Section
10.08, if a problem continues the sensor or Power PCB
may be defective. Test the 5 VDC supply at the Power
PCB (between TP2 and TP3). After eliminating the power
supply as a potential problem check the signal output at
the IRCO2 sensor. Connect a digital voltmeter NEG lead
to jack J1 lead labeled COM (ground). There are 2
COM leads, either lead can be used. Connect the digital
voltmeter POS lead to jack J1 lead labeled LINEAR
(signal output). This linear function gives 0.0 VDC to 1.0
VDC output which equates to 0.0% CO2 to 20.0% CO2.
3.
With the temperature and humidity stable for at least two
(2) hours and with a CO2 setpoint of 0.0% CO2 and no CO2
in the chamber, adjust the FINE ZERO potentiometer
until the digital voltmeter reads 0.0 VDC+ 0.01 VDC. Enter
a CO2 setpoint between 5.0% CO2 to 10.0% CO2 and allow
it to stabilize for about ten (10) minutes. Measure the CO2
with a Fyrite. Multiply the measured CO2 percentage by a
factor of 0.05 and the value obtained will be the IRPCB
output voltage, e.g.
5.5% - CO2 measured
X 0.05
0.275 VDC IRPCB volts out
32
Procedure
Problem
Slowly adjust the “SPAN” potentiometer until the proper
output voltage is obtained. After completing the above
procedure, follow the CO2 calibration procedure Section
10.08.
14.03 Poor CO2 Control
(IR - CO2 Sensor)
(cont.)
14.04 Excessive
Condensation
1.
Check magnetic door gasket.
A.
Does the gasket fit evenly along the incubator
body? There should be no distortions in the gasket
that could cause air to flow between the gasket and
the incubator.
B.
If distortions exist, remove door liner and reposition
or replace gasket.
2.
Check glass door gasket.
A.
Check for gasket tears or imperfections. Replace
gasket, if imperfections found.
B.
Verify that the gasket is completely adhered to the
incubator chamber. If not, apply RTV Silicone sealant (Dow Corning #732) to gasket and chamber.
Allow to cure for 24 hours.
C.
Shut and latch the glass door firmly in place. The
gasket/ glass door interface should be completely
sealed around the entire perimeter of the glass
door. Try to place a business card between the
glass door and gasket in any suspect areas. If a
business card can be placed between the gasket
and glass door, replace the gasket or check glass
door alignment.
3.
Check glass door alignment.
A.
Check that the two plastic nuts are secured tightly
to the two stainless steel hinges.
B.
If the door does not appear to be properly aligned,
loosen the four capnuts holding the hinges onto the
incubator and realign the glass door.
C.
Repeat step 2C to verify the glass door alignment.
Humidity within the chamber can vary with changing
temperature, ambient conditions, and the nature of the
sample. The condensation, or lack thereof, on the glass
door is by no means a proper way to measure the relative
humidity within the chamber, but as a general rule there
will be a very slight amount of condensation near the
edges of the glass door during normal operation or
sometimes no condensation whatsoever. If all of the glass
or greater than half the surface area of the glass is
covered with moisture, this may indicate that the door
heater may require an adjustment of the pulse rate to the
heater. Refer to Section 11.06 to adjust the heater on
time.
33
Problem
14.04 Excessive
Condensation
(cont.)
14.05 Poor R.H. Control
(with optional
R.H. Control)
Procedure
4.
Check door heater and auxiliary heater.
A.
Turn power off.
B.
Disconnect connector J17 from the power supply
board.
C.
See section 14.01 for pin numbering and resistance
values.
1.
Excessive condensation inside the incubator will cause an
overshoot in the R.H. If condensation exists, remove condensation with a sponge.
2.
See troubleshooting Section 14.04 (Excessive Condensation). Verify that no problems exist.
3.
Check R.H.. distilled water supply. If supply is empty, a
setpoint can not be reached; therefore, add more distilled
water.
4.
Check power supply board.
A.
Turn power on.
B.
Set R.H. setpoint to 97%. Note: setpoint must be
higher than actual humidity being displayed.
C.
With a DC voltmeter check the following voltages on
the power supply board.
TP2 & TP413.5V - 15.5V
TP2 & TP35V
If any of the voltages are incorrect replace the power
supply board.
5.
Check R.H. pump.
A.
Turn power on.
B.
Set R.H. setpoint to 97%.
C.
Open front cover of control panel by loosening the
two thumb screws.
D.
Place an AC voltmeter between Pins 1 & 3 on the wire
side of the white connector on the R.H. pump mounting bracket. The pump does not run continuously but
should run when the "on" light next to the R.H. display
is lit. Voltmeter should read line voltage. If not, check
wiring. (Refer to wiring diagram at end of manual.)
E.
If part D checks okay and pump is not turning, replace
pump.
34
Procedure
Problem
14.05 Poor R.H. Control (cont.)
6.
Check neoprene tubing
A.
Turn power off.
B.
Remove front cover from control panel by loosening the two thumb screws.
C.
Inspect the cream-colored tubing which fits inside
the peristaltic pump.
D.
The tubing should lie evenly around the pump. If
not, loosen the clear plastic thumbscrew and place
the norprene tubing in the correct position. Retighten the plastic thumbscrew.
E.
Inspect the norprene tubing for wear. If the tubing
shows any type of wear, replace the tubing.
7.
Check tubing system for leaks.
A.
Disconnect the tubing from the steam generator.
B.
Turn power on.
C.
Set R.H. setpoint to 97%. Setpoint must be higher
than actual humidity being displayed.
D.
Verify that the pump is turning and that there is an
ample distilled water supply.
E.
Look for small droplets of water exiting the tubing
where it has been disconnected from the steam
generator. This could take up to 30 minutes if the
distilled water supply is fresh. If water is not flowing, first replace the distilled water filter adjacent to
the pump. Be careful to install the new filter in the
correct orientation.
F.
Repeat the above test. If water still does not flow,
check for kinks or breaks in the tubing system.
8.
Check steam generator.
A.
If water is being injected into the incubator rather
than steam, the steam generator should be suspected.
B.
Turn power off.
C.
Disconnect connector J16 from the power supply
board.
D.
Check the resistance between connector Pins 4
and 5 with an ohmmeter. At ambient temperature,
ohmmeter should read as follows:
115V
129 - 151 ohms
If not, replace the steam generator.
35
Problem
14.06 Noisy Fan
Procedure
Noise inside the incubator chamber, above what would normally be expected, is usually an indication of fan blade or fan
motor trouble. Problems with excessive humidity and poor
temperature uniformity can also signal fan motor or fan blade
trouble. The fan blade mounts to the fan motor shaft by friction.
The proper rotation of the fan blade, observing the blade from
within the chamber, is clockwise. Air is drawn into the fan and is
blown out tangent to the fan blade. Buzzing noises can be
isolated by checking the fan blade position on the shaft; it may
be too close to the plenum, or pushed too far back against the
fan motor plate.
36
15.0 Part Replacement Procedures
3. Locate jack J16 on the main PCB and remove
the leads, remove the ground lead from the
motor as well.
4. Remove the shelves and plenum from the
chamber. Pull fan blade off shaft, remove
retaining ring and two (2) screws which
secure motor to fan motor plate.
5. Reinstall the new motor, carefully noting the
rotation of the shaft. Reverse the above
procedure.
WARNING
DISCONNECT POWER CORD BEFORE PERFORMING
ANY OF THE FOLLOWING PROCEDURES.
15.01 Temperature Sensor
1. Disconnect incubator from power source.
2. Remove the six (6) screws which secure
rear cover plate.
3. Locate jack J7 on the main PCB and
disconnect.
4. Pull out sensor from fan motor plate.
5. Reinstall new sensor, reversing above
procedure.
15.04 Air Heater
1. Disconnect incubator from power source.
2. Remove the shelves, supports, and plenum
from within the incubator chamber.
3. Remove the six (6) screws which secure
rear cover plate. Note: It is not necessary to
remove the fan motor plate to change the air
heater.
4. Disconnect the spade terminals leading from
the main PCB at heaters ends.
5. Remove the two (2) nuts which secure the
heater to the fan motor plate and pull heater
out through the front of the fan motor plate.
6. Reinstall new heater, reversing the above
procedure.
NOTE
WHEN INSTALLING NEW PROBE MAKE CERTAIN
THE FLARE AT THE CABLE END OF THE PROBE
STOPS AT THE BLACK GROMMET ON THE FAN
MOTOR PLATE.
6. Recalibrate temperature control, if necessary.
Follow procedure in Section 10.05.
15.02 CO2 Sensor
15.05 Water Jacket Heaters
1. Disconnect incubator from power source.
2. Remove the six (6) screws which secure
rear cover plate.
3. Locate jack J5 on the main PCB and
disconnect.
4. Remove the four (4) screws which fasten the
CO2 sensor to the fan motor plate.
5. Reinstall new sensor, by reversing the above
procedure.
6. Allow the temperature and humidity to
stabilize for at least two (2) hours. Recalibrate
the CO2 control following the procedure in
Section 10.08.
1. Disconnect incubator from power source.
2. Remove the six (6) screws which secure
rear cover plate.
3. Locate the water jacket heaters, one left, one
right at rear, near the bottom of the jacket.
Remove the nut and retaining washer which
secure the heater in the thermowell.
4. Locate jack J17 on the main PCB and
disconnect the heater leads.
5. Remove the heaters from the thermowells.
Note: Grasp the heater sheath with pliers if
heater will not easily slide out. Do not pull
them out by the leads, as they may rip out and
leave the heater sheath stuck on the
thermowell tube.
6. Reinstall new heaters, reversing the above
procedure.
15.03 Fan Motor
1. Disconnect incubator from power source.
2. Remove the six (6) screws which secure
rear cover plate.
37
15.06 Door Heaters
7. Remove the screws which secure the CPU
PCB to the chassis.
8. Install new CPU PCB reversing steps 6, 7.
Replace rear cover plate.
1. Disconnect incubator from power source.
2. Remove the screws which secure control
panel.
3. Disconnect leads connected with wire nuts
which pass through door hinge.
4. Remove screws which secure inner liner of
outer door. These screws are under the
outer door gasket.
5. Peel off defective heater from door liner.
6. Install a new door heater, reversing the above
procedure.
The unit now needs to have the new CPU
PCB configured for the model in which its
placed. Find the model number of the
incubator on the id tag on the outer door liner,
then match it to the model in the table. Note
the unit id code for your model.
1. Reapply power to the incubator.
15.07 Auxiliary Heater
2. Press
1. Disconnect incubator from power source.
2. Remove the screws which secure control
panel.
3. Remove insulation.
4. Disconnect leads connected with wire nuts.
5. Peel off defective heater from top of chamber.
6. Install a new heater, reversing the above
procedure.
3. Press
and
at the same time.
4. Display will show:
5. Enter configuration password 37 (use
15.08 Power Supply/CPU PCB
The power supply and CPU circuit board
must be replaced together as a matched set.
6. Press
)
.
If the value is not entered within 1 (one)
minute, the unit automatically times out. If
this occurs, repeat the setup starting at item
2.
WARNING
DISCONNECT POWER CORD BEFORE PERFORMING
THIS SERVICE PROCEDURE.
1. Disconnect incubator from power source.
2. Remove the screws which secure the rear
cover plate.
3. There are two jumpers on the power supply-JP2 and JP3. These jumpers configure the
power supply to match the A/C line input
voltage. Remove the replacement board from
its pouch and configure the jumpers to match
the board in the unit. Note the location of each
connector going to the power supply board.
Carefully remove each connector from the
board.
4. Remove the screws which secure the Power
Supply PCB.
5. Install new Power Supply PCB reversing
steps 3, 4.
6. Remove the ribbon cables connected to J1
and J2 on the CPU PCB.
, enter the unit I.D. number for
7. Using
your model. Obtain the unit I.D. from table
15.1 on the following page.
8. Press
.
9. Press
to return to normal display.
To check unit, press
again and unit will
scroll through a series of verifications:
38
Software revision level.
Unit id - this should match value you selected
from table.
CO2 sensor type (T/C or IR)
LED segment check
3. Disconnect the CO2 gas sample hose and
water fill hose.
4. Disconnect the ribbon cable(s) from the circuit
board.
5. Remove 11/32" nylon nuts which fasten the
circuit board to the panel. Do no use metal
nuts or metal washers in place of these nylon
nuts as they may short the solder traces on
the board or crack the board.
6. Install new Display/Keyboard PCB reversing
above procedure.
Press TEST again to exit.
Calibration of the unit must be performed. See
Section 10.0.
Models
Unit ID
6101-0
6301-0
6t-
6101F-0
6301F-0
6f-
6101H-0
6301H-0
6th
6101FH-0
6301FH-0
6fh
6101C-0
6301C-0
6tc
6101FC-0
6301FC-0
6fc
15.11 Steam Generator (optional R.H. Control)
1. Disconnect incubator from power source.
2. Remove the screws which secure the rear
cover plate.
3. Allow steam generator to cool.
4. Disconnect heater wires from J-16 terminals
4 and 5. Disconnect connector J10.
5. Disconnect steam generator from retaining
bracket.
6. Loosen bulkhead fitting and pull steam
generator out of fan motor plate.
7. Install new steam generator by reversing
above procedure.
15.12 IR CO2 Sensor
1. Disconnect power from incubator.
2. Remove the screws which secure the rear
cover plate.
3. Locate jack J1 on Power PCB and disconnect.
4. Remove front shield covering sensor and
remove the screws which secure the sensor
and rear shield.
5. Install new sensor, carefully replace the metal
shield near the sensor, reversing the above
procedure.
6. Allow temperature and humidity to recover for
at least four (4) hours and follow the CO2
Calibration Procedure in Section 10.08.
Table 15.1, unit ID
15.09 CO2 Solenoid Valve
1. Disconnect incubator from power source.
2. Remove the six (6) screws which secure the
rear cover plate.
3. Locate jack J12 and unplug connector.
4. Disconnect hoses from defective valve
assembly.
5. Remove valve assembly.
6. Install new valve assembly, reversing the
above procedure.
15.10 Display/Keyboard PCB
1. Disconnect incubator from power source.
2. Remove the screws which secure the control
panel to the body of the incubator. These four
(4) screws are located on the underside of the
control housing and can be seen when you
open the door.
39
Replacement and Accessory Parts
51201075
51201105
51201076
51201106
Catalog Number
51201077
51201107
51201078
51201108
Voltage
120~
Part Number (units built pre
6/1/2002)
Ammonium, Quaternary
Part Number (units built post
6/1/2002)
51200912
Battery, Lithium CR2330 (For CPU PCB)
Available Locally
Blower Wheel
34000002
Cable ASM, CPU/Display
34542345
Cable ASM, CPU/Powerboard
34542362
Caplug (For Door Liner)
34221123
Caster Kit
51200816
Clamp, 3/8" Self Tightening
34450068
Clamp, (External Supply) Hose
34257142
Clamp, Tygon Tubing
34257161
Clean Start Kit
51200904
Connector, Power
34000039
CO2 Tank Regulator
51200901
Door Assembly, Glass
51245040
51245479
Duct, Blower Kit
51245401
Filter, EMI/RFI
26365012
Filter Kit, HEPA Gas
51200834
Filter, Water
34004942
Fuse Kit, 5x20mm 0.8 A SLOBLO
51245404
Fuse Kit, 5x20mm, 6.3 A SLOBLO
51245394
Fuseholder Kit, 15 A
51245402
Fyrite CO2 Analyzer
34001528
Gasket, Glass Door
34232338
Gasket, Magnetic Outer Door
34167341
Heater, Air
34247431
Heater, 50 W Auxillary (Above Chamber)
34247450
Heater, 100 W Cartridge (Water Jacket)
34000027
Heater, Door
34247448
40
Replacement and Accessory Parts
51201075
51201105
51201076
51201106
Catalog Number
51201077
51201107
51201078
51201108
Voltage
120~
Part Number (units built
pre 6/1/2002)
Part Number (units built
post 6/1/2002)
Hose Assembly, Supply (R.H.)
34001218
Hose Assembly, Water Fill (8 ft w/Fitting)
51200905
Hose, CO2 Supply (8 ft)
51200822
Jack, R.H. Level
34000087
Leveler Kit, 5/16-18 Foot
51245376
Liner, Left Hand Door (Hinge Left)
34000124
36500029
Liner, Right Hand Door (Hinge Right)
34000187
36500030
Motor Replacement Kit, Fan
51245056
Outlet, 230 Volt Auxillary
34003395
Pan Kit, Humidity
51200900
PCB, Power Supply
34000313
PCB, CPU
PCB, Keypad/Disp.
34388301
PCB, RS232
51200906
PCB, Slave Disp.
34388601
Power Cord
34353025
R.H. Supply Assembly (Pump)
(for Units with "C" in the model number)
51245195
Reservoir, R.H. H20 Supply
(for Units with "C" in the model number)
34000499
Sensor, Relative Humidity
(for Units with "C" or "H" in the model number)
34000085
Sensor Assembly, Temperature
34542382
Sensor Assembly, TC CO2
34542353
Sensor Kit, Infrared CO2 (Sensor & PCB)
51245036
Shelf Kit (One Shelf & Two Slides)
51200826
41
Replacement and Accessory Parts
51201075
51201105
51201076
51201106
Catalog Number
51201077
51201107
51201078
51201108
Voltage
120~
Shelf Standard, Left Front
Part Number (units built
pre 6/1/2002)
Part Number (units built
post 6/1/2002)
34000071
36500047
Shelf Standard, Rear
34000070
Shelf Standard, Right Front
34000072
36500042
Steam Generator Kit
(for Units with "C" in the model number)
34387600
Stopper, #6 Solid Green (For Rear Port)
34221172
Switch Assembly, Float
51245181
Switch, Power
34240618
Thumbscrew, Front Panel
(for Units with "C" in the model number)
34000103
Transformer Assembly, Power
34003436
Tubing, Clear Gas
37001233
Tubing Replacement Kit, Water Pump (includes tubing,
fittings & filter) (for Units with "C" in the model number)
34542580
Valve Asm, Shuttle
34542406
Valve Assembly, Solenoid (CO2 & O2)
51245085
Latch Kit, Glass Door
51245032
42
51245482
43
UNIT ASSEMBLY,SINGLE
44
ORIENTATION NOTE:
.375 X 45° CHAMFERED CORNERS
INDICATE BOTTOM OF LINER.
1.0"
#8-18 X 1/2
TRX/SLT SCREW
12 REQ'D.
CAPLUG
1050
1 REQ'D.
INSULATION, DOOR
WITHOUT HOLE.
INSULATION, DOOR
WITH HOLE, 1 REQ'D.
#8-32 KEPS NUT
CAD PLATED.
1 REQ'D.
GASKET, MAGNETIC
1 REQ'D.
LINER, DOOR
LEFT HAND.
1 REQ'D.
BEARING, DOOR
HINGE, 2 REQ'D.
DOOR EXTERIOR
1 REQ'D.
WIRE ASSEMBLY
DOOR, GROUND
1 REQ'D.
HEATER, DOOR 120W
1 REQ'D.
(REF.)
ORIENTATION NOTE:
RADIUSED CORNERS INDICATE
TOP OF THE LINER.
DOOR, HANDLE
1 REQ'D.
34247448
115V
VOLTAGE/PART NO.
DOOR MODULE
LEFT HAND
HEATER,DOOR
HEATER TYPE
45
SCREW
CONTROL PANEL
NUT,#8-32
UNITS WITH
RH PUMP ONLY
CONTROL PANEL CONNECTIONS
TUBING ASSEMBLY
NUT, BRASS
RIBBON CABLE
FILL TUBE
ENLARGED CORNER
46
G:\NAPCO\CO2\MANUAL\6000CPNL.PRT
#8-32 NYLON
LOCKNUT
DISPLAY
SLAVE PCB ASM.
DISPLAY
KEYBOARD ASM.
CONTROL
PANEL
CONTROL PANEL
NUT SUPPLIED
AS PART OF
BULKHEAD.
R.H. CONTROL
UNIT ONLY.
2 REQ'D.
OVERLAY
BILKHEAD RING
GREEN.
R.H. CONTROL
UNIT ONLY.
1/16 BULCKHEAD
LUER
(ATTACH HOSE
USING CLAMP)
DOOR
R.H. CONTROL
UNIT ONLY
THUMBSCREW
R.H. CONTROL
UNIT ONLY
USING WIRE CUTTERS,CLIPOFF
SWITCH SHAFT FLUSH WITH
SWITCH 3 PLACES AS SHOWN.
OPTIONAL R.H. PUMP SUPPLY
47
G:\NAPCO\CO2\MANUAL\SUBASSEM.PRT
MOTOR, CAPACITOR & VOLTAGE SELECTION
CHART
ASSEMBLY
PART NO.
DESCRIPTION
PART
NUMBER
VOLTAGE
MOTOR
115V/60HZ
34393000
34000112
110/115V
CAPACITOR
50mF
SUPPLIED
WITH MOTOR
BUTT CONNECTOR-END
2 REQ'D.
CAPACITOR
SELECT FOR CORRECT
PART NO. & VOLATGE
PER CHART.
CUT LEADS TO 1 1/2"
1 REQ'D.
#6 RING TERMINAL
22-16 GA.
1 REQ'D.
SHRINK TUBING
.076 I.D. X 1.0 LONG.
2 REQ'D.
18 GA. WIRE
1015 GRN/YLW
5" LONG
1 REQ'D.
CABLE TIE
2 REQ'D.
BRACKET
CAPACITOR MTG.
1 REQ'D.
18 GA. WIRE
1015 BLACK
4" LONG
1 REQ'D.
SCREW, P.H. MACHINE
#4-40 X 1 1/4"
2 REQ'D.
PIN CONTACT
14-20 AWG
1 REQ'D.
WASHER, #4
S.S. INT S.P.
4 REQ'D.
CAP HOUSING
3 POSITION
MATENLOK
1 REQ'D.
HURST MOTOR
SELECT FOR CORRECT
PART NO. & VOLTAGE
PER CHART.
1 REQ'D.
COUPLING
1 REQ'D.
SPACER
ALUM, 1 1/16" LG.
2 REQ'D.
CONNECTOR
SPIDER INS.
1 REQ'D.
COUPLING
1/4" BORE
1 REQ'D.
4-40 X 3/8 LG.
PHSS MACHINE
SCREW (2)
SCREW
SUPPLIED
WITH PUMP
ASSEMBLY.
PUMP HEAD
ASSEMBLY
1 REQ'D.
PLATE, R.H.
PUMP MTG.
1REQ'D.
KNOB, CLAMP &
SCREW SUPPLIED
AS PART OF PUMP
ASSEMBLY
1 REQ'D.
#4 INTERNAL
TOOTH
LOCKWASHER
CLAMP, KURLY
LOK, B.H.
2 REQ'D.
FILTER,
MODIFIED.
1 REQ'D.
TUBING, NORPHIENE
CUT 14" LONG.
1 REQ'D.
WATER PUMP TUBING REPLACEMENT
KIT #542580 INCLUDES TUBING, FILTER
AND CONNECTORS
R.H. SUPPLY, PUMP & MOTOR ASSEMBLY
48
G:\NAPCO\CO2\MANUAL\C00393000.PRT
SHUTTLE VALVE
ASSEMBLY N2
NUT, 3/8-24
SHUTTLE VALVE
ASSEMBLY CO2
SCREW,8-32
KEPS NUT, #8-32
BULK HEAD LUER
R.H PUMP ONLY
PCB ASM, RS232
CONNECTION
BULK HEAD GREEN
R.H. PUMP ONLY
FITTING
TUBING, WATER
TOP TO BOTTOM
LABELED 0 (CONNECT
AS SHOWN) ATTACH
USING CLAMP
SCREW, RS232
TUBING, GAS
O2, N2, CO2
TOP TO BOTTOM
(CONNECT AS
SHOWN)
HOSE CLAMP
(CONNECT 3 PLACES)
RS232 CABLE
ASSEMBLY
TUBING, WATER
TO STEAM GENERATOR
ATTACH USING CLAMP
TOP UNIT
SINGLE CHAMBER & DOUBLE CHAMBER TOP UNIT
CO2 GAS & R.H. WATER TUBING CONNECTIONS
SCREW, #8-32
KEPS NUT, #8-32
TUBING, WATER
TO STEAM GENERATOR
HOSE CLAMP
(CONNECT 3 PLACES)
VALVE, SOLENOID
CO2, N2, O2 ASS'Y.
BOTTOM UNIT
DOUBLE CHAMBER BOTTOM UNIT
CO2 GAS & R.H. WATER TUBING CONNECTIONS
49
G:\NAPCO\CO2\MANUAL\MAINASSY.PRT
50
G:\NAPCO\CO2\MANUAL\MAINASSY.PRT
CPU PCB ASSEMBLY
PAD, NOISE ISOLATOR
PEEL RELEASE LINER & LOCATE
USING FIXTURE T15887
CLAMP, KURLY-LOCK
9 REQ. (6001 SERIES)
15 REQ.(7001 SERIES)
GAS INLET TUBING
(ROUTE AS SHOWN)
BRACKET, AUX.
CONTROLS
OVERLAY REAR, TOP
WIRES, SOLENOID
(ROUTE AS SHOWN)
FUSEHOLDER BODY
2 REQ'D
RIBBON
CABLE
SCREW, #8 X 7/8
TORX, 2 REQ.
FUSE, POWER, LINE
TRANSFORMER
FUSE CAP
2 REQ'D.
INSULATION
(NOMEX)
LABELS, FUSE
RATINGS
COVER
SCREW, TRX.
6 REQ.
SCREW, #8 X 7/8 TORX (REF)
PCB BOARD
SCREW, TORX #8 X 1/2
FILTER, EMI/RFI STAR WASHER
INSTALL BETWEEN EMI FILTER
AND BODY,TOP TAP ONLY
POWER CONNECTOR
KEPS NUT, #6-32
2 REQ.
OUTLET, 115V
FLOAT SWITCH
SCREW, #6-32 X 1/2
FLAT HEAD, 2 REQ.
SWITCH, POWER
OVERLAY, REAR, SIDE
FUSE, AUX. OUTLET
UNIT ASSEMBLY, SINGLE, REAR 115 VOLTS
SCREW #8 X 1 1/2"
TORX, 2 REQ.
CABLE ASSEMBLY CPU
TO POWER BOARD
BODY ASSEMBLY
MOUNTING
BRACKET
SCREW,TORX,BLACK #8-18 X
1/2, 2 REQ'D
51
G:\NAPCO\CO2\SUBASSEM.PRT
SCREW, #8 TORX
2 REQ.
#8 EXT. TOOTH
LOCKWASHER
WIRE ASSEMBLY
SHORT, IR SENSOR
STEAM GENERATOR AND IR CO2
SENSOR CONNECTIONS
ROUTE WITH
SOLENOID
SCREW, #6-32 WIRES, USE
X 3/4, 4 REQ. WIRE TIES
SUPPLIED WITH
IR SENSOR
STEAM GENERATOR
NUT, #8-32 S.S.
STEAM GENERATOR AND IR CO2
SENSOR ASSEMBLY
BRACKET, STEAM
GENERATOR
IR BOARD
SPACER, 1/4 O.D.
4 REQ.
BLACK & BROWN MOTOR
LEADS TOGETHER.
CUT 4" LONG & STRIP
ENDS 1/4"
SPLICE CLOSED
END 18 - 12.
2 REQ'D.
WHITE & RED MOTOR
LEADS TOGETHER.
CUT 4" LONG & STRIP
ENDS 1/4"
18 GA WIRE 1015 BLACK
CUT 4" LONG & STRIP
ENDS 1/4", PIN 1.
1 REQ'D.
18 GA WIRE 1015 WHITE.
CUT 4" LONG & STRIP
ENDS 1/4", PIN 3.
1 REQ'D.
PLUG 9 POS.
PHOENIX 5 MM
1 REQ'D.
A/R CABLE TIE 4"
3 REQ'D.
18 GA WIRE 1015 WHITE
CUT 12" LONG & STRIP
ENDS 1/4", PIN 7.
1 REQ'D.
18 GA WIRE 1015 BLACK
CUT 15" LONG & STRIP
ENDS 1/4", PIN 6.
1 REQ'D.
WIRING DIAGRAMS 100 & 115 VAC
( -0 -2 )
52
G:\NAPCO\CO2\00391618.PRT
53
G:\NAPCO\CO2\00391618.PRT
TC CO2 SENSOR ASSEMBLY
#6-32 X 3/8"
SCREW S.S.
4 REQ'D.
SENSOR, CO2
ASSEMBLY
GROMMET
(SLLIT TO
INSTALL)
IR-CO2 SENSOR
PACKAGE, MODIFIED
SENSOR SHIELD, FRONT
#4-40 SCREW
2 REQ'D.
18 GA WIRE
GRN/YLW
11" LONG
STRIP BOTH
ENDS 1/4".
#8 RING
TERMINAL
#6-32 SCREW
4 REQ'D.
CONNECT SLEEVE
GROUND WIRE
AS SHOWN
#6 RING
TERMINAL
IR SHIELD
(SLEEVE)
SENSOR SHIELD, REAR
IR CO2 SENSOR ASSEMBLY
OPTIONAL
GROUND WIRE, REF.
SHIELD, MOTOR
#8-32 SCREW, REF.
SPACER, IR S.S.
SPACER, IR
GASKET, BLACK
SCREW, M3 X 8
NUT
0-5B-N
CONNECTOR
UNION 15-5-N
NUT, BULKHEAD
WITH HOLE
0-5-H
SENSOR, RH ASS'Y
WITH SCREWS
RH SENSOR ASSEMBLY
OPTIONAL
54
G:\NAPCO\CO2\MANUAL\FANPLATE.PRT
115
100
230
230 VOLTS
115
100
230
115 VOLTS
115
230
100
100 VOLTS
FUSE
T315mAL250V
110 / 115V CONFIGURATION
230V CONFIGURATION
PCB POWER BOARD JUMPERS
CAUTION:
JUMPERS JP1 AND JP2 ON POWER BOARD MUST BE SET
FOR CORRECT LINE VOLTAGE OR DAMAGE TO THE
ELECTRICAL CIRCUIT COULD RESULT.
POWER SUPPLY PCB
LINE VOLTAGE JUMPERS
55
G:\NAPCO\CO2\MANUAL\JUMPERS.PRT
5
ONLY ONE SENSOR TYPE
IS USED PER UNIT.
BLK
9C
GRN/YEL
F1
BLK
H
HC
2C
5
(LINE)
10
4
1C
2
TP4
7.0 VOLT
ALARM
OUTPUT
J2
+5
TXD
RXD
GND
4
6
1
ORG
1
J8
ORG
YEL
BLU
BLU
1
ORG
115V
3
110V
230V
J11
2
BLK
BLK
BRN
WHT
WHT
BLK
G1 HEATER AIR
1
2
3
4
5 J16
6
7
8
9
ORG
1
ORG
J-20
J19
J12
1
2
3
4
5
123
JP3
9
1
WHT
2
BLK
BLK
CHASSIS
GROUND
RED
RED
RED/YEL
60 watt
240 Ω
RED
RH
PUMP
MOTOR
60 watt
240 Ω
BLK
1
2
3
4
5 J16
6
7 POWER
8
9 SUPPLY
123
J-20
G1
BOARD
BLK
HUMIDITY
WATER
SUPPLY
(OPTIONAL)
FLOAT SW.
LIGHT :
100/115V
BLK
EXTERNAL BACKUP
TEMPERATURE CONTROL
(OPTIONAL)
654321
CONTROL
WHT
YEL
BLU
1 2 3 4 5 6 7 8 9 101112
WHT
EXTERNAL BACKUP
TEMP. SENSOR (OPTIONAL)
BLK
Heaters resistance is with element
at ambient temperature,and
connector removed from PC board.
Tolerance is + 5% , -10%
RED
ORG
J17
WATER
JACKET
WHT
HEATER,DOOR
120W TOTAL
115/230V
WHT
10mV/ C
BLK
G1
DOUBLE UNIT,LOWER
RED
WHT
BLK
BLK/WHT
WHT
RED/WHT
GRN/YEL
TO CHASSIS
GROUND
BLK
FLOAT SW.
WHT
CO2
WIRING 100/115V
GRN/YEL
WHT
DS1
1 2 3 4 5 6 7 8 9 101112
SOLENOID
WHT
5
STEAM GENERATOR
(OPTIONAL)
P20
12
5C
13
WHT
WHT
WHT
3C G1
POWER
IN
J17
100Volt,100 Ω
115Volts,132 Ω
GRAY
56
GRN/YEL
100 WATTS
TO CHASSIS
GROUND
GRN/YEL
3
WHT
4C
GRAY
WHT
1 2 3 4 5 6 7 8
4
JP2
115V
230V
115V
230V
FAN
MOTOR
DISPLAY/
KEYBOARD
1
J14
BROWN
RED
J20
BLK
TO CHASSIS
GROUND
POWER SUPPLY BOARD
CABLE ASM CPU/POWER BOARD
CABLE ASM CPU/DISPLAY
RED
1K 1%
BLU
11
HEATERS :
100V,100 Ω
115V,132 Ω
RED
1
+5
BLU
1
J7
YEL
TEMP.SENSOR
J10
J9
J6
10mV/ C
GRN/YEL
RH SENSOR
CPU PCB
RS232
CONNECTION
(OPTIONAL)
1
HEATER,BAND
100W.
10mV/1% RH
BLK
14
TO CHASSIS
GROUND
1
DPST
MAIN
SWITCH
J5
F2
10C
F1
BROWN
BLU
BLK
AUXILLARY
OUTLET
6C
G1
BLK
WHT
RED
GRN
THERMOSTAT
UNREG
+5A
GND
TP1
TP2
{
{
TEMP
REC.
R5
SENSOR,RTD,
1K.AT 0 C
YEL
TC CO2 SENSOR
J1
1
J4
BLK
TP3
1
RED
TC CO2
WHT
+
COM
N/C
N/O
12C
11C
14C
BLK
H
5C
CONNECT
TOGETHER 8C
7
WHT
H
G
BLK
7C
BLK
O2 SENSOR
GRN/YEL
N
G
EMI/RFI
FILTER
8
6C
G1
WHT
N
GRN/YEL
1
7
TO CHASSIS
GROUND
8C
GRN/YEL
4
6
G1
TO CHASSIS
GROUND
BLK
RED
RED
WHT 5C
F2
AUXILLARY
10C
OUTLET
GRN/YEL
GRN
GRN/YEL
CAUTION:
DPST
MAIN
SWITCH
FROM LOWER UNIT
13C
G1
1
BLU
2
IR CO2
PCB
BLK
WHT
BLU
TOP UNIT
PCB POWER
BOARD
NC
N
WHT
BLK
2
5
GRN
RED
POWER
CONNECTOR
4C
BLK
BLK
WHT
10
GRN/YEL
4
BLK
1C
J19
YEL
WHT
2C
WHT
WHT
BLK
50mV / % CO2
with a 10mV
at 0% offset
IR CO2 SENSOR
200
Ω
WHT
HEATER,AUX.50W
(ABOVE CHAMBER)
100V
YEL
G1
BLK
GRN/YEL
Capacitor:
100/115Volts
.47mf
Motor :
100/115Volts
(OPTIONAL)
100(-2)/115(-0) VOLT
6101,6301
GRN/YEL
BLK
BLK
G1
TO CHASSIS
GROUND
HEATER,CARTR.
100W PER ELEMENT
115/230V
WHT
BLK
BLK
144 Ω
WHT
25 watt
576 Ω
WHT
25 watt
576 Ω
144 Ω
BLK
WIRING 115
RED
HEATER,AUX.
50W TOTAL
(ABOVE CHAMBER)
115/230V
TO CHASSIS
GROUND
83 Ω
BLK
WHT
HEATER,DOOR
120W,100V
HEATER,CARTR.
100W PER ELEMENT
100V
100 Ω
WHT
WHT
100 Ω
WIRING 100V
BLK
WIRE NUT
WIRING SCHEMATIC,115 VOLT
6101,6301
Warranty
NAPCO warrants its products against defects in material or in workmanship when used under
appropriate conditions and in accordance with appropriate operating instructions for a period of no less
than one (1) year from the date of delivery of the products.
The sole obligation of NAPCO shall be to repair or replace at our option, FOB factory or locally,
without charge, any part(s) that prove defective within the warranty period, provided that the customer
notifies NAPCO promptly and in writing of any such defect. Compensation for labor by other than
NAPCO employees will not be our obligation. Part(s) replacement does not constitute an extension of
the original warranty period.
NAPCO makes no warranty of merchantability, fitness for a particular purpose, or any other
warranty, express or implied, as to the design, sale, installation, or use of its products, and shall not be
liable for consequential damages resulting from the use of its products.
NAPCO will not assume responsibility for unauthorized repairs or failure as a result of
unauthorized repairs, replacement, or modifications made negligently or otherwise improperly made or
performed by persons other than NAPCO employees or authorized representatives.
While our personnel are available to advise customers concerning general application of all
manufactured products, oral representations are not warranties with respect to particular application and
should not be relied upon if inconsistent with product specification or the terms stated herein.
In any event, the terms and conditions continued in NAPCO formal sales contracts shall be
controlling; and any changes must be in writing and signed by an authorized executive of NAPCO .
All defective components will be replaced without charge for one (1) year from the date of
delivery. There will be no charge for labor if the apparatus is returned to the factory prepaid.
Conditions and qualifications of the warranty statement shall prevail at all times.
57