1
iRobot Scooba® Service Manual
Published July 2008
EUROPE:
Scooba (grey bumper)
• 385
USA:
Scooba (blue bumper)
• 330/335/340 (5800)
Scooba (grey bumper)
• 350 (6000)
• 380 (6050)
iRobot Corporation
8 Crosby Drive, Bedford MA 01730 - Tel 781.430.3000 - Fax 781.430.3001 - www.irobot.com
1
Table of Contents
Scooba Service Process __________________________________________________________ 4
01: Customer Call _________________________________________________________________________
02: Scooba Return Procedure ________________________________________________________________
03: Incoming Scooba Inspection ______________________________________________________________
04: Scooba Software Download ______________________________________________________________
05: Scooba Built-in-Test (BiT) _______________________________________________________________
06: Scooba Built-in-Test Data Capture _________________________________________________________
07: Scooba Service (Fix or Replace)___________________________________________________________
08: Scooba Battery Test ____________________________________________________________________
09: Scooba Power Supply Test _______________________________________________________________
10: Virtual Wall Test_______________________________________________________________________
11. Re-Pack Scooba _______________________________________________________________________
4
5
6
7
7
7
7
8
8
8
8
Scooba Floor Washing Robot _____________________________________________________ 9
Scooba Terminology _________________________________________________________________ 9
Normal behavior _________________________________________________________________________
End of cycle – drying mode ________________________________________________________________
Scooba – Bottom Chassis __________________________________________________________________
Scooba – Top Chassis _____________________________________________________________________
Scooba – Tank and Brush __________________________________________________________________
11
12
13
14
15
Service Procedure (based on Built-in-Test) _____________________________________________ 17
BiT 0 - Panel LEDS ______________________________________________________________________
BiT 1 – External Watch Dog Test____________________________________________________________
BiT 2 – Bumper switch and Board rev ________________________________________________________
BiT 3 – Side Cliff Sensors _________________________________________________________________
BiT 4 – Front Cliff and Wall Sensors _________________________________________________________
BiT 5 – Side Wheel Drops _________________________________________________________________
BiT 6 – Front Wheel Drop & Stasis __________________________________________________________
BiT 7 – Tank, Filter and Cleaning Head Sensors ________________________________________________
BiT 8 – Light Sensor______________________________________________________________________
BiT 9 – RCON Infrared Receiver ____________________________________________________________
BiT 10 – Main Brush _____________________________________________________________________
BiT 11 – Vacuum ________________________________________________________________________
BiT 12 – Pump __________________________________________________________________________
BiT 13 – Tank Level Sensors _______________________________________________________________
BiT 14 to 15 – Left & Right Wheel __________________________________________________________
BiT 16 – Wheel Encoders __________________________________________________________________
BiT 17 – Charger Detector _________________________________________________________________
BiT 18 – Battery Sensor ___________________________________________________________________
BiT 19 to 23 – Charger tests ________________________________________________________________
BiT 24 – Software Version _________________________________________________________________
17
17
18
18
19
19
20
21
22
22
22
23
24
25
26
26
27
27
27
27
Scooba Accessories ____________________________________________________________ 28
Scooba Battery ____________________________________________________________________ 29
General Battery Maintenance Tips ___________________________________________________________ 30
Battery Troubleshooting ___________________________________________________________________ 30
Scooba Power Supply _______________________________________________________________ 31
Power Supply Troubleshooting______________________________________________________________ 32
Scooba Charger Base _______________________________________________________________ 33
iRobot Corporation
8 Crosby Drive, Bedford MA 01730 - Tel 781.430.3000 - Fax 781.430.3001 - www.irobot.com
2
Charger Base Troubleshooting ______________________________________________________________ 33
Scooba Virtual Wall ________________________________________________________________ 34
Virtual Wall Troubleshooting _______________________________________________________________ 35
Appendix A: Troubleshooting Flowchart via Telephone _______________________________ 36
Appendix B : User Panel Lights __________________________________________________ 37
Service Light____________________________________________________________________________
Power Button and Light ___________________________________________________________________
Clean Button and Light ____________________________________________________________________
Check Tank Light________________________________________________________________________
Check Brush Light _______________________________________________________________________
I’m Stuck Light _________________________________________________________________________
37
37
37
38
38
38
Appendix C: Scooba Serial Number Format ________________________________________ 39
Appendix D: Scooba Error Codes _________________________________________________ 40
Appendix E: Scooba OSMO _____________________________________________________ 45
OSMO Download Procedure _______________________________________________________________ 45
Appendix F: Scooba Built-in-Test_________________________________________________ 46
Scooba Built-in-Test Procedure _____________________________________________________________ 46
iRobot Data Capture ______________________________________________________________________ 50
Alternative Data Capture (without iRobot software) _____________________________________________ 50
Appendix G: Scooba Built-in-Test Limits ___________________________________________ 51
Appendix H: Battery Test Procedure ______________________________________________ 52
Appendix I: Power Supply Test Procedure __________________________________________ 53
Appendix J: Suggested Maintenance Procedure _____________________________________ 54
Scooba Dry Vacuum Squeegee Replacement ___________________________________________________
Scooba Cleaning Head Disassembly__________________________________________________________
Scooba Wheel Replacement ________________________________________________________________
Scooba Chassis Disassembly _______________________________________________________________
54
55
56
57
Appendix K: Glossary __________________________________________________________ 61
iRobot Corporation
8 Crosby Drive, Bedford MA 01730 - Tel 781.430.3000 - Fax 781.430.3001 - www.irobot.com
3
Scooba Service Process
This manual details the steps of a Scooba Service Procedure.
01: Customer Call
Scooba issues can be examined over the telephone by guiding a customer through a
troubleshooting process (see Appendix A and Appendix D). At a minimum, the customer should
be asked to perform the following troubleshooting steps:
A) Inspect proper placement of :
1. Brush, Battery, Filter, Vacuum Flow Tube, and Tank
B) Clean Scooba
1. Clean the cliff sensors under the bumper with compressed air.1
2. Remove any hair or obstruction from the wheels.2
3. Remove any hair or obstruction from the brushes.3
4. Clean out the filter and tube.4
5. Rinse the tank and refill the clean before running. 5
C) Perform a ‘Battery Reset’ (not applicable to customers that use a Charging Base).
1. Unplug Scooba from Power Supply and take the battery out.
2. Press the POWER button for 5 seconds
3. Reseat the Battery.
4. Wait 5 seconds and plug the Power Supply into Scooba.
5. Charge the Battery fully.
iRobot Corporation
8 Crosby Drive, Bedford MA 01730 - Tel 781.430.3000 - Fax 781.430.3001 - www.irobot.com
4
1
2
3
5
4
02: Scooba Return Procedure
If the initial troubleshooting steps do not solve the issue, have the customer send the Scooba and
all accessories to a service repair center. The customer should add documentation that provides the
date, their name, address, a reference number and a description of the complaint.
o Avoid receiving a depleted Battery. Ask customer to remove the Battery from Scooba and
place it separately in the box.
o Avoid water leakage during shipment. Ask customer to drain the Tank and place it in a thin
plastic bag before shipping.
iRobot Corporation
8 Crosby Drive, Bedford MA 01730 - Tel 781.430.3000 - Fax 781.430.3001 - www.irobot.com
5
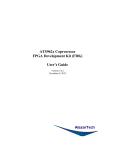
03: Incoming Scooba Inspection
Perform a general outer visual inspection of Scooba’s condition. Look for wear
on the Bumper and Wheels.
Remove the Tank and ensure that the Filter and the Vacuum Flow Tube are
properly inserted.
Tank:
o Add water into both dirty and clean Tank. Shake and pour out.
o Add water through the four bottom Tank ports. Shake and pour out.
Filter and Tube:
o If dirty, clean the Filter and Tube through running water.
Inspect the Brushes:
o Ensure the cleaning head is properly inserted in the chassis.
o If dirty, open the cleaning head and clean the brush.
Inspect the Wheels:
o Inspect the drive Wheels. Bounce and turn them for equal resistance.
o Inspect front Caster. Make sure it spins freely, pivots and rotates. Remove
the wheel and look for dirt.
Inspect the Cliff and Wall Sensors:
o If dirty, clear them with compressed air.
o
o
o
o
Reinsert the Scooba components.
Insert a charged Battery in Scooba
Add some water in the clean Tank.
Run Scooba and see if it ends immediately with an error code.
Appendix D
iRobot Corporation
8 Crosby Drive, Bedford MA 01730 - Tel 781.430.3000 - Fax 781.430.3001 - www.irobot.com
6
04: Scooba Software Download
Download the latest software, if applicable. Make sure Scooba has a charged
Battery.
Appendix E
05: Scooba Built-in-Test (BiT)
It is important that this step only diagnose Scooba failures. For this reason, do not conduct the BiT
test with customer accessories as these can be tested separately.
Insert a charged Battery in Scooba.
Verify that the Filter and Tube are inserted in Scooba.
Insert an empty Tank.
Perform BiT steps. (Use known working Power Supply, Virtual Wall and Remote)
Appendix F
06: Scooba Built-in-Test Data Capture
Use ‘iRobot Factory Test Client Version 1.1’ to capture BiT.
Appendix F
07: Scooba Service (Fix or Replace)
Repair parts using Built-in-test Fix Steps.
Service
Procedure
chapter
Retest the BiT and continue fixing until BiT passes.
Appendix F
iRobot Corporation
8 Crosby Drive, Bedford MA 01730 - Tel 781.430.3000 - Fax 781.430.3001 - www.irobot.com
7
08: Scooba Battery Test
Fully charge the returned Scooba Battery.
Test the returned Battery
o Battery Voltage Test
o Battery Voltage Drop Test
Appendix H
&
Battery
chapter
Optional : Discharge the Battery by running it in a Scooba or using a battery
discharger (discharge the Battery at a constant 2.9V to 1V per cell). The
discharge time should be about 60 minutes. If not, replace the Battery.
09: Scooba Power Supply Test
Test returned Power Supply
o Output Voltage
o Solid green light under load
Appendix I
&
Power Supply
chapter
If the Power Supply light is off or blinking while charging, replace the Power
Supply.
10: Virtual Wall Test
Test returned Virtual Wall
o Insert charged batteries, if its light is blinking
o Clean Virtual Wall (IR emitter)
Troubleshoot
Virtual Wall
(pg 37)
11. Re-Pack Scooba
To avoid depleting the Battery during shipment, do not ship Scooba back with
the Battery inserted in Scooba. Wrap the Battery separately.
Also, remove any water left in the Tank. Use the Scooba Bulb to remove the
water that will not come out
naturally.
iRobot Corporation
8 Crosby Drive, Bedford MA 01730 - Tel 781.430.3000 - Fax 781.430.3001 - www.irobot.com
8
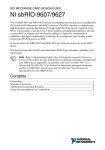
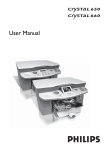
Scooba Floor Washing Robot
Scooba Terminology
Power
button
RCON –
Virtual Wall
Sensor
Clean
button
Bumper
User Interface (UI)
Handle & Tank Release
Wall Sensor
Tank
Charging
Socket
Receiver
Cliff Sensors
Front Caster
Dry Vacuum
Squeegee
Air Exhaust
Dry Vacuum
Port
Main Brush
Drive Wheel
Tire
Wet Vacuum
Squeegee
iRobot Corporation
8 Crosby Drive, Bedford MA 01730 - Tel 781.430.3000 - Fax 781.430.3001 - www.irobot.com
9
Battery Pocket
Filter
Charging Socket
Tank Receiver
Tank Eject
Serial Port
Solution Valve
Sensor
Brush Eject
Vacuum Flow
Tube
iRobot Corporation
8 Crosby Drive, Bedford MA 01730 - Tel 781.430.3000 - Fax 781.430.3001 - www.irobot.com
10
Scooba Cleaning Methods
1.
2.
3.
4.
Dry vacuum – air flow directs loose dirt into tank
Washing – liquid is deposited on the floor from the clean tank
Scrubbing – brush gently scrubs floor to remove dirt on floor
Wet vacuum – vacuum sucks up liquid into the dirty tank
While Scooba cleans, it calculates the best path to clean the floor. The cleaning cycle may last
between 5 and 45 minutes. Before it ends the cleaning cycle, Scooba will enter a 5-minute drying
mode that dries its brush and cleaning system. The Scooba will end the clean cycle either due to an
empty clean tank, a full dirty tank or a low battery. Scooba will not run if at startup these
termination causes have not been resolved.
Scooba can be used on tile, linoleum, vinyl, marble, slate and sealed hardwood floors, but all grout
and seams need to be sealed. Scooba should not be run on carpets, laminate or unfinished/unsealed
floors as these floors may be damaged by water (unsealed floors do not contain a layer of
polyurethane that protects the sub-flooring from water damage).
Normal behavior
In normal cleaning behavior, Scooba switches between 4 different behaviors:
• Drive – Scooba drives straight
• Spiral – Scooba drives in an outward spiral pattern
• Bounce – Bumper activation makes Scooba back up, turn in place, and drive straight
• Wall follow – Scooba follows along a wall
When first started, Scooba runs the pump for up to 3 seconds, and then goes into spiral mode (if
the ‘clean’ button is held down for an extended period of time at start up it will drive straight and
skip the spiral mode). When the bumper is activated for the first time, Scooba goes into wallfollow mode. Thereafter, when the bumper is activated Scooba will normally do a bounce, but will
revert to wall-follow mode every 10 to 15 bumps.
iRobot Corporation
8 Crosby Drive, Bedford MA 01730 - Tel 781.430.3000 - Fax 781.430.3001 - www.irobot.com
11
There are other behaviors that react to specific situations
• Cliff-avoid – Scooba backs up and turns whenever its cliff sensor detects a cliff
• RCON-avoid – Scooba turns whenever the RCON sensor detects an infrared beam
• Bump-follow – Scooba follows a wall with its bumper
• Escape spin – Scooba will spin in place when a drive wheel is stuck or when Scooba moves
straight for 4.5 meters without triggering its bumper of cliff sensors.
There is special control of brush, pump and drive motors:
• The brush is deactivated when Scooba backs up, and re-activated as it moves forward.
• The pump is deactivated when Scooba is turning in place or backing up.
• The pump and brush is deactivated when Scooba is in drying mode.
• If the drive wheel is overcurrenting, Scooba will stop all motors for one second at a time
for up to 5 times. If it stays stuck for too long, it will shut down with a beep error code.
End of cycle – drying mode
At the end of the cycle, Scooba will enter a 5 minute dry mode designated by a blinking CLEAN
button. It enters dry mode in the following conditions:
• when the CLEAN button is pressed while running,
• when the clean Tank becomes empty,
• when the dirty Tank becomes full,
• before the Battery runs out of power.
In this mode, Scooba drives at normal speed with the pump and brush motor off for 5 minutes.
iRobot Corporation
8 Crosby Drive, Bedford MA 01730 - Tel 781.430.3000 - Fax 781.430.3001 - www.irobot.com
12
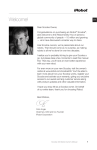
Scooba – Bottom Chassis
1) Suction : There are 2 suction inlets, the ‘Dry Vacuum Port’ and the ‘Wet Vacuum Port’, which
trails the Main Brush. All incoming dirt must take those two inlet paths.
2) Air Outlet : There are 2 air exhausts, the ‘Debris Air Jet’ and the ‘Air Exhaust’. The exhausted
air has been filtered and is free of dirt.
3) Water Outlet : Water is deposited on the floor via two nozzles in front of the main brush.
2
1
Debris Air Jet
(from fan)
Dry Vacuum
Port
Air Exhaust
(from fan)
Wet Vacuum
Port
3
Water/Jet nozzles
iRobot Corporation
8 Crosby Drive, Bedford MA 01730 - Tel 781.430.3000 - Fax 781.430.3001 - www.irobot.com
13
Scooba – Top Chassis
[Air/water] ‘wet vacuum
port’ to tank
[Air] dirty
Tank to
fan
[Water] clean Tank
to jet nozzles
[Air] ‘dry vacuum
port’ to dirty Tank
iRobot Corporation
8 Crosby Drive, Bedford MA 01730 - Tel 781.430.3000 - Fax 781.430.3001 - www.irobot.com
14
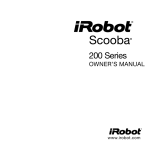
Scooba – Tank and Brush
When viewing the Tank from below, the transparent part holds clean liquid while the opaque part
holds dirty liquid. The clean Tank can hold up to one liter of fluid.
Tank Magnet
Poppet Valve
(anti-vacuum)
Solution Valve
Seals to cleaning head
Seals to ‘dry
vacuum port’
Seals to
Filter
Dirty Tank Full
sensor
iRobot Corporation
8 Crosby Drive, Bedford MA 01730 - Tel 781.430.3000 - Fax 781.430.3001 - www.irobot.com
15
All suction from the floor is directed into a compartment in the Tank that has a ‘ball check valve’.
The valve is open when the Tank is in the horizontal position as shown in the cross section of the
tank below (A). When the valve is open, heavy material (water and dirt) is allowed to pass into the
dirty Tank while light material (air and hair) moves passed the Filter to the impeller fan. The valve
is closed when the tank is in the vertical position. (B).
open
A
closed
B
Note : A customer needs to transport the Tank by holding the tank vertically from the tank handle.
If the tank is flipped on its side or spun around, water from the dirty tank will spill out of the tank
ports.
iRobot Corporation
8 Crosby Drive, Bedford MA 01730 - Tel 781.430.3000 - Fax 781.430.3001 - www.irobot.com
16
Service Procedure (based on Built-in-Test)
Every Scooba that is serviced is required to undergo a Built-in-Test (BiT) which will then dictate
how to best service the Scooba. A Scooba needs to pass the BiT before being returned to a
customer.
The following Service Procedure is based on failed BiT steps or specific Scooba symptoms. Basic
troubleshooting steps are detailed but as a last resort, a replacement part is suggested.
REPLACEMENT
PART
BiT REPAIR STEPS
BiT 0 - Panel LEDS
Customer complaint :
o Scooba lights do not turn on;
o Scooba enters BiT when power is started.
Æ Press both buttons on the user panel and make sure they
snap in and out. If not, replace user interface panel.
Scooba Core Robot
BiT 1 – External Watch Dog Test
This step does not require tester interaction. The robot performs a self-check to verify that the
Scooba processor can reset if it gets locked up.
iRobot Corporation
8 Crosby Drive, Bedford MA 01730 - Tel 781.430.3000 - Fax 781.430.3001 - www.irobot.com
17
REPLACEMENT
PART
BiT REPAIR
STEPS
BiT 2 – Bumper switch and Board rev
Customer complaint :
o Scooba may push longer and harder on walls;
o Scooba ends with an error “uh-oh and 3 beeps”.
Æ Does the bumper compress and release freely?
Scooba Core Robot
REPLACEMENT
PART
BiT REPAIR STEPS
BiT 3 – Side Cliff Sensors
Customer complaint :
o Scooba does not detect a cliff ;
o Scooba gives an “ehh” error on start up;
o Scooba backs up and spins;
o Scooba ends with an error “uh-oh and 4 beeps”.
Æ Does the bumper compress and release freely?
Æ Visually inspect under the bumper edges for debris.
Clean the cliff sensors with compressed air or a cotton
swab
Scooba Core Robot
iRobot Corporation
8 Crosby Drive, Bedford MA 01730 - Tel 781.430.3000 - Fax 781.430.3001 - www.irobot.com
18
REPLACEMENT
PART
BiT REPAIR STEPS
BiT 4 – Front Cliff and Wall Sensors
Customer complaint :
o Scooba does not detect a cliff ;
o Gives an “ehh” error on start up;
o Scooba backs up and spins;
o Does not follow walls;
o Scooba ends with an error “uh-oh and 4 beeps”.
Æ Does the bumper compress and release freely?
Æ Visually inspect under the bumper edges for debris.
Æ Clean the cliff and wall sensors with compressed
air or a cotton swab
Scooba Core Robot
BiT REPAIR
STEPS
BiT 5 – Side Wheel Drops
Customer complaint :
o Scooba ends with an error “uh-oh and 1 beep”.
Æ Inspect the drive wheels and test if they depress
and spring out.
iRobot Corporation
8 Crosby Drive, Bedford MA 01730 - Tel 781.430.3000 - Fax 781.430.3001 - www.irobot.com
19
REPLACEMENT
PART
Scooba Core Robot
REPLACEMENT PART
BiT REPAIR STEPS
BiT 6 – Front Wheel Drop & Stasis
Customer complaint :
o Scooba ends with an error “uh-oh and 1or 2 beeps”
o Scooba goes “ehh”.
B
Æ Inspect front wheel and make sure the wheel can
pivot, rotate and swivel. Remove the wheel module
and inspect for damage or debris.
Scooba Front Caster
OR
Scooba Core Robot
iRobot Corporation
8 Crosby Drive, Bedford MA 01730 - Tel 781.430.3000 - Fax 781.430.3001 - www.irobot.com
20
BiT 7 – Tank, Filter and Cleaning Head Sensors
Customer complaint :
o ‘Check Tank’ light comes on;
o ‘Check Brush’ light comes on.
BiT REPAIR STEPS
Æ Tank Present Sensor: A magnet located in the
front of the tank triggers a reed switch inside the user
interface panel. This prevents the robot from running
without a tank.
Æ Filter Present Sensor: A magnet located on the
filter triggers a reed switch inside the robot. This
prevents the robot from running without a filter,
which could damage the vacuum.
Æ Brush Present Sensor: A magnet located on the top
of the cleaning head triggers a reed switch inside the
robot. This prevents the robot from running without a
cleaning head assembly, which would cause poor
cleaning performance.
REPLACEMENT
PART
Æ If a magnet is missing from tank, filter or cleaning
head housing, insert a magnet
Replace magnets (if missing)
OR
Scooba Core Robot
iRobot Corporation
8 Crosby Drive, Bedford MA 01730 - Tel 781.430.3000 - Fax 781.430.3001 - www.irobot.com
21
BiT 8 – Light Sensor
Most Scoobas do not have a light sensor and this step can be skipped by pressing the CLEAN
button.
REPLACEMENT
PART
BiT REPAIR STEPS
BiT 9 – RCON Infrared Receiver
Customer complaint :
o Scooba passes an activated virtual wall.
Æ Do a visual inspection of the RCON and wipe any
dirt.
Æ Test the RCON using a Roomba remote. Once
Scooba is powered on, then the remote can be used to
select a clean mode or move it directionally.
Scooba Core Robot
BiT REPAIR STEPS
BiT 10 – Main Brush
Customer complaint :
o Floor is dirty;
o Main brush is not turning or loud;
o ‘Check Brush’ light is on.
Æ Open and remove cleaning head and look for
obstructions.
Æ Do a visual inspection of the cleaning head and
check it is installed properly. Replace if damaged.
Æ If brush is not turning or the motor/gearbox are
broken, replace Brush Motor module.
iRobot Corporation
8 Crosby Drive, Bedford MA 01730 - Tel 781.430.3000 - Fax 781.430.3001 - www.irobot.com
22
Scooba Core Robot
REPLACEMENT PART
BiT REPAIR STEPS
BiT 11 – Vacuum
Customer complaint :
o Floor is too wet;
o Scooba is screeching loudly;
o Scooba ends with an alarm and 2 beeps.
Æ While Scooba is running, determine if air is being
exhausted onto the floor (bottom left hand side of
robot). This is an indication that the impeller fan is
working.
Æ If Scooba vacuum fan sounds loud, replace
vacuum module.
Æ Inspect the Filter. A broken Filter may have
allowed dirt to enter the fan. Replace if punctured.
Scooba Filter
OR
Scooba Core Robot
iRobot Corporation
8 Crosby Drive, Bedford MA 01730 - Tel 781.430.3000 - Fax 781.430.3001 - www.irobot.com
23
BiT 12 – Pump
BiT REPAIR STEPS
Customer complaint :
o Scooba does not clean floor / floor is dry;
o Scooba ends with an alarm and 1 beep
Æ Inspect the solution sensor. Replace if broken or
clogged (see A)
Æ Use a Scooba bulb and push air through the pump
system at least three times (see B). Replace the tank
and re-start Scooba.
Æ Check that the Filter and Vacuum Flow Tube is
installed properly (see C).
Æ Increase the conductivity of the water in the Clean
Tank by adding water with 60 ml vinegar, or a little
salt or soap to the clean tank water to increase the
conductivity of the water.
A
B
REPLACEMENT
PART
C
Scooba Core Robot
iRobot Corporation
8 Crosby Drive, Bedford MA 01730 - Tel 781.430.3000 - Fax 781.430.3001 - www.irobot.com
24
BiT 13 – Tank Level Sensors
Customer complaint :
o ‘Check Tank’ light is on.
Sensor Background :
REPLACEMENT
PART
BiT REPAIR STEPS
Æ Clean Tank Empty Sensor (see A): Two stainless
steel pins in Scooba’s solution valve measure
electrical resistance of fluid and confirm that water is
present in the tubes. The robot runs as long as it sees
fluid across the sensor.
Æ Dirty Tank Full Sensor (see B): Two stainless
steel pins in the dirty tank measure fluid resistance to
determine when the dirty tank is full.
Æ Make sure the dirty sensor wire is not dirty.
o Clean the dirty tank full sensor with a cotton bud
as shown (B)
o Clean contacts that plug into the dirty tank full
sensor (C).
o Clean and rinse Tank
Æ Increase the conductivity of the water in the Clean
Tank by adding water with 60 ml vinegar, or a little
salt or soap to the clean tank water to increase the
conductivity of the water.
Scooba Tank
iRobot Corporation
8 Crosby Drive, Bedford MA 01730 - Tel 781.430.3000 - Fax 781.430.3001 - www.irobot.com
25
REPLACEMENT
PART
BiT REPAIR STEPS
BiT 14 to 15 – Left & Right Wheel
Customer complaint :
o Scooba is not driving straight;
o Scooba is driving in circles;
o Scooba gives an error of “uh-oh and 5 beeps”.
o Wheels sound loud.
Æ Check the tires for wear. Confirm they turn with
equal resistance.
Æ Optional : unscrew the two tires and check for
debris on the inside of the wheel (see A).
Æ Remove the front caster and inspect for debris.
Scooba Core Robot
REPLACEMENT
PART
BiT REPAIR STEPS
BiT 16 – Wheel Encoders
Customer complaint :
o Scooba circles, stops, circles;
o Scooba circles and backs up;
o Scooba ends with “uh-oh and 5 beeps"
Æ A dirty encoder causes a type of circle dance.
Æ A broken encoder causes it too back up a
distance, circle and so forth
Scooba Core Robot
iRobot Corporation
8 Crosby Drive, Bedford MA 01730 - Tel 781.430.3000 - Fax 781.430.3001 - www.irobot.com
26
BiT 17 – Charger Detector
ÆIf this step fails, try again with known good Power Supply. If the problem persists, replace
Scooba.
BiT 18 – Battery Sensor
Æ This step does not require tester interaction. If the step fails, try again with another charged
Battery. If problem persists, replace the Battery.
BiT 19 to 23 – Charger tests
Æ This step does not require tester interaction. If the step fails, try again with another Power
Supply. If problem persists, replace Scooba.
BiT 24 – Software Version
Æ This step does not require tester interaction.
iRobot Corporation
8 Crosby Drive, Bedford MA 01730 - Tel 781.430.3000 - Fax 781.430.3001 - www.irobot.com
27
Scooba Accessories
Battery
Power Supply
Charger Base
Virtual Wall
iRobot Corporation
8 Crosby Drive, Bedford MA 01730 - Tel 781.430.3000 - Fax 781.430.3001 - www.irobot.com
28
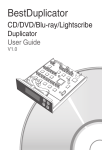
Scooba Battery
Scooba is powered by a rechargeable NiMH (nickel metal hydride) battery made up of 12 cells. A
Scooba battery can be charged in the Scooba or the Scooba Charger Base. Normally, a charged
Scooba battery has a voltage between 15.5 to 18 V. If the voltage falls below 10.8 V, Scooba will
enter a ‘reconditioning mode’ during charging that takes 16 hours to complete and should not be
disrupted. In this recondition mode, the Scooba power light will pulse faster than when in regular
charge mode. The battery also has a thermistor which is sensitive to temperature and relies on the
change of resistance to measure battery temperature.
+ve contact
-ve contact
Thermistor contacts
iRobot Corporation
8 Crosby Drive, Bedford MA 01730 - Tel 781.430.3000 - Fax 781.430.3001 - www.irobot.com
29
General Battery Maintenance Tips
•
Battery Storage - For best battery performance, Scooba's battery should be stored in a cool,
dry place immediately after charging completes. While charging battery in Scooba, leave the
Tank off or wide open to keep the battery cool. If Scooba will not be used for two weeks or
more, it is best to unplug the power supply, remove the battery, and store the battery in a cool,
dry place.
•
Battery Life - Fully charge Scooba's battery (3 to 4 hours) before each cleaning cycle. When
fully charged, Scooba's battery will always last longer than a full Clean cycle.
•
16-Hour Refresh Charge - With regular use, Scooba's battery will fully charge in about 3
hours. In some circumstances, a longer, 16-hour refresh cycle will be required. This longer
charge reconditions the battery when it is depleted, and helps extend Scooba's battery life.
Battery Troubleshooting
•
Problem : Charging in hot conditions may cause the battery to overheat and Scooba will
stop charging until the battery cools down. In this on and off situation, Scooba may not
accurately monitor the battery’s capacity and result in a short runtime. Fix: Do a ‘Battery
Reset’. Remove Scooba from the Power Supply, pull out the Battery, wait 5 seconds, reseat
the Battery, wait 5 seconds, and replug the Power Supply.
•
Problem : Batteries will discharge when left in the Scooba as there is a sleep current of 11
mA. Fix : Keep the battery out of Scooba if not plugged into the Power Supply.
•
Problem : Batteries are not easy to insert and many users will not seat battery properly. If
the battery is not inserted well, the tank will not seal properly. Fix : Proper battery insertion
requires user to rotate the battery into its slot, making sure the yellow battery tabs fit inside
the guide holes. User should listen for a click as the battery snaps into place.
iRobot Corporation
8 Crosby Drive, Bedford MA 01730 - Tel 781.430.3000 - Fax 781.430.3001 - www.irobot.com
30
Scooba Power Supply
Scooba is charged with either a Universal (100-240V) or Domestic (120V) Power Supply. The
Power Supply steps the voltage down to 22VDC and 1.75A. The solid green power light on the
Power Supply is an indication that it is plugged in and operating properly.
Solid green light
There are 3 phases to the normal charging algorithm.
1. The first phase is a full current charge (1.75A).
2. The second phase is a low current charge (430 mA).
3. The final phase is trickling (11 mA). Note: older software code was set at 50 mA.
There is also a reconditioning charge that will occur if the battery voltage is less than 10.8V. In
this mode the battery will be charged at 430 mA for 16 hours.
Charging Mode
Cooling Mode
Current Termination Reasons :
0
• Timeout: 2 hours
• Battery temperature ≤ 40° C
Recondition
Mode
430 mA
•
•
•
Timeout: 16 hours
Overvoltage: Battery voltage > 1.8V/cell or >21.6V
Overtemperature: Battery temperature > 60° C
Charge Mode
1.75 A
•
•
•
•
•
•
•
•
Timeout: 4 hours
Inflection: Battery voltage slope dips > 1.25mV/min for 60s.
dT/dt: Battery temperature rising > 0.7° C per minute
Peak voltage: Battery voltage slope < 0mV/min for 60s.
Hi-res voltage dip: Battery voltage dips > 10mV when above
15V.
Low-res voltage dip: Battery voltage dips > 60mV
Overtemperature: Battery temperature > 60° C
Overvoltage: Battery Voltage > 21.6V
•
Timeout: 1 hour
Low Current
430 mA
iRobot Corporation
8 Crosby Drive, Bedford MA 01730 - Tel 781.430.3000 - Fax 781.430.3001 - www.irobot.com
31
•
•
•
Charge
(finishes current
sequence)
Trickle mode
11 mA
(keeps battery
fully charged)
Float mode
(starts after
trickle mode
aborted)
0 mA
•
•
•
Overtemperature: Battery temperature > 60° C
Overvoltage: Battery voltage > 1.8V/cell or >21.6V
Hi-res voltage dip: Battery voltage dips > 10mV when above
15V
Low-res voltage dip: Battery voltage dips > 60mV
Overvoltage: Battery voltage > 1.8V/cell or >21.6V
Battery temperature > 42 degrees C
Both conditions must be true:
• Battery temperature < 40 degrees C
• Battery voltage < 21.0V
Power Supply Troubleshooting
•
If the Power Supply light is not on or blinking while charging, first try another wall outlet
before replacing the power supply.
iRobot Corporation
8 Crosby Drive, Bedford MA 01730 - Tel 781.430.3000 - Fax 781.430.3001 - www.irobot.com
32
Scooba Charger Base
The Scooba Charging Base is used to charge the Battery and charging takes about three hours. The
power light on the Charging Base is an indicator that it is plugged in and operating properly. This
light must be on and solid green for the Scooba battery to charge. The battery charging light on the
Charging Base signifies that the battery is charging.
+ve contact
Charging Status
Power
-ve contact
Thermistor contact
Charger Base Troubleshooting
Charger Base Status Light
Battery Status
Green pulse
Battery charging
Blinks once
Battery is too warm or not installed correctly.
Blinks two times
Charger Base failed a self test (charging switch
failure). Replace Charger Base. Test Power
Supply.
Blinks three times
Charger Base failed a self test (servo failure).
Replace Charger Base. Test Power Supply.
Light Turns Off
Battery is fully charged
iRobot Corporation
8 Crosby Drive, Bedford MA 01730 - Tel 781.430.3000 - Fax 781.430.3001 - www.irobot.com
33
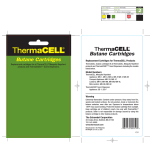
Scooba Virtual Wall
The Virtual Wall emits an invisible, infrared beam up to 8 feet (~2.5 meters) long that Scooba
regards as a barrier and will not cross. The beam spreads out and can get up to 3 feet wide (~1
meter). To avoid infrared interference, do not place the Virtual Wall within 8 feet of a Roomba
Home Base. When turned on, the Virtual Wall will turn off automatically after approximately 2.5
hours. The batteries last for about 140 hrs of operations.
Infrared Avoidance
/Force Field Emitter
Infrared Beam Emitter
Strength Setting
(in feet or meters)
Battery LED Status
Power Button
iRobot Corporation
8 Crosby Drive, Bedford MA 01730 - Tel 781.430.3000 - Fax 781.430.3001 - www.irobot.com
34
Top view of Virtual Wall and beam spread
Virtual Wall Troubleshooting
•
•
•
If the Virtual Wall is turned on but the battery status light is off or flashing, the batteries are
low. Check the batteries and the virtual battery door. If new batteries still cause issues, do a
battery reset. Remove virtual wall batteries and press the power button for 5 seconds. Replace
battery.
If Scooba goes through the virtual wall beam, wipe Scooba’s RCON and the infrared field
emitter on the Virtual Wall and retest mobility through the beam.
To test the Virtual Wall strength, set the Scooba in Built-in-Test # 9. Make sure that the Virtual
Wall battery status light is on and not flashing. Set the Virtual Wall to the highest setting and
bring the Virtual Wall 2.5 meters away from the Scooba bumper. Verify that the ‘Check Tank’
light is lit and recognizes the Virtual Wall. Repeat this for the lower settings, bringing the
Virtual Wall closer for the lowest setting. Reject any Virtual Walls that fail.
iRobot Corporation
8 Crosby Drive, Bedford MA 01730 - Tel 781.430.3000 - Fax 781.430.3001 - www.irobot.com
35
Appendix A: Troubleshooting Flowchart via Telephone
NO
Does Scooba start or
end with an error?
Does Scooba POWER
button pulse when
charging?
Inspect the Power
Supply. Is its light solid
green when charging?
Try another wall plug.
Else, SERVICE
ROBOT
Press Scooba's POWER
and CLEAN button. Do
they both snap under the
finger?
SERVICE ROBOT
Did you charge the
Battery fully (3-16 hours)
without disruption?
Charge Battery. Run
robot
Is Battery inserted in
Scooba properly?
Reinsert Battery. Run
robot
Run robot. Is water
deposited on floor?
Rinse Tank, Filter,
Tube. Refill Clean
Tank. Run robot. Is
water deposited?
Is the Scooba ending on
either dead battery, an
empty clean tank or a full
dirty tank?
SERVICE ROBOT
YES
Go to Appendix D :
Scooba Error Codes
YES
NO
iRobot Corporation
8 Crosby Drive, Bedford MA 01730 - Tel 781.430.3000 - Fax 781.430.3001 - www.irobot.com
36
Appendix B : User Panel Lights
Note : ‘Pulsing’ means that the light brightens and dims. ‘Blinking’ means the light turns abruptly
on and off.
Service Light
The service light indicates a hard failure that normally requires a replacement to fix.
Solid Red
o 4 tone alarm followed by a series of beeps.
See Appendix H.
Power Button and Light
o Powers on/off the robot
Off
o Off
o Not
charging
Solid
Green
Pulsing Green
o Cleaning
o Drying
o Battery fully
charged
Solid
Red
o Charging
o If fast pulse then
o Not charging
o Battery
in recharge mode
(16 hours)
dead(plays a dead
battery song)
Blinking
Red
o Battery not
installed properly
o Software not
installed properly
Clean Button and Light
o Starts cleaning cycle
o Starts drying mode
o Stops cleaning mode
Off
Solid Green
o Not powered on
o Cycle complete
o Running -Battery charged
o Cycle successfully
completed
Blinking Green
o Drying
o Startup
o Error conditions – blinks for error and
cycle pause conditions
iRobot Corporation
8 Crosby Drive, Bedford MA 01730 - Tel 781.430.3000 - Fax 781.430.3001 - www.irobot.com
37
Check Tank Light
In normal conditions, the light comes on when the cycle is complete and either the clean Tank is
empty or the dirty Tank is full.
Solid Green
o Cycle complete
o Clean Tank empty
o Dirty Tank full
o Tank not present
Check Brush Light
If the “Check Brush” light comes on make sure the Brush and Filter are correctly installed.
Solid Yellow
o Brush not present or stalled
o Filter not present
o Brush stall
I’m Stuck Light
The ‘I’m stuck’ indicates soft failures. Usually moving the robot away from an obstacle and
restarting the cycle is the proper corrective action. These normally do not require replacements
unless the problem is persistent.
Solid Yellow
o “uh-oh” and a series of beeps. See
Appendix H.
iRobot Corporation
8 Crosby Drive, Bedford MA 01730 - Tel 781.430.3000 - Fax 781.430.3001 - www.irobot.com
38
Appendix C: Scooba Serial Number Format
To find the product code for Scooba, open the tank. The product code sticker should appear just
below the battery. (There is no need to remove the battery to view the product code.)
e.g. J
E
N
MM
U
LLLLL
YY
mm
dd
RR
Manufacturer ID: 'JE' = Jetta, ‘YT’ = Kin Yat and 'PR' = PRC
Status : 'N' = new, 'R' = remanufactured
Model number (00000 - 09999)
Year (since 2000) this robot was manufactured
Month this robot was manufactured
Day of the month this robot was manufactured
Model revision for this robot
o
sssss
0 5 8 0 0
0 6
0
1
2 1
0
2
0 0 0 0 1
[01] = Software Code : 2005-12-13-2046 – implemented 15h Dec 2005
[02] = Software Code : 2006-06-09-1200 – implemented 30th Aug 2006
[03] = Software Code : 2006-01-29-1253 – implemented 14th Mar 2007
[04] = Software Code : 2007-07-06-1452 – implemented 3rd Sep 2007
[05] = pump output is 22 ml/min, robot speed is 180 mm/s –23rd Oct 2007
o
o
o
o
Sequence
iRobot Corporation
8 Crosby Drive, Bedford MA 01730 - Tel 781.430.3000 - Fax 781.430.3001 - www.irobot.com
39
Appendix D: Scooba Error Codes
What Scooba Says +
What It Means
Ask Customers to do the following :
Dead battery song +
POWER button red
• Do Battery reset. Fully charge Battery in Scooba or Charging Base
until fully charged.
• The battery is low
and needs recharging
• In case of battery low, Scooba will complete the dry cycle before
stopping and giving error.
“Ehh”
• Cliff sensors are dirty
or need repair
No beeps
• Wheel is stuck or off
the ground
• Remove the Tank and turn Scooba over. Check for any dirt
underneath the bumper and in the three cliff sensor housings. Use
compressed air to blow them out.
• Is the front Caster in place?
• Remove the Tank and turn Scooba over. Check all three of the
wheels, turn them and make sure they are not obstructed and that they
can pop in and out.
“uh-oh” + 1 beep
• Wheel drop error
• Remove the Tank and turn Scooba over and inspect the wheels.
Replace tires if worn or torn. Push each wheel in/out and turn them
for resistance. Remove the front caster and inspect for dirt. Reinsert
and make sure it can spin freely, pivots and rotates. Place Scooba back
on the floor. Reseat the tank and restart the Clean cycle.
• Note : This error can be triggered by a threshold in the environment
causing Scooba to get stuck.
“uh-oh” + 2 beeps
• No-bump error
(caster error)
• The front wheel may be stuck. Ensure that the front caster can spin
freely, pivots and rotates. Remove the caster by pulling it out and clear
any dirt. Reinsert the wheel and lightly push the wheel up and down.
• Note : This error can also be caused in a large room where Scooba’s
bumper is not activated over a certain distance. Scooba will do a panic
spin every 4.5 meters, four times before shutting down and giving an
error.
“uh-oh” + 3 beeps
• Constant bump error
• Tap the bumper to ensure that it moves in and out. Remove Tank and
turn Scooba over and visually inspect under the bumper edges for
debris. Use compressed air to clean under the bumper.
iRobot Corporation
8 Crosby Drive, Bedford MA 01730 - Tel 781.430.3000 - Fax 781.430.3001 - www.irobot.com
40
“uh-oh” + 4 beeps
• Constant cliff error
• Remove the Tank and turn Scooba over. Clean cliff sensors with a
cotton swab or compressed air. Inspect wheels and cleaning head.
“uh-oh” + 5 beeps
• Wheel Stall error
• Left or right wheel malfunction is caused by a wheel, motor or
encoder failure. Remove the Tank and turn Scooba over. Inspect
Scooba’s two drive wheels. Spin the wheels by hand and confirm that
they offer some resistance. Dislodge any obstruction and inspect the
wheels for damage.
• Customer may observe erratic spinning and backing up (a foot at a
time in reverse) which is a sign of a bad encoder.
Alarm + 1 beep
• Go to “Floor is too dry” below (pg 46)
• Pump stall
• In case of pump/brush stall, Scooba will complete the dry cycle
before stopping and giving error.
Alarm + 2 beeps
• If the vacuum motor is abnormally loud, replace the vacuum.
• Vacuum stall
• Ensure the Filter is not broken, allowing dirt to enter the fan.
Alarm + 3 beeps
• Battery over current
while running
• Replace Battery.
Alarm + 4 beeps
• Power Supply has
failed
•Need to test the Power Supply and Scooba.
Alarm + 5 beeps
• Wait for the Battery to cool down and try again.
• Battery is too hot
while charging
• Note: Make sure Scooba was not recently filled with hot water or
charged with the tank closed and in a hot environment.
iRobot Corporation
8 Crosby Drive, Bedford MA 01730 - Tel 781.430.3000 - Fax 781.430.3001 - www.irobot.com
41
User Interface Errors
• With the Battery removed, press POWER button and confirm that it
snaps under the finger like the CLEAN button. If not, user panel needs
to be replaced.
Power button off
• User interface failure
• Reinsert the Battery and start charging the Battery in Scooba. If the
power light does not illuminate, the Battery could be entering deep
discharge mode. Wait a few minutes and see if the power light comes
on. If a green light starts pulsing fast, it is in deep discharge mode. If
still no light, Scooba needs to be repaired for possible charging or user
interface problem. Perform a full Built–in-Test.
• Is the Tank missing, the clean Tank empty, or dirty Tank full?
• Use the Scooba Bulb on the solution valve and squeeze air through
the pump 3 times.
Check Tank
• Tank missing
• Clean Tank empty
• Dirty Tank full.
• Pump - sticky valve
• Water too soft
• Rinse out the clean and dirty Tank with some water.
• If the problem persists, empty Tank and add a mixture of water and
60 ml of vinegar in the clean tank water to increase the conductivity of
the water. Then use the Scooba bulb to push air through the water
sensor and clear the tubes. Then reinsert Tank with the fresh
water/vinegar mixture.
iRobot Corporation
8 Crosby Drive, Bedford MA 01730 - Tel 781.430.3000 - Fax 781.430.3001 - www.irobot.com
42
• Check that the Filter, Vacuum Flow Tube, Cleaning Head are
properly seated. Remove and reinsert them.
Check Brush
• Brush stall
• Filter missing
• Cleaning Head
missing
• In case of brush stall, Scooba will complete the dry cycle before
stopping and giving error.
Behavior only
Tank won’t open
Tank won’t close
• Place one hand on the tank Receiver and apply pressure on the back
while the other hand taps lightly on the edge of the Tank handle. The
tank should release.
• Make sure there are no obstructions
• Make sure the Battery, Vacuum Flow Tube and Filter are seated
properly
• Ensure the user is placing enough pressure on the top of tank when
closing it.
• Is the user letting the 5 minute drying cycle complete? The dry cycle is
not intended to dry the floor but dry the internal tubing in the Scooba so
it does not leave a puddle on the floor.
Floor too wet
• Clogged ports
• Bad squeegee
• Bad tank seal
• Rinse out the Filter, and all ports on the underside of the Scooba Tank
since they may be clogged.
• Ensure that all the squeegees (dry and wet) are not ripped or bent. If
the dry vacuum squeegee is rippled or bent, you can take some dish
soap between your thumb and index finger and run it along the squeegee
to straighten it out.
iRobot Corporation
8 Crosby Drive, Bedford MA 01730 - Tel 781.430.3000 - Fax 781.430.3001 - www.irobot.com
43
• Note : A blinking CLEAN light signifies it is in dry mode and no
water is being placed on the floor
• Use the Scooba Bulb on the solution valve and squeeze air through the
pump 3 times.
Floor too dry
• Sticky valve
• Bad tank seal
• Ensure there is liquid in the clean Tank.
• Make sure the Battery is in place with the yellow tabs tucked into the
battery latch. Ensure the Tank is properly latched into robot
• Ensure the Filter and Vacuum Flow Tube are properly installed.
• Fill clean Tank. Using a pen tip, push on the poppet valve to ensure a
flow is coming out. Test over sink.
• Is the Battery properly seated?
Charging Failure
• Is the Power Supply light off or flashing? If yes, Scooba and the Power
Supply may need to be replaced. Perform full Built-in-Test.
• Make sure Scooba does not end in an error code.
Short run time (<60
min)
• Do a Battery Reset : Remove power to robot. Take out battery and
press power for 5 seconds. Reseat battery and make sure that it is seated
properly. Wait 5 seconds and reattach to power supply.
• Charge Battery fully (3 – 16 hours)
• Although the tank may end clean cycle after 45 minutes, the battery
should last for another tank and run total of 60minutes.
Gets stuck on
transitions
• Scooba can only clear 3 mm transitions. Anything larger will cause the
bumper to turn the Scooba away.
iRobot Corporation
8 Crosby Drive, Bedford MA 01730 - Tel 781.430.3000 - Fax 781.430.3001 - www.irobot.com
44
Appendix E: Scooba OSMO
Scooba’s software is continuously improved by iRobot software engineers. When a Scooba is
serviced it is best practice to update it with the latest software code with an OSMO. OSMO will
only update software if the robot’s software is an older version than what is installed in OSMO.
Software Date Tag
2007-07-06-1452
Robot Production
Implementation
Notes
3 September 2007
Universal code
(can be applied to any
Scooba model)
Scooba OSMO
OSMO Download Procedure
The OSMO download takes about 2 minutes and requires battery power during the download.
OSMO will first delete the robot’s operating system before downloading new software and if the
battery dies during the download, the robot remains without an operating system. In this case the
robot’s POWER light will blink red until the software is properly loaded again.
OSMO is very easy to install, please follow the steps below.
1.
2.
3.
4.
Remove the power supply.
Attach a charged Battery into your Scooba.
Line the OSMO up so the serial connector is facing towards the serial port.
Once plugged in, the OSMO and the Scooba’s power light will flash for a couple of
minutes and then the power light will turn solid green.
5. Remove OSMO. The upgrade is now complete!
iRobot Corporation
8 Crosby Drive, Bedford MA 01730 - Tel 781.430.3000 - Fax 781.430.3001 - www.irobot.com
45
Appendix F: Scooba Built-in-Test
[A Serial Cable can not be attached to Scooba during Built-in-Test]
Scooba Built-in-Test Procedure
To put Scooba into Built-in Test mode:
1. Power Scooba OFF (if not already OFF) by pressing the POWER button.
2. Hold down the CLEAN button.
3. Power Scooba ON by pressing and releasing the POWER button.
4. Keep holding down the CLEAN button for about 0.5 SECONDS until you hear a series of
ASCENDING BEEPS and the user panel LEDs start flashing.
For AUTO-ADVANCE mode:
5. Release the CLEAN button.
For MANUAL-ADVANCE mode:
6. Continue holding down the CLEAN button for a total of 3 SECONDS until you hear a
second series of DESCENDING BEEPS.
7. Release the CLEAN button.
Test Name
Tester Action
0
Panel LEDs
Check correct flashing
of LEDs. Press
CLEAN to advance to
the first test.
1
External
Watchdog
Test
None [this test makes
sure that the processor
can reset if it gets
locked up]
2
Bumpers +
board-rev
Press and release left
bumper. Press and
release right bumper.
Robot
Action
(Left)
Check Tank
LED
All LED’s
will go out
briefly and
then return
to normal
state.
External
watchdog
test passed.
Left bumper
pressed.
(Middle)
Check
Brush
LED
(Right)
I’m Stuck
LED
Board rev
ID OK
(>=3)
Right
bumper
pressed.
Power
LED’s
iRobot Corporation
8 Crosby Drive, Bedford MA 01730 - Tel 781.430.3000 - Fax 781.430.3001 - www.irobot.com
46
3
Side Cliff
Sensors
Briefly lift robot's left
side to simulate cliffleft. Briefly lift
robot's right side to
simulate cliff-right.
Cliff-left
detected.
Cliff-right
detected.
4
Front Cliff +
Wall Sensors
Briefly lift front of
robot to simulate clifffront. Briefly simulate
a wall.
Cliff-front
detected.
Wall
detected.
5
Side Wheel
Drops
Lift robot for one
second to cause a
wheel drop on left
wheel, then do the
same for the right
wheel.
Left wheel
drop
detected.
Right
wheel drop
detected.
6
Front wheel
drop + stasis.
Briefly lift robot to
cause a wheel drop on
the caster. Spin caster
while dropped and
verify that lights do
not change. Hold the
robot so it’s resting on
just the front caster
(holding the other
wheels in the air).
Move the robot
forward one foot to
cause the stasis switch
to activate at least 3
times.
Caster wheel
drop
detected.
Stasis
switch
status.
7
Tank, filter,
+ cleaning
head present
switches.
Remove the tank.
Briefly remove and reinsert the filter.
Briefly remove and reinsert the cleaning
head. Re-insert the
tank.
Tank
removal
detected.
8
Light sensor
None. Test
automatically passes
for Scoobas without
light sensors. Tester
can skip by pressing
‘clean’ button
Light sensor
sees
darkness.
Filter
removal
detected.
Cleaning
head
removal
detected.
Light
sensor sees
brightness.
iRobot Corporation
8 Crosby Drive, Bedford MA 01730 - Tel 781.430.3000 - Fax 781.430.3001 - www.irobot.com
47
9
Rcon IR
Receiver
Point a virtual wall at
the rcon IR receiver.
Then point the virtual
wall away or turn it
off.
Point a Roomba
remote control at the
rcon IR receiver and
briefly press any
button except Power.
Virtual-wall
signal at
rcon IR
receiver.
Remote
signal at
rcon IR
receiver
10
Main Brush
Make sure brush is
unobstructed. Wait
until POWER LED is
constantly GREEN for
1 second. Then stall
the main brush until
Check tank LED is
constantly yellow for
1 second.
Main brush
turns on.
Brush
overcurrent
stall.
Brush
current OK.
11
Vacuum
None.
Vacuum
turns on.
Vacuum
stall.
Vacuum
current OK.
12
Pump
None. { If it fails, use
a Scooba bulb to push
air through the pump }
Pump turns
on.
Pump stall.
13
Tank level
sensors
Ensure tank is inserted
and empty. Wait 5
seconds until middle
LED lights. Remove
tank. Add a tank with
some liquid in the
clean and dirty tank
and insert in Scooba.
Wait for clean tank
sensor light to
activate. Tilt the robot
if necessary to light
the dirty tank light.
Pump turns
on.
Clean tank
level sensor
active (IE
sees water).
14
Left Wheel
Make sure wheels are
in the air and
unobstructed. Wait
until POWER LED is
constantly GREEN.
Then stall left wheel
until Check tank LED
is constantly yellow
for 1 second.
Left wheel
turns in
forward
direction
Left wheel
overcurrent
stall.
Good
pump
encoder
signal.
Lights
when the
test is
waiting
for the
tester to
remove
the tank
& fill it.
Pump
current OK.
Dirty tank
level
sensor
active (IE
sees
water).
Left motor
current and
encoder
speed OK.
iRobot Corporation
8 Crosby Drive, Bedford MA 01730 - Tel 781.430.3000 - Fax 781.430.3001 - www.irobot.com
48
15
Right Wheel
Make sure wheels are
in the air and
unobstructed. Wait
until POWER LED is
constantly GREEN.
Then stall right wheel
until Check tank LED
is constantly yellow
for 1 second.
Right wheel
turns in
forward
direction.
16
Wheel
Encoders
Robot will drive
backwards for 1
seconds, verify that
robot drives straight.
Drive
wheels turn
in backward
direction.
17
Charger
detection
Plug in the charger.
Charger
detected
18
Battery
Sensors
None
Battery
voltage
between 12 18 V.
19
Plug-in
Charger
Trickle.
None
Plug-in
charger
available.
Trickle
current OK.
20
Plug-in
Charger Low
Current.
None
Plug-in
charger
available.
Low charge
current OK.
21
Plug-in
Charger High
Current
None
Plug-in
charger
available.
High charge
current OK.
22
Charger
Watchdog
Test
None [again, this test
checks that we stop
charging if the
processor locks up]
Plug-in
charger
available.
Charger
watchdog
test passed
23
Charger
switch
isolation test
None [this tests two
switches on the main
board, electronically
between battery and
charger. Redundant
protection in case we
need to switch
charging off]
Plug-in
charger
available.
Charger
switch
isolation
test passed
24
SW Version
None [this test verifies
that the software is
protected and cannot
be read]
25
Built-in test
Complete
Charging
current only
passes
when both
switches are
enabled.
Left wheel
encoder
signal.
Right
wheel
overcurrent
stall.
Right motor
current and
encoder
speed OK.
Right
wheel
encoder
signal.
Motor
current and
encoder
speed OK.
Thermistor
present.
Baseline
current OK.
SW Version
OK?
iRobot Corporation
8 Crosby Drive, Bedford MA 01730 - Tel 781.430.3000 - Fax 781.430.3001 - www.irobot.com
49
iRobot Data Capture
1. Run “iRobot_BiT_CaptureV1.1.exe”. If the program has not yet been downloaded, extract the
zip file into a folder making sure ‘RobotOriginList.txt’ file is in the same folder as the
executable.
2. Choose the robot Model.
3. Create or select the file to write the bit data into using ‘Browse’ button. Now enter the serial
number of the robot from the robot sticker. The serial number has the following verifications:
Length is 21, Starts with “JEN” or “jen”, “KYN” or “ kyn”, “PRR” or “prr”
4. Choose the origin from where the robot was shipped
5. Choose the mobility test result
6. Choose the com port you are using to connect to the robot and press ‘Capture’
7. After performing the BiT test, connect the robot to the com port selected in step 6.
8. Press ‘Clean’ button on the robot to get the BiT data
9. If you do not get data within 5 secs, press clean again
10. The BiT summary data will be displayed and will be automatically saved into the file
11. You can continue to another robot without closing the program. Repeat steps 3-10
NOTE 1: If robot model needs to be changed, re-start the application
NOTE 2: Please do not edit/open the ‘RobotOriginList.txt’ file. If you want to edit the robot
‘shipped from’ details, use the ‘…’ button to edit the drop down list.
Alternative Data Capture (without iRobot software)
[Note : When the Built-in-Test is completed, the Scooba’s POWER light will be flashing GREEN
(it passed) or RED (it failed). Do not remove the Battery as this will erase the test information.]
o Plug in the serial cable from the robot into COM1 or COM2 of the computer.
o Open HyperTerminal
(In Windows) START ->Programs -> Accessories -> Communications ->
HyperTerminal
…or…
(In Windows) START->RUN and enter HYPERTRM.EXE
o Name the connection (anything you want)
o Choose COM1 or COM2 depending on where you attached the cable into the computer.
o Select bits per second and change to “57600”and under flow control select “none” (leave all
other settings alone).
o In "HyperTerminal" go to TRANSFER -> CAPTURE TEST -> START
o Press Clean on Scooba
o In "HyperTerminal" go to TRANSFER -> CAPTURE TEST -> STOP
Serial cable available from iRobot :
iRobot Corporation
8 Crosby Drive, Bedford MA 01730 - Tel 781.430.3000 - Fax 781.430.3001 - www.irobot.com
50
Appendix G: Scooba Built-in-Test Limits
The following are the minimum and maximum limits used in each Built-in-Test.
Relevant
Scooba BiT #
10,11,12,14,18
10
10
11
12
12
14
14
15
15
18
19
20
21
22
23
Description
Baseline Current
Brush Current
Brush Stall Current
Vacuum Current
Pump Current
Pump Stall Current
Left Drive Current
Left Drive Stall Current
Right Drive Current
Right Drive Stall Current
Battery Voltage
Charging Trickle Current (nominal 49 mA)
Charging Low Current (nominal 430 mA)
Charging High Current (nominal 1750 mA)
Charging Disabled Current
Charging Switch 1 & 2 Disabled Current
MINIMUM
MAXIMUM
-195 mA
-683 mA
-3251 mA
-2060 mA
-97 mA
-303 mA
-205 mA
-1406 mA
-205 mA
-1406 mA
12V
29 mA
390 mA
1572 mA
-253 mA
-253 mA
-68 mA
-166 mA
-1894 mA
-1376 mA
-19 mA
-117 mA
-39 mA
-585 mA
-39 mA
-585 mA
18V
68 mA
468 mA
1923 mA
0 mA
0 mA
iRobot Corporation
8 Crosby Drive, Bedford MA 01730 - Tel 781.430.3000 - Fax 781.430.3001 - www.irobot.com
51
Appendix H: Battery Test Procedure
Using Battery Voltage Tester
To measure voltage across a Scooba battery, to measure voltage across a 5-Ohm resistor, and to measure the thermistor
resistance.
Equipment : Battery Voltage Tester, Multimeter, and fully charged battery under test.
Method
1. Fully charge battery with Scooba or Charger Base. Insert battery into tester.
To measure voltage across the battery, set the multimeter to measure DC VOLTAGE (V), and plug the multimeter terminals to the
2.
positive (red+) and negative (black-) terminals of the battery tester. Failure if reading is not between 15.5 – 18V.
To measure the voltage across a 5 Ω resistor, follow step 1 and press the 5-Ohm resistor push button (Caution: Do not press button
3.
for more than a few seconds to avoid overheating of the load. Failure if voltage drop is more than 2 Volts.
4. To measure the thermistor resistance value (thermistor contact to ground contact), set the multimeter to measure RESISTANCE (Ω),
and plug the multimeter terminals to the thermistor terminal and the negative (-) terminal. Failure if not within specs in table below.
Objective :
iRobot Corporation
8 Crosby Drive, Bedford MA 01730 - Tel 781.430.3000 - Fax 781.430.3001 - www.irobot.com
52
Appendix I: Power Supply Test Procedure
For 1.75A International Power Supply
Equipment:AC Voltmeter, DC voltmeter, ammeter, variable voltage AC supply,
Method 1
1.
Plug power supply into variable voltage AC supply with AC voltmeter connected across AC supply.
2.
Set AC supply voltage for 85 VAC.
3.
Set AC supply voltage for 264 VAC. Failure if DC output voltage < 21.5 VDC or > 24 VDC; or light is off
4.
Disconnect power supply from AC supply. Set AC supply voltage for 65 VAC. Reconnect power supply to AC supply.
Failure if output current isn’t zero (power supply should shut down) or light is off
Failure if DC output voltage < 21.5 VDC or > 24 VDC; or light is off
Method 2
1.
Plug power supply into wall socket. Failure if DC output voltage < 21.5 VDC or > 24 VDC; or light is off
ground
+ ve
iRobot Corporation
8 Crosby Drive, Bedford MA 01730 - Tel 781.430.3000 - Fax 781.430.3001 - www.irobot.com
53
Appendix J: Suggested Maintenance Procedure
Scooba Dry Vacuum Squeegee Replacement
1
Turn Scooba over and remove the bracket that
holds in the dry vacuum squeegee.
2
Pull our short squeegee and replace.
3
Pull out the long squeegee and replace.
iRobot Corporation
8 Crosby Drive, Bedford MA 01730 - Tel 781.430.3000 - Fax 781.430.3001 - www.irobot.com
54
Scooba Cleaning Head Disassembly
1
Open Cleaning Head by using the two tabs on
the edge of the frame.
2
Open Cleaning Head to expose and remove the
Brush. Clean the Brush.
3
Close Cleaning Head and reinsert it into
Scooba by first aligning the frame with the
chassis.
iRobot Corporation
8 Crosby Drive, Bedford MA 01730 - Tel 781.430.3000 - Fax 781.430.3001 - www.irobot.com
55
4
Push in the Cleaning Head until it clicks into
place.
Scooba Wheel Replacement
1
2
With Scooba turned over, press on the two
tabs on the bottom of the wheel and pull up.
Remove the tire if needed with a screwdriver
(one screw per wheel).
iRobot Corporation
8 Crosby Drive, Bedford MA 01730 - Tel 781.430.3000 - Fax 781.430.3001 - www.irobot.com
56
Scooba Chassis Disassembly
1. Remove battery, tank, filter and suction port
iRobot Corporation
8 Crosby Drive, Bedford MA 01730 - Tel 781.430.3000 - Fax 781.430.3001 - www.irobot.com
57
2. Remove bumper (2 screws)
iRobot Corporation
8 Crosby Drive, Bedford MA 01730 - Tel 781.430.3000 - Fax 781.430.3001 - www.irobot.com
58
3. Remove screws in lower chassis (10 screws)
iRobot Corporation
8 Crosby Drive, Bedford MA 01730 - Tel 781.430.3000 - Fax 781.430.3001 - www.irobot.com
59
4. Remove screws along user panel (6 screws)
5. To open chassis cover, do the following :
o Remove white flexible cable by pulling it out of user panel.
o Push suction valve down as chassis top is removed.
iRobot Corporation
8 Crosby Drive, Bedford MA 01730 - Tel 781.430.3000 - Fax 781.430.3001 - www.irobot.com
60
Appendix K: Glossary
BiT
Chassis
Encoder
o
o
o
o
Force Field
Infra Red (IR)
Light Emitting Diode (LED)
Mobility
Overcurrents
PCB
RCON
o
o
o
o
o
o
Squeegee
o
Stasis
o
o
User Interface (UI)
Virtual
o
Built-in-Test
The plastic frame of the Scooba
A sensor that relays information to the robot
An IR avoidance beam that ensures the Scooba does not bump
into it. Force field is used in the Home Base and Virtual Wall
Light with wavelengths greater than those of visible light.
Semiconductor light source that emits visible light or invisible
infrared radiation.
Capable of moving or being moved readily
Exceeds the current limits for the motors.
Printed circuit board
Room confinement (reference to the IR receiver eye on the top
of the outer bumper)
A flat, smooth rubber blade, used to remove or control the flow
of liquid on a flat surface
Refers to things that are not moving or changing
The physical means and method of interaction between users
and products
Not physical
iRobot Corporation
8 Crosby Drive, Bedford MA 01730 - Tel 781.430.3000 - Fax 781.430.3001 - www.irobot.com
61