1
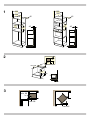
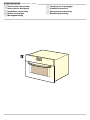
*9000419349*
Û
ì
Ú
Þ
Ø
9000419349 940618
Instrucciones de montaje
Instruções de montagem
Installation instructions
Notice de montage
Montageanleitung
â
é
î
ó
Istruzioni per il montaggio
Installatievoorschrift
Инструкция по монтажу
Monteringsanvisning
PLQ
PLQ
PD[
PLQ
PD[
PLQ
PLQ
PLQ
es
Û Instrucciones de montaje
Aspectos que se deben tener en cuenta
Conexión eléctrica
El aparato está listo para ser conectado y sólo debe conectarse
a una toma de corriente con contacto de puesta a tierra
instalada conforme a las instrucciones. La colocación de la
toma de corriente o la sustitución de la línea de conexión solo
puede llevarla a cabo un técnico electricista observando las
instrucciones pertinentes. Si el enchufe queda inaccesible una
vez concluido el montaje, la instalación deberá contar con un
dispositivo separador omnipolar con una distancia de contacto
de al menos 3 mm. La protección contra contacto manual debe
garantizarse mediante el montaje. Fusible: ver Instrucciones de
uso - Datos técnicos.
Muebles empotrados
Este aparato ha sido diseñado exclusivamente para su montaje
empotrado. Este aparato no ha sido concebido como aparato
de sobremesa ni para ser utilizado dentro de un armario.
El armario empotrado no puede tener ninguna placa posterior
detrás del aparato. Entre la pared y el fondo del armario o la
pared posterior del armario superpuesto debe mantenerse una
distancia mínima de 45 mm.
El armario empotrado debe tener en la parte delantera un
orificio de ventilación de 50 cm2. Para ello, recortar el
embellecedor de zócalo o colocar una rejilla de ventilación. No
cubrir las aberturas de ventilación ni los orificios de aspiración.
Solo un montaje profesional según estas instrucciones
garantiza un uso seguro. En caso de daños debido a un
montaje erróneo, la responsabilidad será del instalador. Los
muebles empotrados deben ser capaces de resistir una
temperatura de hasta 90 °C, los frontales de los muebles
contiguos, como mínimo hasta 65 °C.
Aparato montado en un armario en alto ‒ Figura 1
Aparato debajo de la placa de cocción ‒ Figura 2
El fondo intermedio del armario bajo requiere una abertura de
ventilación.
Si el aparato se va a instalar debajo de una placa de cocción,
deben observarse las instrucciones de montaje de esta.
Montaje en esquina ‒ Figura 3
Tener en cuenta las medidas para realizar el montaje en
esquina.
O armário embutido tem de possuir uma abertura de ventilação
de 50 cm2, na parte dianteira. Para tal, deverá cortar o painel
do soco ou aplicar uma grelha de ventilação. A ranhura de
ventilação e as aberturas de admissão não podem estar
vedadas. A utilização segura do aparelho só é garantida
através de uma montagem profissional, de acordo com as
presentes instruções. Em caso de danos resultantes de uma
montagem incorrecta, a responsabilidade pelos mesmos recai
sobre quem procedeu à montagem. Os móveis embutidos têm
de ser resistentes a temperaturas até 90 °C, a parte da frente
dos móveis adjacentes até, pelo menos, 65 °C.
Aparelho em armário elevado ‒ figura 1
Aparelho sob a bancada de trabalho ‒ figura 2
O fundo intermédio do armário inferior necessita de um orifício
de ventilação.
Caso o aparelho seja montado sob uma placa de cozinhar,
respeite as instruções de montagem da mesma.
Montagem de canto ‒ figura 3
Aquando da montagem de canto, tenha as medidas em
consideração.
Fixar o aparelho - figura 4
1. Insira totalmente o aparelho e coloque-o ao centro.
Não dobre o cabo de ligação.
2. Fixe o aparelho com parafusos.
O espaço entre a bancada de trabalho e o aparelho não pode
ser vedado com réguas adicionais.
Desmontar
1. Desligue o aparelho da corrente.
2. Desaperte os parafusos de fixação.
3. Levante ligeiramente o aparelho e retire-o completamente para
fora.
en
Ú Installation instructions
The following must be noted
1. Introducir el aparato por completo y centrarlo.
Electrical connection
The appliance is fitted with a plug and must only be connected
to a properly installed earthed socket. Only a qualified
electrician who takes the appropriate regulations into account
may install the socket or replace the connecting cable. If the
plug is no longer accessible following installation, an all-pole
isolating switch must be present on the installation side with a
contact gap of at least 3 mm. Contact protection must be
ensured by the installation. Fuse protection: see instructions for
use - technical data.
2. Atornillar el aparato.
Fitted units
Fijar el aparato - Figura 4
No doblar el cable de conexión.
El espacio entre la encimera y el aparato no debe obstruirse
con listones suplementarios.
Desmontaje
1. Desconectar el aparato de la corriente.
2. Aflojar los tornillos de ajuste.
3. Levantar ligeramente el aparato y extraerlo por completo.
pt
ì Instruções de montagem
Deverá ter em conta as seguintes indicações
Ligação eléctrica
O aparelho está pronto a ser ligado à rede eléctrica, podendo
apenas ser ligado a uma tomada com contacto de protecção
(tipo Schuko) devidamente instalada. A instalação de uma
tomada ou troca do cabo de ligação só pode ser feita por um
electricista, respeitando as normas aplicáveis. Se após a
montagem a ficha deixar de ficar acessível, tem de estar
disponível no lado da instalação um dispositivo de corte geral
omnipolar com uma distância de contacto mínima de 3 mm. A
protecção contra contacto acidental tem de ficar assegurada na
montagem. Protecção fusível: consulte o Manual de Instruções
– Dados técnicos
Móveis embutidos
Este aparelho destina-se apenas a ser embutido, não tendo
sido concebido para ser utilizado como aparelho de mesa nem
no interior de um armário.
O armário embutido não deve ter parede posterior atrás do
aparelho. Entre a parede e a base do armário, ou a parede
posterior do armário de cima, tem de ser mantida uma distância
mínima de 45 mm.
This appliance is only intended to be fully fitted in a kitchen. This
appliance is not designed to be used as a tabletop appliance or
inside a cupboard.
The fitted cabinet must not have a back wall behind the
appliance. A gap of at least 45 mm must be maintained
between the wall and the base or back panel of the unit above.
The fitted cabinet must have a ventilation opening of 50 cm2 on
the front. To achieve this, cut back the base panel or fit a
ventilation grille. Ventilation slots and intakes must not be
covered. The safe operation of this appliance can only be
guaranteed if it has been installed in accordance with these
installation instructions. The fitter is liable for any damage
resulting from incorrect installation. The units into which the
appliance is fitted must be heat-resistant up to 90 °C, and
adjacent unit fronts up to at least 65 °C.
Appliance in the upper cabinet ‒ Fig. 1
Oven under the work surface ‒ Fig. 2
There must be a ventilation cut-out made in the intermediate
floor of the base unit.
If the appliance is being installed beneath a hob, observe the
hob assembly instructions.
Corner installation ‒ Fig. 3
The dimensions must be taken into consideration for corner
installation.
Securing the appliance in place - Fig. 4
1. Fully insert the appliance and centre it.
Do not kink the connecting cable.
2. Screw the appliance into place.
The gap between the worktop and the appliance must not be
closed by additional battens.
Removal
1. Disconnect the appliance from the power supply.
2. Undo the securing screws.
3. Raise the appliance slightly and pull it out completely.
fr
Þ Notice de montage
Consignes à respecter
Branchement électrique
L’appareil est livré prêt à brancher et doit être raccordé
impérativement à une prise de courant de sécurité installée de
manière réglementaire. Seul un électricien agréé est habilité à
installer ou à déplacer une prise ou à changer le cordon de
branchement, en respectant les prescriptions en vigueur. Si,
après l’encastrement, la prise n’est plus accessible, un dispositif
de coupure tous pôles avec un écartement des contacts d’au
moins 3 mm doit être présent du côté installation.
L’encastrement doit garantir la protection contre les contacts
accidentels. Fusible : voir la notice d’utilisation - Caractéristiques
techniques.
Meuble d’encastrement
Cet appareil est destiné à l’encastrement uniquement. Cet
appareil n’est pas destiné à être utilisé comme appareil de table
ou dans une armoire.
Le meuble d’encastrement ne doit pas posséder de paroi
arrière derrière l’appareil. Entre le mur et le plancher du meuble
ou bien la paroi arrière du meuble situé au-dessus, respecter
une distance d’au moins 45 mm.
Le meuble d’encastrement doit disposer sur le devant d’un
orifice d’aération de 50 cm2. A cet effet, découper le cache du
socle ou fixer une grille de ventilation. Les fentes d’aération et
les orifices d’aspiration ne doivent pas être recouverts. Seule
une installation effectuée selon cette notice de montage garantit
une utilisation en toute sécurité. En cas de dommages résultant
d’une installation incorrecte, l’installateur est responsable. Les
meubles d’encastrement doivent résister à une température
jusqu’à 90 °C, la façade des meubles voisins au moins jusqu’à
65 °C.
Appareil dans un meuble haut ‒ fig. 1
L’appareil sous le plan de travail ‒ fig. 2
Le faux-plancher de l’élément bas doit être pourvu d’une
découpe pour l’aération.
Si l’appareil est encastré sous une table de cuisson, respectez
la notice de montage de la table de cuisson.
Encastrement angulaire ‒ fig. 3
En cas d’encastrement angulaire, tenir compte des cotes.
Fixer l’appareil - fig. 4
1. Pousser l’appareil jusqu’au fond et le centrer.
Ne pas plier le câble de raccordement.
2. Visser l’appareil.
L’écart entre le plan de travail et l’appareil ne doit pas être
obturé par des baguettes supplémentaires.
Dépose
1. Mettre l’appareil hors tension.
2. Desserrer les vis de fixation.
3. Soulever légèrement l’appareil et le retirer complètement.
de
Ø Montageanleitung
Das müssen Sie beachten
Elektrischer Anschluss
Das Gerät ist steckerfertig und darf nur an eine vorschriftsmäßig
installierte Schutzkontakt-Steckdose angeschlossen werden.
Das Verlegen einer Steckdose oder Austausch der Anschlussleitung darf nur vom Elektrofachmann unter Berücksichtigung
der einschlägigen Vorschriften ausgeführt werden. Wenn der
Stecker nach dem Einbau nicht mehr erreichbar ist muss installationsseitig eine allpolige Trennvorrichtung mit einem Kontaktabstand von mind. 3 mm vorhanden sein. Der
Berührungsschutz muss durch den Einbau gewährleistet sein.
Absicherung: siehe Gebrauchsanleitung - Technische Daten.
Einbaumöbel
Dieses Gerät ist nur für den Einbau bestimmt. Dieses Gerät ist
nicht als Tischgerät oder für den Gebrauch innerhalb eines
Schrankes gedacht.
Der Einbauschrank darf hinter dem Gerät keine Rückwand
haben. Zwischen Wand und Schrankboden bzw. Rückwand des
darüberliegenden Schrankes muss ein Abstand von mind.
45 mm eingehalten werden.
Der Einbauschrank muss an der Vorderseite eine Lüftungsöffnung von 50 cm2 haben.Dazu die Sockelblende zurückschneiden oder ein Lüftungsgitter anbringen. Lüftungsschlitze und
Ansaugöffnungen dürfen nicht verdeckt werden.Nur ein fachgerechter Einbau nach dieser Montageanweisung garantiert einen
sicheren Gebrauch. Bei Schäden durch falschen Einbau haftet
der Monteur. Einbaumöbel müssen bis 90 °C temperaturbeständig sein, angrenzende Möbelfronten mind. bis 65 °C.
Gerät im Hochschrank ‒ Bild 1
Gerät unter Arbeitsplatte ‒ Bild 2
Der Zwischenboden des Unterschrankes benötigt einen Lüftungsausschnitt.
Wird das Gerät unter einem Kochfeld eingebaut, beachten Sie
die Montageanleitung des Kochfeldes.
Eckeinbau ‒ Bild 3
Beim Eckeinbau, Maße berücksichtigen.
Gerät befestigen - Bild 4
1. Gerät ganz einschieben und mittig ausrichten.
Anschlusskabel nicht knicken.
2. Gerät festschrauben.
Der Spalt zwischen Arbeitsplatte und Gerät darf nicht durch zusätzliche Leisten verschlossen werden.
Ausbau
1. Gerät spannungslos machen.
2. Befestigungsschrauben lösen.
3. Gerät leicht anheben und ganz herausziehen
it
â Istruzioni per il montaggio
Procedere nel modo seguente
Allacciamento elettrico
L’apparecchio è dotato di spina e può essere collegato
solamente a una presa con messa a terra installata secondo le
istruzioni. Lo spostamento di una presa o la sostituzione del
cavo di allacciamento possono essere effettuati unicamente da
un elettricista qualificato tenendo conto delle relative istruzioni.
Se dopo il montaggio la spina non è più raggiungibile, occorre
predisporre un dispositivo di collegamento universale con una
distanza di contatto dal lato di installazione di almeno 3 mm. La
protezione da contatto deve essere garantita tramite il
montaggio. Protezione: vedere le istruzioni per l’uso – Dati
tecnici.
Mobili da incasso
Questo apparecchio è concepito esclusivamente per l’incasso e
non è indicato per l’utilizzo come apparecchio da tavolo o
all’interno di un mobile.
Inserire l’apparecchio in un mobile da incasso senza parete
posteriore. Rispettare una distanza pari ad almeno 45 mm tra il
muro e il fondo o la parete posteriore del pensile sottostante.
Il lato anteriore del mobile da incasso deve essere provvisto di
un foro di ventilazione di 50 cm2. A tal fine, accorciare lo
zoccolo o montare una griglia di ventilazione. Le fessure di
ventilazione e le prese d’aria non devono essere coperte.
L’utilizzo sicuro viene garantito solo se il montaggio è stato
effettuato in modo corretto secondo le presenti istruzioni. In
caso di danni dovuti a un montaggio scorretto, la responsabilità
ricade su chi ha montato l’apparecchio. I mobili da incasso
devono essere termostabili fino a 90 °C e i frontali dei mobili
vicini almeno fino a 65 °C.
Apparecchio in un pensile ‒ Figura 1
Apparecchio sotto il piano di lavoro ‒ Figura 2
l doppiofondo del mobile necessita di fessura di ventilazione.
Se si monta l’apparecchio sotto un piano di cottura, seguire le
istruzioni di montaggio di quest’ultimo.
Montaggio angolare ‒ Figura 3
Quando si effettua un montaggio angolare, tenere conto delle
misure.
Fissaggio dell’apparecchio - Figura 4
1. Inserire l’apparecchio fino in fondo e centrarlo.
Non schiacciare il cavo di allacciamento.
2. Fissare l’apparecchio con le viti.
Non chiudere lo spazio tra il piano di lavoro e l’apparecchio
con ulteriori listelli.
Smontaggio
1. Scollegare l’apparecchio.
2. Svitare le viti di fissaggio.
3. Sollevare leggermente l’apparecchio ed estrarlo
completamente.
nl
é Installatievoorschrift
Hierop dient u te letten
Elektrische aansluiting
Het apparaat is klaar voor gebruik en mag alleen op een geaard
stopcontact worden aangesloten dat volgens de voorschriften is
geïnstalleerd. Het aanbrengen van het stopcontact of het
vervangen van de aansluitkabel dient door een elektricien, met
inachtneming van de geldende voorschriften, te worden
uitgevoerd. Wanneer de stekker na het inbouwen niet meer
toegankelijk is, moet een schakelaar met een contactafstand
van minstens 3 mm worden geïnstalleerd. De bescherming
tegen aanraking dient door de inbouw te zijn gewaarborgd.
Beveiliging: zie gebruikershandleiding - Technische gegevens.
Inbouwmeubels
Dit apparaat is uitsluitend bestemd voor inbouw. Dit apparaat is
niet als tafelapparaat of voor gebruik in een kast ontworpen.
De inbouwkast mag achter het apparaat geen achterwand
hebben. Tussen wand en bodem van de kast, resp. achterwand
van de bovenliggende kast moet een afstand van minimaal
45 mm worden aangehouden.
De inbouwkast moet aan de voorkant een ventilatie-opening
hebben van 50 cm2. Daarvoor de plint inkorten of een
ventilatierooster aanbrengen. Ventilatie-openingen en
aanzuigopeningen mogen niet worden afgedekt. Alleen
deskundige inbouw volgens deze montage-instructie garandeert
een veilig gebruik. Bij schade door verkeerde inbouw is de
monteur aansprakelijk. Inbouwmeubelsl moeten tot 90 °C
temperatuurbestendig zijn, aangrenzende meubelfrontjes tot
minimaal 65 °C.
Apparaat in bovenkast ‒ afbeelding 1
Apparaat onder werkblad ‒ afbeelding 2
In de tussenbodem van de onderkast moet een ventilatieopening worden aangebracht.
Wanneer het apparaat onder een kookplaat wordt ingebouwd,
raadpleeg dan de montagehandleiding van de kookplaat.
Hoekinbouw ‒ afbeelding 3
Bij hoekinbouw rekening houden met de maten.
Apparaat bevestigen - afbeelding 4
1. Het apparaat volledig inschuiven en centrisch uitrichten.
De aansluitkabel niet knikken.
2. Apparaat vastschroeven.
De spleet tussen werkblad en apparaat mag niet door extra
lijsten worden afgesloten.
Demontage
1. Maak het apparaat spanningsloos.
2. Bevestigingsschroeven losdraaien.
3. Het apparaat licht optillen en helemaal naar buiten trekken.
ru
î Инструкция по монтажу
На что следует обратить внимание
Подключение к электросети
Прибор можно подключать к сети только через правильно
установленную розетку с заземляющим контактом. Перенос
розетки или замена сетевого провода должны выполняться
только квалифицированным электриком с учётом существующих
предписаний. Если после установки прибора до штепсельной
вилки невозможно будет добраться, то при установке следует
сделать специальный выключатель для размыкания всех
полюсов с расстоянием между разомкнутыми контактами не
менее 3 мм. При установке следует обеспечить защиту от
прикосновения. Предохранители: см. Руководство по
эксплуатации - Технические характеристики.
Мебель для встраивания
Данный прибор предназначен исключительно для встраивания.
Прибор нельзя использовать, установив его на стол или в шкаф.
У шкафа для встраивания не должно быть задней стенки. Между
стеной и нижней полкой или задней стенкой шкафа,
установленного над прибором, необходимо оставить зазор
минимум 45 мм.
На фронтальной поверхности шкафа для встраивания должно
располагаться вентиляционное отверстие площадью 50 см2.Для
этого сделайте вырез в цокольной панели или вставьте
вентиляционную решётку. Вентиляционные прорези закрывать
запрещается.Безопасность эксплуатации гарантируется только
при квалифицированной сборке с соблюдением данной
инструкции по монтажу. За повреждения из-за неправильной
установки ответственность несёт сборщик. Мебель для
встраивания должна выдерживать температуру до 90°C, а
соседние фасады – до 65 °C.
Прибор в шкафу-колонне ‒ рис. 1
Прибор под столешницей ‒ рис. 2
В нижней полке шкафа, в который встраивается прибор, должно
быть отверстие для вентиляции.
При установке прибора под варочной панелью соблюдайте
инструкцию по монтажу варочной панели.
Монтаж в углу ‒ рис. 3
При монтаже в углу учитывайте указанные размеры.
Закрепление прибора — рис. 4
1. Задвиньте прибор до упора и выровняйте его.
Сетевой провод не перегибать!
2. Закрепите прибор с помощью винтов.
Зазор между столешницей и прибором нельзя закрывать
дополнительной планкой.
Демонтаж
1. Обесточьте прибор.
2. Ослабьте винты крепления.
3. Приподнимите и выньте прибор.
sv
ó Monteringsanvisning
Viktigt!
Elanslutning
Enheten är anslutningsklar med kontakt och du får bara ansluta
den till jordade uttag. Det är bara behörig elektriker som får
installera uttag eller byta sladd enligt gällande föreskrifter. Om
det inte går att nå kontakten efter inbyggnad, så måste
installationen ha en åtkomlig, allpolig brytare med min. 3 mm
brytavstånd. Installationen måste ge ett fullgott petskydd.
Avsäkring: se bruksanvisningen - Tekniska data.
Skåpstomme
Den här enheten är avsedd för inbyggnad. Enheten är varken
avsedd att vara bänkenhet eller bli använd inuti skåp.
Stommen får inte ha någon rygg bakom enheten. Det ska vara
min. 45 mm spalt mellan väggen och överskåpets skåpbotten
resp. -rygg.
Skåpstommen ska ha en ventilationsöppning på 50 cm2 framtill.
Såga ur sockelpanelen eller sätt i ventilationsgaller. Se till så att
ventilations- och intagsöppningar inte blir övertäckta. Säker
användning förutsätter proffsig montering enligt
monteringsanvisningen.Installatören ansvarar för skador som
uppstår på grund av felaktig inbyggnad. Stommarna ska tåla
temperaturer upp till 90°C, luckor och lådfronter intill upp till
min. 65°C.
Enhet i högskåp ‒ bild 1
Enhet under bänkskiva ‒ bild 2
Underskåpets hyllplan ska ha ventilationshål.
Monterar du enheten under en häll, följ hällens
monteringsanvisning.
Hörnmontering ‒ bild 3
Ta hänsyn till måtten vid hörnmontering.
Fästa enheten - bild 4
1. Skjut in enheten i skåpet helt och hållet och justera in den.
Du får inte vecka sladden.
2. Skruva fast enheten.
Se till så att spalten mellan bänkskiva och enhet inte blir täckt
av andra lister.
Demontering
1. Slå av strömmen.
2. Lossa fästskruvarna.
3. Lyft enheten något och dra ut den helt och hållet.