1
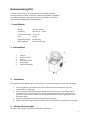
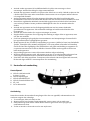
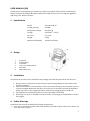
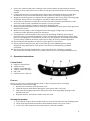
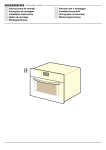
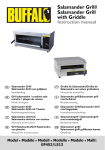
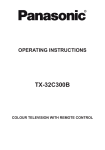
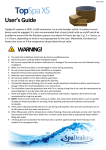
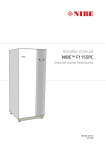
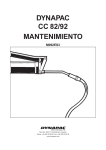
Manual TIM-12 Portabel Ismaskin Portable Ice Maker 2012-01-19 SE GB ANVÄNDARHANDBOK USER MANUAL FeiyueGroup Europé Aps Sundsholmen 14 DK 9440 Norresundby, Denmark Bruksanvisning (SE)..................................................................................................................................................................... 3 1. Specifikation ....................................................................................................................................................................... 3 2. Konstruktion....................................................................................................................................................................... 3 3. Installation .......................................................................................................................................................................... 3 4. Viktiga säkerhetsregler ................................................................................................................................................... 3 5. Kontroller och användning ............................................................................................................................................. 4 Kontrollpanel: ................................................................................................................................................................... 4 Användning ....................................................................................................................................................................... 4 Starta maskinen ................................................................................................................................................................. 5 6. Felsökning ........................................................................................................................................................................... 5 7. Rengöring och Underhåll................................................................................................................................................. 5 8. Garantivillkor ..................................................................................................................................................................... 6 9. Miljöskydd ........................................................................................................................................................................... 6 USER MANUAL (GB) ...................................................................................................................................................................... 7 1. Specification ........................................................................................................................................................................ 7 2. Design ................................................................................................................................................................................... 7 3. Installation .......................................................................................................................................................................... 7 4. Safety Warnings ................................................................................................................................................................. 7 5. Operation instructions ..................................................................................................................................................... 8 Control Panel:.................................................................................................................................................................... 8 First use ............................................................................................................................................................................. 8 Starting the machine .......................................................................................................................................................... 8 6. Troubleshooting ................................................................................................................................................................ 9 7. Cleaning and Maintenance .............................................................................................................................................. 9 9. Warranty Provisions...................................................................................................................................................... 10 10. Environmental Protection............................................................................................................................................ 10 SE GB Funktionerna i denna bruksanvisning publiceras med reservation för ändringar. The features described in this manual are published with reservation to modifications. 2 Bruksanvisning (SE) Tack för att du valt den här nya modellen av portabel ismaskin. Denna produkt är endast avsedd för inomhus användning i hushållet. Läs denna bruksanvisning noggrant innan du använder produkten. Spara bruksanvisningen för framtida behov. 1. Specifikation Modell TecLime TIM-12 Spänning 220-240 V , 50 Hz Strömförbrukning 0,7 / 1,2A Vikt 9,3 kg Kylmedel/mängd R134A/62g Mått (BxHxD) 297x367x378 mm 2. Konstruktion 1 2 3 4 5 6 Isskopa Sensor ”Is Full” Iskorg Lock med fönster Luftutsläpp Vattenavtappning 3. Installation Kontrollera att alla tillbehör finns med i paketet och läs anvisningarna för deras användning. 1. Ta bort tejpbitarna som håller fast de inre delarna under transporten. Gör rent vattentanken och iskorgen. 2. Placera maskinen på en plan vågrät bänkskiva. Undvik att placera den nära någon värmekälla eller i direkt solljus. Se till att det finns minst 10mm fritt utrymme runt apparaten. Låt den stå en timma för att låta kylmedlet hamna rätt i aggregatet innan kontakten sätts i. 3. Apparaten skall alltid stå så att stickontakten är åtkomlig. 4. Innan du använder din ismaskin, rekommenderas det starkt att rengöra den ordentligt. 4. Viktiga säkerhetsregler Läs dessa anvisningar noga innan du använder apparaten. 3 Använd endast apparaten för hushållsändamål och på det sätt som anges i dessa anvisningar. Använd den aldrig för något annat ändamål. Använd inte apparaten utomhus och placera den alltid i en torr miljö. Undvik att placera den i direkt solljus eller nära andra värmekällor. Lämna minst 10 cm utrymme mellan enheten och omgivande föremål. Anslut apparaten enbart till jordat vägguttag. Kontakten ska alltid vara åtkomlig efter installationen. Täck inte över kabeln och dra den inte där det finns risk att snubbla över den. Kontrollera regelbundet nätkabeln. Använd aldrig apparaten om kabeln eller kontakten visar tecken på skador. Denna produkts sladdlängd har valts för att minska risken för skador. Använd inte apparaten med en förlängningssladd som inte har samma elektriska specifikation som apparaten. Vid tveksamhet rådfråga en kvalificerad elektriker eller leverantören. Använd inte andra vätskor för att göra istärningar än vatten. Koppla alltid ur apparaten före rengöring eller ändring av några delar av apparaten, samt när den inte används. Se till att spänningen på typskylten överensstämmer med nätspänningen. Eventuella fel i hur apparaten ansluts ogiltigförklarar garantin. Denna apparat är inte avsedd för användning av personer (inklusive barn) med minskade fysiska, sensoriska eller mentala möjligheter, eller som saknar erfarenhet och kunskap, såvida de inte fått vägledning eller instruktioner vad gäller användning av apparaten av en person som ansvarar för deras säkerhet. Barn bör hållas under uppsikt så att de inte leker med apparaten. Doppa aldrig apparaten i vatten eller annan vätska av någon anledning. Reparera aldrig apparaten själv. Alla insatser som görs av en icke-kvalificerad person kan vara farliga. Eventuellt utbyte av nätkabeln måste utföras av en behörig elektriker. Vänd eller vält aldrig apparaten. Transportera den stående. Har den lagrats kallt vintertid, låt den stå några timmar i rumstemperatur före användning 5. Kontroller och användning Kontrollpanel: A. LED för vald kubstorlek S=Liten / L=Stor B. LED för Spänning på C. LED för Isbehållare full D. LED för Vattenbehållare tom E. PÅ / AV F. Val av kubstorlek Användning Innan du använder din ismaskin första gången eller efter ett uppehåll, rekommenderas det starkt att rengöra den ordentligt. 1. Ta ut iskorgen, diska och skölj av den. 2. Rengör interiör med utspätt rengöringsmedel, varmt vatten och en mjuk trasa. 3. Skölj sedan noga med vatten och låt vattnet rinna ut genom att dra ur proppen på undersidan mitt fram. 4. Torka av interiör och exteriör med en ren mjuk trasa. 4 Starta maskinen 1. 3. 2. 3. 4. 5. 6. 7. 8. Öppna locket, ta bort iskorgen och häll vatten i tanken. Håll vattennivån under märket för max vattennivå. Tryck på "ON / OFF" knappen på kontrollpanelen för att starta maskinen. Välj storlek på isbitarna genom att trycka på "SELECT"-knappen. LED-indikatorer visar vald storlek. Om rumstemperaturen är lägre än 15 ℃, rekommenderas att välja små isbitar för att undvika att isbitarna fryser fast vid varandra. Is-cykeln varar ca 5 till 13 minuter, beroende på val av storlek och rumstemperatur. Rekommenderad rumstemperatur är 10 ℃ till 38 ℃ Om vattenpumpen inte kan fylla istråget med vatten kommer ismaskinen att stanna automatiskt, och "Add Water" indikatorn kommer att lysa. Stäng av med "ON / OFF" knappen, fyll på vatten upp till max. vattennivå. Efter 3 min kan apparaten startas genom att trycka på "ON / OFF" knappen igen. Enheten stoppas när iskorgen är full och "Ice Full"-indikatorn kommer att lysa. Varning: Direkt solljus eller reflektion kan orsaka att sensorn luras. Om enheten inte stannar när iskorgen är full, flytta enheten till plats där inget solljus kan störa funktionen. Byt vatten i vattenbehållaren varje dygn för att säkerställa en bra hygiennivå. Om apparaten inte ska användas, dränera bort allt vatten och torka tanken. 6. Felsökning Reparera inte eller ta isär enheten själv. Felaktig reparation kan sätta inbyggda skyddsfunktioner ur funktion och även orsaka skada för användaren. Garantin på produkten upphör också att gälla. Fel Orsak "Add Water" lyser Brist på vatten "Ice Full" lyser Iskorgen är full Isbitarna fryser ihop Maskinen verkar fungera men ingen is bildas Isprocessen är för lång Vattentemperaturen i tanken är för låg Rumstemperaturen eller vattentemperaturen är för hög Kylmedlet har läckt ur maskinen Rör i kylsystemet blockerat Åtgärd Stoppa ismaskin, fyll på vatten, och tryck på "ON / OFF" knappen igen för att starta om enheten Ta bort is från iskorgen. Genom att hålla ”Select” nedtryckt i 5 sek. kan maskinen fortsätta att gör is i 10 cykler även när lampan lyser Stoppa ismaskinen och starta den när isblocket smält. Välj små isbitar istället Byt vatten. Temperaturen skall vara 8-32°C Rumstemperatur 5-40°C Vattentemperatur 8-32°C Anlita en kvalificerad serviceman Anlita en kvalificerad serviceman 7. Rengöring och Underhåll Rengöring. 1. Ta ut iskorgen, diska den och skölj noga. 2. Rengör interiör med utspätt rengöringsmedel, varmt vatten och en mjuk trasa. Vid behov kan vatten med lite ättika användas. 3. Använd sedan rent vatten för att skölja insidan och låt rinna ut genom att dra ur proppen till dräneringen på undersidan fram. 4. Utsidan av ismaskin rengörs regelbundet med ett milt rengöringsmedel och fuktad trasa. 5. Torka av interiör och exteriör med en ren mjuk trasa. 6. När maskinen inte ska användas under en längre tid, dränera vattnet helt och torka interiören. 5 Observera! En god hygien är nödvändig att ha runt hanteringen av vatten och is. Ta inte is med händerna ur maskinen utan använd en skopa eller dylikt. Om isen skulle kännas ofräsch eller lukta illa stanna maskinen, töm den och gör rent enligt ovan. Skölj med citronvatten det sista. 8. Garantivillkor Garantitiden för denna produkt är 1 år från och med inköpsdatum. Under denna period repareras alla defekter i material eller utförande kostnadsfritt. Följande villkor gäller rörande denna garanti: 1. Vi tillbakavisar uttryckligen alla övriga ersättningskrav, inklusive ersättning för följdskador. 2. Garantin förlängs inte i samband med reparationer eller byten av delar som sker inom garantiperioden. 3. Om produkten modifieras, tillförs delar som inte är original eller repareras av en tredje part gäller inte garantin längre. 4. Garantin gäller endast om daterat köpebevis i original visas upp och om detta köpebevis inte innehåller några ändringar. 5. Garantin täcker inte skador som uppstått genom hantering som inte är i enlighet med bruksanvisningen, försummelse eller skadegörelse 6. Köparen står för transportkostnader och ansvarar för eventuella risker i samband med att produkten eller dess delar förflyttas. För att undvika onödiga kostnader rekommenderar vi att du alltid först läser igenom bruksanvisningen noga. Om denna inte erbjuder någon lösning bör du ta med produkten till återförsäljaren för reparation. 9. Miljöskydd När apparaten inte längre fungerar måste den kasseras på ett sådant sätt att den skadar miljön i minsta möjliga mån och i enlighet med de regler som gäller i din kommun. 6 USER MANUAL (GB) Thank you for selecting this new model of portable ice machine. This product is intended for indoor use in the household. Read this manual carefully before you are using the appliance and keep it for future reference. 1. Specification Model TecLime TIM-12 Cooling capacity 2,05kW Refrigerant/charge R134A/75g Voltage 220-240 V , 50 Hz Power in 0,7/1,2A Weight 9,3 kg Dimension (WxHxD) 297x367x378 mm 2. Design 1 2 3 4 5 6 Ice shovel Is Full Sensor Ice basket Top cover with window Air outlet Water drain cap 3. Installation Check that all accessories are included in the package and read the instructions for their use. 1. Remove pieces of tape that secures the inner parts during shipment. Clean water tank and the ice basket 2. Place the machine on a level and flat counter top. Avoid placing it near any heat source or in direct sunlight. Make sure that there is at least 10 cm clearance around the appliance. Allow one hour for the refrigerant fluid to settle before plugging the ice maker in. 3. The appliance must always be placed so the mains plug is accessible. 4. Before you use your ice machine for the first time, it is strongly recommended to clean it thoroughly. 4. Safety Warnings Read these instructions carefully before using the appliance. 1. Use only for domestic purposes and in the manner specified in these instructions. Never use it for any other purpose. 7 2. Do not use outdoors and place it always in a dry environment. Avoid placing it in direct sunlight or near other heat sources. Allow 10 cm space between the device and surrounding objects. 3. Connect the unit only to grounded outlets. The contact should always be accessible after installation. Do not cover cable and drag it where there is a danger of tripping over it. 4. Regularly check the power cord. Never use the appliance if the cord or plug is showing signs of damage. This product's cord length is selected to reduce the risk of injury. 5. Do not use an extension cord that does not have the same electrical specifications as the unit. If in doubt consult a qualified electrician or service provider. 6. Do not use other liquids to make ice cubes than drinking water. 7. Always unplug the appliance before cleaning or modification of some parts of the apparatus, and when not in use. 8. Make sure the voltage on the rating plate match the supply voltage. Any error in the connection of the apparatus voids your warranty. 9. This appliance is not intended for use by persons (including children) with reduced physical, sensory or mental capabilities, or lack of experience and knowledge, unless they have received guidance or instructions on the use of the appliance by a person responsible for their safety. Children should be supervised so they do not play with the appliance. 10. Never immerse the appliance in water or other liquid, for any reason. 11. Never repair the unit yourself. Any action taken by a non-qualified person can be dangerous. Any replacement of the power cord must be performed by a qualified electrician. 12. Never turn the machine upside down or tip it more than 45°. Transport it upright. Has it been stored cold in winter, let it stand a few hours at room temperature before use 5. Operation instructions Control Panel: A. B. C. D. E. F. LED’s for selected size LED for Power LED for ”Ice basket full” LED for ”Water shortage” ON / OFF Selection of ice cube size First use Before you use your ice machine the first time or after a longer break, it is strongly recommended to clean it thoroughly. 1. Remove the ice basket, wash and rinse it off. 2. Clean the interior with diluted detergent, warm water and a soft cloth. 3. Then rinse thoroughly with water and let the water drain by pulling the plug on the bottom front side. 4. Wipe the interior and exterior with a clean soft cloth. Starting the machine 1. Open the lid, remove the ice basket and pour water in the tank. Use only drinking water 2. Keep water level below the mark for the maximum water level. (max 2 liter) 3. Press "ON / OFF" button on the control panel to start the machine. 8 4. Select the size of ice cubes by pressing "SELECT" button. LED indicators show the selected size. If the room temperature is below 15 ℃, it is recommended to select small pieces of ice to prevent the ice cubes freeze solid at each other. 5. One cycle lasts about 5 to 13 minutes, depending on the choice of size and room temperature. The recommended working temperature is 10 ℃ to 38 ℃ 6. If the water pump not can fill tray, the icemaker will stop automatically, and the "Add Water" indicator will light. 7. Turn the machine OFF and fill with water up to max. water level. After 3 min, the device can be started by pressing the "ON / OFF" button. 8. The unit will stop when the ice basket is full and the "Ice Full" indicator will light. 9. Warning: Exposure to direct sunlight or reflections can cause the sensor to be fooled. If the device does not stop when the ice basket is full, move the unit to the place where no sunlight can interfere with the function. 10. Change the water in the water tank every day to ensure a good level of hygiene. 11. If unused, drain off all water and dry the tank. 6. Troubleshooting Do not repair or disassemble the device by yourself. Improper repairs can cause built-in safeguards to fail and even cause injury to the user. The warranty of the product is also repealed. Problem "Add Water" indicator is on. "Ice Full" indicator is on. Ice cubes stick together Ice making cycle is normal but no ice is formed Possible cause Lack of water Ice basket is full Solution Stop the ice maker, fill water, and press “ON/OFF” button again to restart the unit. Remove ice from ice basket. Continuous press “Select” button 5 seconds, the unit could make ice 10 cycles even “Ice” indicator is on. The ice making cycle is too long Stop the ice maker, and restart it when the ice blocks melt. Select the small size ice cube selection. Water temperature in inner tank is too low Replace the water. Temperature of water recommended at 8-32℃ Room temperature or water temperature in inner tank is too high Refrigerant in cooling system leaks Pipe in the cooling system is blocked. The room temperature should be 5-40℃, water temperature should be 8-32℃ Verify by a qualified technician. Verify by a qualified technician. 7. Cleaning and Maintenance Cleaning. 1. Remove the ice basket, wash it and rinse thoroughly. 2. Clean the interior with diluted detergent, warm water and a soft cloth. If necessary, water with a little vinegar can be used. 3. Then use clean water to rinse the inside and allow it draining out by pulling the water drain cap on the bottom (front side). 9 4. The exterior of ice machine should be cleaned regularly with a mild detergent and damp cloth. 5. Wipe the interior and exterior with a clean soft cloth. 6. When the machine is not used for a long time, drain the water completely and dry the interior. Note! Good hygiene is necessary to have around the handling of water and ice. Do not take ice cubes out of the machine with your hands. Use instead a bucket, spoon or similar. If the ice would taste or smell bad, stop the machine, empty it and clean it as described above. Then rinse with lemon water. 9. Warranty Provisions This product comes with a 12-month warranty starting on the date of purchase. Within this period any defects in material or workmanship will be repaired without any charge. The following provisions shall apply regarding this warranty: 1. We expressly dismiss all other claims for damage, including consequential damages; 2. Any repairs or replacements of components within the term of the warranty will not result in an extension of the term of the warranty; 3. The warranty will no longer apply if the product has been modified, non-original parts have been used, or if it has been repaired by third parties; 4. The warranty will only apply, when you present the original, dated proof of purchase, provided no changes have been made to it; 5. The warranty will not apply to damage caused by actions not in compliance with the Directions for Use, neglect, vandalism; 6. Transportation costs and the risk involved during the transportation of the product or its components will always be the responsibility of the purchaser. In order to avoid unnecessary costs, we recommend that you always read the Directions for Use carefully first. If they offer no solution, please take the product to your dealer for repair. 10. Environmental Protection Waste electrical products should not be disposed of with household waste.Please recycle where facilities exist. Check with your Local Authority or retailer for recycling advice. 10