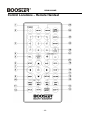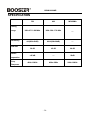
1
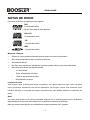
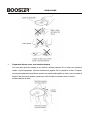
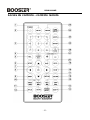
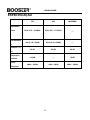
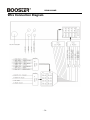
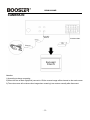
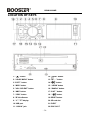
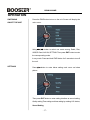
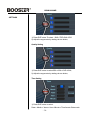
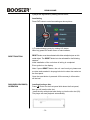
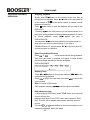
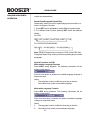
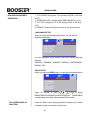
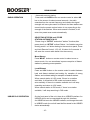
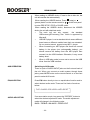
BDVM-8320MP THE PERFECT SOUND BDVM-8320MP INSTALAÇÃO / MANUAL DO PROPRIETÁRIO Receptor DVD multimídia com 3.0'' True Color TFT Painel BDVM-8320MP Índice analítico INFORMAÇÕES DE SEGURANÇA.............................................................................. 3 NOTAS DE DISCO ......................................................................................................... 4 INSTALAÇÃO ................................................................................................................. 6 ESQUEMA DE LIGAÇÃO DO FIO................................................................................ 9 CÂMERA EM................................................................................................................... 10 LOCALIZAÇÃO DE CHAVES ....................................................................................... 11 OPERAÇÃO ........................................................................................................... 12 POWER ON / OFF DA UNIDADE....................................................................... 12 AJUSTES............................................................................................................... 12 FUNCIONAMENTO DO DISCO (DVD/VCD/CD/MP3) .............. ..................... 14 FUNCIONAMENTO DO RÁDIO......................................................................... 19 USB / SD................................................................................................................. 20 CONTROLE REMOTO...................................................................................................... 23 ESPECIFICAÇÃO.............................................................................................................. 25 -2- BDVM-8320MP INFORMAÇÕES DE SEGURANÇA Utilize este produto com segurança Este conjunto foi projetado e fabricado para garantir a segurança pessoal. O uso inadequado pode resultar em choque elétrico ou risco de incêndio. As salvaguardas incorporadas nesta unidade de protegê-lo, se você observar os seguintes procedimentos para instalação, uso e manutenção. Esta unidade não contém peças que possam ser reparadas pelo usuário. Ao dirigir Mantenha o nível de volume baixo o suficiente para estar ciente das condições da estrada e do trânsito. Ao lavar o carro Não exponha o produto a água ou umidade excessiva. Isso pode causar curto-circuitos, incêndios ou outros danos. Quando Estacionado Estacionamento na luz solar direta pode produzir temperaturas muito elevadas no interior do seu veí culo. Dão ao interior uma chance de esfriar antes de iniciar a reprodução. Use a fonte de alimentação Este produto é projetado para operar com uma CC de 12 volts Use Centros de Serviços Autorizados Não tente desmontar ou ajustar este produto precisão. Por favor, consulte a lista Centro de Serviço incluí do com este produto para assistência serviço. Para Instalação A unidade deve ser instalada em posição horizontal com a frente acabam em um ângulo conveniente, mas não mais do que 300. -3- BDVM-8320MP NOTAS DE DISCO Formatos de disco suportados por este jogador DVD 12 centí metros disco (De um único lado do disco apenas) Vídeo CD 12 centí metros disco CD 12 centí metros disco MP3 12 centí metros disco Manuseio e limpeza Sujeira, pó, riscos e discos empenamento vai causar um mau funcionamento. Não coloque etiquetas ou fazer arranhões nos discos. Não deformar discos. Um disco deve sempre ser mantido em sua bolsa, quando não em uso, para evitar danos. Não coloque os discos nos seguintes locais: - Luz solar direta. - Sujos, empoeirados e úmidos. - Perto de aquecedores de carro. Nos assentos ou painel. Limpeza de disco Use um pano seco e macio para limpar a superfície. Se o disco está muito sujo, utilize um pano macio levemente umedecido com álcool isopropílico (de fricção). Nunca use solventes como benzina, diluente ou soluções de limpeza convencionais, pois podem danificar a superfície do disco. Nota: Um disco pode tornar-se um pouco arranhada (embora não o suficiente para torná-lo inutilizável), dependendo da forma como ele étratado e as condições do ambiente de utilização. Note que esses riscos não são uma indicação de qualquer problema com o jogador. -4- BDVM-8320MP Preparando discos novos com manchas ásperas Um novo disco pode ter arestas no seu interior e bordas externas. Se um disco com arestas é usada, o ajuste apropriado, não será realizada eo jogador não irá reproduzir o disco. Portanto, remova as arestas de antecedência usando uma caneta esferográfica ou lápis, como mostrado à direita. Para remover as arestas, pressionar o lado do lápis ou caneta contra o interior e bordas externas do disco. -5- BDVM-8320MP INSTALAÇÃO Notas: Escolher o local de montagem em que a unidade não irá interferir com a função normal de condução do condutor. Antes de instalar o aparelho, conecte os fios temporariamente e verifique se tudo estáconectado corretamente e se o aparelho e que o sistema funcione corretamente. Utilize somente as peças incluídas com a unidade para garantir a instalação adequada. O uso de peças não autorizadas pode causar avarias. Consulte o seu revendedor mais próximo se a instalação requer a perfuração de furos ou outras modificações no veí culo. Instale a unidade onde ele não fique no caminho do motorista e não pode ferir o passageiro no caso de uma parada brusca, como uma parada de emergência. Se anjo de instalação exceder 30 ° da horizontal, a unidade não pode dar seu melhor desempenho. Evite instalar a unidade onde ele estaria sujeito a altas temperaturas, como da luz solar direta, ou de ar quente, a partir do aquecedor, ou onde seria sujeito a vibração poeira, sujeira ou excessiva. -6- BDVM-8320MP DIN FRONT / REAR-MOUNT Esta unidade pode ser instalada apropriada "Front" (convencional Montagem DIN frontal) ou "retaguarda" (DIN instalação posterior de montagem, utilizando os orifí cios para parafusos nas laterais do chassi do aparelho). Para mais informações, consulte os seguintes métodos de instalação ilustrados. Montagem DIN frontal (Método A) Abertura de instalação Esta unidade pode ser instalada em qualquer painel que tem uma abertura, como mostrado abaixo: Instalação da unidade 1.This jogador deve ser instalado por um técnico profissional. 2. por favor leia as instruções e operação de equipamentos cuidadosamente antes de instalar. 3. Certifique-se de conectar outros fios antes da conexão de energia. 4. Para evitar curto-circuito. Por favor, certifique-se todos os fios expostos estão o isolamento. 5. Corrija todos os fios após a instalação. 6. Por favor, faça conexão com o jogador de acordo com o manual de instruções. Conexão errada pode causar danos. 7. Este jogador só serve para 12V DC dispositivo e verifique se o carro pertence a este tipo de sistema de aterramento elétrico do cátodo. 8. Por favor, ligue os fios corretamente. Conexão errada vai causar mau funcionamento ou danificar o sistema elétrico. -7- BDVM-8320MP -8- BDVM-8320MP Diagrama de conexão de fio -9- BDVM-8320MP CÂMERA EM Atenção: 1). Segundo a conexão acima. 2). Quando o fio da Visão Back (rosa) ligar a 12V, a imagem inversa serámostrada na tela principal. 3). A tela principal não vai mostrar outra imagem ao inverter, pode restaurar normalmente após a desconexão. - 10 - BDVM-8320MP LOCALIZAÇÃO DE CHAVES 1. " "Botão. 12. "6 DIR +"Botão. 2. "LIGAR/MUDO" Botão. 13. " "Botão. 3. "3 RPT "Botão. 14. " "Botão. 4. "MOD"Botão. 15. "4 RDM"Button 5. "VOL / SEL / ENT" botão. 16. "BANDA"Botão. 6. "AMS"Button 17. "2 INT "Botão. 7. "5 DIR-"botão. 18. "1 8. "IR" Sensor Infra. 19. RESET. 9. "3" "TFT. 20. Slot para cartão SD. 10. Porta USB. 21. EJECT 11. "AUX IN ". 22. Slot de disco - 11 - "Botão. BDVM-8320MP OPERAÇÃO LIGAR / DESLIGAR A UNIDADE Pressione o PWR botão para ligar a unidade,Tela irá mostrar o menu principal. Uso / botão para seleccionar um dos modos: Rádio, Disco, USB, SD Cartão, AUX EM, SETTING. Timprensa galinha ENT botão para entrar no modo correspondente. De qualquer modo. Pressione e segure PWR botão por 2 segundos para desligar o aparelho. AJUSTES Imprensa botão para entrar abaixo definindo menu principal como imagem abaixo: Timprensa galinha ENT botão para entrar na configuração de interface como definição de som, definição de qualidade, definição de tempo e definição da área, girando o botão VOL; Soar Fixação - 12 - BDVM-8320MP AJUSTES 1) Pressione o botão ENT para selecionar: BAS-> TRE-> BAL> FAD 2) Ajuste os argumentos girando o botão de volume.; Ajuste de Qualidade 1) botão ENT. Pressione para selecione: BRI-> CON-> CHR-> SHA; 2) Ajuste os argumentos girando o botão de volume.; Definição da Hora 1) Pressione o botão ENT para selecionar: Data-> Mês-> Anos-> Hora-> Minuto-> Tempo formato-> Modo de data - 13 - BDVM-8320MP 2) Ajuste os argumentos girando o botão de volume.; Definição de Área Pressione o botão ENT para entrar na configuração da área como a imagem acima. 1) Para selecionar o paí s desejado, girando o botão VOL; Nota: botão ENT longo imprensa voltar àinterface principal; REAJUSTE FUNÇÃO REAJUSTE botão deve ser ativado com uma caneta esferográfica ou objeto de metal fino. O REAJUSTE botão deve ser ativado pelas seguintes razões: Instalação inicial da unidade quando toda a fiação estiver concluída. Símbolo de erro no visor. Nota: se pressionar REAJUSTE botão, a unidade não pode trabalhar ainda, por favor use um cotonete embebido em álcool isopropílico para limpar o soquete no painel frontal. DISCO DE OPERAÇÃO (DVD/VCD/CD/MP3) Uma vez que o botão de reset é pressionado. Todas as informações de memória serão perdidos! Carga / ejetar um disco Imprensa botão no painel frontal deslizante para baixo do painel frontal, então você vai ver o slot de disco. Insira o disco com o lado impresso voltado para cima no slot de disco (22). O jogador irá iniciar a reprodução automaticamente. - 14 - BDVM-8320MP DISCO DE OPERAÇÃO (DVD/VCD/CD/MP3) Interromper a reprodução Pouco pressione botão no controlo remoto um tempo de pré-parar a reprodução da unidade. Quando botão no painel frontal ou na tela ou no controle remoto é pressionado, a reprodução normal vai continuar. Imprensa duas vezes o botão para parar a reprodução e voltar para o LOGO DVD. Premente no painel frontal ou no controle remoto ou na tela durante a reprodução irá parar temporariamente a reprodução. Para retornar à reprodução normal, pressione again.If reproduzir um DVD / VCD / SVCD, segundo imprensa no painel frontal por alguns segundos para parar na próxima imagem (função de etapa). Se você reproduzir um CD CD/MP3/Picture, segundo imprensa no painel frontal por alguns segundos, é ineficaz. Avanço / retrocesso rápido rápida Imprensa & no controle remoto durante a reprodução. Cada vez que o botão épressionado, a velocidade da rápida para a frente / para trás muda de acordo com o disco como se segue. DVD/VCD/CD/MP3: Ignorando faixa Imprensa / botões do controle remoto ou / painel frontal durante a reprodução. Imprensa para passar para a próxima faixa e pressione para saltar para a faixa anterior. no Nota: Para alguns discos VCD2.0 (PBC-Controle de reprodução), disponíveis. / botões podem não estar Reprodução de DVD menu de vídeo 1. Ao reproduzir um disco DVD, pressione TÍTULO botão no controle remoto vai parar o a reprodução e voltar ao menu de título que é armazenado em disco de DVD. O disco será reproduzido automaticamente e parar na imagem menu. - 15/ - , / botões cursor do controle remoto para 2. Imprensa mover entre o destaque barras no menu. BDVM-8320MP DISCO DE OPERAÇÃO (DVD/VCD/CD/MP3) 3. Imprensa Ok botão no controle remoto ou no painel frontal para confirmar o item selecionado. Repita Reprodução / Reprodução Repetida Parágrafo Repita jogar: quando você deseja repetir a reprodução do disco inteiro ou uma faixa ou um capí tulo no disco. 1. Imprensa RPT botão repetidamente para selecionar diferentes modos de repetição. 2. Para diferentes tipos de discos, pressionando RPT botão tem efeitos diferentes. Para DVD: Para VCD/SVCD/CD/MP3/WMA: Nota: Função de repetição não suporta VCD2.0 (com PBC ON). Repita parágrafo Jogar: quando você quer jogar repetindo um parágrafo desejado. Funções especiais para DVD Multi-legendas função da linguagem Imprensa SUBT durante a reprodução. As informações a seguir serão mostrados na tela. Cada vez que o botão épressionado, as mudanças de legenda de linguagem em ordem seqüencial. Notas: O número de linguagem édiferente de acordo com o disco. Alguns discos contêm apenas um idioma de legenda. Multi-Function de áudio Idioma Imprensa AUD durante a reprodução. As informações a seguir serão mostrados na tela. Cada vez que o botão é pressionado, as mudanças trilha sonora lí ngua na ordem seqüencial. Notas: 3. O número de linguagem édiferente de acordo com o disco. 4. Alguns discos contêm apenas um idioma da trilha sonora. - 16 - BDVM-8320MP DISCO DE OPERAÇÃO (DVD/VCD/CD/MP3) Função de zoom Permite que a imagem a ser aumentado de tamanho. Imprensa ZOOM botão no controlo remoto para alternar entre escala 1, 2, 3, 4, 1/2, 1/3, e 1/4. Quando a escala é1/4, pressione ZOOM novamente para sair zoom operação. Durante o zoom modo, pressione / , / botões para mover a imagem para a esquerda / direita, acima / abaixo. Notas: A lí ngua é diferente de acordo com o disco. Alguns discos contêm apenas um idioma de legenda. Função Goto Para DVD: Imprensa GOTO botão no controlo remoto, A tela irá exibir a seguinte mensagem: Use as teclas numéricas para introduzir o tí tulo desejado, Capí tulo ou Tempo, em seguida, pressione Ok para confirmar. DVD de instalação No modo DVD, quando o disco for jogar ou no modo de parada, pressione Botão SETUP no painel frontal ou no controle remoto para entrar no menu de configuração. 1. Quando o cursor está na parte de cima, use / botões para se mover entre as diferentes páginas. 2. Imprensa botão para mover o cursor para a página de configuração abaixo e, em seguida, você pode usar / botões para se mover entre as opções de configuração diferentes. 3. Imprensa botão para exibir a lista de opções para cada opção de configuração e, em seguida, usar / botões e Ok botão para alterar a sua seleção. CONFIGURAÇÃO DO SISTEMA Quando você abrir o menu de configuração, você verá a página de configuração do sistema em primeiro lugar, veja abaixo: - 17 - BDVM-8320MP DISCO DE OPERAÇÃO (DVD/VCD/CD/MP3) 1. SISTEMA DE TV: Alterar o modo de TV entre NTSC, PAL e AUTO. 2. PROTEÇÃO DE TELA: Alterar a proteção de tela ou desligar. 3. TIPO DE TV: alterar o tipo de TV entre 4:3 PS, 4:3 LB e 16:9. 4. PADRÃO: Restaurar a configuração do sistema para a configuração padrão. SELEÇÃO IDIOMA Quando vocêabrir o menu de configuração de idioma, vocêvai ver o página de configuração de idioma: Vocêpode mudar o idioma do OSD / AUDIO SUBTITLE / / MENU entre PORTUGUÊS / ALEMÃO / ESPANHOL / FRANCÊS / PORTUGUÊS / ITALIANO / OFF. CONFIGURAÇÃO DE VÍDEO Quando você abrir o VIDEO menu, você veráa seguinte imagem SOBRE TELA função de exibição Pressione no controle remoto ou no painel / , / Para ajustar o brilho / contraste / matiz / saturação / NITIDEZ valor correspondente, depois de ajustado, pressione "OK" para confirmar Pressione o Botão DISP durante a reprodução para exibir o consoláinformação do disco atual na tela. - 18 - BDVM-8320MP FUNCIONAMENTO DO Alternar para o modo RADIO Imprensa MODO botão no controle remoto do menu de origem para selecionar o modo RADIO. . Tele seguinte informação aparecerá no visor. RÁDIO RÁDIO SELEÇÃO A banda de frequência Pouco pressione BAND botão no painel frontal do controle remoto ou toque BAND barra na tela para selecionar a banda desejada. A banda de recepção mudará na seguinte ordem: Por duas faixas de onda: Seleção da freqüência Durante o modo rádio, pressione botão no controle remoto para aumentar a frequência, pressione botão no controle remoto para diminuir a frequência de um passo de espaçamento de canal. Rádio Função Select: Pressão longa CONFIGURAÇÃO botão no painel frontal para selecionar Band-> PS> AS-> -> Estação-> . Em seguida, pressione "ENT"Para confirmar a função. História Memória automático e programa de digitalização: - Programa de digitalização Pouco pressione AS / PS botão no controle remoto ou selecione PS í cone na tela para digitalizar estação programada. E que irá realizar em cada estação por cerca de 5 segundos. - 19 - BDVM-8320MP FUNCIONAMENTO DO RÁDIO USB / SD operação Reprodução - Automático de memória armazenando Pressione e segure AS / PS botão no controle remoto ou selecionar AS barra na tela por vários segundos, as buscas de rádio da freqüência atual e verifica a intensidade do sinal até uma pesquisa ciclo estáterminado. E, em seguida, as estações são armazenadas no botão número predefinido, por sua vez de acordo com a força das estações. Quando a busca automática é concluída, ele irá entrar em modo de exploração programada automaticamente. SELEÇÃO estação e STORE Estação automaticamente Por favor, tempo para "CONFIGURAÇÃO"E selecione" estação "função, após a imprensa logo"CONFIGURAÇÃO"Escolha um ordinal a 6 estação pode também diretamente pressione 1-6 botão pertencem à distância ou painel, Pressione e segure Controle Remoto 1,2,3,4,5, 6 botão por 2 segundos. Ele vai salvar a estação de rádio atual na memória. Mono / Stereo: Imprensa MO / ST botão no controle remoto para selecionar modo mono ou estéreo. Às vezes você pode melhorar a recepção de distante estações selecionando operação mono. Local / Distante: Pressione e LOC botão no controle remoto para selecionar entre o local eo distante definição stations.Local para a recepção da Estação forte, e um cenário distante para a recepção de estações mais fracas. Quando a estação de pesquisa no modo LOC, se não houver estação avai lable, ele irá alternar para o modo DIS e da estação de pesquisa automático automaticamente. Se não houver estação disponível também vai interromper a pesquisa e voltar ao modo LOC. Quando a estação de pesquisa no modo DIS, se não houver uma estação disponível, ele vai parar de procurar no modo DIS. No painel frontal da unidade, existe uma interface USB / SD. Um driver USB / SD pode ser conectado através desta interface. Um driver USB / SD para a interface USB / SD, e alterar o modo de USB / SD modo, a unidade irá ler os arquivos armazenados no dispositivo USB / SD automaticamente. - 20 - BDVM-8320MP Ao ler um dispositivo USB / SD, se insere um disco de abertura do disco, a unidade iráler o disco automaticamente. Ao ler o dispositivo USB / SD, pressione (Parar) ou (Pausa) no controle remoto ou no painel frontal para entrar no modo de pré-parada parar ou pausar. Ao ler o dispositivo USB / SD, desconecte o dispositivo USB / SD, a unidade irámudar último modo. A unidade principal pode suportar apenas o padrão USB de memória de disco (de memória SD) que é aprovado pela Microsoft. USB MP3 player não é um padrão, o que significa nome de marca diferente ou modelos diferentes têm o seu próprio padrão. Assim, o nosso produto não pode apoiar todos os MP3 jogador. Ao conectar um MP3 player e não tem bateria normal no jogador (bateria recarregável não), você deve remover a bateria do leitor de MP3, em seguida, conecte-o à interface USB. Caso contrário, pode provocar explosões da pilha. Quando em modo de reprodução USB, não se esqueça de remover o driver USB da interface USB. OPERAÇÃO AUX EQUALIZAÇÃO AJUSTE ÁUDIO Alternar para o modo AUX Há um par de valetes entrada de áudio na parte da frente e de trás da unidade. Quando você conectar um sistema de áudio através destas tomadas, pressione o botão MODE no controle remoto ou no painel frontal para selecionar o modo AUX. Imprensa EQ botão brevemente para ativar a função de equalização e para selecionar o modo de áudio desejado. Existem cinco tipos de modo de como a seguir: Se nenhum modo estação de salvamento, tempo pressione a tecla "ENT / SEL" para selecionar o modo de ajuste desejado. O modo de ajuste de áudio irá mudar na seguinte ordem: BASS TREBLE --- --- SALDO --- FADER -SAIR - 21 - BDVM-8320MP MUTE No rádio, DVD,USB, SD, AUX modo, Imprensa MUTE botão para silenciar a saí da de áudio. Pressione-o novamente para recuperar saí da. - 22 - BDVM-8320MP Locais de controlo - controlo remoto - 23 - BDVM-8320MP 1. MUTE 2. PODER 3. 0-9 4. LOUD / EQ 5. SET 6. PARE 7 . OK 8. / , / 9. DISP 10. / 11. GOTO 12. TÍTULO 13. SUB-T 14. ÁUDIO / MO / ST 15. / 16. ZOOM 17. CONFIGURAÇÃO 18. RDM 19. REP 20. 21. VOL + / 22. BAND: 23. AS / PS 24. HOME / MENU 25 .. MODO 26. LOC: Pressione para silenciar o som. Pressione novamente para reCover o som. Pressione-o para ligar a unidade ON ou OFF Entradas o número correspondente. Pressione e segure para ligar / desligar o Loudness. Pressione-o para selecionar desejado equalização de áudio Acesse o Bass, Treble, Balance e Fader configuração .. Para parar a reprodução. Confirmar a faixa / capí tulo selecionado com os botões numéricos ou selecionada com os botões do cursor na tela No caso do modo MENU, / , / serve como botões cursor botões para selecionar o item esquerda / direita, frente / trás. Para exibir algumas informações do estado atual Imprensa para passar para a próxima faixa e imprensa para saltar para trás um acompanhar em modo de navegação. Disco botão de busca no modo DVD, cooperativamente usado com numérico Botões Exibe o menu de tí tulos armazenado no disco DVD. Mudança do idioma da legenda na multi-idioma da legenda DVD. Mudança da trilha sonora de áudio multi-trilha sonora DVD disco No modo de rádio, pressione o botão para definir a recepção entre mono e modo estéreo. No modo CD/MP3/DVD. Imprensa / para procurar avançar rapidamente E para procurar reverter rapidamente. No modo de rádio, use / para sintonização manual. Permite que a imagem a ser aumentado de tamanho. No modo DVD, pressione para exibir o menu SETUP Pressione-o para reproduzir todas as faixas em ordem aleatória Repete jogar de capí tulos, tí tulos, faixas e discos. Pressione para pausar a reprodução. Pressione-o novamente para retomar a reprodução AUMENTO (+) ou diminuir (-) o volume. Para selecionar FM1, FM2, FM3, bandas de rádio AUX. No modo de rádio, pressione-o para ativar a memória automática Armazenar função Digitalização / Programa. Voltar para o menu principal / reproduzir DVD MENU tempo de retorno Pressione para alterar a fonte. Ligar / desligar a função local. - 24 - BDVM-8320MP ESPECIFICAÇÃO FM AM EUA: 87,5 ~ 108 MHz EUA: 520 ~ 1710 KHz MP3/WMA Ajustando faixa --- Sensibilidad 4uV (S / N = 30dB) 63uV (S / N = 20dB) --- 50 dB 45 dB 60 dB > 25 dB --- 50dB 40Hz ~ 12KHz 40Hz ~ 2KHz 20Hz ~ 16KHz e Relação S / N Separação estéreo Freq. Resposta - 25 - BDVM-8320MP THE PERFECT SOUND BDVM-8320MP INSTALLATION/OWNER’S MANUAL DVD Multimedia Receiver with 3.0'' True Color TFT Panel - 26 - BDVM-8320MP Table of Contents SAFETY INFORMATION…………………………………………………………………28 DISC NOTES………………………………………………………………………………29 INSTALLATION……………………………………………………..................................31 WIRE CONNECTION DIAGRAM..................................................................................34 CAMERA IN……………………………………………………………………………….34 LOCATION OF KEYS……………………………………………………........................36 OPERATION………………………………………………..............................…..…..37 POWER ON/OFF THE UNIT…………………………………………... ......…...37 SETTINGS…………………………………………………............... .............. ....37 DISC (DVD/VCD/CD/MP3) OPERATION …………………….. ....... ................39 RADIO OPERATION …………………………………………...….............. ......44 USB/SD………………………………………………….................................…...45 REMOTE CONTROL……………………………………………….....................……......48 SPECIFICATION……………………………………………….....................…………......50 - 27 - BDVM-8320MP SAFETY INFORMATION Use This Product Safely This set has been designed and manufactured to assure personal safety. Improper use can result in electric shock or fire hazard. The safeguards incorporated in this unit protect you if you observe the following procedures for installation, use and servicing. This unit doesn’t contain any parts that can be repaired by the user. When Driving Keep the volume level low enough to be aware of road and traffic conditions. When Car Washing Do not expose the product to water or excessive moisture. This could cause electrical shorts, fire or other damage. When Parked Parking in direct sunlight can produce very high temperatures inside your vehicle. Give the interior a chance to cool down before starting playback. Use the Proper Power Supply This product is designed to operate with a 12 volt DC Use Authorized Service Centers Do not attempt to disassemble or adjust this precision product. Please refer to the Service Center list included with this product for service assistance. For Installation The unit should be installed in a horizontal position with the front end up at a convenient angle, but not more than 300. - 28 - BDVM-8320MP DISC NOTES Disc formats supported by this player DVD 12 cm disc (Single-sided disc only) Video CD 12 cm disc CD 12 cm disc MP3 12 cm disc Handling and Cleaning Dirt, dust, scratches and warping discs will cause misoperation. Do not place stickers or make scratches on discs. Do not warp discs. A disc should always be kept in its case when not in use to prevent from damage. Do not place discs in the following places: - Direct sunlight. - Dirty, dusty and damp areas. - Near car heaters. On the seats or dashboard. Disc Cleaning Use a dry soft cloth to wipe the surface. If the disc is quite dirty, use a soft cloth slightly moistured with isopropyl (rubbing) alcohol. Never use solvents such as benzine, thinner or conventional record cleaners as they may mar the surface of the disc. Note: A disc may become somewhat scratched (although not enough to make it unusable) depending on the way it is handled and conditions in the usage environment. Note these scratches are not an indication of any problem with the player. - 29 - BDVM-8320MP Preparing New Discs with Rough Spots A new disc may have rough edges on its inside and outside edges. If a disc with rough edges is used, the proper setting will not be performed and the player will not play the disc. Therefore, remove the rough edges in advance by using a ballpoint pen or pencil as shown on the right. To remove the rough edges, press the side of the pen or pencil against the inside and outside edges of the disc. - 30 - BDVM-8320MP INSTALLATION Notes: Choose the mounting location where the unit will not interfere with the normal driving function of the driver. Before finally installing the unit, connect the wiring temporarily and make sure it is all connected up properly and the unit and the system work properly. Use only the parts included with the unit to ensure proper installation. The use of unauthorized parts can cause malfunctions. Consult with your nearest dealer if installation requires the drilling of holes or other modifications of the vehicle. Install the unit where it does not get in the driver’s way and cannot injure the passenger if there is a sudden stop, like an emergency stop. If installation angel exceeds 30°from horizontal, the unit might not give its optimum performance. Avoid installing the unit where it would be subject to high temperature, such as from direct sunlight, or from hot air, from the heater, or where it would be subject to dust, dirt or excessive vibration. - 31 - BDVM-8320MP DIN FRONT/REAR-MOUNT This unit can be properly installed either from “Front” (conventional DIN Front-mount) or “Rear” (DIN Rear-mount installation, utilizing threaded screw holes at the sides of the unit chassis). For details, refer to the following illustrated installation methods. DIN FRONT-MOUNT (Method A) Installation Opening This unit can be installed in any dashboard having an opening as shown below: Installing the unit 1.This player should be installed by professional technician. 2. please read the instruction and operation of equipment carefully before installing. 3. Make sure to connect other wires before power connection. 4. To avoid short circuit. Please make sure all the exposed wire are insulating. 5. Please fix all the wires after installation. 6. Please make connection to the player accordingly to this instruction manual. Wrong connection may cause damage. 7. This player only fit for 12V DC device and please make sure your car belongs to this kind of cathode grounding electrical system. 8. Please connect the wires rightly. Wrong connection will cause malfunction or damage the electrical system. - 32 - BDVM-8320MP - 33 - BDVM-8320MP Wire Connection Diagram - 34 - BDVM-8320MP CAMERA IN Attention: 1).According to above connection. 2).When the wire of Back Sight(Pink) connect to 12V,the reverse image will be showed on the main screen. 3).The main screen will not show other image when reversing,it can restore normally after disconnect. - 35 - BDVM-8320MP LOCATION OF KEYS 1. “ ” button. 12. “6 DIR+” button. 2. “LIGAR/ MUDO” button. 13. “ 3.“3 RPT ” button. 14.“ 4. “MOD” button. 15. “4 RDM” button 5. “VOL / SEL/ENT” button. 16. “BANDA” button. 6. “AMS” button 17.“2 INT ” button. 7. “5 DIR-” button. 18. “1 8. “IR”Infra Sensor. 19. RESET button. 9. “ 3" ” TFT display. 20. SD card slot. 10. USB port. 21. EJECT 11. “AUX IN” jack. 22. DISC SLOT - 36 - ” button. ” button. ” button. BDVM-8320MP OPERATION SWITCHING ON/OFF THE UNIT Press the PWR button to turn on the unit,Screen will display the main menu. Using / button to select one mode among: Radio, Disc, USB,SD Card, AUX IN, SETTING. Then press ENT button to enter the corresponding mode. In any mode. Press and hold PWR button for 2 seconds to turn off the unit. SETTINGS Press button to enter below setting main menu as below picture: Then press ENT button to enter setting interface as sound setting, Quality setting,Time setting and Area setting by rotating VOL button; Sound Setting - 37 - BDVM-8320MP SETTINGS 1).Press ENT button To select:BAS->TRE->BAL>FAD 2).Adjust the arguments by rotating volume button; Quality Setting 1).Press ENT button to select:BRI->CON->CHR->SHA; 2).Adjust the arguments by rotating volume button; Time Setting 1).Press ENT button to select: Date-> Month-> Years-> Hour->Minute-> Time format->Date mode - 38 - BDVM-8320MP 2).Adjust the arguments by rotating volume button; Area Setting Press ENT button to enter Area setting as above picture. 1).To select desired country by rotating VOL button; Note: long press ENT button return to main interface; RESET FUNCTION RESET button must be activated with either a ballpoint pen or thin metal object. The RESET button is to be activated for the following reasons: Initial installation of the unit when all wiring is completed. Error symbol on the display. Note: if press RESET button, the unit can’t work yet, please use a cotton swab soaked in isopropyl alcohol to clean the socket on the front panel. Once the reset button is pressed. All the memory’s information will be lost! DISC(DVD/VCD/CD/MP3) OPERATION Loading/ejecting a disc Press button on the front panel slide down the front panel, then you will see the disc slot. Insert the disc with printed side facing up into the disc slot (22). The player will start playback automatically. - 39 - BDVM-8320MP DISC(DVD/VCD/CD/MP3) OPERATION Stopping playback Shortly press button on the remote control one time to pre-stop the unit playback. When button on the front panel or on the screen or on the remote control is pressed, normal playback will continue. Press button twice to stop the playback and go back to the DVD LOGO. Pressing on the front panel or on the remote control or on the screen during playback will stop playback temporarily. To return to normal playback, press again.If you play a DVD/VCD/SVCD, second press on the front panel for several seconds to stop at the next picture (step function). If you play a CD/MP3/Picture CD, second press on the front panel for several seconds is ineffective. Rapid Forward/Rapid Reverse Press & on the remote control during playback. Each time the button is pressed, the speed of rapid forward /reverse changes according to the disc as follows. DVD/VCD/CD/MP3: Skipping Track Press / buttons on the remote control or front panel during playback. Press to skip to the next track, and press previous track. / on the to skip to the Note: For some VCD2.0 discs (PBC-playback control), / buttons may be unavailable. DVD video menu play 1. When playing a DVD disc, press TITLE button on the remote control will stop the playback and return to the TITLE menu that is stored in DVD disc. The disc will be played automatically and stop at menu picture. 2. Press / , / cursor buttons on the remote control to move between the highlight bars in the menu. - 40 - BDVM-8320MP DISC(DVD/VCD/CD/MP3) OPERATION 3. Press OK button on the remote control or on the front panel to confirm the selected item. Repeat Play/Paragraph Repeat Play Repeat play: when you want to repeat playing the whole disc or a track or a chapter in the disc. 1. Press RPT button repeatedly to select different repeat modes. 2. For different kinds of discs, pressing RPT button has different effects. For DVD: For VCD/SVCD/CD/MP3/WMA: Note: REPEAT feature does not support VCD2.0 (with PBC ON). Paragraph Repeat Play: when you want to repeating play a desired paragraph. Special Functions for DVD Multi-subtitle Language Function Press SUBT during playback. The following information will be shown on the screen. Each time the button is pressed, the subtitle language changes in sequential order. Notes: The language number is different according to the disc. Some discs only contain one subtitle language. Multi-audio Language Function Press AUD during playback. The following information will be shown on the screen. Each time the button is pressed, the audio soundtrack language changes on sequential order. Notes: 5. The language number is different according to the disc. 6. Some discs only contain one soundtrack language. - 41 - DISC(DVD/VCD/CD/MP3) OPERATION BDVM-8320MP Zoom function Allows the picture to be increased in size. Press ZOOM button on the remote control to toggle scale among 1, 2, 3, 4, 1/2 , 1/3, and 1/4. When the scale is 1/4, press ZOOM again will exit zoom operation. During zoom mode, press / , / buttons to move the picture left/right, up/down. Notes: The language is different according to the disc. Some discs only contain one subtitle language. Goto Function FOR DVD: Press GOTO button on the remote control, the screen will display the following message: Use the number keys to input the desired Title, Chapter or Time, then press OK key to confirm. DVD Setup In DVD mode, when the disc is playing or in stop mode, press SETUP button on the front panel or on the remote control to enter setup menu. 1. When the cursor is on the topside, use / buttons to move between the different pages. 2. Press button to move the cursor to the setup page below and then you can use / buttons to move between the different setup options. 3. Press button to display the choice list for each setup option and then use / buttons and OK button to change your selection. SYSTEM SETUP When you open the setup menu, you will see the system setup page at first, see below: - 42 - BDVM-8320MP DISC(DVD/VCD/CD/MP3) OPERATION 1. TV SYSTEM: Change the TV mode among NTSC, PAL and AUTO. 2. SCREEN SAVER: Change the SCREEN SAVER on or off. 3. TV TYPE: Change the TV TYPE among 4:3PS, 4:3LB and 16:9. 4. DEFAULT: Restore the system setup to the default setup. LANGUAGE SETUP When you open the language setup menu, you will see the language setup page: You can change the OSD/ AUDIO/ SUBTITLE/ MENU language between ENGLISH / GERMAN / SPANISH / FRENCH / PORTUGUESE / ITALIAN / OFF. VIDEO SETUP When you open the VIDEO menu, you will see the following picture Press on remote or panel / , / to adjust BRIGHTNESS/CONTRAST/HUE/SATURATION / SHARPNESS corresponding value,after adjusted,press”OK”to confirm ON–SCREEN DISPLAY FUNCTION Press the DISP button during playback to display the console information of the current disc on the screen. - 43 - BDVM-8320MP RADIO OPERATION SWITCHING TO THE RADIO MODE Press MODE button on remote control the source menu to select RADIO mode. . The following information will appear on the display. SELECTING THE FREQUENCY BAND Shortly press BAND button on the front panel on remote control or tap BAND bar on the screen to select desired band. The reception band will change in the following order: For two wave bands: Selecting Frequency During radio mode, press button on the remote control to increase frequency, press button on the remote control to decrease frequency by one step of channel spacing. Radio Function Select: Long press SETUP button on the front panel to select Band->PS>AS-> ->Station-> . Then press “ENT” to confirm the function . Automatic Memory Story & Program Scanning: - Program scanning Shortly press AS/PS button on remote control or select PS icon on screen to scan preset station. And it will hold at each station for about 5 seconds. - 44 - BDVM-8320MP RADIO OPERATION - Automatic memory storing Press and hold AS/PS button on remote control or select AS bar on the screen for about several seconds , the radio searches from the current frequency and checks the signal strength until one cycle search is finished. And then stations are stored into the preset number button in turn according to the strength of the stations. When auto search is finished, it will enter into preset scan mode automatically. SELECTING STATION and STORE STATION AUTOMATICALLY Please long to "SETUP” and select "station" function,after press shortly to “SETUP” ordinal Choice 1 to 6 station may also directly press 1 to 6 button belong to the remote or panel, Press and hold Remote Control 1,2,3,4,5, 6 button for 2 seconds. It will save the current radio station into the memory. Mono/Stereo: Press MO/ST button on remote control to select mono or stereo mode. You can sometimes improve reception of distant stations by selecting mono operation. Local/Distant: Press and LOC button on the remote control to select between local and distant stations.Local setting for reception of strong Station, and a distant setting for reception of weaker stations. When search station in LOC mode, if there is no station avai lable, it will switch to DIS mode and search station auto matically. If there is no station available too it will stop searching and return to LOC mode. When search station in DIS mode, if there is no station available, it will stop searching in DIS mode. USB/SD PLAY OPERATION On the front panel of the unit, there is an USB/SD interface. An USB/SD driver can be connected through this interface. An USB/SD driver to the USB/SD interface, and change the mode to USB/SD mode, the unit will read the files stored in the USB/SD device automatically. - 45 - BDVM-8320MP When reading an USB/SD device, if insert a disc to disc slot, the unit will read the disc automatically. When reading the USB/SD device, Press (stop) or (pause) button on the remote control or on the front panel to enter PRE-STOP, STOP or PAUSE mode. When reading the USB/SD device, disconnect the USB/SD device, the unit will switch last mode. The main unit can only support the standard USB-memory(SD-memory) disc which is approved by Microsoft. USB MP3 player is not a standard which means different brand name or different models have their own standard. So our product cannot support every MP3 player. When connecting an MP3 player and there has normal battery in the player (non rechargeable battery), you should remove the battery from the MP3 player then connect it to the USB interface. Otherwise, it may cause battery burst. When in USB play mode, be sure not to remove the USB driver from the USB interface. AUX OPERATION Switching to AUX mode There is a pair of AUDIO INPUT jacks on the front and back of the unit. When you connect an audio system through these jacks, press MODE button on the remote control or on the front panel to select AUX mode. EQUALIZATION Press EQ button shortly to turn on equalization function and to select desired audio mode. There are five kinds of mode as below: AUDIO ADJUSTING If no save station mode, long press the “ENT/SEL” button to select the desired adjustment mode. The audio adjustment mode will change in the following order: BASS---TREBLE---BALANCE---FADER--EXIT - 46 - BDVM-8320MP MUTE In radio, DVD,USB,SD, AUX mode,Press MUTE button to muting the AUDIO output. Press it again to recover output. - 47 - BDVM-8320MP Control Locations – Remote Handset - 48 - BDVM-8320MP Press to Mute the sound. Press again to recover the sound. 1. MUTE 2. POWER 3. 0-9 4. LOUD/EQ 5. SET 6. STOP 7 .OK 8. / , / 9. DISP 10. / 11. GOTO 12. TITLE 13. SUB-T 14. AUDIO/MO/ST 15. / 16. ZOOM 17. SETUP 18. RDM 19. REP 20. 21. VOL+/22. BAND: 23. AS/PS 24. HOME/MENU 25.. MODE 26. LOC: Press it to turn the unit ON or OFF Inputs the corresponding number. Press and hold to turn on/off Loudness. Press it to select desired audio equalization Access the Bass, Treble, Balance and Fader setting.. To stop the playing. Confirm the Track/Chapter selected with the numeric buttons or selected with the cursor buttons on screen In case of MENU mode, / , / buttons serves as cursor buttons to select item left/right, ahead/back. To display some information of current status Press to skip to the next track & press to skip back one track in navigation mode. Disc search button in DVD mode, cooperatively used with numeric Buttons Displays the title menu that is stored on the DVD disc. Changing of the SUBTITLE language on multi-subtitle language DVD disc. Changing of the AUDIO soundtrack on multi-audio soundtrack DVD disc In radio mode press the button to set the reception between mono and stereo mode. In CD/MP3/DVD mode. Press / to search forward rapidly & to search reverse rapidly. In radio mode, use / for manual tuning. Allows the picture to be increased in size. In DVD mode, press to display the SETUP menu Press it to play all tracks in random order Repeats play of chapters, titles, tracks and discs. Press to pause the playing. Press it again to resume play ncrease(+) or decrease(-) the volume level. To select FM1,FM2,FM3,AUX radio bands. In radio mode, press it to activate Automatic Memory Storing/Program Scanning function. Back to the main menu / play DVD return time MENU Press to change the source. Turn on/off the local function. - 49 - BDVM-8320MP SPECIFICATION FM AM USA: 87.5~108 MHz USA: 520~1710 KHz MP3/WMA Tuning range Sensitivity --- 4uV(S/N=30dB) 63uV(S/N=20dB) --- 50 dB 45 dB 60 dB >25 dB --- 50dB 40Hz~12KHz 40Hz~2KHz 20Hz~16KHz S/N ratio Stereo separation Freq. Response - 50 -