1
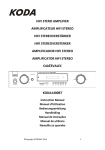
POWER AMPLIFIER
AMPLIFICATEUR DE PUISSANCE
LEISTUNGSVERSTÄRKER
VERMOGENSVERSTERKER
AMPLIFICADOR
AMPLIFICATOR DE PUTERE
OJAČEVALEC
KODA1305
Instruction Manual
Manuel d’Utilisation
Bedienungsanleitung
Handleiding
Manual de Instruções
Manual de utilizare
Navodila za uporabo
©Copyright LOTRONIC 2012
1
GB
Congratulations to the purchase of your new amplifier. Please read the manual prior
to using the unit and keep it for future reference.
Warnings:
The triangle containing a lightning symbol is intended to alert the user
to the presence of uninsulated dangerous voltages within the
product’s enclosure that me be of sufficient magnitude to constitute a
risqué of electric shock to persons.
An exclamation mark in a triangle is intended to alert the user to the
presence of important operating and maintenance (servicing)
instructions in the literature accompanying the appliance.
SAFETY INSTRUCTIONS
•
•
•
•
•
•
Connect the unit only to a power supply that is of the type described in the
specifications
Where the MAINS plug or an appliance coupler is used as the disconnect device,
the disconnect device shall remain readily operable
Where an all-pole MAINS SWITCH is used as the disconnect device, the location
on the apparatus and the function of the switch shall be described and the
switch shall remain readily operable.
Unplug the unit from the mains when it is not used for a long period of time
Do not let any objects nor liquids enter the housing.
Don’t put any recipients filled with liquids on the housing.
©Copyright LOTRONIC 2012
2
Front and Rear panel description
1. Power switch
3. Headphone volume control
5. Treble control
7. Balance control
9. Input selector switch (AUX1/AUX2/CD/MP3)
11. AUX1 input jack
13. CD input jack
15. A channel speaker output left
17. B channel speaker output left
2. Headphone output
4. Speaker output select
6. Bass control
8. Master volume control
10. MP3 input jack
12. AUX2 input jack
14. A channel speaker output right
16. B Channel speaker output right
18. Power cable
Operating instructions
Prior to switching the
system on, please make all
connections properly
according to the above
chart.
Please pay particular
attention to the polarity.
Turn all volume controls
down to the minimum.
©Copyright LOTRONIC 2012
3
Turn the input selector switch to the correct position and power the unit on. A few
seconds later, the unit has reached normal working condition. Adjust the volume
according to your taste.
If the fuse blows, please contact a technician to replace the fuse by a new one that is
identical to the original one.
If the LED doesn’t light up when the amplifier is switched on, it means that there is a
malfunction. Please turn the power immediately off and solve the problem. Turn
power on again.
Use the A/B function to select the speaker output according to your speaker cable
connection. If the amplifier is connected to two pairs of speakers at both A & B
channels, please select the A+B channel position.
Warning: Do not connect 2 pairs of 4 Ohms speakers at the same time to the
amplifier A & B outputs.
Trouble-shooting
If the amplifier doesn’t operate properly, check the points in the table below. If this
doesn’t solve the problem, please contact your dealer.
Problem
Causes
No sound
• Bad speaker connection
• Wrong connection of
audio input socket
• Bad connection of power
plug
• Volume turned down to
the minimum
• Speaker output selector
not in the correct position
• Connect securely
• Check the audio input socket
• Connect the power cable
properly
• Turn the volume up to a
suitable level
• Select the correct speaker
output
• The volume is too loud
•
Distortion
Sound only
from one
channel
• Incomplete speaker
connection
• Incomplete input/output
lead connections
• Left/right balance is off on
one side
©Copyright LOTRONIC 2012
Solution
Reduce the volume to an
acceptable level
• Connect securely
• Connect securely
• Adjust the balance properly
4
Specifications
Output power (RMS) ......................................................... 2 x 140W @ 4 Ohms
.......................................................................................... 2 x 100W @ 8 Ohms
THD .......................................................................................... <2% (30-20kHz)
Frequency response ..................................................................... 30Hz – 20kHz
Signal to noise ratio .......................................................... >77dB (A-weighted)
Rated input level/impedance................................................................. 500mV
Rated load impedance .......................................................................... 4 Ohms
Power consumption ............................................................................... <140W
Power supply ....................................................................... 230Vac ∼ 50/60Hz
Dimensions .......................................................................... 420 x 330 x 98mm
Net weight ............................................................................................... 3.9 kg
Notes:
1. The above specifications are only for reference
2. Design and specifications are subject to change for improvement without prior
notice
Accessories:
1x user manual
1x 2-phono to 2-phono lead (1.5m)
Electric products must not be put into household waste. Please bring them
to a recycling centre. Ask your local authorities or your dealer about the
way to proceed.
©Copyright LOTRONIC 2012
5
F
Nous vous félicitons pour l’achat de ce nouvel amplificateur. Lire attentivement le
mode d’emploi avant la première mise en service et conserver pour référence
ultérieure.
Avertissement:
ATTENTION !
AFIN DE REDUIRE LE RISQUE D’INCENDIE OU D’ELECTROCUTION,
NE PAS EXPOSER L’APPAREIL A LA PLUIE OU A L’HUMIDITE. NE PAS OUVRIR LE
BOITIER (OU L’ARRIERE). L’APAPREIL NE CONTIENT AUCUNE PIECE REMPLACABLE
PAR L’UTILISATEUR. TOUTES LES REPARATIONS DOIVENT ETRE EFFECTUEES PAR UN
TECHNICIEN QUALIFIE.
Le triangle avec l’éclair attire l’attention de l’utilisateur sur la présence de
tensions non-isolées à l’intérieur du boîtier qui sont d’une magnitude
suffisante pour provoquer un choc électrique.
Le point d’exclamation dans le triangle attire l’attention de l’utilisateur
sur la présence d’importantes informations continues dans le manuel.
CONSIGNES DE SECURITE
•
•
•
•
•
•
Branchez l’amplificateur uniquement sur une source d’alimentation qui délivre la
tension spécifiée dans les caractéristiques techniques.
Lorsque le cordon d'alimentation ou un coupleur d'appareil est utilisé comme
dispositif de déconnexion, ce dispositif doit rester facilement accessible.
Si un interrupteur omnipolaire est utilisé comme dispositif de déconnexion,
l'emplacement sur l'appareil et la fonction de l'interrupteur doit être décrite, et le
commutateur doit rester facilement accessible.
Débranchez l’appareil du secteur en case d’une non-utilisation prolongée.
Ne pas laisser d’objets ni de liquides pénétrer à l’intérieur du boitier.
Ne pas poser de récipients remplis de liquide sur l’appareil.
©Copyright LOTRONIC 2012
6
Description de la façade et de l’arrière
1. Interrupteur général
3. Contrôle de volume du casque
5. Réglage des aigus
7. Contrôle de Balance
9. Sélecteur d’entrée (AUX1/AUX2/CD/MP3)
11. Entrée AUX1
13. Entrée CD
15. Sortie HP gauche canal A
17. Sortie HP gauche canal B
2. Sortie casque
4. Sélecteur d’enceintes
6. Réglage des graves
8. Contrôle de volume général
10. Entrée MP3
12. Entrée AUX 2
14. Sortie HP droit canal A
16. Sortie HP droit canal B
18. Cordon secteur
Utilisation
Avant la mise sous tension du système,
assurez-vous que toutes les connexions
ont été effectuées correctement selon le
tableau ci-dessus.
Respectez la polarité !
Baissez complètement tous les contrôles
de volume.
©Copyright LOTRONIC 2012
7
Réglez le sélecteur d’entrée sur la bonne source et mettez l’amplificateur sous
tension. Quelques secondes plus tard, l’amplificateur a atteint l’état de
fonctionnement normal. Réglez le volume selon votre goût.
Le fusible ne peut être replace que par un technicien. Le nouveau fusible doit être en
tous points identique au fusible d’origine.
Si la LED ne s’allume pas lorsque l’amplificateur est mis sous tension, il y a un
dysfonctionnement quelque part. Eteignez immédiatement l’amplificateur et
résolvez le problème. Remettez l’amplificateur de nouveau sous tension.
Sélectionnez le canal sur lequel vous avez branché vos enceintes. Si l’amplificateur
est branché sur deux paires d’enceintes en même temps, sélectionnez la position
A+B.
Avertissement: Ne pas brancher 2 paires d’enceintes de 4 Ohms en même temps
sur les sorties A + B de l’amplificateur.
Diagnostic de défaillance
Si l’amplificateur ne fonctionne pas correctement, vérifiez les points dans le tableau
ci-dessous. Si le problème persiste, contactez votre revendeur.
Problème
Pas de son
Distorsion
Le son ne sort
que d’un seul
canal
Causes
• Mauvais branchement des
HP
• Mauvais branchement de
l’entrée audio
• Mauvais branchement
secteur
• Volume baissé au
minimum
• Sélecteur d’enceintes
dans la mauvaise position
• Le volume est trop for
• Mauvais branchement
• Mauvais branchement
entrée/sortie
• La balance gauche/droite
est à 0 d’un côté
©Copyright LOTRONIC 2012
Solution
• Branchez fermement les
enceintes
• Vérifiez le branchement de
l’entrée audio
• Branchez correctement le
cordon secteur
• Montez le volume à un niveau
convenable
• Sélectionnez la bonne sortie
HP
• Baisse le volume à un niveau
acceptable
• Vérifiez les branchements
• Vérifiez les branchements
• Réglez correctement la balance
8
Caractéristiques techniques
Puissance de sortie (RMS) ............................................. 2 x 140W sous 4 Ohms
...................................................................................... 2 x 100W sous 8 Ohms
THD .......................................................................................... <2% (30-20kHz)
Bande passante ............................................................................ 30Hz – 20kHz
Rapport S/B ......................................................................... >77dB (pondéré A)
Niveau/impédance d’entrée nominale .................................................. 500mV
Impédance de charge nominale ........................................................... 4 Ohms
Consommation ....................................................................................... <140W
Alimentation ........................................................................ 230Vac ∼ 50/60Hz
Dimensions .......................................................................... 420 x 330 x 98mm
Poids......................................................................................................... 3,9 kg
Notes:
1. Les caractéristiques ci-dessus ne constituent qu’une référence.
2. Design et caractéristiques peuvent changer sans préavis si cela apporte une
amélioration du produit.
Accessoires:
1x mode d’emploi
1x cordon 2 RCA vers 2 RCA (1,5m)
NOTE IMPORTANTE : Les produits électriques ne doivent pas être mis au
rebut avec les ordures ménagères. Veuillez les faire recycler là où il existe
des centres pour cela. Consultez les autorités locales ou votre revendeur sur
la façon de les recycler.
©Copyright LOTRONIC 2012
9
D
Herzlichen Glückwunsch zum Kauf Ihres neuen Verstärkers. Bitte lesen Sie die
Anleitung vor der ersten Inbetriebnahme durch und bewahren Sie sie für spätere
Bezugnahme auf.
Warnhinweise:
Der Blitz im Dreieck weist den Bediener auf gefährliche, unisolierte
Spannungen im Gehäuseinneren hin, die stark genug sind, um einen
elektrischen Schlag zu verursachen.
Das Ausrufezeichen im Dreieck weist den Benutzer auf wichtige Hinweise
in der Betriebsanleitung hin.
SICHERHEITSHINWEISE
•
•
•
•
•
•
Das Gerät nur an eine Stromquelle anschließen, die den Angaben in den
technischen Daten entspricht.
Wenn der Stecker zum Ein- und Ausschalten des Geräts benutzt wird, muss
dieser jederzeit leicht zugänglich sein.
Wen ein Schalter zur Entkopplung des Geräts benutzt wird, muss dieser deutlich
gekennzeichnet sein..
Bei längerem Nichtgebrauch Gerät vom Netz trennen.
Es dürfen keine Gegenstände und Flüssigkeiten ins Gehäuse dringen.
Keine mit Flüssigkeiten gefüllten Behälter wie Vasen auf das Gehäuse stellen.
©Copyright LOTRONIC 2012
10
Beschreibung der Front- und Rückseite
1. Hauptschalter
3. Lautstärkeregler des Kopfhörers
5. Treble Regler
7. Balance Regler
9. Eingangswahlschalter (AUX1/AUX2/CD/MP3)
11. AUX1 Eingangsbuchse
13. CD Eingangsbuchse
15. Linker LS-Ausgang Kanal A
17. Linker LS-Ausgang Kanal B
2. Kopfhörerausgang
4. Kanalwahlschalter
6. Bass Regler
8. Master Lautstärkeregler
10. MP3 Eingangsbuchse
12. AUX2 Eingangsbuchse
14. Rechter LS-Ausgang Kanal A
16. Rechter LS-Ausgang Kanal B
18. Netzkabel
Bedienung
Vor dem Einschalten der Anlage
erst alle Anschlüsse vornehmen.
Bitte achten sie besonders auf die
richtige Polarität.
Alle Lautstärkeregler ganz
herunterfahren.
Den Eingangswahl-schalter auf die
entsprechende Eingangsquelle
stellen und Gerät einschalten.
©Copyright LOTRONIC 2012
11
Nach einigen Sekunden ist das Gerät voll betriebsbereit. Stellen sie die Lautstärke
nach Ihren Wünschen ein.
Falls einmal die Sicherung durchbrennt, wenden Sie sich an einen erfahrenen
Techniker. Die neue Sicherung muss der alten in jeder Hinsicht entsprechen.
Wenn die LED beim Einschalten des Verstärkers nicht aufleuchtet, liegt ein Fehler
vor. Schalten sie sofort wieder das Gerät aus und lösen Sie das Problem. Danach das
Gerät erneut einschalten.
Stellen Sie den Kanalwahlschalter auf den Kanal ein, an den Sie Ihre Lautsprecher
angeschlossen haben. Wenn an beide Kanäle Lautsprecher angeschlossen sind,
stellen Sie den Schalter auf A+B ein.
Achtung, Niemals 2 Paar Lautsprecher mit 4 Ohm Impedanz gleichzeitig an den A
und B Kanal anschließen.
Fehlerdiagnose
Wenn der Verstärker nicht ordnungsgemäß funktioniert, prüfen Sie die
nachstehenden Punkte. Wenn das Problem damit nicht behoben ist, wenden Sie sich
bitte an Ihren Fachhändler.
Problem
Kein Ton
Verzerrung
Nur ein Kanal
funktioniert
Ursachen
• Schlechter LS-Anschluss
• Schlechter Anschluss der
Audioquelle
• Schlechter Anschluss des
Netzkabels
• Lautstärke ist ganz
heruntergestellt
• Kanalwahlschalter ist nicht
auf den richtigen Kanal
eingestellt.
• Die Lautstärke ist zu hoch
• Unvollständiger LSAnschluss
• Ein- und Ausgänge sind
nicht richtig
angeschlossen
• Links/rechts Balance ist an
einer Seite aus
©Copyright LOTRONIC 2012
Lösungen
• LS fest anschließen
• Audioeingangsbuchse prüfen
• Netzkabel richtig anschließen
• Lautstärke auf einen normalen
Pegel einstellen
• Den richtigen Kanal wählen
•
Die Lautstärke auf einen
annehmbaren Pegel einstellen
• LS richtig anschließen
• Anschlüsse der Ein- und
Ausgänge prüfen
• Balance richtig einstellen
12
Technische Daten
Ausgangleistung (RMS) ...................................................... 2 x 140W @ 4 Ohm
........................................................................................... 2 x 100W @ 8 Ohm
THD .......................................................................................... <2% (30-20kHz)
Frequenzgang............................................................................... 30Hz – 20kHz
Störabstand .......................................................................>77dB (A-gewichtet)
Nom. Eingangspegel/-impedanz ............................................................ 500mV
Nom. Lastimpedanz ................................................................................ 4 Ohm
Verbrauch .............................................................................................. <140W
Versorgungsspannung ......................................................... 230Vac ∼ 50/60Hz
Abmessungen....................................................................... 420 x 330 x 98mm
Nettogewicht ........................................................................................... 3,9 kg
Hinweise:
1. Die obigen Angaben sind nur Bezugswerte
2. Design und technische Daten können sich ohne Vorankündigung ändern, wenn
dies zur Produktverbesserung dient.
Zubehör:
1 Anleitung
1x 2-Cinch auf 2-Cinch Kabel (1,5m)
Elektrogeräte gehören nicht in den Hausmüll. Sie müssen in speziellen Betrieben
recycelt werden. Wenden Sie sich hierzu an die örtlichen Behörden oder Ihren
Fachhändler!
©Copyright LOTRONIC 2012
13
NL
Gefeliciteerd voor de aankoop van uw nieuwe versterker. Lees deze handleiding
aandachtig door alvorens U de versterker gebruikt en bewaar ze voor latere
raadpleging op.
Waarschuwingen:
De bliksem in de driehoek vestigt de aandacht van de gebruiker op
een elektrische schokrisico.
De driehoek met het uitroepteken vestigt de aandacht van de gebruiker
op belangrijke gebruik- of onderhoudinstructies.
VEILIGHEIDSINSTRUCTIES
•
De versterker alleen op een voedingsbron aansluiten die van hetzelfde type is
zoals in de specificaties getoond.
Ontkoppeling van het net
• a) Indien het toestel via het stopcontact wordt uitgeschakeld, moet de
contactdoos altijd makkelijk bereikbaar zijn
• b) Indien het toestel via een schakelaar wordt uitgeschakeld, moet deze duidelijk
gemarkeerd en makkelijk bereikbaar zijn.
• Na gebruik of in geval van langere niet gebruik trek de stekker uit het
stopcontact.
• Laat geen vloeistoffen of voorwerpen binnen de behuizing dringen.
• Geen met vloeistof gevulde voorwerpen op de behuizing plaatsen.
©Copyright LOTRONIC 2012
14
Voor- en achterzijde
1. Aan/uit
2. Hoofdtelefoon uitgang
3. Hoofdtelefoon volume controle
4. Keuze van de luidspreker uitgang
5. Treble controle
6. Bass controle
7. Balance controle
8. Master volume controle
9. Ingangskeuze schakelaar (AUX1/AUX2/CD/MP3) 10. MP3 ingang
11. AUX ingang
12. AUX2 ingang
13. CD ingang
14. A kanaal luidspreker-uitg. rechts
15. A kanaal luidspreker uitgang links
16. B kanaal luidspreker-uitg. rechts
17. B kanaal luidspreker uitgang links
18. Netsnoer
Bediening
Alvorens u het systeem inschakelt
doe alle aansluitingen volgends de
boven staande afbeelding.
Let op de juiste polariteit. Draai alle
volume controles naar beneden op
het minimum.
Draai de ingangskeuzeschakelaar op
de juiste positie en schakel het
©Copyright LOTRONIC 2012
15
toestel aan. Na enkele seconden heeft het toestel de normale werkconditie bereikt.
Stel het volume na uw wensen in.
Indien de zekering doorbrandt laat ze door een technicus door een identieke
vervangen.
Indien de LED niet oplicht wanneer de versterker ingeschakeld wordt heeft de
versterker een probleem. Schakel de versterker direct uit en los het probleem op.
Schakel de versterker opnieuw aan.
Kies de luidsprekeruitgang volgends uw kabelverbinding d.m.v. de A/B schakelaar.
Indien de versterker aan twee paar luidsprekers op beide kanalen A en B, kies de A+B
kanaal positie.
Waarschuwing: Nooit 2 paar 4 ohms luidsprekers tegelijkertijd op de A & B
uitgangen aansluiten.
In geval van storing
Indien de versterker niet goed werkt controleer volgende punten in de tabel
beneden. Indien uw probleem niet wordt opgelost raadpleeg uw dealer.
Probleem
Geen geluid
Vervorming
Geluid
alleen van
een kanaal
Oorzaak
• Slechte luidspreker
aansluiting
• Foute aansluiting van de
audio ingang
• Slechte aansluiting van de
voedingsplug
• Volume op het minimum
ingesteld
• Luidspreker uitgangskeuze
schakelaar niet in de juiste
positie
• Het volume is te hoog
• Onvolledige luidspreker
aansluiting
• Onvolledige ingang/ uitgang
kabel aansluitingen
• Links/rechts balance is uit
op een kant
©Copyright LOTRONIC 2012
Oplossing
•
•
•
•
Vast aansluiten
Audio ingang controleren
Netsnoer goed aansluiten
Volume op een geschikt niveau
instellen
• Kies de juiste luidspreker
uitgang
•
Verminder het volume op een
geschikt niveau
• Vast aansluiten
• Vast aansluiten
• Balance juist instellen
16
Specificaties
Uitgangsvermogen (RMS) .................................................. 2 x 140W @ 4 Ohm
........................................................................................... 2 x 100W @ 8 Ohm
THD .......................................................................................... <2% (30-20kHz)
Frequentiebereik ......................................................................... 30Hz – 20kHz
Signaal ruis verhouding ..................................................... >77dB (A-weighted)
Ingangsniveau/impedantie .................................................................... 500mV
Lastimpedantie ....................................................................................... 4 Ohm
Opgenomen vermogen .......................................................................... <140W
Voeding ................................................................................ 230Vac ∼ 50/60Hz
Afmetingen .......................................................................... 420 x 330 x 98mm
Nettogewicht ........................................................................................... 3,9 kg
Opmerkingen:
1. De specificaties hierboven zijn alleen referentiewaarden
2. Wisselingen in design en specificaties zonder aankondiging zijn voorbehouden
Toebehoren:
1x handleiding
1x 2-phono naar 2-phono kabel (1.5m)
De elektrische producten mogen niet naast het huisvuil geplaatst worden. Gelieve
deze te laten recycleren daar waar er centra’s hiervoor voorzien is. Raadpleeg de
plaatselijke autoriteiten of uw verkoper ivm de manier van recycleren.
Imported from China for:
LOTRONIC SA
Avenue Zénobe Gramme 1
B – 1480 SAINTES
©Copyright LOTRONIC 2012
17
PT
Obrigado por adquirir este novo amplificador. Por favor, leia o manual antes de
usar o aparelho e guarde-o para referência futura.
Avisos:
O triângulo contendo um símbolo de um raio é destinado a alertar o
utilizador sobre a presença de voltagens perigosas não isoladas dentro da
estrutura do produto, que possui magnitude suficiente para constituir
um risco de choque eléctrico para as pessoas.
Um ponto de exclamação dentro de um triângulo serve para alertar o
utilizador para a presença de informações importantes de operação e
manutenção (assistência).
INSTRUÇÕES DE SEGURANÇA
•
•
•
•
•
•
Ligue o aparelho apenas a uma fonte de alimentação do mesmo género que o
descrito nas especificações.
Quando a ficha de alimentação é usada como dispositivo de desactivação, o
dispositivo de desligamento deve estar sempre acessível.
Sempre que um interruptor de alimentação de todos os polos é utilizado como o
dispositivo de desligação, a localização no aparelho e a função do interruptor
devem ser descritas e o interruptor deve estar sempre acessível.
Desligue o aparelho da corrente quando não é utilizado durante um longo
período de tempo.
Não deixe nenhum objecto nem líquidos entrar na estrutura.
Certifique-se de que nenhum líquido seja derramado na estrutura através das
aberturas.
©Copyright LOTRONIC 2012
18
Descrição do Painel Frontal e Traseiro
1. Interruptor ON/OFF
3. Controlo de volume de auscultadores
5. Controlo de Treble
7. Controlo de Balance
9. Interruptor de Entrada
(AUX1/AUX2/CD/MP3)
11. Entrada Jack AUX
13. Entrada Jack CD
15. Saída esquerda de coluna de canal A
17. Saída esquerda de coluna de canal B
2. Saída de auscultadores
4. Selecção de saída de coluna
6. Controlo de Bass
8. Controlo de volume Master
10. Entrada Jack MP3
12. Entrada Jack AUX2
14. Saída direita de coluna de canal A
16. Saída direita de coluna de canal B
18. Cabo de alimentação
Instruções de Operação
Antes de ligar o sistema,
verifique se as ligações estão
correctas de acordo com o
gráfico acima.
Preste especial atenção à
polaridade. Regule o volume
para o valor mais baixo.
Gire o selector de entrada para
a posição correcta e ligue a
unidade. Alguns segundos
©Copyright LOTRONIC 2012
19
depois, a unidade chegou a condição de trabalho normal. Ajuste o volume de acordo
com a sua preferência.
Se o fusível queimar, entre em contacto com um técnico para substituir o fusível por
um novo, que é idêntico ao original.
Se o LED não acender quando o amplificador é ligado, não significa que seja um
defeito. Ligue imediatamente a alimentação externa de modo resolver o problema.
Ligue-o novamente.
Use a função A / B para seleccionar a saída da coluna de acordo com a sua ligação
dos cabos de colunas. Se o amplificador for ligado a dois pares de colunas em ambos
os canais A & B, deverá seleccionar a posição de canal A + B.
Aviso: Não ligue 2 pares de colunas de 4 Ohms ao mesmo tempo as saídas do
amplificador A & B.
Resolução de problemas
Se o amplificador não funcionar correctamente, verifique os pontos na tabela abaixo.
Se não resolver o problema, por favor contacte o seu revendedor.
Problema
Causa
Solução
Sem som
• Más ligações na coluna
• Ligação errada da fiche de
entrada áudio
• Má ligação da fiche de
alimentação
• Volume no mínimo
• Selector de saída de
coluna não está na
posição correcta
• Fixe a ligação com firmeza
• Verifique a fiche de entrada de
áudio
• Ligue o cabo de alimentação
correctamente
• Aumente o volume
• Seleccione a saída de coluna
correcta
Distorção
• O volume está
demasiado elevado
•
Som de
apenas um
canal
• Ligação de coluna
incompleta
• Ligações do cabo de
entrada/saída
incompletas
• Balance esquerdo/direito
está off num dos lados
©Copyright LOTRONIC 2012
Reduza o volume para um
nível mais adequado
• Fixe a ligação com firmeza
• Fixe a ligação com firmeza
• Ajuste o balance
correctamente
20
Especificações
Potência de Saída (RMS) ................................................... 2 x 140W @ 4 Ohms
.......................................................................................... 2 x 100W @ 8 Ohms
THD .......................................................................................... <2% (30-20kHz)
Frequência ................................................................................... 30Hz – 20kHz
Sinal / ruido Nominal ........................................................ >77dB (A-weighted)
Nível de entrada/impedância Nominal .................................................. 500mV
Carga de impedância Nominal .............................................................. 4 Ohms
Consumo ................................................................................................ <140W
Fonte de alimentação .......................................................... 230Vac ∼ 50/60Hz
Dimensões ........................................................................... 420 x 330 x 98mm
Peso liquido.............................................................................................. 3.9 kg
Notas:
1. As especificações acima são apenas para referência.
2. O design e especificações estão sujeitos a alterações sem aviso prévio.
Acessórios:
1x Manual de instruções
1x Cabo de 2-phono para 2-phono (1.5m)
Produtos eléctricos não deverão ser postos em contentores de lixo caseiros.
Por favor, deposite-os em contentores para reciclagem. Questione as
autoridades locais ou onde adquiriu o produto sobre como deverá proceder.
©Copyright LOTRONIC 2012
21
RO
Multumim pentru achizitionarea noului amplificator. Va rugam sa cititi manualul
inainte de a utiliza amplificatorul si pastrati-l pentru referinte ulterioare.
Avertisment:
Simbolul unui fulger in interiorul unui triunghi echilateral, avertizeaza
utilizatorul asupra prezentei unei tensiuni potential periculoase,
suficient de mari astfel incat sa prezinte risc de electrocutare pentru
utilizator.
Semnul exclamarii in interiorul unui triunghi echilateral avertizeaza
utilizatorul asupra existentei unor instructiuni importante de functionare
si service din manual. Consultati manualul de utilizare.
INSTRUCTIUNI DE SIGURANTA
•
•
•
•
•
•
Conectati amplificatorul doar la o sursa de alimentare (retea de alimentare) de
tipul celei descrise in specificatiile manualului.
Cablul de alimentare de la retea trebuie sa fie usor accesibil.
In cazul in care se foloseste un intrerupator multipolar, acesta trebuie sa fie usor
accesibil.
Deconectati amplificatorul de la retea in cazul in care nu il folositi o perioada mai
lunga de timp.
Incercati sa evitati patrunderea de obiecte sau substante lichide in interiorul
carcasei.
Asigurati-va ca in interiorul incintei amplificatorului nu vor patrunde lichide.
©Copyright LOTRONIC 2012
22
Descriere panoului frontal si panoului din spate
1. Comutator pornire
3. Control volum casti
5. Control sunete inalte
7. Control balans
9. Comutator intrare (AUX/AUX2/CD/MP3)
11. Mufa intrare AUX
13. Mufa intrare CD
15. Iesire canal A difuzor stanga
17. Iesire canal B difuzor stanga
2. Iesire casti
4. Selectare iesire difuzor
6. Control bass
8. Control volum principal
10. Mufa intrare MP3
12. Mufa intrare AUX2
14. Iesire canal A difuzor dreapta
16. Iesire canal B difuzor dreapta
18. Cablu alimentare
Instructiuni de functionare
Inainte de a porni sistemul, va
va rugam sa efectuati toate
conexiunile in mod
corespunzator – vezi schema
alaturata.
Va rugam sa fiti atenti la
polaritate. Rotiti comutatorul
volumului la minim.
©Copyright LOTRONIC 2012
23
Rotiti comutatorul de selectare a intrarii in pozitia corecta si porniti amplificatorul.
Reglati volumul in functie de nivelul dorit.
Daca siguranta se arde, va rugam sa contactati un tehnician pentru a o inlocui cu una
noua, care sa aibe aceleasi caracteristici cu cea originala.
Daca LED-ul nu se aprinde atunci cand amplificatorul este pornit, inseamna ca exista
o defectiune. Va rugam sa opriti alimentarea imediat si sa rezolvati problema. Porniti
din nou alimentarea aparatului.
Utilizati functia A / B pentru a selecta iesirea difuzoarelor in functie de conexiunea
prin cablu a difuzorului. In cazul in care amplificatorul este conectat la doua perechi
de difuzoare de la ambele canale A & B, va rugam sa selectati pozitia canalelor A + B.
Atentie: Nu conectati 2 perechi de difuzoare de 4 ohmi in acelasi timp, la iesirile A
& B ale amplificatorului.
Depanare
In cazul in care amplificatorul nu functioneaza corespunzator, verificati posibilele
defecte din tabelul de mai jos. In cazul in care problema persista, va rugam ca
contactati furnizorul.
Problema
Fara sunet
Distorsiune
Sunetul
provine de la
un singur
canal
Cauze
Solutii
• Conexiune incorecta a
difuzorului
• Conexiune
necorespunzatoare a
mufei intrarii audio
• Conexiune incorecta a
cablului de alimentare
• Volum redus la minim
• Selectorul de iesire a
difuzorului nu este in
pozitia corecta
• Volumul este prea mare
• Conectati in conditii de
siguranta
• Verificati mufa intrarii audio
• Conectati cablul de alimentare
in mod corespunzator
• Mariti volumul pana la nivelul
dorit
• Selectati iesirea
corespunzatoare a difuzorului
• Conexiune incompleta a
difuzorului
• Conexiuni incomplete ale
sondelor de intrare/iesire
• Balans stanga/dreapta
oprit pe o parte
• Conectati in conditii de
siguranta
• Conectati in conditii de
siguranta
• Reglati balansul corespunzator
©Copyright LOTRONIC 2012
•
Reduceti volumul la un nivel
acceptabil
24
Specificatii
Putere de iesire (RMS) ......................................................2 x 140 W @ 4 Ohmi
..........................................................................................2 x 100 W @ 8 Ohmi
THD ......................................................................................... <2% (30-20 kHz)
Raspuns in frecventa .................................................................. 30 Hz – 20 kHz
Raport S/N ........................................................................ >77dB (A-weighted)
Nivel intrare nominala/impedanta ....................................................... 500 mV
Impedanta sarcina nominala ................................................................. 4 ohmi
Consum .................................................................................................. <140W
Alimentare ........................................................................... 230Vac ∼ 50/60Hz
Dimensiuni .......................................................................... 420 x 330 x 98 mm
Greutate neta........................................................................................... 3.9 kg
Note:
1. Specificatiile mentionate mai sus sunt doar cu titlu de referinta.
2. Desig-ul si specificatiile produsului pot fi supuse schimbarilor fara o instiintare
prealabila.
Accessorii:
1 x manual de utilizare
1 x cablu 2-phono la 2-phono (1.5m)
Produsele electrice nu trebuie reciclate impreuna cu gunoiul menajer. Va rugam sa
le transportati la un centru de reciclare. Adresati-va autoritatilor locale si cereti
informatii despre procedura.
©Copyright LOTRONIC 2012
25
SLO
Čestitamo vam za nakup vašega novega ojačevalca. Prosimo, preberite navodila pred
uporabo naprave in jih shranite za poznejšo uporabo.
Opozorila:
Trikotnik, ki vsebuje simbol strele je namenjena za opozarjanje
uporabnika na prisotnost neizolirane nevarne napetosti v ohišju
izdelka, ki je dovolj visoka, da predstavlja nevarnost električnega
udara.
Klicaj v trikotniku je namenjen da opozori uporabnika na prisotnost
pomembnih navodil za uporabo in vzdrževanje (servisiranje) v literaturi
aparata.
VARNOSTNA NAVODILA
•
•
•
•
•
•
Priključite enoto le na električno omrežje, kot opisano v razpisni dokumentaciji.
Če je omrežni vtič ali vijačni terminal kot sredstvo za prekinitev napetosti, mora
biti enostavno dostopen za odklop naprave.
Če se omrežno stikalo uporablja kot sredstvo za prekinitev napetosti, položaj
stikala na aparatu in funkcija stikala morajo biti opisani in stikalo enostavno
dostopno.
Izključite napravo iz električnega omrežja, ko jo ne uporabljate dalj časa.
Ne dovolite, vstop predmetov, niti tekočine v ohišje.
Prepričajte se, da ni mogoče vstop tekočina v prostor skozi odprtine.
©Copyright LOTRONIC 2012
26
Opis sprednje in zadnje plošče
1. Stikalo za vklop
3. Glasnost slušalk
5. Kontrola visokih tonov
7. Kontrola ravnovesja
9. Vhodi - izbira (AUX/AUX2/CD/MP3)
11. AUX vhod jack
13. CD vhod jack
15. A kanal zvočniškega izhoda - levo
17. B kanal zvočniškega izhoda - levo
2. Izhod za slušalke
4. Izhod za zvočnike - izbira
6. Kontrola nizkih tonov
8. Kontrola glasnosti
10. MP3 vhod jack
12. AUX2 vhod jack
14. A kanal zvočniškega izhoda - desno
16. B kanal zvočniškega izhoda - desno
18. Napajalni kabel
Navodila za uporabo
Pred priklopom sistema,
prosim, da vse povežete
pravilno po zgornji tabeli.
Prosimo, bodite posebej
pozorni na polariteto. Glasnost
nastavite na najmanjšo.
©Copyright LOTRONIC 2012
27
Obrnite stikalo za izbiro vhoda v pravilen položaj in moč aparata. Nekaj sekund
kasneje enota doseže normalne delovne pogoje. Nastavite glasnost po vašem okusu.
Če varovalka pregori, se obrnite na serviserja, da zamenjajte varovalko z novo, ki je
enaka originalu.
Če LED ne zasveti, ko je ojačevalnik vklopljen, to pomeni, da je napaka. Prosimo,
napravo takoj izklopite in rešite problem. Vklopite napajanje znova.
Uporabite funkcijo A / B za izbiro zvočnika moči glede na vašo povezavo zvočniških
kablov. Če je ojačevalnik priključen na dveh parov zvočnikov, A in B kanalov, izberite
A + B položaj kanala.
Opozorilo: Ne priključujte 2 para 4 omskih zvočnikov hkrati na A in B izhode
Ojačevalca.
Odpravljanje težav
Če ojačevalec ne deluje pravilno, preverite točke v spodnji tabeli. Če to ne reši
problema, se obrnite na prodajalca.
Problem
Ni zvoka
Popačenje
Zvok samo iz
enega kanala
Vzrok
Rešitev
• Slaba povezava zvočnikov
• Napačen priklop avdio
vhod vtičnice
• Slaba povezava
omrežnega kabla
• Glasnost na minimumu
• Izbira zvočnikov ni v
pravilnem položaju
• Glasnost je premočna
• Priključite varno
• Preverite vhodno avdio vtičnico
• Priključite napajalni kabel
pravilno
• Nastavite glasnost na primerno
raven
• Izberite pravilni izhod zvočnika
• Nepopolna povezava
zvočnikov
• Nepoploni vhod/izhod
priključki
• Levo/desno ravnovesje
izključeno na eni strani
©Copyright LOTRONIC 2012
•
Zmanjšajte glasnost na
sprejemljivo raven
• Priključite varno
• Priključite varno
• Prilagodite ravnovesje,
ustrezno
28
Tehnični podatki
Moč (RMS) ........................................................................ 2 x 140W @ 4 Ohms
.......................................................................................... 2 x 100W @ 8 Ohms
Popačenje ................................................................................ <2% (30-20kHz)
Frekvenčni Razpon ....................................................................... 30Hz – 20kHz
Razmerje Signal / Šum ...................................................... >77dB (A-weighted)
Rated input level/impedance................................................................. 500mV
Impendanca .......................................................................................... 4 Ohms
Poraba .................................................................................................... <140W
Napajanje ............................................................................. 230Vac ∼ 50/60Hz
Mere..................................................................................... 420 x 330 x 98mm
Teža .......................................................................................................... 3.9 kg
Opombe:
1. Zgornji podatki so le za referenco.
2. Zasnova in specifikacije se lahko spremenijo brez predhodnega obvestila
Dodatki:
1x Navodila za uporabo
1x 2-phono / 2-phono kabel (1.5m)
Električni izdelki se ne smejo odlagati v gospodinjske odpadke. Prosimo, da
jih pripeljete do reciklažnega centra. Vprašajte vaše lokalne oblasti ali
svojega prodajalca o načinu za začetek izvajanja.
Imported from China for:
LOTRONIC SA
Avenue Zénobe Gramme 1
B – 1480 SAINTES
©Copyright LOTRONIC 2012
29