1
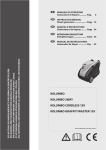
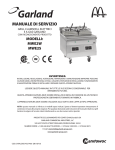
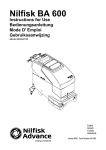
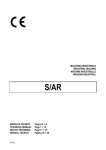
I
DEUMIDIFICATORI
UK
DEHUMIDIFIER
DE
ENTFEUCHTER
F
DESHUMIDIFICATEUR
SecoSteel 40
MANUALE D’USO E MANUTENZIONE
USE AND MAINTENACE MANUAL
BEDIENUNGSANLEITUNG
NOTICE D’UTILISATION ET D’ENTRETIEN
INFORMAZIONE AGLI UTENTI
Ai sensi dell’art. 13 del D. L. 25 luglio 2005, n. 151 “Attuazione Direttive 2002/95/CE, 2002/96/CE e 2003/108/CE,
relative alla riduzione dell’uso di sostanze pericolose nelle apparecchiature elettriche ed elettroniche, nonché allo
smaltimento dei rifiuti”.
Il simbolo del cassonetto barrato indica che il prodotto alla fine della propria vita deve essere raccolto separatamente dagli altri
rifiuti.
L’utente dovrà, pertanto, conferire l’apparecchiatura agli idonei centri di raccolta differenziata dei rifiuti elettronici ed
elettrotecnici, oppure riconsegnarla al rivenditore al momento di riacquisto.
Lo smaltimento abusivo del prodotto da parte dell’utente comporta l’applicazione delle sanzioni amministrative di cui al D.Lgs.
n. 22/1997” (art. 50 e seg. del D.Lgs. n. 22/1997).
INFORMATION FOR USERS
For the purpose and effect of Directives 2002/95/CE, 2002/96/CE and 2003/108/CE, relative to the reduction of the use
of hazardous substances in electrical and electronic appliances as well as the disposal of waste”.
The barred waste bin symbol indicates that the product must be collected separately from other waste at the end of its life. The
user must therefore take the appliance to approved collection points suitable for differential collection of electric and electronic
waste, or give it back to the dealer.
Abusive disposal of the waste by the user leads to the application of the administrative sanctions
INFORMATION AUX USAGERS
Conformément Directives 2002/95/CE, 2002/96/CE et 2003/108/CE, relatives à la réduction de l’utilisation de
substances dangereuses dans les équipements électriques et électroniques, ainsi que le traitement des déchets ».
Le symbole du conteneur barré indique que, à la fin de sa vie, le produit doit être collecté séparément des autres déchets.
L’usager devra donc, apporter l’équipement aux centres de collecte sélective des ordures électroniques et électrotechniques,
ou bien le rapporter au revendeur au moment de l’achat d’un nouvel équipement. L’écoulement abusif du produit de la part de
l’usager comporte l’application des sanctions administratives.
INFORMATIONEN FÜR DEN BENUTZER
Im Sinne des Art. 13 des Gesetzeserlasses 2002/95/EG, 2002/96/EG und 2003/108/EG unter Bezugnahme auf die
Verminderung der Verwendung von gefährlichen Stoffen in elektrischen und elektronischen Geräten sowie auf die
Abfallentsorgung”.
Das Symbol, welches einen durchgestrichenen Müllcontainer zeigt, bedeutet, dass das Produkt nach Verbrauch getrennt von
anderen Abfällen gesammelt werden muss. Der Benutzer hat die Geräte somit einer entsprechenden Sondermüllentsorgung
für elektrische und elektronische Geräte zuzuführen oder dem Händler bei neuerlichem Kauf zurückzugeben.
Die unsachgemäße Entsorgung des Produkts seitens des Benutzers hat eine Verwaltungsstrafe zufolge.
DATI TECNICI – TECHNICAL DATA
I
UK
Mod.
Alimentazione
Power supply
Potenza nom. media assorbita (a 20°C, 60% UR)
Rated Aver. Power Consumpt. (at 20°C, 60% RH)
Massima potenza assorbita (a 35°C, 95% U.R.)
Max Power Consumption (at 35°C,95%R.H)
Max. corrente assorbita (a 35°C, 95% U.R.) F.L.A.
Max. Absorbed Current (at 35°C, 95% R.H.) F.L.A
Corrente di spunto F.L.A.
Locked Rotor Current L.R.A.
Portata d’aria
Air Flow
Livello pressione sonora Lps (a 3m in campo libero)
Suond Pressure Level (at 3 mts in free field)
Refrigerante R407c
Refrigerant R407c
Controllo dello sbrinamento standard
Standard Defrosting Control System
Controllo dello sbrinamento a gas caldo (opzionale)
Hot gas defrosting control system (optional)
Capacità del contenitore della condensa
Capacity of Condensed Water Tank
Attacco sulla macchina per scarico condensa (maschio)
Cond. Water Draining Pipe Connection (male)
Campo di funzionamento temp. (versione standard)
Functioning Temp. Range (standard version)
Campo di funzionam. temp. (vers. con sbrinam. a gas caldo)
Functioning Temp. Range (hot gas defrost. version)
Campo di funzionamento umidità relativa
Functioning Relative Humidity Range
Capacità di condensazione nominale (30°C - 80 %)
Rated Condensation Capacity (at 30°C 80%)
Capacità di condensazione nominale (32°C-90 %)
Rated Condensation Capacity (at 32°C-90%)
Peso netto
Weight with empty tank
Dimensioni LxPxH cm
Dimensions LxDxH with pipe arms cm
Mod.
44
10°C 60%
8l/24h
230/1/50+T
530 W
780 W
4,6 A
18.0 A
400 cm/h
43 db (A)
640 g
elettronico
electronic
termost./elettron.
termost./electronic
9 kg
¾”
7-35 °C
0,5-35 °C
35 – 100 %
36 l/d
44 l/d
38 kg
350X370X710
UMIDITA’ CONDENSATA ALLE DIVERSE TEMPERATURE ED UMIDITA’ RELATIVE
CONDENSED WATER AT DIFFERENT AMBIENT TEMPERATU RE AND HUMIDITY CONDITIONS
10°c 80% 15°C 60% 15°C 80% 20°C 60% 20°C 80% 25°C 60% 25°C 80% 27°C 65% 27°C 80%
13l/24h
10l/24h
16l/24h
14l/24h
18l/24h
16l/24h
25l/24h
22l/24h
27l/24h
30°C 80% 32°C 90%
36l/24h
44l/24h
DE
TECHNISCHEN DATEN– DONNE?S TECHNIQUES
F
Mod.
Stormversorgung
Alimentation en électricité
Durchschnittlich aufgenommene Leistung bei einer Raumtemp. (von20°C,60%RF)
Puissance moyenne absorbeé (à 20°C,60%HR)
Max.aufgenommene leistung bei einer Raumtemp. (von 35°,95%RF)
Puissance maximale absorbeé (à 35à,95%HR)
Max. absorbierte Strom (35°C, 95% U.R.) F.L.A.
Courant a pieine charge (35°C, 95% R.H.) F.L.A
Storm beim Start
Courant de demurrage
Luftvolume
Débit d’air
Geräuschpegel (bei 3m Abstand im freiem Feld)
Niveau pression acoustique (à 3m en champ libre)
Kuelmittel R407c
Réfrigérant R407c
Entfroster (Standardausführung)
Dispositif de dègivrage stndard
Entfroster mit Heißgas (auf Anfrage)
Dispositif de degivragé
Kapazität des Kanisters
Capacité de la cuvette de rétention de l’eau
Verbiendung kondensiert wasser
Connection eau condensée
Arbeitende Temperaturspanne. (Standardführung)
Intervalle de temperature
Arbeitende Temperaturspanne (bei heissgas-entfroster)
Intervalle de temperature (avec gaz chaud)
Relative arbeitende Luftfeuchte Bereich
Intervalle U.R.
Kondensierte feuchtigkeit in 24 stunden (30°C - 80 %)
Humidité condensée (30°C 80%)
Kondensierte feuchtigkeit in 24 stunden (32°C - 90 %)
Humidité condensée (32°C 90%)
Leer Gewicht
Poids a’vide
Abmessungen LxPxH cm
Dimensions LxPxH cm
230/1/50+T
530 W
780 W
4,6 A
18.0 A
400 cm/h
43 db (A)
640 g
elettronico
electronic
termost./elettron.
termost./electronic
9 kg
¾”
7-35 °C
0,5-35 °C
35 – 100 %
36 l/d
44 l/d
38 kg
350X370X710
KONDENSIERTE FEUCHTIGKEIT IN 24 STUNDEN BEI UNTERSCHIEDLICHEN BEDINGUNGEN
HUMIDITé CONDENSéE EN 24h DANS LES DIFFERENTES CONDITIONS AMBIANTES
Mod.
44
10°C 60%
8l/24h
10°c 80%
13l/24h
15°C 60%
10l/24h
15°C 80%
16l/24h
20°C 60%
14l/24h
20°C 80%
18l/24h
25°C 60%
16l/24h
25°C 80%
25l/24h
27°C 65%
22l/24h
27°C 80%
27l/24h
30°C 80%
36l/24h
32°C 90%
44l/24h
IT
1
2
COMPRESSOR
MOTORFAN
COMPRESSORE
VENTILATORE
SCHEDA
ELETTRONICA
3
ELECTRONIC CARD
4
HUMIDISTAT
UMIDOSTATO
5
6
7
8
MICROSWITCH
ELECTRO VALVE
THERMOSTAT
HOUR COUNTER
BLUE
BROWN
RED
GREY
ORANGE
WHITE
PURPLE
BLACK
MICROINTERRUTORE
ELETTROVALVOLA
TERMOSTATO
CONTAORE
BLU
MARRONE
ROSSO
GRIGIO
ARANCIONE
BIANCO
VIOLA
NERO
4 LE3
1 ACN
6 LE1
2 F1
5 LE2
3 ACL
M1(ev)
M2(fan)
UK
DE
FR
KOMPRESSOR
VENTILATOR
COMPRESSEUR
VENTILATEUR
ZÜNDSTROMPLATINE
BOÎTE DE COMMANDE
RÉGULATEUR
D'HUMIDITÉ
MIKROSCHALTER
MICRORUPTEUR
MAGNETVENTIL
ÉLECTROVALVE
THERMOSTAT
THERMOSTAT
BETRIEBSTUNDENZÄHLER COMPTEUR HORAIRE
BLAU
BLEU
BRAUN
MARRON
ROT
ROUGE
GRAU
GRIS
ORANGE
ORANGÉ
WEIß
BLANC
VIOLETT
VIOLET
SCHWARZ
NOIR
HYGROSTAT
I
1. AVVERTENZE DI SICUREZZA
Il deumidificatore deve essere sempre collegato a prese di corrente provviste di collegamento di terra. L’inosservanza di tale
norma, come per tutti gli apparecchi elettrici, è causa di pericolo delle cui conseguenze il costruttore non si assume alcuna
responsabilità.
Lo smontaggio dell’apparecchio con l’uso di attrezzi deve essere effettuato esclusivamente da un tecnico qualificato.
Quando l’apparecchio è collegato ad una presa deve essere mantenuto in posizione verticale e non deve essere spostato
violentemente. Eventuali fuoriuscite di acqua dalla tanica o dalla vaschetta possono andare in contatto con parti elettriche con
ovvie conseguenze di pericolo. E’ pertanto indispensabile disinserire la spina prima di spostare il deumidificatore e vuotarne
la tanica prima di sollevarlo.
Nel caso si verifichi uno spandimento d’acqua in seguito a bruschi spostamenti, il deumidificatore deve restare fermo in
posizione verticale per almeno 8 ore prima di essere avviato.
Distanze da ostacoli. Questo deumidificatore aspira l’aria nella parte posteriore e la espelle attraverso la griglia anteriore;
pertanto il pannello posteriore, che porta il filtro dell’aria, deve essere mantenuto ad una distanza di almeno 15 centimetri da
pareti.
L’apparecchio non deve inoltre essere fatto funzionare in spazi angusti che non consentano la diffusione nell’ambiente
dell’aria che esce dalla griglia anteriore. E’ invece possibile accostare i pannelli laterali alle pareti senza creare difficoltà al
regolare funzionamento.
Questo deumidificatore è costruito rispettando le più severe norme di sicurezza. Non si devono peraltro inserire oggetti
appuntiti (cacciaviti, ferri da maglia o similari) nella griglia o nell’ apertura che resta scoperta nel pannello posteriore quando
si estrae il filtro: ciò è pericoloso per le persone e può danneggiare l’apparecchio.
Non lavare con acqua l’apparecchio. Per pulirlo si può utilizzare uno straccio umido dopo aver scollegato la spina dalla presa.
Non coprire la griglia frontale con panni o altri oggetti l’apparecchio si danneggia e può creare pericolo.
Pulire periodicamente il filtro: la pulizia deve essere effettuata mediamente ogni mese; nel caso di uso in ambienti molto
polverosi la pulizia deve essere più frequente. Per le modalità della pulizia vedere il capitolo relativo. Quando il filtro è sporco
l’aria esce più calda del normale danneggiando l’apparecchio e riducendone la resa.
2. NORME TECNICHE DI RIFERIMENTO
Questo deumidificatore soddisfa i requisiti essenziali contenuti nelle Direttive della Comunità Europea 2006/95/CE del 12 dicembre
2006 in materia di sicurezza dei prodotti elettrici da usare in Bassa Tensione; 2004/108/CE del 15 Dicembre 2004 in materia di
Compatibilità Elettromagnetica; 2006/42/CE del 17 maggio 2006 in materia di sicurezza delle macchine.
La conformità è dichiarata con riferimento alle seguenti norme tecniche armonizzate:
CEI-EN 60335-2-40, CEI-EN 55014-1, CEI-EN 55014-2.
Si dichiara inoltre che il prodotto è fabbricato in conformità alla Direttiva RoHS in vigore ovvero 2002/95/CE, recepita con il D.lgs 25
luglio 2005 n.151 (articolo 5).
3. DESCRIZIONE DELL’APPARECCHIO
Tutti i deumidificatori portatili utilizzano il ciclo frigorifero con compressore. Gli apparecchi sono descritti nel seguito.
FUNZIONAMENTO
Questo deumidificatore è un apparecchio a ciclo frigorifero il cui funzionamento si basa sul principio fisico per cui l’aria quando viene a
contatto di una superficie fredda la bagna cedendo umidità sotto forma di gocce di condensa, o di ghiaccio se la temperatura ambiente
non è elevata.
In pratica una macchina frigorifera mantiene freddo un serpentino attraverso il quale viene fatta passare l’aria che si raffredda e
deumidifica. Successivamente passando attraverso uno scambiatore di calore caldo l’aria si riscalda per tornare in ambiente
deumidificata ed a temperatura leggermente superiore a quella iniziale.
Fig. 1
Apparecchi con
arresto a galleggiante
Fig. 2
Apparecchi con
arresto a peso
Fig. 3
Apparecchi con
pompa di sollevamento condensa
Con riferimento al disegno (fig.1), l’aria viene aspirata dalla parte posteriore dell’apparecchio, attraversa nell’ordine il filtro -1- il
serpentino freddo di alluminio (evaporatore) -2-, lo scambiatore caldo (condensatore) -3-. Successivamente il ventilatore -4- espelle
l’aria attraverso la griglia frontale reimmettendola nell’ambiente. L’acqua condensata viene raccolta nella tanica -5-. Un
microinterruttore -6- arresta l’apparecchio quando il livello dell’acqua nella tanica raggiunge un opportuno livello provocando il
sollevamento del galleggiante. L’umidostato -7- consente il funzionamento del deumidificatore quando l’umidità in ambiente è più
elevata del livello desiderato. Una scheda elettronica -8- gestisce lo sbrinamento ed impedisce dannose partenze ravvicinate del
compressore -9- ritardandone l’avviamento. Alcuni modelli hanno un dispositivo di arresto che anziché il galleggiante usano un
dispositivo a peso (fig.2). la Fig. 3 si riferisce alla macchine con pompa di sollevamento condensa, la quale comprende un serbatoio di
raccolta condensa -5- ed un dispositivo a galleggiante di arresto della macchina per troppo pieno -6- nel caso la pompa non scarichi
correttamente.
Apparecchi dotati di dispositivo di sbrinamento a gas caldo.
I modelli con sbrinamento a gas caldo differiscono da quelli senza per la presenza dell’elettrovalvola, di una diversa scheda elettronica
(con doppio relè) e di un termostato di sbrinamento.
Il funzionamento del sistema di sbrinamento è esclusivo dei nostri prodotti: in pratica un sistema con un termostato ed un controllo
elettronico utilizza il by-pass del gas caldo solo quando e per il tempo in cui esso è strettamente necessario. Ciò allunga la vita della
macchina riducendo la fase di funzionamento a gas caldo.
4. PANNELLO DI CONTROLLO E COMANDI
Pannello di controllo
Il pannello di controllo è sempre ubicato nella parte superiore della macchina e comprende quattro
indicazioni luminose, il cui ordine può cambiare nei vari modelli.
POWER (SUPPLY): luce rossa che si accende quando la macchina è alimentata.
FULL (ALARM): luce verde che si accende quando il contenitore della condensa è pieno, o se la
pompa di sollevamento non è in grado di funzionare correttamente per cui il relativo serbatoio si
riempie; qualdo questa luce è accesa la macchina si arresta.
DEFROST (PAUSE):luce rossa che si accende quando il compressore è in pausa o per il ritardo al
primo avviamento o nella fase di defrost.
WORKING (RUNNING): luce rossa accesa quando il deumidostato richiede il funzionamento
dell’apparecchio.
Deumidostato
Può essere ubicato nella parte anteriore o posteriore della macchina. Porta una gradazione con una
scala che può andare da uno a cinque o da uno a sette. Il valore minimo corrisponde al 80%, il
massimo al 20%. Il valore intermedio (3 oppure 4) indica circa il 55%.
In posizione CONT la macchina funziona sempre indipendentemente
dal valore di umidità relativa; In posizione OFF la macchina non
parte mai (interruttore unipolare).
Contaore
Alcuni modelli sono dotati di contaore ubicato normalmente nella
parte posteriore dell’apparecchio. Esso indica direttamente il numero
di ore di funzionamento.
5. PRIMO AVVIAMENTO
Per poter essere messo in funzione l’apparecchio deve essere rimasto in posizione verticale corretta per almeno 8 ore. L’inosservanza
di questa norma può causare un danneggiamento irreparabile del compressore.
Trascorso il tempo appena citato, è possibile collegare la spina del deumidificatore ad una presa di corrente a 230 Volt monofase dotata
di cavo di terra. Si dovrà accendere almeno il voyant rosso “POWER” il quale indica che l’apparecchio è alimentato correttamente.
Qualora il voyant “WORKING” sia spento, ruotare in senso orario la manopola fino all’accensione del voyant suddetto. Si accenderà
anche il voyant “DEFROST (PAUSE)” e dopo circa 5 minuti l’apparecchio inizierà a deumidificare. Qualora sia accesa la luce verde
FULL (ALARM), la macchina non parte. Vuotare il contenitore della condensa o inserirlo meglio; nel caso delle macchine con pompa
verificare che questa funzioni (premendo l’apposito pulsante) e che il tubo di mandata sia libero.
E SE IL DEUMIDIFICATORE NON SI AVVIA OPPURE NON DEUMIDIFICA ?
Per prima cosa accertarsi che la luce rossa “POWER” sia accesa. Ciò indica che l’apparecchio è alimentato. In caso contrario verificare
che la spina sia correttamente inserita nella presa e che quest’ultima sia effettivamente alimentata eventualmente inserendo un altro
apparecchio. Se quanto sopra è verificato e la luce suddetta è spenta portare l’apparecchio al rivenditore dove lo avete acquistato.
Verificare che la luce verde “FULL (ALARM)” sia spenta. Se ciò non fosse controllare il corretto inserimento della tanica togliendola e
inserendola nuovamente fino a sentire lo scatto del microinterruttore. Ovviamente controllare che la tanica sia vuota.
Controllare che sia accesa la luce rossa “WORKING (RUNNING)” il che indica che l’umidostato richiede il funzionamento. Quando
l’apparecchio viene avviato dopo una sosta dovuta al raggiungimento dell’umidità prescelta o dopo che si è vuotata la tanica, se
l’umidostato richiede il funzionamento, oltre alle due luci rosse centrali si accende anche la luce rossa “DEFROST (PAUSE)”: In questa
situazione, che dura circa 5 minuti, funziona solo il ventilatore mentre il compressore rimane fermo. Questo ciclo si ripete ogni 45 minuti
circa per consentire l’eventuale sbrinamento del serpentino (evaporatore). Qualora la luce di pausa resti accesa per più di sei minuti
portare il deumidificatore presso il rivenditore.
Qualora l’apparecchio apparentemente funzioni correttamente (due luci rosse centrali accese) ma non produca acqua, o ne produca
molto poca, verificare che l’umidità relativa in ambiente non sia inferiore al 40-45 %. In caso contrario portare il deumidificatore al
rivenditore.
6. COLLEGAMENTO AD UNA TUBAZIONE DI SCARICO – POMPA DI SOLLEVAMENTO
CONDENSA (optional)
Questo deumidificatore prevede la possibilità di collegare
l’apparecchio direttamente ad una tubazione di scarico fissa.
In tal caso va rimossa la tanica per permettere il collegamento
del tubo al filetto.
Per il collegamento impiegare un tubo dotato di attacco
femmina da 3/4” ad una estremità.
Negli apparecchi a galleggiante se non si inserisce il
contenitore della condensa l’apparecchio non funziona. Alcuni
hanno un interruttore per consentire il funzionamento senza
contenitori, in altri va deformata la linguetta posta vicino al
galleggiante. Negli apparecchi con tanica anteriore, va inserito
un apposito raccordo, in dotazione, nella parte superiore destra
del vano tanica (v. fig. 1), ed utilizzato il gommino, in dotazione,
per bloccare la leva del micro-interruttore, posto nel vano tanica
in alto a sinistra, in avanti verso l’interno della macchina (fig.2).
Fig. 1
Fig.2
Apparecchi con pompa di sollevamento condensa.
Inserire il tubo di gomma di mandata dell’acqua in una tubazione di scarico.
Fare attenzione che il tubo di mandata non sia occluso o strozzato. La pompa
lavora automaticamente con un proprio controllo di livello. Qualora il
funzionamento non sia corretto (pompa difettosa o tubo strozzato), la pompa
ha un secondo controllo di livello di troppo pieno che da’ un allarme segnalato
nel pannello di controllo del deumidificatore con luce verde (FULL-ALARM) e
arresta la macchina. Il pulsante sulla pompa consente di vuotare la pompa
stessa.
Massima altezza di sollevamento: 3,5-4 metri.
7. MANUTENZIONE PERIODICA
Pulizia del filtro dell’aria
L’unica manutenzione da eseguire periodicamente è la pulizia del filtro che va eseguita con frequenza variabile a seconda della
polverosità dell’ambiente e della quantità di ore al giorno di effettivo funzionamento dell’apparecchio.
Orientativamente per un uso normale la pulizia è sufficiente una volta al mese. Per un impiego in ambienti polverosi si può rendere
necessaria una frequenza anche più che doppia.
La pulizia va effettuata ponendo il filtro sotto il getto d’acqua di un normale lavandino nel verso contrario rispetto al flusso dell’aria: il
pannello forato deve stare verso il basso in modo che l’acqua tenda a spingere il filtro verso il pannello stesso.
Dopo alcuni anni di funzionamento può essere necessaria una pulizia dello scambiatore di calore caldo (condensatrore) mediante aria
compressa. Va effettuata da personale qualificato. Questa pulizia migliora le prestazioni dell’apparecchio e ne assicura lunga vita.
Sono disponibili filtri di ricambio. Richiedeteli al rivenditore.
UK
1. SAFETY WARNINGS
This dehumidifier must be always connected using earthed electrical plugs as required for all electrical appliances; FRAL
Company declines any responsibility for any danger or damage whenever this norm is not complied with.
Any intervention on the machine using any instrument must be carried out only by a qualified technician.
When the machine is connected with a power socket, it must be in vertical position and any rough move must be avoided
because it could cause some water to come into contact with electrical parts; it is therefore recommended to remove the
plug from the socket before moving around the dehumidifier; if any water may have been spread on the machine, following
some rough handling of the same, then the dehumidifier must be turned off and can be started up again only after 8 hours.
Correct Distance: this dehumidifier draws in the air from the back and lets out through the front side grille: therefore the
back panel, which supports the air filter, must be kept at a minimum distance of 15 cm from the wall.
The dehumidifier, moreover, must not be set running in narrow areas, which do not allow a proper diffusion in the room of
the air coming out from the grille. It is, instead, allowed to set the machine sides near the walls.
This dehumidifier has been designed and manufactured in compliance with the strictest safety rules. Therefore,
pointed instruments (screw drivers, wool needles or similar ones) are not to be inserted in the grille or in the opening of
the back panel when it is opened to remove the filter.
The machine must not be cleaned using water. To clean the machine use a wet cloth. Remember to disconnect the plug
from the socket before.
The front panel should not be used to lay over it cloths or other things: it could cause damages or dangers.
The filter should be cleaned periodically (normally every month), but in dusty rooms it should be cleaned more often (see
chapter 7). Remember that when the filter is dirty, the air circulation and, consequently, the machine performance is
reduced.
2. PERTINENT TECHNICAL NORMS AND REGULATIONS
The dehumidifier has been designed and manufactured in conformity to all following European Norms and Regulations:
MACHINES NORMS (2006/42/CE - 17.05.2006) ;
SECURITY REGULATIONS FOR LOW TENSION APPLIANCES 2006/95/CE - 12.12.2006;
ELECTROMAGNETIC COMPATIBILITY (EMC) – 2004/108/CE – 15.12.2004.
It is hereby certified that this Dehumidifier conform to the:
IEC Regulations CEI-EN 60335-2-40, CEI-EN 55014-1, 55014-2.
The machine is built according to RoHS European Norms
3. DESCRIPTION OF THE MACHINE
FUNCTIONING
This dehumidifier is a refrigerating cycle dehumidifier: its functioning is based on a physical principle according to which the air,
coming into contact with a coovoyant surface, it wets the surface by covering it with humidity in the form of condensed drops, or ice
with low ambient temperature. What really happens is that a refrigerating machine maintains in a refrigerated state the coil through
which is conveyed the incoming air that, in this way, is coovoyant and dehumidified. Then the air, passing through a warm heatexchanger, heats up and returns in the room dehumidified and at a slightly higher temperature.
Fig. 1
Machines with water
tank floating ball stop
Fig. 2
Machines with water
tank gravity stop
Fig. 3
Machines with condensed
water lifting pump
With reference to the drawing (fig. 1), the air is drawn in through the back side of the dehumidifier, then it passes through the filter
(1), through the aluminium refrigerated coil or evaporator (2), again trough the heat- exchanger or condenser (3). Finally, the motor
fan (4) expels the air back into the room through the front grilvoyant panel: The condensed water is collected in the tank (5). A
micro-switch (6) stops the machine when the water in the tank reaches the correct level by raising the water float lever. The
humidistat (7) starts the functioning of the dehumidifier when the humidity his higher than the preset level. An electronic circuit (8)
controls the defrosting and prevents the compressor (9) repeated starts within too short a time by delaying each new start.
Some models have a different water tank stop device and use a gravity system ( fig. 2) instead of the floating ball.
Fig. 3 refers to the machine provided with lifting pump, which includes a water collection tank (5) and a floating ball stopping device
for full tank (6), in case the pump would not unload properly.
.
Machines provided with Hot Gas Defrosting System
The models with hot gas defrosting system have one by-pass solenoid valve and a special electronic card.
The functioning of Hot Gas Defrosting is an exclusive Fral system for the dehumidifiers: this system consists of a thermostat and one
electronic control, which use the hot gas by-pass system only when it is necessary and for the period of time required; this will
lengthen the life of the machine by reducing the hot gas functioning phases.
.
4. CONTROL AND DISPLAY PANEL
CONTROL PANEL
The Control Panel is always placed on the upper side of the machine and consists of 4 lights
indications:
POWER (Supply): red light which turns on when the electric power arrives at the machine;
FULL (ALARM): green light which turns on when the water tank is full, or when the lifting pump is not
working properly and then it fills up the water tank. When this light is on, the machines will stop
running.
DEFROST: red light which turns on when the compressor is in ‘pause or idle’ position for the
programmed delayed start off at first start up of the machine, or during the defrosting phases.
WORKING (RUNNING): red light on when the dehumidostat starts up automatically the functioning of
the machine.
DEHUMIDOSTAT
May be placed on the front or rear side of the machine.
It consists of a number scale ranging from 1 to 5 or from 1 to 7. The minimum value correspond to
80%, the highest value to 20%; the intermediate value (3-4) indicates that the humidity is at approx.
55%, a suggested good general value.
In the position “CONT”, the machine will keep running all the time, independelntly from the relative
humidity in the room.
In position “OFF”, the machine is not running and will never start running (one-pole switch)
HOUR COUNTER
Some models are equipped with an Hour Counter which is normally
located in the rear side of the machine: this will show the hours that the
machine has been working.
.
5.
FIRST STARTING OF MACHINE
Before starting the dehumidifier, make sure that the machine has been standing in vertical position for at-least 8 hours. If one fails to
observe this procedure, irreparable damage may be caused to the compressor. Then one can proceed and connect the dehumidifier
plug to a 230 V - one phase power socket.
The red light 'POWER' will switch on confirming correct supply of power to the machine. If the light 'WORKING' is still off, turn
clockwise the knob on the control panel till the light 'WORKING’ is ON. The light 'DEFROST (PAUSE) will also switch on and , after
about 5 minutes the dehumidifier will start dehumidifying.
When the red light is “ON” (ALARM), the machine wiil not start: one must check that the water tank be empty and, then, that be set in
correctly; with the machines provided with pump, check that the pump function be working and that the delivry pump may be clear.
AND IF THE DEHUMIDIFIER DOES NOT START OR DEHUMIDIFY ?
First make sure that the red light 'POWER' is 'ON': this means that the current is fed to the machine. If the power supply light is not
on, make sure that the connecting wire plug may be properly inserted into a main line socket in the room. After checking all this, if the
power light is still off, then call the dealers service.
Make sure that the green light 'FULL' be off; If this is not the case, check the correct position of the draining pipe (see point 4.)
Make sure that the red light 'RUNNING' be 'on'; this means that the Humidostat activates the functioning of the machine. When the
dehumidifier is set again to functioning, after an idle period due to the reaching of the preset humidity or after emptying the water
tank, if the Humidostat requires functioning of the machine, then beside the two red central lights, also the red light 'Pause' will light
up. During this 5 minutes long phase, only the motor fan is running whereas the compressor is off. This operating cycle take place
every 45 minutes to allow the defrosting of the cooler. When the red light 'Pause' will remain off for a period longer than 6 minutes,
the dehumidifier should be brought to Dealer's service centre.
When the machine appears to be working correctly ( the two central red lights are on), but it is not producing condensed water or
produces only very little condensed water, it should be checked whether the relative humidity in the room may be lower than
40.45%; if the relative humidity is higher than that, the machine should be controlvoyant by the dealer's service.
6. CONNECTION TO A DRAIN PIPE - LIFTING PUMP (optional)
This dehumidifier a
This dehumidifier can be connected directly with a fixed draining
pipe; in this case, the water tank must be removed to allow for the
connection of the pipe to the connection fitting.
For the connection, use one pipe provided with a ¾” female fitting
at one end.
In the machines with ball-cock, if the water tank is not fitted in,
the machine will not work.
Some have machines have a switch in order to allow the
functioning without water tanks, in other machines one must
modify the tongue-shaped device placed near the ball-cock.
In the machines with tank placed in the front, one special fitting,
which is supplied with the machine, must be placed on the right
upper side of the water tank room, and must be used also the
supplied rubber device to block the microswitch lever which is
located on the left upper side of the water tank towards the front
part.
Fig. 1
Fig.2
Machines with condensed water lifting pumps
This machine includes a condensed water lifting pump.
Put the rubber pipe of the pump supply in a waste pipe or similar. Pay attention
that the pipe be no choked up because of eventual narrow bends.
The pump will work automatically, controlvoyant by a ball cock placed inside the
pump.
Before moving the machine, push the button placed on the pump to empty the
tank of the pump.
If the pump cannot work correctly, the compressor stops and the green light
turns on. In this case, check the pipe situation. Maximum head working
pressure of the pump is about 3.5-4 meters.
7. PERIODICAL MAINTENANCE
AIR FILTER CLEANING
The only required periodical maintenance is the cleaning of the filter once every month, or more often if the enviroment is very
dusty or the dehumidifier is working for many hours every day.
The cleaning must be done by placing the filter under a water jet with the drilvoyant panel facing the floor so that the water jet may
push the filter towards the drilvoyant panel.
After a few years running, may be necessari to make a cleaning of the warm heat exchanger (condenser) by using compressed air.
This operation must be done by a specialized technician. This cleaning will improve the performaces and the long life of the machine.
Note: You can require spare filters from your dealer's service.
DE
1. SICHERHEITSHINWEISE
Die Luftentfeuchter müssen immer an Schutzkontakt-Steckdosen angesteckt werden. Die Nichtberücksichtigung dieser
Vorschrift, die ja alle elektrischen Geräte betrifft, ist gefährlich und schließt jegliche Verantwortung der fabrikant aus.
Die Demontage mit Werkzeugen muß ausschfließlich durch qualifiziertes Personal erfolgen.
Wenn das Gerät angesteckt ist, muß es in vertikaler Position gehalten werden und nicht mit Gewalt verschoben werden.
Eventuelles, aus dem Kanister oder Behälter geflossenes Wasser, könnte mit elektrischen Teilen in Berührung kommen und
somit gefährlich werden. Man muß also den Stecker herausnehmen, bevor man das Gerät verschiebt und den Kanister
entleeren, bevor man es aufhebt. Sollte beim Verschieben Wasser verschüttet werden, muß der Luftentfeuchter 8 Stunden in
vertikaler Position gehalten werden, bevor er wieder in Betrieb genommen werden kann.
Sicherheitsabstände. Die Geräte saugt die Luft von hinten auf und läßt sie vorne, durch das Gitter heraus; es muß also der
hintere Deckel, der den Luftfilter enthält, mindestens 15 cm von der Wand entfernt gehalten werden.
Das Gerät darf nicht in engen Räumen betätigt werden, wo das Zirkulieren der Luft, die vorne herausströmt, nicht
gewährleistet wird. Das Gerät kann aber seitlich neben Wänden gestellt werden, ohne seine Funktion zu beeinträchtigen.
Die Luftentfechter wurden unter Berücksichtigung der strengsten Sicherheitsnormen hergestellt. Man darf außerdem nicht
spitze Gegenstände (Schraubenzieher, Stricknadeln usw.)durch das Gitter oder in die Öffnung, die am hinteren Deckel
freibleibt, wenn man den Filter entfernt, stecken: das ist für die Personen gefährlich und kann außerdem das Gerät
schädigen.
Das Gerät nicht mit Wasser reinigen. Zum Reinigen benützt man ein feuchtes Tuch, nachdem man den Stecker
herausgenommen hat.
Das Front-Gitter darf mit nichts zugedeckt werden, das schädigt das Gerät und könnte gefährlich werden.
Den Filter regelmäßig reinigen: die Reinigung erfolgt durchschnittlich einmal im Monat; sollte das Gerät in sehr staubigen
Räumen betätigt werden, muß die Reinigung öfters erfolgen. Im Kapitel 7 ist die Reinigung näher beschrieben. Wenn der
Filter schmutzig ist, kommt wärmere Luft heraus als unter normalen Bedingungen, das Gerät kann beschädigt und die
Leistung beeinträchtigt werden.
2. TECHNISCHE NORMEN
Dieser Luftentfeuchter wurde gemäß den folgenden Gesetzen und Vorschriften hergestellt:
MASCHINEN NORM (2006/42/CE - 17.05.2006) ;
SICHERHEITSREGULARIEN FÜR NIEDERSPANNUNGSGERÄTE 2006/95/CE - 12.12.2006;
ELEKTROMAGNETISCHE KOMPATIBILITÄT (EMC) – 2004/108/CE – 15.12.2004.
Es wird bestätigt, dass dieser Luftentfeuchter den nachstehenden Regularien entspricht:
IEC Regularie CEI-EN 60335-2-40, CEI-EN 55014-1, 55014-2.
Die Maschine wurde in Übereinstimmung zu den RoHS Europäischen Normen hergestellt.
3. BESCHREIBUNG DES GERÄTES
FUNKTIONIEREN
Die Geräte sind Luftentfeuchter mit Kühl-Zyklus, dessen Betrieb ein physisches Prinzip zur Grundlage hat; wenn also die Luft mit
einer kalten Oberfläche in Berührung kommt, macht sie diese naß und es entsteht Feuchtigkeit in Form von Kondenswassertröpfchen.
Praktisch wird durch eine Kühlmaschine eine Serpentine kalt erhalten, durch die dann die Luft geht und sich somit abkühlt und
entfeuchtet. Daraufhin, wird die Luft durch Durchfließen eines Warm-Wärmeaustauschers wieder warm um dann wieder entfeuchtet,
etwas wärmer als anfänglich, in die Umwelt zu gelangen oder aus Eis, wenn die Umgebungstemperatur nicht hoch ist.
Fig. 1
Geräte mit Schwimmer
als Stoppvorrichtung
Fig. 2
Geräte mit Gewichten
als Stoppvorrichtung
Fig. 3
Geräte mt
Kondensatpumpe
Bezugnehmend auf die Zeichnung 8 (fig.1), wird die Luft am Gerät hinten aufgesogen, durchläuft dann der Reihe nach, den Filter -1die kalte Alu-Serpentine (Evaporator) -2-, den Warm-Wärmeaustauscher (Kondensator) -3-. Daraufhin wird die Luft vom Ventilator 4- durch das Gitter vorne rausgeblasen und gelangt somit wieder in den Raum. Das Kondenswasser wird im Kanister -5- gesammelt.
Ein Mikro-Schalter -6- schaltet das Gerät aus, wenn das Wasser im Kanister einen gewissen Stand erreicht und somit den Schwmmer
hebt. Der Feuchtigkeitsmesser –7- erlaubt das Funktionieren des Luftentfeuchters, wenn die Luftfeuchtigkeit im Raum die
gewünschte Grenze überschreitet. Eine elektronische Karte –8- gewährleistet das Abtauen und verhindert das zu ofte und somit
schadhafte Einschalten des Kompressors –9-. Einige Modelle sind mit einer Stoppvorrichtung ausgestattet, die statt eines Schwimmers
eine Vorrichtung mit Gewichten benutzen (Abb. 2). Abb. 3 bezieht sich auf Maschinen mit einer Kondensatpumpe, die mit einem
Kondensatbehälter -5- und einer Schwimmervorrichtung zum Stoppen der Maschine bei Überlauf -6-, falls die Pumpe nicht korrekt
ableitet, ausgestattet ist.
Geräte mit Heißgasabtauung.
Die Funktionsweise des Abtausystems ist exklusiv für unsere Produkte: Es handelt sich um ein System mit Thermostat und
elektronischer Kontrolle, das den Heißgasbypass nur benutzt, wenn und so lange dies wirklich notwendig ist. Dies verlängert die
Lebensdauer der Maschine und reduziert die Betriebsphasen mit Heißgas
4. FUNKTIONSKONTROLLE UND BEDIENUNGSTABLEAU
Das Bediennungstableau
Das Bedienungstableau befindet sich immer im oberen Teil der Maschine und besteht aus 4
Kontrollleuchten, deren Anordnung je nach Modell variieren kann.
POWER (SUPPLY): ein rotes Licht, das erleuchtet, wenn die Maschine angeschlossen ist.
FULL (ALARM): ein grünes Licht, das erleuchtet, wenn der Kondensatbehälter voll ist, oder wenn die
Pumpe nicht korrekt funktioniert und sich deshalb der Behälter füllt; wenn diese Kontrollleuchte
angeht, kommt es zum Maschinenstopp.
DEFROST (PAUSE):ein rotes Licht, das erleuchtet, wenn der Kompressor in Warteposition ist,
entweder weil der Erststart mit Verspätung erfolgt oder weil die Abtauphase eingeleitet ist.
WORKING (RUNNING): ein rotes Licht, das erleuchtet, wenn der Kondenstrockner den
Gerätebetrieb erfordert.
Kondenstrockner
Er kann sich am vorderen oder am hinteren Teil der Maschine befinden. Er verfügt über eine
Abstufungsskala, die von eins bis fünf oder von eins bis sieben reichen kann. Der Minimalwert
entspricht 80%, der Maximalwert 20%. Der Mittelwert (3 oder 4) zeigt ungefähr 55% an.
Auf der Position CONT ist die Maschine immer in Betrieb, unabhängig
vom entsprechenden Feuchtigkeitswert. Auf der Position OFF startet die
Maschine nie (einpoliger Schalter).
Zähler
Einige Modelle sind mit einem Zähler ausgestattet, der sich
normalerweise am hinteren Teil des Geräts befindet. Er zeigt direkt die
Betriebsstunden an.
5. ERSTMALIGES EINSCHALTEN
Um eingeschalten werden zu können, muß das Gerät für mindestens 8 Stenden in korrekter, gerader Position gestanden haben. Die
Nichtbeachtung dieser Regel könnte den Kompressor für immer schädigen.
Nach Ablauf dieser Wartezeit, kann das Gerät an eine 230 Volt – Einphasen-Steckdose angeschlossen werden. Es muß jetzt die rote
Kontrolleuchte für “Spannnung” einschalten, die uns angibt, daß das Gerät richtig versorgt wird. Sollte die Kontrolleuchte für “Betrieb”
ausgeschaltet sein, dreht man , den sich im Schaltfeld befindlichen Drehknopf, im Uhrzeigersinn, bis die Leuchte einschaltet. Auch die
Leuchte für “Pause” schaltet ein, und nach ungefähr fünf Minuten beginnt der entfeuchter zu entfeuchten.
Sollte die grüne Kontrollleuchte (FULL ALARM) eingeschaltet sein, startet die Maschine nicht. Entleeren Sie den Kondensatbehälter
oder befestigen Sie ihn besser; bei Maschinen mit Pumpe überprüfen Sie, dass diese funktioniert (drücken Sie dazu den
entsprechenden Knopf), und dass das Ansaugrohr frei ist.
WAS TUN WENN DER ENTFEUCTHER NICHT EINSCHALTET ODER NICHT ENTFEUCHTET ?
Zuerst sollte man sich vergewissern, daß die rote Kontrollleuchte “POWER” eingeschaltet ist. Das gibt uns an, daß das Gerät mit
Strom versorgt ist, andernfalls kontrolliert man, ob der Stecker richtig angesteckt ist und ob die Steckdose auch wirklich mit Strom
versorgt ist ; eventuell durch Anstecken eines anderen Geräts prüfen. Hat man dies alles nachgeprüft, und bleibt die oben genannte
Leuchte trotzdem ausgeschaltet, wendet man sich an den Verkäufer, der uns das Gerät verkauft hat.
Sich vergewissern, daß die grüne Kontrolleuchte “FULL (ALARM)” aus ist. Ist das nicht der Fall, kontrolliert man, ob der Kanister
richtig festsitzt, eventuell herausnehmen und wieder einsetzen bis man das Klicken des Mikro-Schalters wahrnimmt. Natürlich muß
man dabei beachten, daß der Kanister leer ist.
Kontrollieren, ob die rote Kontrolleuchte “WORKING” eingeschaltet ist, was bedeutet, daß durch den Feuchtigkeitsmesser die
Inbetriebnahme gefordert wird. Schaltet das Gerät nach einer Pause, sei es weil die gewünschte Luftfeuchtigkeit erreicht wurde oder
weil man den Kanister entleert hat, wieder ein weil vom Feuchtigkeitsmesser danach verlangt wird, leuchtet außer den zentralen roten
Lichtern auch das rote Licht für “DEFROST (PAUSE)” auf: in dieser Situation, die ungefähr 5 Minuten dauert, funktioniert nur der
Ventilator, wobei der Kompressor stillsteht. Dieser Zyklus wiederholt sich etwa alle 45 Minuten, um eventuell das Abtauen der
Serpentine (Evaporator) zu ermöglichen. Sollte das Licht “DEFROST (PAUSE)” für mehr als 5 Minuten eingeschaltet bleiben,
wendet man sich an den Verkäufer.
Sollte das Gerät funktionieren (die zwei mittleren roten Lichter sind eingeschaltet) aber kein Wasser oder nur spärliches Wasser
abgeben, kontrolliere man, ob die relative Raumluftfeuchtigkeit weniger als 40-45% betrage. Andernfalls wende man sich an den
Verkäufer.
6. ANSCHLUSS AN EINE ABFLUSSLEITUNG – KONDENSATPUMPE (optional)
Die Luftentfeuchter Mod. FD können direkt an ein fixes
Abflußrohr angeschlossen werden.
Indiesem Fall entfernt man den Kanister, um den Schlauch
anschliessen zu können. Für den Anschluß benützt man
möglichst einen Silikon-Schlauch mit einer Muffe von 3/4”.
Unten am Gerät befindet sich das Loch für den Ausgang des
Abflußschlauchs.
In Geräten mit Schwimmer funktioniert das Gerät nicht, wenn
kein Kondensatbehälter installiert wird. Einige haben einen
Schalter, um den Betrieb ohne Behälter zu ermöglichen, bei
anderen Geräten muss die Zunge neben dem Schwimmer
verbogen werden. Bei Geräten mit Vordertank wird ein
passendes Anschlussstück, das im Zubehör enthalten ist, oben
rechts im Tankbehälter eingeführt (siehe Abb. 1), und der kleine
Gummi (ebenfalls im Zubehör enthalten) benutzt, um den Hebel
des Mikro-Schalters, der sich im Tankbehälter oben links
befindet, nach vorne, zum Innern der Maschine hin (Abb. 2), zu
blockieren.
Fig. 1
Fig.2
Geräte mit Kondensatpumpe.
Führen Sie das Wasseransaugrohr aus Gummi in eine Abflussleitung ein.
Achten Sie darauf, dass das Ansaugrohr nicht verstopft oder verengt ist. Die
Pumpe arbeitet automatisch, mit einer eigenen Niveaukontrolle. Bei nicht
einwandfreiem Betrieb (defekte Pumpe oder verengtes Rohr), verfügt die
Pumpe über eine zweite Niveaukontrolle für den Überlauf, die ein Alarmsignal
mit grünem Licht im Bedienungstableau des Entfeuchters auslöst (FULLALARM) und die Maschine stoppt. Der Knopf auf der Pumpe ermöglicht es,
die Pumpe selbst zu entleeren.
Maximale Hebehöhe: 3,5-4 Meter..
7. PERIODISCHE WARTUNG
REINIGUNG DES FILTERS
Die einzige periodisch auszuführende Wartung besteht in der Reinigung des Filters. Unter normalen Bedingungen ist die Reinigung
ungefähr einmal im Monat auszuführen.
In staubigen Räumen ist es manchmal sogar nötig zweimal oder auch mehrmals den Filter zu reinigen. Für die Reinigung wird der
Filter unter fließendem Wasser gehalten und zwar dem Luftstrom gegenüber umgekehrt: der löchrige Teil muß unten sein, damit das
Wasser den Filter gegen denselben stoßen kann.
Nach einigen Betriebsjahren kann sich die Reinigung des Wärmetauschers (Kondensator) mit Pressluft, als notwendig erweisen. Diese
muss von qualifiziertem Personal durchgeführt werden. Die Reinigung verbessert die Leistung des Geräts und garantiert seine lange
Lebensdauer
Diese Filter können bei fabrikant als Ersatzteile durch den Verkäufer nachgefragt werden.
F
1. NOTICES DE SECURITE
L’appareil doit toujours être branché à une prise de courant équipée dune prise de terre. La non observation de cette norme,
valable pour tous les appareils électriques, peut causer des dangers dont le constructeur n’assume aucune responsabilité.
Exclusivement par un technicien compétent.
Lorsque l’appareil est branché à une prise il doit être maintenu en position verticale et ne doit pas être déplacé violemment.
Des écoulements d’eau éventuels du réservoir ou du bac peuvent créer des contacts avec des parties électriques avec des
conséquences évidentes de danger. Il est donc indispensable de débrancher la fiche avant de déplacer l’appareil et de
vidanger le réservoir avant de le soulever.
Dans le cas d’un débordement d’eau à la suite de brusques déplacements, le déshumidificateur doit rester ferme en position
verticale au moins 8 heures avant de le mettre en marche.
Distances d’obstacles. Le déshumidificateur aspire l’air par l’arrière et la renvoie par la grille antérieure; donc le tableau
arrière, qui porte le filtre de l’air, doit être maintenu à une distance d’au moins 15 centimètres des parois.
L’appareil ne doit pas être mis en marche dans des endroits étroits qui ne permettent pas la diffusion dans l’atmosphère de
l’air qui sort de la grille antérieure. Par contre il est possible d’encastrer les panneaux latéraux contre les parois latérales
sans créer des difficultés au fonctionnement régulier.
Le déshumidificateur est réalisé en respectant les normes de sécurité les plus sévères. On ne doit pas placer d’objets
pointus (tournevis, aiguilles à tricoter ou similaires) dans la grille ou dans l’ouverture qui reste découverte dans le
Tableau arrière lorsqu’on enlève le filtre): cela est dangereux pour les personnes et peut endommager l’appareil.
Ne pas laver l’appareil avec de l’eau. Pour nettoyer Le déshumidificateur utiliser un chiffon humide après avoir débranché la
fiche de la prise.
Ne pas couvrir la grille antérieure avec des tissus ou d’autres objets car l’appareil peut s’endommager et créer des dangers.
Nettoyer périodiquement le filtre. Son nettoyage doit être effectué chaque mois en moyenne. Si l’appareil est utilisé dans des
endroits poussiéreux le nettoyage doit se faire plus fréquemment. Pour les modalités de nettoyage voir chapitre 7. Lorsque
le filtre est sale l’air qui sort est plus chaud que normalement endommageant l’appareil et réduisant son débit.
2. NORMES
TECHNIQUES DE REFERENCE
Ce déshumidificateur a été construit suivant les lois et les normes Européen 2006/95/CE du 12 décembre 2006
sur la sécurité électrique pour les appareillages à basse tension ; 2004/108/CE du 15 décembre 2004 relative
à la comptabilité électromagnétique ; 2006/42/CE du 17 mai 2006 sur la sécurité des machines.
L’appareil est conforme aux normes: CEI-EN 60335-2-40, CEI-EN 55014-1, 55014-2.
L’appareil est également conforme à la directive RoHS.
3. DESCRIPTION DE L’APPAREIL
FONCTIONNEMENT
L’appareil est un déshumidificateur à cycle frigorifique dont le fonctionnement se base sur le principe physique pour lequel l’air au
contact d’une surface froide crée une condensation en cédant de l’humidité sous forme de gouttes de vapeur.
Fig. 1
Appareils avec
flotteur d’arrêt
Fig. 2
Appareils avec
dispositif d’arrêt au poids
Fig. 3
Appareils avec
pompe de relevage de condensats
Pratiquement une machine réfrigérante maintient un serpentin froid à travers lequel on fait passer de l’air qui se refroidit et se
déshumidifie. Successivement l’air en passant à travers un échangeur de chaleur chaud, se réchauffe pour retourner dans l’ambiance
déshumidifiée à une température légèrement plus que celle initiale.
Avec référence au schéma (fig.1), l’air vient aspiré par l’arrière de l’appareil, traverse dans l’ordre le filtre -1- le serpentin froid
d’aluminium (évaporateur) –2-, l’échangeur chaud (condensateur) -3-. Successivement le ventilateur –4- expulse l’air à travers la
grille antérieure en l’introduisant dans l’atmosphère. L’eau condensée est récoltée dans le réservoir -5. Un microinterrupteur –6arrête l’appareil quand le niveau de l’eau du réservoir atteint un niveau pré-fixé provoquant le soulèvement du flotteur. L’humidistat –7consent le fonctionnement du déshumidificateur lorsque l’humidité dans l’atmosphère est élevée que le niveau souhaité. Une fiche
électronique -8- exploite le dégivrage et empêche des mauvais départs rapprochés du compresseur -9- en retardant sa mise en
fonctionnement.
Appareils munis de dispositifs de dégivrage à gaz chaud.
Le fonctionnement du système de dégivrage est une exclusivité de nos produits: un système avec thermostat et contrôle électronique
fonctionnant avec régulation du gaz chaud grâce à un by-pass qui se met en route quand cela est nécessaire et pour la durée
nécessaire. En réduisant la phase de fonctionnement à gaz chaud, la machine dure plus longtemps.
4. TABLEAU DE CONTRÔLE ET DE COMMANDE
Le tableau de commande
Le tableau de commande est toujours installé sur la partie supérieure de la machine et comprend
quatre témoins lumineux, dont l’ordre peut varier selon les modèles.
POWER (SUPPLY): lumière rouge qui s’allume quand la machine est alimentée.
FULL (ALARM): lumière verte qui s’allume quand le bac de condensats est plein, ou quand la
pompe de relevage ne fonctionne pas correctement et par conséquent son réservoir se remplit;
quand cette lumière est allumée, la machine s’arrête.
DEFROST (PAUSE): lumière rouge qui s’allume quand le compresseur est en pause ou pour un
retard lors du premier démarrage ou lors de la phase de dégivrage.
WORKING (RUNNING): lumière rouge allumée quand l’hygrostat réclame le fonctionnement de
l’appareil.
Hygrostat
Il peut se trouver sur la partie avant ou arrière de la machine. Il est composé d’une échelle de
graduation de un à cinq ou de un à sept. La valeur maximum correspond à 80%, la minimum à 20%.
La valeur intermédiaire (3 ou 4) indique environ 55%.
En position CONT la machine fonctionne toujours indépendamment de
la valeur d’humidité relative; en position OFF la machine ne démarre
jamais (interrupteur unipolaire).
Compteur
Certains modèles sont équipés d’un compteur qui se trouve
généralement à l’arrière de l’appareil. Celui-ci indique directement le
nombre d’heures de fonctionnement
5. PREMIERE MISE EN SERVICE
PREMIERE MISE EN ROUTE
Pour pouvoir mettre en fonction l’appareil, il doit rester en position verticale correcte pour 8 heures au moins. La non obervance de
cette règle peut causer un dommage irréparable du compresseur. Après 2 heures, il est possible de brancher la fiche du
déshumidificateur à une prise de courant à 220 Volts monophasé. Le voyant rouge de “power” (tension) doit s’allumer indiquant que
l’appareil est correctement alimenté. Si le voyant de “running” (fonctionnement) reste éteint, tourner dans le sens des aiguilles d’une
montre la poignée placée sur le tableau des commandes sous les voyants, jusqu’à ce voyant de fonctionnement s’allume. Le voyant
“pause” s’allumera en même temps et après environ 5 minutes l’appareil commence à déshumidifier.
SI L’APPAREIL NE DEMARRE PAS OU S’IL NE DESHUMIDIFIE PAS?
Avant tout s’assurer que la lumière rouge “POWER” (tension) soit allumée. Cela signifie que l’appareil est alimenté. Dans le cas
contraire vérifier que la fiche soit correctement branchée dans la prise et que celle ci soit effectivement alimentée /essayer avec un
autre appareil). Après ces contrôles et si la lumière rouge ne s’allume pas, retourner l’appareil au détaillant ou vous l’avez acheté.
Vérifier que la lumière verte “FULL” (pleine) soit éteinte. Dans le cas contraire contrôler que le réservoir soit bien placé, en le levant
et en le remplaçant de nouveau jusqu’à entendre le déclenchement du micro-intérrupteur. Contrôler que le réservoir soit vide et que
le levier du flotteur soit correctement placé dans son logement.
Contrôler que la lumière rouge de “WORKING” (fonctionnement) soit allumée: cela indique que l’humidistat demande de
fonctionner. Lorsque l’appareil a démarré, après un arrêt dû au fait d’avoir rejoint l’humidité choisie ou après avoir vidangé le
réservoir d’eau, di l’humidistat demande de fonctionner, en plus des deux lumières rouges centrales, la lumière “PAUSE” s’allume.
Dans cette situation, d’une durée d’environ 5 minutes, seul le ventilateur fonctionne alors que le compresseur est arrêté. Ce cycle
se reproduit chaque 45 minutes environ pour consentir le dégivrage.
6. RACCORD À UN TUYAU D’ÉVACUATION - POMPE DE RELEVAGE CONDENSATS (en option)
6.
Si on n’insère pas de bac de récupération des condensats dans
des appareils avec flotteur, ceux-ci ne fonctionnent pas.
Certains appareils ont un interrupteur pour permettre un
fonctionnement sans bacs, d’autres ont une languette qui se
trouve près du flotteur qui se déforme. Dans les appareils avec
bac à l’avant, un raccord est fourni et doit être inséré sur la
partie supérieure droite du compartiment du bac (v. fig. 1), et le
bouchon, livré avec, sert à bloquer le levier du microinterrupteur qui se trouve dans le compartiment du bac en haut
à gauche, en avant vers l’intérieur de la machine (fig.2).
Fig. 1
Fig.2
Appareils avec pompe de relevage condensats.
Insérer le tuyau de refoulement en caoutchouc dans un tuyau d’évacuation.
Faire attention que le tuyau de refoulement ne soit pas obstrué ou étranglé. La
pompe travaille automatiquement avec son propre contrôle des niveaux. Au
cas où le fonctionnement ne soit pas correct, (pompe défectueuse ou tuyau
étranglé), la pompe est dotée d’un deuxième contrôle des niveaux indiquant un
trop-plein avec une alarme signalée sur le tableau de commande du
déshumidificateur par une lumière verte (FULL-ALARM) et qui arrête la
machine. Le bouton sur la pompe permet de la vider.
Hauteur de relevage maximum: 3,5-4 mètres.
7. ENTRETIEN PERIODIQUE
NETTOYAGE DU FILTRE
Le seul entretien à effectuer périodiquement est le nettoyage du filtre qui doit être fait avec une fréquence variable selon la poussière
dans l’atmosphère et selon le nombre d’heures de fonctionnement effectif de l’appareil par jour.
A titre indicatif pour une utilisation normale il est suffisant de nettoyer l’appareil une fois par mois.
Pour une utilisation plus lourde une fréquence de nettoyage double pourrait se rendre nécessaire.
Le nettoyage doit être effectué en plaçant le filtre sous un jet d’eau dans le sens contraire par rapport au flux d’air: le tableau percé
doit rester en bas afin que l’eau pousse le filtre vers le tableau.
Après plusieurs années de fonctionnement un nettoyage de l’échangeur de chaleur (condensateur) peut être nécessaire avec de l’air
comprimé par du personnel qualifié. Ce nettoyage améliore les prestations de l’appareil et sa durée de vie.
Demander de filtres de rechanges au revendeur.