1
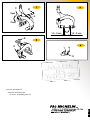
PERFORMANCE BRAKES
Thank you for purchasing Performance brakes, a product that offers both safety and functionality over time.
Before proceeding with using the brakes, please read carefully the
following instruction and store them in a safe place for eventually
reusing.
Fac Michelin S.p.A. reserves to modify the content of this manual
without notice. The update version will always be available www.
miche.it.
On our website you will also find information on the other MICHE
and SUPERTYPE products.
TOOLS
increase the cable tension and tighten the cable clamp screw back
down (D) (Pic. 2) with a torque of 5 Nm.
Check that the cable is firmly fixed in place, without damaging it,
so that it does not work loose when the brakes are used, as if it is
loose or damaged it could mean the brakes would no longer work
and cause accidents and serious or mortal injuries.
• On Performance brakes that have traditional brake pads, i.e. without orbital adjustment, regulate the brake pads so that they are
centred in height with respect to the braking surface of the rims.
Screwing the pads with a 5 mm Allen screw (H) (Pic. 4), with a
torque up to 8 Nm. Pay special attention that the direction of the
grooves in the brake pad is opposite to the rotation direction of
the wheels.
Check that the fixing screws are firmly tightened, as if they work
loose they could cause serious and even mortal accidents.
(Picture pag.8)
Performance set of brakes can be mounted onto the frame, regulated and maintained with the following spanners (not included in
the pack):
• 2-5 mm Allen spanner
• Torque wrench
CHANGING THE BRAKE PADS
a) Always change both brake pads together.
b) Remove the brake pad screws (H) (Pic. 4) from the right and left
brake pads using a 5 mm Allen spanner.
c) Screw down the replacement brake pad with a 5 mm Allen
spanner, paying special attention that the direction of the grooves
on the brake pad are in the opposite direction to the rotation of
the wheels.
Check that the fixing screws are firmly fixed, because if they work
loose the brake pad could fall out and cause serious and even
mortal accidents.
WARNING!
If you have any doubt whatsoever regarding your servicerepair ability, please take your bicycle to a qualified repair
shop.
Before any maintenance operations on your brakes, always
wear gloves and protection glasses.
INSTALLING THE BRAKE
• Before positioning the brake, check that the brake pads are suitable for the rim
MAINTAINING THE BRAKES
• Fit the brake onto the frame or fork, and tighten the Allen nut (B)
(Pic. 1) using a 5 mm spanner, and then manually centre the brake
with respect to the wheel. Once the brake is centred, close the
release lever (C) (Pic. 1).
During installation, always check that the centre screw on the brake enters the threaded bushing by at least 6-7 threads. Less screwed threads could cause the centre screw to break when the bike
is being used and therefore cause the brake to detach from the
frame and cause accidents and serious or even mortal injuries.
• Periodically check the brake pads for signs of wear, and replace
them when the braking surface is near to the end of the grooves or
when their braking power is not sufficient.
• Periodically check that brake pads are 1.5-2 mm from the surface of the rim. If they are not, regulate the distance by turning the
regulation screw on the cable tension (E) (Pic. 2). If that is not sufficient, loosen the cable clamp screw (D) (Pic. 2), increase the cable
tension and tighten the cable clamp screw back down (D) (Pic. 2).
Check that the cable is firmly fixed in place with an Allen spanner
with a torque of 5 Nm, without damaging it, so that it does not
work loose when the brakes are used, as if it is loose or damaged it
could mean the brakes would no longer work and cause accidents
and serious or mortal injuries.
• Fix the cable by tightening the cable clamp screw (D) (Pic. 2)
with a torque of 5 Nm using a 5 mm Allen spanner. If there is too
much space between the pad and rim on both sides, regulate it by
turning the regulation screw for cable tension (E) (Pic. 2).
Check the cable is correctly fixed in place, as if it is loose or damaged it could mean the brakes would no longer work and cause
accidents and serious or mortal injuries.
• The brakes are fitted with a regulation screw (A) (Pic. 1) for correcting the centring of the brake with the wheel, using a 2 mm
Allen spanner.
USEFUL TIPS TO ENSURE THE BRAKES
WORK CORRECTLY
• Periodically have the tightening torque on the brake fixing screws,
the pad fixing and the cable fixing checked by a specialised operator.
• Fix the brake to the frame by tightening the nut (B) (Pic. 1) using
the torque wrench with a torque of 10 Nm.
Check that the nut is firmly tightened down because if it works use
when the bike is being used, it could mean the brakes would no
longer work and cause accidents and serious or mortal injuries.
• If the brakes are used under the rain, sand or dirt could build
up on the brake pads, which could damage the rims even on one
single outing.
• To keep the pads efficient and prevent wear to the braking surface on the rims, we advice checking them frequently and immediately removing any foreign bodies that deposit on the pads.
REGULATING AND FIXING THE BRAKE PADS
• Periodically check that the brake pads are 1.5-2 mm away from
the surface of the rim (Pic. 3). If they are not, regulate the distance
by turning the regulation screw on the cable tension (E) (Pic. 2).
If that is not sufficient, loosen the cable clamp screw (D) (Pic. 2),
3
ENGLISH