1
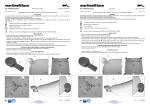
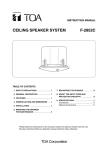
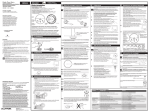
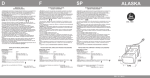
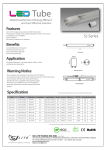
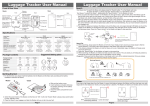
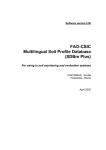
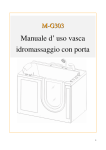
ROMA
ELECTRONIC
DIMMABLE
DAL 1960
Ø280
h
h
285
285
Ø280
Ø
Ø
pict. A
pict. B
h
Fig.
Pict.
Ø500mm
590mm
A
Ø680mm
615mm
A
Ø480mm SF
610mm
B
Dimensioni, dimensions
Ø
REV. 00 05/11
I
INSTALLAZIONE
INSTALLATION
}
L
BROWN
200/277V
GREEN/YELLOW
50/60Hz
N BLUE
+ VIOLET
DIMMER
- GREY
1-10V
}
Fig. 1
1
3
4
2
ISTRUZIONI DI INSTALLAZIONE
USO E MANUTENZIONE
FITTING FOR METAL HALIDE AND
HIGH-PRESSURE SODIUM LAMPS
cable H05 RN-F
Ø 7÷12mm2
BASIC SERIES: ROMA ELECTRONIC DIMMABLE
Characteristics:
- Feeding tension:
200/277V~
- Insulation class:
I
- Lamp’s power, lamp’s type :
250W ME-SE
350W ME
400W ME-SE
- Lampholder:
E40
- Protection degree:
IP65
- Weight:
max Kg 9,5
1
3
4
2
ORDINE DI SERRAGGIO:
ORDINE DI SERRAGGIO:
1-2-3-4
1-2-3-4
COPPIA DI SERRAGGIO:
1,2NM
2NM
ORDER OF TIGHTENING:
ORDER OF TIGHTENING:
COPPIA DI SERRAGGIO:
1-2-3-4
1-2-3-4
TORQUE SETTING:
1,2NM
TORQUE SETTING:
2NM
Fig. 2
Fig. 3
VENTURE LIGHTING LAMPS
min 1m
Manufacturer Code
Luminous
Power
Efficacy
Light
Output
Colour
Temp.
Ra
250W 23800lm 3700K
350W 35000lm 3700K
400W 42000lm 3700K
70
70
70
Uni-Form® PULSE START
HIE250W/C/V/PS/4K HIGH EFFICIENCY
HIE350W/C/V/PS/4K ENERGY SAVING
HIE400W/C/V/PS/4K HIGH EFFICIENCY
95lm/W
100lm/W
105lm/W
INSTALLATION, USE AND
MAINTENANCE INSTRUCTIONS
- Attenzione! La sicurezza del proiettore é garantita solo con, l’osservanza delle
seguenti istruzioni, pertanto é necessario conservarle.
- Attenzione! Presenza di alta tensione nell’apparecchio.
Prima di eseguire le connessioni di rete, durante il montaggio o
sostituzione della lampada, assicurarsi di aver tolto tensione.
- Warning! Safety of this floodlight is guaranteed only if the following instructions
are properly respected. It is therefore necessary to preserve them.
- Warning! High tension inside the fitting. Before executing the net connections
and during positioning or replacement of the lamp,
ensure the tension has been disconnected.
- Per il montaggio o sostituzione della lampada, eseguire le istruzioni date dal
costruttore allegate alla lampada stessa. Utilizzare solo lampade con la protezione
UV incorporata.
- Nell’uso del proiettore, assicurarsi che la distanza tra la lampada e l’oggetto
illuminato non sia inferiore a 1m come indicato nel relativo simbolo. 1 m
- Durante l’installazione e l’uso attenersi alle posizioni di
funzionamento ed alle distanze minime indicate in fig. 4.
- Attenzione! L’apparecchio deve essere utilizzato solo se completo del suo
schermo di protezione. Trattasi di vetro float temperato sodico-calcico.
- L’apparecchio può essere fissato direttamente a plafone mediante un gancio in
acciaio che si inserisca nell’apposito golfare predisposto. Accertarsi che il gancio
sia ben fissato a plafone ed abbia una sezione di almeno 28mm2 (es. un tassello
a vite M6).
- L’apparecchio è idoneo al fissaggio su superfici normalmente infiammabili.
- L’apparecchio é idoneo al funzionamento in esterni ed interni
(ta = - 20°C ; +60°C).
- L’apparecchio non é idoneo al funzionamento in cascata.
- Altezza di installazione qualsiasi.
- For positioning or replacing the lamp, follow the instructions given by the
manufacturer, supplied with the lamp itself. Use only lamps with anti-UV protection.
- When the floodlight is on, ensure that a minimum distance of 1m
1m
between the lamp and the illuminated surface is respected, as indicated
by the symbol.
- During installation and use, respect the working positions and the minimum
distances - as indicated in pic.4.
- Warning! This fitting must be used only with its protective diffuser. It is a float
tempered glass, sodic-calcic type.
- This fitting can be installed directly on the ceiling through a steel hook to be
inserted into the eyebolt supplied. Ensure that the hook is safely fixed into the
concrete ceiling and that the minimum hook’s section is at least of 28 mm² (ex:
screw dowel M6).
- This floodlight is suitable for installation on normally inflammable surfaces.
- This fitting is suitable for indoor and outdoor installation
(ta= -20°C; +60°C).
- This fitting is not suitable for tandem installation.
- Installation height: whatever.
- Per la connessione alla rete di alimentazione attenersi alle seguenti indicazioni:
Utilizzare un cavo 4 poli + terra tipo H05 RN-F avente sezione minima di 1mm2
per ogni conduttore e diametro esterno compreso tra Ø7÷12mm, connetterlo alla
morsettiera di alimentazione come indicato in fig. 1, quindi bloccarlo sotto
l’apposito dispositivo serracavo.
A cablaggio ultimato serrare a fondo il pressacavo per garantire la tenuta
all’acqua. Pressacavo idoneo per cavi Ø7÷12mm.
Serrare le n°4 viti M4 del coperchio vano cablaggio con un momento torcente di
1,2Nm in modo progressivo e secondo lo schema indicato in fig.2.
- L’apparecchio consente la dimmerazione della lampada da 50% al 100%
attraverso il collegamento ad un dimmer analogico 1-10V.
Regolazione Dimmer
Valore potenza lampada
0-1.5V
50% P max
1.5-8.5V
50%-100% P max (andamento lineare)
8.5-10V
100% P max
- For the connection to the feeding, follow the following indications:
make use of 4-pole+earth cable type H05 RN-F with minimum section of 1mm² for
each wire and external diameter between Ø 7÷12mm. Connect it to the feeding
terminal block as indicated in pic. 1 , then block it under the suitable cable clamp.
Once the wiring is finished, tighten the cable gland to assure the watertight. Cable
gland suitable for cables of Ø 7÷12mm.
Tighten progressively the 4 screws M4 of the gear box cover with 1,2 Nm torque,
following the pic.2.
- This fitting allows the lamp to dimmer from 50% to 100% with the connection to
an analogical dimmer 1-10V.
Dimmer adjustment
Power lamp value
0-1.5V
50% P max
1.5-8.5V
50%-100% P max (Linear trend)
8.5-10V
100% P max
- L’apparecchio è dotato di una serie di protezioni che intervengono per
preservare l’elettronica di comando.
> L’apparecchio attende 20 minuti dall’accensione prima di effettuare la
dimmerazione della lampada.
> L’apparecchio effettua la riduzione del flusso luminoso della lampada in caso di
abbassamento del valore della tensione di rete o a causa di sovratemperatura
ambiente.
> L’apparecchio effettua lo spegnimento della lampada (dopo 30minuti) a causa di
tensione lampada troppo elevata o lampada a fine vita.
- Lampade ME consigliate per l’utilizzo con Roma Electronic Dimmable.
- ME lamps suggested for Roma Electronic Dimmable application.
- ME Leuchtmittel empfohlen für Roma Electronic Dimmable.
- Lampes ME conseillées pour l’utilisation avec Roma Electronic Dimmable.
- Lámparas ME aconsejadas para Roma Electronic Dimmable.
Fig. 4
UK
- Fissare la parabola al corpo dell’apparecchio mediante le n°4 viti da M6 ad esso
pre-avviate. Assicurarsi che la guarnizione in dotazione sia adeguatamente
posizionata fra corpo e parabola, indi avvitare progressivamente le viti come
indicato in fig.3 fino ad una coppia di serraggio pari a 2Nm.
Fissare l’estremità libera della catenella del vetro all’apposito anello fissato al
corpo inferiore.
- This fitting is provided with protections to save the control electronic part.
> This fitting waits for 20 minutes from the ignition before realizing the dimmer of
the lamp.
> This fitting reduces the light flux in case of the fall of the mains voltage value or
in case of environmental overtemperature.
> This fitting realizes the turning off of the lamp (after 30 minutes) if the lamp
voltage is high or if the lamp is end of life.
- Fix the reflector to the body with the N°4 screws M6 (pre-screwed).
Make sure that the supplied gasket is correctly placed between the body and the
reflector, then screw the screws in accordance with the pic. 3 until a tightening
couple of 2Nm.
Fix the other end of the chain of the glass to the proper ring fixed to the lower
body.