Transcript
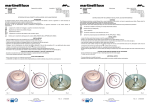
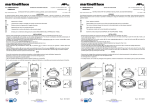
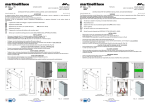
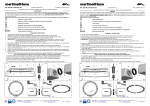
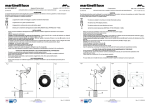
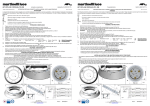
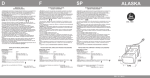
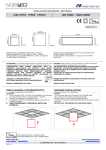
ART. 2760/85/I/AG BOLLA
Plafoniera per lampade
Lampadine: 3x60W E27
Design: Elio Martinelli 1960
Dim.-85x85 h.25
ART. 2760/85/I/AG BOLLA
Design: Elio Martinelli 1960
Ceiling lamp
Bulbs: 3x60W E27
Dim.-85x85 h.25
ISTRUZIONI PER UNA CORRETTA INSTALLAZIONE, USO E MANUTENZIONE
INSTRUCTIONS FOR THE CORRECT INSTALLATION, USE AND MAINTENANCE
AVVERTENZE
Le seguenti istruzioni devono essere seguite per la corretta installazione del sistema e servono a garantire la vostra sicurezza. É
necessario conservarle per una successiva consultazione.
IN CASO DI DUBBIO INTERPELLARE UN INSTALLATORE QUALIFICATO.
Disinserire la rete di alimentazione durante l’installazione dell’apparecchio; é opportuno disinserire la rete anche durante la
manutenzione.
WARNING
The following instructions must be followed for a correct installation of the product, and serve to guarantee your safety. Please retain for
future reference and make available to those that maintain the product.
IF IN DOUBT, PLEASE SEEK THE ADVICE OF A QUALIFIED INSTALLER.
Disconnect the mains while installing the fitting; the mains should be disconnected also during maintenance operations.
The device is suitable for mounting on normally inflammable surfaces.
L’apparecchio é adatto al montaggio su superfici normalmente infiammabili.
Interior device (not waterproof).
Apparecchio per interni (non protetto all’acqua).
Class I appliance.
Apparecchio di Classe I.
The device conforms to current directive and norms.
L’apparecchio è conforme alle direttive e alle normative vigenti.
Symbol for product disposal (see DISPOSAL OF THE APPLIANCE – RAEE).
Simbolo per lo smaltimento dell’apparecchio (vedere SMALTIMENTO DELL’APPARECCHIO RAEE)
-
INSTALLAZIONE
Rimuovere le viti e dadi di fissaggio (a) dei quattro cilindri di supporto (b) (fig. 1);
Posizionare come nella fig.2 e riavvitare le viti e dadi (a);
Fissare la base (c) al plafone con adeguati tasselli e con l’interasse dei quattro fori come segnato nella fig.3;
Collegare i cavi di alimentazione che arrivano dal plafone attraverso il foro (g) alla morsettiera (d); il cavo giallo/verde deve essere
collegato al morsetto contrassegnato dal simbolo
(messa a terra); fare attenzione a non schiacciare i cavi sotto la piastra portacomponenti (vedi fig.4);
- Inserire le lampade (e) nel relativo portalampada (f) controllando i dati di targa dell’apparecchio (fig.4) ;
- Montare, infilando nelle torrette (i) i bordi dello schermo diffusore (h) e bloccarlo ruotando le ghiere (j) sulle torrette (i).(fig 5-6).
-
CAUTELE DA ADOTTARE DURANTE L’USO DELL'APPARECCHIO
- Durante la manutenzione (per sostituzione lampadina o pulizia) disinserire la rete elettrica;
- Per la pulizia utilizzare solamente un panno asciutto;
-
INSTALLATION
Remove the fixing nuts (a) from the four edge blocks (b) (fig.1);
Position as shown in fig.2 and screw the screws and nuts (a);
Fix the base plate (c) to the ceiling with suitable anchors using the inter-axial distance of the four holes as shown in fig.3;
Connect the power cables coming from the ceiling through the hole (g) to the terminal board (d); the yellow/green cable must be
symbol (earth); pay attention not to crush the cables under the component holder plate;
connected to the terminal marked by the
- Insert the bulbs (g) in the relevant bulb holder (f), checking the device label data (fig.4);
- Assemble inserting the edges of the diffusing screen (h) into the edge blocks (i)and lock it by turning the sleeves (j) ( fig.5-6);
CAUTION TO BE ADOPTED DURING USE OF THE DEVICE
- During maintenance (to change the bulb or cleaning) disconnect the mains supply.
- To clean use only a dry cloth;
ADDITIONAL NOTES
- For your safety do not modify the device;
- Martinelli Luce Spa does not assume any responsibility for products modified without authorisation;
NOTE SUPPLEMENTARI
- Per la vostra sicurezza non modificare l'apparecchio;
- La Martinelli Luce Spa non si assume alcuna responsabilità per prodotti modificati senza preventiva autorizzazione;
b
b
a
a
c
c
Fig. 1
Fig. 1
Fig. 2
j
Fig. 4
g
f
Fig. 2
Fig. 3
Fig. 5
f
j
h
j
Fig. 4
g
Fig. 3
Fig. 5
j
h
d
d
i
i
e
e
i
i
Fig. 6
Fig. 6
Via T.Bandettini
55100 Lucca – Italia
tel. +39 0583 41.83.15 telefax +39 0583 41.90.03
e-mail [email protected]
Rev. 1
20/05/2009
Via T.Bandettini
55100 Lucca – Italia
tel. +39 0583 41.83.15 telefax +39 0583 41.90.03
e-mail [email protected]
Rev. 1
20/05/2009