1
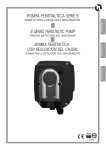
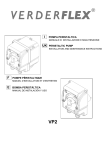
Detergent Pumps
PA
Dosing pump with conductivity probe control
Hole for probe connection: 22.5 mm (7/8")
Power supply: 230 Vac. Consumption 3.5 W
MODEL
PA 6 (Santoprene tubing)
PA 9 (Santoprene tubing)
BAR
0.1
0.1
L/H
6
9
BAR
0.1
0.1
L/H
1.5
3
PE
Fixed flow-rate pump
Power supply 230 Vac
Consumption: 3.5 W
MODEL
PE 1.5 (Santoprene tubing)
PE 3 (Santoprene tubing)
PR
Adjustable flow-rate dosing pump with speed control
Power supply: 230 Vac
Consumption: 3.5 W
MODEL
PR 4 (Santoprene tubing)
PR 7 (Santoprene tubing)
BAR
0.1
0.1
L/H
4
7
PS
Fixed flow rate dosing pump with timer control, powered via the loading
and rinse solenoid valves. Two setting trimmer enable detergent First Fill
and Top Up. Power supply: 230 Vac. Consumption: 3.5 W.
First Fill time: 5 to 220 sec.
Top Up time: 1 to 20 sec.
MODEL
PS 3 (Santoprene tubing)
PS 10 (Santoprene tubing)
BAR
0.1
0.1
L/H
3
10
PRT
Fixed flow rate dosing pump with timer control. Models powered via
single or double solenoid valves available. Two setting trimmer enable
detergent First Fill and Top up. Power supply: 230 Vac. Consumption: 3.5 W
First Fill time: 18 to 180 sec.
Top Up time: 2 to 15 sec.
MODEL
PRT 6 (Santoprene tubing)
PRT 9 (Santoprene tubing)
innovation > technology > future
BAR
0.1
0.1
L/H
6
9
Fig.1
Fig . 2
POMPA DOSATRICE PERISTALTICA A VELOCITA’ VARIABILE
VARIABLE SPEED PERISTALTIC DOSING PUMP
PR
b iad es iv o / ad h es iv e t ap e
MANUALE DI USO E MANUTENZIONE
Fig. 3
Fig. 4
direzione di
montaggio
mounting
direction
corpo filtro
filter body
peso metallico
metallic filter
ballast
tubo aspir.
suction.tube
PR-18 = 18 lt/hr with Santoprene tubing
Cod. 136131.R4/96
PERPR_IE
MAINTENANCE AND
INSTRUCTIONS MANUAL
Pompa peristaltica a dosaggio predisponibile
mediante la regolazione della velocità di
funzionamento.
Variable capacity peristaltic pump regulated
through speed control.
Altezza di aspirazione: 1,5 m
Max suction hight: 1,5 m
AVVERTENZE
NOTICE
In fase di installazione della pompa, leggere
l’etichetta e verificare che:
• il tubo membrana sia di materiale compatibile con
il liquido che deve essere dosato;
• la tensione di alimentazione sia corrispondente a
quella indicata;
• la pressione in corrispondenza del punto di
iniezione sia inferiore o uguale a quella nominale
della pompa;
• il tubo di aspirazione sia inserito all’interno del
serbatoio del prodotto, sia connesso al raccordo di
aspirazione della pompa (segnato sul coperchio
con ∆) e serrato con l’apposita ghiera (v. fig.1);
• il tubo di mandata sia connesso al raccordo di
mandata della pompa (segnato sul coperchio con
∇) , serrato con l’apposita ghiera, e sia inserito nel
raccordo di entrata in vasca;
• il coperchio di protezione del gruppo idraulico sia
correttamente incastrato nella sua sede;
• la pompa sia connessa alla rete in modo che sia
presente un dispositivo di disinserzione
onnipolare con distanza di apertura dei contatti di
almeno 3 mm;
IL MANCATO RISPETTO DI UNA DELLE
When installing the pump read the label and
verify the following:
• tubing material is compatible with the liquid;
• the power supply available is identical to the
indicated one;
• pressure at the injection point is lower or equal
to the pump nominal pressure;
• suction tubing is inserted in the liquid
container, fitted to the suction connection of
the pump (represented on the lid with ∆) and
tightened with the proper nut (see fig. 1);
• delivery tubing is fitted to the delivery
connection of the pump (represented on the lid
with ∇), tightened with the proper nut and
fitted to the tank injection connection;
• the protection lid of the liquid end is properly
fitted in its seat;
• the pump is connected to an electric system
which has an all-poles disconnection device
with open state distance between contacts of at
least 3 mm;
PRESCRIZIONI QUI CONTENUTE PUÒ PROVOCARE
DANNI ALLE PERSONE E/O IL NON CORRETTO
FUNZIONAMENTO O DANNEGGIAMENTO DEGLI
APPARECCHI.
IF ANY OF THE INSTRUCTIONS HERE
CONTAINED IS NOT RESPECTED THERE CAN BE
DAMAGE TO PERSONS AND/OR INCORRECT
WORKING OR DAMAGE TO THE APPARATUS
,,, ATTENZIONE ,,,
Prima di effettuare qualunque intervento sulla
pompa, disconnettere la tensione di
alimentazione!!
,,, IMPORTANT ,,,
Before carrying out any operation on the
pump, disconnect the power supply !!
ISTRUZIONI DI MONTAGGIO
Montaggio con staffa in dotazione
• Fissare la staffa metallica mediante la vite in
dotazione, nella maniera indicata in fig.2;
• nel caso di fissaggio su pareti con piastrelle o con
finitura superficiale a basso attrito, fare uso del
biadesivo fornito con la pompa:
togliere uno dei due fogli protettivi dal biadesivo,
attaccare il biadesivo alla staffa, togliere il
secondo foglio protettivo dal biadesivo e
procedere al fissaggio della staffa con la vite;
• appoggiare la parte posteriore della pompa al di
sopra della staffa, in modo da far scivolare la
staffa nel canale di invito ricavato sul coperchio
posteriore, sino all’incastro.
Montaggio con fissaggio del coperchio
• Smontare la pompa svitando le viti di fissaggio
sulla scatola
• sollevare verso l’alto il morsetto della tensione
per staccarlo dal circuito
• i fori per il fissaggio sono sul coperchio posteriore
della pompa: far saltare le protezioni plastiche dai
fori destinati al fissaggio mediante un punteruolo
o un giravite (come dima di foratura, si può
utilizzare il coperchio stesso) ;
• fissare il coperchio mediante la vite in dotazione o
mediante viti Ø 4 mm;
• connettere nuovamente il morsetto volante al
circuito e montare la parte anteriore della pompa,
mediante le viti di fissaggio; per il cablaggio dei
cavi si veda la fig.3.
Montaggio filtro di aspirazione
• Inserire l’estremità del tubo di aspirazione nel
peso metallico, in modo che il tubo fuoriesca dalla
parte svasata del peso stesso;
• infilare fino in fondo il portafiltro nella stessa
estremità del tubo;
• serrare il tubo, avvicinando con una rotazione il
peso al portafiltro, fino a battuta;
• La fig.4 illustra la sequenza di montaggio dei
pezzi componenti il filtro di aspirazione.
• si consiglia di usare sempre il filtro di fondo in
aspirazione, di accertarsi che arrivi sul fondo del
serbatoio e di pulirlo periodicamente da eventuali
residui di prodotto essiccato o sporcizia
accumulata.
INSTALLATION INSTRUCTIONS
Installation with the provided bracket
• Fix the metal bracket with the provided screw
(see fig. 2);
• in case of tiled or low friction walls use the
supplied adhesive tape as follow:
peel off one of the two protective foils from the
tape, stick the tape to the bracket, peel off the
second protective foil and proceed to fix the
bracket with the provided screw;
• fix the pump on the bracket making tongues on
the back of the pump slide in the bracket.
Installation with the back cover
• Open the pump unscrewing the fixing screws
on the box;
• detach the power supply connection from the
circuit;
• holes for mounting are on the back cover of
the pump: break the plastic protections from
the holes with an awl or screwdriver (to trace
the drilling template the back cover can be
used);
• fix the back cover with the provided screw or
with Ø 4 mm screws;
• reattach the power supply connection to the
circuit and mount the front part of the pump
with the fixing screws; for the wiring see fig.3.
Suction filter installation
• Insert the end of the tubing in the metal wieght
so that it exits from the flared part; insert the
filter container in the same end of the tubing;
• tighten the tubing screwing the weight until it
sits on the filter container;
• Fig. 4 shows the mounting steps to follow to
install the suction filter
• It is strongly recommended to use the suction
filter in all situations, to assure that it reach the
bottom of the tank and to clean it periodically
to avoid dry residual of product or
accumulation of dirt.
Capacity regulation
• To modify the capacity, take out the protection
tap on the right of the operation led with a
screw driver 5 x 20;
• to reduce capacity turn the trimmer counterclockwise.
Regolazione della portata
• Per impostare il valore di portata desiderato,
estrarre con un giravite 5x20 il tappo di
protezione a destra della spia di funzionamento;
Cod. 136131.R4/96
PERPR_IE
• per diminuire la velocità di rotazione, ruotare in
senso antiorario.
Sostituzione tubo
• Togliere la alimentazione alla pompa, in maniera
che non possa azionarsi il motore in maniera non
voluta;
• togliere il coperchio trasparente a scatto di
protezione del gruppo idraulico;
• per lo smontaggio, posizionare il portarullini con
i due rullini in posizione verticale;
• rimuovere dalla sua sede il raccordoposto a
sinistra della pompa, tirando il tubo verso l’alto,
seguendone il percorso ruotando manualmente il
portarullini in senso orario, sino ad estrarre anche
il raccordo posto a destra della pompa
• per il montaggio, posizionare il portarullini con i
due rullini in posizione orizzontale;
• inserire a fondo il raccordo posto a sinistra della
pompa, con la parte curva in basso;
• premere il tubo nella sua sede, seguendone man
mano il percorso ruotando manualmente il
portarullini in senso orario, sino ad inserire a
fondo anche il raccordo posto a destra della
pompa;
• inserire nuovamente il coperchio di protezione a
partire dal bordo superiore, posizionandolo con il
bordo di incastro verso la pompa e premendo
leggermente sui lati, sino a sentire lo scatto di
chiusura.
Tubing substitution
• Disconnect the pump from the power supply
• take off the transparent lid on the hydraulic
group
• to dismantle the tube turn the roll holder so
that the rollers are on a vertical line
• remove from its seat the connection on the left
of the pump, alternatively pull the tube out of
its seat and manually rotate the roll holder
clockwise until it is possible to extract the
right hand side connection from its seat;
• to mount the tube turn the roll holder so that
the rollers are on a horizontal line;
• insert the connection in its seat on the left of
the pump with the curved side towards the
floor;
• alternatively push the tube into its seat and
manually rotate the roll holder clockwise until
it is possible to insert the right hand side
connection into its seat;
• insert the protection lid starting from the top,
with the shear facing the pump and pushing
slightly on the sides so to hear the click.
Tubing Characteristics
Tubing
Characteristics
Limitations
Santoprene
Tubing suitable for a wide range of applications supplied as standard in all PBR, PBM,
Not suitable for solvents
PE, PG and PP Pumps Available in a special versione suitable for food application.
Sekobril
Tubing suitable for a wide range of applications where may be supplied with all range Not recommended with strong acids or alkaline solution
Swells up in many organic solutions
of pumps. Available in a special versione suitable for food application.
Sekoflex
Tubing with an uncomparable flexibility that assure the constant dosing after ours of
operation also. Suitable for Alkaline products.
Not suitable for strong acids, black pigments may leach out.
Sekokem
Tubing suitable for applications where are used very aggressive acids and solvents.
Limited lifetime
Sekofarm
High quality for medical, laboratory and research use Homogeneous structure tubing
for a better chemical resistance. Suitable for food and medical applications
More hard than the other tubing may affect the life of the
gearbox
Norprene®
Same as Santoprene, is a standard tubing for the PSG and PSH models. Suitable for
Additives and black pigments may leach out
Alkaline chemicals
Tygon R-1000®
Tubing with a strong chemical compatibility but low mechanical life.
Become hard and may affect motor life with some chemical
whit which ahs a good chemical compatibility
Norprene® AND Tygon R-1000® are a Saint Gobain Co. Reg. TM’
Tubing Code
3x7
Santoprene
Sekobril
3 x 7,4
3x8
4 x 8,6
9900106234
5x8
6x9
6 x 10
9900090226
9900106551
9900090057
3/8 x 5/8
9900090068
9900090067
Sekoflex
9900090234
9900090232
Sekokem
9900090249
9900090242
9900090121
9900090098
9900090096
Sekomed
Norprene
Tygon R-1000
9900090064
9900090017
9900090256
Santoprene Food
9900090113
Sekobril Food
9900090082


![[IT] Application brochures.qxp:[IT] Kitchen App - tecno](http://vs1.manualzilla.com/store/data/006102550_1-2441a61e303c81eaa28814eb7a6c1f05-150x150.png)