1
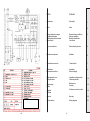
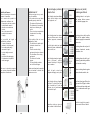
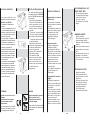
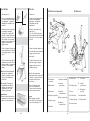
EXPER T 205 INSTRUCTIO N M ANUAL VEG E TA B LE C U TTIN G M A C HIN ES Via 4 Novembre, 6 - 21040 Oggiona S. Stefano (Va) - Italy I GB Gentile Cliente Dear Customer, Il Tagliaverdure é stato progettato secondo le Direttive Macchine 98/37, per rispondere ai requisiti richiesti dalla legislazione alla data di costruzione. Caratteristiche fondamentali sono la facilita' di pulizia, la robustezza della costruzione, la sicurezza e l'affidabilita' di funzionamento. I materiali utilizzati, alluminio anodizzato e acciaio inox, sono stati scelti nel rispetto delle normative igienico sanitarie, per rendere la macchina inalterabile nel tempo. Le normativ e che regolamentano la costruzione sono: The Vegetable Cutting is manufactured in accordance with the 98/37 Machinery Directive. They meet all legislative requirements valid at the date of manufacture. Its principle characteristics are easy cleaning, robust manufacture, safe and reliable operation. The materials utilized, anodized aluminium and stainless steel, have been selected with due regard to hygiene regulations and ensure that the machine has a long life. The regulations applicable to its manufacture are the following: EN 1678 Macchine tagliaverdure. Specifiche di igiene e sicurezza EN 1678 Vegetable cutting machinesSafety and hygiene requirements. EN 60204 Impianto elettrico delle macchine:Parte 1 Regole generali. EN 60204 Electrical equipment of machinesPart 1:General requirements. EN 1088 Sistemi di interblocco associati a dispositivi di protezione. EN 1088 Interlocking devices associated with guards. EN 954-1 Sicurezza del macchinario - Parti dei sistemi di comando legate alla sicurezza - Principi generali per la progettazione. EN 954-1 Safety of machinery - Safety related parts of control system - General priciples for design. 89/109/CEE Direttiva per i materiali e gli oggetti destinati a venire a contatto con i prodotti alimentari. 89/109/EEC Directives for the materials and things destined to come into contact with food. Regolamento CE n. 1935/2004 Riguardante i materiali e gli oggetti destinati a venire a contatto con i prodotti alimentari. Rule CE n. 1935/2004 for the materials and things destined to come into contact with food. 89/336/CEE Direttiva sulla Compatibilità Elettromagnetica(EMC). 89/336/EEC Directive on Electromagnetic Compatibility (EMC). 73/23/CEE Direttiva bassa tensione. 73/23/EEC Directive on low voltage. 2002/95/CE RoHS- Sulla restrizione dell’uso di determinate sostanze pericolose nelle apparecchiature elettriche ed elettroniche. 2002/95/CE (RoHS - Restriction of Hazardous Substances). La Dichiarazione CE di Conformità, lo schema elettrico sono allegati al presente Manuale che, per una corretta installazione e utilizzo della macchina, consigliam o di leggere attentamente. The EEC Declaration of Conformity and the circuit diagram are delivered together with the instruction manual, that we recommend to read with great attention for a correct installation and use of the machine. Ci auguriamo che possiate apprezzare le prestazioni dei nostri prodotti. We hope that you can make the best use of the performance of our products. Cordialmente Yours faithfully. 1 Indice C ontents Introduzione Description 1 Indice Index 2 Note generali alla consegna Condizioni di fornitura Identificazione della macchina Elenco Dischi General delivery conditions Delivery conditions Machine identification List of discs 3 Electrical safety devices 5 Definizione componenti Definition 6 Caratteristiche tecniche Technical data 7 Installazione Allacciamento elettrico Installation Electrical supply 8 Funzionamento e uso del tagliaverdura Vegetables cutting machine functioning and use 10 Manutenzione Pulizia Maintenance Cleaning 15 Anomalia Soluzioni Problem and corretive action 18 Garanzia Warranty 20 Schemi elettrici Wiring diagrams 21 Sicurezze elettriche 21 2 Note generali alla co n seg n a G eneral delivery conditions G aranzia Warranty La macchina viene sempre consegnata adeguatamente imballata. I componenti dell' imballo (cartone, sacchi di polietilene, poliuretano espanso), sono assimilabili ai rifiuti solidi urbani, lo smaltimento avviene senza difficoltà. Non disperdere nell'ambiente. Direttiva 2002/96/CE RAEE: Conferire la macchina alla ditta costruttrice, per effettuare lo smaltimento a norma di legge. The machine is always delivered with its packaging. The packaging materials (cardboard, polyethylene sacks, expanded polyurethane) are to be considered city waste materials. Even though each material must not be collected separately, it should be disposed of with consideration. Directive 2002/96/CE (DEEE): Rendre la machine au fabricant afin qu’il procède à son élimination selon les normes en vigueur. Il fabbricante garantisce, al primo utente, per la durata di sei mesi, l'affettatrice di propria produzione da ogni difetto di costruzione o di montaggio. The producer guarantees its slicer to the first user for a period of 6 months against any manufacturing or assembly defect. Il fabbricante si impegna a sostituire e riparare presso il proprio stabilimento, qualsiasi parte che risulti anche a suo giudizio difettosa. Sono esclusi dalla riparazione in garanzia tutti i guasti derivanti dal trasporto, cattivo uso e manutenzione, incuria e manomissione della macchina. Sono esclusi dalla garanzia la finitura esterna, le materie plastiche,le parti elettriche e le parti soggette a logorio naturale. La sostituzione gratuita delle parti in garanzia e' subordinato alla visione del pezzo difettoso. Le spese di trasporto e di trasferta sono a carico di chi richiede il servizio. The producer wil replace or repair in his factory any part that, in his judgement, turns out to be defective. Any damage caused by transport, bad use or maintenance, negligence or machine tampering are excluded from repairs under warranty. External finishing, plastic materials, electric parts and all parts that naturally wear out are excluded from warranty. The replacement, free of ch a rg e , o f th e parts under warranty is always subject to the visual inspection of the defective parts. Transport charges are always to be paid by the person who requested the service. Il fabbricante e' esonerato da ogni r e s p o n s a b il i ta ' e o b b lig a z io n e p e r q u a ls ia s i in c id e n t e a l l e p e r s o n e in dipendenza della merce fornita. The produce r is exonerated fro m a n y re sp o n s ib ilit y o r o b lig a tio n in c a s e o f a n y acciden t to any person using the machine supplied. 1 Condizioni di fornitura Alla consegna controllare che l'imballo sia integro e che la fornitura corrisponda all' ordine e al documento d'accompagnamento; in caso contrario informare immediatamente lo spedizioniere. Tolta la macchina dall' imballo, in due persone, collocare la macchina su un piano adatto a sostenerne il peso pag. 7. D elivery conditions Check on delivery that the packaging is unbroken and that the goods correspond to those described on the order or the delivery note; in case of error, inform the shipper immediately. Remove the slicer from the packaging. The machine must be placed by two operators on a stable base adequate to support its weight page 7. 2 3 Elenco com poneti: 1 Tagliaverdure 2 Dichiarazione CE List of com ponents: EXPERT 205 4 1 Vegetables cutter 2 EC declaration di conformità of conformity 3 Manuale d'uso 3 Instruction manual 4 Schema elettrico 4 Wiring diagram Identificazione della m acchina M achin e identification In any communication with the manufacturing company always quote the serial number indicated on the identification label of the machine. Per qualsiasi informazione, rivolgersi al costruttore, citando sempre il numero di matricola riportato sulla targhetta di identificazione. 3 20 Qualità del lavoro: WORK OUALITY Prima di qualunque intervento fermare la macchina. Se lo scarico dei prodotti si effettua male, verificare che: - Ll'espulsore sia ben montato - I prodotti nella vasca di raccolta non ostruiscano l'uscita, - Non vi sia accumulo di prodotti nella camera di taglio, Before carrying out any work, stop the machine. lf the products have not been cleared properly, check that: - The ejector is fitted correctly. - The products in the receiving bowl are not blocking the outlet. - There is not an accumulation of products in the cutting chamber. Se la qualità del taglio é insufficiente, verificare: - Il senso di rotazione (antiorario visto da sopra) - La corretta scelta degli accessori di taglio - Lo stato degli accessori di taglio - La scelta della tramoggia, - L'introduzione dei prodotti nella tramoggia If the quality of the cut Is not satisfactory, check: - The direction of rotation (anticlockwise viewed from above). - That the correct cutting equipment has been chosen - The condition of the cutting equipment - The choice of the feed hopper. - The way that the products are in the feed hopper. Nel caso le soluzioni proposte non risolvono l'anomalie indicate, interpellare l'assistenza. In the event of any faulty operation do not hesitate to contact the customer service. Dischi di taglio (coltello) rotanti e fissi E1 E2 Dischi di taglio rotanti per affettare patate, cipolle, lattuga, cetrioli, cavoli, peperoni, ecc. E3 E4 E6 Revolving discs to cut: potatoes, onions, lettuce, cucumbers, kohlrabi, pepper, etc. E8 E 10 Dischi di taglio rotanti con lama a falce per affettare mele, limoni, pomodori, peperoni, mozzarella, ecc. S1 S2 S5 Revolving discs with scythe knife to cut: apples, lemons, tomatoes, pepper, mozzarella cheese, etc. Dischi di taglio rotanti per taglio ondulato di patate, barbabietole, carote, cetrioli, ecc. E 3 OND E 4 OND E 6 OND E 8 OND E 10 OND Revolving discs for curly cut of potatoes, beetroots, carrots, cucumbers, etc. Dischi di taglio rotanti per taglio a strisce (Julienne), particolarmente indicati per il taglio di carote e sedano. H 2,5 - 4 H6-8 H 10 Revolving discs for stir fry cut (Julienne); particularly suitable to cut carrots or celery. Z2 Z3 Z4 Z7 V Dischi di taglio rotanti per grattugiare formaggio, noci, pane. B6 B8 B 10 Dischi di taglio fissi per il taglio a listelli tipo B e i dischi fissi per il taglio a cubetti tipo D, sono da utilizzare solo in combinazione con i dischi di tipo E. D 8X8 D 10X10 D 12X12 D 16X16 D 20X20 Grater revolving discs to grate cheese, bread, walnuts, etc. The fixed discs type B to cut in strips and the D type to obtain small cubes cut have to be used only in combination with type E disc. Rack that is usefu l to properly place a set of differen t discs. Rastrelliera: utile per riporre in modo ordinato i dischi utilizzati. 19 Discs to cut (knife) revolving and fixed 4 Sicurezze elettriche THE MACHINE WILL NOT START, CHECK THAT: Electrical safety devices The electrical safety devices in accordance with the EN 60204 and the EN 1088 standards are the following: - Start and stop pushbuttons. - Control circuit provided with electric servocontrol; in any case of blade clamping the machine must be re-started manually. - If the cover is open, a safety device to stop the rotation of the machine, when the cover is closed the machine must be re-started manually. - Safety device that stop the cutter when the pressure pad is lifted; the machine the re-start only when the pressure pad is lowered in the working position. This machine is fitted with a motor thermic safety device. If the motor stops after a long use wait 10-20 minutes (the time necessary to reduce the motor temperature). Le sicurezze ellettriche, sono realizzate in conformità alla norme EN 60204 e alla EN 1088: - Pulsantiera di avviamento e arresto. - Circuito di comando provvisto di un servocomando elettrico; per qualsiasi arresto della macchina, è richiesta l'operazione manuale di avviamento. - Se viene aperto il coperchio, un dispositivo di sicurezza arresta la macchina, richiudendo il coperchio è richiesta l'operazione manuale di avviamento. - Dispositivo di sicurezza che arresta la macchina se viene sollevato il pressore, la macchina si riavvia solo quando il pressore viene abbassato nella condizione di lavoro. - Le macchine sono equipaggiate con dispositivo di protezione termica al motore. Se durante un uso particolarmente intenso il motore si arresta attendere 1020 minuti (il tempo necessario per ridurre la temperatura del nucleo del motore). Anom alie e Soluzioni - The machine is plugged in. - The electrical power supply to the socket is correct. - The cover is closed. - The feed arm is in the feed hopper. L'apparecchio non si avvia verificare che: - La macchina sia collegata alla rete elettrica in maniera corretta. - L'alimentazione elettrica e la presa di corrente sia giuste. - Il coperchio sia chiuso - La leva-pressore sia posizionata all'interno della tramoggia. ABNORMAL NOISES: - Stop the machine. - Check that the disc, grid and ejector are fitted correctly. - Dismantle, clean if necessary and refit. If the noise continues and- the machine lacks power check that: the three phase motor is -not operating on tow phases. the belt is not worn or needs to be tensioned Rumore anormale: Fermare l'apparecchio Verificare il corretto posizionamento del disco, della griglia e dell'espulsore. Smontare, pulire se necessario e rimettere in funzione. Se il- rumore persiste e l'apparecchio manca potenza, verificare che: Il motore trifase non funzioni a due sole fasi. La cinghia di trasmissione non sia usurata o da ritensionare. BLOCKAGE OF A DISC: - Unplug the machine, - Place a hand flat on the ejector and block it so that cannot turn, - With your other hand, hold the outside of the disc in the finger holes and turn sharply anticlockwise - Lift it whilst turning backwards and forwards. Inceppamento di un disco di taglio: ATTENZIONE WARNING Quando la macchina non e' utilizzata : - Assicurarsi che sia spenta - Che lo stantufo sia nella propria sede. Non manomettere le etichette collocate sulla macchina, in caso di danneggiamento sostituirle. V 230 When the machine is not used: - Make sure that it is off - Re-position the feed stick in the feed hopper. V 400 Do not remove the labels placed on the machine and replace them if damaged. 5 - Scollegare l'apparecchio - Posare il palmo della mano sull'esplulsore e bloccare la rotazione. - Con l'altra mano, prendere il disco dalla parte esterna lungo la scanalatura per le dita e dare un colpo secco in senso antiorario. - Sollevarlo facendo un movimento di rotazione alternata in un senso e nell'altro. 18 Fine Utilizzo After U se 5 Vedere punto 1-4 5 Refer to 1-4 6 Pulire gli elementi amovibili con acqua calda addizionata con detergenti - sgrassanti disinfettanti compatibili con i materiali. 6 Clean the removable parts in hot water and detergent degreaser - disinfectant compatible with the equipment. 7 Risciacquare con acqua pulita e lasciare asciugare. Consigli: Per le griglie MS premere i cubetti residui prigionieri con l’aiuto di una carota. Evitare l’uso di utensili metallici che potrebbero danneggiare le lame della griglia stessa. 7 Rinse in clean water and leave to dry. Tip : For the MS grids, push any cubes that are stuck with a carrot. Do not use metallic objects. 8 Pulire la camera di taglio del corpo macchina con l’aiuto di una spugna umida e sciacquare. 8 Clean the cutting chamber of the machine using a dampen sponge and then rinse thoroughly. 9 Pulire la parte esterna del tagliaverdure con l’aiuto di una spugna umida e risciacquare con l’aiuto di una spugna adatta. 9 Clean the outer side of the machine using a dampen sponge and rinse with a suitable sponge. D efinizione com ponenti Definitions 1 6 2 5 8 4 6 11 3 Nota: Non utilizzare detergenti abrasivi che raschiano le superfici, o prodotti a base di cloro che sbiadiscono l’alluminio. Note: Do not use abrasive detergents which scratch the surfaces, or chlorine based products which dulI the aluminium. 10Sconsigliato il lavaggio in lavastoviglie delle parti in plastica. Non lavare mai l’apparecchio con getti d’acqua a pressione Sistemazione 11Dopo la pulizia riporre accuratamente ogni accessorio di taglio nel suo portadischi. 10 4 9 1 Pulsantiera comandi 10 Do not clean the plastic parts in a dishwasher. Do not clean the machine with a pressure cleaner. 2 Basamento Storage 11After cleaning, carefully store all of the cutting equipment in the storage rack. 4 Cerniera coperchio 3 Coperchio 7 Imbocco tubolare 1 Switch pad 8 Pestello (amovibile) 2 Casting base 3 Cover 9 Apertura d'evacuazione Tube inlet 8 Pusher (removable) 9 Evacuation opening 4 Cover hinge 10 Ejection disc 5 Large opening 11 Driving shaft 10 Disco espulsore 5 Imbocco largo 11 Albero di trasmissione 6 Pressure pad 6 Pressore 17 7 6 C aratteristiche tecniche Technical data 1 Dimensioni mm 2 Peso Kg a senza imballo b con imballo 1 Dimensions mm 2 Weight Kg a without packaging b with packaging 3 Temperatura di utilizzo 4 Rumorosità dB 5 Grado di protezione 3 4 5 Range temperature Acustic dB Protection grade EXPERT 205 1 2 3 4 5 A B C D E F G a b 480 250 157 275 450 520 810 25 28 +5 °C ÷ +40 °C <70 G A C D B E F 55 Motors data Caratteristiche motore W 1~ 800 230 50 400 50 7 DANGER Perform the cleaning operations with great care: danger of accident Pulizia, igiene, sistem azione C leaning , hygien e and storage Prima di ogni intervento scollegare l’apparecchio dalla rete elettrica. Before dismantling machine, disconnect from the power supply. Tra Due Diverse Lavorazioni In Between Use 1 Sollevare la leva-pressore ed aprire il coperchio, e se necessario smontarlo facendolo uscire dai cardini con una leggera pressione in senso contrario rispetto ai perni su cui il coperchio è incernierato. 1 Lift pressure pad and open the cover and, if necessary, remove it by pulling it off its hinges. A light pressure in the opposite direction to the pins where it is hinged is enough. 2 Togliere gli accessori di taglio (disco, griglia, espulsore) ed il pestello. the 2 Remove the cutting equipment (disc, grid, ejector) and the feed pusher. 3 Lavare gli accessori con acqua calda, sciacquare ed asciugare. 3 Wash the equipment in hot water, rinse and dry. 4 Pulire la camera di taglio del corpo macchina con l’aiuto di una spugna umida non abrasiva. 4 Wash the cutting chamber using a clean, damp sponge. CL V Hz 120 60 PERICOLO Durante le operazioni di pulizia fare molta attenzione: pericolo di infortunio. B 3~ S1 16 M an utenzion e M aintenance Consigliamo l'uso di guanti protettivi durante le operazione di manutenzione e pulizia. All cleaning and maintenance operations must only be carried out with the machine disconnected and isolated from the mains supply and the slice thickness control on zero. All cleaning and maintenance operations must be carried out whilst wearing protective gloves. Controllo cavo alimentazione Check of the electric cable Prima di eseguire le operazione di pulizia e manutenzione è necessario scollegare la macchina dalla fonte di energia. di Controllare periodicamente lo stato di usura del cavo di alimentazione. It is recommended to check the wear of the electric cable at regular intervals. Ricambi Spare parts In caso di sostituzione di pezzi richiedere esclusivamente ricambi originali. In the event that replacement parts need to be fitted, request only original spare parts. Pulizia Cleaning Eseguire sempre la pulizia della macchina dopo lunghi periodi di inattività. Per la pulizia di tutte le parti accessibili utilizzare un panno inumidito con acqua. If you do not use the machine for long time, always carry out a deep cleaning of the machine before using it. For the cleaning of all the open parts use a dampen cloth. Installazione Installation Il tagliaverdure deve essere collocata su una superficie piana, orizzontale, antiscivolo e stabile, adatta a sostenere il peso della macchina pag. 7. L' altezza consigliata del piano di lavoro e' di circa 800 mm . Occorre verificare che non ci siano impedimenti e che sia facile caricare la merce pag. 7. The vegetables cutting machines must be mounted horizontally on a stable, robust and antiskid base adequate to support its weight page 7. The suggested height of the working table is of about 800 mm. It must be checked that the product to be cut can be easily loaded page 7. Preliminary cleaning Pulizia preliminare Before connecting the plug clean off the protective oil from the machine. Follow the instructions indicated in page 15. La macchina deve essere pulita dall'olio di protezione prima di collegarla alla presa di corrente. Seguire le indicazioni riportate nella pag. 15. WARNING The working table must always be cleaned. ATTENZIONE Il piano di lavoro deve essere sempre pulito. Electrical supply The machine must be installed in the proximity of a mains socket. Check that the power supply voltage corresponds to that described on the information label and that it is connected to an adequate earth. Allacciam ento elettrico La macchina deve essere installata vicino ad una presa di corrente. Controllare che la tensione corrisponda ai dati di targa e che la presa sia corredata di messa a terra. 1 Connect the plug. ATTENZIONE Non utilizzare getti d'acqua WARNING Do not use water jet M essa Fuori S ervizio e Sm altim ento R em oval and disposal The symbol affixed on the machine means that it must not be disposed with usual urban waste. The European 2002/96/EC Directive classifies the machine as WEEE, which disposal must be effected according to law. Il simbolo apposto sulla macchina indica il divieto di smaltimento con i rifiuti solidi urbani. La Direttiva Europea 2002/96/CE classifica la macchina come RAEE , lo smaltimento deve avvenire a norma di legge. 15 1 Collegare la macchina alla presa di corrente. 2 Check that the cover is closed. 2 Controllare che il coperchio sia chiuso. 3 Check that the feed stick is in the feed hopper. 3 Controllare che il pressore sia abbassato. 8 4 Premendo il pulsante verde la macchina si avvia (spia luminosa accesa) 4 Press pushbutton vert to switch on the machine (the light signal is illuminated) 5 Guardando dall'apertura di scarico, verificare che l'albero di trascinamento ruoti nella direzione indicata dalla freccia. 5 The blade must rotate in the direction indicated by the arrow. ATTENZIONE WARNING Nel caso di macchina con motore trifase, quando la lama ruota in senso opposto a quello indicato dalla freccia, operare come segue: In the case of machine with three-phase motor follow these instructions when the blade rotates in the direction contrary to that indicated by the arrow: a) Premendo il pulsante rosso si arresta la macchina a) The machine stops red by pressing pushbutton b) Togliere la spina ed invertire i fili di collegamanto come indicato in figura b) Disconnect the plug and reverse the wires in the plug as indicated in figure Se la macchina è corredata di una spina con invertitore di fase incorporato, utilizzando un cacciavite, premere e ruotare di 180° per otttenere l'inversione automatica delle fasi. If the machine is fitted with a plug with self-contained phase inverter, use a screwdriver to press and rotate it throgh 180° in order to automatically swap the phases Ricollegare la macchina alla presa di corrente, premere il pulsante verde, controllare la direzione di rotazione dell'albero di trascinamento, premere il pulsante rosso di arresto. Re-connect the plug. Press pushbutton vert and check the rotation of the blade. Press stop pushbutton red 9 Uso della tramoggia grande e della leva-pressore Use of the large feed hopper and the feed arm La Macchina non può funzionare se il coperchio non è bloccato. - Colloccare lo stantufo nella sua sede per evitare che i prodotti salgano all’interno della tramoggia per verdure Iunghe. - Premere il pulsante verde di MARCIA - Alzare con una mano la levapressore. - All’uscita della leva-pressore dalla bocca della tramoggia, il motore si arresta immeditamente, permettendo di caricare i prodotti in tutta sicurezza. - Alla discesa della leva, il tagliaverdure riparte automaticamente. Per tagliare, affettare. - In aiuto alla leva - pressore, accom pagnare i prodotti nella tramoggia do sandonela pressione fino in fondo. - Quindi sollevare la leva-pressore e iniziare un nuovo ciclo. - Alla fine del lavoro, premere il pulsante rosso di STOP. The Machine will only operate if the cover Is closed. - Leave the feed pusher inside of the feed arm to prevent the products from coming back out. - Press the START button vert. - Lift up the feed arm with one hand. - As soon as the feed arm is clear of the teed hop per, the motor stops immediately, thus allowing the products to be loaded in complete safety. - When the feed arm Is lowered, the machine will start up again automatically. To slice or shred - Using the feed arm, insert the products into the feed hopper until it reactt8s its lover stop: by progressively applying pressure to the arm. - Raise the feed arm and begin a new cycle. - when the work has been completed, press the button red to STOP . Note: The force applied te the feed arm depends on: - the product being used (soft product less forte) - the cutter chosen (a grater requires more effort than a slicing disc). Nota: Dosare lo sforzo necessario sulla leva - pressore in funzione: - del prodotto da lavorare (prodotto tenero = leggera pressione) - dell’accessorio di taglio scelto (un disco grattugia richiede una pressione maggiore rispetto ad un disco fette) Use of the small feed hopper and the feed pusher Uso della piccola tramoggia e del pestello - Lasciare la Ieva-pressore in posizione abbassata. - Premere il pulsante di l’avviamento. - Tenere il pestello con una mano e con l’altra inserire i prodotti. - Premere i prodotti con I’aiuto del pestello e ricominciare un nuovo ciclo. - Alla fine del lavoro premere il pulsante rosso di STOP, - Leave the feed arm in its Iower position - Press the button to start operation. - Raise the feed pusher and insert the products with the other hand. - Push the products using the feedpusher and start a new cycle. - When the work has been completed, press button red to stop. ATTENZIONE Non introdurre mai la mano o un corpo duro in una tramoggia quando la macchina e’ in funzione. ATTENTION Never insert your hand or a hard object in the feed hopper when the machine is in operation. 14 Scelta e funzionamento delle tramogge Choice and Functions of the Feed Hoppers Funzionam ento e uso Tramoggia grande con levapressore articolata. The large feed hopper with and the feed arm Scelta degli accessori di taglio A Taglio a fette - B Sfilacciatura C Grattugia A Slicing - B Shredding - C Grating 1 Passaggio di prodotti di grossa dimensione (max. 160x80 mm, corrispondente ad 1/4 di cavolo). 1 Passage for large sized products (160 x 80 mm maximum, corresponding to 1/4 of a cabbage). 2 Il caricamento manuale si effettua introducendo i prodotti, uno alla volta o a manciate controllandone il buon posizionamento alfine di evitare tagli errati. Introdurre i prodotti “fragili” (pomodori, agrumi...) facendoli scendere delicatamente contro le pareti della tramoggia. 2 Manuel loading is carried out by inserting the products one at a time or in handfuls, taking care to position them correctly in order to avoid false cuts. Pack “fragile” products (tomatoes, citrus fruits) against the side. Tramoggia per verdure lunghe con pressore amovibile. The-small feed hopper with removable feed pusher 1 Per tagliare a fette i prodotti lunghi (carote, insalata belga, cetrioli, zucchine...) con diametro max. 52 mm. Per il taglio a fette introdurre sempre i prodotti lunghi dalla estremità più sottile. 1 For slicing long products (carrots, chicory, cucumbers, leeks, etc.), the opening is dia. 52 mm maximum. To slice, always insert long products tip first. 2 Il caricamento manuale si effettua introducendo verticalmente i prodotti nella tramoggia per verdure, uno alla volta o a mandate. 2 Manuel loading is carried out by inserting the products vertically into the small hopper one at a time or in handfuls. 3 Consigli per evitare un taglio inclinato ed irregolare, introdurre verticalmente i prodotti lunghi con I'estremità più larga in alto, per evitare intasamenti tagliare le estremità più dure e legnose delle verdure. 3 Tips for avoiding angled and irregular cuts: place thin products in ‘head first”. blockages, cut off the ends of the vegetables. 13 Funtioning and use Choice of the Cutters 1 E slicing discs for straight cuts from 1 to 10 mm. 1 Dischi fette mod. E : taglio fette da 1 a 10 mm. E OND 2 Dischi fette mod. E OND : taglio ondulato da 3 a 10 mm. Verdure: Patate, carote, bietole, rape, sedani, cavoli, funghi, cetrioli, zucchine, insalata belga, finocchi, cipolle, porro, ravanelli .... Frutta: Mandorle, banane, mele .... 3 Dischi per fiammiferi mod. H: taglio a bastoncino da 2 a 10 mm. Patate a fiammifero, sedano carote, patate a bastoncino. 4 Dischi grattuggia mod. Z : Z2 taglio fine, Z4 taglio medio, Z7 taglio molto grosso. Verdure: carote, patate a fiammifero, sedano, cavoli rossi, bietole, ravanelli,rafano. Formaggi: Groviera, mozzarella. Altri: noci, mandorle, pangrattato, cioccolato. 2 E OND slicing discs crinkle cut from 3 to 10mm for: Vegetables: potatoes, carrots, aubergines, beetraot, celery, cabbages, mushrooms, cucumbers, courgettes, chicary, fennel, onions, Ieeks, radishes .... Fruits: almonds, bananas, apples ..... 3 H shredding discs for cutting into chips of 2 to 5 mm. straw potatoes, celery, carrots far matchstick potatoes 4 Z grating discs: Z2 fine Z4 medium Z7 extra erge Vegetables : carrots, <doorstep> potatoes, grated celery, red cabbages, beetroots, harseradishes, ròsti. Cheeses:gruyère, mozzarella. Other : almands, breadcrumbs, chacolate, etc. 5 B chip grids for cuts from 6 to 10 mm in thickness when used with a 0/0W disc af the same thickness. 5 Griglie per listelli mod. B: taglio da 6 a 10 mm di spessore in combinazione con un disco fette E e W dello stesso spessore. 6 D Dicing grids : for square section cuts af 8 fa 20 mm when used with a 0/0W disc for: Cubes or diamonds: macedoines of vegetables or fruits, jardinières, minestranes, sauted or braised potatoes, stews. 6 Griglie per cubetti mod. D: taglio a sezione quadrata da 8 a 20 mm in combinazione con un disco E e W per: cubetti o parallelepipedi: macedonie di verdura o frutta, giardiniere, minestroni, patate salate o al forno, minestre. 10 Utilizzo degli accessori di taglio U se of the C utters The machine is supplied with the ejector fitted to the drive spindle. Open the cover lock and lift the cover fully in order to remove the ejector. La machina è fornita con l'espulsore montato sull'albero di trasmissione. Sollevare la leva-pressore ed aprire il coperchio fino al suo punto d'appoggio, onde poter togliere l'espulsore. Before starting work, always check the cleanliness of the cutting chamber, the drive spindle, the ejector, the cutting disc and the grid. Prima di iniziare un lavoro controllare sempre lo stato di manutenzione della camera di taglio, dell'albero di trasmissione, dell'espulsore, del disco di taglio e della griglia. ATTENTION Do not use slicing discs over 10 mm (EN 1678 § 5.1.1.1.3.1). ATTENZIONE Non si possono utilizzare dischi taglio maggiori di 10 mm (EN 1678 § 5.1.1.1.3.1). F o r slicin g , sh red d in g and grating P e r affettare , g rattu g giare, sfilacciare 1 Fit the ejector onto the flat of the drive spindle. 1 Montare l'espulsore sul basamento dell'albero di trasmissione. 2 Fit the disc required (slicing, shredding or grating). 2 Inserire il disco di taglio scelto. 3 Turn the disc in a clockwise direction to insert the bayonet fitting, then continue in the same direction until it reaches the pin. 3 Ruotare il disco di taglio in senso orario fino a che l'innesto a baionetta si insersca correttamente nella spina di traino. La parte terminale dell'albero di trasmissione sarà così a filo con il disco di taglio. 4 To remove the disc, turn it in the opposite direction and lift it using the finger holes at the edges of the disc. If it does not come free, refer to page 15. 4 Per togliere il disco di taglio, ruotarlo in senso antiorario e sollevarlo utilizzando le scanalature per le dita situate sul bordo del disco stesso. Se resta bloccato vedere pag. 15. 5 Richiudere il coperchio, abbassare la leva-pressore. P e r ta g lia r e lis te ll i e cubetti For cutting into chips or cu b es 1 Montare l'espulsore 1 Fit the ejector . 2 Posizionare la griglia scelta nel suo alloggiamento,verificando che i punti dove appoggia la griglia stessa siano puliti. La parte superiore della griglia dovrà essere leggermente al di sotto del bordo superiore del corpo macchina. 2 Fit the grid into its housing and check that it is seated correctly (seating area is clean). The upper face of the grid must be slightly below the top of the machine body. 3 Inserire successivamente il disco di taglio e chiudere il coperchio e abbassare la leva-pressore. 3 Then put in the chosen disc, close the cover, lower the pressure pad. 4 Consigli per tagliare prodotti di differente durezza con una griglia tipo D: tagliare prima i prodotti tenerti, poichè questi non riuscirebbero a spingere a spingere i cubetti dei prodotti più duri attraverso la griglia. 4 Tips far using an D grid to cut products of differing hardnesses: begin with the softer products, as they cannot be used to push harder products that are already in the grid. Attenzione Sollevando la leva pressore dell'imbocco di alimentazione largo, la macchina si arresta, caricare il prodotto, abbassare la leva pressore, automaticamente la macchina si ravvia. Attention On lifting the pressure pad lever of the large opening for feeding the machine stops. You load then the product, lower the pressure pad lever and the cutter then re-start itself. 5 Close the cover, lower the pressure pad. 11 12