1
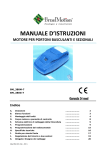
DALCNET SRL
Registered Office: via Bassone, 22 - 37139 Verona (VR) - Italy
Headquarters: via Natta, 55 - 36040 Brendola (VI) - Italy
Tel. + 39 0444 1836680/1867452 Fax. + 39 0444 1867453
VAT: IT-04023100235
[email protected] www.dalcnet.com
RX4-12/24V
MULTI FRQ Ver_1.8-DIMMER
Manuale tecnico – Technical handbook
Made in Italy
rev. 2014-09-03
pag. 1/5
Ricevitore Universale/ Universal Receiver
Manuale per l'installazione e il funzionamento v. 0_1
CARATTERISTICHE TECNICHE
• Ricevitore 4 canali in box
• Alimentazione: 12-24V AC/DC
Selezionabile tramite jumper
• Canali: 4
• Max codici memorizzabili: 48
• Antenna: accordata a 433.92MHz
• Portata: 80 ÷ 250 mt
• Contatti relè: 2A @ 120VAC / 2A @ 24VDC
5A @ 250VAC / 5A @ 30VDC
(dove previsti)
• Temperatura operativa: -10 ÷ 55 °C
• Spia segnalazioni di errore
• Dimensioni (mm): 103 x 66 x 29
TECHNICAL FEATURES
• 4 channels receiver in protective box
• Power supply: 12-24V AC/DC
Selectable by jumper
• Channels: 4
• Max storable codes: 48
• Antenna: tuned on 433.92MHz
• Distance range: 80 ÷ 250 mt
• Relay contacts: 2A @ 120VAC / 2A @ 24VDC
5A @ 250VAC / 5A @ 30VDC
(where provided)
• Operating temperature: -10 ÷ 55 °C
• Error warning light
• Size (mm): 103 x 66 x 29
Generalità – General feauteres
La ricevente universale permette un'estrema versatilità nelle nuove installazioni e in quelle già esistenti. La sua flessibilità consiste nel poter
memorizzare in un'unica ricevente, telecomandi di diversa provenienza, con codici fissi e rolling e con frequenze diverse. La ricevente
universale permette così, nella maggior parte dei casi, di unificare installazioni o sostituire riceventi non funzionanti senza sostituire i
radiocomandi esistenti e quindi garantendo una migliore continuità del servizio e minore disagio per gli utenti.
N.B.:In questa ricevente è stato velocizzato il tempo di risposta al rilascio del pulsante del radiocomando associato. In questo modo la
percezione dell'utente è quella di poter regolare il dimmer con più precisione, il tutto utilizzando un radiocomando inserito nella ricevente.
La ricevente in versione a 2 o 4 canali può essere programmata affichè ogni tasto del radiocomando sia associato univocamente ad un
contatto di uscita della ricevente.
Si consiglia di mantenere il jumper esclusivamente e di default sul jumper P5. In questo modo la ricevente universale funzionerà soltanto alla
frequenza del radiocomando memorizzato, mantenendo le performace in risposta elevate.
Ogni tasto di un trasmettitore equivale ad un codice. Per questo motivo è bene considerare che un radiotrasmettitore con 4 tasti verrà
memorizzato in quattro posizioni differenti. Per quanto riguarda i radiocomandi a codice fisso, questi sono equivalenti nella codifica, e quindi
basta memorizzarne uno affinché tutti funzionino.
The universal receiver allow a huge versatility in the new and old installations. Its flexibility consists in storing different remote controllers, with
different frequencies and with fixed and rolling codes into the same receiver. The universal receiver allows in this way to unify the installations
or to replace any receiver without replacing the existing remote controllers. In this way it guarantees a better continuity service and less
discomfort for the users.
N.B. In this receiver, the push-button reaction response in the associated remote controller is faster. In this way, the perception of the user is to
regulate the dimmer with more precision, just using a remote controller inlaid in the receiver.
In the 2 or 4 channels version receiver, each push-button of the remote controller can be programmed to be associated to one exit contact of
the receiver.
LED CONTROLLERS
DALCNET SRL
Registered Office: via Bassone, 22 - 37139 Verona (VR) - Italy
Headquarters: via Natta, 55 - 36040 Brendola (VI) - Italy
Tel. + 39 0444 1836680/1867452 Fax. + 39 0444 1867453
VAT: IT-04023100235
[email protected] www.dalcnet.com
RX4-12/24V
MULTI FRQ Ver_1.8-DIMMER
Manuale tecnico – Technical handbook
Made in Italy
rev. 2014-09-03
pag. 2/5
We suggest to maintain the jumper on the default setting of jumper P5. Doing this way, the receiver will work just at the frequency of the saved
remote controller, in order to maintain high performances.
Each push-button of a remote controller is the equivalent of one code. For this reason it is important to remember that a remote controller with 4
push-buttons will be saved in 4 different positions. Concerning the remote controllers with fixed code, these have the same coding, so that it is
necessary to store only one code to make all codes work.
Alimentazione – power supply
Il dispositivo può essere alimentato a 12V o 24V AC/DC. La tensione di alimetazione desiderata può essere selezionata tramite un jumper di
selezione presente sulla ricevente.
The device's power supply is of 12V or 24V AC/DC. The input voltage can be settled by a setting jumper on the receiver.
Programmazione - setting
La programmazione della ricevente permette di associare un radiocomando ad un'uscita della ricevente.
Per procedere alla programmazione premere il tasto P. Lampeggerà il led relativo all'uscita selezionata. Premendo ripetutamente il tasto P si
può selezionare l'uscita desiderata, prima di procedere alla memorizzazione. Dopo aver selezionato l'uscita desiderata premere il tasto del
radiocomando che si desidera associare e mantenerlo premuto fino alla completa memorizzazione (tutti i led restano accesi in modo fisso per
mezzo secondo).
The settings of the receiver allow you to associate a remote controller to an exit of the receiver.
To start setting push the button P. The led light of the selected exit will flash. Repeating pushing button P you can chose the exit, before saving
it. After selecting the exit push the button of the remote controller you want to associate to. Keep press the button to complete the savings (all
leds lit up for half a second).
Le segnalazioni led che possono comparire in fase di memorizzazione sono:
LED RELE LAMPEGGIANTE:
Fase di memorizzazione. Il tasto premuto del telecomando viene collegato al relè che sta lampeggiando. In questa fase mantenere premuto e
fermo il telecomando che si sta cercando di memorizzare.
LED RELE 2 LAMPEGGI LENTI:
Il tasto che si sta memorizzando è un HCS che richiede o il SEED oppure è un HCS non conosciuto. Il LED RELE prima resta fisso per un
secondo poi inizia a fare due lampeggi lenti. Se il radiocomando può trasmettere il SEED, trasmetterlo in questa fase. Se il radiocomando non
è conosciuto o non ha la possibilità di trasmettere il SEED, continuare a premere il tasto che si sta cercando di memorizzare, verrà
memorizzato come un HCS fisso. Mantenere premuto finché la memorizzazione non ha avuto successo.
LED TUTTI ACCESI:
Fase transitoria. Indica la fine della memorizzazione con successo, si può rilasciare il tasto premuto del telecomando. Successivamente si
visualizzerà il tipo di telecomando memorizzato.
Led signals, which can appear during the savings:
FLASHING LED RELE:
Saving phase. The pushing-button of the remote controller is connected to the flashing relè. Maintain the press on the button and hold the
remote controller you're saving.
LED RELE-2 SLOW FLASHES:
The button you are storing is a HCS needing the SEED or it is an unknown HCS. The LED RELE at first stays fixed on for 1 second, then start
2 slow flashes. If the remote controller transmit SEED, do it in this phase. If the remote controller is unknown or it cannot transmit SEED,
continue to press the button you're trying to store: it will be stored as a fixed HCS. Maintain press the button till the savings has been completed
successfully.
ALL LEDS ON:
transitory phase. It indicates the storing has completed successfully. You will see the type of stored remote controller.
Led 1
Led 2
Led 3
Led 4
Descrizione
ACCESO/
ON
SPENTO/
OFF
LAMP/
FLASH
SPENTO/
OFF
Numero lampeggi indica il tipo di
telecomando appena registrato.
The number of flashes indicates the type of
registered remote controller.
LAMP = LAMPEGGIO
1 LAMPEGGIO/FLASH : Telecomando memorizzato come registrato/ Registered remote controller
2 LAMPEGGI/FLASHES : Telecomando memorizzato come HCS rolling/ Remote controller saved as rolling HCS
3 LAMPEGGI/FLASHES : Telecomando memorizzato come HCS fisso/ Remote controller saved as fixed HCS
Cancellazione - Removal
La cancellazione dei radiocomandi avviene con una procedura analoga alla programmazione. Per cancellare un radiocomando procedere
premendo il pulsante P. Mentre lampeggia il led relativo al relè (si è entrati in fase di programmazione) premere il tasto S. In questo modo la
ricevente ha tutti i led accesi: si è in modalità di cancellazione. In questa modalità premere il tasto relativo al radiocomando che si vuole
cancellare e mantenerlo premuto finché i led non si spegneranno tutti. Ora il radiocomando è stato cancellato.
LED CONTROLLERS
DALCNET SRL
Registered Office: via Bassone, 22 - 37139 Verona (VR) - Italy
Headquarters: via Natta, 55 - 36040 Brendola (VI) - Italy
Tel. + 39 0444 1836680/1867452 Fax. + 39 0444 1867453
VAT: IT-04023100235
[email protected] www.dalcnet.com
RX4-12/24V
MULTI FRQ Ver_1.8-DIMMER
Manuale tecnico – Technical handbook
Made in Italy
rev. 2014-09-03
pag. 3/5
The removal of the remote controllers is like the programming procedure. To remove a remote controller push the button P. While led is flashing
push the button S. In this way all leds of the receiver lit up. Push the button related to the remote controller you want to remove and maintain it
press until all leds are switched-off. Now the remote controller has been removed.
Segnalazioni di errore – Error signals
Le segnalazioni di errore si identificano dai lampeggi degli altri due led perché i led relativi al relè 1 e 2 sono accesi fissi. Quando questo
accade confrontare il comportamento degli altri due led con la tabella sottostante per capire il tipo di errore in corso.
The error signals can be identified by the flashings of the other two leds, because the leds related to relè 1 and 2 are fixed on.
Led 1
Led 2
Led 3
Led 4
Descrizione
ACCESO/
ON
ACCESO/
ON
LAMP/
FLASH
SPENTO/
OFF
FUORI FREQUENZA UNICA/
OUT OF UNIQUE FREQUECY
ACCESO/
ON
ACCESO/
ON
LAMP/
FLASH
ACCESO/
ON
CODICE NON TROVATO/
CODE NOT FOUND
ACCESO/
ON
ACCESO/
ON
ACCESO/
ON
LAMP/
FLASH
VETTORE CODICI PIENO/
CODES' VECTOR FULL
ACCESO/
ACCESO/
ON
ON
LAMP = LAMPEGGIO
SPENTO/
OFF
LAMP/
FLASH
VETTORE FREQUENZE PIENO/
FREQUENCIES' VECTOR FULL
FUORI FREQUENZA UNICA/ OUT OF UNIQUE FREQUENCY:
Il jumper di banda fissa è inserito e si sta cercando di memorizzare un radiocomando con una frequenza diversa da quella in cui la ricevente è
bloccata.
The fixed bound jumper is inserted and you are trying to store a remote controller with a frequency different from that of the receiver.
CODICE NON TROVATO/CODE NOT FOUND:
Si sta procedendo alla cancellazione di un radiocomando. In questo caso però il radiocomando che si vuole cancellare non è presente nella
ricevente oppure è stato non correttamente interpretato. Riprovare eventualmente l'operazione.
You are going to remove a remote controller. In this case the remote controller you want to remove is not present in the receiver or it has been
not correctly interpreted. Repeat the operation.
VETTORE CODICI PIENO/ CODES' VECTOR FULL:
La memoria della ricevente è piena e si sta cercando di memorizzare un altro radiocomando. Cancellare un radiocomando non in uso e
riprovare.
The storage of the receiver is full and you are trying to store another remote controller. Remove a not used remote controller, then repeat the
operation.
VETTORE FREQUENZE PIENO/ FREQUENCIES' VECTOR FULL
Si sta cercando di memorizzare un radiocomando che ha una frequenza diversa da quelle precedentemente memorizzate. Siccome la capacità
della ricevente di memorizzare frequenze diverse è limitata, non è possibile memorizzare il radiocomando in questione.
You are trying to store a remote controller, which has a frequency different from those stored before. The receiver has limited capacity of storing
different frequencies, so it is impossible to store this last remote controller.
Reset della ricevente – receiver's reset
Per fare un Reset generale della ricevente procedere così:
1.
2.
Premere e mantenere premuto il tasto P e il tasto S per 10 secondi
Rilasciare i tasti quando tutti i led iniziano a lampeggiare velocemente.
I led possono presentare le seguenti configurazioni:
LED LAMPEGGIANO TUTTI VELOCEMENTE: Reset in corso. È possibile rilasciare il pulsante P ed S. Quando il Reset è terminato i LED si
spengono tutti.
To do a general reset of the receiver:
1. Press button P and S for 10 seconds
2. Stop pressing when all leds start flashing quickly
When the reset has finished all led switch-off.
LED CONTROLLERS
DALCNET SRL
Registered Office: via Bassone, 22 - 37139 Verona (VR) - Italy
Headquarters: via Natta, 55 - 36040 Brendola (VI) - Italy
Tel. + 39 0444 1836680/1867452 Fax. + 39 0444 1867453
VAT: IT-04023100235
[email protected] www.dalcnet.com
RX4-12/24V
Made in Italy
MULTI FRQ Ver_1.8-DIMMER
Manuale tecnico – Technical handbook
rev. 2014-09-03
pag. 4/5
Contatti e Schema di collegamento/ Connection schema
RX4CC board
24V
12V
JUMPER
Contatto 1
Contatto 2
+
-
Contatto 3
12/24 Vdc
Contatto 4
(Jumper di selezione)
(selection Jumper)
Led dimmer
Input 1/2/3
Led dimmer
0V/5V
ATTENZIONE/ WARNING
• Nello schema viene presentato per semplicità il collegamento per uno dei quattro contatti presenti sul ricevitore.
Tale schema vale per ciascuno dei quattro contatti.
E' strettamente consigliata la consultazione delle Note Tecniche riportate di seguito.
In this schema there is the connection for just one of the four contacts on the receiver. The schema is the same for all contacts.
See the following Technical Notes.
•La tensione di alimentazione desiderata (12/24V AC/DC)può essere selezionata tramite il jumper presente sulla ricevente.
The input voltage can be selected by the jumper on the receiver.
LED CONTROLLERS
DALCNET SRL
Registered Office: via Bassone, 22 - 37139 Verona (VR) - Italy
Headquarters: via Natta, 55 - 36040 Brendola (VI) - Italy
Tel. + 39 0444 1836680/1867452 Fax. + 39 0444 1867453
VAT: IT-04023100235
[email protected] www.dalcnet.com
RX4-12/24V
MULTI FRQ Ver_1.8-DIMMER
Made in Italy
Manuale tecnico – Technical handbook
rev. 2014-09-03
pag. 5/5
Note Tecniche - Technical Notes
• L'installazione e la manutenzione deve essere eseguita solamente da personale qualificato nel rispetto delle normative vigenti.
• Il prodotto deve essere installato all'interno di un quadro elettrico protetto da sovratensioni.
• Per l'alimentazione utilizzare preferibilmente alimentatori di tipo SELV. In caso di utilizzo di alimentatori in classe I collegare
obbligatoriamente TUTTI i punti di terra di protezione (PE = Protection Earth) ad un impianto di messa a terra eseguito a regola
d'arte e certificato.
• Mantenere separati i cavi a 230V dai circuiti a bassissima tensione di sicurezza (SELV)
• E' assolutamente vietato collegare, per qualunque motivo, direttamente o indirettamente, la tensione di rete 230V alle parti del
circuito.
• Installation and maintenance must be performed only by qualified personnel in compliance with current regulations.
• The product must be installed inside an electrical panel protected against overvoltages
• For the power supply is preferable to use a SELV power supply. In the case of using class I power supply, ALL points of the
protective earth (PE = Protection Earth) must be connected to a valid protection earth .
• Keep 230V cables separate from circuits to low voltage (SELV)
• It 'absolutely forbidden to connect, for any reason whatsoever, directly or indirectly, the 230V mains voltage to any part of the
circuit.
LED CONTROLLERS