1
MAIN FEATURES
• RG-70FM & RG-71FM for flush mounting (single gang box) for up
to 15' (4.5m) or 30' (9m) ranges.
• RG70 & RG71 for wall/ceiling mounting for up to 4.5m (15') or 9m
(30') ranges.
• Suitable for most common types of plate, tempered, laminated and
wired glass.
• Minimum size for all types of glass: 30cm x 30cm (12''x12'')
• Thickness Plate
3.2 mm-6.4mm
(1/8'' -1/4'')
Tempered,
Laminated, Wired
6.4 mm (1/4'')
• No adjustments necessary - each unit is fully calibrated at factory.
• Will not alarm if glass pane broken from inside or glass dropped on
floor.
• Active and passive microphone supervision - verifies unit is in working
condition..
• Full remote test using RG-65 Glass Break Simulator - no need to
open unit.
• RA66 optional ceiling/wall mount bracket available for optimal
mounting and performance.
Deutsch
Akustischer Glasbruchmelder
für Unterputz-oder Wand-/
Deckenmontage
ÜBERSICHT
Der VITRON Plus ist ein fortschritt-licher, mikroprozessor gesteuerter,
akustischer Glasbruchsensor für Aufund Unterputzmontage. Er verwendet eine hochentwickelte MusterErken-nungs-Analyse von sowohl nieder-als auch hochfrequenten
Signalen. Er erkennt das Zerbrechen der meisten
handelsüblichen Scheiben unter Ver-meidung von Falschalarmen.
Fig 4
Fig 5
CABLE
HOLE
MOUNTING HOLES
(SURFACE INSTELLATION)
INSTALLATION PROCEDURE
1
CABLE
HOLE
STEP
RANGE OF COVERAGE
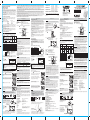
VITRON Plus range of coverage depends on the type of glass (see
Table 1) and the angle between VITRON Plus and glass (see Table
2 Fig 1).
Table 1: Vitron Plus range according to glass type
Thickness Max.
Range
Model
Minimum 3.2 - 6.4mm 4.5m
RG70
RG70FM 30x30cm (1/8''-1/4'') (15ft)
(12''x12'')
Minimum
9m
50x50 cm
RG71
(20"x20") 3.2 - 6.4mm (30ft) Minimum 6.4mm 6m
30x30cm (1/4'') (20ft)
RG71FM Minimum (1/8''-1/4'')
6m (12''x12'')
30x30cm
(20ft)
(12''x12'')
Fig 6
Table 2: VITRON Plus range of coverage according to angle
Angle (degrees)
0
15
30
45
60
75
90
60˚ 45˚
TAMPER
SWITCH
HOLDING TABS
Percentage of
Maximum
30˚
75˚
STEP
15˚ Range as
function of
0˚ angle between
Vitron and
glass.
VITRON
VITRON
Angle
between
VITRON
and glass
WINDOW
Verify that the distance between the VITRON Plus and the furthest
point on the protected glass does not exceed the maximum specified
range taking into account the reduced range due to angle (see Fig 2)
Fig 2
ANGLE
Important: Other factors effecting range:
• Curtains and blinds may reduce the effective range.
• Sound absorbing materials in the protected area may
reduce the range.
RANGE OF LOCATION
VITRON Plus can be mounted in a single gang box using flush mount
adapter or on wall or ceiling. For optimal results the VITRON should
be mounted as nearly opposite the glass area to be protected, as
shown in Fig 3.
Fig 3
VITRON Mounting Options Opposite Wall Mount (For optimal results VITRON is centered
opposite glass)
Ceiling Mount (for optimal results VITRON is
centered and directed towards protected glass
using RA-66 Bracket).
VITRON
YES
VITRON
VITRON
YES
VITRON
YES
VITRON
Note: The VITRON will return to NORMAL mode after two minutes.
Setting the "CODE" switch and pressing the "Manual" button at any
time will initiate another two minutes of Full Remote Test Mode.
If RG65 tester is not available test mode can be initiated by inserting
screwdriver in slot on front cover (to the right of the LED) and pressing
the test button. The VITRON LED will blink every 2 seconds. VITRON
will automatically return to normal mode after 5 minutes. Functional
test can now be performed using another tester. Pressing the button
again during the test mode will immediately return unit to normal mode.
STEP
6
MEMORY INDICATION
VITRON
NO
a) When Ceiling Mounted use the RA66 bracket for best preformance.
b) Do not mount VITRON Plus on same wall as protected glass.
c) Avoid installing the VITRON Plus near sources of loud
noises or vibrations (air conditioners, fans, compressors, stereos,
etc.)
MOUNTING
FLUSH MOUNTING
3) Snap on front cover & secure with screw provided. Snap
complete VITRON Plus unit into mounting bracket.
4) Snap on front
cover of mounting
bracket
2) Insert cable through knockout in
VITRON Plus base & insert wires into
terminal block, snap PCB into base.
If disturbances occur, re-position the unit and re-test. Turn all noise
generating equipment off and wait until unit returns to NORMAL
mode.
To use the MEMORY option - remove the Jumper. The LED is
latched on the first alarm.
The LED is reset by temporarily removing the power from the detector
(using a Switched 12V line from the control panel).
Note:
3
Possible Cause
LED Indication Disturbance
***
Blinks once every
NONE
2 sec.
YES
Rapid Flashes
Low frequency sound
High frequency
Continuously
YES
ON for 3 sec.
sound
VITRON
VITRON
1) Screw mounting
bracket into single
gang box
Note: To remove trimplate, squeeze the top and bottom
simulaniously and pull away.
Montagelöcher
(Aufbaumontage)
Kabeleinführung
Montagelöcher
(Eckinstallation)
Kabeleinführung
4
VITRON PCB - General View
HALTENASEN
Ansicht VITRON Platine
STEP
7
NORMAL OPERATION
There are three types of indication in normal mode:
Active Supervision: Any loud sounds such as clapping, whistling or key
- jingling should produce a flash of the VITRON's LED. This verifies
that the VITRON is active. The alarm relay is not opened.
Passive Supervision: The Vitron continuously monitors its audio channel.
If no sounds are registered for more than 24 hours the LED will flash
rapidly. This indication will persist until a sound is registered. The alarm
relay is not opened.
Alarm: On detection of framed glass being broken from outside the
LED will light continuously for 3 seconds and the alarm relay will open.
SPECIFICATIONS
ELECTRICAL
CURRENT CONSUMPTION
20mA at 12V (24mA max)
VOLTAGE REQUIREMENTS 9.3 - 16 VDC
ALARM CONTACTS NC, 24 VDC, 50mA
TAMPER CONTACTS NC, 24 VDC, 0.5A
ACOUSTIC SENSOR
Omni Directional Microphone
PHYSICAL
SIZE:
87 x 50.7 x 28.6 mm (3.4 x 2.0 x 1.1 in.)
WEIGHT: 63.70g (2.25 oz.)
GLASS
TYPES: Plate, laminated, wired & tempered.
SIZES:
30 x 30cm (12" x 12") minimum, except for 9m /
30ft RG-61 with a minimum of 50x50cm(20" x 20")
ENVIRONMENTAL
OPERATING TEMPERATURE 0˚C to 55˚C (32˚F to 131˚F)
STORAGE TEMPERATURE -20˚C to 60˚C (-4˚F to 140˚F)
RG-71FMUL
Intended to be connected to a UL control panel capable of providing
4 hours of standby power.
Test annually. Specifications are subject to change without prior notice.
Should any questions arise please contact your nearest distributor.
TEST
TASTE
Tabelle 2: VITRON Plus Reichweite abhängig vom Winkel
Winkel (Grad)
0
15
30
45
60
75
90
Max. Abstand in Prozent
100
96
87
70
50
26
0
60˚ 45˚
Abb.1
30˚
75˚
Maximale Prozentuale
Reichweite abhängig
vom Winkel zwischen
VITRON Plus und
0˚ Glasfläche.
15˚
VITRON
Winkel zwischen
VITRON und Glas
GRAD
Seitansicht
2
SCHRITT
5
TEST
Ein Test sollte unter Verwendung des VITRON Testers RG65
durchgeführt werden, der speziell für einen effektiven und genauen
Test entwickelt wurde.
• Stellen Sie den unteren Auswahlschal-ter des RG65 auf
CODE.Drücken Sie den Auslösetaster um den Sensor in den
Testmodus zu versetzen.Die LED des VITRON blinkt alle 2 Sekunden.
• Hochfrequenz (Audio)Test: Positio-nieren Sie das Testgerät am
entferntes-ten Punkt der zu überwachenden Flä-che und richten Sie
das Mikrofon auf den Sensor.Stellen Sie den unteren Wahlschalter
auf Glas und den oberen auf den zu simulierenden Glastyp.
Lösen Sie den Tester aus. Die LED des Vitron wird für 3 Sekunden
aktiviert und das Alarmrelais schaltet.
• Niederfrequenz Test:Klopfen Sie vorsichtig an die Scheibe (Vorsicht,
zerbrechendes Glas kann Verletzungen verursachen!).Kontrollieren
Sie, ob der VITRON mit mehreren schnellen Impulsen der LED
reagiert. Das Alarmrelais wird in diesem Fall nicht aktiviert.
Anmerkung
Alle Tests sollten unter den schlechtesten Bedingungen durchgeführt werden.Positionieren Sie das Testgerät hinter Vorhängen
oder Stores,sofern vorhanden.
WICHTIG: Weitere Faktoren,die die Entfernung beeinflussen:
•Es sollten keine Hindernisse zwischen VITRON und Glas sein
•Vorhänge und Gardinen verringern die Reichweite
•Schalldämmende Materialien in der Umgebung können die
Reichweite beeinflussen.
SCHRITT
GEWINDE FÜR
SCHRAUBEN
HALTENASEN
Vergewissern Sie sich,dass die Entfer-nung zwischen VITRON Plus
und der zu überwachenden Glasfläche die max.
Reichweite abhängig von Glastyp und Winkel zur Fläche nicht
überschreitet
(s.Abb.2)
Abb.2
ALARM
RELAIS
SABOTAGE
SCHALTER
UMGEBUNGSTEST
Aktivieren Sie alle Störquellen in der Umgebung wie etwa
Ventilatoren,Stere-oanlagen usw.
Beobachten Sie den VITRON und ach-ten Sie auf evtl.Störungen:
REICHWEITE IN ABHAN-GIGKEIT
VOM MONTAGEORT
Der VITRON Plus kann mit dem Unterputzgehäuse oder Aufputz montiert werden.Für optimale Ergebnisse
sollte der Melder so nahe wie möglich gegenüber der zu sichernden
Glasflä-che montiert werden,wie in Abb.3 gezeigt.
LED Anzeige
blinkt alle
2 Sek.einmal
schnelles Blinken
permanent an
für 2 Sek.
Störung
keine
mögl.Ursache
***
ja
ja
Nieder-frequenzton
Hoch-frequenzton
Abb.3
VITRON Befestigung gegenüber Scheibe. (Für
optimale Resultate soll-te der Melder zentriert zur
Scheibe befestigt werden)
VITRON
YES
Treten Störungen auf,verändern Sie den Standort des Melders und
testen Sie erneut.
Schalten Sie alle Störquellen aus und warten Sie,bis der Melder in den
NORMAL-Modus zurückschaltet.
Anmerkung
Deckenmontage
Für optimale Ergebnisse ist der Mel-der zur
Scheibe zentriert und mit dem Gehäuse RA-66
leicht abwärts gerich-tet
Eckenmontage
(Wählen Sie die Ecke gegenüber der zu
überwachenden Fläche)
Der VITRON kehrt in den Nor-malzustand automatisch nach 2
Minuten zurück.Betätigen des CODE Schalters und drücken der
MANUELL Taste initiiert eine weiter 2 minütige Komplett-Test-phase.
VITRON
VITRON
VITRON
VITRON
VITRON
VITRON
VITRON
NO
MONTAGE
UNTERPUTZMONTAGE
3) Rasten Sie das Frontgehäuse ein und sichern Sie es mit der
Schraube.Drü-cken Sie die komplette Einheit in das Unterputzgehäuse
4) Drücken Sie die
Frontabdeckung auf den
Melder
2) Kabel einführen im
Durchbruch und anschließen,dann Platine in
Gehäuse einsetzen
PROCEDURA DI INSTALLAZIONE
1
Tabella 1: Portata Vitron Plus riferita al tipo di vetro protetto
Vetro temperato laminato
Tipo di
Vetro normale
e antisfondamento
vetro
Portata
Dimensione Spessore Portata
Modello
max Dimensione Spessore max
Minimo 3.2 - 6.4mm 4.5m Minimo 6.4mm 3m
RG70
RG70F 30x30cm (1/8''-1/4'') (15ft) 30x30cm (1/4'') (10ft)
(12''x12'')
(12''x12'')
Minimo
9m
50x50 cm
RG71
(20"x20") 3.2 - 6.4mm (30ft) Minimo 6.4mm 6m
30x30cm (1/4'') (20ft)
RG71F
Minimo (1/8''-1/4'') 6m (12''x12'')
30x30cm
(20ft)
(12''x12'')
angolo tra il sensore
VITRON e il vetro da
proteggere
ANGOLO
POSIZIONE E FISSAGGIO
VITRON Plus può essere installato con orientamento verso il vetro
utilizzando la staffetta di orientamento RA 66.
Per ottenere il miglior risultato il sensore VITRON deve essere
installato il più possibile vicino e di fronte al vetro da proteggere come
mostrato in figura 3.
Fig 3
Montaggio su muro opposto al vetro. Per un risultato
ottimale il sensore VITRON deve essere installato
il più possibile al centro della finestra verso cui viene
orientato.
Montaggio a soffitto.
Per un risultato ottimale il sensore VITRON deve
essere installato al centro del locale e direzionato
(con la staffetta RA 66) verso i vetri da proteggere.
VITRON
SI
VITRON
VITRON
SI
Montaggio ad angolo. Scegliere l’angolo opposto
alle finestre da proteggere.
VITRON
VITRON
VITRON
1) Montagegehäuse
mit Unterputz-dose
verschrau-ben
SCHRITT
6
SPEICHERANZEIGE
Um die Speicherfunktion zu aktivieren entfernen Sie die Brücke MEM.
Die LED wird bei Alarm dauerhaft ange-steuert.
7
NORMALMODUS
SCHRITT
Es existieren 3 Anzeigearten im Betriebsmodus:
Aktive Überwachung
Jeder laute Ton wie Händeklatschen, Schlüsselklirren oder Pfeifen
bringt die LED zum flackern. Dies zeigt die Betriebsbereitschaft des
VITRON. Das Alarmrelais wird nicht aktiviert.
Passive Überwachung
Der VITRON überprüft permanent die Funktion des Mikrofons.Wird
über einen Zeitraum von 24 Stunden kein akustisches Signal registriert,
beginnt die LED schnell zu flackern bis ein Signal registriert wird. Das
Alarmrelais wird hierbei nicht aktiviert.
Alarm
Wird das Zerbrechen der Scheibe von Aussen registriert, wird die LED
für 3 Sekunden leuchten und das Alarm-relais wird aktiviert.
TECHNISCHE DATEN
ELEKTRISCH
24mA bei 12V DC (24mA max.)
Verbrauch
Betriebsspannung
9,3-16V DC
Alarmkontakt
NC,24V DC,50mA
Sabotagekontakt
NC,24V DC,0,5A
Akustischer SensorOmnidirektionales Mikrofon
Grösse
87x50,7x28,6 mm
Gewicht
63,7 g
Glas-Typen
Normalglas,laminiertes Glas,
getempertes Glas,drahtverstärktes Glas
Größe
30x30 cm min..,bei Abstand 9m
50x50 cm min
UMWELTBEDINGUNGEN
Arbeitstemperatur
0 °C –55 °C
Lagertemperatur
-20 °C –60 °C
SI
Montaggio a lato della finestra.
Non è raccomandato installare il sensore VITRON in
una posizione diversa da quella frontale alla finestra.
Se è necessario farlo consultare i diagrammi di
angolazione e testare con attenzione il sensore usando
il Tester Vitron RG-65.
VITRON
NO
staffa RA66 per una resa ottimale.
b) Non montate il sensore VITRON sullo stesso muro della
finestra da proteggere.
c) Evitate di installare il sensore VITRON vicino a sorgenti di
rumore intenso e fonti di vibrazioni (condizionatori,
compressori, stereo e ventole in genere).
3
4
FORI FER
FISSAGGIO
COLLEGAMENTI
Collegate i fili alla morsettiera secondo le seguenti disposizioni (Fig. 6):
12 Vcc:
alimentazione principale
ALARM:
contatto N. C. di allarme
TAMPER:
contatto N. C. di antiapertura
EOL:
morsetto libero di appoggio per eventuale
resistenza di fine linea
Fig 6
PUNTI DI SGANCIO CIRCUITO
PONTICELLO
DI ABILITAZIONE
MEMORIA DI
ALLARME
PULSANTE DI
ABILITAZIONE
TEST COMPLETO
RELE DI
ALLARME
VITE DI
CHIUSURA
PASSO
TARATURA E TEST
Per effettuare una accurata verifica di funzionamento del sensore
VITRON Plus usate ESLUSIVAMENTE il tester Vitron RG 65.
Il tester RG 65 è stato specificatamente costruito e calibrato per ottenere
una precisa verifica di copertura dei sensori VITRON.
• Impostate il selettore inferiore del tester RG 65 in posizione CODE.
Premete il pulsante del test per porre il sensore VITRON Plus in
modalità TEST.
Il LED posto sul sensore VITRON lampeggerà con frequenza costante
di 2 secondi.
• TEST DELL’ALTA FREQUENZA (AUDIO).
Posizionate il tester RG 65 vicino al vetro da proteggere nella
posizione più lontana orientandolo verso il sensore VITRON.
Riportare il selettore inferiore del tester in posizione GLASS e
impostate il selettore superiore nella posizione relativa al tipo di vetro
che si vuole proteggere: Plate (normale), TEMPERED (temperato),
LAMINATED / WIRED (antisfondamento).
Generate il suono di rottura simulata premendo il tasto (in MANUALE
per una singola riproduzione di rottura, in AUTOMATICO per una
sequenza periodica di suoni di rottura). Verificate che il LED del
VITRON si illumini per 3 secondi e che il relè di allarme si attivi
(conferma dalla centrale di allarme).
Se ciò avviene significa che il sensore VITRON Plus è in grado di
rilevare una eventuale rottura del vetro da quella posizione.
• TEST DELLA BASSA FREQUENZA
Urtate dall’esterno il vetro da proteggere (fatelo non troppo
violentemente).
Verificate che il sensore VITRON Plus produca continui e rapidi
lampeggi del LED in concomitanza con gli urti sul vetro.
Questo test è solo VISIVO e non provoca l’eccitazione del relè di
allarme e la visualizzazione verso la Vostra centrale.
Note: Tutti i test devono essere finalizzati a riprodurre le peggiori
condizioni di rilevazione in modo da garantire i limiti estremi di
rilevazione. Tutti i test, per essere veritieri, devono essere effettuati
lasciando tende, tendaggi e tessuti vari nella posizione naturale.
TEST AMBIENTALE
Verificate che tutte le apparecchiature domestiche non interferiscano con
l’analisi del sensore VITRON (incluso aria condizionata, ventilatori, radio,
ect.).
Osservate il comportamento del LED sul sensore VITRON e confrontatelo
con la tabella sotto esposta:
LED
Un lampeggio
ogni 2 secondi
Lampeggi veloci
DISTURBO
Nessuno
POSSIBILE CAUSA
************
Sì
Acceso per 3
secondi e poi OFF
Sì
Presenza di rumore
in bassa frequenza
Presenza di rumore
in alta frequenza
Se c’è presenza di disturbo si deve cambiare posizione del sensore VITRON
e riprocedere alla verifica di funzionamento con il tester RG 65.
Finita la fase di verifica funzionamento e copertura attendere che il sensore
VITRON esca dalla modalità di TEST e ritorni in modalità NORMALE.
Note: Il sensore VITRON ritorna in modalità normale dopo 2 minuti
da quando è stato posto in TEST. Per riportare il sensore di nuovo in
TEST usate il tester RG 65 e riproducete il segnale di CODE. In questo
modo riporterete per altri 2 minuti il sensore in modalità TEST per poter
ripetere le prove di copertura.
Se il tester RG 65 NON è disponibile, è possibile entrare nella modalità di
TEST del sensore VITRON premendo con un cacciavite il pulsante di test
situato nella parte frontale dell'unità alla destra del LED.
Il LED lampeggerà ogni 2 secondi indicando che il sensore VITRON è
entrato in modalità TEST.
Dalla modalità TEST attivata con pressione del pulsante interno, il sensore
VITRON ne esce automaticamente dopo circa 5 minuti.
Per uscire dalla modalità TEST in qualsiasi momento è sufficiente premere
di nuovo il pulsante posto vicino al LED.
Il sensore esce immediatamente dalla modalità di TEST e ritorna in modalità
di normale funzionamento.
Note: Ogni tester audio usato in alternativa al dispositivo di test RG65 proposto da Rokonet, non è garantito che darà valori precisi sulla
copertura reale del sensore Vitron plus.
6
VITRON
Note: a) Quando il sensore è montato a soffitto usare sempre la
PASSO
A PARETE
PASSAGGIO
CAVI
PASSO
PASSAGGIO
CAVI
FORI FER FISSAGGIO
Vista fori di
Montaggio e
passaggio cavi
VITRON
5
VISTA DI LATO
2
Fig 5
CLIP DI
INNESTO
Altri fattori che possono influire sulla portata sono:
1) ostacoli tra il sensore VITRON e il vetro da proteggere ( mobili, scaffali,
ecc.)
2) tende e tessuti sulla finestra in genere riducono la portata in quanto
assorbono l’energia espressa dal vetro nel momento della rottura.
3) lo stoccaggio di materiale fonoassorbente su scaffali adiacenti al vetro
e comunque nell’ambiente da proteggere riducono la
sensibilità del sensore.
PASSO
Fig 4
TAMPER
ANTIAPERTURA
Tabella 2: Portata Vitron Plus riferita all'angolatura del sensore
rispetto al vetro protetto
Angolo (gradi)
Massima portata (in%)
0
100
15
96
30
87
45
70
60
50
75
26
90
0
45˚
percentuale
della
60˚
Fig 1
30˚
massima portata
75˚
15˚
riferita
all'angolatura del
0˚
sensore rispetto al
vetro da
VITRON
proteggere.
Verificate che la distanza tra il sensore VITRON Plus e il punto più
lontano da proteggere non sia superiore alla massima distanza
riportata specificata nelle tabelle sopra esposte tenendo presente
anche la riduzione della distanza dovuta alla eventuale angolatura
del sensore (fig. 2 in basso).
Fig 2
MODELLO DA PARETE / SOFFITTO
• Aprite il coperchio facendo leva con
un cacciavite.
• Rimuovere la scheda elettronica per
facilitarne il cablaggio (fig. 4)
• Aprite i fori di fissaggio e di passaggio cavi
(fig. 5).
• Inserire il cavo attraverso il foro predisposto e montare la base
dell'unità nella posizione prescelta.
• Sigillare i restanti fori con del silicone.
• Inserire la scheda elettronica.
Scheda VITRON Vista generale
VITRON
Ein Test mit anderen Testgeräten wie dem Tester RG65 kann
falsche Ergebnisse liefern
a) Für Deckenmontage ist das Gehäuse RA66 empfohlen
b) Montieren Sie den VITRON Plus nicht an die selbe Wand an
der sich das zu überwa-chenden Glas befindet
c) Vermeiden Sie eine Installa-tion in der Nähe von Geräuschund/oder Vibra-tionsquellen (Klimaanlage,
Lüfter,Kompressor,Stereo-anlage etc.)
3
Ist kein Testgerät RG65 vorhanden, kann der Testmodus aktiviert
werden durch Öffnen des Gehäuses und Drü-cken der Test-Taste. Die
LED des VITRON wird alle 2 Sekunden blin-ken. Der Melder setzt sich
nach 5 Minuten zurück in den Betriebsmodus.
Ein Funktionstest mit einem anderen Testgerät ist nun möglich.Durch
Drü-cken des Test-Tasters während der Testphase kehrt der Melder
sofort in den Btriebsmodus zurück.
Anmerkung
Anmerkung
SCHRITT
CARATTERISTICHE PRINCIPALI
• Versioni per il montaggio ad incasso RG 70 FM con portata fino a
4,5 metri e RG 71 FM con portata fino a 9 metri.
• Versioni per il montaggio parete / soffitto RG 70 con portata fino a
4,5 metri e RG 71 con portata fino a 9 metri.
• Tutti i modelli sono adatti ai più comuni tipi di vetro normale, temperato,
laminato o anti sfondamento.
• La minima area di vetro che il VITRON PLUS è in grado di rilevare,
per qualsiasi tipo di vetro, è 30 x 30 cm.
• Spessore vetro:
normale
da 3,2 mm a 6,4 mm
temperato
laminato
6,4 mm
antisfond.
• Nessuna taratura è necessaria in quanto ogni sensore è pre tarato
in fabbrica.
• Nessun allarme viene attivato se un vetro viene rotto all’interno
dell’area protetta dal sensore o se un vetro cade sul pavimento.
• Supervisione attiva e passiva del microfono con auto verifica durante
il normale funzionamento.
• Totale test remoto, con commutazione del relè di allarme, usando
il simulatore RG 65 senza aprire il coperchio del sensore.
• E’ opzionalmente disponibile una staffetta per fissaggio parete e
soffitto siglata RA 66 ,molto utile per direzionare il sensore verso le
vetrate da proteggere in modo da ottimizzare le prestazioni del
sensore.
VITRON
YES
YES
Seitliche Wandmontage (nicht empfohlen, da der
Meldernicht gegenüber der Scheibe sitzt - beach
- ten Sie Tabelle 2.) Testen Sie sorgfäl-tig die
beiden äusseren Seiten des Winkels mit dem
Tester RG-65
Italiano
PASSO
COPERTURA E PORTATA
La copertura e la portata del sensore Vitron Plus dipendono dal tipo
di vetro (vedi tabella 1) e dalla angolazione tra il sensore e il vetro da
proteggere (vedi tabella 2 e fig. 1).
VERDRAHTUNG
Abb 6
TESTING
Testing should be performed using the RG65 VITRON tester which
has been specially designed and calibrated to give accurate range test
results.
• Set lower selector switch on RG65 to CODE setting. Press operating
button on tester to put unit into test mode. VITRON LED will blink
every 2 seconds.
• HIGH FREQUENCY (AUDIO) TEST: Position the Glass Break
Simulator at the farthest point on the protected glass and face it into
the room. Set lower selector to GLASS setting and upper to type of
glass to be simulated. Generate glass-break sound by pressing
operating button. Verify that VITRON LED turns on for 3 seconds
and ALARM relay is activated.
• LOW FREQUENCY TEST: Tap the window gently. (Caution: breaking
glass may cause injury). Verify that the VITRON produces several
rapid flashes of its LED in conjunction with each tap. The ALARM
relay is not activated in this case.
VITRON
Side Wall - Mount (not recommended as VITRON
is not opposite glass - see range versus angle
diagram. Test carefully at both ends of glass
using RG-65 Tester)
VITRON Montage-und Kabel-durchführungen
Führen Sie die Verkabelung wie folgt durch (s.Abb.6)
12V DC: Spannungsversorgung
ALARM: Relaisausgang (NC)
TAMPER: Sabotageausgang (NC)
EOL:
Abschlusswiderstand
SCREW HOLE
Note: Any test performed using testers other than RG65 will not give
accurate range results.
Corner Mount (choose corner opposite glass
to be protected).
STEP
5
ALARM RELAY
ENVIRONMENTAL TEST
Operate all devices in the protected region that may interfere with
the detector, including air conditioners, fans, radios etc.
Observe the VITRON and note any disturbances:
• There should be no obstructions between the VITRON Plus
and the protected glass.
2
Abb.5
SCHRITT
FULL
TEST
BUTTON
Note: All tests should be conducted under worst-case
conditions. All sounds should be generated behind curtains
or blinds, if present.
SIDE VIEW
STEP
Abb.4
MEMORY
JUMPER
Percent of max range
100
96
87
70
50
26
0
Fig 1
DESCRIZIONE GENERALE
Il sensore audiometrico rottura vetro VITRON PLUS è basato su un
avanzato microprocessore. Disponibile in versione da parete / soffitto
o da incasso (in scatola 503) VITRON PLUS si pone, con la sua analisi
comparativa della contemporaneità dell’evento bassa frequenza
(flessione/ colpo) e alta frequenza (rottura), come uno dei sensori più
sofisticati della sua categoria. Il VITRON PLUS è in grado di rilevare
con precisione la rottura dei più comuni tipi di vetro ed è immune ai
falsi allarmi.
1
VITRON PCB - General View
HOLDING TABS
MEMORY
JUMPER
WAND-/DECKENMONTAGE
• Öffnen Sie das Gehäuse mit einem
Schlitz-Schraubendreher
• Entfernen Sie die Platine für die
Beschaltung (s.Abb.4)
• Öffnen Sie die benötigten Kabel-und
Schraubendurchbrüche (s.Abb.5)
• Führen Sie das Kabel von hinten ein und befestigen Sie das Gehäuse
am endgültigen Montageort
• Dichten Sie die Öffnungen mit Kitt ab
• Setzen Sie die Patine wieder ein
DEKTEKTIONS REICHWEITE
SCHRITT
Die Reichweite des VITRON Plus ist abhängig vom Glastyp (s.Tab.1)und
dem Richtungswinkel zwischen
VITRON Plus und der Scheibe (S.Tab 2 Abb.1)
Tabelle 1 :VITRON Plus Reichweite
in Bezug auf Glastyp
FENSTER
Size
TERMINAL WIRING
Wire the cable to the Terminal Block as follows (see fig 6):
12 VDC:
Power supply inputs
ALARM:
Normally-Closed relay outputs
TAMPER:
Normally-Closed Tamper
switch outputs
EOL:
End-of-Line resistor connection
Tempered,
Laminated, Wired
Size
Thick Max.
ness Range
Minimum 6.4mm 3m
30x30cm (1/4'') (10ft)
(12''x12'')
Plate
4
Italiano
INSTALLATION
MOUNTING HOLES (CORNER
INSTALLATION)
VITRON
Typ of
Glass
STEP
EIGENSCHAFTEN
• RG70FM &RG71FM bei Unterputz für Entfernungen zwischen 4,5
und 9 m
• RG70 &RG71 bei Aufputzmontage für Entfernungen zwischen 4,5
und 9 m
• Einsetzbar für die meisten handels-üblichen Scheiben,Normalglas,
beschichtet, laminiert und verdrahtet.
• Mindestscheibengröße aller Typen: 30x30 cm
• Scheibendicke Normalglas:3,2-6,4mm;andere Sorten bis 6,4mm
• Kein Abgleich notwendig,jede Ein-heit ist werksseitig kalibriert.
• Keine Auslösung wenn die Scheibe von innen zerbrochen wird,oder
Glas im Raum zerbricht
• Aktiver und passiver Mikrofontest überprüft die Funktion
• Kompletter Ferntest mit RG-65 Simulator,der Melder muß nicht
geöffnet werden.
• RA66-Halter für Wand-/Deckenmontage optional erhältlich
Deutsch
FINESTRA
E n g l i s h
WALL/CEILING MOUNTING
• Open the cover using a flat screwdriver.
• Remove the PCB in order to facilitate
ease of wiring (see Fig 4).
• Open the required mounting and
cableholes (see Fig 5).
• Insert the cable through the cable hole
and mount the rear cover in its final location.
• Seal the remaining holes with sealant.
• Snap back the PCB (if removed).
VITRON
E n g l i s h
GENERAL DISCRIPTION
The VITRON Plus is an advanced microprocessor based Acoustic
Glass Break Detector, for flush or surface wall/ceiling mounting, using
advanced glass-breaking pattern analysis of both low frequency "flex"
and high frequency "shatter" channels. It will detect the breaking of
most common types of framed glass panes while ignoring false alarms.
MONTAGGIO
MONTAGGIO AD INCASSO
3) Svitate la vite di chiusura e sganciate il coperchio. Togliete tutto il
sensore dall’alloggio della staffa di montaggio ad incasso.
MEMORIA DI ALLARME
PASSO
Per usare la funzione di MEMORIA ALLARME presente nel sensore VITRON
si deve agire sul ponticello posto sul circuito elettronico.
Togliendo il ponticello si abilita la MEMORIA DI ALLARME e ogni allarme
vero rilevato dal sensore determina una illuminazione fissa del LED.
Per resettare il LED sempre acceso si deve rimuovere momentaneamente
l’alimentazione al sensore (usare un pulsante N. C. o una funzione della
centrale per ottenere tale prestazione).
7
NORMALE FUNZIONAMENTO
PASSO
Ci sono 3 tipi di segnalazioni che possono essere indicate dal sensore in
modo di normale funzionamento.
SUPERVISIONE ATTIVA: ogni suono forte simile al battere delle mani,
fischio o tintinnio deve produrre un lampeggio del LED sul sensore.
Se questo avviene è la verifica che il sensore è ATTIVO.
Il relè di allarme comunque NON deve commutare.
SUPERVISIONE PASSIVA: il sensore VITRON continua a monitorare il
suo canale audio. Se nessun suono viene campionato in un arco di tempo
di 24 ore il LED lampeggia velocemente indicando la condizione ANOMALA.
Tale condizione visiva persiste finchè almeno un suono non viene campionato.
Il relè di allarme comunque NON deve commutare.
ALLARME: Quando una condizione di rottura vetro valida si presenta il
LED si illumina costantemente per 3 secondi e il relè di allarme commuta.
SPECIFICHE TECNICHE
4) Staccate il frontalino di
plastica.
2) Fate passare il cavo
attraverso il foro predisposto
alla base del VITRON Plus e
collegate i fili alla morsettiera.
per comodità sganciate il
circuito elettronico dalla base.
1) Vite di fissaggio del
contenitore da incasso.
ELETTRICHE
Assorbimento 20 mA a 12 Vcc (24 mA max)
Alimentazione da 9,3 a 16 Vcc
Contatto di allarme N. C. - 24 Vcc - 50 mA
Contatto tamper N. C. - 24 Vcc - 0,5 mA
SENSORE AUDIO
Microfono omni direzionale
MECCANICHE
Dimensioni 87 x 50,7 x 28,6 mm
Peso 63,7 grammi
VETRO ANALIZZATO
Tipo: normale, stratificato, temperato e
antisfondamento.
Dimensioni: 30 x 30 cm minimo, eccetto per
la versione RG 71 (9 metri) che è
minimo 50 x 50 cm.
LIMITI AMBIENTALI
Temperatura di lavoro da 0° C a 55° C
Temperatura di stoccaggio da - 20° C a 60° C
Le specifiche tecniche sono soggette a
modifiche senza l'obbligo di preavviso.