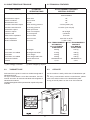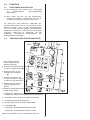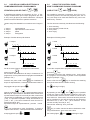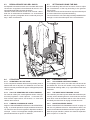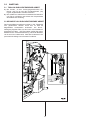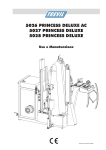
1
MANICHINI DA STIRO INDUSTRIALI
INDUSTRIAL STEAM-AIR FORMERS
MANNEQUINS DE REPASSAGE INDUSTRIEL
MANIQUÍS PARA EL PLANCHADO INDUSTRIAL
PROFI-BÜGELPUPPEN
EMERGENCY
STOP
P
+
START
CYCLE
TIMER
START
STOP
MANUALE D’USO
OWNER’S MANUAL
MANUEL D'USAGE
MANUAL DE EMPLEO
GEBRAUCHSANWEISUNG
ED.10 - REV.403-404/2
ED.
EGREGIO CLIENTE,
Ci complimentiamo con Voi per aver preferito una ns.
macchina. Siamo certi che questo impianto Vi darà piena
soddisfazione e corrisponderà a lungo alle Vs. esigenze.
Vi trasmettiamo questo opuscolo indispensabile per ottenere sempre il massimo rendimento dal Vs. impianto.
La direzione, unitamente ai propri collaboratori ed agenti,
sarà ben lieta di ricevere eventuali Vs. suggerimenti per
migliorare sempre la sua produzione.
Lieta di poterVi annoverare tra la ns. affezionata Clientela,
porgiamo distinti saluti.
DEAR CUSTOMER,
We are grateful you chose our machine and are confident
the preference you have shown will ensure your complete
satisfaction. We have pleasure in enclosing a copy of the
instruction manual for your machine. By carefully following
the instructions in the manual you will be able to obtain
trouble free operation from your plant, and find valuable
information and suggestions for future requirements. We
welcome any suggestions that may assist us to improve
the performance and design of our range of machinery
and we look forward to hearing from you in the future. It is
our sincere wish that you will always remain our satisfied
customer. Yours faithfully,
La Direzione
The Management
ATTENZIONE
ATTENTION
L’USO DELLA MACCHINA DEVE ESSERE CONDOTTO
SECONDO QUANTO CONTENUTO IN QUESTO MANUALE.
THE USE OF THE MACHINE HAS TO BE MADE ACCORDING TO WHAT IS CONTAINED IN THIS MANUAL.
THE PRODUCER DECLINES EVERY RESPONSIBILITY
FOR EVERY IMPROPER USE
IL PRODUTTORE DECLINA OGNI RESPONSABILITÀ
PER OGNI USO IMPROPRIO
PREMESSA
REMARKS
Questo manuale è stato redatto per gli utenti della macchina. In esso sono descritte in modo semplice e figurato le
operazioni essenziali per un utilizzo corretto e sicuro della
stessa.
This manual has been edited for the consumers of the
machine and describes simple way and shown up the
essential operations for a correct and sure use of the machine itself.
ATTENZIONE!
IL PRESENTE MANUALE È INTEGRATO DAL
MANUALE DI INSTALLAZIONE E INTERVENTO
PER IL TECNICO MANUTENTORE. QUALUNQUE ANOMALIA DI FUNZIONAMENTO DEVE
ESSERE TEMPESTIVAMENTE SEGNALATA
AL TECNICO DI MANUTENZIONE .
ATTENTION!
THE PRESENT MANUAL IS COMPLETED WITH
THE INTERVENTION AND INSTALLATION MANUAL FOR THE MAINTENANCE TECHNICIAN.
WHATEVER ANOMALY OF OPERATION MUST
BE PROMPTLY SIGNALED TO THE MAINTENANCE TECHNICIAN.
Chiedere del servizio tecnico indicando il modello e la
matricola della macchina (vedere la targhetta CE riportata
in copertina).
Ask for technical service pointing out the model and the
serial number of the machine (see the CE plate on the
cover).
CHER CLIENT,
Vous avez choisi, de préférence, notre machine. Avec
vous, nous nous réjouissons de votre choix judicieux
et sommes sûrs que la machine vous donnera entière
et pleine satisfaction.
Consultez le livre d’instructions pour tirer le maximum
de votre nouvel outil, Vous y trouverez également des
conseils et des suggestions qui vous seront utiles à
l’avenir.
La Direction, les collaborateurs et agents invitent
toute suggestions susceptible d’améliorer notre
production. D’avance, nous vous en remercions.
En nous félicitant de compter parmi nos nombreux
clients, nous restons à votre service et Vous
présentons, cher Client, nos salutations distinguées.
MUY SENOR NUESTRO,
Le damos las gracias por haber elegido nuestra
maquina. Estamos seguros que responderà a sus
necesidades y le darà completa satisfacción.
Adjuntamos el manual de funcionamiento y
mantenimiento indispensable para garantizar un
optimo rendimiento de la maquina y donde Ud. podrà
encontrar todos los consejos necesarios para su
bueno mantenimiento futuro.
Tanto la Dirección como los Agentes de venta y
Distribuidores le agradeceriamos cualquier consejo
para mejorar nuestra producción.
Contentos de contar Ud, entre nuestros Clientes,
aprovechamos
la
ocasion
para
saludarle
atentamente.
La Direction
La Dirección
ATTENTION
L'EMPLOI DE LA MACHINE DOIT ÊTRE FAIT
SELON TOUT CE QUI EST CONTENU DANS CE
MANUEL
ATENCIÓN
EL EMPLEO DE LA MÁQUINA TIENE QUE SER
CONDUCIDO SEGÚN CUANTO CONTENIDO EN
ESTE MANUAL
LE
PRODUCTEUR
DÉCLINE
RESPONSABILITÉ POUR CHAQUE
IMPROPRE
EL
PRODUCTOR
DECLINA
RESPONSABILIDAD
POR
CADA
IMPROPIO
TOUTE
EMPLOI
TODA
EMPLEO
INTRODUCCIÓN
Este manual ha sido redactado para los usuarios de
la máquina en ello son descritas de modo simple y
representado las operaciones esenciales por un
empleo correcto y seguro de la misma.
INTRODUCTION
Ce manuel a été rédigé pour les utilisateurs de la
machine et il décrit de manière simple et illustrée les
opérations essentielles pour un emploi correct et sûre
de la même.
ATTENTION
LE PRÉSENT MANUEL EST COMPLÉTÉ PAR LE
MANUEL D'INSTALLATION ET INTERVENTION
POUR LE TECHNICIEN D'ENTRETIEN.
N'IMPORTE
QUEL
ANOMALIE
DE
FONCTIONNEMENT DOIT ÊTRE SIGNALÉE AU
TECHNICIEN D'ENTRETIEN IMMÉDIATEMENT.
ATENCIÓN
EL PRESENTE MANUAL ES INTEGRADO POR EL
MANUAL DE INSTALACIÓN Y INTERVENCIÓN
PARA EL TÉCNICO DEL MANTENIMIENTO..
CUALQUIERA ANOMALÍA DE FUNCIONAMIENTO
TIENE QUE SER INMEDIATAMENTE SEÑALADA A.
EL TÉCNICO DE MANTENIMIENTO.
Demander du service technique en indiquant le
modèle et la matricule de la machine (voir la plaque
CE rapportée en couverture).
Preguntar el servicio técnico indicando el modelo y la
matrícula de la máquina. (ver la etiqueta CE indicada
en cubierta).
2
LIEBER KUNDE,
Herzlichen Glückwunsch zu dem Kauf Ihrer neuen
Bügelmaschine.
Diese Maschine wurde nach den neusten technischen
Erkenntnissen konstruiert und gefertigt.
In Ihrem Interesse bitten wir Sie, vor Inbetriebnahme
und Arbeitsbeginn die Bedienungsanleitung Ihres
Gerätes sorgfältig zu lesen, um unnötige
Beanstandungen zu vermeiden.
Unsere Mitarbeiter haben alles daran gesetzt, Ihnen
hervorragende Qualität anzubieten. Sollten Sie
dennoch Fragen zur Bedienung oder Technik haben
stehen wir Ihnen immer gerne zur Verfügung.
Wir danken Ihnen für Ihr Vertrauen und wünschen
Ihnen viel Erfolg mit diesem neuem Gerät.
Die Leitung
ACHTUNG !
DIE MASCHINE MUß LAUT
INHALT DIESER
ANWEISUNG VERWENDET WERDEN.
DER HERSTELLER LEHNT VERANTWORTUNG
FÜR JEDE UNSACHGEMÄßE VERWENDUNG AB.
VORWORT
Diese Gebrauchsanweisung wurde für die Bediener
und
Bedienerinnen
dieser
Maschine
zusammengefasst: sie beschreibt die wichtigsten
Arbeitsgänge für eine sichere und geeignete
Bedienung der Maschine.
ACHTUNG
DIESE GEBRAUCHSANWEISUNG WIRD
VOM
INBETRIEBNAHMEUND
WARTUNGS-ANLEITUNGSBUCH
FÜR
DEN
WARTUNGSTECHNIKER
VERVOLLSTÄNDIGT.
JEDE
FEHLFUNKTION
MUß
DEM
WARTUNGSTECHNIKER RECHTZEITIG
BEKANNT GEGEBEN WERDEN.
Modell und Fabrikationsnummer der Maschine immer
bei Anmeldung mitteilen. (sehen Sie das auf der
Buchdecke
nachgebildete
CE
Schild
)
2
INDICE
INDEX
1.0 Prescrizione per la sicurezza............................... 4
1.1 Oggetto e scopo del manuale
1.0 Safety instructions . ............................................. 4
1.1 Object and purpose of the manual
1.2 Definizione di uso
1.2 Definition of use.
1.3 Dispositivi di sicurezza attivi e passivi.
1.3 Active and passive safety devices
1.4 Definizione di rischio residuo e segnaletica applicata
1.4 Definition of residual risk and applied system of signs.
1.5 Segnali di prescrizione, pericolo e indicazione
1.5 rescription, danger and indication signals.
2.0Dati tecnici.............................................................. 7
2.0 Technical specifications....................................... 7
2.1 Descrizione della macchina
2.1 Description of the machine
2.2 Caratteristiche tecniche
2.2 Technical features
2.3 Targhetta CE
2.3 CE plate
2.4 Descrizione componenti
2.4 Components description
3.0Funzionamento....................................................... 10
3.0 Operation............................................................... 10
3.1 Verifiche preliminari
3.1 Preliminary controls
3.2 Uso delle funzioni del pannello comandi
3.2 Using functions of the control panel
3.3 Accensione macchina
3.3 Start-up of the machine
3.4 Uso della scheda elettronica
3.4 Using the control pane
3.5 Uso della funzione aria manuale
3.5 Using the manual air function
3.6 Uso della funzione vapore manuale
3.6 Using the manual steam function
4.0Uso della macchina............................................... 14
4.0 Use of the machine............................................... 14
4.1 process for finishing cycle
4.2 Use of automatic stretching device of the garment
4.3 Setting and using the bag
4.4 Finishing cycle
4.1 Procedimento per ciclo di stiratura
4.2 Uso del dispositivo automatico di
tensionamento dell’indumento
4.3 Regolazione e uso del sacco
4.4 Stiratura
4.4.1 Stiratura collo e polsi
4.4.2 Ciclo di stiratura del corpo camicia
4.4.3 Camicia con maniche corte
4.4.4 Camici umidi
4.4.5 Cappotti, giacche, giubbotti
4.4.6 Giacca
4.4.7 Impermeabile
5.2 Operazioni da compiere ogni settimana
5.3 Operazioni da compiere ogni 2 settimane
4.4.2 The shirt body finishing cycle
4.4.3 Shorts-sleeves shirts
4.4.4 Wet shirts
4.4.5 Coats and jackets
4.4.6 Jackets
4.4.7 Raincoats
4.5 Use of the wooden sleeves expanders
5.0 Maintenance.......................................................... 18
5.0Interventi di manutenzione.................................... 18
5.1 Operazioni da compiere ogni giorno
4.4.1 Collar and cuff processing
4.5 Uso degli estensori maniche
5.1 Daily maintenance
5.2 Weekly maintenance
5.3 Twice-weekly maintenance
6.0 Dismantling............................................................ 20
6.0 Smantellamento.................................................... 20
7.0 Warranty................................................................. 20
7.0Garanzia.................................................................. 20
TABLE DES MATIERES
ÍNDICE
1.0 Prescription pour la sûreté ....…………................ 4
1.1 Objet est but du manuel
1.2 Définition d’emploi
1.3 Dispositifs de sûreté actives et passifs
1.4 Définition
de
risque
restant
et
signalétique appliqué
1.5 Signaux de prescription, danger et
indication
2.0 Prescripción por la seguridad ....…….................. 4
2.1 Objeto y objetivo del manual
2.2 Definición de empleo
2.3 Aparatos de seguridad activos y pasivos
2.4 Definición de riesgo restante y señal
aplicada
2.5 Señales de prescripción, peligro y
indicación
2.0 Donnes techniques ................................................. 7
2.1 Description de la machine
2.2 Caractéristiques techniques
2.3 Plaque CE
2.4 Description composants
2.0 Datos técnicos ........................................................ 7
2.5 Descripción de la máquina
2.6 Características técnicas
2.7 Etiqueta CE
2.8 Descripción componentes
3.0 Fonctionnement ................................................ 10
3.1 Verifications preliminaires
3.2 Usage des fonctions du panneau
commande
3.3 Demarrage machine
3.4 Usage de la carte electronique
3.5 Usage de la fonction air manuelle
3.6 Usage de la fonction vapeur manuelle
3.0 Funcionamiento ................................................. 10
3.7 Verificaciones preliminares
3.8 Empleo de las funciones del panel manda
3.9 Encendido de la máquina
3.10
Empleo de la tarjeta electrónica
3.11
Empleo de la función aire manual
3.12
Empleo de la función vapor manual
4.0 Usage de la machine ........................................ 14
4.1 Cycle de repassage
4.2 Usage du dispositif tendeur automatique
du vêtement
4.3 Réglage et usage de la housse
4.4 Répassage
4.4.1 Cols et poignets
4.4.2 Cycle de repassage du corps de
chemise
4.4.3 Chemise sans manche
4.4.4 Blouses humides
4.4.5 Manteaux, vestes, blousons
4.4.6 Veste
4.4.7 Impermeables
4.5 Usage des extenseurs manches
4.0 Empleo de la máquina ...................................... 14
4.1 Ciclo de planchado
4.2 Empleo del dispositivo tensor automático
de la prenda
4.3 Regulación y empleo del saco
4.4 Ciclo de planchado
4.4.1 Cuellos y punos
4.4.2 Ciclo de planchado del cuerpo
camisa
4.4.3 Camisas sin mangas
4.4.4 Batas humedas
4.4.5 Abrigos - chaquetas - cazadoras
4.4.6 Chaqueta
4.4.7 Impermeables (gabardinas)
4.5 Empleo de los extensores de las mangas
5.0 Entretien ……………………............................. 18
5.1 Entretien par jour
5.2 Entretien par semaine
5.3 Entretien chaques deux semaines
5.0 Mantenimiento ………………............................ 18
5.4 Mantenimiento diario
5.5 Mantenimiento semanal
5.6 Mantenimiento cada dos semanas
6.0 Démantèlement ............................................... 20
Garantie .................................................................. 20
7.0 Desmantelamiento............................................ 20
8.0 Garantía ........................................................... 20
3
INHALT
1.0 ................................. 4
1.1
.
1.2
1.3
1.4 Warnzeichen: Begriffsbestimmung
1.5 2.0Technische Daten .................................................... 7
2.1
2.2 2.3
2.4 3.0Funktion ................................................................. 10
3.1
3.2 3.3
3.4Gebrauch der Mikroprozessorkarte
3.5 3.6 4.0Gebrauch der Maschine ....................................... 14
4.1
4.2
4.3
4.4
4.4.1 Finishing von Manschetten und Kragen
4.4.2 Bügelzyklus des Hemdenkörpers
4.4.3 Hemden mit kurzen Ärmeln
4.4.4 Feuchte Kittel
4.4.5 Mäntel - Jacken und - Jacketts
4.4.6 Jacken
4.4.7 Regenmäntel
4.5 Gebrauch der Ärmelspanner
5.0.................................... 18
5.1
5.2
5.3
6.0 .................................................... 20
7.0Garanti.................................................................. 20
1.0
PRESCRIZIONI PER LA SICUREZZA
1.0
SAFETY INSTRUCTIONS
1.1 OGGETTO E SCOPO DEL MANUALE
1.1 OBJECT AND PURPOSE OF THE MANUAL
Nel presente manuale sono contenute le informazioni minime necessarie all’utilizzatore/operatore della macchina
finalizzate a:
● garantire il corretto utilizzo dell’impianto in sicurezza;
● definire le operazioni minime di verifica necessarie a
garantire il buon funzionamento della macchina e dei
dispositivi di sicurezza;
● definire il comportamento in caso di situazioni anomale
di rischio;
● fornire alcune definizioni generali, con lo scopo di
informare e formare l’utilizzatore sul significato del sistema presso il quale si accinge ad operare, affinché non
abbiano a verificarsi situazioni di rischio o di pericolo
causate da mancanza di adeguata informazione, (DL
626/94, Titolo III, art. 35, comma 4 capoversi “b”, “c” e
art. 37).
The present manual contains the necessary least information to the user/operator of the machine finalized to:
● guarantee the correct use of the safety plant;
● define the least verification operations necessary to
guarantee the good operation of the machine and the
safety devices;
● define the behavior in case of anomalous and dangerous situations;
● supply some general definitions, with the purpose to inform and to form the user about the meaning of the plant
where is going to operate, with the purpose to avoid
situations of risk or danger caused by lack of suitable
information, (DL 626/94, Title III, art. 35, paragraph 4
indentations “b”, “c” and art. 37)
1.2
1.2
DEFINIZIONE DI USO.
Uso: serie di operazioni, sequenze e attività descritte nel
presente manuale necessarie affinché la macchina sia
utilizzata e mantenuta nelle condizioni ottimali di funzionamento in sicurezza.
1.3 DEFINITION OF USE.
Use: series of operations, sequences and activity described in this manual necessary so that the machine is used
and maintained under the optimal conditions of safety
operations.
DISPOSITIVI DI SICUREZZA ATTIVI E
PASSIVI.
1.3 IN CASO DI GUASTO O ANOMALIA DI FUNZIONAMENTO INFORMARE TEMPESTIVAMENTE
IL TECNICO DI MANUTENZIONE.
La presente macchina è stata progettata e costruita secondo
i più moderni criteri di sicurezza e dotata di tutti i dispositivi
di sicurezza attivi e passivi previsti dalla legge affinché non
sussistano mai, anche nel caso di manovre errate, situazioni di rischio e di pericolo per l’operatore, per le persone
esposte e per gli impianti/macchine attigue. Dispositivo
di sicurezza attivo: consiste in un sistema automatico che
interviene tempestivamente a difesa dell’operatore e dell’impianto in caso di manovre errate o anomalie (es. controllo
di pressione, controllo temperature, ecc...)
ACTIVE AND PASSIVE SAFETY
DEVICES
IN CASE OF BREAKDOWN OR ANOMALY OF
OPERATION, PROMPTLY INFORM THE MAINTENANCE TECHNICIAN
The present machine has been planned and built
according to the most modern safety standards and equipped with all the active and passive safety devices foreseen
by the law so that never subsists, also in case of wrong
handling, situations of risk and danger for the operator, for
the exposed people and for the plant/machines nearby.
Active safety device: it consists in an automatic system
which attends at the right moment to protect the operator
and the plant in case of wrong handlings or anomalies (ex.
pressure control, temperature control, etc…)
È RIGOROSAMENTE VIETATO MANIPOLARE
O ESCLUDERE I DISPOSITIVI DI SICUREZZA
ATTIVI.
IT IS STRICTLY FORBIDDEN HANDLE OR
EXCLUDE THE ACTIVE SAFETY DEVICES
Dispositivo di sicurezza passivo: consiste in un sistema fisso
o amovibile applicato all’impianto/sistema al fine di impedire
il verificarsi di una situazione di pericolo per l’operatore
(carter di chiusura per organi in movimento, barriere fisse
e/o mobili ecc...).
Passive safety device: it consists in a fixed or detachable
system applied to the plant/system with the purpose to prevent a situation of danger for the operator (closing carter for
movement parts, fixed and/or mobile barriers etc...).
È RIGOROSAMENTE VIETATO RIMUOVERE I
DISPOSITIVI DI SICUREZZA PASSIVI SE NON
IN CASO DI MANUTENZIONE AD OPERA DI
TECNICI QUALIFICATI E AUTORIZZATI. NEL
CASO DI RIMOZIONE I DISPOSITIVI DI SICUREZZA PASSIVI, TERMINATE LE OPERAZIONI
DI VERIFICA O MANUTENZIONE, DEVONO
ESSERE ASSOLUTAMENTE RIPOSIZIONATI.
IT IS STRICTLY FORBIDDEN TO REMOVE THE
PASSIVE SAFETY DEVICES UNLESS IN CASE
OF MAINTENANCE INTERVENTION FROM
AUTHORIZED AND QUALIFIED TECNICIANS
IN CASE OF REMOVAL, THE PASSIVE SAFETY
DEVICES, AT THE END OF THE VERIFICATION
OR MAINTENANCE OPERATIONS, HAVE TO
BE ABSOLUTELY REPOSITIONNED
1.0 PRESCRIPTION POUR LA SURETE
1.1 OBJET ET BUT DU MANUEL
Dans le présent manuel il y a les renseignements
moindres nécessaires à l’utilisateur/operateur de la
machine finalisé à:
• garantir l'emploi correct de l'installation en sûreté
• définir les opérations moindres de vérification
nécessaire à garantir le bon fonctionnement de la
machine et des dispositifs de sûreté
• définir le comportement en cas de situations
anomales de risque
• fournir quelques définitions générales, avec le but
d'informer et former l'utilisateur sur le sens du
système près de lequel il s'apprête à opérer, pour
qu'ils n'aient pas à se vérifier situations de risque
ou de danger causé par manque de
renseignement approprié, (DL 626/94, Titre III,
art. 35, alinéa 4 paragraphe “b”, “c” ee art. 37).
2.0 PRESCRIPCIÓN POR LA SEGURIDAD
1.1 OBJETO Y OBJETIVO DEL MANUAL
En el presente manual son contenidas las
informaciones mínimas necesarias a explotador/
operador de la máquina finalizado a:
• garantizar el correcto empleo de la instalación en
seguridad;
• definir las operaciones mínimas de verificación
necesaria a garantizar el buen funcionamiento de
la máquina y los aparatos de seguridad;
• definir el comportamiento en caso de situaciones
anómalas de riesgo
• proveer algunas definiciones generales, con el
objetivo de informar y formar el explotador sobre
el sentido del sistema cerca del que se apresta a
obrar, para que no tengan a averiguarse
situaciones de riesgo o peligro causadas por falta
de adecuada información, (DL 626/94, Título III,
art. 35, inciso 4 párrafos “b”, “c” y art. 37).
1.2 DÉFINITION D’EMPLOI
Emploi: série d'opérations, séquences et activité
décrites dans le présent manuel nécessaire pour que
la machine soit utilisée et maintenue dans les
conditions optimales de fonctionnement en sûreté.
1.2 DEFINICIÓN DE EMPLEO
Empleo: serie de operaciones, secuencias y actividad
descritas en el presente manual necesario para que
la máquina sea utilizada y mantenida en las condiciones optimales de funcionamiento en seguridad.
1.3 DISPOSITIFS
PASSIFS
1.3 APARATOS
PASIVOS
DE
SÛRETÉ
ACTIVES
ET
EN CAS DE PANNE OU ANOMALIE DE
FONCTIONNEMENT INFORMER IMMÉDIATEMENT
LE TECHNICIEN D'ENTRETIEN.
La présente machine a été projetée et construite
selon critères les plus modernes de sûreté et douée
de tous les dispositifs de sûreté actives et passifs
prévu par la loi pour qu'ils n'existent jamais, aussi
dans le cas de manoeuvres erronées, situations de
risque et de danger pour l'opérateur, pour les
personnes exposés et pour les installations/machines
contiguës. Dispositif de sûreté active: il consiste dans
un système automatique qui intervient immédiatement
à la défense de l'opérateur et de l'installation en cas
de manoeuvres erronées ou anomalies (es. contrôle
de pression, contrôle températures, etc...).
DE
SEGURIDAD
ACTIVOS
Y
EN CASO DE AVERÍA O ANOMALÍA DE
FUNCIONAMIENTO INFORMAR INMEDIATAMENTE
EL TÉCNICO DE MANTENIMIENTO.
La presente máquina ha sido planeada y construido
segundo los más modernos criterios de seguridad y
dotados de todos los aparatos de seguridad activas y
voces pasivo previstas para la ley de qué manera no
existan nunca, también en el caso de maniobras
erradas, situaciones de riesgo y peligro para el
operador, para las personas expuestas y por las
instalaciones / máquinas contiguas. Aparato de
seguridad activo: consiste en un sistema automático
que interviene inmediamente a defensa del operador
y la instalación en caso de maniobras erradas o
anomalías (ej. controlo de presión, control
temperaturas, etc...).
IL EST RIGOUREUSEMENT INTERDIT DE
MANIPULER OU EXCLURE LES DISPOSITIFS
DE SÛRETÉ ACTIVES.
Dispositif de sûreté passive: il consiste dans un
système fixe ou amovible appliqué à l'installation /
système afin d'empêcher qu'il se vérifie une situation
de danger pour l'opérateur (carter de fermeture pour
organes en mouvement, barrières fixes et/ou mobiles
ecc...).
ESTÁ
RIGUROSAMENTE
PROHIBIDO
MANIPULAR O EXCLUIR LOS APARATOS
DE SEGURIDAD ACTIVA.
Aparato de seguridad pasiva: consiste en un sistema
fijo o amovible sobrepuesto a la instalación / sistema
para impedir el averiguarse de una situación de
peligro para el operador (cárter de cierre por órganos
en movimiento, barreras fijas y/o móviles etc..).
IL
EST
RIGOUREUSEMENT
INTERDIT
D'ENLEVER LES DISPOSITIFS DE SÛRETÉ
PASSIVES
SI PAS EN CAS D'ENTRETIEN À
L'OEUVRE DE TECHNICIENS QUALIFIÉS ET
AUTORISÉ. DANS LE CAS DE DÉPLACEMENT,
LES DISPOSITIFS DE SÛRETÉ PASSIVES
TERMINEE LES OPÉRATIONS DE VÉRIFICATION
OU
ENTRETIEN,
ILS
DOIVENT
ÊTRE
ABSOLUMENT REPOSITIONNÉ.
ESTÁ
RIGUROSAMENTE
PROHIBIDO
REMOVER LOS APARATOS DE SEGURIDAD
PASIVAS SI NO EN CASO DE MATENIMIENTO A
OBRA
DE
TÉCNICOS
CALIFICADOS
Y
AUTORIZADOS. EN EL CASO DE ELIMINACIÓN
LOS APARATOS DE SEGURIDAD PASIVAS,
ACABAN LAS OPERACIONES DE VERIFICACIÓN
O
MATENIMIENTO,
TIENEN
QUE
SER
ABSOLUTAMENTE REPOSICIONADOS.
4
1.0 SICHERHEITSVORSCHRIFTEN
1.1 ZIEL UND INHALT DIESER ANWEISUNG
Diese Gebrauchsanweisung enthält die dem Bediener
der Maschine zu folgenden Zwecken unbedingt
notwendigen Auskünfte:
• Den richtigen Gebrauch der Anlage in Sicherheit zu
garantieren;
• Die unentbehrlichen Vorgänge zu bezeichnen, die
eine gute Funktion der Maschine und der
Sicherheitsvorrichtungen garantieren;
• Das Verhalten bei unregelmäßigen gefährlichen
Lagen zu bezeichnen
• Einige wichtige Begriffsbestimmungen zu geben,
wodurch der Bediener über die Bedeutung des
Systems, bei dem er seine Arbeit anfängt, informiert
und geschult wird, so daß sich keine gefährlichen
und mit Risiko bedrohten Situationen wegen Mangel
an genügender Information ereignen können. (DL
626/94, Titel III, art. 35, Komma 4 Absätze “b”, “c”
und art. 37).
1.2 GEBRAUCH: BEGRIFFSBESTIMMUNG
Gebrauch:
Reihe
der
in
dieser
Anweisung
beschriebenen Vorgänge, Prozesse und Tätigkeiten, die
nötig sind, um die Maschine unter den besten Funktionund Sicherheitsumständen zu verwenden und zu
behalten.
1.3 AKTIVE
UND
SICHERHEITSVORRICHTUNGEN
!
PASSIVE
JEDE FEHLFUNKTION ODER UNREGELMÄßIGE
FUNKTION MUß DEM WARTUNGSTECHNIKER
RECHTZEITIG BEKANNT GEGEBEN WERDEN.
Die Maschine im Objekt wurde gemäß den modern-sten
Sicherheitsgrundsätzen gestaltet und gebaut und mit
allen vom Gesetz vorgesehenen aktiven und passiven
Sicherheitsvorrichtungen ausgerüstet, um den Bediener,
die Anwesenden und die Anlagen/ Maschinen in der
Nähe, auch bei falscher Bedienung, nie in Gefahr zu
bringen. Die aktive Sicherheitsvorri-chtung besteht aus
einem automatischem System, das bei falscher
Bedienung oder Fehlfunktion zum Schutz des Bedieners
oder der Anlage rechtzeitig einschaltet (z.B.
Druckkontrolle, Temperaturkontrolle, usw.)
ES IST AM STRENGSTEN VERBOTEN, DIE
AKTIVEN SICHERHEITSVORRICHTUNGEN ZU
VERFÄLSCHEN ODER AUSZUSCHLIESSEN.
Die passive Sicherheitsvorrichtung besteht aus einem
fixen oder entfernbaren an der Anlage eingebauten
System, das eine Gefährdung des Bedieners vermeidet
(Kasten/Gehäuse für bewegende Werkteile, fixe oder
bewegbare Sperren, usw.).
ES
IST
AM
STRENGSTEN
VERBOTEN,
DIE
PASSIVEN
SICHERHEITSVORRICHTUNGEN
AUSZUSCHLIESSEN, MIT AUSNAHME DER
DURCH AUSGEBILDETE UND GENEHMIGTE
TECHNIKER
DURCHGEFÜHRTE
WARTUNG.
FALLS
DIE
PASSIVE
SICHERHEITSVORRICHTUNGEN ABGENOMMEN
WERDEN, MÜSSEN SIE UNBEDINGT AM ENDE
DER PRÜFUNGS- UND WARTUNGSARBEITEN
WIEDER EINGEBAUT WERDEN.
4
1.4 DEFINIZIONE DI RISCHIO RESIDUO E
SEGNALETICA APPLICATA.
1.4 Si definisce rischio residuo un rischio potenziale non evidente per il quale non è ragionevolmente possibile predisporre sistemi di sicurezza attivi o passivi, ad esempio
l’apertura del quadro elettrico a cura di personale incompetente, rischio di una parte non visibile ecc... Detti rischi
vengono segnalati mediante l’applicazione di segnali di
pericolo (forma triangolare, nero su fondo giallo), inoltre il
comportamento dell’operatore viene prescritto mediante
segnali di prescrizione (obbligo, forma circolare bianco
su fondo azzurro), e divieto (forma circolare, rosso/nero
su fondo bianco). Infine, sull’impianto, sono apposti tutti i
segnali necessari a fornire le indicazioni relative alle varie
parti dell’impianto stesso (forma rettangolare, colorazione
secondo le Normative vigenti)
DEFINITION OF RESIDUAL RISK AND
APPLIED SYSTEM OF SIGNS.
A residual risk is a non evident potential risk for which is not
possible to predispose active or passive safety systems, for
instance the opening of the electric panel by incompetent
personnel, risk of a non visible part etc... Above risks are signalled through the application of danger signals (triangular
form, black on yellow fund), besides the operator behavior is
prescribed through prescription signals (obligation, circular
form white on blue fund), and prohibition (circular form, red/
black on white fund). Finally, on the plant, there are all the
necessary signals to furnish the indications related to the
various parts of the plant itself (rectangular form, coloration
according to the Normative in force)
ATTENZIONE!
L’OPERATORE DEVE:
CONOSCERE IL SIGNIFICATO DELLA SEGNALETICA DI PERICOLO, PRESCRIZIONE E INDICAZIONE E RISPETTARNE IL CONTENUTO.
ACCERTARE CHE I SEGNALI SIANO MANTENUTI IN PERFETTO STATO FISICO E SIANO
SEMPRE PERFETTAMENTE VISIBILI E LEGGIBILI, IN CASO CONTRARIO DEVE INFORMARE TEMPESTIVAMENTE LA FUNZIONE
PREPOSTA ALLA MANUTENZIONE E/O ALLA
SICUREZZA.
ATTENTION!
THE OPERATOR HAVE TO: KNOW THE MEA
NING OF THE SYSTEM OF SIGNS OF DAN
GER, PRESCRIPTION AND INDICATION AND
TO RESPECT ITS CONTENT VERIFY THAT
THE SIGNALS ARE MAINTAINED IN PERFECT
CONDITIONS AND ALWAYS PERFECTLY
VISIBLE AND LEGIBLE, OTHERWISE THE
OPERATOR HAS TO INFORM PROMPTLY THE
PRECEDED FUNCTION TO THE MAINTENAN
CE AND/OR TO THE SAFETY.
ATTENZIONE!
L’apertura del quadro elettrico di comando è concessa solamente al personale di manutenzione
autorizzato e qualificato.
ATTENTION!
Only qualified and authorized maintenance
personnel is allowed to open the electric control
panel.
IN CASO DI INCENDIO O CORTO CIRCUITO
NON GETTARE ACQUA SULLA MACCHINA la
continuità elettrica generata dall’acqua, se l’interruttore generale non è ancora stato disinserito,
potrebbe causare folgorazione direttamente o
attraverso rigagnoli a pavimento
IN CASE OF FIRE OR SHORT CIRCUIT DO
NOT THROW WATER ON THE MACHINE the
electric continuity produced by the water, if the
main switch has not been disconnected yet,
could cause lightning directly or through rivulets
on the floor.
ATTENZIONE
ATTENTION
FOLGORAZIONE PER RITORNO
ELECTROCUTION BY RETURN
Fig.01
Utilizzare solo estintori che riportano la sigla: E cioè
estintori a CO2 (anidride carbonica) o eco-gas estinguenti,
evitare l’uso di estintori a polvere che renderebbero inutilizzabile la macchina.
Use only extinguishers that bring mark: E i.e. CO2 extinguishers (carbonic anhydride) or echo-gas extinguishers,
avoid the use of dry powder extinguishers that would make
the machine unused.
1.4 DÉFINITION DE RISQUE RESTANT ET
SIGNALÉTIQUE APPLIQUÉ
On définit risque restant un risque potentiel pas
évident pour qui n'est pas raisonnablement possible
de préparer systèmes de sûreté actives ou passifs,
par exemple l'ouverture du panneau électrique par
personnel incompétent, risque d'une partie pas visible
etc... Ces risques sont signalés par l'application de
signaux de danger (forme triangulaire, noir sur fond
jaune) en outre le comportement de l'opérateur vient
prescrit par signaux de prescription (obligation, forme
circulaire blanc sur fonde bleu) et défense (forme
circulaire, rouge/noir sur fond blanc). Finalement, sur
l'installation, tous les signaux nécessaires sont apposés pour fournir les indications relatives aux parties
différentes de l'installation même (forme rectangulaire, coloration selon les Normatifs existantes).
1.4 DEFINICIÓN DE RIESGO RESTANTE Y SEÑAL
APLICADA
Se define riesgo restante un riesgo potencial no
evidente por el que no es razonablemente posible
predisponer sistemas de seguridad activos o pasivos,
por ejemplo la abertura del cuadro eléctrico a cura de
personal incompetente, riesgo de una parte no visible
etc... Estos riesgos son señalados a través de la
aplicación de señales de peligro (forma triangular,
negro sobre hondo amarillo), además el
comportamiento del operador es prescrito a través de
señales de prescripción (obligación, forma circular
blanca sobre hondo azul) y prohibición (forma circular
rojo/negro sobre fondo blanco). Por fin, sobre la
instalación, son puestos todas las señales necesarias
a proveer las indicaciones relativas a las varias partes
de la instalación misma (forma rectangular, coloración
según las Normativas vigentes).
ATTENTION!
ATENCIÓN!
EL OPERADOR TIENE QUE:
CONOCER
EL SENTIDO DE LA SEÑAL
DE PELIGRO, PRESCRIPCIÓN Y INDICACIÓN Y RESPETAR EL CONTENIDO. VERIFICAR QUE LAS SEÑALES SEAN MANTENIDAS EN PERFECTO ESTADO FÍSICO Y
SIEMPRE PERFECTAMENTE VISIBLE Y LEÍBLES, EN CASO CONTRARIO TIENE QUE INFORMAR INMEDIATAMENTE LA
FUNCIÓNANTE PUESTO AL MANTENIMIENTO Y/O A
LA SEGURIDAD.
L'OPÉRATEUR DOIT:
CONNAÎTRE LE SENS DE LA SIGNALISTION
DE DANGER, PRESCRIPTION ET INDICATION
ET EN RESPECTER LE CONTENU. VÉRIFIER
QUE LES SIGNAUX SOIENT MAINTENUS EN
PARFAIT
ÉTAT
PHYSIQUE
ET
ILS
SOIENT TOUJOURS LISIBLES, EN CAS PARFAITEMENT VISIBLES ET CONTRAIRE IL DOIT
INFORMER IMMÉDIATEMENT LA FONCTION
PRÉPOSÉE À L'ENTRETIEN ET/OU À LA SÛRETÉ.
ATTENTION!
ATENCIÓN!
L'ouverture du panneau électrique de controle
est accordée seulement au personnel d'entretien
autorisé et qualifié.
La abertura del cuadro eléctrico de mando
es concedida sólo al personal de mantenimiento autorizado y calificado.
EN CASO DE INCENDIO O CORTO CIRCUITO NO
ECHAR AGUA SOBRE LA MÁQUINA la continuidad
eléctrica engendrada por el agua, si el interruptor
general no ha sido desconectado todavía, podría
causar fulguración directamente o por riachuelos a
suelo.
EN CAS D'INCENDIE OU COURT CIRCUIT NE PAS
JETER EAU SUR LA MACHINE la continuité
électrique engendrée par l'eau, si l'interrupteur
général n'a pas encore été débranché, pourrait
foudroyer directement ou à travers ruisselets le
plancher.
ATTENZIONE/ATTENTION
ATENCIÓN/ ACHTUNG
FOLGORAZIONE PER RIT ORNO
LIGHTNING BY RETURN
FO ELEKT RISCHER RÜCKSCHLAG
UDROIEMENT POUR RET OUR
FULGURACIÓN POR REGRESO
Utiliser des extincteurs seuls qu'ils reportent le sigle:
E c'est-à-dire extincteurs à CO2 (anhydride
carbonique) ou écho-gaz extincteurs, éviter l'usage
d'extincteurs à la poussière qui rendraient inutilisable
la machine.
Utilizar sólo extintores que reconducen la sigla: E es
decir extintores a CO2 (anhídrido carbónico) o
extintores eco-gas, evitar el empleo de extintores a
polvo que harían inutilizable la máquina.
5
1.4 RESTRISIKO
UND
ANGEWENDETE
WARNZEICHEN: BEGRIFFSBESTIMMUNG
Als Restrisiko wird die potentielle nicht offensichtliche
Gefährdung bezeichnet, gegen die keine aktiven oder
passiven
Sicherheitsvorrichtungen
vernünftig
vorzubereiten sind, z.B. Öffnung einer Schalttafel seitens
unausgebildetes
Personals,
Risiko
von
einem
unsichtbaren Bestandteil, usw. Solche Risiken werden
durch die Anwendung von Gefahrschildern bekannt
gegeben (Gefahr: dreieckige Form, schwarz auf gelber
Grundfarbe) und das Verhalten des Bedieners wird
durch Gebotschilder (Gebot: rundes Zeichen, weiß auf
hellblauer Grundfarbe) und Verbotzeichen (rundes
Zeichen,
rot/schwarz
auf
weißer
Grundfarbe)
vorgeschrieben. Die Anlage wird dann mit allen
notwendigen Schildern vorgesehen, die den Bediener
auf wichtige Information über verschiedene Bestandteile
der Anlage hinweisen (rechteckige Form, Farbe gemäß
den aktuellen Vorschriften)..
ACHTUNG!
DER BEDIENER MUß DIE BEDEUTUNG DER
GEFAHR-, GEBOT- UND HINWEISZEICHEN
KENNEN UND ER MUß SICH AN DIE
ENTHALTENEN VORSCHRIFTEN HALTEN. ER
MUß SICH VERGEWISSERN, DAß DIE
ZEICHEN IMMER IN GUTEM ZUSTAND, IMMER
SICHTBAR
UND
IMMER
LESERLICH
BEHALTEN WERDEN, SONST MUß ER
RECHTZEITIG
DIE
ZUSTÄNDIGEN
WARTUNGSODER
SICHERHEITSBEAUFTRAGTEN INFORMIEREN.
ACHTUNG!
Die Öffnung der Steuerschalttafel ist zulässig, nur
wenn sie vom genehmigten und ausgebildeten
Wartungspersonal durchgeführt wird.
BEIM BRANDFALL ODER KURZSCHLUß KEIN
WASSER AUF DER MASCHINE WERFEN Der vom
Wasser verursachte elektrische Kontakt könnte beim
noch nicht ausgeschalteten Hauptschalter einen
elektrischen Schlag verursachen, direkt oder indirekt
durch die Rinnsale am Boden.
ATTENZIONE/ATTENTION
ATENCIÓN/ ACHTUNG
FOLGORAZIONE PER RIT ORNO
LIGHTNING BY RETURN
FO ELEKT RISCHER RÜCKSCHLAG
UDROIEMENT POUR RET OUR
FULGURACIÓN POR REGRESO
Nur Feuerlöscher verwenden, die mit der E Bezeichnung
vorgesehenen sind, d.h. Kohlensäurelöscher (CO2) oder
Feuerlöscher
mit
löschenden
Eko-Gase;
kein
Pulverfeuerlöscher verwenden, der die Maschine
unbrauchbar machen würde.
5
ELENCO RISCHI RESIDUI
LIST RESIDUAL RISKS
TIPOLOGIA / TYPOLOGY
DESCRIZIONE / DESCRIPTION
RISCHI MECCANICI
Nessuno
MECHANICAL RISKS
None
RISCHI ELETTRICI
ELECTRICAL RISKS
Nessuno
None
RISCHI TERMICI
Scottature alle mani per eventuale contatto con la pala riscaldata e con la piastra del ferro da stiro.
THERMAL RISKS
Burns to the hands for contact with the heated paddle and
with the finishing iron plate.
PERICOLI DA RUMORE E VIBRAZIONI
Nessuno
DANGERS FROM NOISE AND VIBRATIONS
None
PERICOLI DA SORGENTI NOCIVE (elettricità, elettricità Nessuno
statica, campi magnetici, radiazioni, laser etc.)
DANGERS FROM HARMFUL SOURCES (electricity, static None
electricity, magnetic fields, radiations, laser etc.)
ALTRE SORGENTI NOCIVE ALLA SALUTE
Nessuno
(polveri, gas, acqua, vapore, fluidi, nebbie, fumi, fuoco, esplosione, sostanze biologiche, e microbiologiche, chimiche, ecc..)
OTHER HARMFUL SOURCES FOR HEALTH
None
(dusts, gas, water, steam, fluid, fogs, smokes, fire, explosion,
biological, microbiological and chemical substances, etc...)
RISCHI ERGONOMICI
(distanze di sicurezza, dimensioni e geometrie ergonomiche ecc.)
Nessuno
ERGONOMIC RISKS
None
(safety distances, dimensions and ergonomic geometries etc..)
COMBINAZIONE DEI PERICOLI (interruzione di energia)
Nessuno
DANGERS COMBINATION (energy’s interruption)
None
PERICOLI CAUSATI DA SITUAZIONI IMPREVISTE
Nessuno
DANGERS CAUSED BY UNEXPECTED SITUATIONS
None
LISTE RISQUES RESTANTES
LISTA RIESGOS RESTANTES
TYPOLOGIE / TIPOLOGÍA
DESCRIPTION / DESCRIPCION
RISQUES MÉCANIQUES
RIESGOS MECÁNICOS
aucun
ninguno
RISQUES ÉLECTRIQUES
RIESGOS ELÉCTRICOS
aucun
ninguno
RISQUES THERMIQUES
Brûlures aux mains pour contact avec la palette
chauffée et avec le plaque du fer à repasser.
Quemaduras a las manos por contacto con la
pala calentada y con la lámina de la plancha.
RIESGOS TÉRMICOS
aucun
ninguno
DANGERS DE BRUIT ET VIBRATIONS
PELIGROS DE RUIDO ES VIBRACIONES
DANGERS DE SOURCES NUISIBLES (électricité, aucun
électricité statique, champs magnétiques, radiations,
laser etc..)
PELIGROS
DE
MANANTIALES
NOCIVOS
(electricidad,
electricidad
estática,
campos
magnéticos, radiaciones, láser etc...)
ninguno
AUTRES SOURCES NUISIBLES À LA SANTÉ
aucun
(poussières, gaz, eau, vapeur, fluides, brouillards,
fumées, feu, explosion, substances biologiques, et
microbiologiques, chimistes, etc....)
OTROS MANANTIALES NOCIVOS A LA SALUD
ninguno
(polvos, gas, agua, vapor, fluido, nieblas, humos,
fuego,
estallido,
sustancias
biológicas,
y
microbiológicas, química, etc....)
RISQUES ERGONOMIQUES
aucun
(distances de sûreté, dimensions et géométries
ergonomiques etc...)
RIESGOS ERGONÓMICOS
(distancias de seguridad, dimensiones y geometrías ninguno
ergonómicas etc...)
COMBINAISON
DES
DANGERS
(interruption
d'énergie)
COMBINACIÓN DE LOS PELIGROS (interrupción de
energía)
DANGERS CAUSÉS PAR SITUATIONS IMPRÉVUES aucun
PELIGROS
CAUSADOS
POR
SITUACIONES ninguno
IMPREVISTAS
6
LISTE DER RESTRISIKEN
/ TYPOLOGIE
BESCHREIBUNG
MECHANISCHE GEFÄHRDUNG
Keine
ELEKTRISCHE GEFÄHRDUNG
Keine
THERMISCHE GEFÄHRDUNG
Handverbrennung wegen
beheizten
Andruckleiste
Bügeleisenplatte.
GERÄUSCH- UND SCHWINGUNGSGEFÄHRDUNG
Keine
GEFÄHRDUNG AUS SCHÄDLICHEN
ENERGIEQUELLEN (Elektrizität, statische Elektrizität,
magnetische Felder, Strahlungen, Laser, usw.)
Keine
ANDERE GESUNDHEITSSCHÄDLICHEN QUELLEN
(Pulver, Gas, Wasser, Dampf, Flüssigkeiten,
Zerstäubung, Rauch, Feuer, Explosion, biologische,
mikrobiologische und chemische Stoffen, usw.)
Keine
ERGONOMISCHE GEFÄHRDUNGEN
(Sicherheitsabstand, ergonomische Abmessungen und
Geometrien usw.)
Keine
GEFÄHRDUNGSKOMBINATION
(Stromunterbrechung)
GEFÄHRDUNG AUS UNVORHERGESEHENEN
EREIGNISSEN
Keine
6
Kontakt mit der
und
mit
der
1.5 SEGNALI DI PRESCRIZIONE, PERICOLO E INDICAZIONE
1.5 PRESCRIPTION, DANGER AND INDICATION SIGNALS
Divieto di togliere i carter di protezione con impianto
funzionante
Do not remove protection covers when machine is
working.
Divieto di eseguire interventi di manutenzione a
macchina in moto
Do not effect maintenance when machine is
working.
Vietata l’apertura del quadro elettrico al personale
non autorizzato.
Authorized personnel only can open the electric
panel.
Vietato utilizzare acqua per spegnere l’incendio.
Do not extinguish with water
Obbligo di riposizionare i carter di protezione prima
di azionare l’impianto
Protection covers must be put on before using the
machine.
Consultare il manuale d’uso, lo schema elettrico e
le procedure.
Consult the instruction’s manual, the electric diagram
and procedures.
Attenzione pericolo di scottature alle mani
High temperatures! Possibility of burning!
Quadro in tensione
Danger: electricity
2.0
DATI TECNICI
2.0
TECHNICAL SPECIFICATIONS
2.1
DESCRIZIONE DELLA MACCHINA
2.1
DESCRIPTION OF THE MACHINE
Manichino stiracamicie universale. Ideale per stirare camicie, camici e divise. Inoltre, si ottengono ottimi risultati
anche sui capi spalla tradizionali.
Chiusura pneumatica della pala anteriore. Contropala aspirante e riscaldata a vapore.
Pinze tendimaniche pneumatiche.
Bloccaggio del collo manuale.
Cicli di lavoro controllati sia con microprocessore sia manualmente.
Possibilità di essere prodotto in doppia versione per l’allineamento dell’orlo della camicia:
1) Con carrello a movimento automatico, completo di pale
a chiusura automatica: due laterali ed una posteriore.
2) Con carrello a movimento manuale completo di due
pale laterali a chiusura automatica ed una posteriore a
chiusura manuale.
Shirt and universal form finisher. Ideal to finish shirts, white
uniforms and uniforms. Besides, good results are gotten on
the traditional shoulder garment.
Pneumatic closing of the front paddle. Steam-heated and
vacuum counter-paddle.
Pneumatic adjustable clamps for sleeves.
Manual neck locking.
Production cycles controlled both with microprocessor both
manually.
Possibility to be produced in double version for the alignment of the shirt hem:
1) With automatic trolley, complete with automatic closing
paddles: two lateral and one rear
2) Manual trolley complete with two automatic closing
lateral paddles and one rear manual closing.
AVAILABLE EXTRAS:
Built-in electronic boiler.
Water spray gun with support.
Electric iron for finishing touch
Buttoner post + shirt hanger.
ACCESSORI A RICHIESTA:
Caldaia elettrica a controllo elettronico incorporata.
Nebulizzatore d’acqua con braccio sostegno.
Ferro elettrico per finiture.
Gruppo abbottonacamicia ed appendicamicia.
1.5 DANGER ET INDICATION
1.5 PELIGRO Y INDICACIÓN
Défense d’enlever les couvercles de protection
pendant le fonctionnement de la machine,
Prohibido quitar la tapa de protección durante el
funcionamiento de la maquina..
Défense d’exécuter toutes entretiens pendant le
fonctionnement de la machine,
Prohibido efectuar todos mantenimientos durante
el funcionamiento de la maquina.
Défense d’ouvrir le cadre électrique par le personnel
non autorisé.
Prohibido abrir el tablero eléctrico para obreros
no autorizados.
Défense d’eteindre avec de l’eau .
Prohibido apagar con agua.
Il est obligatoire de remettre le couvercle de
protection avant d’actionner la machine.
Está obligatorio reponer las tapas de protección
antes que se ponga en marcha la maquina.
Consulter le manuel d’emploi.
Consultar el manual d’empleo.
Hautes températures! Danger de brûlures!
Temperaturas elevadas! Peligro de quemaduras!
Danger électrique
Peligro: Tensión eléctrica
2.0
2.0
2.1
2.1
Mannequins chemises universels. Idéale pour la
finition de chemises, blouses et uniformes. En outre,
on obtient un résultat excellent aussi sur les vestes
traditionnels.
Fermeture pneumatique palette antérieure. Contrepalette réchauffée par la vapeur et aspirante.
Pinces pneumatiques pour la tension des manches.
Blocage manuel cols.
Cycles de travail contrôlés soit avec microprocesseur
soit manuellement.
Possibilité d'être produit en double version pour
l'alignement du bord de la chemise,
1) Chariot automatique, complet avec palette à
fermeture automatique: deux latérales et une
postérieure.
2) Chariot manuel, complet avec deux palettes
latérales
automatiques
et
une
palette
postérieure manuelle
Maniquís plancha camisas y universal. Ideal para
planchar camisas, batas y uniformes. Además, se
consiguen también óptimos resultados sobre las
chaquetas tradicionales.
Cierre neumático de la pala anterior. Contropala
aspirante y calentada con el vapor.
Tensores de mangas neumáticos.
Ciclos
de
trabajo
controlados
sea
con
microprocesador sea manualmente.
Posibilidad de ser producido en doble versión por la
alineación del dobladillo de la camisa
3) Carro con movimiento automático completo de
palas a cierre automático: dos lateral y una
posterior.
4) Carro con movimiento manual, completo de dos
palas laterales a cierre automático y una pala
posterior a cierre manual.
SUR DEMANDE:
Chaudière électronique incorporée.
Pistolet pulvérisateur d’eau avec potence.
Groupe fer électrique pour retouches éventuels
Poste de boutonnage et cintre avec base.
.
Caldera eléctrica con control electrónico incorporada.
Nebulizador de agua con brazo de suspensión.
Grupo de plancha eléctrica para los retoques.
Grupo soporte perchas para abrochamiento y
perchero para las camisas.
-
1.5 VERBOTS-, GEBOTS- UND WARNZEICHEN
Abnahme der Schutzgehäuse bei
anlaufender Anlage verboten.
Wartungseinsätze bei anlaufender
Anlage verboten
Öffnung des Gehäuses für Unbefugte
verboten.
Mit Wasser löschen verboten
Vor Inbetriebsetzung der Anlage
Schutzgehäuse wiedereinbauen.
Betriebsanweisung, Schaltschema und
Vorgänge lesen
Warnung vor Handverbrennungen!
Warnung vor gefährlicher elektrischer
Spannung
2.0 TECHNISCHE DATEN
2.1 MASCHINENBESCHREIBUNG
Hemden-und Oberbekleidungsfinisher. Ideal zum
Bügeln von Hemden, Kitteln und Arbeitsbekleidung.
Ausgezeichnete Ergebnisse werden auch auf
herkömmliche Oberbekleidung erzielt.
Pneumatische
Schließung
der
vorderen
Andruckleiste. Absaugende und dampfbeheizte
Gegenandruckleiste.
Pneumatische Ärmelspannungsklammern
Manuelle Kragenfixierung.
Die Arbeitszyklen können sowohl manuell als auch
durch Mikroprozessor gesteuert werden.
Betreffend die Positionierung am Hemdenrand sind
zwei Ausführungen möglich :
1) Mit automatischer Bewegung des Schlittens,
komplett mit automatisch gesteuerten Patschen
: zwei seitlich und eine hinten gestellt.
2) Mit manueller Bewegung des Schlittens,
komplett mit zwei automatisch gesteuerten
seitlichen Patschen und einer hinteren Patsche
mit manueller Schließung.
ZUBEHÖR AUF WUNSCH:
Eingebauter
Elektrokessel
mit
elektronischer
Kontrolle.
Wassersprühpistole mit Haltearm.
Elektrisches Bügeleisen für Nachbügeln.
Hemdenhänger und-ständer.
7
2.2 CARATTERISTICHE TECNICHE
DATI TECNICI
2.2 TECHNICAL FEATURES
TECHNICAL
ALLACCIAMENTI CENTRALI
SPECIFICATIONS
CENTRAL SUPPLIES
Alimentazione elettrica (*)
Required power (*)
220V/3 50Hz
400V/3+N/50Hz
Alimentazione vapore
Steam inlet
1/2”
Ritorno condensa
Return outlet
1/2”
Alimentazione aria
Air inlet
1/4”
Pressione esercizio vapore
Steam working pressure
Pressione esercizio aria
Air working pressure
Produzione vapore
Steam production
Consumo vapore
Steam consumption
25÷30 Kg/h
Consumo aria
Air consumption
0,6 litri/min
Tubo scarico aspiratore
Vacuum outlet
Ø 70 mm
Motore aspiratore
Vacuum motor
0,25 KW / 0,33 HP
Motore ventilatore
Fan motor
4÷6 bar (58÷87 psi)
8÷10 bar (116÷145 psi)
-
1,5 KW / 2 HP
mod. TENSIONAMENTO
AUTOMATICO
mod. AUTOMATIC
STRETCHING
mod. TENSIONAMENTO
MANUALE
mod. MANUAL
STRETCHING
Peso netto
Net weight
285 Kg
275 Kg
Peso netto con caldaia
Net weight with boiler
315 Kg
305 Kg
Peso lordo
Gross weight
320 Kg
320 Kg
Peso lordo con caldaia
Gross weight with boiler
Dimensioni imballo
Overall dimensions
Volume
Volume
(*) Altri voltaggi a richiesta
(*) Other voltages by request
2.3
TARGHETTA CE
2.3
Sulla macchina è posta in modo ben visibile la targhetta di
identificazione CE.
Per ogni comunicazione con la ditta costruttrice, fare riferimento al numero di matricola rilevabile sulla targhetta di
identificazione stessa.
Copia della targhetta CE è riportata sulla copertina di questo
manuale.
350 Kg
340 Kg
160x80x200 cm
160x80x200 cm
2,6 m3
2,6 m3
CE PLATE
On the machine is easily visible the CE identification plate.
For every communication with the manufacturer, please
refer to the serial number on the identification plate.
A copy of the CE plate is on the cover of this manual.
2.2 CARACTÉRISTIQUES TECHNIQUES
DONNES TECHNIQUES
2.2 CARACTERISTICAS TECNICAS
BRANCHEMENTS CENTRALES
DATOS TECNICOS
CONEXION CENTRAL
Courant (*)
Alimentación eléctrica (*)
220V/3 50Hz
400V/3+N/50Hz
Arrivée vapeur
Alimentación de vapor
Retorno de condensados
Alimentación de aire
1/2”
Presión de trabajo vapor
Presión de trabajo aire
Producción de vapor
Consumo de vapor
Consumo de aire
4÷6 bar (58÷87 psi)
Retour
Alimentation air
Pression travail vapeur
Pression travail air
Production vapeur
Consommation vapeur
Consommation air
Décharge aspirateur
1/2”
1/4”
8÷10 bar (116÷145 psi)
25÷30 Kg/h
0,6 litri/min
Tubo salida de aspirador
Motor aspirador
Motor ventilador
Moteur aspirateur
Moteur ventilateur
Ø 70 mm
0,25 KW / 0,33 HP
1,5 KW / 2 HP
mod. TENSIONNAGE
AUTOMATIQUE
mod. TENSIÓN
AUTOMÁTICA
mod. TENSIONNAGE
MANUEL
mod. TENSIÓN
MANUAL
Poids net
Poids net avec chaudière
Poids brut
Poids brut avec chaudière
Peso neto
285 Kg
275 Kg
Peso neto con caldera
Peso bruto
Peso bruto con caldera
315 Kg
305 Kg
320 Kg
320 Kg
Dimensions emballage
Volume
Dimensiones de embalaje
Volumen
(*) Autres voltages sur demande
350 Kg
340 Kg
160x80x200 cm
160x80x200 cm
2,6 m3
2,6 m3
(*) Otro voltaje bajo demanda
2.3
2.3
Sur la machine est placé de manière bien visible la
plaquette d'identification CE.
Pour chaque communication avec la maison
fabricante, faire référence au numéro de matricule sur
la plaquette d'identification même.
Copie de la plaquette CE est rapportée sur la
couverture de ce manuel.
Sobre la máquina es puesta de modo bien visible la
etiqueta de identificación CE.
Por cada comunicación con la empresa constructora,
hacer referencia al número de matrícula detectable
sobre la etiqueta de identificación misma.
Copia de la etiqueta CE es reproducida sobre la
cubierta de este manual.
2.2 TECHNISCHE EIGENSCHAFTEN
TECHNISCHE DATEN
ZENTRALANSCHLUSSE
220V/3 50Hz
400V/3+N/50Hz
Elektrischer Anschluss (*)
(pos. A)
1/2”
Dampfanschluss
(pos. B)
Kondensatrücklauf
(pos. C)
Lufteingang
(pos. D)
Betriebsdampfdruck
Betriebsluftdruck
Dampferzeugung
Dampfverbrauch
Luftverbrauch
Absaugungsausgang
(pos. F)
Absaugungsmotor
Ventilatormotor
1/2”
1/4”
4÷6 bar (58÷87 psi)
8÷10 bar (116÷145 psi)
25÷30 Kg/h
0,6 litri/min
Ø 70 mm
0,25 KW / 0,33 HP
1,5 KW / 2 HP
mod. AUTOMATISCHE
SPANNUNG
285 Kg
315 Kg
320 Kg
350 Kg
160x80x200 cm
2,6 m3
Nettogewicht
Nettogewicht mit Kessel
Bruttogewicht
Bruttogewicht mit Kessel
Verpackungsabmessungen
Volumen
(*)Andere Stromspannungen auf Anfrage
2.3 CE KENNZEICHNUNGSSCHILD
Auf der Maschine ist das CE Kennzeichnungsschild
deutlich sichtbar.
Die auf dem Kennzeichnungsschild geschriebene
Matrikelnummer immer in Ihrer Korrespondenz mit
dem Hersteller erwähnen.
Eine Kopie des CE Schildes ist auf dem Buchdeck
dieser Anweisung nachgebildet.
8
mod. MANUELLE
SPANNUNG
275 Kg
305 Kg
320 Kg
340 Kg
160x80x200 cm
2,6 m3
2.4 DESCRIZIONE COMPONENTI
2.4 COMPONENTS DESCRIPTION
2
3
1
4
5
7
6
11
EMERGENCY
STOP
12
P
+
START
CYCLE
TIMER
START
STOP
14
13
9
8
10
15
16
18
17
Fig.03
1
2
3
4
5
6
7
8
9
10
11
12
13
14
15
16
17
18
19
19
Manichino di stiro
Regolazione apertura spalla
Leva regolazione pressata pala
Quadro elettrico
Alimentazione aria compressa
Dispositivo automatico di tensionamento destro
Alimentazione vapore (macchina senza caldaia)
Scaricatore di condensa
Fissaggio pinza tendimaniche
Motore + ventilatore
Unità di comando
Estensori maniche
Leva regolazione ventilazione manuale
Dispositivo automatico di tensionamento sinistro
Pedale comando pinza sinistra
Pedale comando pinza destra
Batteria vapore (macchina senza caldaia)
Caldaia
Batteria resistenze elettriche (macchina con caldaia)
1
2
3
4
5
6
7
8
9
10
11
12
13
14
15
16
17
18
19
Steam-air former
Shoulder opening adjustment
Adjustment lever for paddle pressing
Electric control panel
Compressed air feeding
Right stretching automatic device
Steam feeding (machine without boiler)
Steam trap
Sleeve extending clamp fixing
Motor + fan
Control unit
Sleeve expanders
Adjustment lever for manual ventilation
Left stretching automatic device
Left clampp control pedal
Right clamp control pedal
Steam battery (machine without boiler)
Boiler
Electric heating elements battery (machine with boiler)
2.4 DESCRIZIONE COMPONENTI
2.4 COMPONENTS DESCRIPTION
2
3
1
4
5
7
6
11
EMERGENCY
STOP
12
P
+
START
CYCLE
TIMER
START
STOP
14
13
9
8
10
15
16
18
17
Fig.03
1
2
3
4
5
6
7Alimentation vapeur (machine sans chaudière)
8
9
10
11
12
13
14
15
16
17
18
19Batterie résistances électriques (machine avec)
8
19
1
2
3
4
5
6
7
8
9
10
11
12
13
14
15
16
17
18
19Batería resistencias eléctricas (máquina con caldera)
2.4 2
3
1
4
5
7
6
11
EMERGENCY
STOP
12
P
+
START
CYCLE
TIMER
START
STOP
14
13
9
8
10
15
16
18
17
Fig.03
19
1
2
3
4
5
6
7
8
9
10
11
12
13
14
15
16
17
18
19
3.0
FUNZIONAMENTO
3.0
OPERATION
3.1
VERIFICHE PRELIMINARI
3.1
PRELIMINARY CONTROLS
a) La versione senza caldaia viene prodotta di serie con
la batteria di riscaldamento dell’aria alimentata a vapore.
a) The version without boiler is made as standard with
the air heated battery steam fed.
b) Check that the ball valves fitted on the steam pipe (24)
Fig.06 and on the condensation return pipe (23) Fig.06
are open (see page 11).
b) Controllare che i rubinetti a sfera montati sulle tubazioni
d’alimentazione vapore (24) Fig.06 e ritorno condensa
(23) Fig.06 siano aperti (vedere a pag.11).
At first, when the machine is cold, the steam will condense
rapidly and it is therefore advisable to wait a few minutes
before starting work so that the condensation can be
drained off. If this is not done, condensation formed will
emerge from the steam pipes, damaging the garments
being processed.
Inizialmente, con la macchina fredda, il vapore in arrivo
si condenserà rapidamente; è, quindi, consigliabile attendere qualche minuto prima di iniziare la lavorazione,
affinché tutta la
condensa formata si possa scaricare.
Non attenendovi a questa norma, l’abbondante condensa
che si forma uscirebbe dalle tubazioni di vaporizzazione,
danneggiando il capo.
3.2
USO DELLE FUNZIONI DEL PANNELLO COMANDI
3.2
USING FUNCTIONS OF THE CONTROL PANEL
1 EMERGENZA Premere
per arrestare completamente la macchina.
1EMERGENCY Press to
stop completely the machine.
2 SALISCENDI carrello
Tensionamento (■)
2UPS AND DOWN carriage Bending (■)
3 Premere una volta per
far partire l’aspirazione
( ■)
3Press a time to start vacuum (■)
4Press and push for approaching and stop the
paddle of the former
4 Premere e spingere per
avvicinare e bloccare la
pala al manichino
5Press to start the finishing
automatic cycle
5 Premere per la partenza
del ciclo automatico stiratura
6INCLUSION / EXCLUSION rear paddle
6 INCLUSIONE / ESCLUSIONE pala posteriore
7SEE CHAPTER “USE
OF THE ELECTRONIC
CARD”
7 VEDERE CAPITOLO
“USO DELLA SCHEDA ELETTRONICA”
8 EXCLUSION External side paddle
8 ESCLUSIONE palette laterali esterne
9 EXCLUSION sleeves bending
9 ESCLUSIONE tendimaniche
10 SELECTION FOR JACKET OR SHIRT
10 SELEZIONE PER GIACCA O CAMICIA
11 BENDING (■)
11 TENSIONAMENTO (■)
POSIZIONE 0: USO TENSIONAMENTO
POSIZIONE I: ESCLUSIONE TENSIONAMENTO
POSITION 0: BENDING USE
POSITION I: BENDING EXCLUSION
(■) only for models with automatic stretching
(■) solo per modelli con tensionamento automatico
10
3.0
3.0
3.1
3.1
a) La version sans chaudière est produit de série
avec la batterie de chauffage de l’air alimentée à
vapeur.
b) Contrôler que les robinets à sphère montés sur
les conduits d’alimentation vapeur (24) Fig.06 et
retour condensat (23) Fig.06 sont ouverts. (voir
page 11).
a) La versión sin caldera está fabricada de serie con
la battería de calefacción del aire alimentado para
el vapor.
b) Controlar que las llavede bola montados sobre
los tubos de alimentación vapor (24) Fig.06 y
regreso de la condensación (23) Fig.06 estén
abiertos. (ver en la pag. 11).
Au début, quand la machine est froide, la vapeur qui
arrive se condensera rapidement; nous Vous
recommandons pourtant d’attendre quelques minutes
avant de commencer les opérations, de façon que
tout le condensat puisse être déchargé.
Si Vous manquez d’observer cette norme, le
condensat abondant qui se forme sortira des conduits
de vaporisation et endommagera le vêtement.
Al principio, con la máquina fría, el vapor en llegada
se condensará rápidamente; por lo tanto, se aconseja
esperar algunos minutos antes de comenzar la
elaboración, para que toda la condensación formada
se pueda descargar.
Si no se atienen a esta norma, la condensación
abundante que se forma saldría de las cañerías de
vaporización, dañando la prenda.
3.2USAGE DES FONCTIONS DU PANNEAU COMMANDE
3.2EMPLEO DE LAS FUNCIONES DEL PANEL MANDA
1URGENCE Presser
pour arrêter compl
ment la machinE. ète-
1EMERGENCIA Presionar
para parar completamente
la máquina.
2TENSIONNEMENT
VERTICAL charriot
Tension ( ■ )
2
sube (■)
3
hacer partir la aspiración(
3Presser une fois pour
faire partir l'aspiration
( ■)
4 ■)
para acercar y parar la
pala del maniquí.
4
approcher et bloquer la
palette du mannequin
5Presionar por el arranque
del ciclo automático de
planchado
5Presser pour le départ
du cycle automatique de
repassage
6INCLUSION / EXCLUSIÓN pala posterior
6INCLUSION / EXCLUSION palette postérieure
7VER CAPÍTULO
"EMPLEO DE LA FICHA
ELECTRÓNICA"
7VOIR CHAPITRE
“USAGE DE LA FICHE ÉLECTRONIQUE”
8
8EXCLUSION Palettes externes latérales
9
9
10
10
11TENSIÓN (■)
11TENSION (■)
POSITION 0: USAGE TENSION
(■) sólo para modelos con tensión automática
(■) seulement pour modèles avec tension automatique
10
3.0FUNKTION
3.1
a) Die Ausführung ohne Kessel wird serienmäßig
mit
dampfgespeister
Luftheizungsbatterie
ausgestattet.
b) schläuchen montierten Kugelhähne (24) Fig. 06
und dem Dampfrücklauf (23) Fig.06 offen sind.
Am Anfang, bei kalter Maschine, kondensiert der
ausströmende Dampf rasch ab. Es ist ratsam, einige
Minuten zu warten, bevor mit der Arbeit begonnen
wird, und bis das gesamte gebildete Kondenswasser
abgelassen werden kann. Hält man sich nicht an diese
Vorschrift, würde das im Überschuß, aus den
Schläuchen ausströmende Kondenswasser, das
Kleidungsstück beschädigen.
3.2 GEBRAUCH DER STEUERUNGSTAFEL
AUS Zur vollkom1 NOT
menen Abstellung der
Maschine drücken.
2 HINAUFSTEIGEN/HERUNTERKOMMEN
d e s S p a n n u n g ssc h l i t tens ( ■ )
drücken, um die
3 Einmal
Absaugung zu betätigen
( ■)
4 Drücken und treiben, um
die Andruckleiste zur Puppe
zu nähern und zu blockieren
um den automa5 Drücken,
tischen Bügelzyklus zu
starten
6 EINSCHALTEN/AUSSCHALTEN
hinterer Andruckleiste
7
SEHEN SIE ABSCHNITT
"GEBRAUCH DER ELEKTRONISCHEN STEUERKARTE”
8 AUSSCHALTUNG der äußeren seitlichen Patschen
9
10
11SPANNUNG (■)
POSITION 0: SPANNUNGSEINSCHALTUNG
POSITION I: SPANNUNGSAUSSCHA LTUNG
(■) nur für die Ausführung mit automatischer Spannung
10
Fig.05
PANNELLO ELETTRICO COMANDI
ELECTRIC CONTROL PANEL
12
13
14
15
16
17
18
19
12
13
14
15
16
17
18
19
20
21
22
Interruttore accensione caldaia
Segnalazione riscaldamento caldaia
Segnalazione inserimento pompa
Interruttore per riscaldamento principale
Interruttore accensione corrente
Regolazione tempo tensionamento: da 0 a 3 secondi
(solo per modello con tensionamento automatico)
Interruttore per ulteriore riscaldamento aria (+ 2 kW)
Interruttore per secondo ulteriore riscaldamento aria
(+ 2 kW)
20 Interruttoreper terzo ulteriore riscaldamento aria
(+ 2 kW)
21 Segnalazione riscaldamento inserito
22 Segnalazione di presenza corrente
3.3
Switch Starting of the boiler
Signalling boiler heating
Signalling pump insertion
Main heating switch
Switch current lighting
Regulation garment time: from 0 to 3 seconds
(only for models with automatic stretching)
Switch for further heating of the air (+ 2 kW)
Switch for second further heating of the air(+ 2 kW)
Switch for third further heating of the air(+ 2 kW)
Signalling Heating inserted
Signalling of current presence
3.3
ACCENSIONE MACCHINA
START-UP OF THE MACHINE
a) Turn on the general electrical supply switch and the
door closing switch (16) Fig.05 son the electric panel;
the red indicator lamp illuminates (22) Fig. 05 to show
that there is an electrical supply connected.
a) Accendere l’interruttore generale, previsto sulla linea
elettrica d’alimentazione e l’interruttore bloccoporta
(16) Fig.05 sul pannello elettrico di comando della
macchina, l’accensione della spia luminosa rossa (22)
Fig. 05 segnalerà la
presenza di corrente nella macchina.
b) Aprire il rubinetto d’alimentazione
dell’aria compressa
(5) Fig.03, scaricare
l’eventuale condensa depositatasi nella tazza filtro aria
agendo sul volantino. Regolare la
23
pressione dell’aria
compressa a 7 bar.
c) Per macchine senza caldaia: aprire
le saracinesche
d’alimentazione
vapore (24) Fig.06
e ritorno condensa
(23) Fig.06.
24
23
11
b) Open the compressed air cock
(5) Fig.03, srelease
the condensate collected in the air filter
cup by pushing the
hand wheel Adjust
the compressed air
pressure to 7 bar.
c) F o r m a c h i n e s
without boiler:
open the mains water gate valve for
steam feeding (24)
Fig.06 and con densate return (23)
Fig.06.
Fig.05
PANNELLO ELETTRICO COMANDI
PANEL MANDOS ELÉCTRICOS
12
13Signal chauffage chaudière
14Segnal insertion pompe
15Interrupteur pour chauffage principal
16Interrupteur allumage courant
17 Régulation temps tension vêtement: de 0 à 3 seconds
(seulement pour modèle avec tension automatique)
18Interrupteur pour ultèrieur chauffage air(+ 2 kW)
19Interrupteur pour deuxième ultérieur chauffage air
(+ 2 kW)
20Interrupteur pour troisième ultérieur chauffage air
(+ 2 kW)
21
22
12
13
14
15
16
17
8
19Interruptor para segunda ulterior calefacción aire
(+ 2 kW)
20
21
22Señal de presencia corriente
3.3
3.3
a) Encender el interruptor general previsto en la
línea eléctrica de alimentación y el interruptor
bloqueo en puerta (16) Fig.05, del cuadro
eléctrico de la máquina el encendido de la luz de
aviso roja (22) Fig. 05 señalará la presencia de
corriente en la máquina.
b) Abrir la llave
de la alimentación de aire comprimido (5) Fig.03,
descargar la eventual agua de condensación deposi24
tada en la taza filtro aire actuando
sobre el volante.
Ajustar la presión
de aire comprimido
a 7 bars.
a) a) Allumer l'interrupteur général prévu sur la ligne
électrique d'alimentation et l'interrupteur (16) Fig.05
sur le tableau de commande électrique de la machine, la lampe témoin générale rouge (22) Fig. 05 signalera la présence de courant dans la machine.
b) net d’alimentation
de l’air comprimée
(5) Fig.03, décharger l’éventuele condensat dans le
godet filtre air
en agissant sur levolant. Régler la
préssion de l’air
comprimée a 7 bar.
c) Pour machines
sans chaudière:
ouvrir les vannes d’alimentation vapeur (24)
Fig. 06 et retour
condensat(23)
Fig.06.
23
23
11
c) nas sin caldera:
Abrir las válvulas de
alimentación vapor
(24) Fig.06 y retorno
de
condensado
(23) Fig.06.
Fig.05
ELEKTRISCHE STEUERTAFEL
12. Schalter der Kesselanheizung
13. Leuchtmelder der Kesselheizung
14. Leuchtmelder der Pumpenbetätigung
15. Schalter der Hauptheizung
16. Stromschalter
17. Verstellung der Spannungszeit: von 0 bis 3
Sekunden (nur für die Ausführung mit
automatischer Spannung)
18. Schalter für weitere Luftbeheizung (+ 2 kW)
19. Schalter für zweite weitere Luftbeheizung (+2kW)
20. Schalter für dritte weitere Luftbeheizung (+ 2kW)
21. Leuchmelder der eingeschalteten Beheizung
22. Leuchmelder der Stromdurchfluß
3.3 DAS ANLASSEN DER MASCHINE
a) Den Hauptschalter der elektrischen
Versorgungsleitung und den Verriegelungsschalter (16) Fig.05, am Schaltfeld der Maschine
einschalten; das rote Licht zeigt (22) Fig. 05, daß
die Maschine jetzt mit Strom versorgt ist.
b) Den Druckluftversorgungshahn öffnen (5) Fig.03,
und eventuelles Kondenswasser im TassenLuftfilter ablassen. Luftdruck auf 7 bar einstellen
c) Für
Maschine
ohne
Kessel
den
Dampfversorgungshahn
(24)
Fig.06
und
Kondensatrücklaufhahn. (23) Fig.06 öffnen.
24
23
23
11
3.4
USO DELLA SCHEDA ELETTRONICA
3.4
COME MEMORIZZARE I PROGRAMMI DI
STIRATURA (USO DEI TASTI
e
USING THE CONTROL PANEL
HOW TO MEMORISE IRONING PROGRAMS
(USE OF THE
)
AND
KEYS).
E’ possibile memorizzare 10 programmi: da ”P0“ a ”P9“.
I tempi di stiratura dei primi cinque programmi (da “PO”
a “P4”) sono già pronti per essere utilizzati e comunque
possono essere modificati in qualsiasi momento.
It is possible to memorise 10 programs: from ”P0“ to ”P9“.
The ironing times of the first five programs (from “PO” to
“P4”) are ready to be used and however they can be modified at any moment.
I quattro tempi visualizzabili in successione sono i seguenti:
The four times successively visualized are the following:
1° tempo: 2° tempo:
3° tempo:
4° tempo:
1° time: steaming,
2° time: steaming mixed with air,
3° time: pause,
4° time: drying.
vaporizzazione
Vaporizzazione misto ad aria
pausa
asciugatura
Esempio di scelta dei tempi di stiratura
Examples of finishing times:
1° tempo
0
5
1° time
10
0
2° tempo
5
10
2° time
0
5
0
3° tempo
5
3° time
0
5
0
4° tempo
5
4° time
0
5
10
15
20
0
5
10
15
20
Per far scorrere l’elenco dei programmi memorizzati,
To see the complete list of programs in the memory
premere il tasto
.
Per accedere alla variazione dei tempi di stiratura di un
programma, occorre posizionarsi sul programma desiderato
(esempio “P0”).
press the
key.
To be able to access to the variation of the ironing times
of a program, it is necessary to position on the requested
program (example “P0”). .
Premere una prima volta il tasto
per visualizzare il
tempo di vaporizzazione; contemporaneamente inizierà a
Press a first time the
key to visualize the steaming
time (at the same time the steam warning
lampeggiare la spia del vapore
).
ligh
will begin to light).
Agendo sui tasti
e
si potrà impostare il valore
del tempo di “vaporizzazione” desiderato: da 0 a 99 secondi
si potrà variare il tempo di 1 secondo per volta, mentre oltre
i 99 secondi si visualizzerà un minuto e quaranta secondi
(1.40) e si potranno impostare i tempi ad intervalli di 10”
(1’.50”, 1’.60”…) sino ad un massimo di nove minuti e cinquanta secondi (9’.50”).
Impostato il tempo di “vaporizzazione”, premere il tasto
By operating on thei
and
keys it is possible
to plan the value of the requested “steaming” time: from
0 to 99 seconds, the time can be varied of 1 second at a
time, while over 99 seconds, one minute and forty seconds
will be visualized (1.40) and the times can be planned to
intervals of 10” (1’ .50”, 1’ .60”…) till a maximum of nine
minutes and fifty seconds (9’ .50”).
Planned the “steaming” time, press the
per confermarlo e poter visualizzare il tempo di
“vapore misto ad aria”, contemporaneamente inizieranno
key to confirm it and to be able to visualize the “steaming mixed with air” time, at the same time
a lampeggiare le spie
the warning lights
e
.
12
and
will begin to light.
3.4 USAGE DE LA CARTE ELECTRONIQUE
COMME MEMORISER LES PROGRAMMES DE
REPASSAGE
(USAGE
DES
POUSSOIRS
3.4 EMPLEO DE LA TARJETA ELECTRÓNICA
COMO MEMORIZAR LOS PROGRAMAS DE
PLANCHADO
(EMPLEO
DE
LAS
TECLAS
et
).
Il est possible mémoriser 10 programmes: de ”P0“ à
”P9“.
Les temps de repassage des premiers cinq
programmes (de “PO” à “P4”) sont déjà prêtes pour
être utilisés et de toute façon ils peuvent être modifiés
à n'importe quel moment.
Les quatre temps visualisable en succession sont les
suivants:
• 1° temps: vaporisation
• 2° temps: vaporisation mélangée avec air
• 3° temps: pausa
• 4° temps: séchage
y
).
Es posible memorizar 10 programas: de "PO" a "P9"..
Los tiempos de planchado de los primeros cinco
programas (de “PO” a “P4”) ya están listos para ser
utilizados y en todo caso pueden ser modificados en
cualquier momento..
Los cuatro tiempos visualizados en sucesión son los
siguientes:
• 1° tiempo: vaporización,
• 2° tiempo: vaporización mixto a aire,
• 3° tiempo: pausa,
• 4° tiempo: secado.
Ejemplo de elección de los tiempos de planchado:
Exemples de choix des temps de repassage:
•
0
•
•
1° temps
5
•
0
10
•
2° temps
0
5
10
2° tiempo
0
5
•
3° temps
0
•
1° tiempo
3° tiempo
0
5
•
4° temps
0
5
5
10
5
4° tiempo
0
15 20
5
10
15 20
Pour voir la liste des programmes mémorisés appuyer
Para hacer correr la lista de los programas
sur le poussoir
.
Pour pouvoir accéder à la variation des temps de
repassage d'un programme, il faut se positionner sur
le programme demandé (exemple "P0").
memorizados, presionar la tecla
.
Para acceder a la variación de los tiempos de
planchado de un programa, hace falta posicionarse
sobre el programa deseado (ejemplo "P0").
Presser une première fois la touche
pour
visualiser le temps de vaporisation; dans le même
Presionar una primera vez la tecla
para
visualizar el tiempo de vaporización; al mismo tiempo
temps la lampe témoin de la vapeur
à clignoter.
iniciará a relampaguear la espía del vapor
commencera
.
En agissant sur les touches
et
on pourra
régler la valeur du temps de “vaporisation” désiré: de
0 à 99 secondes on pourra changer le temps de 1
seconde par fois, tandis que outre les 99 secondes se
visualisera un minute et quarante secondes (1.40) et
on pourra régler les temps par intervalles de 10” (1'
.50", 1' .60"…) jusqu’à un maximum de neuf minutes
et cinquante secondes (9' .50").
Introduit le temps de "vaporisation”, presser le
Actuando sobre las teclas
y
se podrá
programar el valor del tiempo de "vaporización"
deseado: de 0 a 99 segundos se podrá variar el
tiempo de 1 según por vez, mientras más allá de los
99 segundos se visualizará un minuto y cuarenta
segundos (1.40) y podrán programar los tiempos a
intervalos de 10" (1' .50", 1' .60"…) hasta a un
máximo de nueve minutos y cincuenta segundos
(9'.50").
Programado el tiempo de "vaporización", presionar la
poussoir
pour le confirmer et pour visualiser le
temps de “vapeur mélangée avec air”, dans le même
tecla
para confirmarlo y poder visualizar el
tiempo de "vapor mixto a aire", iniciará al mismo
temps les lampes témoin
commenceront à clignoter.
tiempo a relampaguear las espía
et
12
y
.
3.4 GEBRAUCH DER MIKROPROZESSORKARTE
WIE DIE BÜGELPROGRAMME ZU SPEICHERN
und
SIND (GEBRAUCH DER TASTEN
).
Es ist möglich, 10 Programmen zu speichern: von
”P0“ bis ”P9“. Die Bügelzeiten der ersten fünf
Programme (von “P0” bis “P4”) sind schon fertig zur
Bedienung aber sie können jederzeit auf Wunsch
geändert werden.
Die vier nacheinander sichtbaren Zeitphasen sind wie
folgt:
• 1° Phase: Dämpfen
• 2° Phase: Dämpfen mit Luft gemischt
• 3° Phase: Pause
• 4° Phase: Abtrocknen
Wahlbeispiele für Bügelzeiten:
•
1° Phase
0
•
5
10
2° Phase
0
•
5
3° Phase
0
•
5
4° Phase
0
5
10
15 20
Um die Liste der gespeicherten Programme laufen zu
lassen, die Taste
drücken.
Um die Zeitenlängen der Bügelphasen ändern
zu
können, braucht man sich auf dem gewählten
Programm einzustellen (z.B. “P0”).
Die Taste
zum ersten Mal drücken, um die
Dampfzeit sichtbar zu machen dabei beginnt auch
die Dampfkontrolllampe zu blinken
.
Bei Betätigung der Tasten
und
kann man
die gewünschte Dampfzeit einstellen: zwischen 0 und
99 Sekunden kann man die Zeit von einer Sekunde
nach der anderen regulieren, während über 99
Sekunden erscheint die Zeit von einer Minute und 40
Sekunden (1.40) automatisch und die Zeit wird durch
10-sekundliche Abstände reguliert (1’.50”, 1’.60”…)
bis zu einer Zeit von 9 Minuten und 50“ (9’.50”). am
höchsten.
Nach Einstellung der Dampfzeit, die Taste
drücken, um sie zu bestätigen und um die “Dampf
und Luft” -Zeit sichtbar zu machen.
Dabei werden die Kontrolllampen
blinken.
und
12
Agendo sui tasti
e
del tempo desiderato.
si potrà impostare il valore
and
keys it is possible to
By operating on the
plan the value of the requested time.
Premere il tasto
per confermare il valore del tempo
impostato e poter accedere all’impostazione del tempo di
“pausa”; continuare la medesima procedura sino al tempo
di “asciugamento”. Terminata l’impostazione dell’ultimo
Press the
key to confirm the value of the planned time
and to be able to accede to the planning of the “pause” time;
continue the same procedure till the “drying” time.At the end
si confermerà
tempo, premendo un’ultima volta il tasto
il valore del tempo impostato e si uscirà dalla programmazione dei tempi di stiratura. Quando si è selezionato il programma di stiratura necessario, premere il tasto verde
of the planning of the last time,by pressing the
key, the
value of the planned time will be confirmed and you will go
out from the planning of the ironing times. When you have
selected the desired program, press the green key or the
oppure il tasto
per determinare la partenza del ciclo
di stiratura.
Se si volesse interrompere il ciclo di stiratura prima che
key to start the ironing cycle. If you want to stop the
ironing cycle before its completion, press the
sia ultimato, occorre ripremere il tasto
3.5
Il tasto
.
3.5
USO MANUALE DELLA FUNZIONE ARIA
USING THE MANUAL AIR FUNCTION
The
function turns on the fan, which blows warm
air on the item, and at the same time the warning light
avvia il ventilatore soffiando aria calda nel
will light.. This function is used when it is necessary
to prolong the drying time of the cycle in use or when the
item needs to be only dried.
capo contemporaneamente accenderà la spia
. Tale
funzione viene usata quando occorre prolungare il tempo
d’asciugamento del ciclo in corso, oppure quando il capo
deve essere solamente asciugato.
Press the
and it stops.
una prima volta, il ventilatore si
Premendo il tasto
avvia; premendo nuovamente lo si arresta.
key once, the fan turns on; press it again
key during the calculation of the time
Pressing the
T4, the machine will get ready to continue the phase of ventilation at the end of the calculation of the drying time
durante il conteggio del tempo T4,
Premendo il tasto
si predisporrà la macchina per continuare la fase di ventilazione al termine del conteggio del tempo d’asciugamento
(or
to memorize the
till will be pressed the key
manual function for the subsequent cycles).
(oppure
sino a quando si premeranno i tasti
se si volesse memorizzare la funzione manuale per i cicli
successivi).
3.6
3.6
USING THE MANUAL STEAM FUNCTION
USO MAUALE DELLA FUNZIONE VAPORE
With standing machine, pressing the
Con macchina inattiva, premendo il tasto
si aziona la
vaporizzazione (contemporaneamente si accenderà la
oppure
key steam will
be operated (at the same time the warning light
will light) till the
spia
key.
or
keys will be pressed.
) sino a quando si premeranno i tasti
Pressing the
key during the calculation of the steaming time, the machine will be ready to continue the steaming phase at the end of the calculation of the relative
.
Premendo il tasto
durante il conteggio del tempo di
vaporizzazione, si predisporrà la macchina per continuare
la fase di vaporizzazione al termine del conteggio del
relativo tempo sino a quando si premerà il tasto
ciclo poi continuerà le altre 3 fasi.
key will be pressed; then the cycle will
time till when
continue the other 3 phases.
; il
13
En agissant sur les poussoirs
et
introduire la valeur du temps demandé.
Actuando sobre las teclas
y
programar el valor del tiempo deseado.
on pourra
Presser le poussoir
pour confirmer la valeur du
temps introduit et pouvoir accéder à l’introduction du
temps de “pause”; continuer la même opération
jusqu’au temps de “séchage”. Terminé l’introduction
Presionar la tecla
para confirmar el valor
del
tiempo programado y poder acceder a la impostación
del tiempo de "pausa"; continuar el mismo
procedimiento hasta al tiempo de "secado". Acabada
la impostación del último tiempo, presionando una
pour
du dernier temps, presser le poussoir
confirmer la valeur du temps introduit et pour sortir de
la programmation des temps de repassage.
Quand le programme de repassage nécessaire a été
sélectionné, presser la touche verte ou le poussoir
se confirmará el valor del
última vez la tecla
tiempo programado y se saldrá de la programación
de los tiempos de planchado.
Cuando se ha seleccionado el programa de
planchado necesario, presionar la tecla verde o la
pour déterminer le démarrage du cycle de
repassage.
Si Vous voulez bloquer le cycle de repassage avant
qu’il soit terminé, il faut appuyer sur le poussoir
se podrá
tecla
para determinar el inicio del ciclo de
planchado.
Si se desea intrerrumpir el ciclo de planchado antes
de que éste haya terminado, es necesario presionar
.
3.5 USAGE DE LA FONCTION AIR MANUELLE
la tecla
La fonction
démarre le ventilateur, souffle de l’air
chaud dans le vêtement et dans le même temps la
3.5 EMPLEO DE LA FUNCIÓN AIRE MANUAL
La función
pone en movimiento el ventilador
soplando aire caliente en la prenda y al mismo tiempo
s’allumera. Cette fonction est
lampe témoin
utilisée quand il faut prolonger le temps de séchage
du cycle courant, ou quand le vêtement doit être
seulement séché.
encenderá. Tal función se usa
la espía
cuando es necesario prolongar el tiempo de secado
del ciclo en curso, o cuando la prenda debe ser
secada solamente.
En appuyant sur
une fois, le ventilateur est
démarré; en appuyant encore il est arrêté.
Presionando
una vez, el ventilador arranca;
presionando nuevamente se lo detiene.
Pressant le poussoir
pendant la formulation du
temps T4, la machine sera prête pour continuer la
phase de ventilation à la fin de la formulation du
temps de séchage jusqu’à quand on pressera le
(ou
pour mémoriser
poussoir
fonctionne manuelle pour les cycles suivants).
Presionando la tecla
durante la cuenta del
tiempo T4, se preparará la máquina para continuar la
fase de ventilación al final de la cuenta del tiempo de
la
secado hasta a cuando se presionen las teclas
si se quisiera memorizar la manual por
(o bien
los ciclos siguientes).
3.6 USAGE DE LA FONCTION VAPEUR MANUELLE
Avec la machine inactive, en pressant le poussoir
on actionne la vaporisation (en même temps la
lampe témoin
pressera le poussoir
3.6 EMPLEO DE LA FUNCIÓN VAPOR MANUAL
s'allumera) jusqu’à quand on
ou
Con máquina inactiva, presionando la tecla
se
acciona la vaporización (al mismo tiempo la espía
se encenderá) hasta a cuando se presionen las teclas
.
Pressant le poussoir
pendant la formulation du
temps de vaporisation, la machine sera prête pour
continuer la phase de vaporisation à la fin de la
formulation du temps relatif jusqu’à quand on
pressera le poussoir
autres 3 phases.
.
o bien
.
Presionando la tecla
durante la cuenta del
tiempo de vaporización, se preparará la máquina para
continuar la fase de vaporización al final de la cuenta
del relativo tiempo hasta a cuando se presione la
puis le cycle continuera les
tecla
13
luego el ciclo continuará las otras 3 fases.
Durch Betätigung der Tasten
die gewünschte Zeit einstellen.
und
kann man
Die Taste
drücken, um die gewählte Zeit zu
bestätigen und um die Regulierung der Pause-Phase
beginnen zu können; denselben Vorgang wiederholen
bis zur "Abtrocknenszeit“. Nach Einstellung der
letzten Phasezeit wird man durch endliche Betätigung
den gewählten Wert bestätigen und
der Taste
aus
der
Bügelphasenprogrammierung
herauskommen.
Ist das gewünschte Bügelprogramm gewählt, die
grüne Taste oder die Taste
Arbeitsvorgang einzuleiten.
drücken, um den
Wünscht man eine vorzeitige Unterbrechung, ist
zu drücken.
3.5 GEBRAUCH DER FUNKTION MANUELLE LUFT
Die Funktion
setzt den Ventilator in Gang, wobei
Heißluft in das Bügelgut geblasen wird und die
gleichzeitig betätigt wird. Diese
Kontrolllampe
Funktion dient dazu, den Trocknungszyklus zu
verlängern, oder wenn das Kleidungsstück nur
getrocknet werden soll.
Wenn man einmal die Taste
drückt, springt der
Ventilator an, drückt man ein zweites Mal, kommt er
zum Stillstand.
Wenn die Taste
während der Zeitzählung T4
gedrückt wird, wird die Maschine vorbereitet, die
Ventilation
auch
nach
der
Zählung
der
Abtrocknenszeit fortzusetzen bisher die Taste
wenn man die manuelle
gedrückt wird (oder
Funktion auch für die nächsten Bügelprozesse
speichern will).
3.6 GEBRAUCH DER FUNKTION „MANUELLER
DAMPF“
Wenn die Taste
bei stillgelegter Maschine
gedrückt wird, wird die Dämpfung betätigt (gleichzeitig
wird die Kontrolllampe
Drücken von Taste
anschaltet) bis erneutes
oder
.
Wenn die Taste
während der Zählung der
Dampfzeit gedrückt wird, wird die Maschine
vorbereitet, die Dampfphase auch nach seinem
programmierten Abschluss andauernd weiterzuführen
bisher die Taste
gedrückt wird; der Zyklus wird
dann die weiteren 3 Phasen durchführen.
13
4.0
USO DELLA MACCHINA
4.0
USE OF THE MACHINE
4.1
PROCEDIMENTO PER CICLO DI STIRATURA
4.1
PROCESS FOR FINISHING CYCLE
1. Inserire l’aspirazione (solo per modelli con tensionamento automatico) premendo il pulsante nero (3)
Fig. 04 posto sul pannello comandi. Se il dispositivo
tendimaniche è inserito si chiuderanno le due pinze e
contemporaneamente partirà l’aspirazione.
1. Start the suction cycle (only for models with automatic
stretching) by pushing the black button (3) Fig. 04, on
the control board. If the extensor clamp device is connect, these will be closed and at same time the suction
will starts.
2. Sistemare l’indumento sul manichino prestando attenzione a non sovrapporre i lembi della parte frontale
della camicia ma facendoli combaciare lungo la linea
verticale; la forte aspirazione (solo per modelli con
tensionamento automatico) all’interno della pala del castello permetterà di fissare saldamente l’indumento.
2. Put the garment on the former ensuring that the front
of the shirt does not overlap, but is placed side by side
along the vertical line; the strong suction (only for models with automatic stretching) inside the former clamp
will firmly fix the garment.
3. After all the setting operations have been carried out to
the garment on the former, black push button (3) Fig.
04 on the control board and close the front clamp by
pushing it towards the former until the clamp is locked
on the former.
3. Dopo aver completato tutte le operazioni di fissaggio dell’indumento sul manichino, tenendo premuto il pulsante
nero (3) Fig. 04 posto sul pannello comandi accompagnare la pala anteriore verso il castello con una spinta in
avanti fino a quando la pala si bloccherà sul castello.
4. Slackening the handle on the shirt sleeve clamps and
fixing them on one of the letters marked out on the
slide (“C” = shirts – “V” = dressing-gowns). Pressing
the right button you open the right clamp of the extensor clamps: insert on the right cuff into the clamp and
release the pedal; by pressing the right pedal again,
the right clamp re-opens and you can adjust the cuff
if necessary. Repeat the same operation to fix the left
sleeve cuff by pushing the left pedal.
4. Allentando l’apposita maniglia, far scorrere le pinze
tendimaniche posizionandole in corrispondenza di una
delle lettere tracciate sull’asta (“C” = camicie – “V” =
vestaglie). Tenendo premuto il pedale destro si apre
la pinza destra del dispositivo tendimaniche: inserire
nella pinza il polsino destro e rilasciare il pedale; in
caso d’errata pinzatura ripremere il pedale destro per
riaprire la pinza. Ripetere la medesima operazione per
fissare il polsino della manica sinistra agendo questa
volta sul pedale sinistro.
5. Verify that the spread of the shoulders of the former is
correct with the size of the garment; for the shoulder
size regulation, if you turn the handle (2) Fig.03 on
the right the shoulder expander will widen, and if you
turn on the left the shoulder expander will narrow.
5. Verificare che l’apertura delle spalle del castello sia
corretta rispetto alla taglia dell’indumento da stirare: per
la regolazione delle spalle agire sulla manopola (2) Fig.
03, ruotandola in senso orario si allargano le spalle, in
senso antiorario si restringono.
6. It is possible to perform manual ventilation for the time
that you prefer, before you start the automatic ironing
6. E’ possibile eseguire un’operazione di ventilazione manuale per il tempo desiderato, prima di iniziare il ciclo
automatico di stiratura, agendo sull’interruttore posto
sul pannello comandi
permettendo in tal modo
una maggior distensione del tessuto da stirare e dunque
una successiva miglior finitura. Per quest’operazione è
possibile regolare la quantità d’aria agendo sulla leva
(13) Fig. 03 alzandola si aumenta gradualmente la
portata d’aria, abbassandola la si diminuisce.
cycle by pushing the switch
on the control board.
This allows more air to be blown, and a good finish.
For this operation it is possible to regulate the quantity
of the air, operating on the lever. By lifting the lever (13)
Fig. 03, the quantity of the air increases, and by lowering
it reduces the volume.
7. Now the machine is ready to start the automatic finishing
cycle. Press the green button on the control panel to
close the side clamps of shirt and sleeves’ stretcher
until the sleeves are stretched.
7. A questo punto si può iniziare il ciclo automatico di stiratura. Premendo il pulsante verde posto sul pannello
comandi si chiuderanno le pale laterali del dispositivo
tendicamicia e il dispositivo tendimaniche allargandosi
porterà in tensione le maniche dell’indumento da stirare.
8. The finishing cycle consists of 4 phases:
8. Il ciclo di stiratura si svolge in 4 fasi
- VAPORIZZAZIONE: durante questa fase si generano
continue e brevi soffiate d’aria calda che distribuiscono
uniformemente il vapore all’interno del sacco, permettendo una miglior vaporizzazione dell’indumento ed un
conseguente risparmio energetico.
14
- STEAM: during this phase short and continuous blows
of hot air are injected in order to have uniform steam
inside the bag, thus allowing a better humidification
of the garment to finish at a low energy consumption.
4.0 USAGE DE LA MACHINE
4.0 EMPLEO DE LA MÁQUINA
4.1 DEROULEMENT CYCLE DE REPASSAGE
1. Actionner l’aspiration (seulement pour modèles
avec tension automatique) pressant le poussoir
noir (3) placé sur le panneau de contrôle. Si le
dispositif tendeur-manches est branché les deux
pinces se fermeront et dans le même temps
partira l’aspiration.
2. Placer le vêtement sur le mannequin faisant
attention que les coins du côté frontal ne soient
pas superposés mais soient placés au long de la
ligne verticale; la forte aspiration (seulement pour
modèles avec tension automatique) à l’intérieur
du serre-bord de la poupée permettra de fixer
solidement le vêtement.
3. Après avoir fixé le vêtement sur le mannequin,
presser le poussoir noir (3) Fig. 04 placé sur le
panneau de contrôle et fermer doucement le
support serre-bord antérieur vers la poupée le
poussant en avant jusqu’à le serre-bord se
bloquera sur la poupée.
4. Desserrant la poignée, faire rouler les pinces
tendeur-manches et les placer en correspondance de une des lettres tracées sur la tige (“C”=
chemises – “V” = robes de chambre). Pressant la
pédale droite la pince droite du dispositif tendeurmanches s’ouvre: placer dans la pince le poignet
droit et relâcher la pédale; en cas de position
erronée presser à nouveau la pédale droite pour
rouvrir la pince. répéter la même opération pour
fixer le poignet de la manche gauche, mais en
agissant sur la pédale gauche.
5. Vérifier que l’ouverture des épaules de la poupée
est correcte relativement à la taille du vêtement à
repasser; pour le réglage des épaules opérer sur
la poignée (2) Fig. 03, en la tournant en sens
horaire les épaules s’élargissent, dans le sens
contraire des aiguilles d’une montre se resserrent.
6. Il est possible accomplir une opération de
ventilation manuelle pour le temps nécessaire,
avant le cycle automatique de repassage, au
moyen de l’interrupteur placé sur le panneau de
4.1 PROCEDIMIENTO POR EL CICLO DE PLANCHADO
1. Conectar la aspiración (sólo para modelos con
tensión automática) presionando el boton negro
puesto sobre el panel de control.. Si el dispositivo
tensores de mangas es conectado se cerrarán las
dos pinzas y al mismo tiempo partirá la aspiración
2. Proceder a colocar la prenda sobre el maniquí
teniendo cuidado de no superponer los dos lados
de la parte frontal pero haciéndolos juntar
perfectamente por el largo de la línea vertical; la
fuerte aspiración (sólo para modelos con tensión
automática) a l'interior de la pala del armazon
permitirá de fijar firmemente la prenda.
3. Después de haber completado todas las
operaciones de fijado de la prenda sobre el
maniquí, teniendo presionado el boton negro (3)
Fig. 04 puesto sobre el panel de control
acompañar el soporte pala anterior hacia el
armazon con un empuje hasta cuando la pala
terminara sobre el armazon.
4. Aflojando la adecuada manija, hacer correr las
pinzas tensores de mangas posicionándolas en
correspondencia de una de las letras marcada
sobre el asta (“C”=camisas - "V" =batas). Teniendo
comprimido el pedal derecho se abre la pinza
derecha del dispositivo tensores de mangas: inserir en la pinza el puño derecho y soltar el pedal; en
caso de operación incorrecta re-apretar el pedal
derecho para reabrir la pinza; repetir la misma
operación para fijar el puño de la manga izquierda
actuando esta vez sobre el pedal izquierdo.
5. Comprobar que la abertura de los hombros del
armazon sea correcta respecto a la talla de la
prenda a planchar: por el ajuste de los hombros
actuar sobre la empuñadura (2) Fig. 03 girándola
en sentido horario se ensanchan los hombros, en
sentido a izquierdas se encogen.
6. Es posible ejecutar una operación de ventilación
manual por el tiempo deseado, antes de iniciar el
ciclo automático de planchado, actuando sobre el
interruptor puesto sobre el panel de control
permitiendo en tal manera una mayor distensión
del tejido a planchar y pues un siguiente mejor
perfeccionamiento. Por esta operación es posible
ajustar la cantidad de aire actuando sobre la
palanca (13) Fig. 03 levantandola gradualmente
se aumenta el alcance de aire, bajandola se
disminuye
7. A este punto se puede iniciar el ciclo automático
de planchado. Apretando el interruptor verde
puesto sobre el panel de control se cerrarán las
pinzas del dispositivo tensor de camisas y el dispositivo tensores de mangas extendiéndose llevará
en tensión las mangas de la prenda a planchar.
8. El ciclo de planchado se desarrolla en 4 fases
• VAPORIZACIÓN: durante esta fase se
producen continuos y breves soplados de aire
caliente que distribuyen uniformemente el vapor
dentro del saco, permitiendo una mejor
vaporización de la prenda y un consiguiente
ahorro energético.
ainsi permettant une meilleure
contrôle,
détente du tissu à repasser et donc une meilleure
finition. Pour cette opération il est possible régler
la quantité d’air par le levier (13) Fig. 03. en le
levant on augmente graduellement la quantité
d’air, tandis que en le baissant la quantité d’air
diminue.
7. Maintenant on peut commencer le cycle
automatique de repassage. Pressant le poussoir
vert placé sur le panneau de contrôle, les palettes
laterales du dispositif tendeur-chemise et le
dispositif tendeur-manches se fermeront portant
en tension les manches du vêtement à repasser.
8. Le cycle de repassage se passe en 4 phases
•
VAPORISATION: pendant cette phase la
vapeur, grâce à des brefs et continus coups
de soufflage, est distribuée en manière
uniforme à l’intérieur du sac permettant une
meilleure vaporisation du vêtement à repasser et une conséquente épargne énergétique.
14
4.0 GEBRAUCH DER MASCHINE
4.1 BÜGELVORGANG
1. Durch den schwarzen Druckknopf (3) auf dem
Schaltfeld die Absaugung in Betrieb setzen (nur
für die Ausführung mit automatischer Spannung).
Falls
die
Ärmelspannungsvorrichtung
eingeschaltet ist, schließen sich die zwei
Klammern ein und fängt die Absaugung
gleichzeitig an
2. Das Kleidungsstück auf die Puppe ziehen und
darauf achten, daß die zwei Knopfreihen nicht
übereinander positionert werden, sondern die
Knopfreihen mit senkrechter Linie aneinander
passen: Die leistungsfähige Absaugung der
Andruckleiste wird das Kleidungsstück dann
festhalten (nur für die Ausführung mit
automatischer Spannung)
3. Wenn die Auflegung des Kleidungsstückes
gefertigt ist, den schwarzen Druckknopf (3) Fig. 04
auf dem Schaltfeld drucken und gleichzeitig die
Halterung der vorderen Andruckleiste für ihre
pneumatische Blockierung gegen das Gestell
drücken und begleiten.
4. Die dazu gemeinten Handgriff losmachen und die
Ärmelspannungsklammern auf
angezeigter
Position (“C” = Hemden – “V” = Kittel) bringen. Auf
dem rechten Pedal treten, um die rechte
Ärmelspannungsvorrichtung zu öffnen. Die
Manschette einlegen und Pedal loslassen. Bei
falscher Blockierung der Manschette wieder auf
den Pedal treten, um die Andruckpatsche zu
öffnen. Gleicher Vorgang gilt für die linke
Manschette mit Betätigung des linken Pedals.
5. Schulterweite durch dazu bestimmten Hebel
gemäß der Größe regulieren: für die Erweiterung
den Drehknopf (2) Fig. 03, im Uhrzeigersinn
drehen, und für die Verengung entgegen dem
Uhrzeigersinn.
6. Es ist möglich vor dem automatischem
Arbeitszyklus eine manuelle Ventilation
durch
den Schalter auf dem Schaltfeld für gewünschte
Zeit einzuschalten, damit das Kleidungsstück
besser gespannt wird und um eine bessere
Bügelqualität zu schaffen. Hierfür kann die
Luftmenge durch den dazu bestimmten Hebel (13)
Fig. 03 reguliert werden: nach oben erhöht man
schrittweise die Luftmenge, nach unten wird sie
reduziert.
7. Somit kann man mit dem automatischen
Arbeitsvorgang beginnen. Grünen Knopf auf dem
Schaltfeld drücken, damit sich die seitlichen
Hemdenspannungsklammern schließen und die
Ärmelspannungsvorrichtungen sich ausweiten, um
die Ärmel zu spannen.
8. der BügeIvorgang besteht aus 4 Phasen
• DÄMPFUNG: während des Dampfvorganges
setzt sich gleichzeitig der Ventilator in Betrieb,
der dann fortwährend in Abständen kurze
Blasstöße erzeugt. Dank der Blasstöße wird der
Dampf gleichmäßig im Puppenbezug verteilt,
dadurch werden die Kleidungsstücke deutlich
besser gedämpft und man spart viel Energie.
14
- ARIA CALDA MISTA A VAPORE: durante questa fase
è possibile regolare la quantità d’aria calda manovrando
la leva.
- PAUSA: per lasciare inumidire, per il tempo necessario, l’indumento.
- ARIA CALDA: soffiaggio d’aria calda per l’asciugatura
dell’indumento. Per indumenti particolarmente inumiditi
allungare il tempo d’asciugamento, per tessuti con trama molto fitta portare la leva in posizione medio/bassa,
mentre per tessuti con trama larga portare la leva in
posizione medio/alta.
4.2
- STEAM AND HOT AIR MIX: to adjust the quantity of
hot air in this phase, move the lever.
- BREAK: to allow the garment dampening, for the
necessary time.
- HOT AIR: blowing of hot air to dry the garment. For a
particularly wet garment is possible to extend the drying
time, for garment manufactured with thick cloth move
the lever to the medium/low position, whilst for thiner
cloth move the lever to the medium/high position.
4.2
USO DEL DISPOSITIVO AUTOMATICO DI
TENSIONAMENTO DELL’INDUMENTO
(SOLO PER I MODELLI IN CUI E’ PREVISTO)
USE OF AUTOMATIC STRETCHING
DEVICE OF THE GARMENT
(IF FITTED)
This device is particularly suitable for the ironing of the
shirts. Turning on the switch (11) Fig. 04 the stretching device is automatically inserted every time the finishing cycle
starts; the stretching time of the garment can be adjusted
by the timer. The stretching can be also manually operated
(thanks the aid of the back mirror) in any moment, acting
on the lever (2) Fig. 04 placed on the control panel.
Questo dispositivo è particolarmente indicato per la stiratura
delle camicie. Accendendo l’interruttore (11) Fig. 04 s’inserisce automaticamente il dispositivo di tensionamento ogni
volta che parte il ciclo di stiratura; il tempo di tensionamento
dell’indumento si può regolare tramite il timer. Il tensionamento può essere azionato anche manualmente (grazie
all’ausilio dello specchio posteriore) in qualsiasi momento,
agendo sulla leva (2) Fig. 04 posta sul pannello comandi.
The device consists of:
Il dispositivo è formato da:
1. two side clamps joined and
adjustable in any position, where
have to be positioned the lower
extremities of the garment to
finish; these clamps can also be
used for the ironing of the side
clefts.
These clamps can be moved
in height, loosening the two
handle grips and moving in the
chosen position the device with
the clamps, therefore stop the
handle grips.
2. A back clamp adjustable horizontally where have to be positioned the back part of the
garment.
For the garments with back cleft
or for the ironing of garments
without back cleft, it is necessary
to let the clamps closing automatically at the beginning of the
finishing cycle.
Thanks to the mirror it is possible
to adjust the shirt stretcher in
order to stretch the shirt down if
necessary.
1. Due pale laterali snodabili e
regolabili in qualsiasi posizione, all’interno delle quali
devono essere posizionate
le estremità laterali inferiori
dell’indumento da stirare;
queste pale possono essere
usate anche per la stiratura
degli spacchi laterali.
Queste pale possono essere
spostate in altezza allentando
le due manopole e spostando nella posizione scelta i
dispositivi con le pale, quindi
bloccando le manopole.
2. Una pala posteriore regolabile orizzontalmente all’interno
della quale deve essere posizionata la parte posteriore
dell’indumento. Per gli indumenti con spacco posteriore oppure per la stiratura
d’indumenti senza spacco
posteriore, occorre lasciare
chiudere la pala automaticamente all’inizio del ciclo di
stiratura. E’ possibile agire
sul dispositivo tendicamicia:
con l’ausilio dello specchio
posteriore posizionare il dispositivo in modo da tendere
bene l’indumento
15
•
•
•
MELANGE AIR CHAUDE ET VAPEUR:
pendant cette phase il est possible régler la
quantité d’air chaude au moyen du levier.
PAUSE: pour laisser humidifier, pour le
temps nécessaire, le vêtement.
AIR CHAUD: soufflage d’air chaud pour le
séchage du vêtement. Pour vêtements
particulièrement humides prolonger le temps
de séchage; pour tissus avec trame très
serrée porter le levier en position
moyenne/baisse, tandis que pour tissus avec
trame large porter le levier en position
moyenne/haute.
•
•
•
AIRE CALIENTE MIXTO A VAPOR: durante
esta fase es posible ajustar la cantidad de
aire caliente manejando la palanca.
PAUSA: para humedecer la prenda por el
tiempo necessario.
AIRE CALIENTE: soplado de aire caliente
por el secado de la prenda. Por prendas
particularmente humedecidas prolongar el
tiempo de secado, por tejidos con trama muy
espesa llevar la palanca en posición
medio/baja, mientras por tejidos con trama
ancha llevar la palanca en posición
medio/alta.
4.2 EMPLEO DEL DISPOSITIVO TENSOR
AUTOMÁTICO DE LA PRENDA (CUANDO ESTÁ
4.2
USAGE
DU
DISPOSITIF
TENDEUR
AUTOMATIQUE
DU VÊTEMENT (OÙ PRESENT)
Ce dispositif est particulièrement indiqué pour le
repassage des chemises.
En allumant l'interrupteur (11) Fig. 04 le tendeur
s'insère automatiquement, chaque fois que le cycle
de repassage se met en marche; le temps du
tensionnage du vêtement peut être réglé par le
temporisateur..
Le tendeur peut être aussi actionné manuellement,
grâce à l'aide du miroir postérieur, à n'importe quel
moment, en agissant sur le levier (2) Fig. 04 placé sur
le panneau de contrôle.
Le dispositif est formé par:
PREVISTO)
Este dispositivo es particularmente indicado para el
planchado de las camisas.
Encendiendo el interruptor (11) Fig. 04 se introduce
automáticamente el dispositivo tensor cada vez que
parte el ciclo de planchado; el tiempo de la duración
de la tensión de la prenda se puede ajustar para el
temporizador. O bien el tensor puede ser accionado
manualmente gracias al auxilio del espejo posterior,
en cualquier momento actuando sobre la palanca
(2) Fig. 04 puesta sobre el panel de control.
El dispositivo esta formado de:
1. Dos pinzas laterale articulables y ajustables en cualquiera
posición,
dentro de las cuales
tienen que ser posicionadas
las
extremidades
laterales
inferiores de la
prenda a
planchar; estas pinzas pueden
ser también empleadas por el
planchado de las hendiduras
laterales. Estas palas pueden
ser
desplazadas en
altura
aflojándo las dos empuñaduras
y desplazando en la posición
elegida el dispositivo con la pala
por lo tanto bloquear las
empuñaduras
1. Due pale laterali snodabili e
regolabili in qualsiasi posizione, all’interno delle quali
devono essere posizionate
le estremità laterali inferiori
dell’indumento da stirare;
queste pale possono essere
usate anche per la stiratura
degli spacchi laterali.
Queste pale possono essere
spostate in altezza allentando
le due manopole e spostando nella posizione scelta i
dispositivi con le pale, quindi
bloccando le manopole.
2. Una pala posteriore regolabile orizzontalmente all’interno
della quale deve essere posizionata la parte posteriore
dell’indumento. Per gli indumenti con spacco posteriore oppure per la stiratura
d’indumenti senza spacco
posteriore, occorre lasciare
chiudere la pala automaticamente all’inizio del ciclo di
stiratura. E’ possibile agire
sul dispositivo tendicamicia:
con l’ausilio dello specchio
posteriore posizionare il dispositivo in modo da tendere
bene l’indumento
2. Una pala posterior ajustable
horizontalmente y verticalmente
dentro de la cual tiene que ser
posicionada la parte posterior de
la prenda. Por las prendas con
hendidura posterior o bien por
el planchado de prendas sin
hendidura posterior, es necesario
que el cierre de la pinza se hace
automáticamente al principio del
ciclo de planchado. Es posible
actuar sobre el dispositivo tensor
de camisas gracias al auxilio del
espejo posterior posicionar el
dispositivo de manera que la
prenda esta bien tensada.
15
•
•
•
MELANGE AIR CHAUDE ET VAPEUR:
pendant cette phase il est possible régler la
quantité d’air chaude au moyen du levier.
PAUSE: pour laisser humidifier, pour le
temps nécessaire, le vêtement.
AIR CHAUD: soufflage d’air chaud pour le
séchage du vêtement. Pour vêtements
particulièrement humides prolonger le temps
de séchage; pour tissus avec trame très
serrée porter le levier en position
moyenne/baisse, tandis que pour tissus avec
trame large porter le levier en position
moyenne/haute.
•
•
•
AIRE CALIENTE MIXTO A VAPOR: durante
esta fase es posible ajustar la cantidad de
aire caliente manejando la palanca.
PAUSA: para humedecer la prenda por el
tiempo necessario.
AIRE CALIENTE: soplado de aire caliente
por el secado de la prenda. Por prendas
particularmente humedecidas prolongar el
tiempo de secado, por tejidos con trama muy
espesa llevar la palanca en posición
medio/baja, mientras por tejidos con trama
ancha llevar la palanca en posición
medio/alta.
4.2 EMPLEO DEL DISPOSITIVO TENSOR
AUTOMÁTICO DE LA PRENDA (CUANDO ESTÁ
4.2
USAGE
DU
DISPOSITIF
TENDEUR
AUTOMATIQUE
DU VÊTEMENT (OÙ PRESENT)
Ce dispositif est particulièrement indiqué pour le
repassage des chemises.
En allumant l'interrupteur (11) Fig. 04 le tendeur
s'insère automatiquement, chaque fois que le cycle
de repassage se met en marche; le temps du
tensionnage du vêtement peut être réglé par le
temporisateur..
Le tendeur peut être aussi actionné manuellement,
grâce à l'aide du miroir postérieur, à n'importe quel
moment, en agissant sur le levier (2) Fig. 04 placé sur
le panneau de contrôle.
Le dispositif est formé par:
PREVISTO)
Este dispositivo es particularmente indicado para el
planchado de las camisas.
Encendiendo el interruptor (11) Fig. 04 se introduce
automáticamente el dispositivo tensor cada vez que
parte el ciclo de planchado; el tiempo de la duración
de la tensión de la prenda se puede ajustar para el
temporizador. O bien el tensor puede ser accionado
manualmente gracias al auxilio del espejo posterior,
en cualquier momento actuando sobre la palanca
(2) Fig. 04 puesta sobre el panel de control.
El dispositivo esta formado de:
1. Dos pinzas laterale articulables y ajustables en cualquiera
posición,
dentro de las cuales
tienen que ser posicionadas
las
extremidades
laterales
inferiores de la
prenda a
planchar; estas pinzas pueden
ser también empleadas por el
planchado de las hendiduras
laterales. Estas palas pueden
ser
desplazadas en
altura
aflojándo las dos empuñaduras
y desplazando en la posición
elegida el dispositivo con la pala
por lo tanto bloquear las
empuñaduras
1.
bles dans chaque position,
à l'intérieur desquelles doivent être positionnés les extrémités inférieures latérales
du vêtement à repasser; ces
palettes peuvent être aussi
utilisées pour le repassage
des fentes latérales. Ces pa
en hauteur en desserrant les
deux poignées et en déplaçant dans la position choisie
le dispositif avec les palettes,
ensuite bloquer les poignées.
2.
horizontalement et verticalement, à l'intérieur de laquelle
doit être positionnée la partie
postérieure du vêtement.
Pour les vêtements avec fente postérieure ou pour le repassage de vêtements sans
fente postérieure, il faut que
se vérifie la fermeture de la
palette, automatiquement au
début du cycle de repassage
Il est possible opérer sur le
dispositif tendeur-chemise:
avec l'aide du miroir postérieure, placer le dispositif de
façon à bien tendre le vêtement.
2. Una pala posterior ajustable
horizontalmente y verticalmente
dentro de la cual tiene que ser
posicionada la parte posterior de
la prenda. Por las prendas con
hendidura posterior o bien por
el planchado de prendas sin
hendidura posterior, es necesario
que el cierre de la pinza se hace
automáticamente al principio del
ciclo de planchado. Es posible
actuar sobre el dispositivo tensor
de camisas gracias al auxilio del
espejo posterior posicionar el
dispositivo de manera que la
prenda esta bien tensada.
15
4.3
REGOLAZIONE E USO DEL SACCO
4.3
SETTING AND USING THE BAG
Sul dispositivo di tensionamento sono montate delle corde
che servono a regolare la circonferenza del sacco in funzione della taglia dell’indumento da stirare.
Liberarle dai due blocchetti ferma corda e tirarle o allentarle fino al tensionamento desiderato. La circonferenza
del sacco gonna è preregolata da una corda nel punto più
largo della circonferenza.
On the stretching device there are some cords to adjust
the circumference of the bag according to the garment
size to finish.
Free them from the two blocks which stop the cord and pull
or loosen them till the requested stretching.
The circumference of the skirt bag is already settled before
through a cord in the widest point of the circumference.
4.4
4.4
STIRATURA
FINISHING CYCLE
4.4.1 STIRATURA COLLO E POLSI
Il ciclo completo di stiratura della camicia prevede prima la
stiratura del collo e dei polsi, da effettuarsi con il ferro da
stiro su un tavolo professionale oppure sull’apposita pressa
“collo e polsi”.
4.4.1 COLLAR AND CUFF PROCESSING
To completely finish a shirt, the collar and cuffs should be
processed first. This can be carried out by using either a
professional finishing table, or by a specialised collar and
cuff press.
4.4.2 CICLO DI STIRATURA DEL CORPO CAMICIA
Per camicia umida (cioè centrifugata ad almeno 1000 giri
al minuto) regolare il 1° timer vapore a 3-4 secondi, il 2°
timer miscela vapore aria a 2/3 secondi, il 4° timer aria
calda a 45/50 secondi.
4.4.2 THE SHIRT BODY FINISHING CYCLE
For a wet shirt (one that is spun at least 1000 revolutions per
minute), set the steaming timer to 3/4 seconds, the second
timer which controls the steam and air mix to 2/3 seconds,
and finally the third timer for drying to 45/50 seconds.
4.4.3 CAMICIA CON MANICHE CORTE
Seguire il “PROCEDIMENTO PER CICLO DI STIRATURA”
a pag. 14, tenendo presente che per la stiratura di camicie
con maniche corte occorre regolare il dispositivo tendimaniche più in alto. Con le apposite maniglie posizionare le
pinze tendimaniche sul punto “C” dell’asta.
4.4.3 SHORTS-SLEEVES SHIRTS
Follow “PROCESS FOR FINISHING CYCLE” at page 14
with the only difference that for shorts-sleeves shirts, the
device for the sleeves should be used in the upper position.
With the proper handles, position the sleeves expanders
pliers on point “C” of the rod.
16
4.3
Sur
le dispositif tendeur il y a des cordes qui servent à
4.3
régler la circonférence de la housse en fonction de la
taille du vêtement à repasser. Pour régler les cordes,
il faut, les libérer des deux petit bloc arrêté-corde et
les tirer ou desserrer jusqu'au tensionnage nécessaire
La circonférence de la housse jupe est déjà réglée
avant, par une corde, dans le point le plus large de la
circonférence sans nécessité de la modifier.
Sobre el dispositivo tensor son montadas las cuerdas
necesarias a ajustar la circunferencia del saco en
relación a la talla de la prenda a planchar.
Para ajustar es necesario liberar las cordas de los dos
bloques y tirarle o aflojarle hasta la tensión deseada.
La circunferencia del saco falda esta ya preajustada para
una cuerda en el punto más ancho de la circunferencia
sin necesidad de modificarla.
4.4
4.4
4.4.1 Le cycle complet de la chemise prévoit d’abord le
repassage du col et des poignets, à réaliser avec un fer à
repasser sur une table professionnelle ou bien avec la
presse “cols et poignets”.
4.4.1 El ciclo complete de planchado de la camisa preveé
primero el planchado del cuello y de los punõs, con la
plancha de mano de una mesa profesional, o bien
con la prensa “cuello y punõs.
4.4.2 Pour les chemises humides (c.à.d. essorées à 1000 tours
par minute au moins) régler le 1er temporisateur de
vapeur à 3/4 secondes, le 2ème temporisateur de melange
vapeur/air à 2/3 secondes et le 3ème temporisateur de l’air
chaud à 45/50 secondes.
4.4.2 Para la canisa humeda (o sea centrifugada por lomenos a
1000 rpm) ajustar el 1° temporizador de vapor a 3-4 segundos, el 2° temporizador para la mezcla vapor y aire a
2-3 segundos y el 3° temporizador del aire caliente a
a 45-50 segundos .
4.4.3 CAMISAS SIN MANGAS
Seguir el “PROCEDIMIENTO POR EL CICLO DE
PLANCHADO” en la pág. 14, teniendo presente que para
el planchado de camisas sin mangas, es necesario obrar
como en el punto anterior, colocando el dispositivo de
las mangas mas alto. Con las manillas, posicionar las
pinzas de las mangas en el punto “C” del asta.
4.4.3 CHEMISE SANS MANCHE
Suivre le “DEROULEMENT CYCLE DE REPASSAGE” à
la page 14, avec la seule différence que le dispositif pour
les manches devra être positionné plus en haut.
Avec la poigné, positionner les pinces des manches
au point “C” de la tige.
16
4.3
Auf der Spannungsvorrichtung befinden sich die Regulierungsseile, um die Bezugskreislinie, je nach Größe des
Kleidungsstückes, einregulieren zu können.
Die
Regulierung erfolgt durch zwei Schnurrsperren, die
gezogen oder gelockert werden Schnurrsperren, die
gezogen oder gelockert werden. Die Kreislinie des
Rockbezuges ist schon durch ein Seil auf die breiteste.
Stelle eingestellt und soll nicht verändert werden.
4.4
4.4.1 Für ein perfektes und komplettes Hemdenfinishing
sollen Kragen und Manschetten auf einem Bügeltisch
gefertigt werden oder noch besser, wie hier angezeigt
mit einer Kragen- und Manschetten-Presse.
4.4.2 Für feuchte Hemden (d.h. mit min. 1000
Umdrehungen/min. geschleudert) so einstellen:
1° Dampf Timer auf 3 - 4 Sek
2° Dampf/Luft Timer auf 2 - 3 Sek
3° Warmluft Timer auf 45 - 50 Sek
4.4.3 “BÜGELVORGANG” auf Seite 14, befolgen und wie folgt
vorgehen: beim Finishing von Hemden mit kurzen Ärmeln
sollen die pneumatischem Ärmelspannungsklammern
höher verstellt werden; und sonst wie vor vorgehen.
Durch dazu bestimmten Griff die Ärmelspannungsklammern auf Position “C” des Stabes bringen.
16
4.4.4 CAMICI UMIDI
Seguire il “PROCEDIMENTO PER CICLO DI STIRATURA”
a pag. 14, tenendo presente che per la stiratura di camici
umidi (cioè centrifugati ad almeno 1000 giri al minuto)
occorre regolare il dispositivo tendicamicie verso il basso.
- Con le apposite maniglie posizionare le pinze tendimaniche sul punto “V” dell’asta.
- Orientare obliquamente le pinze tendimaniche.
- Sostituire la pala frontale corta con quella lunga.
4.4.4 WET SHIRTS
Follow “PROCESS FOR FINISHING CYCLE” at page 14
with the only difference that for wet shirts (that are spun at
least 1000 revolutions per minute), the device for expanding shirts should be used in the lower position.
- With the proper handles, position the sleeves expanders pliers on point “C” of the rod
- Position obliquely the sleeves expanders pliers
- Replace the short front clamp by the long one.
4.4.5 CAPPOTTI, GIACCHE, GIUBBOTTI
Seguire il “PROCEDIMENTO PER CICLO DI STIRATURA”
a pag. 14 tenendo presente che per la stiratura di cappotti,
giacche, giacche a vento, giubbotti in jeans e giubbotteria
varia, occorre spegnere il gruppo di riscaldamento aria calda
perché non necessario; è normalmente necessario invece
un tempo di vaporizzazione più lungo. Per la stiratura dei
cappotti utilizzare gli estensori maniche in legno, (vedi punto
4.5) escludendo le pinze tendimaniche pneumatiche tramite
l’apposito deviatore. Smontare il dispositivo tendicamicie da
entrambi i lati. Togliere la paletta manuale del collo e montare
la pala posteriore.
4.4.5 COATS AND JACKETS
Follow “PROCESS FOR FINISHING CYCLE” at page 14
with the only difference that when processing coats, jackets,
windcheaters and sport jackets, the hot air heaters should
be switched off as they are not required; normally a longer
steam time is required.
For finishing of coat, wooden sleeves expanders (see point
4.5) should be used in place of the pneumatic operated sleeve clamps which are disabled by turning off the appropriate
control switch for the pneumatic clamps. Disassemble the
shirts expander device from both sides Finally the manual
collar clamp should be removed (pause) and the rear clamp
attached.
4.4.6 GIACCA
Seguire il “PROCEDIMENTO PER CICLO DI STIRATURA” a pag. 14 tenendo presente che per la stiratura della
giacca, occorre utilizzare gli estensori maniche in legno
(vedi punto 4.5).
4.4.6 JACKETS
Follow “PROCESS FOR FINISHING CYCLE” at page 14
with the only difference that jackets are processed by using
wooden sleeves expanders (see point 4.5).
4.4.7 IMPERMEABILE
Seguire il “PROCEDIMENTO PER CICLO DI STIRATURA”
a pag. 14 tenendo presente che per la stiratura dell’impermeabile occorre utilizzare le pinze pneumatiche per creare
la necessaria pressione all’interno della manica. La trama
del tessuto dell’impermeabile è molto fitta, portare la leva
regolazione aria sulla posizione minima.
4.4.7 RAINCOATS
Follow “PROCESS FOR FINISHING CYCLE” at page 14
with the only difference that raincoats require the pneumatic
sleeve clamps to be used which allows pressure inside the
sleeve during processing to be built up. For raincoats, which
tend to be constructed from thick cloth, adjust the air flow
to the minimum position by the appropriate lever.
4.5
USO DEGLI ESTENSORI MANICHE IN LEGNO
La coppia d’estensori deve essere infilata nelle maniche
dell’indumento da stirare in modo che il lato dell’estensore
ad un unico raggio, segua la parte posteriore della manica.
Fare attenzione che l’estremità con le due punte convergenti
sia rivolta verso l’alto mentre quella con le punte divergenti
sia rivolta verso il basso.
4.5
USE OF THE WOODEN SLEEVES EXPANDERS
The two expanders have to be put on inside the sleeves of
the garment to finish. The side of the expander with a sole
radius have to follow the rear side of the sleeve so to insert
the end with the two points converging up and that ones
with the points diverging down.
17
4.4.4 BLOUSES HUMIDES
Suivre le “DEROULEMENT CYCLE DE
REPASSAGE” à la page 14, avec la seule différence
que pour le repassage des blouses humides (c.a.d.
essorés à 1000 tours par minute au moins) il faut
régler le dispositif de tension des chemises vers le
bas.
• Avec la poigné, positionner les pinces des
manches au point “V” de la tige.
• Orienter obliquement les pinces pour les manches.
• Remplacer le serre-bords antérieur court par la
serre bords long
4.4.4 BATAS HUMEDAS
Seguir el “PROCEDIMIENTO POR EL CICLO DE
PLANCHADO” en la pág. 14, a teniendo presente que
para el planchado de batas humédas (centrifugadas
por lo menos a 1000 r.p.m.) ajustar el dispositivo
tensor de camisa hacia bajo.
• Con las manillas, posicionar las pinzas de las
mangas en el punto “V” del asta.
• Orientar oblicuamente las pinzas de las mangas.
• Reemplazar la pala anterior corta por la pala larga
y actuar como en el ciclo normal
4.4.5 ABRIGOS - CHAQUETAS - CAZADORAS
Seguir el “PROCEDIMIENTO POR EL CICLO DE
PLANCHADO” en la pág. 14 teniendo presente que
para el planchado de abrigos, chaquetas, anoraks,
cazadoras de jean y blosones, es necesario apagar el
grupo de calefacción de aire porqué no es necesario;
puesto que se necesita un tiempo de vaporisacón
mas largo.
Para el planchado de abrigos utilizar los tensores de
mangas en madera (ver punto 4.5) y excluir las
pinzas de mangas neumáticas mediante el deviator
expreso. Desmontar el dispositivo tensor de camisa
por los dos lados. Quitar la pala manual de cuello y
montar la pala posterior.
4.4.5 MANTEAUX, VESTES, BLOUSONS
Suivre
le
“DEROULEMENT
CYCLE
DE
REPASSAGE” à la page 14 avec la seule différence
que pour le repassage des manteaux, vestes,
anoraks et blousons, il faut éteindre les résistances
de chauffage car l’air chaud n’est pas nécessaire; par
contre, normalement, il est nécessaire un temps de
vaporisation plus longue.
Pour le repassage des manteaux, utiliser les
extenseurs de manche en bois (voir point 4.5) au lieu
des pinces pneumatiques qui dans ce cas-la devront
être exclus par l’interrupteur. Enlever le dispositif pour
la tension des chemises de deux côtés. Enlever la
pince col manuelle et monter le serre-bords arrière.
4.4.6 CHAQUETA
Seguir el “PROCEDIMIENTO POR EL CICLO DE
PLANCHADO” en la pág. 14 teniendo presente que
para el planchado de chaquetas, es necesario utilizar
los tensores de mangas de madera (veer punto 4.5).
4.4.6 VESTE
Suivre
le
“DEROULEMENT
CYCLE
DE
REPASSAGE” à la page 14 avec la seule différence
que pour le repassage des vestes, il faut utiliser les
extenseurs des manches en bois. (voir point 4.5).
4.4.7 IMPERMEABLES (GABARDINAS)
Seguir el “PROCEDIMIENTO POR EL CICLO DE
PLANCHADO” en la pág. 14 teniendo presente que
para el planchado de los impermeables (gabardinas)
es necesario utilizar las pinzas neumáticas para
producir la présion necesaria en el interior de las
mangas.
Teniendo en cuenta que la trama del tejido de los
mismos es muy densa, poner la palanca de
regulación de aire en la posición minima.
4.4.7 IMPERMEABLES
Suivre
le
“DEROULEMENT
CYCLE
DE
REPASSAGE” à la page 14 avec la seule différence
que pour le repassages des imperméables il faut
utiliser
les pinces pneumatiques pour créer la
pression nécessaire à l’intérieur de la manche.
Porter le levier de régulation de l’air dans la position
minimale, car la trame de tissu de l’imperméable est
très serrée.
4.5 EMPLEO DE LOS EXTENSORES DE MANGAS
DE MADERA
El par de los extensores, debe ser introducido en las
mangas de la prenda que se debe planchar, en modo
tal que el lado del extensor con un radio único, siga el
lado posterior de la manga. Poner atención a que la
extremidad con las dos puntas convergentes esté
dirigida hacia arriba mientras que aquella con las
puntas divergentes deberá ser dirigida hacia abajo.
4.5 USAGE DES EXTENSEURS MANCHES EN
BOIS
Les deux extenseurs doivent être introduites dans les
manches du vêtement à repasser de façon que le
côté de l’extenseur à un seul rayon, suit le côté
postérieur de la manche. Faire attention que
l’extrémité avec les deux pointes convergentes soit
révolte vers le haut tandis que celle avec les pointes
divergentes devra être révolte vers le bas.
17
4.4.4 FEUCHTE KITTEL
“BÜGELVORGANG” auf Seite 14, befolgen und wie
folgt vorgehen: beim Bügeln von feuchten (mit 1000
Umdrehungen/min geschleuderten) Kitteln die
Hemdenspannungsvorrichtung nach unten verstellen.
• Durch
den
dazu
bestimmten
Griff
die
Ärmelandruckpatschen auf Position “V” bringen
• Die Ärmelandruckpatschen in schräger Stellung
bringen
• Die vordere Standard- Andruckleiste durch die
Maxi-Andruckleiste austauschen.
4.4.5 MÄNTEL,JACKEN UND JACKETT
“BÜGELVORGANG” auf Seite 14 befolgen und wie
folgt vorgehen: beim Bügeln von Mänteln, Jacken,
Windjacken, Jackett usw. die Luftbeheizungsgruppe,
die nicht nötig ist, ausschalten. Normalerweise ist
eine längere Dämpfungszeit notwendig.
Zum Bügeln von Mänteln die Holzärmelspanner
(siehe
Abschnitt
4.5)
benutzen
und
die
pneumatischen Ärmelspannungsklammern, durch den
entsprechenden Abweiser, ausschalten.
Die Hemdenspannungsvorrichtung auf beiden Seiten
abmontieren. Die Kragenklammer entfernen und die
hintere Andruckleiste montieren.
4.4.6 JACKEN
“BÜGELVORGANG” auf Seite 14 befolgen und wie
folgt vorgehen: beim Bügeln von Jacken die
Holzärmelspanner benutzen (siehe Abschnitt 4.5).
4.4.7 REGENMÄNTEL
“BÜGELVORGANG” auf Seite 14 befolgen und wie
folgt vorgehen: beim Finishing von Regenmänteln, um
guten Druck in den Ärmel zu erreichen die
pneumatischen Klammern benutzen.
Da Regenmäntel sehr dichten Gewebeschuss haben,
soll die Luftmengenregulierungsvorrichtung auf
niedrige Stellung gebracht werden.
4.5 GEBRAUCH DER HOLZÄRMELSPANNER
Die zwei Ärmelspanner in den Kleidungsärmeln
hineinstecken, und darauf achten, daß die Seite mit
einzigem Radius der Ärmelhinterseite folgt. Darauf
achten, dass das Ende mit auseinander strebenden
Spitzen nach unten
und das Ende mit
konvergierenden Spitzen nach oben positioniert
werden.
17
5.0
INTERVENTI DI MANUTENZIONE
5.0
MAINTENANCE
5.1
OPERAZIONI QUOTIDIANE
5.1
DAILY MAINTENANCE
a) Chiudere le due saracinesche poste sulle tubazioni
d’alimentazione vapore (24) Fig.06 e ritorno condensa
(23) Fig.06.
b) Disinserire gli interruttori del quadro elettrico della macchina (16) Fig.05, quindi l’interruttore generale previsto
sulla linea d’alimentazione
a) Close the two gate valves(24) Fig.06 fitted to the steam
line and the condensation return (23) Fig.06.
b) Turn off the electrical control board switch (16) Fig.05,
and then the main switch fitted to the electricity supply.
5.2
5.2
OPERAZIONI SETTIMANALI
WEEKLY MAINTENANCE
Check the air compressor filter, empty the water deposited
in the filter bowl using the discharge tap as per Fig. 09 To
the entry of the compressed air line, there is a filter to stop
condensate contained in the air. The filter is supplied with
a tank to collect the condensate. If this tank is full but not
drained, the condensate goes out into the pneumatic plant
of the machine thus causing problems.
Controllare il filtro dell’aria compressa, scaricare l’acqua
depositatasi nella tazza filtro agendo sul relativo rubinetto
di scarico indicato in Fig. 09. All’ingresso dell’aria compressa è posto un filtro per fermare la condensa contenuta
nell’aria. Il filtro è provvisto di serbatoio per la raccolta della
condensa. Quando questo serbatoio è pieno e non viene
svuotato, la condensa fuoriesce nell’impianto pneumatico
della macchina creando problemi.
6
8
80
4
120
10
40
2
160
ps
ba
12
Kl.1,
18
5.0
5.0
5.1
5.1
a) d’alimentation vapeur (24) Fig.06 et retour condensat
(23) Fig.06.
b) la machine (16) Fig. 05, et enfin l’interrupteur
général prévu sur la ligne d’alimentation.
a) lalimentación del vapor (24) Fig. 06 y de retorno de
de condensados (23) Fig.06.
b) máquina, (16) Fig. 05, luego el interruptor eléctrico
general previsto en la línea de alimentación.
5.2
5.2
Controlar el filtro del aire comprimido, descargar el agua
depositada en la taza filtro actuando sobre el relativo
grifo de descargue indicado en Fig. 09. A la entrada del
aire comprimido se encuentra un filtro para parar el agua
de condensación contenida en el aire. El filtro está
provisto de tanque por la colección del agua de condensación. Cuando este tanque está lleno y no es vaciado, el
agua de condensación rebosa en la instalación neumática
de la máquina creando problemas.
Contrôler le filtre de l’air comprimé, décharger l’eau
déposée dans la tasse filtre, en agissant sur le robinet
de déchargement indiqué en Fig. 09. À l'entrée de l'air
comprimé il y a un filtre pour arrêter le condensat
contenu dans l'air. Le filtre est pourvu de réservoir
pour la récolte du condensat.
Quand ce réservoir est plein et il n'est pas vidé, le
condensat sort dans l'installation pneumatique de la
machine créant des problèmes.
6
8
80
4
120
10
40
2
160
ps
ba
12
Kl.1,
18
5.0
5.1
a) Dampf, (24) Fig. 06 und den Kondensrücklauf, (23)
Fig.06, angebrachten Schieber schließen.
b) (16) Fig.05, schließen und zuletzt den Hauptschalter
der elektrischen Zuleitung.
-
5.2
Den Druckluftfilter kontrollieren und das in der Filtertasse
sich gesammelte Wasser durch den im Bild 09
dargestellten Auslasshahn auslassen. Am Drucklufteingang liegt das Filter, um den in der Luft enthaltenen
Kondensat zu halten. Der Filter selbst verfügt über einen
Behälter für die Kondensatsammlung. Wenn der Behälter
voll ist und nicht entleert wird, fließt der Kondensat in die
pneumatische Anlage und verursacht Probleme.
6
8
80
4
120
10
40
2
160
ps
ba
12
Kl.1,
18
5.3
OPERAZIONI QUINDICINALE
5.3
Pulire il filtro dell’aria aspirata dal ventilatore.
Pulire la rete all’interno del camino.
Ogni 15 giorni, tassativamente, bisogna togliere il camino
e allentando 4 bulloni Fig. 10, togliere la rete sopra citata e
pulire il materassino di gomma piuma Fig. 11, spesso ca.
10 mm, posto dietro alla rete stessa.
La funzione di questo materassino è di trattenere pelucchi
e polvere che, trascinati dall’aspiratore, riescono a passare
attraverso la rete.
Portare il materassino all’esterno del locale: usando una
pistola ad aria compressa eliminare pelucchi e polvere
aggrappati al materassino. In mancanza di pistola ad aria
scuotere il materassino per eliminare lo sporco.
Pulire anche il condotto interno dell’aria.
Si consiglia di effettuare questa pulizia per mantenere efficiente la fuoriuscita di aria al sacco manichino e ridurre di
conseguenza i tempi di asciugatura del capo.
TWICE-WEEKLY OPERATIONS
Clean the filter of the air sucked by the fan.
Clean the net inside the cheminey.
Every 15 days, peremptory, remove the air vent cheminey
and loosening the 4 bolts Fig. 10, remove the net above and
clean the foam rubber mat Fig. 11, of ca. 10 mms, placed
behind the net itself.
The function of this mat is to hold back dirty and dust that,
dragged by the fan, can go through the net.
Bring the mat outside the room: using a compressed air
gun remove dirty and dust from the mat. In lack of air gun
shake the mat to eliminate dirty.
Also clean the inside duct of the air.
It is advisable to make this cleaning to maintain efficient
the air exit from the steam air former bag and to reduce
consequently the drying time of the garment.
Fig.11
19
5.3
5.3
Nettoyer le filtre de l'air aspiré par le ventilateur.
Nettoyer le filet à l'intérieur de la cheminée.
Chaque 15 jours, péremptoire il faut enlever la cheminée
et, en desserrant 4 boulons Fig. 10, enlever le filet cidessus et nettoyer le rembourrage en caoutchouc mousse Fig. 11, de ca. 10 mm placé derrière le filet même.
La fonction de ce rembourrage est de retenir lainage et
poussière que, traîné par l'aspirateur, peuvent passer à
travers le filet.
Porter le rembourrage à l'extérieur du local: en utilisant
un pistolet à air comprimé éliminer lainage et poussière
du rembourrage. En manque de pistolet à air secouer le
rembourrage pour éliminer la saleté.
Nettoyer aussi la conduite intérieure de l'air. Il est conseillable effectuer ce nettoyage pour maintenir efficace
l'écoulement d'air au sac mannequin avec par conséquence, une réduction des temps de séchage des vêtements.
Limpiar el filtro del aire aspirado por el ventilador.
Limpiar la red dentro de la chimenea.
Cada 15 días, taxativo, es necesario sacar la chimenea
y aflojando 4 pernos Fig. 10, sacar la red y limpiar el
colchon de gomaespuma Fig. 11, de ca. 10 mm que se
encuentra detrás de la red misma.
La función de esto colchon es de retener lanilla y polvo
que, arrastrados por el aspirador, logran pasar por la red.
Llevar el colchon al exterior del local: usando una pistola
a aire comprimido eliminar lanilla y polvo agarrados al
colchon. En falta de pistola a aire sacudir el colchon para
eliminar la suciedad. Limpiar también el canal interior del aire.
Se aconseja efectuar esta limpieza para mantener
eficiente un perte d'air sur al sac du mannequin con
reducción de los tiempos de secadura de las prendas.
Fig.11
19
5.3
Den Filter für die vom Ventilator abgesaugte Luft reinigen.
Das Netz, das sich im Inneren des Kamins befindet,
reinigen. Zweimal monatlich unbedingt muss man den
Kaminabnehmen : die 4 Schrauben Fig. 10, lockern, das
Netz abnehmen und die 10 mm dicke kleine Schaumgummimatratze Fig. 11, die sich hinter dem Netz befindet,
reinigen. Die Funktion dieser kleinen Matratze ist das
Aufhalten von Pulver und Faser, die vom Ventilator abgesaugt werden und durch das Netz durchgehen. Die kleine
Matratze im Freien bringen und Pulver und Faser mittels
einer Druckluftpistole beseitigen. Wenn die Druckluftpistole nicht anwesend ist, die Matratze schütteln, um
den Schmutzzu beseitigen. Beim Wiederinbetriebsetzen
der Maschine, besonders wenn diese Reinigung seit lange
nicht durchgeführt wurde, wird man eine Erhöhung der
Luftmenge auf dem Puppenbezug beobachten, die die
Trocknungszeitder Hemde abkürzen wird.
Fig.11
19
TABELLA RIASSUNTIVA DELLE OPERAZIONI DI
MANUTENZIONE
SUMMARY
OPERATION
TABLE
OF
MAINTENANCE
OGNI GIORNO OGNI SETTIMANA OGNI DUE SETTIMANE
DAILY
Chiudere le due saracinesche
Close the two gate
Disinserire gli interruttori della macchina
Turn off the electrical control board switch
Spegnere l’interruttore generale
Switch off the main switch
WEEKLY
■
■
■
■
Controllare il filtro dell’aria compressa
Check the air compressor filter
■
Scaricare l’acqua depositatasi nella tazza filtro
Empty the water deposited in the filter bowl
■
Pulire il filtro dell’aria aspirata dal ventilatore.
Clean the filter of the air sucked by the fan.
■
Pulire la rete all’interno del camino
Clean the net inside the cheminey
■
Pulire il materassino di gomma piuma.
Clean the foam rubber mat
■
Pulire i filtri aspiranti
Clean the vacuum filter
6.0
TWICE-WEEKLY
SMANTELLAMENTO
6.0
DISMANTLING
Per lo smantellamento si consiglia di disassemblare la macchina dividendone le parti secondo la loro natura (plastica,
metallo ecc.).
Affidare poi a ditte specializzate nel settore le parti così
suddivise.
For the dismantling it is advisable to disassemble the machine dividing the parts according to their nature (plastic,
metal etc.).
Then submit the parts so divided to specialized Firms in
the sector
7.0
7.0
GARANZIA
Il venditore garantisce i Prodotti da difetti di fabbricazione
o di mate riale per un periodo di 12 (dodici) mesi dalla data
di consegna. La garanzia non include le parti soggette ad
usura. Per il materiale elettrico o altri articoli non prodotti
dal Venditore si applicano le condizioni di garanzia del
rispettivo produttore.
La garanzia si intendi nulla per i Prodotti o parte di essi
installati o fatti funzionare in modo errato, smontati o modificati da personale non specializzato.Sono altresì esclusi
dalla garanzia tutti i danni derivanti dal trasporto.
La responsabilità della garanzia è limitata alla riparazione
o alla sostituzione dei Prodotti riconosciuti difettosi dal
Venditore.
Nessun Prodotto potrà essere restituito al Venditore per la
riparazione o sostituzione senza preventiva autorizzazione
scritta del Venditore. Le spese per riparazioni non autorizzate non saranno rimborsate dal Venditore.
Non rientrano nella garanzia i costi di mano d’opera o qualsiasi altra spesa necessaria alla sostituzione dei Prodotti
difettosi.
In nessun caso il Venditore sarà ritenuto responsabile per
danni diretti e/o indiretti, ivi incluso il mancato profitto o il
fermo di produzione, conseguenti all’uso o mancato uso dei
Prodotti, o dal loro errato o mancato funzionamento, anche
per i vizi o difetti imputabili al Venditore.
WARRANTY
The seller warrants all equipment to be free from defects in
material or workmanship for a period of 12 (twelve) months
from the dispatching date.. The warranty does not cover all
non-durable parts. With respect to electric material or other
parts not manufactured by the seller the warranty is limited
to that provided by the respective manufacturer.
Than warranty is only void an all equipment or parts that
have been wrongly installed or operated, disassempled or
modified by not specialized personnel. The warranty does
not cover all damages deriving from transport.
The liability of warranty is limited to repairing or replacing
any defective equipment or part found by the seller to have
been defective.
No defective equipment or part may be returned to the
seller for repair or replacement without prior written authorization. Charges for unauthorized repair will not be paid
by the seller.
The liability of warranty does not include labour charges
or any other charges necessary for replacing defective
parts.
In no event shall the seller be liable for direct and/or indirect
damages including the unsuccessful profit or interrupted
production caused by using or not of the equipment or by
their wrong or missed operation, also for vices and defects
imputable to the seller.
20
TABLEAU RÉCAPITULATIF DES OPÉRATIONS
D'ENTRETIEN
TABLA SINTETICA DE LAS OPERACIONES DE
MANUTENCIÓN
PAR JOUR
DIARIO
Fermer les deux vannes
Cerrar las dos válvulas
Débrancher les interrupteurs de la machine
Desconectar los interruptores de la máquina
Débrancher l’interrupteurs géneral
Desconectar el interruptor general
Contrôler le filtre de l’air comprimé
Controlar el filtro del aire comprimido
Décharger l’eau déposée dans la tasse filtre
Descargar el agua depositada en la taza filtro
Nettoyer le filtre de l'air aspiré par le ventilateur
Limpiar el filtro del aire aspirado por el ventilador
Nettoyer le filet à l'intérieur de la cheminée
Limpiar la red dentro de la chimenea
Nettoyer le rembourrage en caoutchouc mousse
Limpiar el colchon de gomaespuma
Nettoyer les filtres aspirantes
Limpiar los filtros aspirantes
PAR SEMAINE
SEMANAL
CHAQUES DEUX
SEMAINES
CADA DOS
SEMANAS
■
■
■
■
■
■
■
■
■
6.0 DÉMANTÈLEMENT
Pour le démantèlement il est conseillable de
démonter la machine en divisant les parties selon leur
nature (plastique, métal etc..).
Puis confier aux Maisons spécialisées dans le secteur
les parties si subdivisée
6.0 DESMANTELAMIENTO
Por el desmantelamiento se aconseja desmontar la
máquina dividiendo las partes según su naturaleza
(plástica, metal etc..).
Confiar luego a Empresas especializadas en el sector
las partes así subdivididas
7.0 GARANTIE
Le vendeur garantit les Produits de défauts de
fabrication ou de matériel pour une période de 12
(douze) mois de la date de livraison. Sont exclus de la
garantie, toutes les pièces exposes à l'usure. Pour les
équipements éléctriques ou autres non fabriques par
le vendeur ceux-ci bénéficiant de la garantie de leurs
constructeurs respectifs.
Le bénéfice de la garantie ne pourra en aucun cas
être appliqué aux Produits ou parties d'eux installé ou
fait fonctionner erronément, démonté ou modifié par
personnel pas spécialisé. Les marchandise
voyageant aux risques et périls du destinataire.
L'application de la garantie est limitée à la réparation
ou au remplacement des produits jugés defectueux
par leur constructeur.
Aucune produit ne pourra être retournée au Vendeur
pour réparation ou remplacement, sans consultation
et accord écrit préalable. Les frais de réparation
engagés sans cet accord ne peuvent en aucun cas
être pris en charge par le vendeur.
Sont exclus de la garantie, les frais de main d’œuvre
ou toute autre dépense occasionnée par le
remplacement de la pièce défectueuse.
Le Vendeur ne saurait en aucun cas responsable des
dommages directs et/ou indirects, des éventuels
manques à gagner, immobilisation, ou autre
conséquents à l'usage ou manqué usage des Produit,
ou par leur erroné ou non-fonctionnement, aussi pour
les vices ou défauts imputables au Vendeur.
7.0 GARANTIA
El vendedor garantiza los Productos de defectos de
fabricación o material por un período de 12 (doce)
meses de la fecha de entrega. La garantía no incluye
las partes sometidas a usura. Por el material
eléctricos o otros artículos no producidos por el
Vendedor se aplican las condiciones de garantía del
correspondiente productor.
La garantía se entiende nula para los Productos o
parte de ellos instalados o hechos equivocadamente
funcionar, bajados o modificados de personal no
especializados. Además son excluidos por la garantía
todos los daños consiguientes por el transporte.
La responsabilidad de la garantía es limitada a la
reparación o a la sustitución de los Productos
reconocidos defectuosos por el Vendedor.
Ningún producto podrá ser devuelto al Vendedor por
la reparación o sustitución sin preventiva autorización
escrita del Vendedor. Los gastos por reparaciones no
autorizadas no serán reembolsados por el Vendedor.
No regresan en la garantía los costes de mano de
obra o cualquier otro coste necesario a la sustitución
de los Productos defectuosos.
En ningún caso el Vendedor será creído responsable
por daños directos y/o indirectos, incluido el fallido
provecho o la detención de producción, consiguientes
al empleo o a fallido empleo de los Productos, o del
ustedes errado o fallido funcionamiento, también por
los vicios o defectos imputables al Vendedor..
20
TABELLE DER WARTUNGSARBEITEN
TÄGLICH
Die Schieber schliessen
■
Die Schalter der Maschine ausschalten
■
Den Hauptschalter ausschalten
■
WÖCHENTLICH
Den Druckluftfilter kontrollieren
■
Das sich in der Filtertasse gesammelte Wasser
auslassen
Den Filter für die vom Ventilator abgesaugte Luft
reinigen
Das Netz im Inneren des Kamins reinigen
■
JEDE ZWEI
WOCHEN
■
■
Schaumgummimatratze reinigen
■
Die absaugenden Filter reinigen
■
6.0 ABBAU
Für den Abbau ist es zu empfehlen, daß die Maschine
in Teilen zerlegt wird und diese Teile nach Stoffart (
Kunststoff, Metall, usw.) getrennt werden. Die
getrennten Teile sind dann an spezialisierten
Entsorgungsfirmen zu übergeben.
7.0 GARANTIE
Der Verkäufer leistet für die Produkte eine Garantie
von 12 ( zwölf) Monaten ab Lieferdatum auf
Fabrikations- oder Materialfehler. Verschleißteile sind
von der Garantie ausgeschlossen. Für elektrisches
Material
oder
Fremdprodukte
gelten
die
Garantiebedingungen des jeweiligen Herstellers. Die
Garantie gilt nicht für Produkte oder deren Teile, die
unsachgemäß installiert/eingebaut oder betrieben
sowie nicht von Fachpersonal ausgebaut oder
geändert wurden. Ausgeschlossen aus der Garantie
sind
ebenso
alle
auf
den
Transport
zurückzuführenden Schäden. Die Garantiehaftung ist
auf die Reparatur oder den Ersatz der vom Verkäufer
als mangelhaft anerkannten Produkte beschränkt.
Produkte dürfen dem Verkäufer nur mit dessen
vorhergehenden schriftlichen Genehmigung für die
Reparatur oder den Ersatz zurückgegeben werden.
Kosten für nicht genehmigte Reparaturen werden
vom Verkäufer nicht zurückerstattet.
Die Kosten für Arbeitsstunden oder alle anderen für
den Ersatz der mangelhaften Produkte erforderlichen
Kosten fallen nicht unter die Garantie. Auf keinen Fall
haftet der Verkäufer für direkte und/oder indirekte
Schäden,
einschließlich
Gewinnausfall
oder
Produktionsstillstand, infolge der Verwendung oder
Nichtverwendung der Produkte oder infolge ihres
falschen oder nicht erfolgten Betriebs auch aufgrund
von auf den Verkäufer zurückzuführenden Mängeln
oder Fehlern.
20