1
AESIS
GW19001
GW19006
Manuale di Programmazione
Programming Manual
Programmierhandbuch
Manuel de Programmation
Manual de Programación
Manual de Programação
24806350
SMALTIMENTO
Assicurarsi che il materiale d’imballaggio non
venga disperso nell’ambiente, ma smaltito seguendo le norme vigenti nel paese di utilizzo
del prodotto.
Alla fine del ciclo di vita
dell’apparecchio evitare
che lo stesso venga disperso nell’ambiente.
Lo smaltimento dell’apparecchiatura
deve
essere effettuato rispettando le norme vigenti
e privilegiando il riciclaggio delle sue parti
costituenti.
Sui componenti, per cui
è previsto lo smaltimento con riciclaggio, sono
riportati il simbolo e la
sigla del materiale.
2
DISPOSAL
Do not litter the environment with packing material: make sure it is disposed of according to
the regulations in force
in the country where the
product is used.
When the equipment
reaches the end of its life
cycle, take measures to
ensure it is not discarded in the environment.
The equipment must be
disposed of in compliance with the regulations in force, recycling
its component parts
wherever possible.
Components that qualify as recyclable waste
feature the relevant
symbol and the material’s abbreviation.
ENTSORGUNG
Vergewissern Sie sich,
dass das Verpackungsmaterial gemäß den
Vorschriften des Bestimmungslandes ordnungsgemäß und umweltgerecht
entsorgt
wird.
Das nicht mehr benutzbare Gerät ist umweltgerecht zu entsorgen.
Die Entsorgung hat den
geltenden Vorschriften
zu entsprechen und vorzugsweise das Recycling
der Geräteteile vorzusehen. Die wiederverwertbaren Geräteteile sind
mit einem Materials.
ELIMINATION
S’assurer que le matériel
d’emballage n’est pas
abandonné dans la nature et qu’il est éliminé
conformément
aux
normes en vigueur dans
le pays d’utilisation du
produit.
À la fin du cycle de vie de
l’appareil, faire en sorte
qu’il ne soit pas abandonné dans la nature.
L’appareil doit être éliminé conformément aux
normes en vigueur et en
privilégiant le recyclage
de ses pièces.
Le symbole et le sigle du
matériau sont indiqués
sur les pièces pour lesquelles le recyclage est
prévu.
ELIMINACION
Comprobar que no se
tire al medioambiente
el material de embalaje,
sino que sea eliminado
conforme a las normas
vigentes en el país donde se utilice el producto.
Al final del ciclo de vida
del aparato evítese que
éste sea tirado al medioambiente.
La eliminación del aparato debe efectuarse
conforme a las normas
vigentes y privilegiando
el reciclaje de sus partes
componentes.
En los componentes,
para los cuales está
prevista la eliminación
con reciclaje, se indican
el símbolo y la sigla del
material.
ELIMINAÇÃO
Assegurar-se que o material da embalagem
não seja disperso no
ambiente, mas eliminado seguindo as normas
vigentes no país de utilização do produto.
Ao fim do ciclo de vida
do aparelho evitar que o
mesmo seja disperso no
ambiente.
A eliminação da aparelhagem deve ser efectuada respeitando as
normas vigentes e privilegiando a reciclagem
das suas partes constituintes.
Sobre os componentes,
para os quais é previsto
o escoamento com reciclagem, estão reproduzidos o símbolo e a sigla
do material.
Avvertenze generali
• Leggere attentamente le istruzioni, prima di iniziare l’installazione ed eseguire gli interventi come specificato dal
costruttore;
• Dopo aver tolto l’imballaggio assicurarsi dell’integrità dell’apparecchio;
• Gli elementi dell’imballaggio (sacchetti in plastica, polistirolo espanso, ecc.) non devono essere lasciati alla portata
dei bambini in quanto potenziali fonti di pericolo;
• L’installazione, la programmazione, la messa in servizio e la manutenzione del prodotto deve essere effettuata
soltanto da personale tecnico qualificato ed opportunamente addestrato nel rispetto delle normative vigenti ivi
comprese le osservanze sulla prevenzione infortuni;
• Operare in ambienti sufficientemente illuminati e idonei per la salute e utilizzare strumenti, utensili ed attrezzature
in buono stato;
• Il dispositivo va installato conformemente al grado IP indicato nelle caratteristiche tecniche;
• L’impianto elettrico dovrà essere realizzato in conformità con le normative in vigore nel paese di installazione;
• I conduttori dei cablaggi non utilizzati devono essere isolati.
• Saldare le giunzioni e la parte terminale dei fili onde evitare malfunzionamenti causati dall’ossidazione degli stessi;
• Al termine dell’installazione, verificare sempre il corretto funzionamento dell’apparecchiatura e dell’impianto nel suo
insieme;
• Prima di effettuare qualunque operazione di pulizia o di manutenzione, togliere l’alimentazione al dispositivo;
• In caso di guasto e/o cattivo funzionamento di un dispositivo, distaccarlo dall’alimentazione e non manometterlo;
• Per l’eventuale riparazione rivolgersi solamente ad un centro di assistenza tecnica autorizzato dal costruttore e comunque utilizzare sempre i ricambi forniti da Gewiss s.p.a.;
• L’apparecchio dovrà essere destinato unicamente all’uso per il quale è stato espressamente concepito.
• Il mancato rispetto delle prescrizioni sopra elencate può compromettere la sicurezza dell’apparecchio.
• Il costruttore non può comunque essere considerato responsabile per eventuali danni derivanti da usi impropri,
erronei ed irragionevoli.
General Precautions
• Read the instructions carefully before starting installation and proceed as specified by the manufacturer;
• After removing the packaging, check the condition of the unit;
• The packaging items (plastic bags, expanded polystyrene, etc.) must not be handled by children as they may be dangerous;
• Installation, programming, commissioning and maintenance of the product must only be performed by qualified technicians who have been properly trained in compliance with current standards, including health and safety regulations;
• Operate in sufficiently lighted areas that are conducive to health and use tools, utensils and equipment that are in good
working order;
• The device must be installed in accordance with the IP degree indicated in the technical features;
• The electrical system must comply with current standards in the country of installation;
• Wires belonging tocables that are not used must beinsulated.
• Weld the joints and the ends of the wires to prevent malfunctions caused by wire oxidation;
• When installation is completed, always check for correct operation of the unit and the system as a whole;
• Before performing any cleaning or maintenance operation, disconnect the power supply to the device;
• In the case of device failure or malfunction, disconnect it from the power supply and do not tamper with it;
• Should the unit be in need of repair, contact only a technical support centre authorised by the manufacturer and always
use spare parts provided by Gewiss s.p.a.;
• The equipment must only be used for the purpose for which it was explicitly designed.
• Failure to follow the instructions provided above may compromise the unit’s safety.
• The manufacturer declines all liability for any damage as a result of improper, incorrect or unreasonable use.
Allgemeine Hinweise
• Vor der Installation die Anweisungen aufmerksam lesen, und alle Arbeiten wie vom Hersteller angegeben ausführen.
• Das Gerät aus der Verpackung nehmen und seine Unversehrtheit kontrollieren.
• Die Verpackungsteile (Plastiktüten, Polystyrolschaum usw.) dürfen nicht in Reichweite von Kindern gelassen werden, da sie potentielle Gefahrenquellen darstellen.
• Die Installation, die Programmierung, die Inbetriebnahme und die Wartung des Produkts dürfen nur non qualifiziertem und einschlägig ausgebildetem Fachpersonal unter Beachtung der geltenden Bestimmungen und Unfallverhütungsmaßnahmen ausgeführt werden.
• In ausreichend beleuchteten und nicht gesundheitsschädigenden Räumen arbeiten und Instrumente und Werkzeuge in gutem Zustand benutzen.
• Die Vorrichtung muss gemäß dem IP-Schutzgrad, der in den technischen Merkmalen aufgeführt ist, installiert werden.
• Die Vorrichtungen vorsichtig handhaben: sie enthalten zerbrechliche und feuchtigkeitsempfindliche Elektronikteile.
• Um ungewollten Kontakten vorzubeugen, die Netzanschlusskabel und die Niederspannung führenden
Signalleitungen getrennt umbinden.
• Die Verbindungsstellen und das Ende der Leiter verschweißen, um Störungen durch Oxidation derselben zu
vermeiden.
• Nach Abschluss der Installationsarbeiten immer den korrekten Betrieb des Geräts und der gesamten Anlage prüfen.
• Vor allen Reinigungs- oder Wartungsarbeiten die Vorrichtung von der Spannung trennen.
• Im Fall einer Störung und/oder eines fehlerhaften Betriebs eines Geräts, dieses sofort von der Stromversorgung
trennen und keine unautorisierten Eingriffe durchführen.
• Wenden Sie sich für eventuelle Reparaturarbeiten ausschließlich an eine vom Hersteller autorisierte Kundendienststelle und benutzen sie in jedem Fall immer von Gewiss s.p.a. gelieferte Ersatzteile.
• Das Gerät darf ausschließlich für die Zwecke benutzt werden, für die es ausdrücklich konzipiert wurde.
• Die Nichtbeachtung der oben angeführten Vorschriften kann die Sicherheit des Geräts beeinträchtigen.
• Der Hersteller haftet nicht für Schäden, die durch einen unsachgemäßen, falschen oder unvernünftigen Gebrauch
verursacht werden.
Avertissements généraux
• Lire attentivement les instructions avant de commencer l’installation et effectuer les opérations comme spécifié par le
fabricant ;
• Après l’avoir déballé, vérifier que l’appareil soit en bon état ;
• Ne pas laisser les éléments d’emballage (sachets en plastique, polystyrène expansé, etc.) à la portée des enfants car ils
constituent une source potentielle de danger ;
• L’installation, la programmation, la mise en service et l’entretien du produit ne doivent être effectués que par du personnel technique qualifié et spécialisé, en respectant les normes en vigueur, y compris celles en matière de prévention des
accidents ;
• Travailler dans des lieux salubres et suffisamment éclairés et n’utiliser que des outils et instruments en bon état ;
• Le dispositif doit être installé conformément au degré IP indiqué dans les caractéristiques techniques ;
• L’installation électrique devra être réalisée en conformité aux normes en vigueur dans le pays d’installation ;
• Les conducteurs descâblages qui ne sont pas utilisésdoivent être isolés.
• Souder les jonctions et la partie terminale des fils afin d’éviter des dysfonctionnements dérivant de l’oxydation de ceux-ci;
• À la fin de l’installation, toujours contrôler le bon fonctionnement de l’appareil et de toute l’installation ;
• Avant d’effectuer toute opération de nettoyage ou d’entretien, couper l’alimentation électrique du dispositif ;
• En cas de panne et/ou de mauvais fonctionnement d’un dispositif, le débrancher du réseau électrique, sans tenter
aucune réparation ;
• Pour toute réparation, adressez-vous uniquement à un centre d’assistance technique agréé par le fabricant et dans tous
les cas utiliser toujours des pièces de rechange fournies par Gewiss s.p.a. ;
• L’appareil n’est destiné qu’à l’utilisation pour laquelle il a été expressément conçu.
• Le non-respect des prescriptions susmentionnées pourrait compromettre la sécurité de l’appareil.
• Le fabricant ne pourra dans tous les cas être retenu responsable des dommages dérivant d’une utilisation incorrecte ou
erronée.
Advertencias generales
• Lea atentamente las instrucciones antes de comenzar la instalación, y realice las intervenciones tal y como especifica
el fabricante;
• Tras haberlo sacado de su embalaje, compruebe el buen estado del aparato;
• Los elementos del embalaje (bolsas de plástico, poliestireno expandido, etc.) no deben dejarse al alcance de los
niños, ya que son potenciales fuentes de peligro;
• La instalación, la programación, la puesta en servicio y el mantenimiento del producto deben ser efectuados solamente por personal técnico cualificado que cuente con la formación pertinente, cumpliendo las normativas vigentes,
incluidas las normas de prevención de accidentes;
• Trabaje en entornos suficientemente iluminados e idóneos para la salud, y utilice herramientas, utensilios y equipamiento en buen estado;
• El dispositivo debe instalarse de manera conforme al grado IP indicado en las características técnicas;
• La instalación eléctrica deberá realizarse conforme a las normativas vigentes en el país de instalación;
• Es preciso aislar losconductores de los cableados noutilizados.
• Suelde las junturas y la parte terminal de los hilos para evitar funcionamientos defectuosos causados por su oxidación;
• Al final del proceso de instalación, compruebe el correcto funcionamiento del equipo y de la instalación en su conjunto;
• Antes de efectuar cualquier operación de limpieza o mantenimiento, corte la alimentación del dispositivo;
• En caso de avería y/o funcionamiento defectuoso de un dispositivo, desconéctelo de la alimentación y no lo manipule;
• Si es necesario efectuar reparaciones, acuda únicamente a un centro de asistencia técnica autorizado por el fabricante, y en cualquier caso utilice siempre los recambios suministrados por Gewiss s.p.a.;
• El aparato deberá destinarse únicamente al uso para el que ha sido expresamente concebido.
• El incumplimiento de las anteriores instrucciones puede poner el peligro la seguridad del aparato.
• En cualquier caso, el fabricante no asumirá ninguna responsabilidad por posibles daños derivados de usos impropios,
incorrectos o irrazonables.
Advertências gerais
• Leia com atenção as instruções, antes de iniciar a instalação e efectue as operações conforme especificado pelo fabricante;
• Após ter removido a embalagem certifique-se de que o aparelho está íntegro;
• Os elementos da embalagem (sacos de plástico, isopor, etc.) não devem ser deixados ao alcance de crianças porque são
fontes potenciais de perigo;
• A instalação, a programação, a colocação em serviço e a manutenção do produto devem ser efectuadas apenas por
pessoal técnico qualificado e com formação adequada, cumprindo as normas em vigor, inclusive as disposições sobre a
prevenção de acidentes;
• O dispositivo deve ser instalado de acordo com o grau IP indicado nas características técnicas;
• Trate os dispositivos com cuidado: contêm componentes electrónicos frágeis e sensíveis à humidade;
• Os condutores dosconectores não utilizados devemser isolados.
• Solde as junções e a parte terminal dos fios a fim de evitar falsos alarmes causados pela oxidação dos mesmos;
• No fim da instalação verifique sempre o funcionamento correcto do equipamento e da instalação no seu conjunto;
• Antes de efectuar qualquer operação de limpeza ou de manutenção, desligue o dispositivo da rede de alimentação
eléctrica;
• No caso de avaria e/ou mau funcionamento de um dispositivo, desligue-o da alimentação e não o abra;
• Para a eventual reparação dirija-se apenas a um centro de assistência técnica autorizado pelo fabricante e utilize sempre as peças de reposição fornecidas pela Gewiss s.p.a.;
• O aparelho deve ser destinado unicamente ao uso para o qual foi expressamente concebido.
• O não cumprimento dos conselhos enumerados acima pode comprometer a segurança do aparelho.
• O fabricante não pode, em todo o caso, ser considerado responsável por eventuais danos decorrentes de usos impróprios, errados e irracionais.
3
INDICE
CONTENTS
CARATTERISTICHE TECNICHE . . . . . . . . . . . . . . . . . . . . . . . . . . . . . . . . . . . . . . . . Pag.5
REGOLAZIONI E FUNZIONI DEI LED . . . . . . . . . . . . . . . . . . . . . . . . . . . . . . . . Pag.5
UTILIZZO POSTI ESTERNI CON GW19302 . . . . . . . . . . . . . . . . . . . . . . . . Pag.7
ESEMPI DI COLLEGAMENTO . . . . . . . . . . . . . . . . . . . . . . . . . . . . . . . . . . . . . . . . . Pag.8
FUNZIONE DEI MORSETTI . . . . . . . . . . . . . . . . . . . . . . . . . . . . . . . . . . . . . . . . . . . . Pag.8
PROGRAMMAZIONE . . . . . . . . . . . . . . . . . . . . . . . . . . . . . . . . . . . . . . . . . . . . . . . . . Pag.10
TECHNICAL FEATURES . . . . . . . . . . . . . . . . . . . . . . . . . . . . . . . . . . . . . . . . . . . . . . . Page5
LED FUNCTIONS AND ADJUSTMENTS . . . . . . . . . . . . . . . . . . . . . . . . . . . . Page5
USE OF ENTRY PANELS WITH GW19302 . . . . . . . . . . . . . . . . . . . . . . . . . Page7
CONNECTION EXAMPLES . . . . . . . . . . . . . . . . . . . . . . . . . . . . . . . . . . . . . . . . . . . . Page8
TERMINAL FUNCTION . . . . . . . . . . . . . . . . . . . . . . . . . . . . . . . . . . . . . . . . . . . . . . . . Page8
PROGRAMMING . . . . . . . . . . . . . . . . . . . . . . . . . . . . . . . . . . . . . . . . . . . . . . . . . . . . . Page10
Prima programmazione . . . . . . . . . . . . . . . . . . . . . . . . . . . . . . . . . . . . . . . . . . . . . . . . . . . . . . 10
Procedura di Riprogrammazione . . . . . . . . . . . . . . . . . . . . . . . . . . . . . . . . . . . . . . . . . . . . 12
PROGRAMMAZIONE DI UN GRUPPO INTERCOMUNICANTE Pag.14
Disabilitazione della funzione intercomunicante . . . . . . . . . . . . . . . . . . . . . . . . . . . 15
UTILIZZO POSTI ESTERNI CON GW19301 . . . . . . . . . . . . . . . . . . . . . . Pag.17
ESEMPI DI COLLEGAMENTO . . . . . . . . . . . . . . . . . . . . . . . . . . . . . . . . . . . . . . . . Pag.18
FUNZIONE DEI MORSETTI . . . . . . . . . . . . . . . . . . . . . . . . . . . . . . . . . . . . . . . . . . Pag.18
Configurazione Chiamate . . . . . . . . . . . . . . . . . . . . . . . . . . . . . . . . . . . . . . . . . . . . . . . . . . . . 19
Prima programmazione con UN posto esterno . . . . . . . . . . . . . . . . . . . . . . . . . . . . . 20
Prima programmazione con PIÙ posti esterni . . . . . . . . . . . . . . . . . . . . . . . . . . . . . . . 22
Procedura di Riprogrammazione . . . . . . . . . . . . . . . . . . . . . . . . . . . . . . . . . . . . . . . . . . . . 24
SCHEMI D’IMPIANTO . . . . . . . . . . . . . . . . . . . . . . . . . . . . . . . . . . . . . . . . . . . . . . . . Pag.26
Initial programming . . . . . . . . . . . . . . . . . . . . . . . . . . . . . . . . . . . . . . . . . . . . . . . . . . . . . . . . . 10
Reprogramming procedure . . . . . . . . . . . . . . . . . . . . . . . . . . . . . . . . . . . . . . . . . . . . . . . . . . 12
PROGRAMMING AN INTERCOM GROUP . . . . . . . . . . . . . . . . . . . . . . . . Page14
Disabling the intercom function . . . . . . . . . . . . . . . . . . . . . . . . . . . . . . . . . . . . . . . . . . . . . 15
USE OF ENTRY PANELS WITH GW19301 . . . . . . . . . . . . . . . . . . . . . . . Page17
EXEMPLES DE CONNEXION . . . . . . . . . . . . . . . . . . . . . . . . . . . . . . . . . . . . . . . . Page18
TERMINAL FUNCTION . . . . . . . . . . . . . . . . . . . . . . . . . . . . . . . . . . . . . . . . . . . . . . Page18
Call Configuration . . . . . . . . . . . . . . . . . . . . . . . . . . . . . . . . . . . . . . . . . . . . . . . . . . . . . . . . . . . . 19
Initial programming with ONE entry panel . . . . . . . . . . . . . . . . . . . . . . . . . . . . . . . . . 20
Initial programming with MULTIPLE entry panels . . . . . . . . . . . . . . . . . . . . . . . . . . 22
Reprogramming procedure . . . . . . . . . . . . . . . . . . . . . . . . . . . . . . . . . . . . . . . . . . . . . . . . . . 24
SYSTEM DIAGRAMS . . . . . . . . . . . . . . . . . . . . . . . . . . . . . . . . . . . . . . . . . . . . . . . . . Page26
INHALTSVERZEICHNIS
SOMMAIRE
TECHNISCHE MERKMALE . . . . . . . . . . . . . . . . . . . . . . . . . . . . . . . . . . . . . . . . . . . . Abb.5
EINSTELLUNGEN UND FUNKTIONEN DER LEDS . . . . . . . . . . . . . . . . Abb.5
BENUTZUNG DER AUSSENSTATIONEN MIT GW19302A��������������Abb.7
VERBINDUNGS-BEISPIELE . . . . . . . . . . . . . . . . . . . . . . . . . . . . . . . . . . . . . . . . . . . Abb.8
BELEGUNG DER KLEMMLEISTEN . . . . . . . . . . . . . . . . . . . . . . . . . . . . . . . . . . . Abb.8
PROGRAMMIERUNG . . . . . . . . . . . . . . . . . . . . . . . . . . . . . . . . . . . . . . . . . . . . . . . . . Abb.10
CARACTÉRISTIQUES TECHNIQUES . . . . . . . . . . . . . . . . . . . . . . . . . . . . . . . . . Pág.5
RÉGLAGES ET FONCTIONS DES LEDS . . . . . . . . . . . . . . . . . . . . . . . . . . . . . . Pág.5
UTILISATION DES POSTES EXTÉRIEURS AVEC GW19302 . . . . Pág.7
EXEMPLES DE CONNEXION . . . . . . . . . . . . . . . . . . . . . . . . . . . . . . . . . . . . . . . . . . . Pág.8
FONCTIONS DES BORNES . . . . . . . . . . . . . . . . . . . . . . . . . . . . . . . . . . . . . . . . . . . . Pág.8
PROGRAMMATION . . . . . . . . . . . . . . . . . . . . . . . . . . . . . . . . . . . . . . . . . . . . . . . . . . . Pág.10
Erstprogrammierung . . . . . . . . . . . . . . . . . . . . . . . . . . . . . . . . . . . . . . . . . . . . . . . . . . . . . . . . 10
Neuprogrammierung . . . . . . . . . . . . . . . . . . . . . . . . . . . . . . . . . . . . . . . . . . . . . . . . . . . . . . . . 12
PROGRAMMIERUNG EINER TEILNEHMERGRUPPE . . . . . . . . . . . . Abb.14
Abschaltung der Teilnehmerfunktion . . . . . . . . . . . . . . . . . . . . . . . . . . . . . . . . . . . . . . . 15
BENUTZUNG DER AUSSENSTATIONEN MIT GW19301A�����������Abb.17
VERBINDUNGS-BEISPIELE . . . . . . . . . . . . . . . . . . . . . . . . . . . . . . . . . . . . . . . . . . Abb.18
BELEGUNG DER KLEMMLEISTEN . . . . . . . . . . . . . . . . . . . . . . . . . . . . . . . . . . Abb.18
Konfiguration der Anrufe . . . . . . . . . . . . . . . . . . . . . . . . . . . . . . . . . . . . . . . . . . . . . . . . . . . . 19
Erstprogrammierung mit EINER Außenstation . . . . . . . . . . . . . . . . . . . . . . . . . . . . . . 20
Erstprogrammierung mit MEHREREN Außenstationen . . . . . . . . . . . . . . . . . . . . . 22
Neuprogrammierung . . . . . . . . . . . . . . . . . . . . . . . . . . . . . . . . . . . . . . . . . . . . . . . . . . . . . . . . 24
ANLAGENSCHALTPLÄNE . . . . . . . . . . . . . . . . . . . . . . . . . . . . . . . . . . . . . . . . . . . . Abb.26
Première programmation . . . . . . . . . . . . . . . . . . . . . . . . . . . . . . . . . . . . . . . . . . . . . . . . . . . . 10
Procédure de Reprogrammation . . . . . . . . . . . . . . . . . . . . . . . . . . . . . . . . . . . . . . . . . . . . 12
PROGRAMMATION D’UN GROUPE D’INTERCOMMUNICATION . Pág.14
Désactivation de la fonction d’intercommunication . . . . . . . . . . . . . . . . . . . . . . . . 15
UTILISATION DES POSTES EXTÉRIEURS AVEC GW19301 . . Pág.17
CONNECTION EXAMPLES . . . . . . . . . . . . . . . . . . . . . . . . . . . . . . . . . . . . . . . . . . . Pág.18
FONCTIONS DES BORNES . . . . . . . . . . . . . . . . . . . . . . . . . . . . . . . . . . . . . . . . . . . Pág.18
Configuration des Appels . . . . . . . . . . . . . . . . . . . . . . . . . . . . . . . . . . . . . . . . . . . . . . . . . . . . 19
Première programmation avec UN poste extérieur . . . . . . . . . . . . . . . . . . . . . . . . . 20
Première programmation avec PLUSIEURS postes extérieurs . . . . . . . . . . . . . . 22
Procédure de Reprogrammation . . . . . . . . . . . . . . . . . . . . . . . . . . . . . . . . . . . . . . . . . . . . 24
SCHÉMAS D’INSTALLATION . . . . . . . . . . . . . . . . . . . . . . . . . . . . . . . . . . . . . . . . Pág.26
ÍNDICE
ÍNDICE
CARACTERÍSTICAS TÉCNICAS . . . . . . . . . . . . . . . . . . . . . . . . . . . . . . . . . . . . . . . Pág.5
AJUSTES Y FUNCIONES DE LOS LEDS . . . . . . . . . . . . . . . . . . . . . . . . . . . . . . Pág.5
USO DE PLACAS EXTERIORES CON GW19302 . . . . . . . . . . . . . . . . . . . Pág.7
EJEMPLOS DE CONEXIÓN . . . . . . . . . . . . . . . . . . . . . . . . . . . . . . . . . . . . . . . . . . . . . Pág.8
FUNCIÓN DE LOS BORNES . . . . . . . . . . . . . . . . . . . . . . . . . . . . . . . . . . . . . . . . . . . . Pág.8
PROGRAMACIÓN . . . . . . . . . . . . . . . . . . . . . . . . . . . . . . . . . . . . . . . . . . . . . . . . . . . . . Pág.10
CARACTERÍSTICAS TÉCNICAS . . . . . . . . . . . . . . . . . . . . . . . . . . . . . . . . . . . . . . . Pág.5
REGULAÇÕES E FUNÇÕES DOS LEDS . . . . . . . . . . . . . . . . . . . . . . . . . . . . . . . Pág.5
UTILIZAÇÃO DAS PLACAS BOTONEIRAS COM GW19302 . . . . Pág.7
EXEMPLOS DE CONEXÃO . . . . . . . . . . . . . . . . . . . . . . . . . . . . . . . . . . . . . . . . . . . . . Pág.8
FUNÇÃO DOS BORNES . . . . . . . . . . . . . . . . . . . . . . . . . . . . . . . . . . . . . . . . . . . . . . . . Pág.8
PROGRAMAÇÃO . . . . . . . . . . . . . . . . . . . . . . . . . . . . . . . . . . . . . . . . . . . . . . . . . . . . . . Pág.10
Primera programación . . . . . . . . . . . . . . . . . . . . . . . . . . . . . . . . . . . . . . . . . . . . . . . . . . . . . . . 10
Procedimiento de Reprogramación . . . . . . . . . . . . . . . . . . . . . . . . . . . . . . . . . . . . . . . . . 12
PROGRAMACIÓN DE UN GRUPO INTERCOMUNICANTE . . . . . . Pág.14
Deshabilitación de la función intercomunicante . . . . . . . . . . . . . . . . . . . . . . . . . . . . 15
USO DE PLACAS EXTERIORES CON GW19301 . . . . . . . . . . . . . . . . . Pág.17
EJEMPLOS DE CONEXIÓN . . . . . . . . . . . . . . . . . . . . . . . . . . . . . . . . . . . . . . . . . . . Pág.18
FUNCIÓN DE LOS BORNES . . . . . . . . . . . . . . . . . . . . . . . . . . . . . . . . . . . . . . . . . . Pág.18
Configuración llamadas . . . . . . . . . . . . . . . . . . . . . . . . . . . . . . . . . . . . . . . . . . . . . . . . . . . . . . 19
Primera programación con UNA placa exterior . . . . . . . . . . . . . . . . . . . . . . . . . . . . . 20
Primera programación con VARIAS placas exteriores . . . . . . . . . . . . . . . . . . . . . . . 22
Procedimiento de Reprogramación . . . . . . . . . . . . . . . . . . . . . . . . . . . . . . . . . . . . . . . . . 24
ESQUEMAS DE INSTALACIÓN . . . . . . . . . . . . . . . . . . . . . . . . . . . . . . . . . . . . . . Pág.26
4
Primeira programação . . . . . . . . . . . . . . . . . . . . . . . . . . . . . . . . . . . . . . . . . . . . . . . . . . . . . . . 10
Processo de Reprogramação . . . . . . . . . . . . . . . . . . . . . . . . . . . . . . . . . . . . . . . . . . . . . . . . 12
PROGRAMAÇÃO DE UM GRUPO INTERCOMUNICADOR . . . . . Pág.14
Desabilitação da função intercomunicador . . . . . . . . . . . . . . . . . . . . . . . . . . . . . . . . . 15
UTILIZAÇÃO DAS PLACAS BOTONEIRAS COM GW19301 . . Pág.17
EXEMPLOS DE CONEXÃO . . . . . . . . . . . . . . . . . . . . . . . . . . . . . . . . . . . . . . . . . . . Pág.18
FUNÇÃO DOS BORNES . . . . . . . . . . . . . . . . . . . . . . . . . . . . . . . . . . . . . . . . . . . . . . Pág.18
Configuração Chamadas . . . . . . . . . . . . . . . . . . . . . . . . . . . . . . . . . . . . . . . . . . . . . . . . . . . . . 19
Primeira programação com UMA placa botoneira . . . . . . . . . . . . . . . . . . . . . . . . . . 20
Primeira programação com VÁRIAS placas botoneiras . . . . . . . . . . . . . . . . . . . . . . . . . . . . . 22
Processo de Reprogramação . . . . . . . . . . . . . . . . . . . . . . . . . . . . . . . . . . . . . . . . . . . . . . . . 24
ESQUEMAS DE INSTALAÇÃO . . . . . . . . . . . . . . . . . . . . . . . . . . . . . . . . . . . . . . . Pág.26
CARATTERISTICHE TECNICHE
CARACTÉRISTIQUES TECHNIQUES
TECHNICAL FEATURES
CARACTERÍSTICAS TÉCNICAS
TECHNISCHE MERKMALE
CARACTERÍSTICAS TÉCNICAS
Posto esterno-Entry panel-Außenstation-Poste extérieur-Placa exterior-Placa botoneira
GW19001
GW19006
Alimentazione-Power supply-Stromversorgung-Alimentation-Alimentación-Alimentação
Assorbimento-Absorption-Stromaufnahme-Absorption-Consumo-Consumo
16-18 VDC
250 mA (100 mA stand-by)
Dimensioni-Dimensions-Maße-Dimensions-Dimensiones-Dimensões
120 mA (75 mA stand-by)
99x207x30 mm
Temperatura di stoccaggio-Storage temperature-Lagerungstemperatur
Température de stockage-Temperatura de almacenamiento-Temperatura de armazenagem
-25 °C +70 °C
Temperatura di funzionamento-Operating temperature-Betriebstemperatur
Température de fonctionnement -Temperatura de funcionamiento-Temperatura de funcionamento
-15 °C +50 °C
Grado IP-IP Degree-IP-Grad-Degré IP-Grado IP-Grau IP
IP 54
Telecamera-Camera-Telekamera-Caméra-Cámara-Câmara de vídeo
Standard video-Standard video-Videostandard-Standard vidéo-Estándar de vídeo-Standard vídeo
Risoluzione-Resolution-Auflösung-Résolution-Resolución-Resolução
680x512 pixel
Illuminazione minima-Minimum lighting-Mindestbeleuchtung
Éclairage minimal-Iluminación mínima-Iluminação mínima
1 LUX
EINSTELLUNGEN UND FUNKTIONEN DER LEDS
REGULAÇÕES E FUNÇÕES DOS LEDS
RESET
LED FUNCTIONS AND ADJUSTMENTS
AJUSTES Y FUNCIONES DE LOS LEDS
RESET
REGOLAZIONI E FUNZIONI DEI LED
RÉGLAGES ET FONCTIONS DES LEDS
PAL/NTSC
GW19001
GW19006
PROG
Adjustments
loudspeaker audio M2
Einstellungen
Audio Lautsprecher
Réglages
audio haut-parleur
M1
Regulaciones
audio altavoz
BOUT
audio microfono
microphone audio
Audio Mikrofon
BOUT
audio micro
audio micrófono
Elektroschloss 1÷10 s.
(Default 1 s)
gâche électrique 1÷10 s.
(défaut 1 s)
cerradura eléctrica 1÷10 s. fechadura eléctrica de 1 a
(por defecto1 s)
10 seg. (default 1 seg.)
elettroserratura 1÷10 s. solenoid lock 1-10 s.
(default 1 s)
(default 1 s)
Simbologia LED
SW3
LED symbology
LED-Zeichen
Symboles LED
M2
Significado LED
Regulações
áudio altifalante
PROG
Regolazioni
audio altoparlante
M1
PROG
PROG
SW3
áudio microfone
Símbolos dos LEDs
Spento
Off
Aus
Éteint
Apagado
Apagado
Acceso
On
An
Allumé
Encendido
Aceso
Lampeggio lento
Slow flashing
Langsames Blinken
Clignotement lent
Parpadeo lento
Intermitente lento
Lampeggio veloce
Quick flashing
Schnelles Blinken
Clignotement rapide
Parpadeo rápido
Intermitente rápido
5
6
UTILIZZO POSTI ESTERNI CON GW19302
USE OF ENTRY PANELS WITH GW19302
BENUTZUNG DER AUSSENSTATIONEN MIT GW19302
UTILISATION DES POSTES EXTÉRIEURS AVEC GW19302
USO DE PLACAS EXTERIORES CON GW19302
UTILIZAÇÃO DAS PLACAS BOTONEIRAS COM GW19302
7
Utilizzo Posti Esterni con GW19302-Use of entry panels with GW19302-Benutzung der außenstationen mit GW19302Utilisation des postes extérieurs avec GW19302-Uso de placas exteriores con GW19302-Utilização das placas botoneiras com GW19302
IT
FR
- ESEMPI DI COLLEGAMENTO
- CONNECTION EXAMPLES
EN
ES
- EXEMPLES DE CONNEXION
- EJEMPLOS DE CONEXIÓN
DE
PT
- VERBINDUNGS-BEISPIELE
- EXEMPLOS DE CONEXÃO
RESET
GW19302
M1
M2
M2
M1
– +
PROG
PROG
SW3
BOUT
– +
NO
C
B
B
–
GW19310
GW19001
GW19006
- FUNZIONE DEI MORSETTI
FR - FONCTIONS DES BORNES
IT
Morsettiera M1
BOUT
+
–
Alimentazione 16-18
VDC
–
–
8
Montante
Terminal block M1
- TERMINAL FUNCTION
ES - FUNCIÓN DE LOS BORNES
EN
Klemmenbrett M1
DE
PT
- BELEGUNG DER KLEMMLEISTEN
- FUNÇÃO DOS BORNES
Bornier M1
Busbar
Trägerleitung
Montant
Power supply 16-18 VDC
Stromversorgung 16-18 VDC Alimentation 16-18 VDC
Bornera M1
Régua de bornes M1
Bajante
Coluna
Alimentación 16-18 VCC
Alimentação 16-18 VDC
Morsettiera M2
Terminal block M2
Klemmenbrett M2
Bornier M2
Bornera M2
Régua de bornes M2
Massa
Earth
Masse
Masse
Masa
Massa
Pulsante apriporta (NA)
Door lock release button
Türöffnertaste (NO)
(NA)
Bouton ouvre-porte
(NO)
Botón abrepuerta (NA)
Botão de abertura da
porta (NA)
Elettroserratura
12 V 1 A max
Solenoid lock
12 V 1 A max
Gâche électrique
12 V 1 A max
Cerradura eléctrica
12 V 1 A max
Fechadura eléctrica
12 V 1 A max
Elektroschloss
12 V 1 A max
Utilizzo Posti Esterni con GW19302-Use of entry panels with GW19302-Benutzung der außenstationen mit GW19302
Utilisation des postes extérieurs avec GW19302-Uso de placas exteriores con GW19302-Utilização das placas botoneiras comGW19302
Programmazione di un gruppo intercomunicante
Programming an intercom group
Programmierung einer Teilnehmergruppe
PROG
PROG
PROG
BOUT
BOUT
PROG
M2
PROG
PROG
RESET
PROG
>3’’
PROG
BOUT
M2
PROG
PROG
M2
PROG
RESET
BOUT
RESET
PROG
PROG
M1
M2
RESET
SW3
PROG
M1
M2
<6’’
Programmazione del Tipo dei Tasti
Programming the key type
Programmierung der Tastenart
Programmation du Type des Touches
Programación del Tipo de los Botones
Programação do Tipo de Teclas
M1
SW3
SW3
BOUT
BOUT
PROG
PROG
Pag. 13
Page 13
Seite 13
Page 13
Pág. 13
Pág. 13
SW3
PROG
M1
M2
M1
<6’’
SW3
BOUT
BOUT
M2
Reprogrammation
Reprogramación
Reprogramação
Programmazione dei Tasti di Chiamata
Programming the call keys
Programmierung der Ruftasten
Programmation des Touches d’Appel
Programación de los Botones de Llamada
Programação das Teclas de Chamada
M1
SW3
RESET
Pag. 12
Page 12
Seite 12
Page 12
Pág. 12
Pág. 12
PROG
Pag. 15
Page 15
Seite 15
Page 15
Pág. 15
Pág. 15
SW3
PROG
RESET
M1
PROG
BOUT
M1
BOUT
Désactivation de la fonction d’intercommunication
Deshabilitación de la función intercomunicante
Desabilitação da função intercomunicador
PROG
>3’’
PROG
M2
M2
SW3
Riprogrammazione
Reprogramming
Neuprogrammierung
M1
SW3
SW3
Disabilitazione della funzione intercomunicante
Disabling the intercom function
Abschaltung der Teilnehmerfunktion
PROG
M1
M2
<1’’
M2
SW3
SW3
SW3
RESET
M2
BOUT
M2
PROG
BOUT
PROG
M1
PROG
RESET
<1’’
M1
PROG
PROG
M1
BOUT
M2
PROG
Programmazione dei Tasti di Chiamata
Programming the call keys
Programmierung der Ruftasten
Programmation des Touches d’Appel
Programación de los Botones de Llamada
Programação das Teclas de Chamada
PROG
BOUT
>8’’
<11’’
PROG
RESET
M1
M2
M2
M1
PROG
SW3
PROG
Programmazione del Tipo dei Tasti
Programming the key type
Programmierung der Tastenart
Programmation du Type des Touches
Programación del Tipo de los Botones
Programação do Tipo de Teclas
BOUT
Pag. 11
Page 11
Seite 11
Page 11
Pág. 11
Pág. 11
Seite 14
Page 14
Pág. 14
Pág. 14
BOUT
PROG
RESET
SW3
PROG
Pag. 10
Page 10
Seite 10
Page 10
Pág. 10
Pág. 10
M1
PROG
BOUT
PROG
RESET
M2
M1
M1 14
Pag.
BOUT Page 14
SW3
RESET
PROG
BOUT
M2
>3’’
<6’’
PROG
PROG
PROG
RESET
PROG
M1
Programmation d’un groupe d’intercommunication
Programación de un grupo intercomunicante
Programação de um grupo intercomunicador
RESET
Première Programmation avec un poste extérieur
Primera programación con una placa exterior
Primeira Programação com uma placa botoneira
PROG
Prima Programmazione con un posto esterno
Initial programming with an entry panel
Erstprogrammierung mit einer Außenstation
<1’’
SW3
M2
SW3
SW3
9
Utilizzo Posti Esterni con GW19302-Use of entry panels with GW19302-Benutzung der außenstationen mit GW19302Utilisation des postes extérieurs avec GW19302-Uso de placas exteriores con GW19302-Utilização das placas botoneiras com GW19302
- PROGRAMMAZIONE
- PROGRAMMING
- PROGRAMMIERUNG
FR
ES
PT
Première programmation
Primera programación
Primeira programação
PROG
Prima programmazione
Initial programming
Erstprogrammierung
PROG
PROG
M1
M2
M1
BOUT
PROG
RESET
PROG
BOUT
M2
>3’’
<6’’
SW3
SW3
PROG
a
PROG
BOUTBOUT
M1
b
PROG
RESET
PROG
PROG
M1
M2
SW3
Ingresso in Programmazione. Premere per almeno 3 s il tasto PROG a e rilasciarlo (entro 6 s) non appena il led PROG si accende e la retroilluminazione
dei tasti lampeggia come illustrato in figura b. La mancata accensione del Led PROG segnala un malfunzionamento. Verificare le connessioni e rientrare in
programmazione.
Entering Programming Mode. Press the PROG a key for at least 3 seconds and then release it (within 6 seconds), as soon as the LED PROG lights up and
the key back lighting flashes as illustrated in figure b. Failure of the PROG LED to light up, indicates a malfunction. Check the connections and re-access the
programming mode.
Zugang zur Programmierung. Die Taste PROG a mindestens 3 Sek. gedrückt halten und loslassen (innerhalb von 6 Sek.), sobald die Led-Anzeige
PROG aufleuchtet und die Hintergrundbeleuchtung der Tasten wie in Abbildung b dargestellt blinkt. Wenn die Led-Anzeige PROG nicht aufleuchtet, liegt eine
Fehlfunktion vor. Überprüfen Sie die Verbindungen und kehren Sie zurück zur Programmierung.
Entrée en Programmation. Appuyer pendant au moins 3 secondes sur la touche PROG a et la relâcher (dans les 6 secondes) dès que la led PROG s’allume
et le rétroéclairage des touches clignote comme illustré à al figure b. Le non-allumage de la Led PROG signal un dysfonctionnement. Contrôler les connexions et
rentrer dans programmation.
Entrada en la modalidad de Programación. Pulse durante al menos 3 s el botón PROG a y suéltelo (antes de 6 s) en cuanto se encienda el led PROG
y parpadee la retroiluminación de los botones, tal y como se muestra en la figura b. Si no se enciende el Led PROG significa que se ha producido un fallo de
funcionamiento. Compruebe las conexiones y vuelva a entrar en la modalidad de programación.
Entrada em Programação. Prima durante pelo menos 3 seg. a tecla PROG a e solte-a (dentro de 6 seg.) assim que o led PROG se acender e a retroiluminação
das teclas piscar, como ilustrado na figura b. O não acendimento do Led PROG sinaliza uma anomalia de funcionamento. Verifique as conexões e entre novamente
na programação.
SW3
M1
SW3
BOUT
M2
c
PROG
cA
PROG
BOUTBOUT
M1
d
M2
SW3
M2
PROG
RESET
PROG
PROG
M1
PROG
PROG
PROG
PROG
M1
BOUT
RESET
RESET
RESET
M2
PROG
10
- PROGRAMMATION
- PROGRAMACIÓN
- PROGRAMAÇÃO
SW3
M2
PROG
IT
EN
DE
M1
SW3
BOUT
SW3
M2
cB
Programmazione del Tipo dei Tasti. Premere il primo tasto del posto esterno nella posizione indicata c/cA/cB finchè i led della retroilluminazione
smetteranno di lampeggiare d rimanendo accesi.
Programming of the Key Type. Press the first key of the entry panel in the position indicated c/cA/cB until the backlighting LED stops flashing d
and remains lit.
Programmierung des Tastentyps. Die erste Taste der Außenstation in der gezeigten Stellung drücken c/cA/cB bis die Leds der rückseitigen
Beleuchtung nicht mehr blinken d und eingeschaltet bleiben.
Programmation du Type des touches. Appuyer sur la première touche du poste extérieur dans la position indiquée c/cA/cB jusqu’à ce que les leds du
rétroéclairage cessent de clignoter d en restant allumés.
Programación del Tipo de los Botones. Pulse el primer botón de la placa exterior en la posición indicada c/cA/cB hasta que los leds de la
retroiluminación dejen de parpadear d y permanezcan encendidos.
Programação do Tipo de Teclas. Prima a primeira tecla da placa botoneira na posição indicada c/cA/cB até os leds da retroiluminação deixarem de
piscar d ficando acesos.
Utilizzo Posti Esterni con GW19302-Use of entry panels with GW19302-Benutzung der außenstationen mit GW19302
Utilisation des postes extérieurs avec GW19302-Uso de placas exteriores con GW19302-Utilização das placas botoneiras comGW19302
Programmazione dei tasti chiamata. Sollevare la cornetta (se presente) del derivato che si desidera programmare e e premere i pulsanti apriporta
ed AUX2 f. Premere sul posto esterno il tasto di chiamata da associare al derivato interno g: seguirà un’indicazione acustica di avvenuta memorizzazione. Riappendere eventualmente la cornetta h e proseguire ripetendo le stesse operazioni per tutti gli altri derivati.
Programming the call keys. Lift the receiver (if present) of the extension that you want to programme e then press the door lock release
and
AUX2 f buttons. On the entry panel, press the call key to associate with the internal extension g: an acoustic signal will confirm that the setting was stored.
Hang up the receiver again, if necessary h and continue, repeating the same operations for the other extensions.
Programmierung der Ruftasten. Den Hörer (falls vorhanden) der Innensprechstelle, die programmiert werden soll, e abnehmen und die Tasten
Türöffner
und AUX2 f drücken. An der Außenstation die Ruftaste drücken, die mit der Innensprechstelle g verknüpft werden soll: es folgt ein Akustiksignal zur Bestätigung der Speicherung. Eventuell den Hörer h wieder auflegen und die gleichen Schritte für alle anderen Innensprechstellen wiederholen.
Programmation des touches d’appel. Soulever le combiné (si présent) du poste que l’on souhaite programmer e et appuyer sur les boutons ouvre-porte
et AUX2 f. Appuyer sur le poste extérieur sur la touche d’appel à associer au poste intérieur g : suivra une indication sonore de mémorisation effectuée.
Raccrocher éventuellement le combiné h et continuer en répétant les mêmes opérations pour tous les autres postes.
Programación de los botones de llamada. Descuelgue el auricular (en su caso) del derivado que se desea programar e y pulse los botones abrepuerta
y AUX2 f. Pulse en la placa exterior el botón de llamada que se desea asociar al derivado interno g: seguirá una indicación acústica para confirmar la
memorización. Vuelva a colgar el auricular, en su caso, h y repita las mismas operaciones para todos los demás derivados.
Programação das teclas de chamada. Levante o auscultador (se presente) do derivado que deseja programar e e prima os botões de abertura da porta
e AUX2 f. Prima na placa botoneira a tecla de chamada a associar ao derivado interno g: segue uma indicação acústica de memorização efectuada.
Eventualmente volte a pousar o auscultador h e continue repetindo as mesmas operações para todos os outros derivados.
e
f
beep
g
PROG
h
BOUT
BOUT
i
M1
M2
PROG
PROG
M1
SW3
M2
PROG
RESET
PROG
<1’’
SW3
Uscita dalla Programmazione. Premere brevemente il tasto PROG: i led PROG si spegne. NOTA. In assenza di qualsiasi manovra, la procedura termina
automaticamente dopo 30 minuti.
Exiting programming. Briefly press the PROG key: the PROG LED off. NOTE. If no action is performed, the procedure will automatically end after 30 minutes.
Ausstieg aus der Programmierung. Kurz die Taste PROG drücken: die Leds PROG aus. HINWEIS. Falls keine Eingabe erfolgt, endet der Vorgang automatisch nach 30 Minuten.
Sortie de la Programmation. Appuyer brièvement sur la touche PROG: la led PROG est éteinte. NOTE. En cas absence de toute manœuvre, la procédure s’arrête
automatiquement après 30 minutes.
Salida de la modalidad de Programación. Pulse brevemente el botón PROG: el led PROG apagado. NOTA. Si no se efectúa ninguna operación, el proceso
concluye automáticamente tras 30 minutos.
Sair da Programação. Prima brevemente a tecla PROG: o led PROG fora. NOTA. Na ausência de qualquer operação, o processo termina automaticamente após
30 minutos.
11
Utilizzo Posti Esterni con GW19302-Use of entry panels with GW19302-Benutzung der außenstationen mit GW19302Utilisation des postes extérieurs avec GW19302-Uso de placas exteriores con GW19302-Utilização das placas botoneiras com GW19302
PROG
Procedura di Riprogrammazione
Reprogramming procedure
Neuprogrammierung
>3’’
<6’’
BOUT
BOUT
M2
SW3
SW3
PROG
a
M2
M1
PROG
PROG
M1
PROG
RESET
PROG
PROG
BOUTBOUT
PROG
M1
M1
b
M2
PROG
RESET
PROG
SW3
SW3
M2
Procédure de Reprogrammation
Procedimiento de Reprogramación
Processo de Reprogramação
Ingresso in Programmazione. Premere per almeno 3 s il tasto PROG a e rilasciarlo (entro 6 s) non appena il led PROG lampeggia e la retroilluminazione
dei tasti si accende come illustrato in figura b. La mancata accensione del Led PROG segnala un malfunzionamento. Verificare le connessioni e rientrare in
programmazione.
Entering Programming Mode. Press the PROG a key for at least 3 seconds and then release it (within 6 seconds) as soon as the LED PROG light flashes
and the key back lighting lights up as illustrated in figure b. Failure of the PROG LED to light up, indicates a malfunction. Check the connections and re-access the
programming mode.
Zugang zur Programmierung. Die Taste PROG a mindestens 3 Sek. gedrückt halten und loslassen (innerhalb von 6 Sek.), sobald die Led-Anzeige
PROG blinkt und die Hintergrundbeleuchtung der Tasten wie in Abbildung b dargestellt aufleuchtet. Wenn die Led-Anzeige PROG nicht aufleuchtet, liegt eine
Fehlfunktion vor. Überprüfen Sie die Verbindungen und kehren Sie zurück zur Programmierung.
Entrée en Programmation. Appuyer pendant au moins 3 secondes sur la touche PROG a et la relâcher (dans les 6 secondes) dès que la led PROG clignote
et le rétroéclairage des touches s’allume comme illustré à al figure b. Le non-allumage de la Led PROG signal un dysfonctionnement. Contrôler les connexions et
rentrer dans programmation.
Entrada en la modalidad de Programación. Pulse durante al menos 3 s el botón PROG a y suéltelo (antes de 6 s) en cuanto parpadee el led PROG y
se encienda la retroiluminación de los botones, tal y como se muestra en la figura b. Si no se enciende el Led PROG significa que se ha producido un fallo de
funcionamiento. Compruebe las conexiones y vuelva a entrar en la modalidad de programación.
Entrada em Programação. Prima durante pelo menos 3 seg. a tecla PROG a e solte-a (dentro de 6 seg.) assim que o led PROG piscar e a retroiluminação das
teclas se acender, como ilustrado na figura b. O não acendimento do Led PROG sinaliza uma anomalia de funcionamento. Verifique as conexões e entre novamente
na programação.
Programmazione dei tasti chiamata. Sollevare la cornetta (se presente) del derivato che si desidera programmare c e premere i pulsanti apriporta
ed AUX2 d. Premere sul posto esterno il tasto di chiamata da associare al derivato interno e: seguirà un’indicazione acustica di avvenuta memorizzazione. Riappendere eventualmente la cornetta f e proseguire ripetendo le stesse operazioni per tutti gli altri derivati.
Programming the call keys. Lift the receiver (if present) of the extension that you want to programme c then press the door lock release
and
AUX2 d buttons. On the entry panel, press the call key to be associated with the internal extension e: an acoustic signal will confirm that the setting was
stored. Hang up the receiver again, if necessary f and continue, repeating the same operations for the other extensions.
Programmierung der Ruftasten. Den Hörer (falls vorhanden) der Innensprechstelle, die programmiert werden soll, c abnehmen und die Tasten
Türöffner
und AUX2 d drücken. An der Außenstation die Ruftaste drücken, die mit der Innensprechstelle e verknüpft werden soll: es folgt ein Akustiksignal zur Bestätigung der Speicherung. Eventuell den Hörer f wieder auflegen und die gleichen Schritte für alle anderen Innensprechstellen wiederholen.
Programmation des touches d’appel. Soulever le combiné (si présent) du poste que l’on souhaite programmer c et appuyer sur les boutons ouvre-porte
et AUX2 d. Appuyer sur le poste extérieur sur la touche d’appel à associer au poste intérieur e : suivra une indication sonore de mémorisation effectuée.
Raccrocher éventuellement le combiné f et continuer en répétant les mêmes opérations pour tous les autres postes.
Programación de los botones de llamada. Descuelgue el auricular (en su caso) del derivado que se desea programar c y pulse los botones abrepuerta
y AUX2 d. Pulse en la placa exterior el botón de llamada que se desea asociar al derivado interno e: seguirá una indicación acústica para confirmar
la memorización. Vuelva a colgar el auricular f, en su caso, y repita las mismas operaciones para todos los demás derivados.
Programação das teclas de chamada. Levante o auscultador (se presente) do derivado que deseja programar c e prima os botões de abertura da porta
e AUX2 d. Prima na placa botoneira a tecla de chamada a associar ao derivado interno e: segue uma indicação acústica de memorização efectuada.
Eventualmente volte a pousar o auscultador f e continue repetindo as mesmas operações para todos os outros derivados.
c
d
beep
e
PROG
f
PROG
BOUT
BOUT
g
12
M1
M2
PROG
PROG
M1
SW3
M2
PROG
RESET
<1’’
SW3
Uscita dalla Programmazione. Premere brevemente il tasto PROG: i led PROG si spegne. NOTA. In assenza di qualsiasi manovra, la procedura termina
automaticamente dopo 30 minuti.
Exiting programming. Briefly press the PROG key: the PROG LED off. NOTE. If no action is performed, the procedure will automatically end after 30 minutes.
Ausstieg aus der Programmierung. Kurz die Taste PROG drücken: die Leds PROG aus. HINWEIS. Falls keine Eingabe erfolgt, endet der Vorgang automatisch nach 30 Minuten.
Sortie de la Programmation. Appuyer brièvement sur la touche PROG: la led PROG est éteinte. NOTE. En cas absence de toute manœuvre, la procédure s’arrête
automatiquement après 30 minutes.
Salida de la modalidad de Programación. Pulse brevemente el botón PROG: el led PROG apagado. NOTA. Si no se efectúa ninguna operación, el proceso
concluye automáticamente tras 30 minutos.
Sair da Programação. Prima brevemente a tecla PROG: o led PROG fora. NOTA. Na ausência de qualquer operação, o processo termina automaticamente após
30 minutos.
PROG
Utilizzo Posti Esterni con GW19302-Use of entry panels with GW19302-Benutzung der außenstationen mit GW19302
Utilisation des postes extérieurs avec GW19302-Uso de placas exteriores con GW19302-Utilização das placas botoneiras comGW19302
PROG
M1
h
M2
SW3
SW3
PROG
BOUTBOUT
PROG
M1
PROG
RESET
>3’’
PROG <6’’
M2
PROG
BOUTBOUT
PROG
M1
M1
i
M2
SW3
RESET
M2
PROG
PROG
M1
BOUT
SW3
M2
RESET
j
PROG
PROG
M1
BOUT
k
M2
SW3
PROG
RESET
PROG
SW3
Programmazione del Tipo dei Tasti. In fase di “Programmazione Tasti di Chiamata”, premere per almeno 3 s il tasto PROG h e rilasciarlo (entro 6 s) non
appena il led PROG si accende e la retroilluminazione dei tasti lampeggia come illustrato in figura i, entrando nella procedura “Programmazione Tipo dei Tasti”.
Premere il primo tasto del posto esterno nella posizione indicata j finchè i led della retroilluminazione smetteranno di lampeggiare rimanendo accesi k.
Al termine, per uscire dalla programmazione, premere brevemente il tasto PROG g: il led PROG si spegne. In assenza di qualsiasi manovra, la procedura termina
automaticamente dopo 30 minuti.
Programming key type. At the “Programming Call Buttons” stage, press the PROG h key for at least 3 seconds and then release it (within 6 seconds), as soon
as the LED PROG lights up and the key back lighting flashes as illustrated in figure i, entering “Programming Button Types/Combinations” as part of the procedure.
Press the first key of the entry panel in the position indicated j until the backlighting LED stops flashing k and remains lit.
At the end, exit programming, briefly press the PROG key g: the PROG LED will turn off. If no action is performed, the procedure will end automatically after 30
minutes.
Programmierung der Tastenart. In der Phase “Programmierung der Ruftasten”, die Taste PROG h mindestens 3 Sek. gedrückt halten und loslassen
(innerhalb von 6 Sek.), sobald die Led-Anzeige PROG aufleuchtet und die Hintergrundbeleuchtung der Tasten wie in Abbildung i dargestellt blinkt, wobei
die Prozedur “Programmierung der Ruftasten” aktiviert wird. Die erste Taste der Außenstation in der gezeigten Stellung drücken j bis die Leds der rückseitigen
Beleuchtung nicht mehr blinken k und eingeschaltet bleiben.
Am Ende zum Ausstieg aus der Programmierung kurz die Taste PROG g drücken: Led PROG aus. Falls keine Eingabe erfolgt, endet der Vorgang automatisch
nach 30 Minuten.
Programmation du Type des Touches. En phase de “Programmation des Touches d’Appel”, appuyer pendant au moins 3 secondes sur la touche PROG h
et la relâcher (dans les 6 secondes) dès que la led PROG s’allume et le rétroéclairage des touches clignote comme illustré à la figure i, en entrant dans la procédure
“Programmation du Type des Touches”. Appuyer sur la première touche du poste extérieur dans la position indiquée j jusqu’à ce que les leds du rétroéclairage
cessent de clignoter k en restant allumés.
À la fin, pour sortir de la programmation, appuyer de façon brève sur la touche PROG g: le led PROG s’éteint. En cas absence de toute manœuvre, la procédure
s’arrête automatiquement après 30 minutes.
Programación del Tipo de los Botones. En la fase de “Programación de los Botones de Llamada”, pulse durante al menos 3 s el botón PROG h y suéltelo
(antes de 6 s) en cuanto se encienda el led PROG y parpadee la retroiluminación de los botones, tal y como se muestra en la figura i; entrará en el proceso de
“Programación del Tipo de los Botones”. Pulse el primer botón de la placa exterior en la posición indicada j hasta que los leds de la retroiluminación dejen de
parpadear k y permanezcan encendidos.
Al concluir, para salir de la modalidad de programación, pulse brevemente el botón PROG g: led PROG apagado. Si no se efectúa ninguna operación, el proceso
concluye automáticamente tras 30 minutos.
Programação do Tipo de Teclas. Na fase de “Programação das teclas de Chamada”, prima durante pelo menos 3 seg. a tecla PROG h e solte-a (dentro de 6
seg.) assim que o led PROG se acender e a retroiluminação das teclas piscar, como ilustrado na figura i, entrando deste modo no processo de “Programação do Tipo
de Teclas”. Prima a primeira tecla da placa botoneira na posição indicada j até os leds da retroiluminação deixarem de piscar k ficando acesos.
No fim, para sair da programação, prima brevemente a tecla PROG g: led PROG apagado. Na ausência de qualquer operação, o processo termina automaticamente
após 30 minutos.
13
Utilizzo Posti Esterni con GW19302-Use of entry panels with GW19302-Benutzung der außenstationen mit GW19302Utilisation des postes extérieurs avec GW19302-Uso de placas exteriores con GW19302-Utilização das placas botoneiras com GW19302
IT
- PROGRAMMAZIONE DI UN GRUPPO
INTERCOMUNICANTE
EN - PROGRAMMING AN INTERCOM GROUP
DE
- PROGRAMMIERUNG EINER TEILNEHMERGRUPPE
FR
- PROGRAMMATION D’UN GROUPE
ES
- PROGRAMACIÓN DE UN GRUPO
PT
- PROGRAMAÇÃO DE UM GRUPO
D’INTERCOMMUNICATION
INTERCOMUNICANTE
INTERCOMUNICADOR
y La programmazione del gruppo intercomunicante deve essere effettuata SOLO SUCCESSIVA- y La programmation du groupe d’intercommunication doit être effectuée UNIQUEMENT APRÈS
MENTE all’assegnazione a tutti i derivati interni del tasto di chiamata.
l’attribution à tous les postes intérieurs de la touche d’appel.
y The intercom group must be programmed ONLY AFTER assigning the call code to all the in- y
La programación del grupo intercomunicante debe realizarse SOLO DESPUÉS de asignar a
todos los derivados internos el botón de llamada.
ternal extensions.
y Die Programmierung der Teilnehmergruppe kann ERST NACH der Zuordnung aller Innenspre- y A programação de um grupo intercomunicador deve ser efectuada SÓ APÓS a atribuição a
todos os derivados internos da tecla de chamada.
RESET
chstellen der Taste durchgeführt werden.
PROG
PROG
BOUT
M1
BOUT
>8’’
<11’’
SW3
SW3
a
M2
M2
PROG
M1
PROG
RESET
PROG
PROG
BOUTBOUT
PROG
M1
M1
b
M2
PROG
RESET
PROG
SW3
SW3
RESET
c
PROG
RESET
PROG
PROG
PROG
M1
BOUT
- Mit angeschlossenem Verbindungsdraht SW3 (Standardstellung). Die Taste PROG mindestens 8 Sek. gedrückt halten und loslassen (innerhalb von 11 Sek.)
a, sobald die Led-Anzeige PROG in schneller Folge blinkt und die Hintergrundbeleuchtung der Tasten wie in Abbildung b dargestellt aufleuchtet. Für die
Freischaltung des Teilnehmerbetriebs, auf die Innensprechstelle gehen, die programmiert werden soll und die Intercom-Ruftaste mit der man anrufen möchte,
drücken: für die erfolgte Programmierung ist eine akustische Anzeige hörbar c. Die gleichen Vorgänge mit allen anderen Innensprechstellen, die in die
Teilnehmergruppe eingegliedert werden sollen, wiederholen. Zum Schluss kurz die Taste PROG drücken d. HINWEIS Falls keine Eingabe erfolgt, endet der
Vorgang automatisch nach 30 Minuten.
- Con el jumper SW3 conectado (posición predeterminada). Pulse durante al menos 8 s el botón PROG y suéltelo (antes de 11 s) a en cuanto parpadee
rápidamente el led PROG y se encienda la retroiluminación de los botones, tal y como se muestra en la figura b. Para habilitar el funcionamiento intercomunicante, colóquese en el derivado interno que quiere programar y pulse el botón de llamada intercomu-nicante con el que se desea llamar a él: se producirá una
indicación acústica para confirmar la programación c. Repita estas operaciones para todos los demás derivados internos que desee incluir en el grupo intercomunicante. Al finalizar, pulse brevemente el botón PROG d. NOTA. Si no se efectúa ninguna operación, el proceso concluye automáticamente tras 30 minutos.
3 beep
M1
-With the jumper SW3 connected (default position). Press the PROG key for at least 8 seconds and then release it (within 11 seconds) a as soon as the LED PROG
light flashes rapidly and the key back lighting lights up as illustrated in figure b. To enable the intercom function, go to the internal extension that you want to
programme and press the call button to be used to intercom call it: an acoustic signal will confirm the programming c. Continue by repeating the same operations
for all the other internal extensions to be included in the intercom group. When you are done, briefly pres PROG key d. NOTE. If no action is performed, the procedure
will end automatically after 30 minutes.
- Avec le jumper SW3 activé (position par défaut). Appuyer pendant au moins 8 secondes sur la touche PROG et la relâcher (dans les 11 secondes) a dès que
la led PROG clignote rapidement et le rétroéclairage des touches s’allume comme illustré à la figure b. Pour activer le fonctionnement d’intercommunication, se
positionner sur le poste intérieur que l’on souhaite programmer et appuyer sur la touche d’appel intercomuniquant, avec laquelle l’on veut l’appeler: il y aura une
indication sonore de mémorisation effectuée c. Continuer en répétant les mêmes opérations pour tous les autres postes intérieurs qu’il faut inclure dans le groupe
d’intercommunication. À la fin, appuyer de façon brève sur la touche PROG d. NOTE. En cas absence de toute manœuvre, la procédure s’arrête automatiquement
après 30 minutes.
M2
BOUT
- Con il jumper SW3 inserito (posizione di default). Premere per almeno 8 s il tasto PROG e rilasciarlo (entro 11 s) a non appena il led PROG lampeggia velocemente e la retroilluminazione dei tasti si accende come illustrato in figura b. Per abilitare il funzionamento intercomunicante posizionarsi sul derivato interno
che si vuole programmare e premere il pulsante di chiamata intercomunicante, con il quale lo si desidera chiamare: seguirà un’indicazione acustica di avvenuta
programmazione c. Proseguire ripetendo le stesse operazioni per tutti gli altri derivati interni da includere nel gruppo intercomunicante. Al termine, premere
brevemente il tasto PROG d. NOTA. In assenza di qualsiasi manovra, la procedura termina automaticamente dopo 30 minuti.
<1’’
SW3
- Com o jumper SW3 activado (posição de default). Prima durante pelo menos 8 seg. a tecla PROG e solte-a (dentro de 11 seg.) a assim que o led PROG piscar
rapidamente e a retroiluminação das teclas se acender, como ilustrado na figura b. Para habilitar o funcionamento intercomunicador posicione-se no derivado interno que quer programar e prima o botão de chamada intercomunicante, com o qual o deseja chamar: segue-se uma indicação acústica de programação efectuada
c. Continue repetindo as mesmas operações em todos os outros derivados internos a incluir no grupo intercomunicador. No fim, prima brevemente a tecla PROG
d. NOTA. Na ausência de qualquer manobra, o processo termina automaticamente após 30 minutos.
SW3
M2
d
M2
y Una volta che un derivato interno é stato incluso in un gruppo intercomunicante mediante l’asse-
gnazione del tasto di chiamata, non è più possibile escluderlo dal gruppo medesimo. Qualora invece si
voglia cambiare il tasto di chiamata di un derivato interno già programmato come intercomunicante
ovvero aggiungere al gruppo nuovi derivati interni, è sufficiente ripetere la sequenza di operazioni
descritta per “Programmazione di un gruppo intercomunicante”.
y Once an internal extension has been included in an intercom group through the assignment of a
y Wenn eine Innensprechstelle mit Zuordnung der Ruftaste in eine Teilnehmergruppe aufgenom-
men wurde, kann sie von dieser Gruppe nicht mehr ausgeschlossen werden. Wenn man die Ruftaste
einer bereits als Teilnehmer programmierten Innensprechstelle ändern will, genügt es die Reihenfolge der unter “Programmierung einer Teilnehmergruppe” beschriebenen Vorgänge zu wiederholen.
y Una vez incluido un derivado interno en un grupo intercomunicante mediante la asignación del
call key, it can no longer be excluded from the group. If you want to change the call key for an internal
extension that is already programmed as intercommunicating or add new internal extensions to the
group, simply repeat the sequence of steps described for “Programming an intercom group”.
botón de llamada, ya no se puede excluirlo de ese grupo. Si se quisiese cambiar el botón de llamada
de un derivado interno ya programado como intercomunicante, o bien añadir al grupo nuevos derivados internos, basta repetir la secuencia de operaciones descrita para la “Programación de un grupo
intercomunicante”.
y Une fois qu’un poste intérieur a été inclus dans un groupe d’intercommunication par l’attribution
y Após um derivado interno ter sido incluído num grupo intercomunicador com a atribuição da tecla
de la touche d’appel, il n’est plus possible de l’exclure de ce groupe. Si, en revanche, l’on souhaite
changer la touche d’appel d’un poste intérieur déjà programmé comme en intercommunication ou
bien ajouter au groupe de nouveaux postes intérieurs, il suffit de répéter la séquence d’opérations
décrite pour la “Programmation d’un groupe d’intercommunication”.
14
de chamada, deixa de ser possível excluí-lo desse mesmo grupo. Se desejar mudar a tecla de chamada de um derivado interno já programado como intercomunicador ou seja adicionar ao grupo novos
derivados internos, é suficiente repetir a sequência de operações descrita para “Programação de um
grupo intercomunicador”.
RESET
Utilizzo Posti Esterni con GW19302-Use of entry panels with GW19302-Benutzung der außenstationen mit GW19302
Utilisation des postes extérieurs avec GW19302-Uso de placas exteriores con GW19302-Utilização das placas botoneiras comGW19302
RESET
PROG
Disabilitazione della funzione intercomunicante
Disabling the intercom function
Abschaltung der Teilnehmerfunktion
PROG
1
- Per disabilitare la funzione intercomunicante è sufficiente disinserire il jumper SW3 a; in questo modo si inibisce anche la programmazione del gruppo
intercomunicante. Per riabilitare la funzione medesima è sufficiente reinserire il jumper SW3 b.
SW3
PROG
M2
PROG
a
1
Désactivation de la fonction d’intercommunication
Deshabilitación de la función intercomunicante
Desabilitação da função intercomunicador
SW3
- To deactivate the intercom function, you simply have to disconnect the SW3 jumper a; by doing this, programming of the intercom system is also inhibited. To
re-activate this same function, simply re-insert the SW3 jumper b.
- Um die Funktion Intercom zu deaktivieren, genügt es den Jumper SW3 a herauszuziehen, wodurch auch die Programmierung der Intercom-Gruppe verhindert wird. Um die Funktion wieder zu aktivieren, genügt es den Jumper SW3 b wieder einzustecken.
- Pour désactiver la fonction d’intercommunication, il suffit de désinsérer le cavalier (jumper) SW3 a; de cette manière on désactive aussi la programmation du
groupe d’intercommunication. Pour activer de nouveau cette fonction, il suffit de réinsérer le cavalier (jumper) SW3 b.
- Para deshabilitar la función de intercomunicación basta con extraer el jumper SW3 a; de esta manera se deshabilita también la programación del grupo
intercomunicante. Para volver a habilitar la función basta con insertar de nuevo el jumper SW3 b.
M2
b
- Para desabilitar a função intercomunicador é suficiente desligar o jumper SW3 a; deste modo inibi-se também a programação do grupo intercomunicador. Para
reabilitar esta função basta voltar a ligar o jumper SW3 b.
15
16
UTILIZZO POSTI ESTERNI CON GW19301
USE OF ENTRY PANELS WITH GW19301
BENUTZUNG DER AUSSENSTATIONEN MIT GW19301
UTILISATION DES POSTES EXTÉRIEURS AVEC GW19301
USO DE PLACAS EXTERIORES CON GW19301
UTILIZAÇÃO DAS PLACAS BOTONEIRAS COM GW19301
17
M1
Utilizzo Posti Esterni con GW19301-Use of entry panels with GW19301-Benutzung der außenstationen mit GW19301
Utilisation des postes extérieurs avec GW19301-Uso de placas exteriores con GW19301-Utilização das placas botoneiras com GW19301
IT
FR
- ESEMPI DI COLLEGAMENTO
- CONNECTION EXAMPLES
EN
ES
- EXEMPLES DE CONNEXION
- EJEMPLOS DE CONEXIÓN
- VERBINDUNGS-BEISPIELE
- EXEMPLOS DE CONEXÃO
DE
PT
GW19301
M5
M2
+12V
BIN1 BIN2 BIN3 BOUT
– +
NO
C
B
B
RESET
–
GW19310
M2
M1
PROG
PROG
SW3
BOUT
GW19001
GW19006
- FUNZIONE DEI MORSETTI
FR - FONCTIONS DES BORNES
IT
Morsettiera M1
BOUT
+
–
Alimentazione 16-18
VDC
–
–
18
Montante
Terminal block M1
- TERMINAL FUNCTION
ES - FUNCIÓN DE LOS BORNES
EN
Klemmenbrett M1
- BELEGUNG DER KLEMMLEISTEN
PT - FUNÇÃO DOS BORNES
DE
Bornier M1
Busbar
Trägerleitung
Montant
Power supply 16-18 VDC
Stromversorgung 16-18 VDC Alimentation 16-18 VDC
Bornera M1
Régua de bornes M1
Bajante
Coluna
Alimentación 16-18 VCC
Alimentação 16-18 VDC
Morsettiera M2
Terminal block M2
Klemmenbrett M2
Bornier M2
Bornera M2
Régua de bornes M2
Massa
Earth
Masse
Masse
Masa
Massa
Pulsante apriporta (NA)
Door lock release button
Türöffnertaste (NO)
(NA)
Bouton ouvre-porte
(NO)
Botón abrepuerta (NA)
Botão de abertura da
porta (NA)
Elettroserratura
12 V 1 A max
Solenoid lock
12 V 1 A max
Gâche électrique
12 V 1 A max
Cerradura eléctrica
12 V 1 A max
Fechadura eléctrica
12 V 1 A max
Elektroschloss
12 V 1 A max
Utilizzo Posti Esterni con GW19301-Use of entry panels with GW19301-Benutzung der außenstationen mit GW19301
Utilisation des postes extérieurs avec GW19301-Uso de placas exteriores con GW19301-Utilização das placas botoneiras com GW19301
M1
Programmazione del Tipo dei Tasti
Programming the key type
Programmierung der Tastenart
Programmation du Type des Touches
Programación del Tipo de los Botones
Programação do Tipo de Teclas
PROG
M1
BOUT
PROG
M1
PROG
M1
PROG
<1’’
M1
SW3
Pag. 25
Page 25
Seite 25
Page 25
Pág. 25
Pág. 25
M2
M1
RESET
beep
A
SW3
M2
PROG
Programmazione del Tipo dei Tasti
Programming the key type
Programmierung der Tastenart
Programmation du Type des Touches
Programación del Tipo de los Botones
Programação do Tipo de Teclas
PROG
PROG
M2
BOUT
A
M1
Programmazione dei Tasti di Chiamata
Programming the call keys
Programmierung der Ruftasten
Programmation des Touches d’Appel
Programación de los Botones de Llamada
Programação das Teclas de Chamada
RESET
Programmazione dei Tasti di Chiamata
Programming the call keys
Programmierung der Ruftasten
Programmation des Touches d’Appel
Programación de los Botones de Llamada
Programação das Teclas de Chamada
<1’’
SW3
PROG
>3’’
BOUT
PROG
Pag. 21
Page 21
Seite 21
Page 21
Pág. 21
Pág. 21
Pag. 24
Page 24
Seite 24
Page 24
Pág. 24
Pág. 24
Reprogrammation
Reprogramación
Reprogramação
RESET
A
RESET
Pag. 20
Page 20
Seite 20
Page 20
Pág. 20
Pág. 20
PROG
>3’’
PROG
A
Riprogrammazione
Reprogramming
Neuprogrammierung
Première Programmation avec un poste extérieur
Primera programación con una placa exterior
Primeira Programação com uma placa botoneira
PROG
Prima Programmazione con un posto esterno
Initial programming with an entry panel
Erstprogrammierung mit einer Außenstation
M1
BOUT
A
Configurazione Chiamate
Call Configuration
Konfiguration der Anrufe
<1’’
PROG
SW3
M2
M1
Configuration des Appels
Configuración llamadas
Configuração Chamadas
1
1
2
1 2
3 4
1
1
2
1 2
3 4
19
Utilizzo Posti Esterni con GW19301-Use of entry panels with GW19301-Benutzung der außenstationen mit GW19301
Utilisation des postes extérieurs avec GW19301-Uso de placas exteriores con GW19301-Utilização das placas botoneiras com GW19301
Prima programmazione con UN posto esterno
Initial programming with ONE entry panel
Erstprogrammierung mit EINER Außenstation
M1
>3’’
RESET
a
PROG
PROG
M1
BOUT
SW3
RESET
RESET
M2
b
SW3
M2
PROG
d
20
beep
PROG
M1
BOUT
M2
M1
BOUT
cA
RESET
c
SW3
PROG
PROG
M1
BOUT
PROG
PROG
PROG
M2
PROG
PROG
A
Ingresso in Programmazione. Premere il tasto PROG dell’alimentatore a finchè il led PROG si accende. La mancata accensione del Led PROG segnala un
malfunzionamento. Verificare le connessioni e rientrare in programmazione. Il led PROG e la retroilluminazione dei tasti lampeggeranno come illustrato in figura
b. Attendere 5 secondi la conclusione dell’autotest e proseguire come sotto indicato.
Accessing programming. Die Taste PRG des Netzgeräts a drücken, bis die Led PROG aufleuchtet. Failure of the PROG LED to light up indicates a malfunction.
Check the connections and return to programming. Check the connections and return to programming.The PROG LED and the backlighting of the keys will flash as
shown in figure b. Wait 5 seconds for the self-test to be completed and then continue as described below.
Einstieg in die Programmierung. Für mindestens 3 s die Taste PROG a drücken und innerhalb 6 s loslassen. Falls sich die Led PROG nicht einschaltet,
liegt eine Störung vor. Die Anschlüsse prüfen und wieder in die Programmierung einsteigen. Die Led PROG und die rückseitige Beleuchtung der Tasten blinken
wie in der Abbildung gezeigt b. 5 Sekunden bis zum Ende des Autotests warten und danach wie folgt vorgehen.
Entrée en Programmation. Appuyer sur la touche PROG de l’alimentateur a jusqu’à ce que la led PROG s’allume. Le non-allumage de la Led PROG signale
un défaut de fonctionnement. Contrôler les connexions et rentrer dans programmation. La led PROG et le rétroéclairage des touches clignoteront comme illustré figure
b. Attendre pendant 5 secondes la conclusion de l’autotest et continuer comme indiquÈ ci-dessous.
Entrada en la modalidad de Programación. Pulse el botón PROG del alimentador a hasta que se encienda el led PROG. Si no se enciende el Led
PROG, significa que se ha producido un fallo de funcionamiento. Compruebe las conexiones y vuelva a entrar en la modalidad de programación.El led PROG y
la retroiluminación de los botones parpadearán como se muestra en la figura b. Espere 5 segundos la conclusión de la prueba automática y prosiga como se
indica más abajo.
Entrar na Programação Carregue na tecla PROG do alimentador a até o led PROG se acender. O não acendimento do Led PROG sinaliza uma anomalia no
funcionamento. Verifique as conexões e entre novamente na programação.O led PROG e a retroiluminação das teclas piscam como ilustrado na figura b. Espere 5
segundos para a conclusão do auto teste e continue como indicado a seguir.
RESET
GW19301
Première programmation avec UN poste extérieur
Primera programación con UNA placa exterior
Primeira programação com UMA placa botoneira
M1
SW3
BOUT
SW3
M2
cB
Programmazione del Tipo dei Tasti. Premere il primo tasto del posto esterno nella posizione indicata c/cA/ cB finchè i led della retroilluminazione smetteranno di lampeggiare d rimanendo accesi. Una segnalazione acustica segnalerà l’entrata in “Programmazione dei tasti di chiamata”.
Programming of the Key Type. Press the first key of the entry panel in the position indicated c/cA/cB until the backlighting LED stops flashing d and
remains lit. An acoustic signal will notify entrance in “Call key programming”.
Programmierung des Tastentyps. Die erste Taste der Außenstation in der gezeigten Stellung drücken c/cA/cB bis die Leds der rückseitigen
Beleuchtung nicht mehr blinken d und eingeschaltet bleiben. Ein akustisches Signal meldet den Eintritt in die “Programmierung der Ruftasten”.
Programmation du Type des touches. Appuyer sur la première touche du poste extérieur dans la position indiquée c/cA/cB jusqu’à ce que les leds du
rétroéclairage cessent de clignoter d en restant allumés. Un signal sonore indique l’entrée en “Programmation des touches d’appel”.
Programación del Tipo de los Botones. Pulse el primer botón de la placa exterior en la posición indicada c/cA/cB hasta que los leds de la
retroiluminación dejen de parpadear d y permanezcan encendidos. Una señal acústica indicará la entrada en “Programación de los botones de llamada”.
Programação do Tipo de Teclas. Prima a primeira tecla da placa botoneira na posição indicada c/cA/cB até os leds da retroiluminação deixarem de
piscar d ficando acesos. Uma sinalização sonora confirma a entrada na “Programação das teclas de chamada”.
Utilizzo Posti Esterni con GW19301-Use of entry panels with GW19301-Benutzung der außenstationen mit GW19301
Utilisation des postes extérieurs avec GW19301-Uso de placas exteriores con GW19301-Utilização das placas botoneiras com GW19301
Programmazione dei tasti chiamata. Sollevare la cornetta (se presente) del derivato che si desidera programmare e e premere i pulsanti apriporta
ed AUX2 f. Premere sul posto esterno il tasto di chiamata da associare al derivato interno g: seguirà un’indicazione acustica di avvenuta memorizzazione. Riappendere eventualmente la cornetta h e proseguire ripetendo le stesse operazioni per tutti gli altri derivati.
Programming the call keys. Lift the receiver (if present) of the extension that you want to programme e then press the door lock release
and
AUX2 f buttons. On the entry panel, press the call key to associate with the internal extension g: an acoustic signal will confirm that the setting was stored.
Hang up the receiver again, if necessary h and continue, repeating the same operations for the other extensions.
Programmierung der Ruftasten. Den Hörer (falls vorhanden) der Innensprechstelle, die programmiert werden soll, e abnehmen und die Tasten Türöffner
und AUX2 f drücken. An der Außenstation die Ruftaste drücken, die mit der Innensprechstelle g verknüpft werden soll: es folgt ein Akustiksignal
zur Bestätigung der Speicherung. Eventuell den Hörer h wieder auflegen und die gleichen Schritte für alle anderen Innensprechstellen wiederholen.
Programmation des touches d’appel. Soulever le combiné (si présent) du poste que l’on souhaite programmer e et appuyer sur les boutons ouvre-porte
et AUX2 f. Appuyer sur le poste extérieur sur la touche d’appel à associer au poste intérieur g : suivra une indication sonore de mémorisation effectuée.
Raccrocher éventuellement le combiné h et continuer en répétant les mêmes opérations pour tous les autres postes.
Programación de los botones de llamada. Descuelgue el auricular (en su caso) del derivado que se desea programar e y pulse los botones abrepuerta
y AUX2 f. Pulse en la placa exterior el botón de llamada que se desea asociar al derivado interno g: seguirá una indicación acústica para confirmar la
memorización. Vuelva a colgar el auricular, en su caso, h y repita las mismas operaciones para todos los demás derivados.
Programação das teclas de chamada. Levante o auscultador (se presente) do derivado que deseja programar e e prima os botões de abertura da porta
e AUX2 f. Prima na placa botoneira a tecla de chamada a associar ao derivado interno g: segue uma indicação acústica de memorização efectuada.
Eventualmente volte a pousar o auscultador h e continue repetindo as mesmas operações para todos os outros derivados.
beep
e
beep
f
beep
beep
g
h
GW19301
A
i
PROG
<1’’
M1
Uscita dalla Programmazione. Premere brevemente il tasto PROG: i led PROG si spegne e il posto esterno smette di suonare. NOTA. In assenza di qualsiasi
manovra, la procedura termina automaticamente dopo 30 minuti.
Exiting programming. Briefly press the PROG key: the PROG led goes out and the external station stops ringing. NOTE. If no action is performed, the procedure
will automatically end after 30 minutes.
Ausstieg aus der Programmierung. Die Taste PROG kurz drücken: die Led PROG schaltet sich aus und die Außenstation hört auf zu läuten. HINWEIS. Falls
keine Eingabe erfolgt, endet der Vorgang automatisch nach 30 Minuten.
Sortie de la Programmation. Appuyer brièvement sur la touche PROG : la led PROG s’éteind et le poste extérieur cesse de sonner. NOTE. En cas absence de toute
manœuvre, la procédure s’arrête automatiquement après 30 minutes.
Salida de la modalidad de Programación. Pulse brevemente el botón PROG: los leds PROG se apagan y la placa exterior deja de sonar. NOTA. Si no se
efectúa ninguna operación, el proceso concluye automáticamente tras 30 minutos.
Sair da Programação. Prima brevemente a tecla PROG: o led PROG apaga-se e a placa botoneira deixa de tocar. Na ausência de qualquer operação, o processo
termina automaticamente após 30 minutos.
21
Utilizzo Posti Esterni con GW19301-Use of entry panels with GW19301-Benutzung der außenstationen mit GW19301
Utilisation des postes extérieurs avec GW19301-Uso de placas exteriores con GW19301-Utilização das placas botoneiras com GW19301
Prima programmazione con PIÙ posti esterni
Initial programming with MULTIPLE entry panels
Erstprogrammierung mit MEHREREN Außenstationen
GW19301
PROG
A
M1
>3’’
a
3 P.E
RESET
PROG
BOUT
BOUT
M2
M1
SW3
M2
M2
3 P.E
RESET
PROG
BOUT
BOUT
M1
SW3
RESET
PROG
M1
SW3
RESET
PROG
BOUT
M1
SW3
2 P.E
RESET
RESET
3 P.E
PROG
BOUT
f
22
M2
PROG
M1
SW3
PROG
PROG
PROG
M1
BOUT
SW3
M2
M2
1 P.E
beep
PROG
PROG
BOUT
M2
e
PROG
PROG
PROG
BOUT
RESET
3 P.E
RESET
2 P.E
M1
SW3
SW3
M2
M2
1 P.E
M1
PROG
PROG
PROG
BOUT
M2
d
PROG
PROG
M1
SW3
BOUT
RESET
3 P.E
RESET
2 P.E
M1
SW3
M2
M2
1 P.E
BOUT
PROG
PROG
M1
SW3
M2
c
PROG
PROG
PROG
M1
BOUT
RESET
2 P.E
RESET
1 P.E
SW3
RESET
b
PROG
PROG
M1
SW3
PROG
BOUT
PROG
PROG
PROG
M1
RESET
2 P.E
RESET
1 P.E
BOUT
M2
M1
SW3
M2
SW3
Première programmation avec PLUSIEURS postes extérieurs
Primera programación con VARIAS placas exteriores
Primeira programação com VÁRIAS placas botoneiras
Ingresso in Programmazione. Premere il tasto PROG dell’alimentatore a finchè il led PROG si accende. L’eventuale spegnimento immediato del Led
PROG segnala un malfunzionamento nelle connessioni fra alimentatore e posto esterno. Verificare le connessioni e rientrare in programmazione. Il led PROG e
la retroilluminazione dei tasti lampeggeranno come illustrato in figura b. Attendere 5 secondi la conclusione dell’autotest e proseguire come sotto indicato.
Accessing programming. Press the PROG key on the power supplier a until the PROG LED turns on. If the PROG LED turns off suddenly, this indicates a malfunction in the connection between the power supplier and the entry panel. Check the connections and return to programming. The PROG LED and the backlighting
of the keys will flash as shown in figure b. Wait 5 seconds for the self-test to be completed and then continue as described below.
Einstieg in die Programmierung. Die Taste PRG des Netzgeräts a drücken, bis die Led PROG aufleuchtet. Ein eventuelles sofortiges Ausschalten der
Led PROG zeigt eine Störung in den Verbindungen zwischen Netzgerät und Außenstation. Die Anschlüsse prüfen und wieder in die Programmierung einsteigen.
Die Led PROG und die rückseitige Beleuchtung der Tasten blinken wie in der Abbildung gezeigt b. 5 Sekunden bis zum Ende des Autotests warten und danach
wie folgt vorgehen.
Entrée en Programmation. Appuyer sur la touche PROG de l’alimentateur a jusqu’à ce que la led PROG s’allume. L’éventuelle extinction immédiate de la Led
PROG signale un dysfonctionnement des connexions entre alimentateur et postes extérieur. Contrôler les connexions et rentrer dans programmation.
La led PROG et le rétroéclairage des touches clignoteront comme illustré figure b. Attendre pendant 5 secondes la conclusion de l’autotest et continuer comme
indiqué ci-dessous.
Entrada en la modalidad de Programación Pulse el botón PROG del alimentador a hasta que se encienda el led PROG. Si el Led PROG se apaga
inmediatamente, significa que hay algún problema de funcionamiento en las conexiones entre alimentador y placa exterior. Compruebe las conexiones y vuelva
a entrar en la modalidad de programación. El led PROG y la retroiluminación de los botones parpadearán como se muestra en la figura b. Espere 5 segundos
la conclusión de la prueba automática y prosiga como se indica más abajo.
Entrar na Programação Carregue na tecla PROG do alimentador a até o led PROG se acender. O eventual apagamento imediato do Led PROG sinaliza uma
anomalia no funcionamento das conexões entre o alimentador e a placa botoneira. Verifique as conexões e entre novamente na programação. O led PROG e a
retroiluminação das teclas piscam como ilustrado na figura b. Espere 5 segundos para a conclusão do auto teste e continue como indicado a seguir.
Programmazione del Tipo dei Tasti. Premere il primo tasto del posto esterno c finchè i led della retroilluminazione smetteranno di lampeggiare d
rimanendo accesi. Ripetere l’operazione su tutti i posti esterni da programmare d e: al termine le segnalazioni assumeranno la configurazione f. Una
segnalazione acustica segnalerà l’entrata in “Programmazione dei tasti di chiamata”.
Programming key type. Press the first key on the entry terminal c until stops flashing as does the backlighting LEDs d. Repeat the operation on all entry
panels to be programmed d e: at the end, the signals will assume the configuration f. An acoustic signal will notify entrance in “Call key programming”.
Programmierung der Tastenart. Die erste Taste der Außenstation c drücken, bis die Leds der Hintergrundbeleuchtung d zu blinken aufhören. Den
Schritt an allen zu programmierenden Außenstationen d e wiederholen: am Ende nehmen die Anzeigen die Konfiguration f an. Ein akustisches Signal
meldet den Eintritt in die “Programmierung der Ruftasten”.
Programmation du Type des Touches. Appuyer sur la première touche du poste extérieur c jusqu’à arrêtera de clignoter ainsi que les leds du rétroéclairage d.
Répéter l’opération sur tous les postes extérieurs à programmer d e: à la fin les signalisations adopteront la configuration f. Un signal sonore indique l’entrée en
“Programmation des touches d’appel”.
Programación del Tipo de los Botones. Pulse el primer botón de la placa exterior c hasta los leds de retroiluminación dejen de parpadear d. Repita
esta operación para todas las placas exteriores que se deban programar d e: al concluir la indicación adoptarán la configuración f. Una señal acústica
indicará la entrada en “Programación de los botones de llamada”.
Programação do Tipo de Teclas. Carregue na primeira tecla da placa botoneira c até deixar de piscar, tal como os leds da retroiluminação d. Repita a
operação em todas as placas botoneiras a programar d e: no fim as sinalizações assumem a configuração f. Uma sinalização sonora confirma a entrada na
“Programação das teclas de chamada”.
Utilizzo Posti Esterni con GW19301-Use of entry panels with GW19301-Benutzung der außenstationen mit GW19301
Utilisation des postes extérieurs avec GW19301-Uso de placas exteriores con GW19301-Utilização das placas botoneiras com GW19301
Programmazione dei tasti chiamata. Sollevare la cornetta (se presente) del derivato che si desidera programmare g e premere i pulsanti apriporta
ed AUX2 h. Premere sul posto esterno il tasto di chiamata da associare al derivato interno i: seguirà un’indicazione acustica di avvenuta memorizzazione. Riappendere eventualmente la cornetta j e proseguire ripetendo le stesse operazioni per tutti gli altri derivati.
L’operazione è eseguibile solo dal posto esterno con la segnalazione acustica attiva (PE1 in fig. f pagina 22) : per cambiare il posto esterno da cui effettuare la
programmazione delle chiamate, è necessario premere uno dei tasti di chiamata per almeno 3s.
Programming the call keys. Lift the receiver (if present) of the extension that you want to programme g then press the door lock release
and
AUX2 h buttons. On the entry panel, press the call key to associate with the internal extension i: an acoustic signal will confirm that the setting was stored.
Hang up the receiver again, if necessary j and continue, repeating the same operations for the other extensions.
This operation can only be performed from the external station with acoustic signalling active (PE1 in fig. f page 22) : to change the entry panel from which the
call programming is performed, press one call key for at least 3s.
Programmierung der Ruftasten. Den Hörer (falls vorhanden) der Innensprechstelle, die programmiert werden soll, g abnehmen und die Tasten Türöffner
und AUX2 h drücken. An der Außenstation die Ruftaste drücken, die mit der Innensprechstelle i verknüpft werden soll: es folgt ein Akustiksignal
zur Bestätigung der Speicherung. Eventuell den Hörer j wieder auflegen und die gleichen Schritte für alle anderen Innensprechstellen wiederholen.
Der Vorgang kann nur von der Außenstation mit aktiviertem Hörsignal durchgeführt werden (PE1 auf Abb. f Seite 22): um die Außenstation, von der aus die
Rufprogrammierung ausgeführt werden soll, zu wechseln, muss eine der ersten Ruftasten mindestens 3s lang gedrückt werden.
Programmation des touches d’appel. Soulever le combiné (si présent) du poste que l’on souhaite programmer g et appuyer sur les boutons ouvre-porte
et AUX2 h. Appuyer sur le poste extérieur sur la touche d’appel à associer au poste intérieur i: suivra une indication sonore de mémorisation effectuée.
Raccrocher éventuellement le combiné j et continuer en répétant les mêmes opérations pour tous les autres postes.
Cette opération ne peut être effectuée qu’à partir du poste extérieur avec le signal sonore activé (PE1 sur fig. f page 22): pour changer le poste extérieur depuis
lequel effectuer la programmation des appels, il est nécessaire d’appuyer sur une des touches d’appel pendant au moins 3s.
Programación de los botones de llamada. Descuelgue el auricular (en su caso) del derivado que se desea programar g y pulse los botones abrepuerta
y AUX2 h. Pulse en la placa exterior el botón de llamada que se desea asociar al derivado interno i: seguirá una indicación acústica para confirmar la
memorización. Vuelva a colgar el auricular j, en su caso, y repita las mismas operaciones para todos los demás derivados.
La operación sólo puede realizarse desde la placa exterior con la señal acústica activa (PE1 en la fig. f página 22): para cambiar la placa exterior desde la que
efectuar la programación de las llamadas, es necesario pulsar uno de los botones de llamada durante al menos 3 segundos.
Programação das teclas de chamada. Levante o auscultador (se presente) do derivado que deseja programar g e prima os botões de abertura da porta
e AUX2 h. Prima na placa botoneira a tecla de chamada a associar ao derivado interno i: segue uma indicação acústica de memorização efectuada.
Eventualmente volte a pousar o auscultador j e continue repetindo as mesmas operações para todos os outros derivados.
A operação só pode ser efectuada na placa botoneira com a sinalização sonora activa (PE1 na fig. f página 22): para mudar a placa botoneira com a qual efectuar
a programação das chamadas, é necessário premer um teclas de chamada durante pelo menos 3 seg.
beep
g
beep
h
beep
beep
i
j
GW19301
A
k
PROG
<1’’
M1
Uscita dalla Programmazione. Premere brevemente il tasto PROG: i led PROG si spegne e il posto esterno smette di suonare. NOTA. In assenza di qualsiasi
manovra, la procedura termina automaticamente dopo 30 minuti.
Exiting programming. Briefly press the PROG key: the PROG led goes out and the external station stops ringing. NOTE. If no action is performed, the procedure
will automatically end after 30 minutes.
Ausstieg aus der Programmierung. Die Taste PROG kurz drücken: die Led PROG schaltet sich aus und die Außenstation hört auf zu läuten. HINWEIS. Falls
keine Eingabe erfolgt, endet der Vorgang automatisch nach 30 Minuten.
Sortie de la Programmation. Appuyer brièvement sur la touche PROG : la led PROG s’éteind et le poste extérieur cesse de sonner. NOTE. En cas absence de toute
manœuvre, la procédure s’arrête automatiquement après 30 minutes.
Salida de la modalidad de Programación. Pulse brevemente el botón PROG: los leds PROG se apagan y la placa exterior deja de sonar. NOTA. Si no se
efectúa ninguna operación, el proceso concluye automáticamente tras 30 minutos.
Sair da Programação. Prima brevemente a tecla PROG: o led PROG apaga-se e a placa botoneira deixa de tocar. Na ausência de qualquer operação, o processo
termina automaticamente após 30 minutos.
23
Utilizzo Posti Esterni con GW19301-Use of entry panels with GW19301-Benutzung der außenstationen mit GW19301
Utilisation des postes extérieurs avec GW19301-Uso de placas exteriores con GW19301-Utilização das placas botoneiras com GW19301
Procédure de Reprogrammation
Procedimiento de Reprogramación
Processo de Reprogramação
Procedura di Riprogrammazione
Reprogramming procedure
Neuprogrammierung
Ingresso in Programmazione. Premere il tasto PROG dell’alimentatore a finchè il led PROG si accende. Il led PROG e la retroilluminazione dei tasti
lampeggeranno come illustrato in figura b. Attendere 5 secondi la conclusione dell’autotest e proseguire come sotto indicato.
Accessing programming. Press the PROG key on the power supplier a until the PROG LED turns on. The PROG LED and the backlighting of the keys will flash
as shown in figure b. Wait 5 seconds for the self-test to be completed and then continue as described below.
Einstieg in die Programmierung. Die Taste PRG des Netzgeräts a drücken, bis die Led PROG aufleuchtet. Die Led PROG und die rückseitige Beleuchtung
der Tasten blinken wie in der Abbildung gezeigt b. 5 Sekunden bis zum Ende des Autotests warten und danach wie folgt vorgehen.
Entrée en Programmation. Appuyer sur la touche PROG de l’alimentateur a jusqu’à ce que la led PROG s’allume. La led PROG et le rétroéclairage des touches
clignoteront comme illustré figure b. Attendre pendant 5 secondes la conclusion de l’autotest et continuer comme indiquè ci-dessous.
Entrada en la modalidad de Programación Pulse el botón PROG del alimentador a hasta que se encienda el led PROG. El led PROG y la retroiluminación de los botones parpadearán como se muestra en la figura b. Espere 5 segundos la conclusión de la prueba automática y prosiga como se indica más abajo.
Entrar na Programação Carregue na tecla PROG do alimentador a até o led PROG se acender. O led PROG e a retroiluminação das teclas piscam como ilustrado
na figura b. Espere 5 segundos para a conclusão do auto teste e continue como indicado a seguir.
GW19301
PROG
A
M1
>3’’
a
2 P.E
RESET
RESET
PROG
BOUT
M1
SW3
M2
b
PROG
PROG
M1
BOUT
BOUT
M1
SW3
SW3
M2
M2
Programmazione dei tasti chiamata. Sollevare la cornetta (se presente) del derivato che si desidera programmare c e premere i pulsanti apriporta
ed AUX2 d. Premere sul posto esterno il tasto di chiamata da associare al derivato interno e: seguirà un’indicazione acustica di avvenuta memorizzazione. Riappendere eventualmente la cornetta f e proseguire ripetendo le stesse operazioni per tutti gli altri derivati. L’operazione è eseguibile solo dal posto
esterno con la segnalazione acustica attiva (PE1 in b): per cambiare il posto esterno da cui effettuare la programmazione chiamate, è necessario premere uno
dei tasti di chiamata per almeno 3s.
Programming the call keys. Lift the receiver (if present) of the extension that you want to programme c then press the door lock release
and
AUX2 d buttons. On the entry panel, press the call key to be associated with the internal extension e: an acoustic signal will confirm that the setting was stored.
Hang up the receiver again, if necessary f and continue, repeating the same operations for the other extensions. This operation can only be performed from the external station with acoustic signalling active (PE1 in b): to change the entry panel from which the call programming is performed, press one call key for at least 3s.
Programmierung der Ruftasten. Den Hörer (falls vorhanden) der Innensprechstelle, die programmiert werden soll, c abnehmen und die Tasten Türöffner
und AUX2 d drücken. An der Außenstation die Ruftaste drücken, die mit der Innensprechstelle e verknüpft werden soll: es folgt ein Akustiksignal
zur Bestätigung der Speicherung. Eventuell den Hörer f wieder auflegen und die gleichen Schritte für alle anderen Innensprechstellen wiederholen. Der Vorgang kann nur von der Außenstation mit aktiviertem Hörsignal durchgeführt werden (PE1 auf b): um die Außenstation, von der aus die Rufprogrammierung
ausgeführt werden soll, zu wechseln, muss eine der ersten Ruftasten mindestens 3s lang gedrückt werden.
Programmation des touches d’appel. Soulever le combiné (si présent) du poste que l’on souhaite programmer c et appuyer sur les boutons ouvre-porte
et AUX2 d. Appuyer sur le poste extérieur sur la touche d’appel à associer au poste intérieur e : suivra une indication sonore de mémorisation effectuée.
Raccrocher éventuellement le combiné f et continuer en répétant les mêmes opérations pour tous les autres postes. Cette opération ne peut être effectuée qu’à
partir du poste extérieur avec le signal sonore activé (PE1 sur b) : pour changer le poste extérieur depuis lequel effectuer la programmation des appels, il est
nécessaire d’appuyer sur une des touches d’appel pendant au moins 3s.
Programación de los botones de llamada. Descuelgue el auricular (en su caso) del derivado que se desea programar c y pulse los botones abrepuerta
y AUX2 d. Pulse en la placa exterior el botón de llamada que se desea asociar al derivado interno e: seguirá una indicación acústica para confirmar la
memorización. Vuelva a colgar el auricular f, en su caso, y repita las mismas operaciones para todos los demás derivados. La operación sólo puede realizarse
desde la placa exterior con la señal acústica activa (PE1 en b): para cambiar la placa exterior desde la que efectuar la programación de las llamadas, es necesario pulsar uno de los botones de llamada durante al menos 3 segundos.
Programação das teclas de chamada. Levante o auscultador (se presente) do derivado que deseja programar c e prima os botões de abertura da porta
e AUX2 d. Prima na placa botoneira a tecla de chamada a associar ao derivado interno e: segue uma indicação acústica de memorização efectuada.
Eventualmente volte a pousar o auscultador f e continue repetindo as mesmas operações para todos os outros derivados. A operação só pode ser efectuada na
placa botoneira com a sinalização sonora activa (PE1 na b): para mudar a placa botoneira com a qual efectuar a programação das chamadas, é necessário premer
um teclas de chamada durante pelo menos 3 seg.
beep
c
beep
d
beep
PROG
PROG
PROG
beep
3 P.E
RESET
1 P.E
beep
e
f
GW19301
A
g
24
PROG
<1’’
M1
Uscita dalla Programmazione. Premere brevemente il tasto PROG: i led PROG si spegne e il posto esterno smette di suonare. NOTA. In assenza di qualsiasi
manovra, la procedura termina automaticamente dopo 30 minuti.
Exiting programming. Briefly press the PROG key: the PROG led goes out and the external station stops ringing. NOTE. If no action is performed, the procedure
will automatically end after 30 minutes.
Ausstieg aus der Programmierung. Die Taste PROG kurz drücken: die Led PROG schaltet sich aus und die Außenstation hört auf zu läuten. HINWEIS. Falls
keine Eingabe erfolgt, endet der Vorgang automatisch nach 30 Minuten.
Sortie de la Programmation. Appuyer brièvement sur la touche PROG : la led PROG s’éteind et le poste extérieur cesse de sonner. NOTE. En cas absence de toute
manœuvre, la procédure s’arrête automatiquement après 30 minutes.
Salida de la modalidad de Programación. Pulse brevemente el botón PROG: los leds PROG se apagan y la placa exterior deja de sonar. NOTA. Si no se
efectúa ninguna operación, el proceso concluye automáticamente tras 30 minutos.
Sair da Programação. Prima brevemente a tecla PROG: o led PROG apaga-se e a placa botoneira deixa de tocar. Na ausência de qualquer operação, o processo
termina automaticamente após 30 minutos.
Utilizzo Posti Esterni con GW19301-Use of entry panels with GW19301-Benutzung der außenstationen mit GW19301
Utilisation des postes extérieurs avec GW19301-Uso de placas exteriores con GW19301-Utilização das placas botoneiras com GW19301
GW19301
PROG
A
M1
>3’’
h
3 P.E
RESET
PROG
BOUT
BOUT
M2
M1
SW3
M2
M2
2 P.E
3 P.E
RESET
RESET
1 P.E
PROG
BOUT
PROG
PROG
PROG
PROG
M1
BOUT
SW3
RESET
i
PROG
PROG
M1
SW3
PROG
BOUT
PROG
PROG
PROG
M1
RESET
2 P.E
RESET
1 P.E
M1
SW3
BOUT
M2
M1
SW3
SW3
M2
M2
j
3 P.E
RESET
PROG
PROG
PROG
M1
SW3
BOUT
PROG
PROG
PROG
M1
BOUT
RESET
2 P.E
RESET
1 P.E
BOUT
M2
M1
SW3
Programmazione del Tipo dei Tasti. In fase di “Programmazione Tasti di Chiamata” a premere e mantenere premuto il tasto PROG dell’alimentatore
finché si entra nella procedura “Programmazione Tipo dei Tasti” i. Premere uno dei tasti di chiamata dei posti esterni da riprogrammare, i led della retroilluminazione dei tasti di chiamata j smetteranno di lampeggiare. Ripetere l’operazione su tutti i posti esterni da riprogrammare j e k. Nel caso si effettui la
riprogrammazione su tutti i posti esterni la configurazione sarà quella illustrata in figura l.
Per uscire dalla riprogrammazione, premere brevemente il tasto PROG dell’alimentatore m: i led PROG e i led della retroilluminazione dei tasti si spengono. In
assenza di qualsiasi manovra, la procedura termina automaticamente dopo 30 minuti.
Programming key type. During the “Call button programming” phase a press and hold down on the power supplier PROG key until accessing the “Programming key type” procedure i. Press one of the call keys for the external stations to be reprogrammed, the backlighting leds on the j call keys will stop flashing.
Repeat the operation on all entry panels to be reprogrammed j and k. If all entry panels are reprogrammed, the configuration will be as illustrated in figure l.
To exit reprogramming, briefly press the PROG key on the power supplier m: both LEDs, PROG and the key backlighting will go out. If no action is performed, the
procedure will end automatically after 30 minutes.
Programmierung der Tastenart. Während der “Programmierung der Ruftasten” a die Taste PROG des Netzgeräts drücken und gedrückt halten, bis man
in den Vorgang “Programmierung der Tastenart” i. Eine der Ruftasten der Außenstationen drücken, die neu zu programmieren sind, die Leds der rückseitigen
Beleuchtung der Ruftasten j stellen das Blinken ein. Den Vorgang an allen neu zu programmierenden Außenstationen wiederholen j und k. Falls alle
Außenstationen neu programmiert werden, muss die in Abbildung l gezeigte Konfiguration angewandt werden.
Zum Verlassen der Neuprogrammierung kurz die Taste PROG des Netzgerätes m drücken: die Led PROG und die Led-Hintergrundbeleuchtung der Tasten erlöschen. Falls keine Eingabe erfolgt, endet der Vorgang automatisch nach 30 Minuten.
Programmation du Type des Touches. En phase de “Programmation des Touches d’Appel” a appuyer et maintenir enfoncée la touche PROG de l’alimentateur jusqu’à ce que l’on entre dans la procédure “Programmation Type des touches” i. Appuyer sur une des touches d’appel des postes extérieurs à reprogrammer,
les leds du rétroéclairage des touches d’appel j cesseront de clignoter. Répéter l’opération sur tous les postes extérieurs à reprogrammer j et k. Au cas où serait
effectuée la reprogrammation sur tous les postes extérieurs la configuration sera celle illustrée à la figure l.
Pour sortir de la reprogrammation, appuyer de façon brève sur la touche PROG de l’alimentateur m: les leds PROG et les leds de rétro-éclairage des touches s’éteignent. En cas absence de toute manœuvre, la procédure s’arrête automatiquement après 30 minutes.
Programación del Tipo de los Botones. Durante la fase “Programación de los Botones de Llamada” a mantenga pulsado el botón PROG del alimentador
hasta entrar en el proceso de “Programación del Tipo de los Botones” i. Pulse uno de los botones de llamada de las placas externas que reprogramar. Los leds
de la iluminación trasera de los botones de llamada j dejarán de parpadear. Repita la operación para todas las placas exteriores que desee reprogramar j y
k. Si se reprograman todas las placas exteriores, la configuración será la mostrada en la figura l.
Para salir de la reprogramación, pulse brevemente el botón PROG del alimentador m: los leds PROG y los leds de la retroiluminación de los botones se apagan.
Si no se efectúa ninguna operación, el proceso concluye automáticamente tras 30 minutos.
Programação do Tipo de Teclas. Na fase de “Programação das teclas de Chamada” a prima e mantenha premida a tecla PROG do alimentador até entrar no
processo de “Programação do Tipo de teclas” i. Prima uma das teclas de chamada das placas botoneiras a reprogramar, os leds da retroiluminação das teclas de
chamada j deixam de piscar. Repita a operação em todas as placas botoneiras a reprogramar j e k. No caso de efectuar a reprogramação de todas as placas
botoneiras a configuração será a ilustrada na figura l.
Para sair da reprogramação, prima brevemente a tecla PROG do alimentador m: os leds PROG e os leds da retroiluminação das teclas apagam-se. Na ausência de
qualquer manobra, o processo termina automaticamente após 30 minutos.
SW3
M2
M2
k
2 P.E
RESET
RESET
PROG
BOUT
M1
SW3
M2
PROG
PROG
M1
BOUT
PROG
PROG
PROG
beep
3 P.E
RESET
1 P.E
BOUT
M1
SW3
SW3
M2
M2
l
GW19301
A
PROG
<1’’
M1
m
L’acquisizione delle modifiche, in caso di aggiunta, sostituzione o rimozione di un posto esterno, avviene entrando nella fase “Programmazione Tipo dei Tasti” (da figura h-m).
When adding, replacing or removing an entry panel, the acquisition of the modifications is done during the phase “Programming key type” (figure h-m).
Die Erfassung der Änderungen im Falle von Hinzufügen, Auswechseln oder Entfernung einer Außenstation erfolgt durch Zugriff auf die Phase “Programmierung Tastenart” (Abbildungen h-m).
L’acquisition des modifications, en cas d’ajout, remplacement ou retrait d’un poste extérieur, s’effectue en entrant dans la phase “Programmation Type des Touches” (de figure h à m).
La adquisición de los cambios, en caso de adición, sustitución o eliminación de una placa exterior, se realiza entrando en la fase de “Programación del Tipo de los Botones” (figuras h a m).
A incorporação das alterações, no caso de adição, substituição ou remoção de uma placa botoneira, é efectuada entrando na fase “Programação do Tipo de Teclas” (na figura h-m).
25
IT
FR
- SCHEMI D’IMPIANTO
- SCHÉMAS D’INSTALLATION
EN
ES
A
1
1
DE
PT
- ANLAGENSCHALTPLÄNE
- ESQUEMAS DE INSTALAÇÃO
1
1
1
1
- SYSTEM DIAGRAMS
- ESQUEMAS DE INSTALACIÓN
2
2
2
2
1
1
2
2
GW19302
2
A
AESIS
AESIS
2
1
2
1
4
4
1
2
AL
–
+
2
VELIA
M1
M1
AL
–
+
B
B
M2
CL RES
SW4
M/S
MM
GW19305
SEC
230V
+ 18V –
230V
–
GW19306
18V +
PRI
SW0
1
SW3
1
SW2
OUT
50Hz 18V 10VA
4
SENA
+
2
SW4
3
IN
230V
M1
2
VELIA
M1
-
AL
–
+
B
B
+
-
BUS
AL
CL RES
CL.RES SKM
M/S
LOCAL
B-C
B
A
GW19302
+
–
A
M2
AESIS
M1
+
-
BOUT
M2
-
26
2
GW19301
44
AESIS
AESIS
NAXOS
2
GW19301
4
B
2
2
2
C
GW19302
2
4
C
A
GW19301
A
CN2
RS232
M1
AESIS
+12V
M1
+
-
+
-
BOUT
BIN1
BIN2
M2
BIN3
-
BOUT
-
12V
AESIS
AESIS
+
BOUT
-
M1
M1
+
-
BOUT
M2
M2
-
-
12V
12V
Distanze
Distances
Abstände
Distances
Distancias
Distâncias
GW19391
La
Lb
La+Le
≤100 m
Lb+Le
≤100 m
Distanze
Distances
Abstände
Distances
Distancias
Distâncias
La+Le+L1(L2, L3)
≤150 m
Lb+Le+L1(L2, L3)
≤150 m
≤150 m
Lc+Le
≤100 m
Lc+Le+ L1(L2, L3)
Ld+Le
≤100 m
Ld+Le+ L1(L2, L3)
≤150 m
Lf
≤25 m
La+Lb+Lc+Ld+
Le+L1+L2+L3
≤600 m
Distanze
Distances
Abstände
Distances
Distancias
Distâncias
2x2,5 mm2
Lc
Lf
≤60 m
Ld
GW19393
GW19306
L1, L2, L3
≤100 m
L1+L2+L3
≤300 m
GW19306
Le
Le
GW19301
L1
L2
L3
GW19302
Lf
27
Cod. 7.01.6.223.5
+39 035 946 111
8.30 - 12.30 / 14.00 - 18.00
lunedì ÷ venerdì - monday ÷ friday
24h
+39 035 946 260
[email protected]
www.gewiss.com
ULTIMA REVISIONE 02-2013
Ai sensi dell’articolo 9 comma 2 della Direttiva Europea 2004/108/CE e dell’articolo R2 comma 6 della Decisione 768/2008/CE si informa che responsabile dell’immissione del prodotto sul mercato Comunitario è:
According to article 9 paragraph 2 of the European Directive 2004/108/EC and to article R2 paragraph 6 of the Decision 768/2008/EC, the responsible for placing the apparatus on the Community market is:
GEWISS S.p.A Via A. Volta, 1 - 24069 Cenate Sotto (BG) Italy Tel: +39 035 946 111 Fax: +39 035 945 270 E-mail: [email protected]

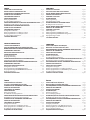


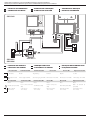
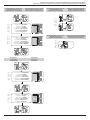
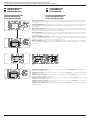
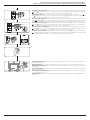
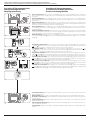
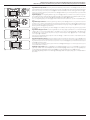
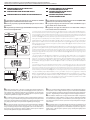
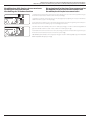


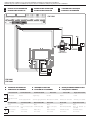
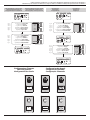
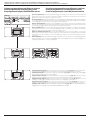
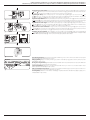
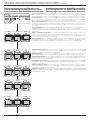
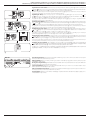
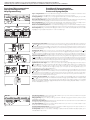
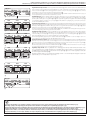
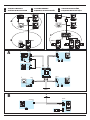
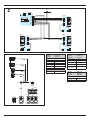


![004770261 [IT GB DE] Clemy v.112008.indd](http://vs1.manualzilla.com/store/data/006104403_1-1997af9356d214347c2fb950650381db-150x150.png)