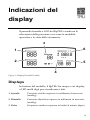
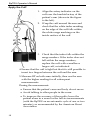
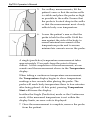
1
Manuale di istruzioni BpTRUl Il presente manuale è stato redatto per i dispositivi BpTRU™ Vital Signs Monitors (modelli BPM100, BPM200 e BPM300). BpTRU, il logo BpTRU e la collezione di questi marchi sono si proprietà della: BpTRU Medical Devices una Divisione di 0764509 B.C. Ltd. Tutti i diritti riservati. © Copyright 2007 BpTRU Medical Devices una Divisione di 0764509 B.C. Ltd. Tutti i diritti riservati. Manuale revisione: 6.1 Contenuto Introduzione ........................................................................1 Panoramica del prodotto........................................................... 1 BPM100 ................................................................................ 1 BPM200 ................................................................................ 2 BPM300 ................................................................................ 2 Informazioni di sicurezza .......................................................... 2 Indicazioni d’uso ................................................................... 2 Controindicazioni d’uso ......................................................... 3 Simboli di sicurezza e definizioni .......................................... 3 Avvertenze e precauzioni...................................................... 4 Avvertenze generali .................................................................. 4 Precauzioni generali ................................................................. 5 Indicazioni del Display .......................................................9 Displays .................................................................................... 9 Indicatori – tutti i modelli ..................................................... 10 Indicatori – BPM200 e BPM300 .......................................... 10 Indicatori – solo BPM300 ................................................... 10 Pulsanti............................ Errore. Il segnalibro non è definito. Pulsanti – tutti i modelli ....................................................... 11 Pulsanti – solo BPM300 ...................................................... 12 Toni audio............................................................................... 13 Misurazione della pressione arteriosa ............................15 Come ottenere misurazioni accurate ...................................... 16 Scelta delle dimensioni corrette del bracciale ..................... 16 Posizione corretta del paziente ........................................... 17 Applicazione del bracciale .................................................. 18 iii Manuale di istruzioni BpTRU Singola misurazione della pressione (modo Singolo) .............. 19 Rilevazione di una singola misurazione .............................. 19 Serie di misurazioni (modo Automatico).................................. 20 Resultati di una serie automatica di misurazioni ................. 22 Richiamo delle misurazioni ..................................................... 22 Richiamo misurazioni in modo Singolo ............................... 22 Richiamo misurazioni in modo Automatico.......................... 23 Annullamento modalità di stand-by ......................................... 23 Termometro (solo BPM300) .............................................25 Misurazioni orale e ascellare .................................................. 25 Preparazione della sonda ................................................... 25 Rilevazione della temperatura corporea.............................. 27 Misurazioni rettali.................................................................... 29 Ricerca problematiche .....................................................31 Guida alla ricerca delle problematiche .................................... 32 Errori di sistema (da E0 a E15) ............................................... 35 Analisi errori (da E20 a E27) ................................................... 37 Errori di temperatura (da E41 a E55) ...................................... 39 Errori di sistema non codificati ................................................ 41 Istruzioni di preparazione.................................................43 Esame del BpTRU prima dell’utilizzo ...................................... 43 Installazione del BpTRU ......................................................... 43 Collegamento dei bracciali ...................................................... 44 Collegamento del tubo a spirale.......................................... 44 Installazione della sonda di temperatura (BPM300) ................ 45 Alimentazione del BpTRU ....................................................... 45 Alimentazione del BPM100 ................................................. 45 Alimentazione del BPM200 e BPM300 ............................... 46 Gestione batteria ................................................................ 48 iv Sostituzione della batteria ................................................... 49 Funzioni di assestamento del BpTRU ..................................... 49 Manutenzione ....................................................................51 Frequenza cura ed ispezioni ................................................... 51 Ispezione ................................................................................ 52 Pulizia / Disinfezione............................................................... 53 Manutenzione ......................................................................... 54 Requisiti di immagazzinamento e smaltimento ....................... 54 Informazioni tecniche .......................................................57 Specifiche: BPM100 ............................................................... 57 Specifiche: BPM200 ............................................................... 59 Specifiche: BPM300 ............................................................... 61 Standards ............................................................................... 63 Informazioni Marchio CE ........................................................ 64 Guida e dichiarazione CEM .................................................... 65 Modalità tecniche operative .................................................... 70 Modalità Avviso/Silente pressione ...................................... 70 Modalità valori nascosti ...................................................... 71 Calibrazione punto zero pressione ..................................... 71 Manometro di riferimento per il controllo di calibrazione...... 72 Modalità Avviso/Silente temperatura (BPM300) .................. 73 Modalità temperatura Celsius/Fahrenheit (BPM300)........... 74 Controllo calibrazione temperature (BPM300) .................... 74 Modalità connessione USB (modelli BPM200 e BPM300) .. 75 Accessori ...........................................................................77 Bracciali misurazione pressione e loro dimensioni .................. 77 Accessori e alimentazione ...................................................... 78 Bracciali e tubi .................................................................... 78 Sonde temperatura e coprisonda ........................................ 78 v Manuale di istruzioni BpTRU Installazione accessori ........................................................ 78 Specifiche alimentazione .................................................... 78 Informazioni utilizzatore .......................................................... 80 Garanzia .............................................................................81 Garanzia limitata..................................................................... 81 ESCLUSIONI: ......................................................................... 82 Registrazione garanzia ........................................................... 83 Indice .................................................................................85 vi Introduzione Congratulazioni per aver acquistato il vostro Monitor dei parametri vitali BpTRU. Panoramica del prodotto BpTRU è un misuratore automatico non invasivo della pressione arteriosa (con rilevazione opzionale della temperatura), progettato specificamente per la cura primaria. Misura i valori di pressione sistolica e diastolica e la frequenza cardiaca. Non richiede la calibrazione manuale. La modalità Automatica brevettata aumenta l’accuratezza delle rilevazioni della pressione arteriosa mediante il calcolo del valore medio di misure multiple, che riduce l’effetto Ipertensione clinica isolate (Ipertensione da camice bianco). BPM100 Il modello BPM100 ha le seguenti caratteristiche: Applicazione a parete per garantire stabilità o da tavolo Tre tipi di bracciali disponibili (pediatrico, per adulti e obesi) Intervalli di misura selezionabili da 1 a 5 minuti per rilevazioni multiple in modalità Automatica Calibrazione continua e automatica del punto zero, garantisce che lo strumento fornisce sempre rilevazioni accurate della pressione Pressurizzazione automatica a 180 mmHg per la prima misura e sgonfiaggio lineare 1 Manuale di istruzioni BpTRU BPM200 Il modello BPM200 ha le seguenti caratteristiche (in aggiunta a quelle del modello BPM100): Batteria ricaricabile con protezione dal versamento di acido Applicazione su stativo a rotelle, da parete o da tavolo Porta USB per trasferimento dei dati a dispositive elettronici BPM300 Il modello BPM300 ha le seguenti caratteristiche (in aggiunta a quelle del modello BPM300): Singola misurazione di temperatura (predittiva) orale ed ascellare in 15 secondi Misurazione continua di temperatura orale, rettale ed ascellare continua da 3 a 4 minuti Dotato di sonda di temperatura e suo contenitore Informazioni di sicurezza Questa sezione descrive le indicazioni d’uso, le controindicazioni, i simboli di sicurezza, avvertenze generali e precauzioni che si dovrebbero tenere utilizzando il BpTRU. Indicazioni d’uso Il BpTRU misura la pressione sistolica e diastolica e la frequenza cardiaca in soggetti da 3 anni di età a salire. Il BPM300 misura la temperatura in soggetti da 3 anni di età a salire. Il BpTRU si intende per l’utilizzo nello studio medico, in area infermieristica cura del paziente in ospedali. Il BpTRU deve essere utilizzato esclusivamente da medici, personale paramedico o professionisti opportunamente istruiti. 2 Introduzione Controindicazioni d’uso Il BpTRU non è stato progettato per l’utilizzo su neonati, infanti o bambini con meno di 3 anni di età. Il BpTRU non è stato progettato, venduto o realizzato con scopi diversi da quelli precedentemente indicati. Simboli di sicurezza e definizioni I simboli di sicurezza che si trovano nell’etichetta nella parte posteriore ed inferiore del monitor BpTRU e nel suo manuale di istruzioni, hanno le seguenti definizioni: Conforme agli standard CSA inerenti i dispositivi elettromedicali per il mercato canadese e statunitense, con specifici standard elencati nel simbolo a fianco. Il marchio CE di questo prodotto indica che è stato testato in conformità alle norme previste dalla Direttiva CEE 93/42/, Allegato II, inerente i Dispositivi Medici. Dispositivo elettrico di Classe II. Parte applicata di Tipo BF, significante che il monitor è protetto dalla scarica del defibrillatore. Dopo l’esposizione al voltaggio del defibrillatore, il BpTRU continuerà regolarmente nelle sue funzioni. Non è necessario nessun tempo di ripristino. Attenzione. Consultare la documentazione allegata per ulteriori informazioni. Simbolo di alimentazione, indicante la corrente diretta DC con le specifiche polarità che deve essere utilizzata con il BpTRU. Solamente l’alimentazione specificata deve essere utilizzata con il monitor. Dispositivo malfunzionante. Consultare le sezioni Messaggi di Errore e Ricerca problematiche. 3 Manuale di istruzioni BpTRU Avvertenze e precauzioni AVVERTENZA Le avvertenze contengono istruzioni specifiche per prevenire gravi lesioni o morte del paziente o dell’operatore. PRECAUZIONE Le precauzioni contengono istruzioni specifiche per prevenire lesion minori al paziente, all’operatore o danni allo strumento. Avvertenze generali AVVERTENZA E’ necessario leggere attentamente ed avere familiarità con le istruzioni operative prima di utilizzare il monitor. AVVERTENZA Un uso prolungato, eccessivo o non corretto del BpTRU potrebbe portare a lesion dei tessuti, stasi venosa e may lead to tissue injury, venous pooling, and impedimenti alla circolazione del sangue nell’arto del paziente. AVVERTENZA Il bracciale per la misura della pressione non deve essere utilizzato sullo stesso arto dove sono presenti fistole o altri dispositivi medici che influiscono sul sistema circolatorio distale dal bracciale. AVVERTENZA L’incorretto inserimento della sonda rettale di temperatura può perforare l’intestino del paziente. 4 Introduzione AVVERTENZA Nei bambini inserire la sonda di temperatura non oltre 1.5 cm nello sfintere. AVVERTENZA Non utilizzare un utensile metallic per installare o rimouvere la batteria. Il terminale potrebbe portare ad un corto circuito o un rischio per la sicurezza elettrica AVVERTENZA La sostituzione di component quali bracciale, sonda di temperature o del fodero della sonda con pezzi non originali potrebbero causare misure inaccurate. Precauzioni generali PRECAUZIONE Evitare compressioni o strozzature del tubo a spirale, che potrebbero determinare restrizioni durante la pressurizzazione e lo sgonfiamento del bracciale e causare danni meccanici al tubo. PRECAUZIONE Danni fisici significanti al BpTRU potrebbero portare a risultati inaccurate o anche a lesioni. PRECAUZIONE Prestare attenzione quando si sposta il BpTRU per evitare il rischio di caduta che potrebbe causare lesion. 5 Manuale di istruzioni BpTRU PRECAUZIONE Non utilizzare il monitor se ci sono evidenze di qualsasi danno elencato nel capitolo “Ispezioni” a pagina 52. Sostituire le parti danneggiate o gli accessori è d’obbligo per un corretto funzionamento del monitor. PRECAUZIONE Umidità eccessisa o l’immersione del BpTRU e dei suoi accessory in un liquido, possono causare rischi per la sicurezza elettrica o il blocco dei connettori e del tubo. Non tentare di utilizzare il monitor senza permettere un tempo sufficiente di asciugatura. PRECAUZIONE Se necessario pulire la batteria, utilizzare solamente un panno secco. Non utilizzare fluidi. PRECAUZIONE Il BpTRU ed i suoi accessori non sono stati realizzati per essere sterilizzati in autoclave. L’ autoclave danneggerà irreparabilmente monitor e accessori. PRECAUZIONE L’utilizza di un alimentatore diverso da quello provvisto con il BpTRU può danneggiare il monitor e provocare misurazioni inaccurate. PRECAUZIONE L’utilizzo di accessori, trasduttori e cavi differenti da quelli specificati, può aumentare le emissioni EMF o diminuire l’immunità del sistema alle EMF con l’ambiente circostante. 6 Introduzione PRECAUZIONE Quando si utilizza lo stativo a rotelle opzionale, assicurasi che il BpTRU e gli accessori siano installati in accordo alle istruzioni fornite con lo stativo, per assicurare stabilità. Se si utilizza uno stativo alternativo, assicurarsi che il BpTRU e i suoi accessori siano sufficentemente stabili oscillando il sistema di 10° dalla verticale. Se sistema ritorna nella posizione originale significa che è sufficinentemente stabile.. PRECAUZIONE L’utilizzo delle batterie oltre la durata raccomadata può danneggiare il dispositivo BpTRU. 7 Manuale di istruzioni BpTRU 8 Indicazioni del display Il pannello frontale a LED del BpTRU visualizza le rilevazioni della pressione cosi come la modalità operative e lo stato dello strumento. 3 1 6 2 5 4 Figura 1: Display Pannello Frontale Displays In fuzione del modello, il BpTRU ha cinque o sei display a LED multi digit per visualizzare i dati. 1. Systolic Pressione sistolica espresso in millimetri di mercurio (mmHg). 2. Diastolic Pressione diastolica espresso in millimetri di mercurio (mmHg). 3. Pulse Frequenza cardiaca espressa in battiti al minuto (bpm). 9 BpTRU Operator’s Manual 4. Reading Indica quale misurazione è visualizzata nei display della sistolica, diastolica e frequenza cardiac. Un numero indica che è visualizzato sul display il risultato di una msirua in modalità singola o automatica. Cioè, se tre misurazioni della pressione sono state rilevate, il display Reading mostra “3” e gli altri display mostreranno il risultato dell’ultima rilevazione. “A” indica il valore medio di una serie di misura ottenute in modalità automatica. . 5. Cycle “SP” (Singola Pressione) indica che il BpTRU sta oeprando in modalità Manuale. Un numero da 1 a 5 indica l’intervallo tra le misure (in minuti) durante la modalità Automatica. 6. Temperature Visualizza il valore della misura di temperatura (solo BPM300). Il BpTRU ha, in aggiunta, diversi piccoli indicatori a LED che visualizzano la modalità operative e lo stato dello strumento. Indicatori – tutti i modelli Dispositivo malfunzionante (vedere “Errori di sistema non codificati” a pagina 41) Indicatori – BPM200 e BPM300 Batteria in carica Batteria scarica Indicatori – solo BPM300 Gradi Celsius Gradi Fahrenheit Modalità Singola (Predittiva) misura di temperatura Modalità Continua misura temperatura Modalità Orale di misura temperatura Modalità Ascellare di misura temperatura Modalità Rettale di misura temperatura 10 Display Reference Pulsanti Pulsanti del pannello frontale di controllo del BpTRU. Figura 2: Pulsanti Pannello Frontale Pulsanti – tutti i modelli Start Avvia la misura della pressione arteriosa. Il bracciale si gonfierà. Stop Ferma la misura in corso e sgonfia il bracciale (una misura automatica può essere riavviata premendo il pulsante Start). Pausa tra le misure nella modalità automatic (riavvio premendo il pulsante Start). Clear Cancella la memoria delle misure memorizzate sia in modalità Singola che Automatica. La memoria deve essere cancellata prima che una nuova serie di misurazioni abbia inizio o quando si passa dalla modalità Singola a quella Automatica. 11 BpTRU Operator’s Manual Review Richiamo e visualizzazione misure memorizzate. In modalità Automatica, è possibile rivedere le misure memorizzate e loro valore medio quando la serie di rilevazioni è complete. E’ possibile inoltre richiamare eventuali misure sospese premendo il pulsante quando una serie di misure è in corso (riavvio premendo il pulsante Start). In modalità Manuale è possible rivedere tutte le misure memorizzate (fino ad un massimo di of 99 rilevazioni). Cycle Selezionare la modalità operativa (Singola o Automatica) e, in modalità Automatica, l’intervallo di tempo delle misurazioni. Per ulteriori informazioni vedere la descrizione del a pagina 10 Pulsanti – solo BPM300 Mode Selezione della modalità operativa di misura temperatura. • Singola-orale ( ) • Singola-ascellare ( • Continua-orale ( • Continua-ascellare ( ) ) ) Il pulsante Mode, in aggiunta, cancella il display della temperatura (Temperature). Temperature Start Inizia entrambe le misure di temperatura, singola e continua. Premendo il pulsante Temperature Start è inoltre possibile fermare entrambe le misure di temperature in corso, singola e continua. 12 Display Reference Toni Audio Il BpTRU emette dei toni audio per indicare determinate condizioni operative o funzioni, come descritto nella seguente tabella. (Per disabilitare i suoni, vedere la sezione “Modalità Avviso/Silente pressione” a pagina 70.) Tono Audio Significato 3 suoni brevi seguiti da 1 suono Suoni attivati quando il BpTRU prolungato si inizializza all’accensione. 1 tono prolungato La serie di 6 misurazioni della pressione è completa. Una misura di temperatura singolapredittiva è completa (solo BPM300). 2 suoni brevi ogni 30 secondi La carica della batteria è bassa. 2 suoni brevi L’alimentazione a rete è disconnessa. Il BpTRU sta ora lavorando alimentato a batterie. 1 tono breve L’alimentazione a rete è connessa. Il BpTRU non è più alimentato a batterie. Il BpTRU emette inoltre toni audio che indicato determianti errori di sistema, come descritto nella seguente tabella. Tono Audio Codice Errore 3 suoni E3, E4, E5, E6, E7, E9 ed E13 3 suoni, seguiti da pausa di 3 secondi, quindi altri 3 suoni (la situazione continua fino a quando non si rimuove l’errore) E2, E10, E11, E12 Per la descrizione dei codici di errori, fare riferimento a o “Guida alla ricerca delle problematiche” a pagina 32. 13 BpTRU Operator’s Manual 14 Misura della pressione arteriosa Il BpTRU può rilevara una misura di pressione arteriosa singola oppure una serie di misure automaticamente. Per informazioni su come ottenere una misura di pressione accurata, consultare “Come otterere misurazioni accurate” a pagine 16. Per rilevare una singola misura fare riferimento a “Singola misurazione della pressione (modalità Singola)” a pagina 19. Per misurazione multiple della pressione, fare riferimento a “Series of Measurements (Automatic Mode)” a pagina 20. Per rivedere To review separate measurements in Manual mode or to review the individual readings taken in Automatic mode, refer to “Reviewing Measurements” on page 22. Reviewing the individual readings for a patient allows the clinician to note the high and low readings for systolic and diastolic blood pressure and pulse rate, as well as assess any trending in the individual readings or error codes. WARNING Warnings contain instructions to prevent serious injury or death of the patient or operator. NOTE Initiate rapid deflation of the cuff at any time by pressing the Stop button or turning off the power. 15 BpTRU Operator’s Manual WARNING Prolonged, excessive, or incorrect use of the BpTRU may lead to tissue injury, venous pooling, and impairment of circulation in the arm of the patient. If the low-battery indicator appears, a maximum of 20 blood pressure measurements may be taken before the BpTRU prevents further operation. Plug the BpTRU into a wall outlet to charge the battery. Note that it is still possible to perform measurements while the battery is charging. To allow auto-calibration to complete, wait at least 5 seconds after turning on the monitor before pressing the BP Start button. Obtaining Accurate BP Measurements Careful patient treatment and use of the BpTRU will result in more accurate blood pressure measurements. Select an Appropriate Size of Cuff The BpTRU may not provide accurate readings if you use the wrong size of cuff. The five available cuff sizes are listed below, with the range of arm circumferences appropriate for each. The child and extra-large adult sizes may be ordered separately. 16 Child 1318 cm Small adult 1826 cm Regular adult 2634 cm Large adult 3243 cm Extra-large adult 4152 cm Display Reference Position the Patient Carefully 1. Ensure that the patient avoids smoking or caffeine for at least one hour before test. 2. Ensure that the patient is comfortable and relaxed, either sitting or lying down. The position shown in the illustration below is ideal. 3. Ensure that the upper arm is at heart level and supported. Cuff Selection and Placement Ensure cuff index line is within cuff range markers when wrapped around the upper arm. Proper Patient Position Cuff at heart level, back and arm supported, feet flat on floor. Stay still during Measurements. Relax. At your discretion, BP can be taken while lying down or standing. 17 BpTRU Operator’s Manual Apply the Cuff 1. Align the artery indicator on the cuff over the brachial artery of the patient's arm (shown in the figure to the left). 2. Wrap the cuff around the arm and check that the white index marking on the edge of the cuff falls within the white range markings on the inside surface of the cuff. 3. Check that the index falls within the range markers. If the index does not fall within the range markers, replace the cuff with a smaller or larger cuff, as indicated. 4. Ensure that the cuff is tight but that it is still possible to insert two fingers between the cuff and the arm. 5. Measure BP on both arms initially, then use the arm with the higher reading for all subsequent measurements. During the measurement: Ensure that the patient’s arm and body do not move. Avoid talking to other people in the room. To improve the accuracy of the results, leave the patient alone in a room for the full six measurements (with the BpTRU on an automatic cycle of one or two minutes), as recommended by the American Heart Association. 18 Display Reference Single BP Measurements (Single Mode) This section describes how to obtain a single blood pressure measurement. Begin by positioning the patient and attaching the cuff as described in “Obtaining Accurate BP Measurements” on page 16. WARNING The blood pressure cuff should not be used on the same arm as an IV or any other medical equipment that relies on the circulatory system distal to the cuff. CAUTION Avoid compressing or restricting the coiled tubing, which may restrict inflation or deflation of the cuff and cause mechanical failure of the tubing. Take the Single BP Measurement 1. Press Clear to ensure that any previous measurements are cleared from the BpTRU’s memory. 2. Select Manual mode by pressing the Cycle button until “SP” is displayed in the Cycle display. 3. Initiate a single blood pressure measurement by pressing the BP Start button. The cuff will inflate to the 180 mmHg pressure level, and then may inflate by 30 mmHg increments as required to obtain an accurate BP result. During inflation and deflation, the Systolic display indicates the cuff pressure. 19 BpTRU Operator’s Manual NOTE Initiate rapid deflation of the cuff at any time by pressing the Stop button or turning off the power. It is important for the patient to remain still and not talk during inflation and deflation of the cuff. Once the measurement is complete, the cuff quickly deflates and the Systolic, Diastolic, and Pulse displays show the appropriate readings. You can initiate the next measurement in Manual mode by pressing the BP Start button again. Wait five seconds after the completion of a measurement before pressing the BP Start button to allow circulation in the patient’s arm and to allow the cuff to fully deflate. The BpTRU will not start a new measurement until the cuff is fully deflated. Series of Measurements (Automatic Mode) Automatic mode performs a series of six blood pressure measurements, discarding the first and averaging the remaining five. The interval between measurements is 1, 2, 3, 4, or 5 minutes, depending on your selection. Individual readings are displayed after each measurement, and the individual and averaged readings can be reviewed during or after the series of measurements (refer to “Reviewing Measurements” on page 22). 1. Select a cuff that is appropriate for the patient. Refer to “Select an Appropriate Size of Cuff” on page 16 2. Apply the cuff to the patient. Refer to “Position the Patient Carefully” on page 17 and “Apply the Cuff” on page 18. 20 Display Reference WARNING The blood pressure cuff should not be used on the same arm as an IV or any other medical equipment that relies on the circulatory system distal to the cuff. 3. Press Clear to ensure that any previous measurements are cleared from the BpTRU’s memory. 4. Select Automatic mode by pressing the Cycle button until the cycle time you want (i.e., the interval between BP measurements) shows in the Cycle display. (“SP” indicates a single measurement.) 5. Initiate the series of measurements by pressing the BP Start button. During each measurement, the cuff will inflate to the minimum required preset pressure level. While inflating and deflating, the Systolic display indicates the cuff pressure. NOTE Initiate rapid deflation of the cuff at any time by pressing the Stop button or turning off the power. It is important for the patient to remain still and not talk during inflation and deflation of the cuff. During the series of measurements, the Reading display shows the number of the measurement currently being taken. The most recent Systolic, Diastolic, and Pulse measurements are shown in the respective displays until the next measurement begins. If you select a one or two minute cycle time and the patient’s blood pressure is high, any individual measurement may take longer than one or two minutes. 21 BpTRU Operator’s Manual The BpTRU will not begin a new measurement until the cuff is fully deflated from the previous measurement. Results of an Automatic Series of Measurements The BpTRU performs the following actions at the completion of six measurements. A tone sounds (unless the tone has been disabled as described in “Technical Modes of Operation” on page 70). The results of the last measurement are displayed for five seconds, while the Reading display shows “6.” After five seconds, the average of the last five Systolic, Diastolic, and Pulse measurements is shown in the respective display, while the Reading display shows “A” (for average). The first measurement is always discarded from the average as it is often elevated due to patient stress (white-coat effect). If an error code is displayed for any measurement, that measurement is not included in the average. The average can be computed from less than five measurements. Reviewing Measurements Use the Review button to review previous measurements. Review Measurements in Single Mode In Manual mode you can review previous manual measurements by pressing the Review button. The Review button cycles through all measurements taken since Manual mode was invoked, or since the last time the Clear button was pressed (up to a maximum of 99 previous measurements). Pressing the Review button during a measurement has no effect. 22 Display Reference Review Measurements in Automatic Mode Upon completing a series of measurements in Automatic mode, you can review each measurement in the series by pressing the Review button. (You cannot review the first measurement of the series because it is always discarded.) As the result of each reading is shown, the reading number (“2” through “6”) is shown in the Reading display. The value “A” in the Reading display indicates that the average of the last five readings is being shown. If you press the Review button between measurements during an automatic series of measurements, the BpTRU suspends measurement. You can then cycle through the measurements taken to that point using the Review button. Press the BP Start button to resume the automatic series. Pressing the Review button during a measurement has no effect. Recovering from Sleep Mode The BpTRU will enter sleep mode if left idle for 10 minutes. All displays will go blank. If the displays are blank, press any button to reenter the normal operating mode. All the data stored in memory is still available and can be viewed using the Review button. Recorded measurements are only lost when the Clear button is pressed or power is turned off. 23 BpTRU Operator’s Manual 24 Thermometry (BPM300 Only) The BPM300 model can perform oral or axillary temperature measurements either in Single (Predictive) mode or in Continuous mode. It can also perform rectal temperature measurements in Continuous mode. Two different temperature probes are available: a blue probe for oral and axillary measurements and a red probe for rectal measurements. The BpTRU automatically recognizes which probe is attached and adjusts its functions accordingly. For oral or axillary measurements, refer to “Oral or Axillary Measurements” on page 25. For rectal measurements, refer to “Rectal Measurements” on page 29. If the low-battery indictor appears, a maximum of 20 single temperature measurements may be taken before the BpTRU prevents further operation. Plug the BpTRU into a wall outlet to charge the battery. Note that it is still possible to perform measurements while the battery is charging. Oral or Axillary Measurements This section describes the use of the BPM in making Oral or Axillary measurements. Prepare the Probe Use only approved BpTRU Disposable Temperature Probe Sheaths with the BpTRU. Use of a sheath from another manufacturer may result in error messages or erroneous results. Sheaths are single-use only. 25 BpTRU Operator’s Manual 1. Connect a blue temperature probe to the BpTRU if it is not already connected. 2. Take a disposable probe sheath from the packaging box. 3. Separate the tabs on the sheath and insert the probe. 4. Slide the full length of the probe into the sheath. 5. Hold the sheath tab and the probe with one hand and, while twisting, pull the probe and sheath out of the packaging. 6. Check that the sheath fully covers the probe and is secure. If not, discard the sheath and repeat the steps above. 26 Display Reference Taking a Temperature Measurement 1. Ensure that the patient is comfortable and relaxed. 2. Use the Mode button to cycle through the temperature measurement modes until the desired mode is selected and indicated on the front panel as: • single-oral ( ) • single-axillary ( ) • continuous-oral ( ) • continuous-axillary ( ) 3. Press the Temperature Start button to begin the temperature measurement. The progress indicators in the Temperature display will begin to flash. 4. For oral measurements, insert the probe tip into the patient’s mouth and carefully slide the probe under the tongue into either sublingual pocket. Fahrenheit Celsius 96.8 36.0 97.4 36.3 98.0 36.7 98.4 36.9 It is important to press the Temperature Start button before inserting the probe, and to ensure that the probe does not contact any other surface before it is placed in the patient’s mouth. To obtain an accurate measurement: Ensure that the temperature probe is correctly positioned in the sublingual pockets of the patient’s mouth. The temperature within the mouth can vary by 2 °F (1 °C). Ensure that the patient’s mouth is closed to minimize air currents across the probe. 27 BpTRU Operator’s Manual 5. For axillary measurements, lift the patient’s arm so that the entire axilla is visible and place the probe as high as possible in the axilla. Ensure that the probe is located deep in the axilla so that the measurement most closely reflects body core temperature. 6. Lower the patient’s arm so that the probe is held in the axilla. Hold the arm against the side of the body to ensure minimal movement of the temperature probe and to ensure minimal air currents across the probe. A single (predictive) temperature measurement takes approximately 15 seconds from the point of tissue contact. At the completion of the measurement, a tone sounds and the measurement shows in the Temperature display. When taking a continuous temperature measurement, the Temperature display begins to show temperature readings a few seconds after placing the probe. The probe will reach body temperature three to four minutes after being placed. At this point, pressing Temperature Start will freeze the display. In either the Single (Predictive) mode or the Continuous mode, if the measured temperature is not within the display limits, an error code is displayed. 7. Once the measurement is complete, remove the probe from the patient. 28 Display Reference NOTE When removing the probe, hold the cover to the probe by the arrow tab to ensure that the cover is removed with the probe. 8. Remove the probe sheath by holding the arrow tab and pulling out the probe. 9. Place the used probe sheath into a biohazards waste receptacle. Rectal Measurements This section describes rectal measurement, which can only be made in Continuous mode. 1. Prepare and sheath the probe as described in “Prepare the Probe” on page 25. 2. Ensure that the patient is lying comfortably on his or her side. 3. Press the Temperature Start button to begin the continuous temperature measurement. The progress indicators in the Temperature display will begin to flash. 4. Separate the buttocks with one hand and gently insert the rectal temperature probe a maximum of 1.5 cm inside the rectal sphincter using the other hand. Use a lubricating jelly on the temperature probe sheath to ease insertion, if necessary. Tilt the temperature probe until the tip is touching tissue. WARNING Incorrectly inserting the temperature probe can perforate the bowel of the patient. 29 BpTRU Operator’s Manual WARNING For children, insert the temperature probe less than 1.5 cm inside the rectal sphincter. The Temperature display begins to show temperature readings a few seconds after placing the probe. If the measured temperature is not within the display limits then an error code is displayed. The probe reaches body temperature three to four minutes after being placed. 5. Press the Temperature Start button to freeze the display. 6. Once the measurement is complete, remove the probe from the patient. NOTE When removing the probe, hold the cover to the probe by the arrow tab to ensure that the cover is removed with the probe. 7. Remove the probe sheath by holding the arrow tab and pulling out the probe. 8. Place the used probe sheath into a biohazards waste receptacle. 30 Troubleshooting This chapter describes all of the system errors that the BpTRU may report, and gives troubleshooting information for other problems you could encounter. For general troubleshooting, refer to “Troubleshooting Guide” on page 32. For error codes E0 through E15, refer to “BP System Errors (E0 to E15)” on page 35. For error codes E20 through E27, refer to “BP Analysis Errors (E20 to E27)” on page 37. For error codes E41 through E55, refer to “Temperature Errors (E41 to E55)” on page 39. If your BpTRU has made a five-second alarm tone and displayed the (device malfunction) indicator, refer to “Unrecoverable System Errors” on page 41. If the troubleshooting information in this manual does not solve your problem, contact your distributor or BpTRU Customer Support. 31 BpTRU Operator’s Manual Troubleshooting Guide Symptoms Possible Causes Corrective Actions Power is on (green indicator light is on) but BP Start button does not initiate inflation. BpTRU is in Automatic mode and six readings have already been taken. Press Clear to clear the memory and then press BP Start to initiate a new BP measurement. Cuff pressure from Check pressure in previous measurement system if the problem not yet fully released. persists. Perform a BP Zero Calibration Check (page 71) or BP Reference Gauge Calibration Check (page 72). Zero pressure calibration not complete. Wait 5 seconds and push the BP Start button again. Power is on (green indicator light is on), but displays are all blank. BpTRU is in sleep mode. Press any button to restore the display. Power is on (green indicator light is on) and device malfunction LED is displayed ( ). Unrecoverable system Turn power off and error has occurred. ensure cuff is deflated. Turn power on again. Refer to “Unrecoverable System Errors” on page 41. Power is on (green indicator light is on) but there is only a dash (-) in the left digit of the Cycle display. BpTRU is in hide mode. Refer to “BP Hide Mode” on 32 page 71. Turn the BpTRU off if it is on. Hold down the Cycle button while turning the BpTRU on again. Display Reference Symptoms Possible Causes Corrective Actions Power is on and E15 Battery is low. displays when BP Start or Temperature Start button is pressed. Plug BpTRU into a wall outlet to charge the battery. Monitor turns off automatically and cannot restart when power applied. Blown fuse. Contact BpTRU Customer Support. No power (green indicator light is off). Power supply is not plugged into wall outlet. Plug power supply into wall outlet. Power supply is not plugged into BpTRU. Plug power supply into BpTRU. Wall outlet is not powered. Have qualified technician inspect wall outlet and power breaker. Battery is fully discharged. Plug BpTRU into wall outlet to charge the battery. Power supply is plugged in properly and power indicator light does not turn on with power switch. Have qualified technician inspect output of power supply. Undetermined causes. Contact BpTRU Customer Support. All displays remain lit BpTRU is not on power up. powered down properly. Turn power off, wait 10 seconds, and turn power on again. 33 BpTRU Operator’s Manual Symptoms Possible Causes Corrective Actions Buzzer does not sound BpTRU is set to BP at end of sixth Silent mode. measurement in Automatic mode. Exit BP Silent mode by turning off power and then holding Stop button down while turning power back on. Buzzer does not sound BpTRU is set to at end of single Temperature Silent temperature mode. measurement. Exit Temperature Silent mode by turning off power and then holding Temperature Start button down while turning on monitor. Cuff does not inflate during operation. Cuff or tubing is not attached properly. Check all cuff and tubing connectors for tightness. Perform a BP Zero Calibration Check (page 71) or BP Reference Gauge Calibration Check (page 72). Leakage in cuff or tubing. Check cuff and tubing for cracks and tears which may lead to leakages Perform a BP Zero Calibration Check (page 71) or BP Reference Gauge Calibration Check (page 72). Internal leakage. Contact BpTRU Customer Support. 34 Display Reference Symptoms Possible Causes Corrective Actions Systolic display shows software version number (e.g., 1.53) and Pulse and Reading displays show varying numbers. BpTRU is set to BP Zero Calibration Check or BP Reference Gauge Calibration Check. Exit BP Zero Calibration Check or BP Reference Gauge Calibration Check by turning power off and then on again. Monitor enters lowInsufficient charging. power state often or turns off automatically End of battery life ( BPM200 & BPM300). Charge battery for 12 hours. Battery charging End of battery life. indicator remains on for longer than 24 hours during charging. Replace battery. Replace battery (part # BPM20036). BP System Errors (E0 to E15) If a BP system error occurs during operation, an error code will be displayed in the Systolic display only. All other displays remain blank. Press the BP Start button to resume measurements. Code Description Corrective Action ___ User-cancelled measurement. None required. E0a Too few pulses detected. Check patient for pulse. Tighten cuff on arm and check BpTRU for leaks in tubing or cuff. E07 Loss of calibration data. Contact BpTRU Customer Support. 35 BpTRU Operator’s Manual E1 a Excessive motion artifacts (motion induced errors). Ensure that patient is sitting quietly and the cuff and upper arm are comfortably elevated to the level of their heart in order to reduce motion artifacts during measurement. E2 Cuff overpressure. Ensure that patient is sitting quietly to reduce motion artifacts during inflation. Ensure that cuff is applied properly and tubing is not kinked. E3 Inflation too slow. Check cuff and tubing for leaks due to cracks and tears. Check connections for tightness. E4 Inflation too fast. Check cuff and tubing for kinks. E5 Deflation too slow. Check cuff and tubing for kinks. E6 Deflation too fast. Check cuff and tubing for leaks due to cracks and tears and connectors for tightness. E7 Pressure offset calibration not complete. E7 will occur if you press BP Start while the BP Zero Calibration Check is still in progress. Wait for the E7 error code to disappear (typically less than 5 seconds) and push the BP Start button again. If the E7 error code occurs when you have not pressed BP Start, or if it does not disappear, contact BpTRU Customer Support. E8 a Low pulse amplitude. Check patient for pulse. Tighten cuff on arm and check BpTRU for leaks in tubing or cuff. E9 Vacuum detected. Push Clear button. Disconnect cuff and wait 15 seconds before reconnecting. Perform zero-offset check. 36 Display Reference E10 Cuff over 300 mmHg for more than 5 seconds. Ensure patient is sitting quietly to reduce motion artifacts during inflation. Check cuff and tubing for kinks. E11 Cuff pressurized for Check cuff and tubing for leaks due more than 130 seconds. to cracks and tears. Check connectors for tightness. Check cuff and tubing for kinks. E12 Automatic cycling timing violation. Check cuff and tubing for kinks. E13 Device reset. Readings in memory, if any, are available for review. Check monitor environment for electromagnetic interference (ESD, power interruptions). Connect USB cable between measurements or when monitor is powered off. E14 Data corrupted after reset. Power the BpTRU off, wait 5 seconds and power on again. E15 Low battery Charge the battery a. In Automatic mode these errors are recorded in memory and measurements continue. The measurement on which the error was detected is not included in the average of measurements displayed at the end of the series of measurements. BP Analysis Errors (E20 to E27) If an analysis error occurs in the determination of any BP reading, an error code is displayed in the corresponding display. All other valid readings are still displayed in the corresponding displays. If an analysis error occurs during Automatic mode, the error code is stored in memory and the series automatically continues until six measurements are taken. 37 BpTRU Operator’s Manual Pressing the Review button shows error codes in the appropriate display (Systolic, Diastolic, or Pulse) for each reading where an error was detected. The averages for systolic blood pressure, diastolic blood pressure, and pulse rate exclude all results for any of the readings where an error was detected. Code Description E20 Indeterminate systolic Check patient for pulse. Tighten cuff blood pressure (likely on arm and check BpTRU for normal due to inadequate inflation pressures. inflation threshold). E21 Indeterminate diastolic pressure (premature deflation, excessive motion artifacts, or diastolic below 40 mmHg). Check patient for pulse. Tighten cuff on arm, check for leaks in tubing or cuff, and ensure that patient is sitting quietly with arm comfortably elevated to level of heart to reduce motion artifacts during measurement. E22 Indeterminate pulse rate. Check patient for pulse. Tighten cuff on arm, check for leaks in tubing or cuff, and ensure that patient is sitting quietly with arm comfortably elevated to the level of heart to reduce motion artifacts during measurement. E23 Systolic blood pressure Check patient manually for blood under-range (<60 pressure and pulse. mmHg). E24 Diastolic blood pressure under-range (<40 mmHg). E25 Systolic blood pressure Check patient using auscultation for over-range (>250 blood pressure and pulse. mmHg). E26 Diastolic blood pressure over-range (>160 mmHg). 38 Corrective Action Check patient manually for blood pressure and pulse. Check patient using auscultation for blood pressure and pulse. Display Reference Code Description Corrective Action E27 Arithmetic overflow in Repeat measurement. data calculation. After a BP analysis error, the corrective action should allow a return to normal operation for the next measurement. If the problem persists, discontinue use and return the monitor for servicing. Temperature Errors (E41 to E55) These error codes only apply to the BPM300. If a temperature error occurs during any temperature measurement, an error code will be displayed in the Temperature display. Code Description Corrective Action E41 Continuous temperature over display limit (>43 °C) Check monitor against reference thermometer in water bath at 43 °C to ensure monitor is working properly. E42 Continuous temperature under display limit (<28 °C) Check monitor against reference thermometer in water bath at 28 °C to ensure monitor is working properly. E43 No temperature probe Attach temperature probe and repeat connected measurement. E44 Timeout on single temperature measurement Allow probe to cool to room temperature for 34 minutes, press Temperature Start, and then repeat measurement. E45 Continuous measurement temperature circuitry not operational Internal malfunction. Contact BpTRU Customer Support. 39 BpTRU Operator’s Manual Code Description Corrective Action E47 Single measurement failed motion check Repeat measurement and ensure that probe is located correctly, patient remains still during single temperature measurement, and patient’s mouth is closed. Use Continuous mode if error is repeated. E48 Single measurement failed curve check Repeat measurement and ensure that probe is located correctly, patient is still during single temperature measurement, and patient’s mouth is closed. Use Continuous mode if error is repeated. E52 Single measurement over display limit (>39 °C) Repeat measurement. Use Continuous mode if error is repeated. E53 Single measurement under display limit (<35 °C) Repeat measurement. Use Continuous mode if error is repeated. E54 Single measurement start temperature out of range (<10 °C or >32 °C) Allow probe to cool to room temperature for 34 minutes, press Temperature Start, and then repeat measurement. Use Continuous mode if error is repeated. E55 Single measurement temperature circuitry not operational Internal malfunction. Contact BpTRU Customer Support. After a temperature error, the corrective action should allow a return to normal operation for the next measurement. If the problem persists, discontinue use and contact your distributor or BpTRU Customer Support. 40 Display Reference Unrecoverable System Errors Certain system errors could result in abnormal operation of the BpTRU, which could present a hazard to the operator or patient. To prevent such a hazard, the BpTRU monitors the following functions and parameters. 1. Proper internal voltage supply. 2. Proper functioning of the microcontroller. 3. Over-inflation of the cuff (maximum 330 mmHg). 4. Overtime inflation of the cuff (over 10 mmHg for maximum 3 minutes). If any of the above conditions occur, the BpTRU will perform the following actions: 1. Deflate the cuff. 2. Sound a five-second alarm tone to signify that a unrecoverable system error has occurred. 3. Deactivate the main display and display the device malfunction indicator ( ). To resume normal operation, turn the power off and then back on again. If normal operation does not resume, contact your distributor or BpTRU Customer Support. 41 BpTRU Operator’s Manual 42 Setup Instructions Examine the BpTRU Before Use Before using your BpTRU, confirm that it does not suffer from any of the following forms of damage. 1. Frayed electrical cords or broken electrical connectors. 2. Cracked or broken enclosure. 3. Broken LED displays. 4. Water damage — possible water in the monitor or discoloration. 5. Torn or missing labels on monitor or accessories. 6. Broken or stripped cuff or tubing connectors. 7. Cracked or deteriorating blood pressure cuffs. 8. Cracked or deteriorating coiled tubing. 9. Battery irregularities such as cracks, deformation, leakage, or corrosion. 10. Cracked or deteriorating temperature probes and cables, if included. If any damage is evident, do not use the BpTRU. Call your distributor or BpTRU Customer Support. CAUTION Significant physical damage to the BpTRU could result in inaccurate results or even injury. Mounting the BpTRU For mounting your BPM device, please refer to the instructions included with the mounting hardware. 43 BpTRU Operator’s Manual Connecting Cuffs The BpTRU is equipped with a coiled tube that can be left permanently attached. The individual blood pressure cuffs connect to this tube via a threaded fitting. Connect the Coiled Tube The coiled tube has a threaded fitting on one end and no fitting on the other end. The bare end (the end without the fitting) connects to the BpTRU. Push the bare end of the coiled tube onto the barbed fitting on the front of the BpTRU, near the BP Start button. Ensure that the tube is fully and snugly attached to the barbed fitting. Loose connections may result in faulty inflation and deflation of the cuff and lead to inaccurate readings. Thread the other end of the coiled tube onto the fitting on one of the cuffs. Refer to “Obtaining Accurate BP Measurements” on page 16 for instructions on selecting an appropriate size of cuff. 44 Display Reference Temperature Probe Mounts (BPM300) On the BPM300, clips are provided to mount the temperature probe on the right hand side of the BpTRU near the temperature control buttons (on the same side of the monitor as the temperature and power jacks). To install these clips, follow the instructions below: There are two temperature probes — a blue probe for oral and axillary measurements and a red probe for rectal measurements. Either probe can be used for this procedure. 1. Insert the temperature probe plug into the jack on the side of the BpTRU. 2. Place two temperature probe clips onto the shaft of the temperature probe. 3. Remove the protective tape to expose the adhesive backing on the temperature probe clips. 4. Attach the temperature probe and clips to the side of the BpTRU, using the adhesive backing. Powering the BpTRU The BPM100 must be connected to a standard wall outlet. The BPM200 and BPM300 can be powered either from a wall outlet or by the internal battery. Powering the BPM100 The BPM100 includes a wall-mounted power supply with a plug style specific to each geographical region. Connect the BPM100 as follows: 45 BpTRU Operator’s Manual 1. Insert the output plug of the DC power supply into the power receptacle on the BpTRU. 2. Insert the input plug of the DC power supply into an AC wall outlet. Powering the BPM200 and BPM300 The BPM200 and BPM300 are shipped with the internal, rechargeable battery disconnected to prevent discharge and to prolong battery life. They include a DC universal input power supply with a cord set specific to each geographical region. 1. Open the battery door at the back of the BpTRU. Use a Phillips screwdriver (provided) to remove both screws. 2. Join the two battery connectors. The connectors only fit one way. 3. Close the battery door and secure it with the two screws. 46 Display Reference WARNING Do not use a metal tool to install or remove a battery. The terminals may short and lead to an electrical safety hazard. 1. Insert the output plug of the DC universal input power supply into the power receptacle on the BpTRU. 2. Plug the cord set into the universal power supply. 3. Insert the cord set plug into an AC wall outlet. The charging indicator should now be lit indicating that the battery is charging. On initial setup of your BpTRU, charge the battery for at least 12 hours. 47 BpTRU Operator’s Manual Battery Management The following techniques and practices help ensure proper battery performance to prolong the life of your battery. It is recommended that the BPM200/BPM300 turned off and left plugged in when not in use to ensure maximum battery life. Operate the BpTRU with the power supply plugged into a wall outlet whenever possible. Charge the battery overnight if the BpTRU was used in battery mode for more than two hours, or if the low-battery indicator is displayed ( ). Charge and then disconnect the battery if the BpTRU is to be shipped or stored for longer than one month. The low-battery indicator lights when the BpTRU needs charging. It will also emit a short double beep every 30 seconds when the battery is low. When these indications occur, plug the power cord into a wall outlet to charge the battery. Note that it is possible to perform measurements while the battery is charging. If the battery charging indicator remains on for longer than 24 hours during charging, the battery needs to be replaced. It is recommended that the battery be replaced every 2 years. Refer to “Replacing the Battery” on page 49 for replacement instructions. CAUTION Using batteries beyond their recommended lifetime may result in damage to the BpTRU. 48 Display Reference Replacing the Battery 1. Open the battery door at the back of the BpTRU. Use a Phillips screwdriver (provided) to remove both screws. 2. Disconnect the battery wiring harness and remove the battery. Do not use a metal tool. Do not pull on the wires. 3. Insert the new battery. Join the two battery connectors. The connectors only fit one way. 4. Close the battery door and secure it with the 2 screws. 5. Dispose of the battery safely. Refer to “Storage and Disposal Requirements” on page 54. WARNING Do not use a metal tool to install or remove a battery. The terminals may short and lead to an electrical safety hazard. Functional Assessment of the BpTRU When you turn on the BpTRU all displays will illuminate, showing “888,” and the buzzer will sound for a few seconds. If the displays or buzzer do not activate the BpTRU may not be working properly. Consult the Troubleshooting section. If you are concerned about the accuracy of the pressure measurements obtained with the BpTRU, use the BP Zero Calibration and BP Reference Gauge Calibration checks to verify the pressure measurement accuracy. See “Technical Modes of Operation” on page 70. 49 BpTRU Operator’s Manual Similarly, use the Temperature Calibration Check to verify temperature measurement accuracy. See “Technical Modes of Operation” on page 70. Please contact BpTRU Customer Support for information on how to order a BP Reference Gauge Calibration Kit. 50 Maintenance Frequency of Inspection and Care The BpTRU and its accessories should be inspected for any damage that may affect safety and accuracy at the following times. Note that no manual calibration is required. After initial setup Monthly After any mishandling (for example, if the BpTRU is knocked off the mounting bracket) Clean the BpTRU and accessories as required, using a damp cloth and mild detergent. The accuracy of the pressure and temperature measurement circuitry in the BpTRU should be checked annually or if you have any concerns about the accuracy of the monitor. Refer to the following sections for instructions on using these modes of operation: “BP Zero Calibration Check” on page 71 “BP Reference Gauge Calibration Check” on page 72 “Temperature Calibration Check (BPM300)” on page 74 The operation of the BP overpressure and overtime safety features of the BpTRU should be checked annually or if there are any concerns about the safety of the monitor. Refer to “BP Reference Gauge Calibration Check” on page 72. Replace the battery every 2 years. Refer to “Replacing the Battery” on page 49. CAUTION Using batteries beyond their recommended lifetime may result in damage to the BpTRU. 51 BpTRU Operator’s Manual CAUTION Stop using the monitor if there is evidence of any of the damage listed below. Replacement of damaged parts or accessories is mandatory for correct functioning of the monitor. Inspection All labels on the BpTRU should be examined for integrity and legibility (i.e., they should not be peeling). Damaged or missing labels may lead to misuse of the monitor. The BpTRU and power supply with cord should be examined for possible electrical hazards caused by any loose connectors, cracks or other broken parts, including damage which might permit access to the interior of the chassis or power supply. All electrical cables should be examined for possible electrical hazards caused by cracked or broken connectors or wires. The BpTRU and power supply should be examined to ensure that they do not rattle (indicating loose components inside which may lead to faulty operation). Prior to using the monitor or after replacing the battery, check for battery irregularities such as cracks, deformation, leakage, corrosion, or other problems. Discontinue use and replace the battery if any such problems arise. The coiled tubing, blood pressure cuffs, and their connections should be examined for cracks or breaks which may lead to air leakage during inflation and deflation. The blood pressure cuffs should be examined for tears in the material and seams of the cuff which may lead to the cuff rupturing when inflated. The cuffs should also be inspected for legibility of cuff 52 Display Reference markings, particularly the cuff model and the markings for arm size range and index. The temperature probes should be examined for cracks, sharp edges, or other deformations that may present a hazard to the patient or user. Cleaning / Disinfection The BpTRU may be cleaned as required by wiping with a cloth dampened with warm water and a mild detergent solution. Allow sufficient time to air dry. The BpTRU and accessories, including the temperature probe, may be disinfected as required (for example, if bodily fluids come into contact the monitor) by wiping with a cloth dampened with a diluted, non-staining disinfectant solution such as bacteriostatic detergent. Allow sufficient time to air dry. The coiled tubing and power supply cabling may be cleaned by wiping with a cloth or sponge dampened with warm water and a mild detergent solution. If further cleaning is required, coiled tubing and cuffs may be cleaned using rubbing alcohol. Do not use harsh solvents such as acetone as they may destroy these parts. The blood pressure cuffs may be cleaned by wiping with a damp cloth or sponge and a mild detergent solution. Allow sufficient time to air dry. CAUTION Excessive wetting or immersion of the BpTRU and accessories may lead to electrical safety hazards or to blockage of connectors and tubing. Do not attempt to use the monitor without allowing sufficient time to air dry. 53 BpTRU Operator’s Manual CAUTION If it is necessary to clean the battery, use a dry cloth only. Do not use fluids. CAUTION The BpTRU and accessories are not designed to be sterilized by autoclaving. Autoclaving will damage the monitor and accessories. Maintenance Maintenance of the BpTRU should consist of periodic inspection and cleaning of the monitor and accessories. Customer calibration of the BpTRU is not required. Accessories including the battery should be replaced as required. There are no user serviceable parts inside the BpTRU. Opening the BpTRU voids the warranty. Storage and Disposal Requirements The BpTRU can be transported and stored in the following environmental conditions. Temperature from 20 to +50 degrees Celsius Humidity from 15 to 95 percent RH (non-condensing) For transport, shipping or storage, use the original packaging, including the inserts, to protect the BpTRU. If the original packaging is not available, wrap the BpTRU in such a manner that it will not be scratched or otherwise damaged during shipping. If shipping the BpTRU or storing it for more than one month, disconnect the battery. 54 Display Reference Contact local authorities for disposal requirements for electronic devices and for lead-acid batteries (same as automobile batteries). Do not throw the battery in the regular garbage. 55 BpTRU Operator’s Manual 56 Technical Information Specifications: BPM100 Item Specification Pressure measurement range 0 to 290 mmHg Pressure measurement accuracy Meets or exceeds ANSI/AAMI SP10:1992 Systolic blood pressure measurement range 60 to 250 mmHg Diastolic blood pressure measurement range 40 to 160 mmHg Pulse rate measurement range 40 to 200 beats per minute Blood pressure measurement efficacy Meets or exceeds ANSI/AAMI SP10:1992 standard for overall efficacy of blood pressure measurements versus standard auscultation (using the 5th Korotkoff sound) Within 3 mmHg or 2%, whichever is greater Average error within +/- 5 mmHg Standard deviation within 8 mmHg Pulse rate measurement efficacy Meets or exceeds specification against a clinical reference Average error within +/- 1 beats per minute Standard deviation within 3 beats per minute Maximum operating cuff pressure 290 mmHg Maximum possible cuff pressure 330 mmHg 57 BpTRU Operator’s Manual Maximum possible cuff inflation time Over 10 mmHg for 3 minutes Input power requirements North American AC power supply range of to regulated power supply 104 to 127 V rms (nominally 60 Hz) European AC power supply range of 207 to 253 V rms (nominally 50 Hz) Australian AC power supply range of 216 to 264 V rms (nominally 50Hz) Output power of regulated 8 V power supply 1A Environmental operating ranges Temperature: 10 to 40 degrees Celsius Humidity: 15 to 90% RH (non-condensing) Elevation: 170 to 1,700 m (from sea level) Monitor lifetime 10,000 full scale BP cycles of 0 to 290 mmHg and back Physical dimensions of the Height: 15 cm BPM100 Width: 23 cm Depth: 8 cm Weight of the BPM100 2.5 kg, including accessories Please note that specifications of all models are subject to change as product improvements may be made at any time to improve performance. 58 Display Reference Specifications: BPM200 Item Specification Pressure measurement range 0 to 290 mmHg Pressure measurement accuracy Meets or exceeds ANSI/AAMI SP10:1992 Systolic blood pressure measurement range 60 to 250 mmHg Diastolic blood pressure measurement range 40 to 160 mmHg Pulse rate measurement range 40 to 200 beats per minute Blood pressure measurement efficacy Meets or exceeds ANSI/AAMI SP10:1992 standard for overall efficacy of blood pressure measurements versus standard auscultation (using the 5th Korotkoff sound) Within 3 mmHg or 2%, whichever is greater Average error within +/- 5 mmHg Standard deviation within 8 mmHg Pulse rate measurement efficacy Meets or exceeds specification against a clinical reference Average error within +/-1 beats per minute Standard deviation within 3 beats per minute Maximum operating cuff pressure 290 mmHg Maximum possible cuff pressure 330 mmHg Maximum possible cuff inflation time Over 10 mmHg for 3 minutes Input power requirements 100 – 240 VAC, 390 mA, 50 – 60 Hz to universal power supply 59 BpTRU Operator’s Manual Output power of universal 10 V, 1.0 - 1.25 A power supply Cord set connector type IEC 320 C7 connector Cord set plug type North American, Continental Europe, United Kingdom, Australia Cord set length 2 m, 6.7 feet Battery voltage and capacity 8 V, 3.0 Ah BP measurements per battery charge 200 at 2 minute cycle time Battery charge time 12 hours, trickle charge Battery charge cycles 250 Environmental operating ranges Temperature: 10 to 40 degrees Celsius Humidity: 15 to 90% RH (non-condensing) Elevation: -170 to 1,700 m (from sea level) Physical dimensions (table top) Height: 15 cm Width: 23 cm Depth: 15 cm Weight 60 4 kg, including accessories Display Reference Specifications: BPM300 Item Specification Pressure measurement range 0 to 290 mmHg Pressure measurement accuracy Meets or exceeds ANSI/AAMI SP10:1992 Systolic blood pressure measurement range 60 to 250 mmHg Diastolic blood pressure measurement range 40 to 160 mmHg Pulse rate measurement range 40 to 200 beats per minute Blood pressure measurement efficacy Meets or exceeds ANSI/AAMI SP10:1992 standard for overall efficacy of blood pressure measurements versus standard auscultation (using the 5th Korotkoff sound) Within 3 mmHg or 2%, whichever is greater Average error within +/- 5 mmHg Standard deviation within 8 mmHg Pulse rate measurement efficacy Meets or exceeds specification against a clinical reference Average error within +/-1 beats per minute Standard deviation within 3 beats per minute Maximum operating cuff pressure 290 mmHg Maximum possible cuff pressure 330 mmHg Maximum possible cuff inflation time Over 10 mmHg for 3 minutes Temperature probe sensor Thermistor type 61 BpTRU Operator’s Manual Item Specification Single temperature measurement range 35 °C to 39 °C (95.0 °F to 102.2 °F) Continuous temperature measurement range 28 °C to 43 °C (82.4 °F to 109.4 °F) Single temperature measurement time 15 seconds Continuous temperature 3 – 4 minutes measurement settling time Single temperature efficacy Average error within +/- 0.1 °C (0.2 °F) Standard deviation within 0.4 °C (0.7 °F) Continuous temperature accuracy Meets ASTM E 111200 accuracy requirements Input power requirements 100 – 240 VAC, 390 mA, 50 – 60 Hz to universal power supply Output power of universal 10 V, 1.0 - 1.25 A power supply Cord set connector type IEC 320 C7 connector Cord set plug type North American, Continental Europe, United Kingdom, Australia Cord set length 2 m, 6.7 feet Battery voltage and capacity 8 V, 3.0 Ah BP measurements per battery charge 200 at 2 minute cycle time Battery charge time 12 hours, trickle charge Battery charge cycles 250 Environmental operating ranges Temperature: 10 to 40 degrees Celsius Humidity: 15 to 90% RH (non-condensing) Elevation: -170 to 1,700 m (from sea level) 62 Display Reference Item Specification Physical dimensions (table top) Height: 15 cm Width: 23 cm Depth: 15 cm Weight 4 kg, including accessories Standards The BpTRU monitor (BPM100, BPM200 and BPM300 models) complies with the following standards: CAN/CSA C22.2 No. 601.1M90, Medical Electrical Equipment – Part 1: General Requirements for Safety, 1990. UL 26011:1988, Medical Electrical Equipment – Part 1: General Requirements for Safety, 1988. ANSI/AAMI, SP10:1992, Electronic or Automated Sphygmomanometers, 1992. IEC 606011 (1988), Medical Electrical Equipment – Part 1. General Requirements for Safety, 1988 (equivalent to EN 606011). International Safe Transit Association, Pre-shipment Test Procedures (Procedure 2A), 1996. IEC 6060112 (2001), Medical Electrical Equipment – Part 1. General Requirements for Safety; Electromagnetic Compatibility – Requirements and Tests, 2001 (equivalent to EN 6060112). IEC 60601230 (1999), Medical Electrical Equipment – Part 230: Particular Requirements for Safety, including Essential Performance of Automatic Cycling Non-Invasive Blood Pressure Monitoring Equipment, 2000 (equivalent to EN 60601230). The BPM300 model further complies with the following temperature standard: ASTM E 111200—Standard Specification for Electronic Thermometer for Intermittent Determination of Patient Temperature, 2000. 63 BpTRU Operator’s Manual CE Mark Information The CE Mark on this product indicates it has been tested to and conforms with the provision noted with the 93/42/EEC Medical Device Directive, Annex II. European contact for regulatory compliance: MDCI Ltd. Arundel House 1 Liverpool Gardens Worthing West Sussex BN11 1SL UK Tel: 44 (0) 1293 429608 Fax: 44 (0) 1293 519121 64 Display Reference EMC Guidance and Declarations The BpTRU family of monitors has the electromagnetic compatibility and immunity characteristics outlined in the following tables. Guidance and manufacturer’s declaration – electromagnetic emissions for the BpTRU monitor The BpTRU monitor is intended for use in the electromagnetic environment specified below. The customer or the user of the BpTRU monitor should assure that it is used in such an environment. Emissions test Compliance Electromagnetic environment – guidance RF emissions CISPR 11 / EN 55011 Group 1 The BpTRU monitor uses RF energy only for its internal function. Therefore, their RF emissions are very low and are not likely to cause any interference in nearby electronic equipment. RF emissions CISPR 11 / EN 55011 Class A Harmonic emissions (BPM100) IEC 6100032:2000 + A1:2001 Class A Harmonic emissions ( BPM200 & BPM300) Class D The BpTRU monitor is suitable for use in all establishments other than domestic and those directly connected to the public low-voltage power supply network that supplies buildings used for domestic purposes. IEC 6100032:1995 Voltage fluctuations/ flicker emissions IEC 6100033 Complies 65 BpTRU Operator’s Manual Guidance and manufacturer’s declaration – electromagnetic immunity The BpTRU monitor is intended for use in the electromagnetic environment specified below. The customer or the user of the BpTRU monitor should assure that it is used in such an environment. Immunity Test IEC 60601 test level Compliance level Electromagnetic environment – guidance Electrostatic discharge (ESD) IEC 6100042 6 kV contact 6 kV contact 8 kV air 8 kV air Floors should be wood, concrete or ceramic tile. If floors are covered with synthetic material, the relative humidity should be at least 30%. The BPM200 monitor should be poweredoff or not taking a measurement when the USB cable is installed or removed. Electrical fast transients/ burst IEC 6100044 Surge IEC 6100045 Voltage dips, short interruptions and voltage variations on power supply input lines IEC 61000411 ±2 kV for power supply lines ±2 kV for power supply lines 1 kV for input/output lines Not applicable 1 kV differential mode 1 kV differential mode 2 kV common mode 2 kV common mode <5% UT for 0.5 cycles 40% UT for 5 cycles 40% UT for 5 cycles 70% UT for 25 cycles 70% UT for 25 cycles <5% UT for 5 sec <5% UT for 5 sec Mains power quality should be that of a typical commercial or hospital environment. Mains power quality should be that of a typical commercial or hospital environment. Mains power quality should be that of a typical commercial or hospital environment. If you require continued operation of BPM100 during power mains interruptions, power the BPM100 from an uninterruptible power supply or battery. NOTE: UT is the a.c. mains voltage prior to application of the test level. 66 Display Reference Guidance and manufacturer’s declaration – electromagnetic immunity The BpTRU monitor is intended for use in the electromagnetic environment specified below. The customer or the user of the BpTRU monitor should assure that it is used in such an environment. Immunity Test IEC 60601 test level Compliance level Electromagnetic environment – guidance Power frequency 3 A/m 3 A/m Power frequency magnetic fields should be at levels characteristic of a typical location in a typical commercial or hospital environment. (50/60 Hz) magnetic field IEC 6100048 Portable and mobile RF communications equipment should be no closer to any part of the BpTRU monitor, including cables, than the recommended separation distance calculated from the equation applicable to the frequency of the transmitter, as shown below. 67 BpTRU Operator’s Manual Guidance and manufacturer’s declaration – electromagnetic immunity The BpTRU monitor is intended for use in the electromagnetic environment specified below. The customer or the user of the BpTRU monitor should assure that it is used in such an environment. Immunity Test IEC 60601 test level Compliance level Electromagnetic environment – guidance Conducted RF IEC 6100046 3 V rms, 150 kHz to 80 MHz 3 V rms Recommended separation distance: Radiated RF IEC 6100043 3 V/m, 80 MHz to 2.5 GHz 3 V/m d = 1.2 P d = 1.2 P (80 MHz to 800 MHz) d = 2.3 P (800 MHz to 2.5 GHz) where P is the maximum output power rating of the transmitter in Watts, according to the transmitter manufacturer, and d is the recommended separation distance in metres. Field strengths from fixed RF transmitters, as determined by an electromagnetic site surveya, should be less than the compliance level in each frequency rangeb. Interference may occur in the vicinity of equipment marked with the following symbol: NOTE 1: At 80 MHz and 800 MHz, the higher frequency range applies. NOTE 2: The guidelines may not apply in all situations. Electromagnetic propagation is affected by absorption and reflection from structures, objects and people. 68 Display Reference a. Field strengths from fixed transmitters, such as base stations or radio (cellular/ cordless) telephones and land mobile radios, amateur radio, AM and FM radio broadcast and TV broadcast cannot be predicted theoretically with accuracy. To assess the electromagnetic environment due to fixed RF transmitters, an electromagnetic site survey should be considered. If the measured field strength in the location in which the BpTRU monitor is used exceeds the applicable RF compliance level above, the BpTRU monitor should be observed to verify normal operation. If abnormal performance is observed, additional measures may be necessary, such as reorienting or relocating the BpTRU monitor. b. Over the frequency range 150 kHz to 80 MHz, field strengths should be less than 3 V/m. Recommended separation distances between portable and mobile RF communications equipment and the BpTRU monitor The BpTRU monitor is intended for use in an electromagnetic environment is which radiated RF disturbances are controlled. The customer or user of the BpTRU monitor can help prevent electromagnetic interference by maintaining a minimum distance between portable and mobile RF communications equipment (transmitters) and the BpTRU monitor as recommended below, according to the maximum output power of the communications equipment. Rated maximum output power of transmitter Separation distance according to frequency of transmitter (m) 150 kHz to 80 MHz 80 MHz to 800 MHz 800 MHz to 2.5 GHz d = 1.2 P d = 1.2 P d = 2.3 P 0.01 0.12 0.12 0.23 0.1 0.38 0.38 0.73 1 1.2 1.2 2.3 10 3.8 3.8 7.3 100 12 12 23 (W) For transmitters rated at maximum output power not listed above, the recommended separation distance d in metres (m) can be estimated using the equation applicable to the frequency of the transmitter, where P is the maximum output power rating of the transmitter in Watts (W) according to the transmitter manufacturer. Note 1 At 80 MHz and 800 MHz, separation distance for the higher frequency applies. Note 2 These guidelines may not apply in all situations. Electromagnetic propagation is affected by absorption and reflection from structures, objects and people. 69 BpTRU Operator’s Manual Cables and acceptable lengths Cable Length AC power cord-set 1.8 m (6’) Oral (blue) temperature probe 1.8 m (6’) Rectal (red) temperature probe 2.4 m (8’) USB cable 3.0 m (10’) CAUTION The use of accessories, transducers, and cables other than those specified may result in increased EMF emissions or decreased immunity of the system to EMF within the surrounding environment. Technical Modes of Operation Technical modes of operation are available for the BpTRU to change configurations, check functionality and accuracy, and to connect the monitor to a computer. BP Alert/Silent Mode As well as the power-up tone, the BpTRU makes a short audible tone after completing a series of measurements in Automatic mode. This feature is enabled by default, but can be disabled and re-enabled as follows: 1. Turn the BpTRU off using the power switch. 2. To toggle BP Alert/Silent Mode, hold Stop while turning the BpTRU on. Repeating this toggles the BpTRU to the previous state. Alert Mode is indicated by three short beeps followed by one long tone during power up. Silent Mode is indicated by three short beeps during power up without a final long tone. 70 Display Reference BP Hide Mode Hide mode allows the operator to hide blood pressure readings that would normally appear at the end of each measurement. By default the BpTRU does not start in Hide mode. Turn on Hide mode as follows. 1. Turn the BpTRU off using the power switch. 2. To toggle the BP Hide Mode, hold the Cycle button while turning the BpTRU on. Repeating this toggles the BpTRU to the previous state. Hide mode is indicated by a dash (-) in the leftmost digit of the Cycle display. When a blood pressure measurement is taken, the applied pressure is indicated in the Systolic display in the usual manner. However, when the measurement is complete dashes are displayed in the Systolic, Diastolic, and Pulse displays. In Hide mode, error messages are displayed in the usual manner and the Review button works in the usual manner. BP Zero Calibration Check The BpTRU does not normally need to be recalibrated. It automatically performs a zero calibration check each time it starts up, and reports error code E7 if this check does not pass (see “BP System Errors (E0 to E15)” on page 35). The BP Zero Calibration Check mode allows you to check this automatic zero-offset calibration function. 1. Turn the BpTRU off using the power switch. 2. Disconnect the coiled tubing from the BpTRU. 3. To select BP Zero Calibration Check mode, hold BP Start while turning the BpTRU on. 4. Release BP Start. The monitor now performs an automatic zero-offset calibration. The BpTRU indicates that it is in BP Zero Calibration Check mode by displaying the software version (e.g., 1.90) in the Systolic display. 71 BpTRU Operator’s Manual After approximately five seconds, the applied pressure is displayed in whole mmHg in the Pulse display and in hundredths of mmHg in the Reading display. A properly calibrated monitor reads “0” in the Pulse display and less than “10” in the Reading display. Return to normal operation by powering the BpTRU off and then on again. BP Reference Gauge Calibration Check The BP Reference Gauge Calibration Check is a feature that allows you to compare the accuracy of the BpTRU’s pressure transducer against a reference pressure gauge of known accuracy. (An electronic pressure gauge is recommended, but a mercury or aneroid gauge is acceptable.) 1. Turn the BpTRU off using the power switch. 2. Disconnect the coiled tubing from the BpTRU. 3. To select the BP Reference Gauge Calibration Check mode, hold BP Start while turning the BpTRU on. 4. Release BP Start. The monitor now performs an automatic zero-offset calibration. BP Reference Gauge Calibration Check mode is indicated by the software version being displayed on the Systolic display. The applied pressure is displayed in whole mmHg in the Pulse display and in hundredths of mmHg in the Reading display, as shown below: Firmw are Rev ision Pressure Units 72 Pressure (1/100ths ) Display Reference 5. Connect a reference pressure gauge and pressure source in parallel with the BpTRU cuff connector to form a closed system. 6. Press BP Start to close the BpTRU’s valve. This closes the pneumatic system and allows pressure to be applied to the BpTRU pressure transducer. The maximum time for the valve to remain closed is approximately 3 minutes. After this time, the valve is opened and the Pulse display shows “ccc.” When the valve has cooled, the pressure display will re-illuminate. 7. Apply a static pressure of up to 300 mmHg, and compare the pressure displayed in the BpTRU Pulse and Reading displays to the reference pressure gauge to verify accuracy. A properly calibrated monitor should read within 3 mmHg of the reference pressure gauge at all pressures. 8. Apply static pressure greater than 330 mmHg, or pressure greater than 10 mmHg for 3 minutes, to check if overpressure or over inflation time safety mechanisms are operating properly and error codes are displayed. Remove the fault condition and press BP Clear to remove the error code. Note that the valve will remain open for 30 seconds following activation of a safety mechanism. 9. Press Stop to open the valve. 10.Return to normal operation by turning the BpTRU off and then on again using the power switch. Temperature Alert/Silent Mode (BPM300) The BpTRU makes a short audible tone after completing a single temperature measurement. This feature is enabled by default, but can be disabled and reenabled as follows. 1. Turn the BpTRU off using the power switch. 2. To toggle BP Alert/Silent mode, hold the Temperature Start button while turning the BpTRU on again. Repeating this toggles the BpTRU to the previous state. 73 BpTRU Operator’s Manual Temperature Celsius/Fahrenheit Mode (BPM300) The BpTRU can be configured to display temperature units in either Celsius or Fahrenheit. The default display unit is Celsius, but the unit can be toggled as follows. 1. Turn the BpTRU off using the power switch. 2. To toggle temperature display units, hold Mode while turning the BpTRU on again. Repeating this toggles the BpTRU to the previous state. When a temperature probe is attached, the selected units (°C or °F) are illuminated on the BpTRU display. Temperature Calibration Check (BPM300) The Temperature Calibration Check allows a comparison of the accuracy of the BpTRU’s temperature measurement circuitry to a reference thermometer of known accuracy. (A precision electronic thermometer is recommended, but a mercury thermometer will work as well.) 1. Attach a temperature probe. 2. Turn the BpTRU off using the power switch. 3. To select the Temperature Calibration Check mode, hold BP Start while turning the BpTRU on. 4. Release BP Start. (Temperature Calibration Check mode is indicated by the software version being displayed in the Systolic display). The probe temperature is displayed (in °C or °F) as whole degrees in the Temperature display, and hundredths of a degree in the Cycle display, as shown below: Firmw are Rev ision Degrees (1/100ths ) 74 Display Reference The probe temperature will settle to the ambient temperature in three to four minutes. 5. Use a heated water bath to apply temperatures in the range 28 °C to 43 °C (82.4 °F to 109.4 °F) to the probe and compare the BpTRU’s displayed temperature against an independent, calibrated thermometer. A properly calibrated monitor should indicate within 0.1 °C (0.2 °F) of the temperature indicated by the reference thermometer. If the probe temperature is not within display limits then an error code is displayed. 6. Return to normal operation by turning the BpTRU off and then on again using the power switch. USB Connectivity Mode (BPM200 & BPM300 models) Contact BpTRU to obtain the BpTRU connectivity manual. USB Connectivity mode allows a PC-based software application, such as an electronic medical record, to communicate directly with the BpTRU. Your application can command the BpTRU to perform a BP measurement or a temperature measurement and collect data onto the PC. CAUTION The USB port on the BpTRU is susceptible to electrostatic discharges (ESD), and in an ESD event the monitor may reset and display an error code. Precautions should be taken when using the USB cable with the monitor, including turning off the monitor and not taking any measurements while the USB cable is being installed or removed. The USB cable used with the BpTRU monitor must be less than 3 metres in length. 75 BpTRU Operator’s Manual 76 Accessories WARNING Substitution of a component, such as a blood pressure cuff, temperature probe or probe sheath different from that supplied may result in measurement inaccuracy. CAUTION The use of a power supply other than that supplied with the BpTRU may result in damage to the monitor or measurement inaccuracy. Blood Pressure Cuff Sizes BpTRU Cuff BPM Catalog Number Arm Circumference Range (cm) Child BPM-100-09 13-18 Small Adult BPM-100-10 18-26 Regular Adult BPM-100-11 26-34 Large Adult BPM-100-12 32-43 Extra Large Adult BPM-100-13 41-52 Note: All cuffs include connector. 77 BpTRU Operator’s Manual Supplies and Accessories Blood Pressure Cuffs and Tubing BPM10009 Child Cuff Assembly BPM10010 Small Adult Cuff Assembly BPM10011 Regular Adult Cuff Assembly BPM10012 Large Adult Cuff Assembly BPM10013 Extra Large Adult Cuff Assembly BPM10014 Coiled Neoprene Tubing (with connector) BPM10019 Coiled Neoprene Tubing Extension (with connectors) CAL00101 BP Reference Calibration Check Card and TConnector Temperature Probes and Covers BPM30020 Oral/Axillary Temperature Probe (blue) and Holder BPM30021 Rectal Temperature Probe (red) and Holder BPM30024 Box of 100 Temperature Probe Sheaths Mounting Accessories BPM30046 BpTRU MOBILE STAND UNIT includes: • Pole and Rolling Base Assembly • Basket • BPM device mounting hardware BPM10040 Wall Mount Bracket Assembly for BPM100 model BPM30040 Bracket Assembly for BPM200/BPM300 model Power Supplies BPM10030 78 Power Supply, North America, 120V, 60HZ For BPM100 Model Only Display Reference BPM10031 Power Supply, United Kingdom, 230V, 50Hz For BPM100 Model Only BPM10032 Power Supply, 230V, 50Hz, Continental Europe, Euro Plug For BPM100 Model Only BPM10033 Power Supply, 230V, 50Hz, Australia For BPM100 Model Only BPM30035 Power Supply, Universal For BPM200/BPM300 Model Only BPM30030 Cord Set, North America For BPM200/BPM300 Model Only BPM30031 Cord Set, United Kingdom For BPM200/BPM300 Model Only BPM30032 Cord Set, Continental Europe, Euro Plug For BPM200/BPM300 Model Only BPM30033 Cord Set, Australia For BPM200/BPM300 Model Only BPM30036 Lead Acid Battery for BPM200/BPM300 Please contact BpTRU Medical Devices for a complete catalogue list. 79 BpTRU Operator’s Manual Owner Information Serial Number Date of Purchase Dealer Dealer Telephone Dealer Representative Dealer Representative Telephone 80 Warranty Limited Warranty BpTRU Medical Devices a Division of 0764509 B.C. Ltd. (BpTRU) warrants to the original purchaser that the BpTRUTM device (BPM) will be free from defects in material and workmanship for two (2) years from the date of the original purchase from BpTRU or its authorized resellers. All BPM accessories are warranted for a period of one (1) year from the date of original purchase from BpTRU or its authorized resellers. This limited warranty is non-transferable. If the BPM is defective during the warranty period, the purchaser's sole and exclusive remedy, and BpTRU's sole obligation, will be (at BpTRU's option): repair the BPM to conform to its specifications; replace the BPM with a comparable product; or refund to the purchaser the original price paid for the BPM. Repaired or replaced products or parts may be new or reconditioned, and are subject to this limited warranty through the end of the original warranty period. To obtain warranty service, the purchaser must: contact BpTRU during the warranty period; provide BpTRU with dated proof of original purchase from BpTRU or an authorized reseller or have completed their BPM registration with BpTRU; ship the BPM to BpTRU by prepaid delivery, and have packaged the BPM appropriately for safe shipment. The purchaser is responsible for shipping costs. This warranty does not apply if the defect or malfunction in the BPM was caused by misuse, neglect, unauthorized attempts to open, repair or modify the BPM, use of the BPM with accessories or other products that are not authorized by BpTRU, or any cause other than the intended normal use of the BPM. Non-warranty work is charged at the minimum repair rate effective at the time the BPM is returned to BpTRU. All repairs include a complete functional test using factory test fixtures. 81 BpTRU Operator’s Manual EXCLUSIONS: TO THE FULL EXTENT ALLOWED BY LAW, THIS LIMITED WARRANTY IS THE PURCHASER'S SOLE AND EXCLUSIVE REMEDY, AND NO OTHER WARRANTIES, CONDITIONS OR GUARANTEES OF ANY KIND SHALL APPLY, WHETHER STATUTORY, WRITTEN, ORAL, EXPRESS OR IMPLIED, INCLUDING WITHOUT LIMITATION WARRANTIES, CONDITIONS OR GUARANTEES OF MERCHANTABILITY, FITNESS FOR A PARTICULAR PURPOSE, PERFORMANCE, QUALITY, OR DURABILITY, ALL OF WHICH ARE DISCLAIMED. IN NO EVENT WILL BpTRU BE LIABLE FOR ANY SPECIAL, EXTRAORDINARY, INDIRECT OR CONSEQUENTIAL DAMAGES OF ANY KIND WHATSOEVER, INCLUDING WITHOUT LIMITATION DAMAGES FOR LOSS OF DATA, LOST PROFITS, LOSS OF OPPORTUNITY, BUSINESS INTERRUPTION, PERSONAL INJURY OR DEATH, OR ANY OTHER LOSS ARISING OUT OF, RELATING TO, OR IN CONNECTION WITH, THE BPM, EVEN IF BpTRU IS ADVISED OF THE POSSIBILITY OF SUCH DAMAGES. LIABILITY LIMITATIONS: IF, AS A RESULT OF OR IN CONNECTION WITH ANY USE OF THE BPM, BpTRU BECOMES LIABLE TO THE PURCHASER OR ANY OTHER PERSON FOR ANY DAMAGES, LOSSES, COSTS, EXPENSES, OR OTHER LIABILITIES WHATSOEVER, AND REGARDLESS OF THE FORM OF ACTION (IN CONTRACT, TORT OR PURSUANT TO STATUTE), THEN BpTRU'S AGGREGATE LIABILITY TO ALL SUCH PERSONS WILL BE LIMITED TO AN AMOUNT EQUAL TO THE PURCHASE PRICE PAID FOR THE BPM. The exclusion of certain conditions and warranties and the limitation of certain liabilities is prohibited in some jurisdictions, so these limitations and exclusions may not apply to some purchasers. 82 Warranty This limited warranty is governed solely by the laws of the Province of British Columbia, Canada and applicable federal laws of Canada, excluding any rules of private international law or the conflict of laws which would lead to the application of any other laws, and the courts of British Columbia, Canada shall have exclusive jurisdiction over any claims relating to this limited warranty. The BpTRU logo, BpTRU, and the collection of these marks are trademarks of BpTRU Medical Devices a Division of 0764509 B.C. Ltd. All rights reserved. Warranty Registration Device registration is required for warranty validation. Please visit our website at www.BpTRU.com to register online. Once at the homepage, select 'BpTRU Warranty Registration' from the 'Customer Services' menu. On the Warranty Registration page, fill in the appropriate information and press 'Submit'. 83 BpTRU Operator’s Manual 84 Index cuff A alarms ........................................ 13 Alert mode BP Alert/Silent mode ....................70 Temperature Alert/Silent mode ....73 Automatic mode (series of measurements) operating in ..................................20 results ..........................................22 reviewing measurements .............23 available sizes ............................. 77 selecting size ............................... 16 Cycle button described ............. 12 Cycle display described .............. 9 D data transfer by USB ................. 75 diastolic display described ........................... 9 Hide mode ................................... 71 measuring diastolic pressure ....... 15 range............................................ 57 B battery charging indicator.........................10 disposal ........................................54 good battery management ...........48 installing .......................................46 low-battery indicator ...............10, 25 replacing ......................................49 beeps ......................................... 13 BP Alert/Silent mode ................. 70 BP calibration Reference Gauge Calibration Check .................................................72 Zero Calibration Check ................71 BP Hide mode ........................... 71 BP measurements Automatic mode ...........................20 series of measurements ...............20 C calibration BP Reference Gauge Calibration Check .......................................72 BP Zero Calibration Check...........71 Temperature Calibration Check ...74 cautions/warnings .................... 4–6 ccc in pulse display BP Reference Gauge Calibration Check .......................................72 Celsius changing between ºC and ºF........74 cleaning/disinfection .................. 53 dimensions ................................ 57 disinfection/cleaning .................. 53 displays defined ........................................... 9 Hide mode ................................... 71 Pulse reads ccc ........................... 72 disposal of battery ..................... 54 E electromagnetic interference ..... 65 EMC .......................................... 65 emissions (EMC) ....................... 65 environmental ranges ............... 57 error codes ? 41 E0 ................................................ 35 E07 .............................................. 35 E1 ................................................ 36 E10 .............................................. 37 E11 .............................................. 37 E12 .............................................. 37 E13 .............................................. 37 E14 .............................................. 37 E15 .............................................. 37 E2 ................................................ 36 E20 .............................................. 38 E21 .............................................. 38 E22 .............................................. 38 E23 .............................................. 38 E24 .............................................. 38 85 BpTRU Operator’s Manual E25 ..............................................38 E26 ..............................................38 E27 ..............................................39 E3 ................................................36 E4 ................................................36 E41 ..............................................39 E42 ..............................................39 E43 ..............................................39 E44 ..............................................39 E45 ..............................................39 E47 ..............................................40 E48 ..............................................40 E5 ................................................36 E52 ..............................................40 E53 ..............................................40 E54 ..............................................40 E55 ..............................................40 E6 ................................................36 E7 ................................................36 E8 ................................................36 E9 ................................................36 P power requirements ................................ 57 pressure range .......................... 57 probe preparing...................................... 25 pulse display described ........................... 9 display reads ccc ......................... 72 measuring rate ............................. 15 pulse rate range ........................... 57 Q question mark (error code) ........ 41 R ranges, measurement ............... 57 Reading display, described ......... 9 Reference Gauge Calibration Check (BP) ............................ 72 results series of BP measurements ......... 22 F reviewing measurements Fahrenheit Automatic mode ........................... 20 Single mode (BP) ......................... 22 changing between ºC and ºF .......74 functional assessment ............... 49 H hazards familiarity with instructions ...........15 impairment of circulation ..............16 perforating patient’s bowel .....29, 30 temperature probe with child ........30 S series of BP measurements (Automatic mode) .................. 20 Silent mode BP Alert/Silent mode .................... 70 Temperature Alert/Silent mode .... 73 Single (manual) mode reviewing measurements ............. 22 taking BP measurements ............. 19 Hide mode ................................. 71 I Single (Predictive) mode indications on start-up ............... 49 inspection ............................ 51–53 interference (EMC) .................... 65 single BP measurement M maintenance .............................. 54 measurement temperature measurements ......... 25 BP measurements ....................... 19 specifications............................. 57 start-up indications .................... 49 storage requirements ................ 54 systolic display described ........................... 9 Hide mode ................................... 71 measuring systolic pressure ........ 15 range of measurement ................. 57 efficacy.........................................57 ranges ..........................................57 multiple BP measurements (Automatic mode) ................... 20 O operating conditions .................. 58 86 T taking BP measurements .......... 20 technical specifications Index BPM-100 ......................................57 temperature Alert/Silent mode .........................73 Calibration Check ........................74 changing scale (ºC/ºF) .................74 display described ...........................9 rectal measurement .....................29 single oral or axillary measurement ...........................25 tones .......................................... 13 transferring data by USB ........... 75 U USB, connecting ....................... 75 W warnings/cautions ................... 4–6 warranty..................................... 81 weight ........................................ 57 Z Zero Calibration Check (BP) ..... 71 87