1
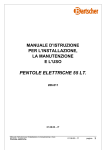
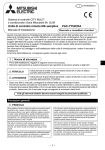
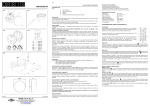
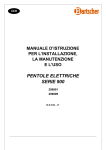
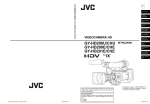
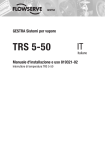
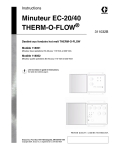
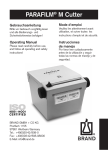
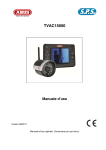
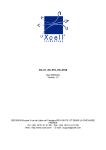
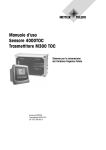
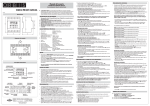
CRONOTERMOSTATO
RESET
SELECTOR DIA
DE LA SEMANA
PULSADOR OK
(VALIDACION DE DATOS)
CAMBIO CALEFACCIÓN
O AIRE ACONDICIONADO
DE 1 - 7 EN
PROGRAMACION
FUNCION TERMOSTATO
INCREMENTA DATOS
SELECCIONA CONFORT
EN PROGRAMACION
SELECTOR MODO DE
FUNCIONAMIENTO
Y APAGADO
DECREMENTA DATOS
SELECCIONA AHORRO
EN PROGRAMACION
PESTAÑA DE FIJACION
BASE DE CONEXIONES
DESCRIPCIÓN
El cronotermostato VIA es un termostato de ambiente electrónico programable de
fácil utilización. Permite asignar distintas temperaturas en diferentes periodos
horarios.
Características
• 8 programas independientes y programables, (uno para cada día de la semana,
y uno para todos los días de la semana 1-7)
• Display de gran tamaño
• Comodidad de programación al poderse realizar fuera de la base
• Posibilidad de control de calefacción o aire acondicionado
• 2 Niveles de temperatura regulables: Ahorro
y Confort
y
apagado (antihielo).
• Periodos mínimos entre niveles de temperatura de 60 minutos
• Regulación de temperatura de +5 ºC a +35 ºC .
• Precisión de medida de temperatura ± 0,5 ºC
• Fácil programación.
• Cambio automático horario de verano – invierno
• Posibilidad de conexión a controlador telefónico
• Posibilidad de bloqueo de teclado
• Temperatura antihielo fija en 4 ºC.(para evitar congelaciones)
ATENCIÓN: La instalación y el montaje de los aparatos eléctricos debe ser
realizada por un instalador autorizado. Antes de proceder a la conexión debe
asegurarse que los conductores a conectar no están bajo tensión.
El aparato está internamente protegido contra las interferencias.
BASE DE FIJACIÓN
DISPLAY
HUECO PASA-HILOS
REGULADOR Tª CONFORT
(COMO PULSADOR,
BLOQUEO / DESBLOQUEO
DE TECLADO)
REGULADOR Tª AHORRO
(COMO PULSADOR,
BLOQUEO / DESBLOQUEO
DE TECLADO)
PESTAÑA
TAPA DE PILAS
COLOCACIÓN Y SUSTITUCIÓN DE PILAS: El aparato está alimentado por
2 pilas alcalinas LR03 (AAA) de 1,5 V (no incluidas). Respetar la polaridad
indicada en el alojamiento de las pilas. La duración aproximada de las pilas es de
1 año.
Después de colocar las pilas por primera vez, accionar RESET introduciendo la
punta de un bolígrafo o similar, comprobando que las pilas están en buen estado y
bien colocadas.
Al colocar las pilas por primera vez se activa la pantalla y aparecen todos los
segmentos del display, y tras un periodo corto de detección de pilas el VIA se
pone en funcionamiento.
SUSTITUCIÓN DE LAS PILAS: Se recomienda poner el selector de modo de
funcionamiento en OFF antes de sustituir las pilas.
ATENCIÓN: Dispone de 10 minutos para realizar la operación de sustitución de
pilas sin que pierda los datos de temperatura regulada, fecha y hora programada,
manteniendo siempre los programas. Si en algún momento quedara la pantalla en
blanco o aparecieran datos no legibles, accionar RESET .
Deposite las pilas usadas en un contenedor para tal fin. Respete el medio
ambiente.
INDICACIÓN DE NIVEL DE PILAS:
Aparecerán en pantalla diferentes símbolos de pila según su carga:
Cuando las pilas están a plena carga.
Cuando las pilas están a media carga.
Cuando las pilas están agotadas aparece parpadeando en pantalla el
símbolo y la palabra “BAT.
PUESTA EN HORA
Con el selector en TIME, comienzan a parpadear los dígitos de año, seleccionado
el año adecuado con Δ y ∇ , y validado con OK, se repite la operación para mes,
día del mes, día de la semana, hora y minutos, por este orden. Pulsar “OK” para
validar los datos introducidos. Los datos de fecha y hora solo se graban en el
cronotermostato al validar los minutos con OK.
Una vez puesto en fecha y hora pasar a modo normal, colocar el selector en
START.
CAMBIO DE ESTACIONES
El cambio de horario se realiza automáticamente el último domingo de Marzo y el
último de Octubre. (No puede cambiarse ni anularse)
TEMPERATURAS PREESTABLECIDAS
Las temperaturas que salen predeterminadas de fábrica son:
23 ºC
21ºC
Estos valores se pueden cambiar con los mandos laterales, el superior para
confort
y el inferior para ahorro
. (con estos mandos se puede también
bloquear el teclado).
PROGRAMAS PREESTABLECIDOS
El cronotermostato VIA sale de fábrica con la programación de todos los días de la
semana de 23h a 07h con temperatura de ahorro
y de 07h a 23h con
temperatura de confort
.
MODO CALEFACCIÓN / AIRE ACONDICIONADO
El equipo sale de fábrica en modo CALEFACCIÓN, para cambiar a modo AIRE
ACONDICIONADO el selector de modo de funcionamiento debe estar en la
posición START, pulsar la tecla OK durante más de 4 segundos y aparece en
pantalla HEAT (calefacción) y con las teclas de incremento o decremento de datos
cambia a COLD (aire acondicionado). Validamos el modo requerido con OK.
MODIFICAR PROGRAMAS
Para modificar programas se coloca selector inferior en PROG, y con el selector
superior se selecciona el día de la semana a programar, o bien el programa para
todos los días de la semana 1-7. El cronograma comienza a parpadear en las 24h
y se inicia la asignación de temperaturas a cada hora con los pulsadores frontales
y
, o pulsación apagado (antihielo) con los botones laterales, con cada
pulsación se va avanzando una hora en el cronograma según se va asignando la
temperatura requerida. Una vez concluida la programación del día seleccionado y
antes de girar cualquier selector pulsar OK para validar. Repetir esta operación
para cada día de la semana girando el selector superior y seleccionando el día a
programar.
ASIGNAR PROGRAMAS
El VIA realiza la asignación de programas de forma automática cuando funciona
en modo normal colocando el selector en START.
Si desea realizar el mismo programa todos los días de la semana, el selector de
días de la semana debe estar en la posición 1-7.
Si desea que cada día realice su programa individualmente, el selector de días
de la semana debe estar en cualquier posición del 1 al 7.
CRONOGRAMAS
TAPA ABATIBLE
MONTAJE: Dispositivo de control electrónico de montaje independiente sobre una
superficie (pared) o sobre caja de mecanismos. Para fijar el aparato abrir la tapa,
deslizar la tapa de pilas hacia la derecha y retirar la base de fijación haciendo
presión sobre la pestaña existente en el hueco de las pilas y separarla del aparato.
Fijar la base con los tornillos adjuntos. Para volver a insertar el VIA en su base
introducir las guías superiores de la base en las ranuras del aparato y presionar
sobre la parte inferior hasta encajar la pestaña en el hueco existente bajo la tapa
de pilas. Volver a poner la tapa de pilas.
CONEXIÓN: Conectar de acuerdo al siguiente esquema:
4
1
CALEFACCIÓN Y/Ó
AIRE ACONDICIONADO
2
3
CRONOGRAMA.
INDICACION DE
TEMPERATURAS
PROGRAMADAS SEGÚN
HORARIO
TEMPERATURA
AMBIENTE
CONTROLADOR
TELEFÓNICO
Para controlar una instalación a través de contactores es aconsejable colocar un
condensador en la bobina del mismo de valor adecuado (0,1 μF 275 V~).
TEMPERATURA
AHORRO
INDICADOR DE
NIVEL DE PILA
HORA ACTUAL
DIA DE LA SEMANA
INDICADOR DE
APAGADO
5
TEMPERATURA
CONFORT
INDICADOR DE
BLOQUEO DE
TECLADO
INDICADOR DE
ACTIVACION DE
CALDERA
FUNCIONAMIENTO OFF. APAGADO
Con el selector en OFF, el equipo no realiza ningún encendido, ni permite
manipular temperaturas, aparece en pantalla off. En este modo el aparato mide la
temperatura ambiente pero no realiza ninguna de sus funciones, excepto si la
temperatura baja del nivel del antihielo, 4 ºC, en cuyo caso se realiza un
encendido.
FUNCIONAMIENTO MANUAL (TERMOSTATO)
Si en modo “START” se pulsa la tecla de regulación de la temperatura de Confort
durante más de 4 segundos, el equipo entra en funcionamiento TERMOSTATO
(sin reloj) controlando siempre la Temperatura de Confort. Para salir de este modo
pulsar de nuevo durante mas de 4 segundos la tecla de regulación de temperatura
de Confort.
DIMENSIONES
27,6
126,7
BLOQUEO DE TECLADO
Para evitar manipulaciones no deseadas podemos bloquear el teclado en
cualquier modo de funcionamiento , para ello se mantiene pulsado sin desplazar
cualquiera de los mandos laterales de regulación de temperatura durante 3
segundos, apareciendo en pantalla el indicador de bloqueo (candado cerrado).
Para desbloquear el teclado realizamos la misma operación y desaparecerá el
indicador de bloqueo.
Cuando el teclado está bloqueado aparece en pantalla
Tipo de regulación:
Precisión de marcha:
Actualización temperatura:
Actualización relé de salida:
Tiempo para cambiar pilas:
Temperatura de funcionamiento:
Tª Transporte y Almacenamiento:
Grado de protección:
Clase de protección:
Situación de contaminación:
Tensión de impulso asignada:
Temperatura para el ensayo de bola:
Clase y estructura del software:
Conexión:
30
26
17
4
2 Pilas LR03/AAA de1,5V
5 (1) A /250 V∼
Aproximadamente 1 año
1B, 1S, 1T y 1U
8
60 minutos
± 0,5 ºC
0,1 ºC
Desde 5 ºC hasta 35 ºC
con ajuste de 0,5 ºC
Ahorro de +5 ºC a +25 ºC
Confort de +15 ºC a +35 ºC
Antihielo 4 ºC
ON-OFF con histéresis de 0,2 ºC
±1,2 s /24 h a 23 ºC
Cada 60 segundos
Cada 60 segundos
10 minutos
De 0 ºC a +50 ºC
De -10 ºC a +60 ºC
IP40 según EN 60529
II en montaje correcto
2
2,5 kW
80 ºC para 21.2.5
Clase A
Bornes de tornillo.
Conductores 1,5 mm2 (máximo)
07/03.2013
30
11
CARACTERÍSTICAS TÉCNICAS
Alimentación:
Poder de ruptura:
Duración de las Pilas:
Tipo de acción:
Programas admitidos:
Tiempos mínimos programables:
Precisión de medida de temperatura:
Resolución de medida de temperatura
Regulación de Temperatura:
11.5
26
CONTROL TELEFÓNICO
El aparato dispone de una conexión específica para conectar un controlador
telefónico. Cuando el controlador cierra su circuito el VIA pasa a modo OFF y
aparece en pantalla off parpadeando, volviendo al modo en el que esta el selector
al abrir el contacto del controlador. Cuando el controlador telefónico tiene cerrado
su circuito el VIA no puede ser programado.
84,5
RESET
Si queremos reinicializar el cronotermostato VIA, pulsamos RESET . Después de
un reset verificar los datos de fecha, hora y temperaturas reguladas.
COTAS DE MONTAJE
A016.73.53434
ORBIS TECNOLOGÍA ELÉCTRICA, S.A.
Lérida, 61
E–28020 MADRID
Teléfono:+ 34 91 5672277; Fax:+34 91 5714006
E-mail: info@ orbis.es
http://www.orbis.es
INSTALLING AND REPLACING BATTERIES: The unit is powered by:
two 1.5 V LR03 (AAA) alkaline batteries (not included). The polarity indicated in the
battery compartment must be respected. Battery lifetime is approximately one year.
It is recommended that the operating mode switch be set to Off before replacing
the batteries.
CHRONOTHERMOSTAT
RESET
WEEKDAY SELECTOR
OK PUSH BUTTON
(DATA CONFIRMATION)
FROM 1 TO 7
PROGRAMMING
DATA INCREMENT
SELECT COMFORT
IN PROGRAMMING
OPERATING MODE
SELECTOR
AND OFF
DATA DECREMENT
SAVINGS SELECTION
IN PROGRAMMING
SECURING TAB
CONNECTIONS BASE
DESCRIPTION
The VIA chronothermostat is an easy-to-use, programmable, electronic,
environment thermostat. It allows various temperatures to be assigned in various
time periods.
Specifications:
• 8 independent programmable programs (one for each day of the week and one
for every day of the week 1-7).
• Large display
• Simple to program as it can be done away from the base
• Possibility to control heating or air-conditioning
• 2 adjustable temperature levels: Savings
and Comfort
• Minimum periods of 60 minutes between temperature levels
• Possibility of locking the temperature regulation.
• Temperature regulation from +5ºC to +35ºC.
• Temperature measurement precision: ± 0.5 ºC
• Possibility of manual switch-off
• Easy to programme
• Automatic summer-winter time change
• Possibility of connection to telephone controller
• Possibility of keyboard locking
• Anti-icing temperature set at 4ºC (to prevent freezing)
WARNING: The assembly and installation of the electric apparatus must be carried
out by an authorised installer. Before proceeding with the installation, it must be
ensured that the wires to be connected are not connected to electrical power.
The unit is internally protected against interference.
SECURING BASE
DISPLAY
WIRES ACCESS HOLE
COMFORT TEMPERATURE
REGULATOR
AS KEYBOARD
LOCKING/UNLOCKING
PUSHBUTTON
SAVINGS TEMPERATURE
REGULATOR
AS KEYBOARD
LOCKING/UNLOCKING
PUSHBUTTON
TAB
BATTERY
COMPARTMENT
COVER
WARNING: Ten minutes are available to perform the battery replacement
operation without losing the regulated temperature, date and programmed time
information, with the programs always being maintained. If, at any time, the screen
appears blank or the information is not legible, RESET the unit using the tip of a
ballpoint pen or similar, and check that the batteries are in good condition.
The spent batteries must be deposited in a container designed for this purpose.
Respect the environment.
When the batteries are first installed, the screen is activated and all the display
segments are shown, then, after a short battery detection period, the VIA unit
enters in operation.
BATTERY LEVEL INDICATION:
When the batteries are fully charged, the following symbol is displayed on
screen
When the batteries are half charged, the following symbol is displayed on
screen .
When the batteries are spent this symbol will flash and the rest of the screen is
blank
SETTING THE TIME
With the selector set to TIME, the year digits begin to flash and the corresponding
year is selected using Δ and ∇, confirming with OK, this operation is then repeated
for the month, day of the month, day of the week, hours and minutes in this order.
Press OK to confirm the entered data. The date and time data are only stored in
the timed thermostat when the minutes are confirmed with OK.
Once the date and time are set, normal mode is entered by setting the selector to
START.
DAYLIGHT SAVING TIME CHANGE
This time change is automatically carried out on the first Sunday in March and the
last Sunday in October. (This cannot be changed or modified).
PRE-ESTABLISHED TEMPERATURES
The factory-set temperatures are:
23 ºC
21ºC
These values can be changed using the side controls, the upper for comfort
and the lower for savings . (These controls can also be used to block the
keyboard).
PRE-ESTABLISHED PROGRAMS
The VIA chronothermostat leaves the factory with programming for all the days of
the week set to 23:00 to 07:00, with savings temperature
and from 07:00 to
23:00 with comfort temperature
.
HEATING/AIR-CONDITIONING MODE
The unit leaves the factory set to HEATING mode, to change it to AIRCONDITIONING, the operating mode selector must be in the START position and
the OK button pressed for more than four seconds, which displays the HEAT
screen, then the data increase and decrease keys are used to change to Cold
(air-conditioning). The required mode is confirmed with OK.
MODIFYING PROGRAMS
Programs are modified by setting the lower selector to PROG and selecting the
day or the week to be programmed with the upper selector, or the program for
every day of the week 1-7. The timed thermostat begins to flash in the 24 hours
and the temperature is set for each hour with the front pushbuttons.
and
, each press advances the timing diagram by one hour as the
required temperature is assigned., Once the programming for the selected day is
completed and before turning any selector switch, OK must be pressed to confirm.
This operation is repeated for each day of the week by turning the upper selector to
the day to be programmed.
ASSIGNING PROGRAMS
The VIA unit assigns programs automatically when in normal mode by setting the
selector to START.
If the same program is to be used for all the days of the week, the weekday
selector must be in the 1-7 position.
If each day is to be individually programmed, the weekday selector must be in
any position from 1 to 7.
TIMING DIAGRAMS
FOLDING COVER
INSTALLATION: An electronic control device for independent installation on a
surface (wall) or mechanism box. In order to fix the unit in place, slide the battery
compartment cover to the right and remove the securing base by pressing the tab
in the battery compartment cavity and separating it from the unit. Fix the base with
the included screws. To return the VIA into its base, insert the upper base guides
into the unit slots and press on the upper section until the tab fits into place into the
cavity under the battery compartment cover. Replace the battery compartment
cover.
CONNECTION: Connect the unit in accordance with the following diagram.
4
1
HEATING AND/OR
AIR-CONDITIONING
2
3
5
TELEPHONE
CONTROLLER
In order to control an installation via contactors, it is recommended to install a
suitable capacitor into its winding (0.1 µF, 275 Vac).
TIMING DIAGRAM
INDICATION OF
TEMPERATURES
PROGRAMMED
ACCORDING TO TIME
ENVIRONMENT
TEMPERATURE
COMFORT
TEMPERATURE
SAVINGS
TEMPERATURE
BATTERY
LEVEL
INDICATOR
CURRENT TIME
WEEKDAY
OFF INDICATOR
KEYBOARD
LOCKED
INDICATOR
BOILER
OPERATION
INDICATOR
OFF OPERATION
With the selector at OFF, the unit will not switch on or allow any temperature
manipulation and the screen will be blank. In this mode, the unit measures the
ambient temperature, but will not perform any of its functions, except if the
temperature drops below the anti-freezing level of 4ºC, in which case it will switch
on.
MANUAL OPERATION (THERMOSTAT)
If, when in START mode, the Comfort temperature regulation key is pressed for
more than four seconds, the equipment will enter THERMOSTAT operation
(without the timer), always controlling the Comfort temperature. To exit this mode,
the Comfort temperature regulation key must again be pressed for more than four
seconds.
DIMENSIONS
27,6
126,7
KEYBOARD LOCKING
In order to prevent undesired manipulation, the keyboard can be locked in any
operating mode, by pressing without moving any of the side temperature regulation
controls for three seconds, with the locked keyboard indicator (a closed lock) being
shown onscreen. The same operation should be repeated to unlock the keyboard,
which will remove the locked indication.
When the keyboard is locked, the following is displayed onscreen
TELEPHONE CONTROL
The unit includes a specific connection for a telephone controller. When the
controller closes its circuit, the VIA changes to OFF mode and “off” is displayed
flashing onscreen, and it will return to the selected mode when the controller
contact is opened. When the telephone controller circuit is closed, the VIA unit
cannot be programmed.
84,5
RESET
REST must be pressed to rest the VIA timed thermostat and this will cause the loss
of the date, time and regulated temperature information.
11.5
30
26
4
17
Temperature regulation type:
Operation precision:
Temperature updating:
Output relay updating:
Battery replacement time:
Operating temperature:
Transport and storage temperature
Protection type:
Protection class:
Contamination situation:
Transient pulse voltage
Ball test temperature
Software class and structure
Connection
07/03.2013
30
Two 1.5 V LR03/AAA batteries
5(1) A /250 V~
Approximately one year
1B, 1S, 1T and 1U
8
60 minutes
± 0.5 ºC
0.1 ºC
From 5 ºC to 35 ºC
with setting of 0,5 ºC
Savings from +5 ºC to +25 ºC
Comfort from +15 ºC to +35 ºC
Anti-icing 4 ºC
ON-OFF with 0.2 ºC hysteresis
±1.2 s /24 h at 23 ºC
Every 60 seconds
Every 60 seconds
10 minutes
From 0 ºC to +50 ºC
From -10 ºC a +60 ºC
IP40 in accordance with EN 60529
II in correctly installed
2
2.5 kV
+ 80 ºC for 21.2.5
Class A
Terminals for wires of maximum
1,5 mm2 section
11
Power supply:
Breaking power:
Battery lifetime:
Type of action:
Accepted programs:
Minimum programmable times:
Temperature measurement precision:
Temperature measurement resolution:
Temperature measurement and regulation:
26
TECHNICAL SPECIFICATIONS
INSTALLATION DIMENSIONS
A016.73.53506
ORBIS TECNOLOGÍA ELÉCTRICA, S.A.
Lérida, 61
E–28020 MADRID
Teléfono:+ 34 91 5672277; Fax:+34 91 5714006
E-mail: info@ orbis.es
http://www.orbis.es
MISE EN PLACE ET REMPLACEMENT DES PILES: l’appareil est alimenté par
2 piles alcalines LR03 (AAA) de 1,5 V (non fournies). Respectez la polarité
indiquée dans l’emplacement des pilas. La durée approximative des piles est de 1
an. Il est recommandé de mettre le sélecteur de mode de fonctionnement sur off
avant de remplacer les piles.
CHRONOTHERMOSTAT
RÉINITIALISATION
SÉLECTEUR JOUR
DE LA SEMAINE
BOUTON-POUSSOIR OK
(VALIDATION DE DONNÉES)
CHANGEMENT CHAUFFAGE
OU AIR CLIMATISÉ
DE 1 - 7 EN
PROGRAMMATION
FONCTION THERMOSTAT
AUGMENTE DONNÉES
SÉLECTEUR MODE DE
FONCTIONNEMENT
ET EXTINCTION
SÉLECTIONNE CONFORT
EN PROGRAMMATION
DIMINUE DONNÉES
SÉLECTIONNE ÉCONOMIE
EN PROGRAMMATION
ANGUETTE DE FIXATION
BASE DE CONNEXION
DESCRIPTION
Le chronothermostat VIA est un thermostat d’ambiance électronique
programmable facile à utiliser. Il permet d’assigner différentes températures
pendant différents intervalles horaires.
Caractéristiques
• 8 programmes indépendants et programmables, (un pour chaque jour de la
semaine, et un pour tous les jours de la semaine 1-7).
• Écran de grande taille.
• Commodité de programmation puisqu’elle peut être réalisée hors de la base.
• Possibilité de contrôle du chauffage ou de l’air climatisé.
• 2 niveaux de température réglables : Économie
et Confort
.
• Périodes minimales entre les niveaux de température de 60 minutes.
• Possibilité de blocage de la régulation de la température.
• Régulation de la température de +5 ºC à +35 ºC.
• Précision de mesure de température: ± 0,5 ºC
• Possibilité d’extinction manuelle.
• Programmation facile.
• Changement automatique heure d’été – hiver.
• Possibilité de connexion à un contrôleur téléphonique.
• Possibilité de blocage du clavier.
• Température antigel fixe à 4 ºC (pour éviter des congélations).
ATTENTION: l’installation et le montage des appareils électriques doivent être
réalisés par un installateur agréé. Avant de procéder à la connexion, vous devez
vous assurer que les conducteurs à connecter ne sont pas sous tension.
L’appareil est internement protégé contre les interférences.
BASE DE FIXATION
PASSE-FILS
ÉCRAN
RÉGULATEUR Tº CONFORT
(COMME BOUTON-POUSSOIR,
BLOCAGE / DÉBLOCAGE
DE CLAVIER)
RÉGULATEUR Tº ÉCONOMIE
(COMME BOUTON-POUSSOIR,
BLOCAGE / DÉBLOCAGE
DE CLAVIER)
CACHE DES PILES
COUVERCLE
RABATTABLE
CONNEXION : connectez conformément au schéma suivant:
4
CHAUFFAGE ET/OU
AIR CLIMATISÉ
3
MISE À L’HEURE
Avec le sélecteur sur TIME, les chiffres de l’année se mettent à clignoter.
Sélectionnez l’année adéquate avec Δ et ∇, puis validez avec OK. Répétez
l’opération pour le mois, le jour du mois, le jour de la semaine, l’heure et les
minutes, dans cet ordre. Appuyez sur «OK» pour valider les données introduites.
Les données de date et d’heure ne sont enregistrées dans le chronothermostat
que lorsque vous validez les minutes avec OK.
Une fois la date et l’heure réglées, passez au mode normal et mettez le sélecteur
sur START.
CHANGEMENT DE SAISONS
Le changement d’heure se réalise automatiquement le dernier dimanche de mars
et le dernier dimanche d’octobre (il ne peut être ni changé ni annulé).
TEMPÉRATURES PRÉDÉFINIES
Les températures qui sont prédéfinies en usine sont:
23 ºC
21ºC
Ces valeurs peuvent être changées avec les commandes latérales, la supérieure
pour confort
et l’inférieure pour économie
. (avec ces commandes, vous
pouvez également bloquer le clavier).
PROGRAMMES PRÉDÉFINIS
Le chronothermostat VIA sort de l’usine avec la programmation de tous les jours
de la semaine de 23h à 07h avec la température d’économie
et de 07h à 23h
avec la température de confort
.
MODE CHAUFFAGE / AIR CLIMATISÉ
L’équipement sort de l’usine en mode CHAUFFAGE. Pour changer au mode AIR
CLIMATISÉ, le sélecteur de mode de fonctionnement doit être sur la position
START. Appuyez sur la touche OK pendant plus de 4 secondes, l’écran affiche
HEAT (chauffage). Avec les touches d’augmentation ou diminution des données,
changez à COLD (air climatisé). Validez le mode requis avec OK.
MODIFIER LES PROGRAMMES
Pour modifier les programmes, mettez le sélecteur inférieur sur PROG et, avec le
sélecteur supérieur, sélectionnez le jour de la semaine à programmer, ou bien le
programme pour tous les jours de la semaine 1-7. Le chronogramme commence à
clignoter sur 24h et l’assignation des températures commence à chaque heure
avec les boutons-poussoirs frontaux.
et
, avec chaque pulsation, vous avancez une heure dans le
chronogramme lorsque vous assignez la température requise. Une fois la
programmation du jour sélectionné terminée et avant de tourner tout sélecteur,
appuyez sur OK pour valider. Répétez cette opération pour chaque jour de la
semaine en tournant le sélecteur supérieur et en sélectionnant le jour à
programmer.
CHRONOGRAMMES
MONTAGE: dispositif de contrôle électronique à montage indépendant sur une
surface (mur) ou sur un boîtier de mécanismes. Pour fixer l’appareil, ouvrez le
couvercle, faites glisser le cache des piles vers la droite, retirez la base de fixation
en appuyant sur la languette qui se trouve sur l’emplacement des piles, puis
séparez-la de l’appareil. Fixez la base avec les vis fournies. Pour insérer à
nouveau le VIA sur sa base, introduisez les guides supérieurs de la base dans les
rainures de l’appareil, puis appuyez sur la partie inférieure jusqu’à emboîter la
languette dans le creux qui se trouve sous le cache des piles. Remettez le cache
des piles.
2
INDICATION DU NIVEAU DES PILES:
Lorsque les piles sont totalement chargées, l’écran affiche le symbole de pile
Lorsque les piles sont à mi-charge, l’écran affiche le symbole de pile
.
Lorsque les piles sont épuisées, l’écran affiche de façon intermittente le
symbole
et le reste de l’écran apparaît en blanc.
ASSIGNER LES PROGRAMMES
Le VIA réalise l’assignation de programmes de façon automatique lorsqu’il
fonctionne en mode normal en mettant le sélecteur sur START.
Si vous souhaitez réaliser le même programme tous les jours de la semaine, le
sélecteur de jours de la semaine doit être sur la position 1-7.
Si vous souhaitez que chaque jour réalise son programme individuellement, le
sélecteur des jours de la semaine doit être sur n’importe quelle position de 1 à 7.
LANGUETTE
1
ATTENTION : vous disposez de 10 minutes pour réaliser l’opération de
remplacement des piles sans perdre les données de température régulée, date et
heure programmées; les programmes sont toujours maintenus. Si à un moment
donné, l’écran reste en blanc ou des données illisibles s’affichent, actionnez la
RÉINITIALISATION en introduisant la pointe d’un stylo ou objet similaire, après
vous être assuré que las piles sont en bon état et bien mises en place.
Déposez les piles usées dans un conteneur prévu à cette fin. Respectez
l’environnement.
Lorsque vous mettez les piles pour la première fois, l’écran s’active et tous les
segments de celui-ci apparaissent et, après une courte période de détection des
piles, le VIA se met en marche.
CHRONOGRAMME
INDICATION DE
TEMPÉRATURES
PROGRAMMÉES SELON
HORAIRE
TEMPÉRATURE
AMBIANTE
TEMPÉRATURE
ÉCONOMIE
INDICATEUR DE
NIVEAU DE PILE
HEURE ACTUELLE
JOUR DE LA SEMAINE
INDICATEUR
D'EXTINCTION
5
CONTRÔLEUR
TÉLÉPHONIQUE
Pour contrôler une installation au moyen de contacteurs, il est conseillé de placer
un condensateur dans la bobine de celui-ci de valeur adéquate (0,1 μF 275 V~).
TEMPÉRATURE
CONFORT
INDICATEUR DE
BLOCAGE DE
CLAVIER
INDICATEUR
D'ACTIVATION DE
CHAUDIÈRE
FONCTIONNEMENT OFF. EXTINCTION
Avec le sélecteur sur OFF, l’équipement ne réalise aucun allumage, ni permet de
manipuler les températures. L’écran affiche off. Dans ce mode, l’appareil mesure
la température ambiante mais ne réalise aucune de ses fonctions, sauf si la
température descend en dessous du niveau de l’antigel, 4 ºC, cas dans lequel un
allumage se produit.
FONCTIONNEMENT MANUEL (THERMOSTAT)
Si dans le mode «START» vous appuyez sur la touche de réglage de la
température de Confort pendant plus de 4 secondes, l’équipement entre en
fonctionnement THERMOSTAT (sans horloge) en contrôlant toujours la
température de Confort. Pour sortir de ce mode, appuyez à nouveau pendant plus
de 4 secondes sur la touche de réglage de la température de Confort.
DIMENSIONS
27,6
126,7
BLOCAGE DU CLAVIER
Afin d’éviter des manipulations non souhaitées, vous pouvez bloquer le clavier
dans n’importe quel mode de fonctionnement. Pour ce faire, maintenez enfoncée
sans la bouger n’importe quelle commande latérale de réglage de la température
pendant 3 secondes, l’écran affiche l’indicateur de blocage (cadenas fermé). Pour
débloquer le clavier, réalisez la même opération et l'indicateur de blocage
disparaît.
Lorsque le clavier est bloqué, l’écran affiche .
CONTRÔLE TÉLÉPHONIQUE
L’appareil dispose d’une connexion spécifique pour connecter un contrôleur
téléphonique. Lorsque le contrôleur ferme son circuit, le VIA passe au mode OFF
et l’écran affiche off de façon intermittente, tout en retournant au mode où se
trouve le sélecteur lorsque le contact du contrôleur est ouvert. Lorsque le
contrôleur téléphonique a son circuit fermé, le VIA ne peut pas être programmé.
84,5
RÉINITIALISATION
Si vous souhaitez réinitialiser le chronothermostat VIA, appuyez sur RESET.
L’appareil perdra les données de date, heure et températures réglées.
11.5
30
26
Type de régulation de Tº:
Précision de marche:
Mise à jour température:
Mise à jour relais de sortie:
Temps pour changer piles:
Température de fonctionnement:
Tº de transport et de stockage
Degré de protection:
Classe de protection:
Situation de pollution:
Tension transitoire d’impulsion
Température pour l’essai bille
Classe et structure du logiciel
Connexion
07/03.2013
30
2 piles LR03/AAA de1,5 V Pouvoir
5 (1) A /250 V∼
Environ 1 an
1B, 1S, 1T y 1U
8
60 minutes
±0,5 ºC
0,1 ºC
De 5 ºC à 35 ºC
réglable de 0,5 ºC
Économie de +5 ºC à +25 ºC
Confort de +15 ºC à +35 ºC
Antigel 4 ºC
ON-OFF avec hystérèse de 0,2 ºC
±1,2 s /24 h a 23 ºC
Toutes les 60 secondes
Toutes les 60 secondes
10 minutes
De 0 ºC à +50 ºC
De -10 ºC à +60 ºC
IP40 selon EN 60529
II dans un montage correct
2
2,5 kV
80 ºC pour 21.2.5
Classe A
Borne à trou pour conducteurs à
section maximale 1,5 mm²
11
26
CARACTÉRISTIQUES TECHNIQUES
Alimentation:
de rupture:
Durée des piles:
Type d’action:
Programmes admis:
Temps minimaux programmables:
Précision de mesure de température:
Résolution de mesure de température :
Mesure et régulation de Tº:
17
4
COTES DE MONTAGE
A016.73.53434
ORBIS TECNOLOGÍA ELÉCTRICA, S.A.
Lérida, 61
E–28020 MADRID
Téléphone:+ 34 91 5672277; Fax :+34 91 5714006
Courriel: info@ orbis.es
http://www.orbis.es
Collegamento: Collegare il dispositivo rispettando scrupolosamente lo schema :
4
1
2
5
3
COMBINATORE
TELEFONICO
CALDAIA O ARIA
CONDIZIONATA
CRONOTERMOSTATO
MANUALE D’USO
DURANTE L’INSTALLAZIONE ED IL FUNZIONAMENTO DEL PRODOTTO E’
NECESSARIO RISPETTARE LE SEGUENTI INDICAZIONI:
Leggere attentamente le istruzioni riportate in questo manuale, il prodotto deve
essere installato da un installatore qualificato.
Prima di accedere ai morsetti di collegamento, assicurarsi che i conduttori da
collegare o già collegati allo strumento non siano in tensione, non alimentare o
collegare il prodotto se qualche parte di esso risulta dannéggiata, collegare il
prodotto rispettando gli schemi descritti nel presente manuale e sullo strumento.
RESET
SELETTORE GIORNI
DELLA SETTIMANA
PER LA
PROGRAMMAZIONE
TASTO CONFERMA
TASTO ESTATE / INVERNO
COMANDO MANUALE
INCREMENTA I DATI
SELEZIONA TEMPERATURA
DIURNA IN PROGRAMMAZIONE
SELETTORE MODO
DI FUNZIONAMENTO
DECREMENTA I DATI
SELEZIONA TEMPERATURA
NOTTURNA IN
PROGRAMMAZIONE
DISPOSITIVO DI
SGANCIO
ATTENZIONE:
ALL’ INSERIMENTO DELLE BATTERIE POTREBBE
TRASCORRERE UN TEMPO DI CIRCA 30 SECONDI PRIMA
CHE IL DISPLAY SI ACCENDA
DESCRIZIONE
Il cronotermostato VIA è un termostato ambiente elettronico programmabile di
facile utilizzo. Permette di assegnare due distinte temperature in differenti orari.
Caratteristiche
8 programmi indipendenti e programmabili, (uno per ogni giorno della
settimana, e uno per tutta la settimana 1-7)
Display grande e segmenti ben visibili
Comoda programmazione che si può realizzare anche con base e
collegamento staccato.
Possibilità di controllare la caldaia e l’ aria condizionata.
2 Livelli di temperatura regolabili: Notturna
e Diurna
.
Intervento minimo del cambio di temperatura 60 minuti.
Regolazione della temperatura da +5 ºC a +35 ºC .
Precisione di misura della temperatura: ± 0,5 ºC
Spegnimento manuale
Facile programmazione.
Cambio automatico dell’ ora legale
Connesione per un combinatore telefonico
Blocco dei tasti
Temperatura antigelo fissa a 4°C. (per evitare il congelamento e la rottura della
tubazione )
BASE DI FISSAGGIO
DISPLAY
PASSAGIO CAVI
REGULAZIONE Tª DIURNA
(COME PULSANTE,
BLOCCO / SBLOCCO
TASTI)
REGULAZIONE Tª NOTTURNA
(COME PULSANTE,
BLOCCO / SBLOCCO
TASTI)
FRONTALE BATTERIE
FRONTALE
Per controllare un’ installazione tramite un teleruttore è consigliabile
installare in parallelo alla bobina un condensatore 0,1 µF 275V~
INSERIMENTO E SOSTITUZIONE DELLE BATTERIE:
Utilizzare batterie alkaline modello LR03 (AAA) da 1,5 V (non incluse).
Rispettare la polarità serigrafata nel fondo del vano batterie .
La durata approssimativa delle batterie è di un anno. Si raccomanda di posizionare
il VIA in funzione OFF prima di sostituire le batterie.
ATTENZIONE: Disponete di 10 minuti per realizzare la sostituzione delle batterie
senza che la memoria interna, quindi tutta la programmazione, venga cancellata.
Depositate le batterie da eliminare, nei contenitori dedicati allo smaltimento
di questo tipo di prodotto, in modo da rispettare l’ambiente.
Se i dati sul diplay dovessero essere poco leggibili o volete resettare ( cancellando
tutti i dati programmati nel VIA ) inserite una punta nel foro con la scritta RESET e
premere, il display visualizzerà tutti i segmenti e potrete riprogrammare il
disposititvo.
Nell’ inserire le batterie si attivano tutti i segmenti del display e dopo qualche
secondo il cronotermostato entra in funzione.
Indicazione del livello delle batterie:
Batterie cariche
Batteire mezze cariche
Batterie scariche il simbolo lampeggia ( sostituirle)
IMPOSTAZIONE DATA E ORA
Con il selettore posto su TIME, si imposta la data l’ ora e il giorno della settimana.
1Selettore su TIME
2L’ ampeggia l’ anno ,con i tasti Δ e ∇ impostare il dato e confermare
con il tasto OK
3Ripetere l’operazione anche per ora, minuti, data e mese.
4Ripetere l’ operazione anche per i giorni della settimana posti a display
sotto l’ orario dal 1 al 7 e con il giorno impostato evidenziato da un
quadrato in neretto .
5Premere sempre il tasto “OK” per confermare le impostazioni
effettuate.
6Impostare il selettore su START.
TEMPERATURE PREIMPOSTATE
Le temperature prestabilite sono:
23 ºC
21ºC
Questi valori si possono cambiare con i due comandi laterali ( mezze manopole
lato dx del VIA )
(con questi comandi premendoli per 3 secondi si può anche bloccare la tastiera).
PROGRAMMI PREIMPOSTATI
Il cronotermostato VIA ha un programma preimpostato ( riprogrammabile ):
Dal Lunedi alla Domenica
Dalle 23:00h alle 07:00h con temperatura notturna
Dalle 07:00h alle 23:00h con la temperatura diurna.
Questa programmazione si ottiene sempre quando si resetta il VIA perchè
impostata nella memoria fissa del cronotermostato.
MODIFICARE I PROGRAMMI
Per modificare il programma si imposta il selettore basso su PROG e il selettore
alto sul giorno della settimana da programmare ( 1= LU, 2= MA........) per usare un
programma per tutti i giorni della settimana impostare il selettore superiore su 1-7.
A display apparirà un cronogramma ( vedi immagine cronogramma ) come se
fosse un orologio con tutte le 24h e per ogni ora il simbolo della temperatura
impostata e il simbolo delle ore 24:00h che lampeggia .
Premendo i tasti Δ
e ∇
decido per l’ ora che lampeggia es. alle 24:00 la
temperatura notturna o diurna che voglio impostare , ad ogni pressione dei tasti
Δ ο ∇ visualizzerò a display il simbolo della temperatura scelta per quell’ ora e
avanzerà in automatico all’ ora succesiva.
Completare il giro delle 24h e confermare la programmazione con il tasto “ OK “ a
questo punto la programmazione per quel giorno ( es. 1= Lunedi ) o ( es. dal 1 al 7
per tutti i giorni della settimana ) è completata .
A programmazione conclusa impostare il selettore su START.
CRONOGRAMMA
INSTALLAZIONE. PRIMA DI PROCEDERE ALL’INSTALLAZIONE, DISINSERIRE
L A RETE ELETTRICA.
Il dispositivo è interamente protetto contro le interferenze.
Montaggio:
Dispositivo di controllo elettronico a montaggio indipendente a parete tramite due
tasselli o in scatola incasso rettangolare tipo 503. Per accedere alla base di
fissaggio, sfilare verso destra il frontalino del vano batterie, premere verso l’ alto il
dispositivo di sgancio posto sotto il display e tirare verso l’ esterno il
cronotermostato. Fissare la base con due viti alla scatola ad incasso tipo 503
oppure tramite tasselli alla parete. Per fissare il VIA sulla base, inserire le due
guide superiori nelle apposite fessure e premere il VIA. Riporre il frontale delle
batterie.
CRONOGRAMMA.
INDICATORE DELLA
TEMPERATURA
PROGRAMMATA IN
FUNZIONE DELL' ORARIO
TEMPERATURA
AMBIENTE
TEMPERATURA
DIURNA
TEMPERATURA
NOTTURNA
INDICATORE
LIVELLO BATTERIE
ORA ATTUALE
GIORNI DELLA
SETTIMANA
INDICATORE DI
SPEGNIMENTO
INDICATORE
BLOCCO TASTI
INDICATORE
CALDAIA ACCESA
FUNZIONAMENTO OFF
Con il selettore su OFF, il VIA non realizza nessuna accensione ne permette di
modificare la temperatura , appare a display il simbolo off.
In questo modo il dispositivo visualizza la temperatura ambiente e entra in funzione
la temperatura antigelo di 4°C se la temperatura scende sotto questo valore si
metterà in funzione la caldaia .
DIMENSIONI:
27,61
126,7
RESET
Premere il tasto RESET posto sul lato alto destro del frontale con un corpo a
punta.
84,5
CAMBIO DELL’ ORA LEGALE
Il cambio dell’ ora legale è automatica e si realizza l’ ultima domenica di Marzo e l’
ultima di Ottobre . (Non può essere modificata ne annulata)
FUNZIONAMENTO ESTATE/INVERNO
Con il selettore impostato su “ Start “ premere per 4 secondi il tasto “ OK “ apparirà
a display la scritta Heat o Cold ( Inverno/Estate) tramite le due frecce scegliere il
modo di funzionamento e confermare con il tasto “OK”.
Il cronotermostato è programmato per il funzionamento invernale ( Heat ).
FUNZIONAMENTO MANUALE
Con il selettore impostato su “ Start “ premere per 4 secondi il tasto “ ^ “ il display
visualizzerà solo la temperatura sole, l’ ora e la temperature dell’ ambiente , con la
manopola laterale del sole , selezionare la temperatura desiderata .
11.5
30
26
4
17
11
26
BLOCCO DEI TASTI
Per evitare interventi indesidearati possiamo bloccare la tastiera, premendo i
comandi laterali della regolazione temperatura per 3 secondi.
A display apparirà il simbolo
per sbloccare la tastiera eseguire la stessa
operazione.
30
COMBINATORE TELEFONICO
Il VIA dispone di una connessione specifica per collegare un combinatore
telefonico.Quando il combinatore chiude il suo circuito, il VIA modifica il proprio
stato ponendosi in OFF. In questo caso sul display verrà visualizzato il simbolo off,
Nessun tipo di programmazione è possibile in questo stato.
CARATTERISTICHE TECNICHE
Alimentazione:
Potere di rottura:
Durata delle batterie:
Prove di Tipo :
Programmi ammessi:
Tempo minimo programmabile:
Precisione di misura della temperatura:
Risoluzione de regolazione
Misura e regolazione della temperatura
Tipo di regolazione
Precisione di funzionamento:
Campionamento della temperatura:
Campionamento stato del relè
Tempo max sostituzione batterie:
Temperatura di funzionamento:
Temp. di trasporto e immagazzinamento:
Gradi di protezione:
Classe di protezione:
Adatto ad inquinamento ambientale:
Tensione transitoria d’impulso
Temperatura di prova con la sfera
Classe e struttura del software:
Collegamenti
SCHEMA DI MONTAGGIO
2 Batterie LR03/AAA 1,5V
5 (1) A /250 V∼
Approssimativamente 1 anno
1B, 1S, 1T e 1U
8
60 minuti
± 0,5 ºC
0,1 ºC
Da 5 ºC a 35 ºC
con regolazione di 0,5 ºC
Notturna da +5ºC a +25 ºC
Diurna da +15°C a +35°C
Antigelo: 4 ºC
ON-OFF con isteresi a 0,2º C
±1,2 s /24 h a 23 ºC
Ogni 60 secondi
Ogni minuto
10 minuti
Da 0 ºC a +50 ºC
Da -10 ºC a +60 ºC
IP40 secondo EN 60529
II installato correttamente
2
2,5 kV
+ 80 ºC per 21.2.5
Classe A
Morsetti a vite per cavi
sez. max 1,5 mm2
07/03.2013
A016.73.53434
ORBIS ITALIA S.p.A.
Via L.Da Vinci, 9/B 20060 Cassina De Pecchi -MITel.- 02/95343454
Fax- 02/9520046
e-mail: info@ orbisitalia.it
http://www.orbisitalia.it