1
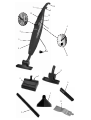
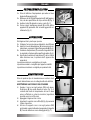
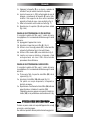
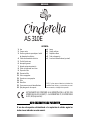
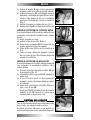
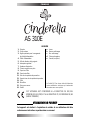
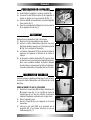
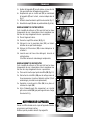
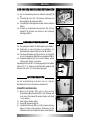
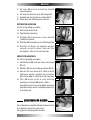
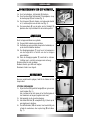
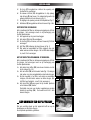
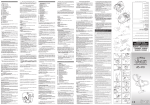
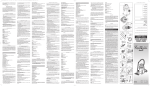
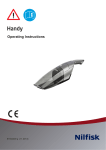
AS 310E
16
1
3
10
14
7
5
4
6
2
9
8
4
15
B
E
A
C
11
D
ITALIANO
AS 310E
LEGENDA
1. Impugnatura
2. Corpo motore
3. Ganci girevoli per alloggiamento
cavo alimentazione
4. Cavo alimentazione
5. Vite fissaggio impugnatura
6. Interruttore generale
7. Variatore aspirazione
8. Spia rossa sacco pieno
9. Coperchio sacco filtro
10. Coperchio microfiltro
11. Sacco raccogli polvere
12. Supporto sacco raccogli polvere
13. Filtro
14. Microfiltro
15. Presa per accessorio battitappeto
16. Occhiello
a) Lancia
b) Spazzola multiuso
c) Bocchetta multiuso
d) Tubo prolunga
e) battitappeto (opzionale)
La POLTI S.p.A. si riserva la facoltà di introdurre le
modifiche tecniche e costruttive che riterrà necessarie, senza obblighi di preavviso.
Questo apparecchio é conforme alla direttiva EC 89/336 modificata dalla 93/68 (EMC) e alla direttiva 73/23 modificata dalla 93/68
(bassa tensione).
USO CORRETTO DEL PRODOTTO
Questo apparecchio è destinato all'uso come aspiratore di solidi secondo le
descrizione ed istruzioni riportate in questo manuale.
ITALIANO
P R E PA R A Z I O N E A L L ' U S O
1a. Prima di utilizzare l'aspirapolvere procedere al montaggio dell'impugnatura (1).
2a. Rimuovere la vite (5) dall'impugnatura (1) dell'apparecchio, ed unire quest'ultimo al corpo motore (2) (fig. 1)
3a. Avvitare la vite (5) girando in senso orario (fig. 2).
4a. Fissare i ganci avvolgicavo girevoli (3) sui fori dell'impugnatura (1) premendo fino ad averli agganciati correttamente (fig. 3).
Fig. 1
Fig. 2
ASPIRAZIONE
Ora l'apparecchio è pronto per operare.
1b. Collegare l'accessorio idoneo alla pulizia da effettuare
2b. Inserire il cavo di alimentazione (4) ad una presa di corrente idonea, e premere l'interruttore generale (6) (fig. 4).
3b. Il variatore di aspirazione (7) consente di regolare la forza aspirante in funzione della superficie da pulire (fig. 4).
4b. Spostando il variatore d'aspirazione (7) verso sinistra
nella direzione max, la potenza dell' apparecchio
aumenterà.
La posizione minima è consigliata per le tende.
La posizione media è consigliata per tappeti e imbottiti.
La posizione massima è consigliata per pavimenti duri.
Fig. 3
Fig. 4
7
6
MANUTENZIONE
Prima di qualsiasi tipo di manutenzione accertarsi che il
cavo di alimentazione non sia collegato alla rete elettrica.
SOSTITUZIONE SACCO RACCOGLI POLVERE
1c. Quando il sacco raccogli polvere (11) sarà pieno,
l’indicatore (8) da verde diventerà rosso (fig. 5). Il
controllo del livello di riempimento del sacco deve
essere effettuato a potenza massima (regolatore
spostato verso la scritta max).
2c. Appoggiare l'apparecchio a terra.
3c. Asportare il coperchio sacco filtro (9) (fig. 6) premendo
il tasto di apertura.
4c. Estrarre il supporto sacco raccogli polvere (12)
arretrandolo e quindi sollevarlo impugnando la linguetta
(Z), facendo attenzione a non danneggiarlo (fig. 7).
Fig. 5
Fig. 6
ITALIANO
5c. Ripiegare la linguetta (Z) su se stessa, andando ad
otturare il foro per evitare fuoriuscita di polvere.
6c. Inserire il nuovo sacco (11) conformandolo al vano di
alloggio e mantenendo la linguetta (Z) verso l'alto,
inserire il lato opposto ad essa nelle scanalature
presenti sul fondo de vano, come mostrato in fig. 8.
7c. Infilarre il manicotto nel foro del sacchetto (fig. 7).
8c. Riposizionare il coperchio (9) nella posizione iniziale
(fig. 6 bis).
PULIZIA O SOSTITUZIONE DEL FILTRO MOTORE
Si consiglia la pulizia del filtro ogni 2 cambi del sacco
raccoglipolvere. Si raccomanda la sostituzione ogni 5 cambi
del sacco.
1d. Appoggiare l'apparecchio a terra.
2d. Asportare il coperchio sacco filtro (9). (fig. 6)
3d. Estrarre sacco raccogli polvere (11), come descritto
nel punto Sostituzione Sacco Raccogli Polvere.
4d. Estrarre il filtro motore (13) come mostrato in fig. 9.
5d. Lavarlo con acqua e detersivo, sciacquare e farlo
asciugare bene, nel caso il filtro fosse lacerato
provvedere alla sostituzione.
PULIZIA O SOSTITUZIONE DEL MICROFILTRO
Si consiglia la pulizia del filtro ogni 2 cambi del sacco
raccoglipolvere. Si raccomanda la sostituzione ogni 5 cambi
del sacco.
1e. Tirare verso l'alto il coperchio microfiltro (10) che si
sgancerà (fig. 10)
2e. Asportare il microfiltro (14) dalla sede (fig. 11).
Per pulirlo con acqua insaponata, sciacquarlo e
lasciarlo asciugare.
3e. Riposizionare correttamente il microfiltro (14) nella sua
apposita sede e richiudere il coperchio (10).
Cinderella può essere appesa a un gancio tramite l'occhiello (16), la cui portata deve essere almeno di 5 Kg.
Fig. 6 bis
Fig. 7
Z
Fig. 8
Fig. 9
Fig. 10
Fig. 11
P U L I Z I A D E L L ' A P PA R E C C H I O
Passare un panno umido sul corpo dell'apparecchio e sugli
accessori e quindi asciugare.
Non utilizzare prodotti abrasivi particolarmente aggressivi.
ITALIANO
AV V E R T E N Z E
Attenzione! Non usare l'apparecchio senza aver letto le istruzioni per l'uso.
• In caso di guasto o mal funzionamento, non tentare mai di smontare l'apparecchio ma
rivolgersi al Centro di Assistenza Autorizzato più vicino.
• L'apparecchio non deve essere utilizzato da bambini o da personale non addestrato all'
uso.
• Non usare mai l'apparecchio con mani o piedi bagnati o a piedi nudi.
• Per non compromettere la sicurezza dell'apparecchio, utilizzare solo parti di ricambio
e accessori originali, approvati dal costruttore.
• Non utilizzare l'apparecchio se il cavo di alimentazione o altre parti importanti
dell'apparecchio sono danneggiate.
• Se il cavo di alimentazione è danneggiato, esso deve essere sostituito dal suo
costruttore o dal suo servizio assistenza tecnica o comunque da una persona con
qualifica similare, in modo prevenire ogni rischio.
• Non aspirare acidi e solventi non diluiti che potrebbero causare seri danni ai materiali
dell'apparecchio e soprattutto non aspirare mai liquidi esplosivi, gas infiammabili,
polveri esplosive, benzine, vernici, olio combustibile, che a contatto con l'aria aspirata
potrebbero causare esplosioni.
• Non usare mai l'apparecchio all'aperto o su superfici bagnate o per aspirare liquidi.
• Non aspirare mai oggetti duri o taglienti, ceneri calde o sigarette accese o altri simili.
• E' vietato l'uso dell'apparecchio in ambienti in cui sussiste il pericolo di esplosioni.
• Non aspirare oggetti in fiamme o incandescenti.
• Non immergere mai l'apparecchio nell'acqua.
NOTE
GARANZIA
CINDERELLA AS 310 è garantita 1 anno dalla data di acquisto contro i difetti di fabbricazione e i vizi dei materiali. La garanzia non è valida se il guasto è causato da un impiego
improprio. In caso di guasto o malfunzionamento, contattare immediatamente il Centro
Assistenza autorizzato più vicino. Eventuali manomissioni dell’apparecchio da parte di personale non autorizzato invalideranno automaticamente la garanzia.
• La Polti S.p.A. declina tutte le responsabilità in caso di incidenti derivanti da un
utilizzo di CINDERELLA AS 310 non conforme alle presenti istruzioni d’uso.
AT T E N Z I O N E
• L’apparecchio è costruito secondo le norme vigenti per il riciclaggio.
• Si raccomanda di non gettare nei rifiuti domestici i materiali di imballaggio protettivi
per il trasporto, ma consegnarli ai relativi centri di raccolta.
• I filtri ed i sacchi raccoglipolvere sono in vendita presso i Centri Assistenza Tecnica Autorizzati e presso i
migliori negozi di elettrodomestici. Raccomandiamo di
usare solo ricambi originali.
R
UFFICIO SERVIZIO CLIENTI
Chiamando questo numero verde al solo costo di uno scatto,
800 012363
potrà ordinare i sacchi raccoglipolvere di ricambio e riceverli
direttamente a casa sua tramite il servizio postale.
Chiamando questo numero i nostri incaricati saranno a disposi-
800 824148
zione per rispondere alle Vostre domande e fornirVi tutte le indicazioni utili per sfruttare al meglio le qualità dei prodotti POLTI.
ESPAÑOL
AS 310E
LEYENDA
1. Asa
2. Cuerpo motor
3. Ganchos giratorios para alojar el cable
de alimentación eléctrica
4. Cable de alimentación eléctrica
5. Tornillo fijación asa
6. Interruptor general
7. Variador potencia aspiración
8. Piloto rojo indicador saco lleno
9. Tapa saco filtro
10. Tapa microfiltro
11. Saco recogepolvo
12. Soporte saco recogepolvo
13. Filtro
14. Microfiltro
15. Toma para accesorio bate-alfombras
16. Ojal para gancho de soporte
a)
b)
c)
d)
e)
Lanza
Cepillo multiuso
Boquilla multiuso
Tubo prolongación
Accesorio bate-alfombras (opcional)
POLTI S.p.A se reserva el derecho de introducir las
modificaciones técnicas y constructivas que considere necesarias, sin obligación de preaviso.
ESTE APARATO ES CONFORME A LA NORMATIVA DE LA EC 89/336
MODIFICADA EL 93/68 (EMC) Y A LA NORMATIVA 73/23 MODIFICADA
EL 93/68 (baja tensión).
USO CORRECTO DEL PRODUCTO
El uso de este aparato está destinado a la aspiración de sólidos según las
instrucciones indicadas en este manual.
ESPAÑOL
P R E PA R A C I Ó N PA R A L A U T I L I Z A C I Ó N
1a. Antes de utilizar el aspirador proceder al montaje del
asa (1).
2a. Mover el tornillo (5) del asa (1) del aparato y unir éste
último al cuerpo motor (2) (fig. 1).
3a. Atornillar el tornillo (5) girándolo en sentido horario
(fig. 2).
4a. Fijar los ganchos aloja cable girándolos (3) hacía fuera
del asa (1) presionando hasta haberlos enganchado
correctamente (fig.3).
Fig. 1
Fig. 2
ASPIRACIÓN
Ahora el aparato esta disponible para ser utilizado.
1b. Conectar el accesorio idóneo de acuerdo con la
limpieza que se desee efectuar.
2b. Insertar el cable de alimentación en una toma de corriente
adecuada y presionar el interruptor general (6) (fig. 4).
3b. El variador de aspiración (7) (fig. 4) permite regular la
fuerza de aspiración en función de la superficie a limpiar.
4b. Desplazando el variador de aspiración (7) hacía la izquierda, en la dirección Max la potencia del aparato aumentará.
La posición mínima es aconsejada para las cortinas.
La posición media es aconsejada para alfombras, colchas
y edredones.
La posición máxima es aconsejada para suelos duros.
Fig. 3
Fig. 4
7
6
MANTENIMIENTO
Antes de efectuar cuaquier operación de mantenimiento
cerciorarse de que el cable de alimentación no esté
conectado a la red eléctrica.
SUSTITUCIÓN DEL SACO RECOGEPOLVO
1c. Cuando el saco recogepolvo (11) esté lleno el indicador
(8) passará de color verde a rojo (fig. 5).
El control del nivel de llenado del saco debe ser
efectuado a la potencia máxima (regulador desplazado
hacia la indicación Max).
2c. Apoyar el aparato en el suelo.
3c. Levantar la tapa del saco filtro (9) (fig. 6) presionando
la tecla de apertura.
4c. Extrer el soporte del saco recogepolvo (12) tirando de
él y después levantándolo empuñando la lengueta (Z),
prestando atención en no dañarlo (fig. 7).
Fig. 5
Fig. 6
ESPAÑOL
5c. Replegar la lengueta (Z) sobre sí misma para obturar
el agujero y evitar así la salida de polvo del aspirador.
6c. Introducir el nuevo saco (11) conformándolo al vano de
alojamiento y manteniendo la lengueta (Z) hacia arriba.
Insertar el lado opuesto de esta en la acanaladura
presente en el fondo del vano, tal como se muestra en
la fig. 8.
7c. Ensartar el manguito en el agujero del saco. (fig. 7)
8c. Reposicionar la tapa (9) en su posición inicial (fig. 6 bis)
LIMPIEZA O SUSTITUCIÓN DEL FILTRO DEL MOTOR
Se aconseja la limpieza del filtro cada dos cambios del saco
recogelpolvo. Se recomienda la sustitución cada 5 cambios
del saco.
1d. Apoyar el aparato en el suelo.
2d. Levantar la tapa del saco filtro (9) (fig. 6)
3d. Extraer el saco recogepolvo (11) tal como se indica en
el punto Sustitución del Saco Recogepolvo.
4d. Extraer el filtro motor (13) tal como se muestra en la
fig. 9.
5d. Lavarlo con agua y detergente, enjuagarlo y secarlo
bien. En el caso de que el filtro estuviese desgarrado
proceder a su sustitución.
LIMPIEZA O SUSTITUCIÓN DEL MICROFILTRO
Se aconseja la limpieza del microfiltro cada dos cambios del
saco recogepolvo. Se recomienda la sustitución cada 5
cambios del saco.
1e. Tirar hacia arriba de la tapa porta microfiltro (10) que
se desenganchará (fig. 10).
2e. Para limpiarlo utilizar agua enjabonada, enjuagarlo y
dejarlo secar.
3e. Si aun está intacto lavarlo con agua enjabonada,
enjuagarlo y secarlo. (Si estuviese dañado proceder a
su sustitución)
4e. Reposicionar correctamente el microfiltro (14) en su
lugar y cerrar la tapa (10).
El aspirador CINDERELLA puede colgarse de un gancho
mediante el ojal (16) teniendo en cuenta que la
resistencia debe ser de al menos 5 Kgs.
Fig. 6 bis
Fig. 7
Z
Fig. 8
Fig. 9
Fig. 10
Fig. 11
L I M P I E Z A D E L A PA R AT O
Pasar un paño húmedo sobre el cuerpo del aparato y sobre
los accesorios, procediendo después a secarlos.
No utilizar productos abrasivos ni que puedan ser
particularmente agresivos con los materiales del aspirador.
ESPAÑOL
ADVERTENCIA
¡ Atención ! No utilizar el aparato sin haber leído antes las instrucciones de uso.
• En caso de avería o mal funcionamiento no intentar nunca desmontar el aparato.
Dirigirse al Servicio Técnico Autorizado más cercano.
• El aparato no debe ser utilizado por niños o personas no adiestradas en su utilización.
• No utilizar nunca el aparato con las manos o los pies mojados o descalzo.
• Para no comprometer la seguridad del aparato utilizar solo recambios y accesorios
originales homologados por el fabricante.
• No utilizar el aparato si el cable de alimentación u otras partes importantes del aparato
están dañadas.
• Si el cable de alimentación está dañado debe ser sustituido por el constructor o por
su Servicio Técnico Autorizado, o por personal cualificado a fin de prevenir cualquier
riesgo.
• No aspirar ácidos ni disolventes ya que se pueden causar serios daños a los materiales
del aspirador y sobre todo no aspirar nunca líquidos ni productos explosivos, gas
inflamable, gasolina, barnices, aceite combustible ó productos similares que en
contacto con el aire aspirado puedan causar explosión.
• No utilizar nunca el aspirador al aire libre, o sobre superficies mojadas o para aspirar
líquidos.
• No aspirar nunca objetos duros o cortantes, cenizas calientes, cigarrillos encendidos
o similares.
• Está prohibido el uso del aparato en ambientes en los que exista el peligro de
explosiones o deflagraciones.
• No aspirar objetos en llamas o incandescentes.
• No sumergir nunca el aparato dentro del agua.
ESPAÑOL
GARANTÍA
CINDERELLA AS 310 está garantizada por un año desde la fecha de compra contra
defectos de fabricación y faltas de los materiales. La garantía no es válida si la avería ha
sido causada por un uso inadecuado. En caso de avería o mal funcionamiento, hay que
ponerse en contacto inmediatamente con el Centro de Asistencia autorizado más cercano. Los eventuales desperfectos del aparato causados por personal no autorizado invalidarán automáticamente la garantía.
POLTI S.P.A. declina toda responsabilidad en caso de accidentes derivados de una
utilización de CINDERELLA AS 310 no conforme a las presentes instrucciones de
uso.
I M P O R TA N T E
• El aparato está construido según las normas vigentes para el reciclaje.
• Se recomienda no tirar los embalajes protectores del transporte junto con los desechos domésticos, sino entregarlos a los centros de recogida correspondientes.
• Los filtros y sacos recogepolvo pueden adquirirse en los Servicios de Asistencia Técnica Autorizados y en los mejores establecimientos de electrodomésticos. Recomendamos utilizar solo recambios originales.
FRANÇAIS
AS 310E
LEGENDE
1. Poignée
2. Corps moteur
3. Ergots pivotants pour le rangement
du câble d'alimentation
4. Câble d'alimentation
5. Vrille de fixation de la poignée
6. Interrupteur général
7. Variateur d'aspiration
8. Témoin rouge de sac plein
9. Capot sac filtre
10. Capot microfiltre
11. Sac de récupération de poussière
12. Support du sac de récupération de poussière
13. Filtre
14. Microfiltre
15. Prise pour suceur
16. Oeillet
a.
b.
c.
d.
e.
Lance
Brosse multi-usage
Bec multi-usage
Tube prolongateur
Suceur (en option)
La Société POLTI se réserve la faculté d’introduire
toutes modifications techniques qui s’avéreraient
nécessaires sans aucun préavis.
CET APPAREIL EST CONFORME A LA DIRECTIVE CE 89/336
MODIFIEE 93/68 (CEM) ET A LA DIRECTIVE 73/23 MODIFIEE 93/68
(BASSE TENSION)
U T I L I S AT I O N D U P R O D U I T
Cet appareil est destiné à l'aspiration de solides et son utilisation doit être
conforme aux instructions reportées dans ce manuel.
FRANÇAIS
P R E PA R AT I O N D E L ' A P PA R E I L
1a Avant d'utiliser l'aspirateur, montez le manche (1).
2a Connectez la vrille (5) du manche (1) de l'appareil, et
montez ce dernier au corps du moteur (2) (fig. 1).
3a Vissez la vrille (5) en tournant dans le sens des aiguilles
d'une montre (fig. 2).
4a Fixez les ergots pivotants (3) dans les trous du manche
(1) en appuyant à fond (fig. 3).
Fig. 1
Fig. 2
A S P I R AT I O N
Maintenant votre appareil est prêt à fonctionner
1b Branchez l'accessoire adapté à votre besoin.
2b Insérez le câble d'alimentation (4) dans une prise
électrique adaptée, appuyez sur l'interrupteur général
(6) (fig. 4) et commencez l'aspiration.
3b Le variateur d'aspiration (7) (fig. 4) permet de régler la
puissance de l'appareil en fonction de la surface à
nettoyer.
4b En tournant le variateur d'aspiration (7) à gauche dans
la direction max, la puissance de l'appareil augmente.
Nous vous conseillons d'utiliser la position minimale
pour les rideaux, moyenne pour les tapis et capitonnés.
La position maximale est conseillée pour les sols durs.
Fig. 3
Fig. 4
7
6
MANUTENTION GENERALE
Avant de procéder à quelque entretien que ce soit, assurezvous que le câble d'alimentation soit débranché du circuit
électrique.
REMPLACEMENT DU SAC A POUSSIERE
1c Quand le sac à poussière (11) est plein, l’indicateur vert
(8) devient rouge (fig. 5). Le contrôle du niveau de
remplissage du sac doit être effectué à puissance
maximum (régulateur positionné vers le signe max).
2c Placez l'appareil à terre.
3c Ouvrez le capot (9) (fig. 6) en appuyant sur la touche
d’ouverture.
4c Extrayez le sac plein (12), en le soulevant par la
languette (Z), et en faisant attention de ne pas
l'endommager (fig. 7).
Fig. 5
Fig. 6
FRANÇAIS
5c Repliez la languette (Z) sur elle même, en bouchant le
trou pour éviter des échappées de poussière.
6c Remplacez-le par un sachet neuf (11) en maintenant
la languette (Z) vers le haut, comme indiqué dans la
fig. 8.
7c Enfilez le manchon dans le petit trou du sachet (fig. 7).
8c Remettez le capot (9) dans sa position initiale (fig. 6 bis).
REMPLACEMENT DU FILTRE MOTEUR
Il est conseillé de nettoyer ce filtre une fois tous les deux
changements du sac à poussières et de le remplacer une
fois tous les cinq changements du sac a poussières.
1d Placez l'appareil à terre.
2d Ouvrez le capot filtre moteur (9) (fig. 6).
3d Extrayez le sac à poussière plein (11), en faisant
attention de ne pas l'endommager.
4d Extrayez le filtre moteur (13) comme indiqué sur le
schéma 9.
5d Lavez-le avec de l'eau et du détergent, rincez-le et
séchez-le bien.
Si le filtre moteur est endommagé, remplacez-le.
Fig. 6 bis
Fig. 7
Z
Fig. 8
Fig. 9
REMPLACEMENT DU MICROFILTRE
Il est conseillé de nettoyer ce filtre une fois tous les deux
changements du sac à poussières et de le remplacer une
fois tous les cinq changements du sac a poussières.
1e Tirez vers le haut le capot porte microfiltre (10) (fig. 10).
2e Décrochez le microfiltre (14) pour le nettoyer avec de
l’eau savonneuse, rincez-le et laissez-le sécher (s’il est
endommagé, procédez au remplacement).
3e Remettez correctement le filtre (14) à sa place et
refermez le capot (10).
4e Votre Cinderella peut être suspendue à un crochet
grâce à son oeillet (16), qui peut supporter une charge
d'au moins 5 Kg.
Fig. 10
Fig. 11
N E T T O YA G E D E L ' A P PA R E I L
Passer un chiffon humide sur le corps de l'appareil et sur les
accessoires, puis laissez sécher.
N'utilisez pas de produits abrasifs trop agressifs.
FRANÇAIS
C O N S I G N E S I M P O R TA N T E S
Attention ! N'utilisez pas cet appareil sans avoir lu les instructions d'utilisation.
• En cas de dommage ou de mauvais fonctionnement, ne tentez jamais de démonter
l'appareil mais rendez vous au Centre d'Assistance Technique Agréé POLTI le plus
proche.
• Le circuit électrique auquel est branché l'appareil doit être en conformité avec les lois
en vigueur.
• L'appareil ne doit être utilisé ni par les enfants ni par les personnes n'en connaissant
pas le fonctionnement.
• Pour une question de sécurité, n'utilisez que des accessoires et pièces de rechange
d'origine, approuvés par le constructeur.
• N'utilisez pas l'appareil si le câble d'alimentation ou une autre partie importante de
l'appareil est endommagée.
• Ne branchez jamais l'appareil avec les mains mouillées.
• N'aspirez jamais ni acides ou solvants non dilués qui pourraient endommager gravement
l'appareil, ni liquides explosifs, gaz inflammables, poussières explosives, benzine,
vernis, huile combustible, qui au contact des parties internes de l'appareil pourraient
causer des explosions.
• N'utilisez jamais l'appareil ouvert, sur des surfaces mouillées ou pour aspirer des
liquides.
• N'aspirez jamais d'objets durs ou tranchants, cendres chaudes, cigarettes allumées ou
similaires
• Evitez d'utiliser l'appareil dans des endroits dangereux avec risque d'explosion.
• N'aspirez jamais des objets en flamme ou incandescents, comme les cendres et autres
matériaux en phase de combustion.
• N'immergez jamais l'appareil dans l'eau.
FRANÇAIS
GARANTIE
Votre CINDERELLA AS 310 est garantie pendant un an à compter de la date d’achat contre tous les défauts de fabrication et vices de matériaux. Les pannes dues à une mauvaise
utilisation du produit sont exclues de la garantie. En cas de panne, n’essayez pas de
démonter l’appareil, mais contactez le Centre d’Assistance Technique le plus proche. Toute intervention sur l’appareil de la part d’une personne non autorisée invaliderait automatiquement la garantie.
La garantie est uniquement valable sur présentation de votre original de facture d’achat.
• La Société POLTI S.p.A. décline toutes responsabilités pour tout accident dû à
une utilisation de CINDERELLA AS 310 ne correspondant pas aux présentes
instructions d’emploi.
AT T E N T I O N
• Votre appareil est construit selon les normes en vigueur en matière de recyclage.
• Nous vous recommandons de ne pas jeter, dans vos ordures ménagères, les
emballages de protection pour le transport, mais de les déposer dans une
déchetterie procédant au recyclage.
• Les filtres et les sachets de poussières sont vendus dans les Centres d’Assistance
Technique Agréés POLTI et auprès de tous les distributeurs spécialisés en appareils
électroménager. Nous vous recommandons de n’utiliser que des pièces et
accessoires de rechange originaux et approuvés par le constructeur.
DEUTSCH
AS 310E
GESAMTABBILDUNG
1.
2.
3.
4.
5.
6.
7.
8.
9.
10.
11.
12.
13.
14.
15.
16.
Handgriff
Motorgehäuse
Haken zur Kabelaufwicklung
Netzkabel
Handgriffsbefestigungsschraube
Hauptschalter
Saugkraftregulierung
Rote Kontrollampe
für Staubtütenfüllanzeige
Tüte- und Filterverschluß
Mikrofilterverschluß
Staubtüte
Staubtütenhalterung
Filter
Mikrofilter
Anschluß für Zubehör Tapetenreiniger
Lasche
a)
b)
c)
d)
e)
Lanze
Vielseitige Bürste
Vielseitige Düse
Verlängerungsrohr
Tapetenreiniger (extra Zubehör)
Modelländerung in Ausstattung, technischen Daten
und Zubehör vorbehalten. Technische und
Herstellungsdaten können von POLTI S.p.A. ohne
Vorankündigung geändert werden, wenn sich dies
als nützlich erweisen sollte.
CE Dieses Gerät entspricht der EC-Direktive 89/336, die von der 93/68
(EMC) verändert wurde, und der Direktive 73/23, die von der 93/68
(Niederspannung) verändert wurde.
DAS GERÄT RICHTIG VERWENDEN
Dieses Gerät ist bestimmt zur Verwendung als Trockensauger entsprechend
den in dieser Bedienungsanleitung gegebenen Beschreibungen und
Sicherheitshinweisen.
DEUTSCH
DEN SAUGER BETRIEBSBEREIT MACHEN
1a. Vor der Verwendung bauen Sie bitte den Handgriff (1)
an.
2a. Schraube (5) vom Griff (1) nehmen und diesen am
Motorgehäuse (2) anbringen (Bild 1).
3a. Schraube (5) im Uhrzeigersinn drehen und fest anziehen
(Bild 2).
4a. Drehbaren Kabelaufwicklungshaken (3) auf den
Handgriff (1) drücken und korrekt in der Halterung
befestigen (Bild 3).
Bild 1
Bild 2
SAUGKRAFTREGULIERUNG
Bild 3
1b. Das geeignete Zubehör für die Reinigung anschließen .
2b. Netzkabel an einer Steckdose anschließen, zur
Inbetriebnahme Hauptschalter drücken (6) (Bild 4).
3b. Die Saugkraftregulierung (7) dient dazu, die Saugkraft
je nach zu reinigender Oberfläche zu regulieren (Bild 4).
4b. Saugkraftregulierung (7) nach rechts schieben, um die
Leistung des Gerätes zu erhöhen
Die niedrigste Stufe ist für z.B. Vorhänge geeignet. Die mittlere
Stufe ist für z. B. Tapeten und Polstermöbel geeignet. Die
höchste Stufe ist für z. B. harte Böden geeignet.
Bild 4
7
6
I N S TA N D H A LT U N G
Bild 5
Vor der Instandhaltung versichern Sie sich, daß das
Netzkabel nicht mit der Steckdose verbunden ist.
STAUBTÜTE AUSTAUSCHEN
1c. Wenn die Staubtüte (11) voll ist, wird die rote
Kontrollampe (8) aufleuchten (Bild 5). Der Füllstand muß
in der max. Stufe überprüft werden (Regler nach Stufe
+ verschieben).
2c. Gerät auf den Boden stellen.
3c. Deckel (9) abnehmen (Bild 6).
4c. Staubtütenhalterung (12) vorsichtig herausnehmen,
indem Sie diese zurückschieben. Entnehmen Sie die
Staubtüte an der Lasche (Z), ohne diese zu beschädigen.
Bild 6
DEUTSCH
5c. Die Lasche (Z) kann zum Verschluß der Staubtüte
verwendet werden.
6c. Eine neue Tüte einsetzen, wie im Bild 8 dargestellt.
7c. Staubtüte über den Saugstutzen schieben (Bild 7).
8c. Deckel (9) in seine Halterung wieder einsetzen.
MOTORFILTER AUSSPÜLEN
Der Filter ist regelmäßig auszuspülen.
Bild 6 bis
Bild 7
1d. Gerät auf den Boden stellen.
2d. Motorfilterdeckel abnehmen.
3d. Staubtüte (11) herausnehmen, wie im Abschnitt
„Staubtüte" dargestellt.
4d. Motorfilter (13) herausnehmen, wie im Bild 9 dargestellt.
Z
Bild 8
5d. Motorfilter mit Wasser und Spülmittel waschen,
ausspülen und gut trockenen. Wenn der Filter
beschädigt ist, sollten Sie ihn sofort wechseln.
MIKROFILTER AUSSPÜLEN
Der Filter ist regelmäßig auszuspülen.
1e. Mikrofilterdeckel (10) nach oben ziehen und aushaken
(Bild 10).
Bild 9
2e. Mikrofilter (14) aus seiner Halterung nehmen (Bild 11).
3e. Wenn der Filter noch unversehrt ist, sollten Sie ihn mit
Seifenwasser waschen, ausspülen und gut trocknen.
Wenn er beschädigt ist, sollten Sie ihn sofort wechseln.
4e. Filter (14) wieder korrekt in seiner Halterung
unterbringen und Deckel (10) wieder schließen.
Cinderella kann durch eine Lasche (16) auf einen Haken
aufgehängt werden, dessen Tragfähigkeit mindestens 5
kg. betragen muß.
Bild 10
Bild 11
REINIGUNG DES GERÄTS
Das Gerätegehäuse und die Zubehörteile mit einem feuchten
Tuch abwischen und nachher gut trocknen.
Kein aggressives Reinigungsmittel benutzen.
DEUTSCH
H I N W E I S E V O R D E M E I N S AT Z D E S G E R Ä T S
Wichtig! Vor einer Inbetriebnahme des Geräts unbedingt die Gebrauchsanweisung
lesen.
• Im Falle von Defekten oder Fehlfunktionen versuchen Sie unter keinen Umständen, das
Gerät zu demontieren, sondern wenden Sie sich an einen Servicehändler in Ihrer Nähe.
• Überlassen Sie das Gerät nicht Kindern oder Personen, die nicht über den korrekten
Betrieb unterrichtet sind.
• Berühren Sie das Gerät nicht mit nassen Händen, solange der Stecker ans Netz
angeschlossen ist.
• Um die Sicherheit dieses Gerätes gewährleisten zu können, sollten Sie ausschließlich
vom Hersteller genehmigte original Ersatz- oder Zubehörteile verwenden.
• Vermeiden Sie eine Inbetriebnahme des Gerätes bei defekten Stromkabel oder bei
Defekten an anderen wichtigen Geräteteilen.
• Sollte das Anschlußkabel defekt sein, dann es muß vom Hersteller oder seinem
Kundendienst bzw. von einer ähnlich qualifizierten Person ausgetauscht werden.
• Vermeiden Sie die Absaugung von unverdünnten Säuren oder Lösemitteln, die schwere
Schäden an den Gerätestoffen verursachen würden. Insbesondere dürfen keine
Sprengflüssigkeiten, Zündgas, Sprengpulver, Benzin, Lack und Brennöl aufgesaugt
werden, die in Kontakt mit den Innenteilen des Gerätes Explosionen verursachen könnten.
• Das Gerät nich im Freien, auf nassen Oberflächen oder für die Absaugugng von
Flüßickeiten verwenden.
• Keine harten oder scharfen Gegenstände, heiße Asche, angezündete Zigarette oder
ähnliches aufsaugen.
• Die Verwendung des Gerätes in explosionsgefährdetem Raum ist verboten.
• Vermeiden Sie die Absaugung von Flamm- oder Glutgegenständen.
• Tauchen Sie das Gerät nie in Wasser oder andere Flüssigkeiten.
DEUTSCH
GARANTIE
Polti gewährt Ihnen 12 Monate Garantie auf das Gerät ab Verkaufsdatum. Mit dem
bestätigten Kaufdatum (Rechnung) umfaßt die Garantie alle Ansprüche aufgrund von
Verarbeitungs- oder Materialfehlern. Ausgenommen sind Schäden, die durch
unsachgemäße Handhabung sowie Abnutzung und natürlichen Verschleiß entstehen.
Ebenfalls werden Folgeschäden durch diese Garantie nicht erfaßt. Bei Beanstandungen
bitten wir, das Gerät dem Händler zu geben oder an die nächstgelegene PoltiKundendienststelle zu senden.
ENGLISH
AS 310E
KEY
1.
2.
3.
4.
5.
6.
7.
8.
9.
10.
11.
12.
13.
14.
15.
16.
Handle
Motor
Rotating hooks for cable storage
Power supply cable
Handle locking screw
Mains ON/OFF switch
Suction variator
"Full bag" red indicator light
Cover of bag/filter housing
Microfilter cover
Dust bag
Dust bag support
Motor filter
Microfilter
Socket for carpet sweeper accessory
Eyelet
a) Lance
b) Multipurpose brush
c) Multipurpose nozzle
d) Extension tube
e) Carpet sweeper (optional)
Polti S.p.A. reserves the right to change
equipment or accessory specification without
prior notice.
This unit conforms with EC-directives 89/336 as amended by 93/68
(EMC) and 73/23 as amended by 93/68 (low voltage).
CORRECT USE OF THIS PRODUCT
This appliance is intended for use as a vacuum for solids in accordance with the
descriptions and instructions in this manual.
ENGLISH
P R E PA R AT I O N F O R U S E
1.a Before using the vacuum cleaner, assemble the handle
(1)
2.a Remove the locking screw (5) from the handle (1) and
locate it in the power plant (2) (fig. 1)
3.a Tighten the screw (5) with the wrench n. 6 supplied,
turning it clockwise (fig. 2)
4.a Fix the rotating hooks for cable storage (3) in the holes
of the handle (1) by pushing them until they are
correctly located.
Fig. 1
Fig. 2
SUCTION
The appliance is now ready to operate
1.b Connect the accessory required for the cleaning
operation.
2.b Connect the supply cable to the mains and push the
mains ON/OFF switch
3.b Variable suction (7) allows you to control the suction
power according to the surface to be cleaned.
4.b By moving the variable suction slider (7) to the left in
the max direction, the power of the appliance will
increase
The minimum position is suggested for curtains.
The medium position is suggested for carpets and upholstery.
The maximum position is suggested for hard floors.
MAINTENANCE
Fig. 3
Fig. 4
7
6
Fig. 5
Before any kind of maintenance, make sure that the supply
cable is not connected to the mains.
REPLACING THE DUST BAG
1.c When the dust bag is full, the indicator light (8) will go
from green to red (fig. 5). The fullness of the bag can only
be correctly seen when the appliance is operating at
maximum power (regulator turned towards max mark).
2.c Lay the appliance on the floor.
3.c Remove the cover (9) (fig. 6) by pushing the opening
button.
4.c Take out the dust bag support (12) by pushing it
backwards and then lift it by holding the flap (Z), paying
attention not to damage it.
Fig. 6
ENGLISH
5.c Fold the flap (Z) on itself so as to fill the hole and avoid
dust leakage.
6.c Insert the new dust bag (11) adapting it to the housing
and keeping the flap (Z) upwards, insert the opposite
side of the flap in the grooves at the bottom of the
housing , as shown in fig. 8.
7.c Insert the sleeve in the hole of the bag.
8.c Put the cover (9) back in its position
CLEANING OR REPLACING THE MOTOR FILTER
It is recommended to clean the filter every two times you
replace the dust bag. It is recommended to replace the
filter every five times you replace the dust bag.
1.d Lay the appliance on the floor
2.d Remove the cover of bag/filter housing (9)
3.d Take out the dust bag (11) , as described in the
"Replacing the dust bag" paragraph.
4.d Take out the motor filter (13) as shown in fig.
5.d Wash it with water and soap, rinse it and leave it to dry
well. If the filter is damaged, replace it.
CLEANING OR REPLACING THE MICROFILTER
It is recommended to clean the filter every two times you
replace the dust bag. It is recommended to replace the
filter every five times you replace the dust bag.
1.e Lift the cover (9) which holds the microfilter and it will
unhook.
2.e Remove the microfilter (14) from its position (fig. 11) to
clean it with soap and water, rinse it and leave it to dry.
3.e Put the filter (14) back in its correct position and close
the cover (10).
Cinderella can be hung from the eyelet (16) on a hook,
which must be capable of carrying at least 5 kg.
Fig. 6 bis
Fig. 7
Z
Fig. 8
Fig. 9
Fig. 10
Fig. 11
CLEANING THIS APPLIANCE
Wipe the body of the appliance and the accessories with a
damp cloth and then dry.
Do not use abrasive products.
ENGLISH
PRECAUTIONS
Attention! Do not use the appliance without reading the instructions.
• In case of damage or malfunction, do not attempt to disassemble the appliance but
contact the nearest Polti Authorised Service Centre.
• Do not allow children to use the machine or any others who may not know how to
operate it .
• Do not touch the appliance with wet hands or feet when it is plugged into the mains.
• In order not to compromize the safety of the appliance, only use original spare parts
and accessories, approved by the manufacturer.
• Do not use the appliance if the supply cable or other important parts of the unit are
damaged.
• If the supply cable is damaged, it must be replaced by the manufacturer or by its
authorized Service Centre.
• Do not suck up undiluted acids or solvents, which may cause serious damage to the
appliance and especially do not suck up explosive liquids, inflammable gases, explosive
powders, benzines, paints, fuel oil, which may cause explosions if they come in contact
with the sucked up air.
• Do not use the appliance outdoor or on wet surfaces or to suck up liquids.
• Do not suck up hard or sharp objects, hot cinders or lit cigarettes or similars.
• Do not use the appliance in environments where there is danger of explosion.
• Do not suck up objects on fire or that are hot.
• Never immerse the appliance in water.
ENGLISH
GUARANTEE
The CINDERELLA AS310 is guaranteed to the original purchaser for one year from
purchase date against manufacturing or raw material defects.The guarantee is not valid
if the appliance has been misused in any way. Unauthorised alterations or repairs to the
machine will automatically invalidate this guarantee.
• Polti declines liability for any damage or accident derived from any use of
CINDERELLA AS 310 which is not in conformity with the instructions contained
in this booklet.
AT T E N T I O N
The filters and the dust bags are sold by Polti authorized Service Centres and by quality
electrical retailers. We recommend to use manufacturer's original spare parts only.
NEDERLANDS
AS 310E
1.
2.
3.
4.
5.
6.
7.
8.
9.
10.
11.
12.
13.
14.
15.
16.
Handvat
Motorgroep
Snoeropberg
Snoer
Schroeven voor handvat
Hoofdschakelaar
Afzuigingsregelaar
Rood lampje stofzak vol
Deksel filterzak
Deksel microfilter
Stofzak
Stofzak houder
Filter
Microfilter
Stopcontact voor tapijtborstel
Opening
a.
b.
c.
d.
e.
Lans
Borstel multifunktie
Mond multifunktie
Verlengstuk
Tapijtborstel (optie)
De firma POLTI S.p.A. behoudt zich het recht voor om
zonder kennisgeving vooraf technische wijzigingen
of wijzigingen aan de constructie aan te brengen die
POLTI nodig acht.
DIT APPARAAT IS OVEREENKOMSTIG MET DE RICHTLIJN EC 89/336
GEWIJZIGD DOOR 93/68 (EMC) EN MET DE RICHTLIJN 73/23 GEWIJZIGD DOOR 93/68 (LAGE SPANNING).
G E B R U I K VA N H E T A P PA R A AT
Dit apparaat is geschikt voor het zuigen van stoffen als beschreven in deze
gebruiksaanwijzing.
NEDERLANDS
V O O R B E R E I D I N G VA N H E T G E B R U I K
1a Voor het gebruiken, het handvat (1) plaatsen.
2a De schroeven (5) uit het handvat (1) verwijderen, en op
de motorgroep (2) vast maken (fig. 1)
3a De schroeven (5) vast draaien, met geleverde sleutel
nr 6, met de wijzers van de klok mee (fig. 2).
4a De snoeropberg (3) op de gaten van het handvat (1)
plaatsen door op te drukken tot de korrekte positie.
Fig. 1
Fig. 2
AFZUIGING
Nu is het apparaat klaar voor gebruik.
1b De geschikte toebehoren aansluiten.
2b De stekker op een geschikte stopcontact verbinden, en
op de hoofdschakelaar drukken.
3b De afzuigingsregelaar (7) zorgt voor het aanpassen
van de zuigkracht in funktie van de te reinigen
oppervlakken.
4b Door de afzuigingsregelaar (7) naar links te schuiven
(richting max.), gaat het vermogen naar omhoog .
Minimum stand is voor gordijnen.
Medium stand is geschikt voor tapijten.
Maximum stand is voor tegels.
Fig. 3
Fig. 4
7
6
ONDERHOUD
Alvorens onderhoud te plegen, haalt U de stekker uit het
stopcontact.
STOFZAK VERVANGEN
1c Bij vol stofzak (11) gaat het lampje (8) van groen naar
rood branden (fig. 5).
Het controleren van het niveau in het stofzak gebeurt
met maximum vermogen (regelaar naar max.)
2c Het apparaat op de grond neerleggen.
3c Het deksel filterzak (9) verwijderen (fig. 6) door op de
openingsknop te drukken.
4c De stofzakhouder (12) uit nemen, heel voorzichtig om
schade te voorkomen, door op de tong (Z) te trekken
(fig. 7).
Fig. 5
Fig. 6
NEDERLANDS
5c De tong (Z) terugplaatsen sluitend de opening om
stofverlies te voorkomen
6c De nieuwe stofzak (11) terugplaatsen in zijn opberg
met de tong (Z) naar boven. De andere kant goed in zijn
opberg plaatsen als beschreven in fig. 8.
7c De ingang in de opening van de stofzak plaatsen (fig. 7).
8c Het deksel (9) terug plaatsen als beschreven in fig. 6 bis.
MOTORFILTER VERVANGEN
Het is raadzaam het filter om de twee vervanging van stofzak
te reinigen. Het vervangen moet na vijf vervanging van
stofzak plaatsvinden.
1d Het apparaat op de grond neerleggen
2d Het deksel filterzak (9) verwijderen.
3d De stofzak (11) uit nemen, als beschreven bij "stofzak
vervangen"
4d Het filter (13) uitnemen als beschreven in fig. 9
5d Met water en wasmiddel het filter reinigen, dan met
water wassen en laten drogen. Als het filter beschadigd
is, moet U het vervangen.
HET MICROFILTER VERVANGEN OF REINIGEN.
Het is raadzaam het filter om de twee vervanging van stofzak
te reinigen. Het vervangen moet na vijf vervanging van
stofzak plaatsvinden.
1e Het deksel microfilter (10) naar boven trekken om het
los te maken (fig. 10).
2e Het microfilter (14) uit de houder halen (fig. 11) reinigen
met water en schoonmaakmiddel en dan laten drogen.
3e Als het mogelijk is, het filter met water en wasmiddel
reinigen, dan met water wassen en laten drogen. (Als
het filter beschadigd is, moet U het vervangen).
4e Het microfilter (14) weer goed in zijn houder plaatsen
en het deksel (10) sluiten.
Cinderella mag aan een houder opgehangen worden
dankzij de opening (16). De houder moet tot 5 kilo
kunnen dragen.
Fig. 6 bis
Fig. 7
Z
Fig. 8
Fig. 9
Fig. 10
Fig. 11
H E T R E I N I G E N VA N H E T A P PA R A AT
Met een vochtige doek op het apparaat zelfs en op de
toebehoren en dan laten drogen.
Geen bijtende produkten gebruiken.
NEDERLANDS
WA A R S C H U W I N G
OPGELET ! Lees voordat U het apparaat gebruikt, deze instructies door.
• Wanneer het apparaat stuk is of slecht werkt, probeer het dan niet te demonteren, maar
ga naar de dichtstbijzijnde officiële technische centrum.
• Laat het apparaat niet gebruiken door kinderen of door personen die niet weten hoe
het werkt.
• Nooit het apparaat gebruiken met vochtige handen of voeten.
• Voor veiligheidsredenen, uitsluitend originele onderdelen van Polti gebruiken.
• Het apparaat niet gebruiken in geval van beschadiging van de snoer of van andere
belangrijke onderdelen.
• Wanneer de voedingskabel beschadigd is, moet deze door de fabrikant of zijn
technische dienst of door een bevoegde persoon vervangen worden om elk risico te
voorkomen.
• Nooit zuur of soldeervloeistof om de beschadiging van het apparaat te voorkomen.
Nooit gevaarlijke stoffen zuigen als gas, benzine, vernis, olie die in kontakt met
onderdelen komen en die de oorzaak van explosie kunnen zijn.
• Het apparaat nooit buiten of op vochtige oppervlakken of om vloeistof te zuigen
gebruiken.
• Harde snijdende stukken, warm as, sigaretten of resten van het haardvuur nooit zuigen
• Het apparaat nooit gebruiken in plaatsen waar men een risico van explosie loopt.
• Nooit vlammen of warme stukken zuigen.
• Het apparaat nooit onderdompelen in water.
• Gebruik van het apparaat
• Dit apparaat is geschikt voor het zuigen van stoffen als beschreven in deze
gebruiksaanwijzing.
NEDERLANDS
GARANTIE
De CINDERELLA AS 310 heeft een garantie van 1 jaar tegen fabricage- en materiaalfouten,
ingaande op de datum van aankoop. De garantie geldt niet wanneer de schade is
veroorzaakt door oneigenlijk gebruik. Wanneer het apparaat stuk is of slecht werkt, neem
dan onmiddellijk contact op met het dichtstbijzijnde officiële technisch centrum. Wanneer
het apparaat eventueel wordt beschadigd door onbevoegd personeel, vervalt de garantie
onmiddellijk.
• De firma POLTI S.p.A. wijst iedere aansprakelijkheid van de hand voor
incidenten die zijn ontstaan doordat de CINDERELLA AS 310 niet conform de
gebruiksaanwijzing is gebruikt.
BELANGRIJK
Het apparaat is gefabriceerd volgens de huidige recyclingnormen. We raden u aan het
verpakkingsmateriaal voor bescherming tijdens het transport, niet bij het huisvuil te zetten,
maar het bij het desbetreffende inzamelpunt af te geven.
Filters en stofzakken zijn te kopen bij uw Polti dealer.
Het is raadzaam Polti onderdelen te gebruiken.