1
Start-up
Before starting up, please carefully read and comply with this
supplement and the operating instructions provided with the
heater.
Remote control
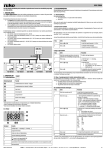
The appliance is operated via a remote control (1) with an infrared transmitter (IR remote control) and an infrared receiver (2)
installed in the cover. The remote control must always be pointed at the infrared receiver in order to perform the individual
switching commands.
Adjusting the simulated flames
Repeatedly pressing the button (e) enables three different
simulated flames to be called up in turn.
The following simulations can be selected:
–– Glow
–– Glow with small flame
–– Glow with large flame
Adjusting the flame speed
Repeatedly pressing the button (f) enables four different flame
speeds to be called up in turn.
Switching off
Switch off the front case with flame effect using the “On / Off”
button (a) on the remote control. The last selected settings are
saved.
Manual On/Off / factory setting
1
2
Figure 1
Switching off
The flame effect can be
switched off with the button on the underside of the
cover.
Switching on
Pressing the button – for
approx. 1 second – switches
on the flame effect with the
last settings made.
h
g
a
c
b
Figure 3
Factory setting
Pressing the button – for approx. 3 seconds – resets the settings of the front case with flame effect to the as-delivered
state.
d
IR remote control battery change
e
Only use micro-batteries that will not leak, type LR 3, AM4,
AAA, MN 2400 (1.5 V).
f
The battery compartment is on the back of the remote control.
Figure 2
When inserting new batteries, make sure
the positive / negative terminals are connected correctly.
a=“On / Off” button
b=Adjusting the brightness of the flame and glow
c =Adjusting the volume
d=Selecting the crackling sounds
e =Selecting the simulated flames
f =Adjusting the flame speed
g=Function display (every press of a button is acknowledged
by the LED lighting up)
h =Infrared transmitter
Figure 4
Switching on
No warranty is given for damage caused by leaking
batteries.
Switch on the front case with flame effect using the “On / Off”
button (a) on the remote control. The last selected settings are
taken over.
Adjusting the brightness
Use the “+” or “-” buttons (b) to adjust the brightness of the
flame and glow.
Empty, used batteries can leak
and damage the remote control!
Remove the batteries if the remote control is not being used for a long period of
time.
Pick up leaking batteries only while wearing
gloves, for example.
Before scrapping the remote control, always remove the batteries and dispose of them properly.
Adjusting the volume
Use the “+” or “-” buttons (c) to adjust the volume.
Setting the crackling sounds
Repeatedly pressing the button (d) enables two different
crackling sounds to be called up in turn.
7