1
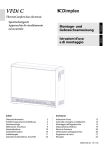
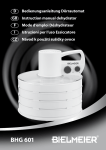
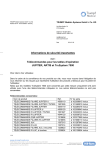
D Bedienungsanleitung Luftbefeuchter GB Air Humidifier Instruction Manual F Mode d’emploi humidificateur I Istruzioni per l’uso Umidificatore CZ Návod k použití – zvlhčovac vzduchu BHG 558 D D Inhalt GB Contents Teile Ihres Luftbefeuchters. . . . . . . . . . . . . . . . . . . 4 Know your Air Hunidifier. . . . . . . . . . . . . . . . . . . . 4 Wichtig!. . . . . . . . . . . . . . . . . . . . . . . . . . . . . . . . . . . . . . 6 Important!. . . . . . . . . . . . . . . . . . . . . . . . . . . . . . . . . . . 11 Sicherheitshinweise . . . . . . . . . . . . . . . . . . . . . . . . . 6 Safety information. . . . . . . . . . . . . . . . . . . . . . . . . . . 11 Reinigung und Pflege . . . . . . . . . . . . . . . . . . . . . . . 6 Cleaning and care of appliance. . . . . . . . . . . . . . 11 Reinigung und Austausch des Wasserfilters.6 Cleaning and replacement of water filter. . . 11 Pflege-Empfehlungen. . . . . . . . . . . . . . . . . . . . . . . 7 Care recommendations. . . . . . . . . . . . . . . . . . . . . . 12 Anwendung von Zitronensäure oder anderen Entkalkungsmitteln . . . . . . . . . . . . . . . . . . . . . . . . . 7 Use of citric acid or other descalers. . . . . . . . . . 12 Inbetriebnahme. . . . . . . . . . . . . . . . . . . . . . . . . . . . . 7 Troubleshooting. . . . . . . . . . . . . . . . . . . . . . . . . . . . . 14 Problembehebung. . . . . . . . . . . . . . . . . . . . . . . . . . 9 Technische Daten . . . . . . . . . . . . . . . . . . . . . . . . . . . 9 Der Umwelt zuliebe . . . . . . . . . . . . . . . . . . . . . . . . . 9 Garantie . . . . . . . . . . . . . . . . . . . . . . . . . . . . . . . . . . . . . 10 Using the appliance for the first time. . . . . . . . 12 Technical details. . . . . . . . . . . . . . . . . . . . . . . . . . . . . 14 Caring for the environment. . . . . . . . . . . . . . . . . . 14 Warranty. . . . . . . . . . . . . . . . . . . . . . . . . . . . . . . . . . . . . 15 F TABLE DES MATIERES I Contenuto Parties de votre humidificateur . . . . . . . . . . . . . 4 Accessori del deumidificatore . . . . . . . . . . . . . . . 4 Important!. . . . . . . . . . . . . . . . . . . . . . . . . . . . . . . . . . . 16 Importante! . . . . . . . . . . . . . . . . . . . . . . . . . . . . . . . . . 21 Consignes de securite . . . . . . . . . . . . . . . . . . . . . . . 16 Avvertenze per la sicurezza . . . . . . . . . . . . . . . . . 21 Nettoyage et entretien. . . . . . . . . . . . . . . . . . . . . . 16 Pulizia e manutenzione. . . . . . . . . . . . . . . . . . . . . . 21 Nettoyage et remplacement du filtre a eau .16 Pulizia e sostituzione del filtro d‘acqua . . . . . . 21 Conseils d‘entretien . . . . . . . . . . . . . . . . . . . . . . . . . 17 Consigli per la manutenzione . . . . . . . . . . . . . . . 22 Utilisation d‘acide citrique ou autres produits anti-tartre . . . . . . . . . . . . . . . . . . . . . . . . . . . . . . . . . . . 17 Uso di acido citrico o altri decalcificanti . . . . . 22 Mise en service . . . . . . . . . . . . . . . . . . . . . . . . . . . . . . 17 Risoluzione dei problemi . . . . . . . . . . . . . . . . . . . . 24 Solutions aux problemes. . . . . . . . . . . . . . . . . . . . 19 Donnees techniques . . . . . . . . . . . . . . . . . . . . . . . . 19 Pour l‘amour de l‘environnement. . . . . . . . . . . . 19 Garantie . . . . . . . . . . . . . . . . . . . . . . . . . . . . . . . . . . . . . 20 Messa in funzione . . . . . . . . . . . . . . . . . . . . . . . . . . . 22 Dati tecnici. . . . . . . . . . . . . . . . . . . . . . . . . . . . . . . . . . . 24 Indicazioni sulla tutela dell’ambiente . . . . . . . 24 Garanzia. . . . . . . . . . . . . . . . . . . . . . . . . . . . . . . . . . . . . 25 CZ OBSAH Součásti vašeho zvlhčovače vzduchu . . . . . . . 4 Důležité. . . . . . . . . . . . . . . . . . . . . . . . . . . . . . . . . . . . . . 26 Bezpečnostní pokyny. . . . . . . . . . . . . . . . . . . . . . . . 26 Použití kyseliny citronové nebo jiných odvápňovacích prostředků . . . . . . . . . . . . . . . . . 27 První uvedení do provozu. . . . . . . . . . . . . . . . . . . 27 Údržba a péče. . . . . . . . . . . . . . . . . . . . . . . . . . . . . . . 26 Odstranění problémů . . . . . . . . . . . . . . . . . . . . . . . 29 Čištění a výměna vodního filtru. . . . . . . . . . . . . . . . . . . . . . . . . . . . . . . . 26 Technické údaje . . . . . . . . . . . . . . . . . . . . . . . . . . . . . 29 Dbejte na životní prostředí . . . . . . . . . . . . . . . . . . 29 Údržba – doporučení. . . . . . . . . . . . . . . . . . . . . . . . 27 Záruční list . . . . . . . . . . . . . . . . . . . . . . . . . . . . . . . . . . 30 3 D D 1 D 2 AUTO Wasser! RF 3 STD minmax Luftfeuchte Nebel Dauer EIN / AUS 4 5 1 Nebelauslass 2 Wassertank 3 Anzeige 4Bedienelement 5 Öffnung des Feuchtsensors 6 Griff 7Wasserfilter 8 Deckel des Wassertanks 9Gerätesockel 10 Netzschalter 11 Netzkabel 6 7 1 Sortie de brume 2 Cuve 3 Écran 4 Élément de commande 5 Ouverture du capteur d’humidité 6 Poignée 7 Filtre à eau 8 Couvercle de la cuve 9 Socle de l’appareil 10 Interrupteur 11 Cordon d’alimentation Sous réserve de modification. CZ 1 Mist outlet 2 Water tank 3 Display 4 Operator panel 5 Opening of humidity sensor 6 Handle 7 Water filter 8 Lid of water tank 9 Base of appliance 10 Power switch 11 Power cable Product may be subject to change. Änderungen vorbehalten. F 8 GB I 1 Bocchetta di nebulizzazione 2 Serbatoio dell’acqua 3 Display 4 Pannello comandi 5 Apertura del sensore di umidità 6 Maniglia 7 Filtro dell’acqua 8 Tappo serbatoio 9 Base 10 Interruttore 11 Cavo di alimentazione Il prodotto può essere soggetto a modifiche. 1 výstup mlhy 2 nádrž na vodu 3 LCD- displej 4 ovládací prvky 5 otvor senzoru vlhkosti 6držadlo 9 7 vodní filtr 8 víko vodní nádrže 10 9 podstavec přístroje 10íťový spínač 11 síťový kabel 11 4 Změny vyhrazeny. 5 D D WICHTIG! Bitte lesen Sie diese Bedienungsanleitung aufmerksam durch, sie enthält wichtige Hinweise für die Sicherheit, den Gebrauch und die Wartung des Gerätes. Bewahren Sie die Bedienungsanleitung sorgfältig auf und geben Sie diese gegebenenfalls an den Nachbesitzer weiter. Sicherheitshinweise Bei offensichtlichen Schäden an Gerät oder Zuleitung, oder wenn das Gerät ungewöhnliche Gerüche oder Geräusche erzeugt, das Gerät vom Fachmann oder dem BIELMEIERKundendienst überprüfen lassen. Reparaturen an Elektrogeräten sind nur von Fachkräften durchzuführen. Durch unsachgemäße Reparaturen können erhebliche Gefahren für den Benutzer entstehen. Der Hersteller haftet nicht für eventuelle Schäden, die durch nicht bestimmungsgemäßen Gebrauch oder falsche Bedienung verursacht werden. Gerät nur an Wechselstrom – mit Spannung gemäß Typenschild – anschließen. Nach Gebrauch, vor Reinigung oder bei even- tuellen Störungen während des Betriebes den Netzstecker ziehen. Fassen Sie den Netzstecker nicht mit feuchten oder nassen Händen an. Kinder erkennen nicht die Gefahr, die im Um- gang mit einem elektrischen Gerät entstehen kann; deshalb Kinder niemals unbeaufsichtigt mit dem Gerät lassen. Das Gerät nicht auf heißen Oberflächen oder in der Nähe von offenen Gasflammen abstellen und betreiben. Das Gerät muss während des Betriebs frei ste- hen und darf nicht abgedeckt werden, damit Zu- und Abluft nicht behindert werden. Schalten Sie das Gerät aus und ziehen Sie den Netzstecker bevor Sie das Gerät reinigen oder an einer anderen Stelle platzieren. Schalten Sie den Luftbefeuchter nicht ein, wenn kein Wasser im Tank ist. Ziehen Sie den Netzstecker immer bei längerer Abwesenheit und während eines Gewitters, um Schäden durch Blitzschlag zu vermeiden. Füllen Sie kein warmes oder heißes Wasser in den Tank, das Gerät könnte dadurch beschädigt werden. Entleeren Sie das Wasser aus dem Gerätesockel und dem Tank bei Temperaturen unter 0° C, da andernfalls das Wasser gefrieren könnte und das Gerät Schaden nehmen könnte. Den Gerätesockel mit der Zuleitung niemals in Wasser tauchen. 6 Das Gerät nur in trockenen Räumen betreiben. Nun den Wasserfilter (7) wieder im Deckel Inbetriebnahme Die Reinigung ist nun beendet. 1 Stellen Sie den Luftbefeuchter an einen geeigneten Platz und nehmen Sie den Tank (2) ab. (8) fixieren und den Tank (2) aufsetzen. 4 Der Wasserfilter (7) sollte alle 6 bis 12 Monate erneuert werden. So erneuern Sie den Filter (7): Den Tank (2) abnehmen, den Deckel (8) ab- Reinigung und Pflege Reinigen Sie die Anzeige (3), den Tank (2) und das Gehäuse (9) mit einem trockenen oder leicht feuchten Tuch ohne Reinigungsmittel. Die Anzeige (3) ist empfindlich. Reinigen Sie die Anzeige nur mit einem weichen, feuchten Tuch. Reinigung und Austausch des Wasserfilters 1 Der Wasserfilter (7) im Tankdeckel (8) enthält Nano-Silber-Keramikkugeln und einen Kalkfilter. Achtung: Zerlegen Sie den Wasserfilter (7) nicht, sondern halten Sie sich an diese Anleitung. 2 Wasserqualität: Der Luftbefeuchter kann mit Leitungswasser betrieben werden. Die NanoSilber-Keramikkugeln sterilisieren das Wasser. Der Kalkfilter reduziert Ablagerungen im Gerät und vermeidet zugleich, dass sich Kalk auf den umliegenden Oberflächen im Raum ablegt. 3 Der Wasserfilter (7) soll alle ein bis zwei Monate gereinigt werden. Eine regelmäßige Reinigung des Wasserfilters (7) ist für das Gerät besser. So reinigen Sie den Filter (7): Den Wassertank (2) abnehmen, den Deckel (8) abschrauben und den Wasserfilter (7) herausschrauben. Tauchen Sie den Wasserfilter (7) in sauberes Wasser. Entfernen Sie die Verunreinigungen von der glatten Oberfläche des Filters (7) und waschen Sie den gesamten Filter (7). Entfernen Sie den Deckel (8) und befüllen Sie den Tank (2) mit Wasser (Leitungswasser oder destilliertes Wasser). Empfehlung: Bei Verwendung von destilliertem Wasser bleibt Ihr Luftbefeuchter frei von Kalkablagerungen. schrauben und den Wasserfilter (7) herausschrauben. Nun den neuen Wasserfilter (7) im Deckel (8) fixieren und den Tank (2) aufsetzen. Der Austausch ist nun beendet. Die Oberflächen können zerkratzt werden. Verwenden Sie keine Scheuermittel oder spitzen Gegenstände beim Reinigen. 5 Bitte nehmen Sie den Wasserfilter (7) heraus und bewahren Sie ihn mit dem Gerät an einem trockenen Ort auf, wenn der Luftbefeuchter längere Zeit nicht in Betrieb ist. 2 Nun können Sie den Deckel (8) wieder auf den Tank (2) geben. Entfernen Sie Wasserflecken an der Außenseite des Wassertanks (2) am besten mit einem weichen Tuch. Setzen Sie den Tank (2) wieder auf den Gerätesockel (9). Benutzen Sie den Luftbefeuchter mit destil- 3 Stecken Sie den Netzstecker ein (220 – 240 V / 50 Hz) und drücken Sie den Netzschalter (10), es ertönt ein Piepton. Der Luftbefeuchter be findet sich nun im Stand-by-Modus. Die Standby-Anzeige (16) schaltet sich ein. Wechseln Sie das nicht verbrauchte Wasser 4 Drücken Sie die EIN / AUS-Taste (21), die Standby-Anzeige (16) erlischt und die Nebeleinstellung S2 (rot + orange) wird angezeigt (18). PFLEGE-EmpfehlungEN liertem Wasser, um Kalkablagerungen zu ver meiden. regelmäßig, um es vor Verunreinigungen zu schützen. Der Luftbefeuchter befindet sich im Dauerbetrieb (AUTO-Anzeige (12) leuchtet nicht) und gibt somit unentwegt Sprühnebel der Stärke 2 von sich. Die aktuelle relative Luftfeuchtigkeit der Um gebung wird in der Luftfeuchtigkeitsanzeige (13) dargestellt. Wenn der Luftbefeuchter längere Zeit nicht benutzt wird, nehmen Sie den Wasserfilter (7) heraus (siehe „Reinigung und Austausch des Wasserfilters“), lassen Sie den Wassertank (2) offen gut austrocknen und bewahren Sie das Gerät an einem trockenen Ort auf. Lassen Sie alle Teile des Luftbefeuchters trocknen bevor Sie ihn verpacken. 5 Durch Drücken der Nebel-Taste (20) stellen Sie die Stärke des Sprühnebels (18) ein. Es gibt vier Stufen um die Dichte des erzeugten Nebels einzustellen: Anwendung von Zitronensäure oder anderen Entkalkungsmitteln S1 – S2 – S3 – S4 (rot – orange – blau – grün). Den Luftbefeuchter ausschalten und den Netz- Auf der Anzeige (18) sehen Sie die gerade eingestellte Dichte des Sprühnebels. stecker (11) ziehen. Wasser entfernen. 5 – 10 Tropfen Entkalker oder 1 – 2 g Zitronen- säure in die Mulde im Gerätesockel (9) geben, mit warmem Wasser auffüllen (ca. 60° C), bis das Wasser das weiße Ventil bedeckt. Anschließend die Mulde im Gerätesockel (9) mit klarem Wasser nachspülen. 6 Im automatisch gesteuerten Betrieb (12), wird eine bestimmte Luftfeuchtigkeit im Raum angestrebt. Um diesen Betrieb zu aktivieren, drücken Sie die Luftfeuchtigkeits-Taste (19) – AUTO (12) leuchtet auf und in der Luftfeuchtigkeitsan zeige (13) erscheint 40 %. 7 D D Problembehebung Die Auswahl der relativen Feuchte der Raumluft ist von 40 % – 70 % RF möglich. Wenn Sie die Einstelltaste (19) kurz drücken, erhöht sich die gewählte Luftfeuchte um 1 %. Wenn Sie die Einstelltaste längere Zeit drücken, erhöht sich die gewählte Luftfeuchte um 5 %. 12 13 14 Nach dem Einstellen schaltet die Luftfeuchtig keitsanzeige (12) alle 5 Sekunden zwischen eingestellter und aktueller Luftfeuchtigkeit hin und her. Das Gerät schaltet automatisch ab, wenn die Luftfeuchte im Raum dem am Luftbefeuchter eingestellten Wert entspricht. Die Luftbefeuchtung startet wieder, sobald die Luftfeuchte im Raum wieder absinkt. S1 S2 S3 S4 15Betriebsanzeige 8 35 – 50 Wohn- / Arbeitszimmer im Winter 50 – 70 Büroräume 40 – 60 13Anzeige der relativen Luftfeuchte (in %) Überprüfen Sie die Sicherung. Wassermangel. Wasser in den Tank füllen. Neues Gerät. Öffnen Sie den Tank und spülen Sie mit klarem Wasser. Schmutziges Wasser. Reinigen Sie den Tank und füllen Sie frisches Wasser ein. Das Gerät ist verschmutzt, das Wasser ist verschmutzt oder ist zu lange im Tank. Das Gerät reinigen, den Tank reinigen und frisches Wasser einfüllen. Sprühnebelerzeugung abnormal. 16Stand-by-Anzeige Leeren Sie die Sockelmulde und setzen Sie den Tank sorgfältig auf. Zu viel Wasser in der Sockelmulde. Abnormales Geräusch. Wasser aus dem Tank wird nicht genutzt. 14Wassertank leer Hohlraum zwischen Gerät und Untergrund. Platzieren Sie das Gerät auf einem stabilen Untergrund. Der Tankdeckel ist verschmutzt. Reinigen Sie den Tankdeckel und das Ventil im Deckel. Tank sitzt nicht richtig auf dem Gerätesockel. Setzen Sie den Tank sorgfältig noch einmal auf. Achtung! Sollten Sie ein Problem mit dem Gerät haben und der angegebene Lösungsvorschlag dazu nicht funktionieren, wenden Sie sich bitte an die BIELMEIER Hausgeräte GmbH oder den Verkäufer des Geräts. Zerlegen Sie das Gerät nie selbst. Reparieren Sie das Gerät auch nie selbst. 18Anzeige der Nebeldichte: Stufe 1 = S1 (rot) Stufe 2 = S2 (rot + orange) Stufe 3 = S3 (rot + orange + blau) Stufe 4 = S4 (rot + orange + blau + grün) 19Einstellung der Luftfeuchtigkeit 20Einstellung der Nebeldichte 21 EIN / AUS-Taste Achtung: Die angegebenen Werte für die Luftfeuchtigkeit in dieser Bedienungsanleitung sind nur Richtwerte. Kein Strom in der Steckdose. Sprühnebel mit sonderlichem oder störendem Geruch. 17 Anzeige der Betriebsdauer (in Stunden) Wohn- / Arbeitszimmer im Sommer Schalten Sie das Gerät ein. 16 17 18 22 rel. Luftfeuchte (in %) Gerät ist nicht eingeschaltet. 21 12Anzeige bei automatisch gesteuertem Betrieb geschlossene Räume bei 20°C Stand-by-Anzeige ist außer Betrieb, keine Funktion. 15 20 8 Wenn zu wenig Wasser im Tank ist, wird kein Sprühnebel mehr produziert, ein Piepton ist zu hören und die Wasserstandsanzeige (14) leuchtet auf. Bitte schalten Sie den Luftbefeuchter aus und füllen Sie Wasser in den Tank (2) (siehe Punkt 1 und 2). Richtwerte für relative Luftfeuchte in Räumen je nach Nutzungsart Lösung Wasserstandsanzeige leuchtet, keine Befeuchtung. Der Luftbefeuchter schaltet sich automatisch ab, wenn die eingestellte Zeit abgelaufen ist. Wird kein Wasser zugeführt, schaltet sich das Gerät nach 1 Minute automatisch von selbst aus. Grund 19 7 Die Betriebsdauer ist von 1 – 12 Stunden ein stellbar. Drücken Sie hierzu die Dauer-Taste (22). Per Knopfdruck wird eine Stunde eingestellt. Nach dem Ende des Einstellvorganges beginnt die Zeit zu laufen. Problem 22Einstellung der Betriebsdauer Abb. 1: Anzeige (3) und Bedienelement (4) im Detail Technische Angaben Der Umwelt zuliebe bitte beachten Stromquelle / Anschlusswert: 220 – 240 V ~ (50 Hz) / 30 W Verpackungsmaterial und ausgediente Geräte nicht einfach wegwerfen, sondern der Wieder verwertung zuführen. Max. Volumen des Wassertanks: 5 Liter Nebelausstoß: ab 260 ml pro Stunde Laufgeräusch: < 35 dB Den zuständigen Recyclinghof bzw. die nächste Sammelstelle erfragen Sie bitte bei Ihrer Kommunalverwaltung. 9 D GB GARANTIE If the appliance or mains cable are visibly dam- Für die am Verkaufstag beginnende Garantie gelten innerhalb der EU und der Schweiz folgende Bestimmungen: 1.Garantiedauer: 2 Jahre 2.Garantieleistungen: a) Nach unserer Wahl Reparatur oder Austausch von Teilen, die nach unserer Überprüfung Material- oder Fertigungsfehler aufweisen. b) Die Garantie wird nur bei Vorzeigen dieser Garantiekarte und der Verkaufsrechnung geleistet. Die Karte ist nur gültig, wenn sie am Verkaufstag vollständig ausgefüllt wurde. 3. Die Garantie gilt nicht: für Kratzer und Flecken am Gerät. für Beleuchtungs- und Kontrolllampen. für leicht zerbrechliche Teile aus Bakelit, Glas, Plastik und so weiter, es sei denn, es handelt sich um Materialfehler, die von uns als solche anerkannt werden. für Beschädigungen, die durch falsche Installation oder Befestigung verursacht wurden. wenn das Gerät an ein Stromnetz mit höherer Spannung, als auf dem Gerät angegeben, angeschlossen wird. c) Die Garantieleistung gilt nur gegenüber dem Erstverbraucher. d) Durch die Reparatur oder den Austausch von Teilen innerhalb der Garantiedauer wird die ursprüngliche Garantiezeit weder verlängert noch erneuert. e) Transportkosten gehen zu Lasten des Käufers (gilt nicht für die ersten 6 Monate der Garantiezeit). f) Sofern der Schaden oder Mangel nicht be seitigt werden kann oder die Nachbesserung von uns abgelehnt oder unzumutbar verzögert wird, wird innerhalb von 6 Monaten ab Kauf- / Lieferdatum auf Wunsch des Endabnehmers entweder kostenfrei Ersatz geliefert oder der Minderwert vergütet oder das Gerät gegen Erstattung des Kaufpreises, jedoch nicht über den marktüblichen Preis hinaus, zurückgenommen. bei falscher oder unsachgemäßer Bedienung. bei mangelnder Sorgfalt. bei ungenügender oder falscher Wartung. Please read these instructions for use carefully as they contain important information about safety as well as for usage and maintenance of the appliance. Only connect this appliance to an AC power outlet (voltage acc. to rating plate). After usage, unplug the appliance from the mains before cleaning or if any fault occurs during operation. Do not touch the power plug with damp or wet hands. Children are unaware of the risks associated bei unsachgemäßem Transport oder unsach- Do not set down/operate the appliance on a wenn das Gerät für andere als für Haushaltszwecke eingesetzt wird. wenn Personen, die nicht von unserer Firma dazu ermächtigt sind, Reparaturen oder Änderungen durchführen. hot surface or near a naked gas flame. During operation the appliance must stand well away from other objects. Do not cover or otherwise hinder the free flow of air. Switch the appliance off and remove the power plug before cleaning or moving to another location. Do not switch the air humidifier on when there is no water in the tank. Für dieses Gerät leisten wir 2 Jahre Garantie für Mängel, die auf Fertigungs- oder Materialfehler zurückzuführen sind. Die Garantiezeit beginnt mit dem Tag der Übergabe und wird nur bei Vorlage der Garantiekarte und der Verkaufsrechnung gewährt. Weitergehende Ansprüche bestehen nicht. Always remove the power plug before any lengthy absence or during thunderstorms to prevent any damage being caused by lightning. Do not add warm or hot water to the tank as Modell: Wichtig! Bitte notieren Sie hier den auf dem Typenschild am Gerät befindlichen FD-Code: this might damage the appliance. Drain the water from the base of the appliance and the tank if the temperature falls below 0° C as otherwise the water might freeze and damage the appliance. Never immerse the appliance base with the mains cable in water. 10 Stempel und Unterschrift des Verkäufers Verkaufsdatum be carried out by appropriately qualified professionals. Unauthorised repairs may result in significant safety risks to the user. The manufacturer accepts no liability for any damage caused by improper usage or incorrect operation. SAFETY INFORMATION with electrical equipment. For this reason never leave a child alone and unsupervised with the appliance. 4. Die Garantie erlischt: Repairs to electrical appliances should only Keep the instructions for use in a safe place and pass them on to any new owner of the appliance. bei Fallenlassen des Gerätes oder einzelner Teile. gemäßer Verpackung für den Transport. aged, please have your appliance checked by a technician or BIELMEIER customer service. This also applies if the appliance is making unusual noises or giving off a strange odour. Important! Only use the appliance in dry rooms. CLEANING AND CARE OF APPLIANCE Surfaces may scratch, so do not use scouring agents or sharp objects when cleaning. Clean the display (3), the tank (2) and the housing (9) with a dry or slightly damp cloth without using any cleaning products. The display (3) is easily damaged. Only clean the display with a soft, damp cloth. CLEANING AND REPLACEMENT OF WATER FILTER 1 The water filter (7) in the lid of the tank (8) contains nano-silver ceramic balls and a scale filter. Caution: Do not take apart the water filter (7) but observe these instructions. 2 Water quality: The air humidifier can be operated with tap water. The nano-silver ceramic balls sterilise the water for atomisation. Scale filter reduces precipitation in the appliance. Furthermore it avoids, that chalk is layed down on surrounding surfaces in the room. 3 The water filter (7) should be cleaned every 1 – 2 months. It is better for the appliance if the water filter (7) is cleaned regularly. How to clean the filter (7): Remove the water tank (2), unscrew the lid (8) and remove the water filter (7). Immerse the water filter (7) in clean water. Remove soiling from the smooth surface of the filter and wash the entire filter. 11 GB Now secure the water filter (7) back in the lid (8) and put the tank (2) back in place again. This completes the cleaning process. 4 The water filter (7) should be replaced every 6 – 12 month. How to replace the filter (7): GB USING THE APPLIANCE FOR THE FIRST TIME Remove the lid (8) and fill the tank (2) with water (tap water or distilled water). It is possible to select a relative humidity level of 40 % – 70 % RF (relative humidity) for the room air. Every time you tap on the selection button (19), the humidity level selected will increase by 1 %. If you press the selection button slightly longer, the humidity level selected will increase by 5 %. Recommendation: The use of distilled water in the BHG 558 air humidifier will prevent limescale. After selection the humidity indicator (13) switches between the current / selected humi dity level every 5 seconds. 1 Position the air humidifier at a suitable location and remove the tank (2). Remove the tank (2), unscrew the lid (8) and remove the water filter (7). Now secure the new water filter (7) in the lid (8) and put the tank (2) back in place again. This completes replacement. 5 Please remove the water filter (7) and store in a dry place with the appliance if the air humidifier is not going to be used for a lengthy period of time. CARE RECOMMENDATIONS 2 Now put the lid (8) back on the tank (2). Wipe off any splashes of water on the outside of the water tank (2) preferably using a soft cloth. 3 Insert the power plug (220 – 240 V / 50 Hz) and press the power switch (10). You will hear a beep. The air humidifier is now in Stand-by mode. The Stand-by indicator (16) switches on. 4 Press the “EIN / AUS” (on/off) button (21). The Standby indicator (16) is extinguished, and the mist setting S2 (red + orange) is displayed (18). Replace any unused water regularly to protect it from contamination. If the air humidifier is not going to be used for a lengthy period of time, remove the water filter (7) (see “Cleaning and replacement of water filter”). Leave the water tank (2) uncovered to dry thoroughly and store the appliance in a dry place. Allow all parts of the air humidifier to dry before packing it away. USE OF CITRIC ACID OR OTHER DESCALERS power plug (11). Drain off the water. Add 5 –10 drops of descaler or 1 – 2 g of citric acid to the recess in the appliance base (9) and fill up with warm water (approx. 60° C) until the water covers the white valve. Then rinse out the recess in the appliance base (9) with clean water. The air humidifier is now in Continuous mode (AUTO indicator (12) not lit up) and continuously emits an atomised spray at level 2. The current relative air humidity in the environment is displayed on the humidity indi cator (13). 5 Press the “Nebel“ (mist) button (20) to adjust the level of the atomised spray (18). The appliance switches off automatically when the humidity level in the room reaches the value set on the air humidifier. Humidification will restart as soon as the humidity level falls again in the room. 8 If there is too little water in the tank, no spray will be produced. You will hear a beep, and the water level indicator (14) lights up. Please switch the air humidifier off and fill up the tank with water (2) (see items 1 and 2). If no water is added, the appliance will switch off automatically after 1 minute. Guide values for relative humidity levels in rooms depending on their function S1 – S2 – S3 – S4 (red – orange – blue – green). Closed rooms at 20°C The indicator (18) displays the density of the atomised spray just selected. Living / work room in summer 35 – 50 Living / work room in winter 50 – 70 Offices 40 – 60 To activate this mode, press the Humidity button (19) . AUTO (12) lights up, and the humidity indicator (13) reads 40 %. 14 15 S1 S2 S3 S4 16 17 18 19 20 21 22 12Display of automatic mode 13Display of relative humidity (in %) 14Water tank empty 15Operation indicator 16Stand-by indicator 17 Display of operating time (in hours) 13 The air humidifier switches off automatically when the selected time expires. There are four levels for selecting the density of the mist produced: 6 Automatic mode (12) aims to attain a specific humidity level in the room. 12 7 The operating time can be set from 1 – 12 hours. To do so press the “Dauer” (duration) button (22). Each press of the button will add an hour. The running time will start as soon as selection ends. Switch off the air humidifier and remove the 12 Place the tank (2) back on the appliance base (9). Operate the air humidifier with distilled water to prevent limescale. Rel. humidity (in %) Caution: The humidity levels specified in these instructions for use are only guide values. 18Display of mist density: Level 1 = S1 (red) Level 2 = S2 (red + orange) Level 3 = S3 (red + orange + blue) Level 4 = S4 (red + orange + blue + green) 19Selection of humidity level 20Selection of mist density 21 On / off button 22Selection of operating time Fig. 1: Display (3) and operator panel (4) in detail 13 GB GB TROUBLESHOOTING WARRANTY Problem Reason Solution Stand-by indicator is not lit up, no function. Appliance is not switched on. Switch on appliance. No power supply from socket. Check fuse. Water level indicator lit up, no humidification. Strange or unpleasant odour to atomised spray. Abnormal atomisation of mist. Not enough water. Add water to tank. New appliance. Open tank and rinse with clean water. Clean tank and fill up with fresh water. Dirty water. The appliance is dirty, the water is either dirty or has been in the tank too long. Remove water from recess and carefully set up tank again. Too much water in recess of base. Gap between appliance and supporting surface. Strange noises. Water is not used from tank. Clean appliance, clean tank and fill up with fresh water. Place appliance on a stable surface. Lid of tank is dirty. Clean lid of tank and valve in lid. Tank is not securely positioned on appliance base. Carefully reposition tank again. Caution! If you have a problem with the appliance and the solutions suggested here do not work, please contact BIELMEIER Hausgeräte GmbH or the vendor of the appliance. Never take the appliance apart yourself. Never repair the appliance yourself. In the EU and Switzerland, the following conditions apply for the warranty, which begins on the date of purchase of the product: 1.Warranty period: 2 years 2. Conditions of warranty: a) Parts which exhibit defects in material and/or workmanship after our inspection will either be repaired or replaced at our discretion. b) The warranty will only be honoured upon presentation of this warranty card and purchase receipt. This warranty is only valid if it is filled out on the date of sale and in a complete and appropriate manner. c) This warranty is only valid for the first owner of the device. d)No replacement or repair of parts performed within the warranty period shall provide grounds for any extension of the original warranty period. e) Any transportation costs shall be borne by the purchaser (this shall not apply during the first 6 months of the warranty). f) Within the first 6 months after the purchase/ delivery of the device, if the damage or defect cannot be eliminated, if we refuse to repair the defect, or in the event of a delay in our repairing of the device, then the end user can choose from one of three options: the device will be replaced free of charge, its value will be reimbursed, or the device will be taken back with a refund of the original purchase price which shall not exceed the usual market price. 3.The warranty does not apply to: spots and scratches on the device control lamps and lights motor brushes easily breakable parts (e. g. bakelite, plastic, glass), even in the case of defects in material as recognized by us damage due to improper installation or improper repair damage caused by an inappropriate voltage supply or an inappropriate electricity network improper or inappropriate use of the equipment unsatisfactory care damage caused by incompetent or insufficient maintenance damage caused by dropping the equipment or part thereof improper transportation or insufficient packaging during transportation 4.The warranty shall be deemed void: in the case of use or application of the device for something other than its intended use for household purposes. in the case of any servicing or repairing of the device performed by third parties that have not been authorized for such purpose by our company. A 2-year warranty is provided for damage caused by defects in material or workmanship. The warranty period shall begin on the day of delivery or on the day the buyer takes possession of the item, and the warranty will only be honoured upon presentation of the warranty card and the purchase receipt. No further claims shall be granted. TECHNICAL Details CARING FOR THE ENVIRONMENT Power source / Connected load: Do not simply throw away packaging and disused appliances. These can be recycled. 220 – 240 V ~ (50 Hz) / 30 W Max. volume of water tank: 14 5 litres Spray output: from 260 ml per hour Noise level: < 35 dB Model: Important! Please write down the FD-code located on the rating plate here: Contact your local authority for details of the relevant recycling centre or the nearest collection point. Stamp and signature of salesperson Date of sale 15 F F IMPORTANT! Veuillez lire attentivement ce mode d‘emploi, il contient d‘importantes remarques de sécurité ainsi que sur l‘utilisation et l‘entretien de l‘appareil. Conservez précieusement le mode d‘emploi et, le cas échéant, donnez-le au propriétaire suivant. endommagés, ou si l‘appareil fait des bruits inhabituels ou dégage des odeurs inhabituelles, le faire contrôler par un spécialiste du SAV BIELMEIER. Ensuite, replacer le filtre à eau (7) dans le MISE EN SERVICE Le nettoyage est terminé. 1 Posez l‘humidificateur à un endroit adéquat et retirez la cuve (2). Seuls des spécialistes sont autorisés à répa- 4 Le filtre à eau (7) doit être renouvelé tous les 6 à 12 mois. rer les appareils électriques. Les réparations incorrectes peuvent engendrer des risques pour l‘utilisateur. Le fabricant ne saurait être tenu responsable des éventuels dommages provoqués par une utilisation inadéquate ou incorrecte. CONSIGNES DE SECURITE Après l‘utilisation, avant le nettoyage ou en cas de dysfonctionnement pendant la marche, débrancher l‘appareil. Ne touchez pas la prise si vous avez les mains mouillées ou humides. Les enfants ne sont pas conscients des risques qui existent lors de l‘utilisation d‘un appareil électrique, c‘est pourquoi il est impératif de ne jamais laisser les enfants seuls et sans surveillance en présence de l‘appareil. Ne jamais poser ou faire fonctionner l‘appareil sur des surfaces chaudes ni à proximité de flammes de gaz. Pendant le fonctionnement, l‘appareil doit être dégagé et non couvert, afin d‘assurer l‘arrivée d‘air et l‘aération. Avant de nettoyer l‘appareil ou de le déplacer, éteindre l‘appareil et le débrancher. Lorsque la cuve d‘eau est vide, ne pas allumer l‘appareil. En cas d‘absence prolongée, et pendant un orage, débranchez l‘appareil. Ne pas mettre d‘eau chaude dans la cuve, cela risquerait d‘endommager l‘appareil. Lorsque la température passe en-dessous de 0°C, vider l‘eau se trouvant dans le socle de l‘appareil et dans la cuve, autrement l‘eau risque de geler et d‘endommager l‘appareil. Ne jamais mettre le socle de l‘appareil ni la conduite d‘alimentation dans l‘eau. 16 N‘utiliser l‘appareil que dans des pièces sèches. Si l‘appareil ou la conduite d‘alimentation sont Voici comment remplacer le filtre (7): NETTOYAGE ET ENTRETIEN Les surfaces peuvent être rayées. Lors du nettoyage, ne pas utiliser de mousses ni d‘objets pointus. Nettoyez l‘écran (3), la cuve (2) et la carcasse (9) au moyen d‘un chiffon sec ou légèrement humide, mais sans produit nettoyant. et le filtre à eau (7). Ensuite, placer le nouveau filtre à eau (7) Le remplacement est terminé. 5 Si vous n‘utilisez pas l‘appareil pendant une période prolongée, veuillez retirer le filtre à eau (7) et le conserver avec l‘appareil dans un endroit sec. CONSEILS D‘ENTRETIEN L‘écran (3) est sensible. Ne nettoyer l‘écran qu‘avec un tissu doux et sec. Utilisez l‘humidificateur avec de l‘eau distillée, afin d‘éviter les dépôts de calcaire. NETTOYAGE ET REMPLACEMENT DU FILTRE A EAU Changez régulièrement l‘eau non utilisée, afin 1 Le filtre à eau (7) se trouvant dans le couvercle de la cuve (8) contient des nanobilles-en argent et céramique-ainsi qu‘un filtre à calcaire. Si, pendant une période prolongée, vous Attention: Ne démontez pas le filtre à eau (7), et respectez ce mode d‘emploi. 2 Qualité de l‘eau : L‘humidificateur peut fonctionner avec de l‘eau du robinet. Les nanobilles en argent et céramique stérilisent l‘eau. Le filtre à calcaire réduit les dépôts qui se forment dans l‘appareil et empêche que le calcaire se dépose sur les surfaces environnantes. 3 Le filtre à eau (7) doit être nettoyé tous les un à deux mois. Il est recommandé de nettoyer régulièrement le filtre à eau (7). Voici comment nettoyer le filtre (7): Retirer la cuve (2), dévisser le couvercle (8) et le filtre à eau (7). Plongez le filtre à eau (7) dans de l‘eau propre. Retirez les impuretés se trouvant sur la surface lisse du filtre (7) et lavez tout le filtre (7). Retirez le couvercle (8) et remplissez la cuve (2) d‘eau (eau courante ou distillée). Conseil: Si vous utilisez de l‘eau distillée, votre humidificateur n‘aura pas de dépôts de calcaire. Retirer la cuve (2), dévisser le couvercle (8) dans le couvercle (8) puis poser la cuve (2). Ne brancher l‘appareil que sur courant alter- natif, dont la tension correspond à la plaque signalétique. couvercle (8) puis poser la cuve (2). 2 Vous pouvez replacer le couvercle (8) sur la cuve (2). Pour nettoyer les tâches d‘eau à l‘extérieur de la cuve à eau (2), le mieux est d‘utiliser un chiffon doux. 3 Branchez l‘appareil sur secteur (220 – 240 V / 50 Hz) et appuyez sur l‘interrupteur (10), un bip retentit. L‘humidificateur est alors en mode veille. L‘écran de veille (16) se met en marche. 4 Appuyez sur le bouton MARCHE / ARRET (21), l‘écran de veille (16) s‘éteint et il s‘affiche le mode Brume S2 (rouge + orange) (18). L‘humidificateur est en mode fonctionnement continu („AUTO“ (12) ne s‘allume pas) et dégage en continu une brume de force 2. L‘humidité relative actuelle de l‘environnement est indiquée dans l‘écran d‘humidité de l‘air (13). d‘éviter l‘apparition d‘impuretés. n‘utilisez pas l‘humidificateur, retirez le filtre à eau (7) (voir „Nettoyage et remplacement du filtre à eau“), laissez la cuve d‘eau (2) ouverte afin qu‘elle sèche bien, et conservez l‘appareil dans un endroit sec. Avant d‘emballer l‘appareil, laissez sécher toutes les pièces de l‘humidificateur. UTILISATION D‘ACIDE CITRIQUE OU AUTRES PRODUITS ANTI-TARTRE 5 En appuyant sur la touche brume (20), vous pouvez régler l‘intensité de la brume (18). Pour régler la densité de la brume, quatre degrés sont possibles: S1 – S2 – S3 – S4 (rouge – orange – bleu – vert). Il apparaît sur l‘écran (18) la densité que vous venez de choisir pour la brume. Éteindre l‘humidificateur et débrancher la prise (11). Retirer l‘eau. Mettre 5 à 10 gouttes de produit anti-tartre dans le creux situé dans le socle de l‘appareil (9), le remplir d‘eau chaude (env. 60° C), jusqu‘à ce que l‘eau couvre la vanne blanche. Ensuite, nettoyer le creux situé dans le socle (9) avec de l‘eau claire Replacez la cuve (2) sur le socle de l‘appareil (9). 6 Le mode automatique (12), cherche à atteindre une certaine humidité ambiante. Pour activer ce mode, appuyez sur la touche d‘humidité de l‘air (19) – AUTO (12) s‘allume, et il apparaît 40 % pour l‘humidité de l‘air (13). La fourchette pour choisir l‘humidité de l‘air ambiant va de 40 % à 70 %. Si vous appuyez brièvement sur la touche de réglage (19), 17 F F SOLUTIONS AUX PROBLEMES l‘humidité ambiante choisie augmente de 1 %. Si vous appuyez plus longtemps sur la touche de réglage, l‘humidité ambiante choisie augmente de 5 %. 12 Après le réglage, l‘humidité de l‘air (12) s‘affiche et alterne toutes les 5 secondes entre l‘humidité choisie et l‘humidité effective. 13 L‘appareil s‘éteint automatiquement lorsque l‘humidité ambiante correspond à celle préréglée. L‘humidification recommence dès que l‘humidité ambiante diminue. 15 14 S1 S2 S3 S4 7 La durée de fonctionnement peut se régler de 1 à 12 heures. Pour cela, appuyez sur la touche DUREE (22). Pour avancer d‘une heure, il suffit d‘appuyer sur le bouton. Le compte à rebours commence dès la fin du réglage. S‘il n‘y a pas d‘amenée d‘eau, l‘appareil s‘éteint automatiquement au bout d‘une minute. Raison Solution Affichage de veille hors service, ne fonctionne pas. L‘appareil n‘est pas allumé. Allumez l‘appareil. Pas de courant dans la prise. Contrôlez les fusibles. Manque d‘eau. Remplir la cuve d‘eau. Nouvel appareil. Ouvrez la cuve et nettoyez-la à l‘eau claire. Eau sale. Nettoyez la cuve et ajoutez de l‘eau fraîche. L‘appareil est encrassé, l‘eau est encrassée ou est trop longtemps dans la cuve. Nettoyer l‘appareil, nettoyer la cuve et mettre de l‘eau fraîche. Le niveau d‘eau s‘affiche, pas d‘humidification. La brume a une odeur étrange ou mauvaise. 19 20 21 L‘humidificateur s‘éteint automatiquement une fois que la durée est écoulée. 8 S‘il n‘y a pas assez d‘eau dans la cuve, la brume ne sera plus produite, un bip retentit et le niveau d‘eau (14) s‘allume. Veuillez éteindre l‘humidificateur et remplissez la cuve d‘eau (2) (voir points 1 et 2). 16 17 18 Problème 22 Création de brume anormale. Bruit anormal. 12Affichage en mode automatique 13 Affichage de l‘humidité ambiante relative (en %) 14 Cuve vide Videz le creux du socle et placez soigneusement la cuve. Trop d‘eau dans le creux du socle. L‘eau de la cuve n‘est pas utilisée. 15 Affichage de la marche Espace vide entre l‘appareil et le sol. Placez l‘appareil sur un sol stable. Le couvercle de la cuve est encrassé. Nettoyez le couvercle de la cuve ainsi que la vanne dans le couvercle. La cuve n‘est pas correctement placée sur le socle de l‘appareil. Replacez correctement la cuve. 16 Affichage de la veille VALEURS APPROXIMATIVES POUR L‘HUMIDITE AMBIANTE RELATIVE SELON LE TYPE D‘UTILISATION pièces fermées à 20°C 18 humidité ambiante relative (en %) Salon / Bureau l‘été 35 – 50 Salon / Bureau l‘hiver 50 – 70 Bureaux 40 – 60 Attention: Les valeurs indiquées dans ce mode d‘emploi pour l‘humidité ambiante ne sont annoncées qu‘à titre indicatif. 17 Affichage de la durée de fonctionnement (en heures) Attention! Si vous rencontrez un problème avec l‘appareil et que la solution proposée ne fonctionne pas, veuillez alors contacter la société BIELMEIER Hausgeräte GmbH, ou le vendeur de l‘appareil. 18 Affichage de la densité de la brume : Ne démontez jamais l‘appareil vous-même. Ne réparez jamais l‘appareil vous-même. Niveau 1 = S1 (rouge) Niveau 2 = S2 (rouge + orange) Niveau 3 = S3 (rouge + orange + bleu) Niveau 4 = S4 (rouge + orange + bleu + vert) 19 Réglage de l‘humidité ambiante DONNEES TECHNIQUES POUR L‘AMOUR DE L‘ENVIRONNEMENT 20 Réglage de la densité de la brume Source de courant / Branchement: 220 – 240 V ~ (50 Hz) / 30 W Ne pas jeter les emballages et les appareils usagés aux ordures ménagères, mais les faire recycler. Volume max. de la cuve d‘eau: 5 litres Veuillez consulter le point de recyclage ou de collecte de votre commune. 21 Touche MARCHE / ARRET 22 Réglage de la durée de fonctionnement Fig. 1: Écran (3) et élément de commande (4) en détail Brume: à partir de 260 ml par heure Bruit de fonctionnement: < 35 dB 19 F I IMPORTANTE! GARANTIE Pour la garantie prenant effet le jour de l‘achat, sur les territoires de l’UE et de la Suisse, s‘appliquent les conditions suivantes. 1. Durée de la garantie 2 ans 2. Ce que comprend la garantie: a) à notre choix, réparation ou remplacement des pièces qui, après contrôle par nos soins, présentent des défauts de matériel ou de fabrication. b) La garantie n‘est applicable que sur présentation de ce coupon-garantie et de la facture d’achat. Ce coupon n‘est valable que s‘il a été rempli le jour de l‘achat. c) La garantie n‘est valable que pour le premier utilisateur. d) Le fait de réparer ou d‘échanger des pièces pendant la durée de la garantie ne prolonge ni ne renouvelle la durée de cette dernière. e) Les frais de transport sont à la charge de l‘acheteur (ne s‘applique pas pour les 6 premiers mois de la garantie). f) S‘il n‘est pas possible de réparer le défaut ou la détérioration, ou si nous refusons l‘amélioration ou qu‘elle prend plus de temps qu‘il n‘est acceptable, sur demande du client, soit un article de remplacement sera fourni dans les 6 mois à compter de la date d‘achat / de livraison, soit l‘article sera remboursé, mais pas au prix en cours sur le marché. 3. La garantie ne s‘applique pas: aux rayures et tâches sur l‘appareil. aux lampes et voyants de contrôle. pour les pièces fragiles en bakélite, en verre, en plastique et autres, à moins qu‘il s‘agisse de défauts de matériel que nous avons reconnus comme tels. aux détériorations dues à une mauvaise installation ou à une mauvaise fixation. si l‘appareil est branché à un secteur électrique dont la tension est supérieure à celle indiquée sur l‘appareil. en cas d‘utilisation incorrecte ou inadéquate. en cas de négligence. en cas d‘un manque d‘entretien ou d‘un entretien incorrect. si l‘appareil ou certaines pièces sont tombées. en cas de transport inapproprié ou d‘emballage non approprié au transport. 4. La garantie s‘annule: si l‘appareil est employé à d‘autres fins qu‘à des fins ménagères. si des personnes non autorisées par notre société procèdent à des réparations ou à des modifications. Une garantie de 2 ans s‘applique à cet appareil pour les défauts dus à une erreur de fabrication ou de matériel. La garantie prend effet le jour de la remise et n‘est applicable que sur remise du bon de garantie et de la facture d‘achat. Modèle: Important! Veuillez noter ici le code FD se trouvant sur la plaque signalétique de l‘appareil: Queste istruzioni d’uso contengono importanti informazioni sull’utilizzo e la manutenzione del vostro nuovo apparecchio. Prima di utilizzarlo vi preghiamo di leggere attentamente le avvertenze e di conservarle per una prossima consultazione. Una manutenzione accurata dell’apparecchio vi procurerà grande soddisfazione per molti anni. 20 Date de l‘achat utti. In caso di danni evidenti all’apparecchio o al cavo di alimentazione, o se l’apparecchio emette odori e rumori inconsueti, far controllare l’apparecchio da uno specialista o da un centro di assistenza alla clientela BIELMEIER. Le riparazioni alle apparecchiature elettriche devono essere effettuate esclusivamente da personale specializzato. Riparazioni inadeguate possono provocare danni considerevoli all’utente. Il produttore non è responsabile per nessun danno causato da un’inopportuna o erronea osservanza delle istruzioni. AVVERTENZE PER LA SICUREZZA Collegare l’apparecchio ad una rete, la cui tensione corrisponda alle indicazioni riportate sulla targhetta. Dopo l’uso, la pulizia o per eventuali disturbi durante il funzionamento staccare la spina. Non toccare la spina con le mani umide o bagnate. I bambini non riconoscono i pericoli causati da apparecchiature elettriche. Per questo non lasciare mai i bambini da soli con apparecchi elettrici. Non posizionare o utilizzare l’apparecchio su superfici molto calde o vicino alla fiamma del gas aperto. PULIZIA E MANUTENZIONE Le superfici si possono graffiare. Evitare quindi l’uso di prodotti abrasivi o di oggetti appuntiti durante la pulizia. Pulire il display (3), il serbatoio (2) e il corpo dell’apparecchio (9) con un panno asciutto o leggermente umido senza aggiunta di pulitore. Il display (3) è sensibile. Pulirlo solo con un panno umido morbido. PULIZIA E SOSTITUZIONE DEL FILTRO D’ACQUA Durante il funzionamento l’apparecchio ha bi- 1 Il filtro dell’acqua (7) nel tappo del serbatoio (8) contiene particelle in ceramica e in tecnologia nano silver nonché un filtro per togliere il calcare. Spegnere l’apparecchio e staccare la spina Non accendere l’umidificatore se non c’è ac- 2 Qualità dell’acqua: L’umidificatore funziona con acqua corrente. Le particelle in ceramica e tecnologia nano silver sterilizzano l’acqua. Il filtro anticalcare riduce i residui sull’apparecchio e ostacola allo stesso tempo che il calcare si depositi sulle superfici circostanti dell’ambiente. sogno di spazio e non va coperto per evitare di ostruire la presa e l’emissione di aria. prima di pulirlo o di spostarlo. qua nel serbatoio. Staccare sempre la spina in caso di assenze prolungate e durante un temporale, per evitare danni provocati da fulmini. Non riempire il serbatoio con acqua cal- da o fredda, ciò potrebbe danneggiare l’apparecchio. Togliere l’acqua dalla base e dal serbatoio in caso di temperature al di sotto di 0° C, per evitare che l’acqua congeli e l’apparecchio subisca danni. Cachet et signature du vendeur Utilizzare l’apparecchio solo in ambienti asci- Non immergere mai la base con il cavo di alimentazione in acqua. Attenzione: Non smontare il filtro dell’acqua (7), attenersi a queste istruzioni. 3 Il filtro dell’acqua (7) va pulito da una a due volte al mese. Una pulizia regolare del filtro dell’acqua (7) è ottimale per il buon funzionamento dell’apparecchio. Pulizia del filtro (7): Rimuovere il serbatoio dell’acqua (2), allentare il tappo (8) ed estrarre il filtro dell’acqua (7). 21 I I Immergere il filtro (7) in acqua pulita, rimuovere le impurità dalle superfici lisce e poi lavarlo interamente. Fissare il filtro dell’acqua (7) nuovamente nel tappo (8) e rimettere il serbatoio (2). La pulizia è completata. 4 Il filtro dell’acqua (7) va rinnovato ogni 6-12 mesi. Sostituzione del filtro (7): Rimuovere il serbatoio (2), allentare il tappo (8) ed estrarre il filtro dell’acqua (7). MESSA IN FUNZIONE 1 Posizionare l’umidificatore in un luogo appropriato e rimuovere il serbatoio (2). Allentare il tappo (8) e riempire il serbatoio (2) con acqua (acqua corrente o acqua distillata). Suggerimento: L’uso di acqua distillata libera l’umidificatore dal deposito di calcare. 2 Rimettere il tappo (8) sul serbatoio (2). Rimuovere macchie di acqua sul lato esterno del serbatoio (2) con un panno morbido. Fissare il nuovo filtro (7) nel tappo (8) e rimettere il serbatoio (2). La sostituzione è terminata. 5 Estrarre il filtro dell’acqua (7) e conservarlo insieme all’apparecchio in un luogo asciutto, se l’umidificatore non è in funzione per un tempo prolungato. CONSIGLI PER LA MANUTENZIONE Utilizzare l’umidificatore con acqua distillata Se l’umidificatore non è in funzione per lungo tempo, estrarre il filtro dell’acqua (7) (vedi „Pulizia e sostituzione del filtro dell’acqua“), lasciare asciugare bene il serbatoio aperto (2) e conservare l’apparecchio in un luogo asciutto Aspettare che tutte le parti siano ben asciutte prima di conservarlo. USO DI ACIDO CITRICO O ALTRI DECALCIFICANTI 4 Premere il tasto di accensione e spegnimento EIN / AUS (21), l’indicatore di stand-by (16) si spegne e si accende la spia di nebulizzazione S2 (rosso + arancione) (18). L’umidificatore si trova nella modalità di funzionamento in continuo (la spia AUTO (12) è spenta) ed emette in continuazione nebulizzazione di livello 2. L’umidità attuale dell’ambiente viene indicata dalla spia con il grado di umidità (13). Dopo l’impostazione la spia di umidità (12) indica ogni 5 secondi i due valori quello dell’umidità impostata e quello dell’umidità attuale. L’apparecchio si spegne automaticamente, quando l’umidità dell’ambiente corrisponde al valore impostato nell’umidificatore. Il processo di umidificazione riprende, non appena l’umidità nell’ambiente si abbassa. Ci sono quattro livelli per impostare la densità di nebulizzazione: S1 – S2 – S3 – S4 (rosso – arancione – blu – verde). Sull’indicatore (18) viene visualizzata la densità attuale di nebulizzazione impostata. S3 S4 16 17 18 19 20 21 22 13 Spia di umidità relativa (in %) 14 Serbatoio vuoto 16 Spia di stand-by 17 Spia durata di funzionamento (in ore) 18 Spia di nebulizzazione: VALORI DI RIFERIMENTO DI UMIDITÀ RELATIVA NEGLI AMBIENTI IN BASE AL LORO USO g di acido citrico nella vaschetta alla base dell’apparecchio (9), versarci dell’acqua calda (ca. 60° C), fino a coprire la valvola bianca. Soggiorno /studio in inverno 50 – 70 Uffici 40 – 60 Infine sciacquare la vaschetta nella base (9) con E’ possibile impostare l’umidità dell’ambiente dal 40% al 70%. Premendo brevemente il S2 15 Spia di funzionamento 35 – 50 acqua limpida. S1 Se non si mette acqua nel serbatoio, l’apparecchio si spegne automaticamente dopo 1 minuto. Soggiorno /studio in estate Per attivare questo funzionamento, premere il tasto di umidità (19), si accende la spia AUTO (12) e l’indicatore di umidità (13) indica 40%. 15 12Spia di funzionamento automatico 6 Il funzionamento automatico (12) serve a creare nell’ambiente l’umidità desiderata. Inserire 5 – 10 gocce di decalcificante o 1 – 2 14 8 Se nel serbatoio c’è poca acqua, l’apparecchio produce più nebulizzazione, emette un segnale acustico e la spia dell’acqua (14) si illumina. Si prega di spegnere l’umidificatore e di riempire il serbatoio (2) (vedi punti 1 e 2). Umidità relativa (in %) Togliere l’acqua. 13 L’umidificatore si spegne automaticamente, al termine della durata di funzionamento impostata. 5 Premendo il tasto Nebel (nebulizzazione) (20) impostare il livello di nebulizzazione (18). 12 7 E’ possibile impostare la durata del funzionamento da 1 a 12 ore, premendo il tasto Dauer (22). Alla fine dell’operazione di impostazione il tempo comincia a scorrere. Ambienti chiusi a 20°C Spegnere l’umidificatore e staccare la spina (11). 22 Riposizionare il serbatoio dell’acqua (2) sulla base (9). 3 Inserire la spina (220 – 240 V / 50 Hz) e premere l’interruttore (10), l’apparecchio emette un segnale acustico ed entra in modalità di stand-by (16). per evitare depositi di calcare. Cambiare regolarmente l’acqua non utilizzata per proteggerlo da impurità. tasto Luffeuchte (umidità) (19), l’umidità scelta aumenta dell’1%. Se si tiene premuto il tasto più a lungo aumenta del 5%. Livello 1 = S1 (rosso) Livello 2 = S2 (rosso + arancione) Livello 3 = S3 (rosso + arancione + blu) Livello 4 = S4 (rosso + arancione + blu + verde) 19 Impostazione di umidità 20 Impostazione densità di nebulizzazione Attenzione: I valori di umidità indicati in questo manuale d’istruzioni sono solo valori relativi. 21 Tasto di accensione /spegnimento 22 Impostazione durata di funzionamento Fig. 1: Spie (3) e pannello comandi (4) in dettaglio. 23 I I RISOLUZIONE DEI PROBLEMI GARANZIA Problema Causa Soluzione La spia di stand-by è fuori uso, non è in funzione. L’apparecchio è spento. Accendere l’apparecchio. Non c’è corrente nella presa. Controllare il fusibile. Mancanza di acqua. Mettere acqua nel serbatoio. Apparecchio nuovo. Aprire il serbatoio e sciacquarlo con acqua limpida. Acqua sporca. Pulire il serbatoio e rimetterci acqua fresca. La spia dell’acqua è accesa, nessuna umidificazione. La nebulizzazione emana un odore sgradevole. Produzione di nebulizzazione anormale. L’apparecchio è sporco, l’acqua è sporca oppure è rimasta per troppo tempo nel serbatoio. Svuotare la vaschetta della base e rimettere il serbatoio in maniera accurata. Troppa acqua nella vaschetta della base. Rumore anomalo. L’acqua del serbatoio non è utilizzata. Pulire l’apparecchio e il serbatoio e riempirlo con acqua fresca. Risonanza dalla superficie dell’apparecchio. Posizionare l’apparecchio su una superficie stabile. Il tappo del serbatoio è sporco. Pulire il tappo e la valvola del tappo. Il serbatoio non è collocato bene sulla base. Posizionare il serbatoio sulla base in maniera corretta. Attenzione! In caso di problemi con questo apparecchio e qualora le soluzioni suggerite non fossero sufficienti, vi preghiamo di rivolgervi alla BIELMEIER Hausgeräte GmbH o al vostro rivenditore. Non smontare l’apparecchio e non provare a ripararlo da soli. Le seguenti disposizioni di garanzia decorrono dalla data di acquisto e sono valide all’interno dell’UE e della Svizzera: 1. Periodo di garanzia: 2 anni 2. Prestazioni di garanzia: a) Riparazione o sostituzione, a nostro esclusivo giudizio e dopo accurata verifica, di pezzi che presentano difetti di materiale o di fabbricazione. b) La garanzia è valida solo su presentazione di questo certificato di garanzia, che a sua volta è valido solo se compilato in ogni sua parte nel giorno dell’acquisto. c) La garanzia è valida solo per il primo utente. d) Il periodo di garanzia non sarà rinnovato o prolungato a seguito di successiva riparazione o sostituzione di pezzi. e) I costi di trasporto sono a carico dell’acquirente (non vale per i primi 6 mesi di garanzia). f) In caso di guasto o difetto irreparabile, qualora la riparazione venisse da noi respinta o gli interventi necessari non fossero eseguiti entro un termine adeguato, si provvederà - a scelta dell’utente entro 6 mesi dalla data di acquisto/fornitura - alla sostituzione gratuita dell’apparecchio o al rimborso del valore minimo o alla riconsegna dell’apparecchio dietro rimborso del prezzo d’acquisto, tuttavia non del prezzo corrente sul mercato. 3. La garanzia non è valida: per graffi o macchie sull’apparecchio. per le spie luminose e di controllo. per parti leggermente fragili in bachelite, vetro, plastica e simili, eccetto che si tratti di difetti di costruzione riconosciuti da noi come tali. per danni causati da errata installazione o fissaggio. se l’apparecchio è collegato ad una rete elet- trica di tensione maggiore rispetto a quella indicata sull’apparecchio; in caso di uso errato o inadeguato. in caso di scarsa manutenzione. in caso di manutenzione errata o insufficiente. in caso di rotture dovute alla caduta dell’apparecchio o di singoli pezzi. in caso di trasporto inadeguato o di imballaggio inadeguato per il trasporto. 4. La garanzia decade: se l’apparecchio è utilizzato per scopi diversi da quelli domestici. se le riparazioni e le modifiche sono esegu- ite da personale non autorizzato dalla nostra azienda. Garantiamo questo apparecchio per un periodo di 2 anni per guasti dovuti a difetti di materiale o di fabbricazione. La garanzia decorre dal giorno della fornitura del prodotto ed è valida solo su presentazione del certificato di garanzia e della ricevuta fiscale di pagamento. Ulteriori pretese di garanzia sono escluse. DATI TECNICI Tipologia di connessione elettrica: 220 – 240 V ~ (50 Hz) / 30 W Capacità massima serbatoio: 5 Liter Emissione nebulizzazione: a partire da 260 ml all’ora 24 Rumorosità: < 35 dB INDICAZIONI SULLA TUTELA DELL’AMBIENTE Modello: Importante! Si prega di annotare l’FD- Code apposto sulla targhetta dell’apparecchio: Non disperdere nell’ambiente il materiale d’imballaggio e l’apparecchio da rottamare, ma destinarli ad operazioni di riciclo. Si prega di richiedere presso la propria amministrazione comunale informazioni sui punti di raccolta differenziata e smaltimento di rifiuti. Timbro e firma del Rivenditore Data dell’acquisto 25 CZ DŮLEŽITÉ! Tento návod k obsluze si prosím pečlivě přečtěte, obsahuje mnoho důležitých upozornění, která se týkají bezpečnosti, použití a údržby přístroje. CZ Když je přístroj viditelně poškozen nebo když vydává neobvyklé zvuky nebo pachy, nechte jej překontrolovat u odborníka, nebo kon taktujte zákaznickou linku BIELMEIER. Opravy elektropřístrojů smí být prováděny pouze odborníky. Neodbornými opravami mohou vzniknout spotřebiteli značné škody. Výrobce neručí za případné škody, které jsou způsobeny chybnou obsluhou, nebo chybným používáním. Pečlivě jej uschovejte, případně jej předejte dalšímu vlastníkovi. BEZPEČNOSTNÍ POKYNY pětím podle typového štítku na přístroji. ní, před čištěním nebo při případných poruchách během provozu. Zástrčky se v žádném případě nedotýkejte mokrýma nebo vlhkýma rukama. 4 Vodní filtr byste měli vyměnit jednou za 6 až 12 měsíců. ÚDRŽBA A PÉČE Povrchové plochy se mohou poškrábat. Nepoužívejte proto při čištění žádné špičaté předměty nebo abrazivní látky. Vytáhněte nádrž (2), odšroubujte víko (8) a víka (8) a nádrž (2) nasaďte. 5 Pokud není přístroj delší dobu v provozu, vyndejte vodní filtr (7) a spolu s přístrojem ho uložte na suchém místě. ÚDRŽBA – DOPORUČENÍ Přístroj nikdy nenechávejte stát na horkém LCD-displej je citlivý. Otírejte jej pouze vlhkým měkkým hadrem. Zbytkovou vodu vyměňujte pravidelně, aby se Během provozu musí přístroj stát ve volném prostoru, nesmí být ničím přikrytý, aby přívod a odvod vzduchu zůstal volný. Pokud chcete přístroj čistit nebo přemístit na jiné místo, vypněte ho a vytáhněte ze zásuvky. Přístroj nezapínejte, jestliže v něm není žádná voda. Při delší nepřítomnosti a během bouřky přístroj vždy vypínejte, aby nedošlo ke škodám způ sobeným úderem blesku. Do nádrže nepřidávejte teplou nebo horkou vodu, přístroj by se tím mohl poškodit. Při teplotách pod 0°C vždy vyprázdněte nádrž i podstavec přístroje, v opačném případě by voda mohla zmrznout a přístroj by se tak mohl poškodit. Nikdy neponořujte do vody podstavec a ani přívodní kabel. Přístroj uvádějte do chodu pouze v suchých místnostech. nou vodu, abyste zabránili usazování vodního kamene. zabránilo znečištění. Pokud zvlhčovač nepoužíváte delší dobu, vy- 1 Vodní filtr (7) ve víku nádrže (8) obsahuje nanočástice stříbra a jeden filtr na odstranění vodního kamene. Pozor: Nerozebírejte ho (7), ale dodržujte pokyny v tomto návodu. 2 Kvalita vody: Zvlhčovač vzduchu může používat vodu z vodovodu. Nanočástice stříbra sterilizují vodu. Filtr na vodní kámen redukuje usazeniny v přístroji a zároveň zamezuje usazování vodního kamene v okolí. 3 Vodní filtr (7) musíte čistit každý měsíc (nebo jednou za dva měsíce). Pro přístroj je lepší, když se vodní filtr (7) čistí pravidelně. Čištění filtru (7) – postup: Vytáhněte nádrž (2), odšroubujte víko (8) a vyšroubujte vodní filtr (7). Vodní filtr (7) ponořte do čisté vody. Odstraňte nečistoty z hladké povrchové plochy filtru a celý ho umyjte. Sundejte víko (8) a naplňte ji (2) vodou (voda z vodovodu nebo destilovaná voda). Doporučení: Při použití destilované vody nezůstanou ve vašem zvlhčovači vápenaté usazeniny. Pak už jen znovu upevněte vodní filtr (7) do Děti nerozpoznají nebezpečí, které jim hrozí při ČIŠTĚNÍ A VÝMĚNA VODNÍHO FILTRU 1 Postavte zvlhčovač na vhodné místo a vyndejte nádrž (2). vyšroubujte vodní filtr (7). Do zvlhčovače vzduchu používejte destilova- povrchu nebo v blízkosti otevřeného ohně (plynových hořáků). To samé platí i pro jeho provoz. PRVNÍ UVEDENÍ DO PROVOZU Výměna filtru (7) – postup: LCD-displej (3), nádrž (2) a kryt (9) přístroje čistěte suchým, nebo vlhkým hadrem bez přidání čisticího prostředku. manipulaci s přístrojem, proto je nikdy nenechávejte v blízkosti přístroje bez dozoru. 26 víka (8) a nádrž (2) nasaďte. Výměna je hotová. Přístroj připojte ke střídavému proudu – s na Zástrčku vytáhněte – po ukončení používá- Pak už jen znovu upevněte vodní filtr (7) do ndejte vodní filtr (7) (viz. „Čištění a výměna vodního filtru“), otevřenou nádrž (2) nechte vyschnout a přístroj uložte na suché místo. Před uložením a zabalením přístroje nechte všechny jeho části důkladně vyschnout. POUŽITÍ KYSELINY CITRONOVÉ NEBO JINÝCH ODVÁPŇOVACÍCH PROSTŘEDKŮ Přístroj vypněte a zástrčku (11) vytáhněte ze zásuvky. Vodu vylijte. Do otvoru v podstavci (9) dejte 5 – 10 kapek odvápňovače nebo 1 – 2 g kyseliny citronové, naplňte teplou vodou (ca. 60°C), až voda zakryje bílý ventil. Potom opláchněte otvor v podstavci (9) čistou vodou. 2 Nyní už můžete nádrž (2) zase zakrýt víkem (8). Měkkým hadrem odstraňte skvrny od vody na vnější straně nádrže (2). Nádrž (2) nasaďte zpátky na podstavec přístroje (9). 3 Zástrčku dejte do zásuvky (220 – 240 V / 50 Hz) a stiskněte síťový spínač (10), zazní zvukový signál. Zvlhčovač se nyní nachází v pohotovostním režimu. Ukazatel pohotovostního režimu (16) se zapne. 4 Stiskněte tlačítko EIN/AUS (21), ukazatel pohotovostního režimu (16) zhasne a ukáže se nastavení mlhoviny S2 (červené + oranžové) (18). Přístroj se nachází v nepřetržitém provozu (ukazatel AUTO (12) nesvítí) a vydává mlhu síly 2. Aktuální relativní vlhkost vzduchu okolí je zobrazena ukazatelem vlhkosti (13). 5 Stisknutím tlačítka NEBEL (20) nastavíte sílu mlhy (18). Čtyři stupně, pomocí nichž nastavíte sílu mlhy (18): S1 – S2 – S3 – S4 (červený – oranžový – modrý – zelený) Nastavenou sílu uvidíte na ukazateli (18). 6 V automaticky řízeném provozu (12) je vždy dosažena stanovená vlhkost vzduchu v místnosti. K aktivaci tohoto provozu stiskněte tlačítko vlhkosti (19) – rozsvítí se AUTO (12) a na ukazateli vlhkosti (13) se ukáže 40 %. Výběr relativní vlhkosti vzduchu v místnosti je možný v rozmezí 40 % – 70 % . Když krátce 27 CZ CZ ODSTRANĚNÍ PROBLÉMŮ Problém Důvod Řešení Ukazatel pohotovostního režimu je mimo provoz, žádná funkce Přístroj není zapnutý. Zapněte přístroj. V zásuvce není proud. Zkontrolujte pojistky. Svítí ukazatel stavu vody, žádné zvlhčování. Mlha – zvláštní nebo rušivý zápach. Výroba mlhy – abnormální. Nedostatek vody. Doplňte vodu do nádrže. Nový přístroj. Otevřete nádrž a vymyjte čistou vodou. Špinavá voda. Vyčistěte nádrž a naplňte čistou vodou. Přístroj je znečištěný, voda je znečištěná nebo je v nádrži příliš dlouho. Vyčistěte přístroj, nádrž a naplňte ji čistou vodou. Příliš mnoho vody v otvoru podstavce. Vyprázdněte jej a nádrž opatrně nasaďte. Dutina mezi přístrojem a podložkou. Abnormální hluk. Voda z nádrže není vyčerpaná. Víko nádrže je špinavé. Nádrž nesedí správně na podstavci. Umístěte přístroj na stabilní podložku. Vyčistěte víko a ventil nádrže. Přístroj sami nerozebírejte a také ho sami neopravujte! 12 Po nastavení přepíná ukazatel vlhkosti vzduchu (12) každých pět sekund mezi nastavenou a aktuální vlhkostí. 13 14 Přístroj se automaticky vypíná, když vlhkost vzduchu v místnosti odpovídá nastavené hodnotě na zvlhčovači. Ten se opět zapne, jakmile vlhkost vzduchu v místnosti klesne. 7 Délku provozu je možné nastavit na dobu 1 – 12 hodin. K tomu stiskněte tlačítko DAUER (22). Stisknutím tlačítka se nastaví jedna hodina. Po dokončení nastavení začíná běžet čas. 15 S1 S2 S3 S4 20 21 8 Pokud je v nádrži málo vody, nevzniká už žádná mlha, zazní zvukový signál, ukazatel stavu vody (14) se rozsvítí. Zvlhčovač vypněte a nádrž (2) naplňte vodou (viz. 1 a 2) Když vodu nedoplníte, přístroj se automaticky po jedné minutě vypne. 22 12ukazatel při automaticky řízeném provozu 13ukazatel relativní vlhkosti vzduchu (v %) ORIENTAČNÍ HODNOTA PRO RELATIVNÍ VLHKOST VZDUCHU V MÍSTNOSTECH PODLE ZPŮSOBU VYUŽITÍ Uzavřené prostory při 20ºC Relativní vlhkost vzduchu (v %) Obývací pokoj / pracovna v létě 35 – 50 Obývací pokoj / pracovna v zimě 50 – 70 Nebytové prostory 40 – 60 Pozor: Uvedené hodnoty vlhkosti vzduchu v tomto návodu jsou pouze orientační. 14 nádrž na vodu – prázdná 15ukazatel provozu 16ukazatel pohotovostního režimu (stand-by) 17 ukazatel doby provozu (v hodinách) 18ukazatel hustoty mlhy: stupeň 1 = S1 (červený) stupeň 2 = S2 (červený + oranžový) stupeň 3 = S3 (červený + oranžový + modrý) stupeň 4 = S4 (červený + oranžový + modrý + zelený) 19nastavení vlhkosti vzduchu TECHNICKÉ ÚDAJE DBEJTE NA ŽIVOTNÍ PROSTŘEDÍ! Zdroj elektřiny / příkon: 220-240 V~ (50 Hz) ú 30 W Obalový materiál a starý přístroj nevyhazujte, ale dovezte k recyklaci. 20nastavení hustoty mlhy Maximální objem nádrže na vodu: 5 litrů Na příslušné recyklační místo nebo sběrný dvůr se informujte na vašem obecním nebo městském úřadě. 22nastavení doby provozu Výstup mlhy od 260 ml za hodinu Hlučnost chodu: < 35 dB 16 17 18 19 Zvlhčovač se automaticky vypíná, když nastavený čas vyprší. Znovu nádrž pečlivě nasaďte. Pozor! Pokud byste měli s přístrojem problémy a výše uvedené návrhy řešení by je neodstranily, obraťte se prosím na zákaznický servis BIELMEIER nebo svého prodejce. 28 stisknete tlačítko nastavení (19), zvýší se zvolená vlhkost vzduchu o 1 %. Když tlačítko podržíte déle, zvýší se zvolená vlhkost vzduchu o 5 %. 21vypnutí / zapnutí přístroje Obr. 1: Ukazatel (3) a ovládací pole (4) – detailně 29 CZ ZÁRUČNÍ LIST D Notizen GB Notes F Notes I Note CZ Poznámky Pro záruku začínající dnem prodeje spotřebiče platí pro země EU (i Českou republiku) a Švýcarsko tyto podmínky: 1.Trvání záruky: 2 roky 3. Záruka se nevztahuje na případy: 2. Poskytování záruky: poškrábání nebo fleky na spotřebiči a na světelné kontrolky nebo žárovky a na motorové kartáče. a) záruční opravu provedeme podle našeho zvážení opravou nebo výměnou vadných dílů, jestliže tyto závady vznikly prokazatelně vadou materiálu nebo chybou při výrobě. b)záruční oprava bude provedena jen při předložení tohoto záručního listu a dokladu o zaplacení. c) záruku mohou uplatnit pouze první majitelé spotřebiče. na lehce rozbitné díly z bakelitu, skla, plastů apod., pokud se nejedná o chybu materiálu. poškození jako následek chybné instalace nebo upevnění. kdy je spotřebič zapojen do sítě s vyšším napětím, než je na spotřebiči uvedeno. chybného nebo neodpovídajícího použití. d)jestliže dojde k opravě nebo výměně spotřebiče v záruční době, záruční doba se prodlouží. nedbalosti při používání. e) poplatky za dopravu hradí kupující. nevhodného transportu nebo nedostatečného zabalení. f) v případě, že se závada nebo škoda nedá odstranit, nebo se překročí doba servisního zásahu (30 dnů), bude spotřebič vyměněn za nový, nebo vráceny peníze v prodejně, kde byl spotřebič zakoupen. upadnutí spotřebiče nebo jeho jednotlivých částí. 4. Záruka zaniká: při použití spotřebiče jinak než v domácnosti. při provádění opravy nebo změny na spotřebiči osobou jinou než pověřenou naším servisem. Na tento spotřebič poskytujeme 2 roky záruku na nedostatky, které jsou označeny jako výrobní chyby nebo chyby materiálu. Záruční doba začíná dnem prodeje a je uznána po předložení záručního listu a dokladu o zaplacení. Jiné nároky neuznáváme. Model: 30 razítko a podpis prodávajícího Důležité! Prosím, napište si FD kód, který je umístěný na štítku: datum prodeje 31 Bielmeier Hausgeräte GmbH Gnaglbergstraße 6 D-94267 Prackenbach Bielmeier Hausgeräte s.r.o. Bořice 25 CZ-34401 Domažlice Tel.: +49 (0) 9942 94 88 93-0 Fax: +49 (0) 9942 94 88 93-22 E-Mail:[email protected] Internet:www.bielmeier-hausgeraete.com Tel.: +420 - 379 768 010 Fax: +420 - 379 768 020 E-Mail:[email protected] Internet:www.bielmeier.cz