1
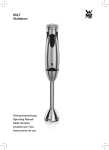
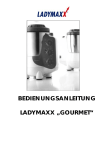
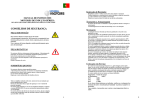
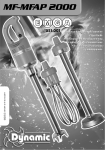
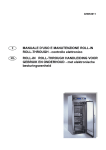
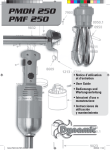
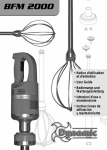
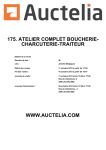
FTP 94
Mini Fouet sans-fil
Bon de garantie • Warranty
Garantiesche in • Garanzia • Garantia
✔
Hôtel, Auberge
Restaurant
Cafétéria
Pâtisserie
Glacier
Hôpital
Autre
Nom de l’utilisateur
Hotel, Inn
Restaurant
Cafétéria
Pastry
Ice-cream Manufacturer
Hôpital
Other
Hotel/Gaststäte
Restaurant
Cafe
Konditorei
Eiscafe
Krankenhaus
Sonstige
Hotel, albergo
Ristorante
Self service
Pasticceria
Gelateria
Ospedale
Altro
Hotel, Posada
Restaurante
Cafeteria
Pasteleria
Heladeria
Hospital
Otro
Français
p.2
English
p.8
Name
Name
Nome dell’Utilizzatore
Nombre del usuario
Deutsch
p.14
Address
Adresse
Indirizzo
Dirección
Italiano
p.20
City
Stadt
Città - Provincia
Ciudad
Español
p.26
➜
Adresse
➜
Ville
➜
Code
Code
Postleitzahl
CAP
Código postal
Telephone
Telefon
Telefono
Teléfono
➜
Téléphone
➜
Dealer stamp
DYNAMIC FRANCE
Stempel des Verkäufers
Timbro del rivenditore
Sello del vendedor
S.A. au capital de 216.780 Euros - RCS 416 450 435 - La Roche-sur-Yon
B.P. 57 - Z.i. du Puy Nardon - 85290 MORTAGNE-sur-SEVRE
TEL. 33 (0)2 51 63 02 72 - FAX 33 (0)2 51 63 02 73
Web site : www.dynamicmixers.com • e-mail : [email protected]
Offrez-vous les originaux !
L’EXPÉRIENCE AU SERVICE DES PROFESSIONNELS
Création Graphique Bleu Com’ Cèdre - 02 41 56 08 73 - Cholet - RCS ANGERS 437 855 083 000 14
Cachet du distributeur
Notice d’utilisation et d’entretien
Mini Fouet sans-fil FTP94
Pack batterie
rechargeable
Support mural
Gachette Moteur
DESCRIPTION :
• Tension : 9,6 V
• Vitesse : 700 tr/mn
• Longueur des outils :
185 mm
• Longueur totale : 445 mm
• Poids : 1,5 kg
PACK BATTERIE
RECHARGEABLE :
• Tension de sortie 9,6 Volt
• Autonomie 40 à 50
minutes en fonction
des préparations.
• Batterie en Nickel Métal
Hydrure (NiMH).
CHARGEUR :
Notice d’utilisation et d’entretien
Mini Fouet sans-fil FTP94
SÉCURITÉ :
➜ Attention :
• Eteignez avant de retirer l’appareil du liquide
• Eteignez et débranchez avant de nettoyer l’appareil.
• Ne pas faire entrer de liquide dans le moteur en vous en servant
ou en le nettoyant.
UTILISATION ET MISE EN MARCHE :
• Pour garantir la durée de vie du pack batterie, il est nécessaire d’assurer la
décharge complète de celui-ci.
A- Recharge du pack batterie
• Pour recharger le pack batterie : brancher le chargeur sur le secteur (230 V).
Le voyant vert s’allume.
• Inserrer le pack batterie dans le chargeur, la recharge commence.
• Tension d’alimentation :
230 Volts
• Tension de sortie : 12 Volts
• Temps de recharge : 2 heures
• Au bout de deux heures environ la recharge est terminée. Le voyant rouge
reste éteint.
SUPPORT MURAL :
➜ 2- Charge réduite le voyant rouge clignote
• Simple et pratique
B- Types de recharge :
➜ 1- Charge rapide le voyant rouge s’allume
➜ 3- Charge de maintien le voyant rouge s’éteint
• Quand le pack batterie est rechargé, vous pouvez le retirer
du chargeur. Le chargeur est prêt pour recevoir un autre pack
batterie.
Chargeur
Outils fouets
page 2
• Une fois inséré,si le pack batterie déchargé ne commence pas
à se recharger, c’est qu’il est à une température
trop élevée. Le pack batterie peut rester dans
le chargeur.
Dès que celui-ci atteint une température
comprise entre 0 et 50 ° C, il commence à se
recharger automatiquement.Le chargeur est
muni d’un dispositif électronique de contrôle
de la température.
page 3
Notice d’utilisation et d’entretien
Mini Fouet sans-fil FTP94
11
2
Déclaration de conformité - Service
après-vente et garanties
➜ Attention : Ne jamais faire fonctionner le Mini Fouet
sans-fil DYNAMIC avec l’outil fouet non immergé.
ATTESTATION DE CONFORMITÉ AUX RÈGLES D’HYGIÈNE ET DE
SÉCURITÉ DU TRAVAIL :
B- Mise en marche du FTP94 sans-fil Dynamic :
Avant de mettre en marche le Mini Fouet sans-fil DYNAMIC, il faut lui inserrer le pack batterie rechargé comme
dans les shémas 1 et 2.
Attestons que l’appareil Mini Fouet sans-fil Dynamic est
conforme aux exigences essentielles de la normes : EN 12853
La Société DYNAMIC S.A.
IMMERGER L’APPAREIL :
SERVICE APRES-VENTE ET GARANTIE
INSTRUCTIONS POUR LA REPARATION DE VOTRE APPAREIL :
➜ Ces croquis montrent comment se servir du Mini
Fouet sans-fil pour travailler dans les meilleures
conditions :
➜ Si votre appareil ne fonctionne plus normalement ou s’il présente des
anomalies, contactez votre revendeur ou expédiez-le à l’adresse suivante :
S.A. Dynamic - Z.i. du Puy Nardon – B.P.57
85290 MORTAGNE-sur-SEVRE Cedex
Tél. 02 51 63 02 72 - Fax : 02 51 63 02 73
e-mail : [email protected]
• Tenir le Mini Fouet sans-fil par la poignée avec une main,
en mettant un doigt sur la gachette G (sans appuyer).
• Avec l’autre main, appuyer sur le bouton de sécurité BS.
G
RCS - la Roche-sur-Yon - B 416450435 - SIRET 41645043500019
BS • Appuyer maintenant sur la gachette G, l’appareil est en
marche. Vous pouvez relacher le bouton de sécurité BS.
➜ Tout appareil doit être correctement emballé et retourné en PORT PAYE.
• Pour arrêter l’appareil, relacher la gachette G.
PRÉPARATION :
GARANTIE :
• Le Mini Fouet sans-fil Dynamic, a été étudié pour travailler de petites
quantités, il réalise la plupart des préparations :des blanc en neige, d’excellentes mousselines, des crêmes, des pâtes et en particulier : génoise,
pâtes d’amandes, meringues, crême au beurre, soufflés, chantilly, sauces,
pâtes à crêpes, fromages battus, mayonnaise. Et vous découvrirez vousmême bien d’autres possibilités.
➜ Nos appareils sont garantis 1 an à partir de la date d’achat, contre tout
vice de fabrication. La garantie Dynamic couvre totalement pièces et
main d’œuvre. La garantie concerne le remplacement de toute pièce
défectueuse, mais ne saurait couvrir les bris par chute ou choc, les détériorations provoquées par un emploi anormal, les erreurs de branchement
ou le non respect des conditions d’utilisation prescrites dans la notice
d’emploi.
ENTRETIEN :
• NE JAMAIS nettoyer l’appareil sous l’eau.
• NE JAMAIS immerger le bloc moteur dans un liquide. Pour le nettoyage de
l’appareil il suffit simplement de passer les outils fouets sous le robinet
sans rien démonter. Par sécurité, retirer le pack batterie du fouet.
➜ Pour être valable, le bon de garantie doit être certifié par le vendeur (date
et cachet) joint à l’appareil en cas de réparation sous garantie.
MAINTENANCE :
• Il ne nécessite ni graissage, ni entretien particulier.
page 4
page 5
Eclaté – Nomenclature
Mini Fouet sans-fil FTP94
9401.1
9402
9404
Vis de poignée (l’unité)
Interrupteur non verrouillable
Bande décor “Dynamic”
Vis de tirants (les 4)
Demi-poignée inférieure (avec étiquette)
Demi-poignée supérieure
Griffes (la paire)
Tirants (les 4)
Moteur + pignon
Boîte fouet + 3 bagues
Pignon intermédiaire + axe
Axes de sortie équipés de 2 pignons + 2 goupilles (les 2)
Embase équipée de bagues et joints
Outil fouet (la paire)
Poignée équipée
0702
0908
1027
8317
9401.1
9402
9404
9416
9417
9418
9420
9421
9422
9424
9431
0908
0702
8317
9416
9417
9418
9420
9421
9422
9424
page 6
page 7
User Guide for Dynamic
Mini Cordless whisk FTP94
Rechargeable
Battery Pack
Wall mount
support
DESCRIPTION :
• Operating Voltage : 9,6 V
• Speed : 700 RPM
• Whisk length : 185 mm (7
1/2 Inch)
User Guide for Dynamic
Mini Cordless whisk FTP94
SECURITY :
➜ Warning :
• Start unit when whisks are fully immersed.
• Shut off unit, before removing from liquid.
• Shut off and unplug the unit before cleaning.
Main switch
Motor housing
RECHARGEABLE
BATTERY PACK :
• When cleaning, protect motor housing from any liquid inflitration through
the ventilation slots.
• Operating Voltage : 9,6 V
• Autonomy : 40 / 50 minutes
• Nickel Cadium Battery
OPERATING THE MIXER :
CHARGER :
• In order to maintain battery life, drain battery completely before recharging.
• Operating Voltage :
120 Volts (230 Volts)
• Output Voltage : 12 Volts
• Full recharge time : 2 hours
A- Recharging battery :
• Connect AC cord to wall outlet. A green led will light up, indicating good
AC connection.
• Insert the battery into the charger slot. Red led will light up, charging process is in effect.
• It takes 2 hours to recharge completely.
B- Recharging process details :
➜ 1- Rapid charge :Red led open (continuous).
➜ 2- Slow charge :Red led blinking.
➜ 3- When red led is off, process is finished.
Battery Charger
Whisk
page 8
• When inserting an empty battery, charging process must start.
Probable cause not to do so would be that the internal battery
temperarure is to high.
• Leave the battery in the charger, the process
will automaticaly start when the internal
temperature reaches 0 °C to 50 °C.The Charger
is equiped with electronic sensors in order to
avoid possible internal damages to the battery
pack.
page 9
Certificate of conformity - Customer
Service and warranty
User Guide for Dynamic
Mini Cordless whisk FTP94
11
➜ Warning : Never run the whisk in free air.Start only
when immersed.
2
B- Operating the Whisk :
Before using the whisk, insert the battery pack as shown
in figures 1 and 2.
CONFORMITY STATEMENT FOR HEALTH AND SECURITY :
We declare that Mini Fouet sans-fil Dynamic mixer is in complete accordance with EN12853 Standards.
La Société DYNAMIC S.A.
CUSTOMER SERVICE &WARRANTY :
IMMERSE THE WHISK FOOT :
➜ In order to be fully efficient, you must use the
whisk as indicated bellow. The oblique position will
give you better results and avoid any damages to
your machine and/or cooking ware.
➜ Should your unit require service, check with your distributor to see where
local service is available. If you wish your unit to be serviced at the factory,
ship it to :
Canada Service Centre
Dynamic International Ltd.
5859 Chemin Saint-François
Saint-Laurent / Québec H4S-1B6
Toll Free Phone / Tel: 1-800-267-7794
Toll Free / Fax: 1-877-668-6623
U.S.A. Service Centre
Dynamic International Ltd.
178 West Service Road - Champlain
N.Y. 12919 - USA
Toll Free Phone/Tel: 1-800-267-7794
Local phone : (514) 956-0127
• Hold the whisk by the handle with one hand and put a finger on the G switch without pressing
G
• With your other hand, start the whisk by pressing the G
switch.You can now release the the BS switch and operate
BS
the whisk.
WARRANTY :
USAGE :
• DYNAMIC “MINI cordless whisk” will give you great results in all sorts of
mixture, and is intended for light applications. It can easily and rapidly beat
egg whites. Also great for creams, mayonnaise, pancake batter etc...
MAINTENANCE :
• NEVER clean with water jet sprays.
• NEVER immerse motor into any liquid. To clean whisks, just rince under
clear water. REMOVE BATTERY PACK BEFORE CLEANING
IMPORTANT :
• It is recommended to regulary inspect your machine before every use.
• Verify for cracks on the whisk’s plastic body or for any loose parts
page 10
➜ Your new Dynamic product is warranted to the original purchaser, for a
period of one year, from the date of purchase.
➜ Dynamic warrants products to be free of manufacturing defects for a period of 12 months from day of original shipment, covering parts and labor.
➜ Damage caused by improper usage, accident and/or abuse are not considered to be manufacturing defects.
➜ Dynamic will repair or replace, at its option, defective products returned
to an authorized warranty repair center, freight prepaid one way.
➜ Unauthorized work on the products during the warranty period will void
this warranty.
➜ The portion below must be sent to the Service Centre within 10 days from
the purchase date.
page 11
Schematic and parts list Dynamic
Mini Cordless whisk FTP94
9401.1
9402
9404
Handle screw (1)
Non locking switch
Dynamic label
Brace screws (4)
Inferior half handle label side
Upper half handle
Clips (2)
Braces (4)
Motor & gear
Whisk connection box w/3 rings
Middle gear & axle
Equiped output shaft w/2 gears + 2 pins
Holder assembly w/ seals & washer+D331
Whisk (2)
Complete handle
0702
0908
1027
8317
9401.1
9402
9404
9416
9417
9418
9420
9421
9422
9424
9431
0908
0702
8317
9416
9417
9418
9420
9421
9422
9424
page 12
page 13
Bedienungs und wartungsanleitung
Mini Mixer Rührbesen mit Akku
BESCHREIBUNG :
Akku aufladbar
Wandhalterung
Schalter Motor
Bedienungs und wartungsanleitung
Mini Mixer Rührbesen mit Akku
SICHERHEIT :
• Leistung : 9,6 V
• Geschwindigkeit :
700 U/Min
• Länge der Rührbesen :
185 mm
• Gesamtlänge : 445 mm
• Gewicht : 1,5 kg
➜ Achtung :
AKKU :
INBETRIEBNAHME :
• Leistung : 9,6 V
• Betriebsdauer bis zu 1
Std.je nach Anwendung
• Akku aus Nickel Metall
Hydrid (NiMH).
A- Wiederaufladen des Akkus
LADEGERÄT :
• Nach ca.2 Std.ist der Akku geladen. Das rote Licht bleibt aus.
• Versorgungsspannung :
230 Volts
• Ausgangsspannung :
12 Volts
• Ladezeit : 2 Std.
• Bitte schalten Sie das Gerät aus bevor Sie es aus der Flüssigkeit holen
• Schalten Sie das Gerät vor der Reinigung aus und ziehen Sie den
Netzstecker
• Achten Sie darauf, dass keine Flüssigkeit an der Motor kommt.
• Schließen Sie die Ladevorrichtung an das Stromnetz 230V an.Das grüne
Licht leuchtet.
• Stecken Sie nun den Akku in die Ladestation. Das Aufladen beginnt.
B- Die verschiedenen Ladevorgänge :
➜ 1- Schnelles laden :das rote Licht geht an
➜ 2- Langsames Laden :das rote Licht blinkt
WANDHALTERUNG
• Wenn der Akku geladen ist, können Sie diesen aus der
Ladestation entnehmen. Der nächsten Akku kann aufgeladen
werden.
Ladegerät
Rührbesen
ACHTUNG NICHT
ABNEHMBAR!)
page 14
• Sollte ein Ladevorgang nicht gleich beginnen, kann
die Temperatur des Akkus zu hoch sein.Der Akku kann in
der Ladestation bleiben.Sobald er eine Temperatur unter
50 ° erreicht hat, lädt er sich automatisch auf.
• Die Ladestation ist mit einer elektronischen
Kontrollvorrichtung für die Temperaturen
ausgerüstet.
page 15
Bedienungs und wartungsanleitung
Mini Mixer Rührbesen mit Akku
11
2
➜ Achtung : Den Rührbesen mit Akku niemals freilaufend betätigen.
B- Inbetriebnahme des Mini Mixers mit Akku :
Bevor Sie den Rührbesen anschalten, muß der Akku wie
folgt in das Gerät gesteckt werden.Der Akku rastet ohne
großen Druck ein.
Konformitätsbescheinigung CE Kundendienst und Garantie
KONFORMITÄTSBESCHEINIGUNG CE :
Hiermit bescheinigen wir, das der Mini Rührbesen Akku von Dynamic der
Richtlinie EN12853 für Hygiene und Sicherheit entspricht.
La Société DYNAMIC S.A.
KUNDENDIENST UND GARANTIE :
TAUCHEN DIE RÜHRBESEN BIS MAX.
2/3 IN DIE ZU VERARBEITENDE MASSE :
➜ Im Falle einer Funktionsstörung des Dyna Speed Control wenden Sie sich
bitte an den Fachhändler bei dem Sie das Gerät gekauft haben, oder senden Sie das Gerät direkt an uns zur Reparatur.
➜ Die folgenden Abbildungen zeigen Ihnen in
welcher Position Sie am besten arbeiten.
Die Rührbesen sollten nicht auf den Kesselboden
kommen.
G
• Nehmen Sie den Rührbesen mit einer Hand und legen Sie
einen Finger auf den Schalter G, ohne zu drücken.
• Drücken Sie nun den Sicherheitsschalter BS mit der andere Hand.
BS
• Drücken Sie nun den Schalter G und das Gerät läuft. Sie
können den Schalter BS loslassen.
• Wenn Sie den Schalter G loslassen, schaltet das Gerät ab.
ANWENDUNGSBEISPIELE :
• Der Mini Rührbesen Akku wurde gebaut um in kleinen Mengen bis 5 L.zu
arbeiten.
• Mit dem Rührbesen produzieren Sie Cremes, Eisschnee, leichte Teige,
Baiser, Soßen,Massen für Aufläufe, Buttercreme, Sahne, Crepesteig,
Quarkspeisen, Mayonnaise.
REINIGUNG UND WARTUNG :
• Das Gerät niemals mit einem Wasserstrahl reinigen.
• Den Motorblock niemals in eine Flüssigkeit tauchen.
• Zur Reinigung tauchen Sie die Rührbesen des Gerätes in einen Behälter mit
Reinigungsmittel und lassen das Gerät kurz laufen.
• Achtung:Das Reinigungsmittel darf nur bis zur Oberkante der Rührbesen
im Behälter gefüllt werden.
page 16
Dynamic Küchengeräte GmbH
Auenheimer Straße 26
77694 Kehl – Neumühl
Tel. : 07851 / 898258 - Fax: 07851 / 898259
E-mail: [email protected]
GARANTIE :
➜ Auf unsere Geräte erhalten Sie ein Jahr Garantie, ab Kaufdatum. Wir
gewähren diese Garantie auf alle elektrischen und mechanischen Teile.
➜ Ausgenommen von der Garantie, sind defekte Teile durch mutwillige
Beschädigungen, Bruch z.B. durch Fall oder Überanspruchung der Geräte,
Ebenfalls ausgeschlossen sind Verschleißteile.
➜ Für die Gültigkeit der Garantie muß die Garantiekarte vom Verkäufer ausgefüllt werden, mit Datum, Unterschrift und Stempel.
➜ Sollte das Gerät selbständig, ohne Absprache geöffnet oder repariert werden, erlischt die Garantie.
➜ Im Falle einer Funktionsstörung des Dyna Speed Control wenden Sie sich
bitte an den Fachhändler bei dem Sie das Gerät gekauft haben, oder senden Sie das Gerät direkt an uns zur Reparatur.
Dynamic Küchengeräte GmbH
Auenheimer Straße 26 - 77694 Kehl – Neumühl
page 17
Explosionszeichnung – Stückliste
Mini Mixer Rührbesen mit Akku
9401.1
9402
9404
Schraube für Griffteil
Schalter
Band “Dynamic”
Schrauben für Zugstange (4)
Unterer Halbgriff
Oberer Halbgriff
Verschlußklammern (2) für Griff
Zugstangen (4)
Motor + Zahnrad
Getriebegehäuse
Inneres Zahnrad mit Achse
Achsen (2) mit Zahnräder (2)
Buchse mit Ring und Dichtung
Rührbesen (Paar)
Kompletter Griff
0702
0908
1027
8317
9401.1
9402
9404
9416
9417
9418
9420
9421
9422
9424
9431
0908
0702
8317
9416
9417
9418
9420
9421
9422
9424
page 18
page 19
Istruzioni d’uso e manutenzione del
Minifrusta senza filo FTP94
Batteria
ricaricabile
Supporto murale
Interruttre a
grilletto
Motore
DESCRIZIONE :
Istruzioni d’uso e manutenzione del
Minifrusta senza filo FTP94
SICUREZZA :
• Tensione : 9,6 V
• Velocità : 700 giri/mn
• Lunghezza dei frustini :
185 mm
• Lunghezza totale : 445 mm
• Peso : 1,5 kg
➜ Attenzione :
BATTERIA RICARICABILE :
UTILIZZO E MESSA IN MARCIA :
• Tensione di uscita : 9,6 V
• Autonomia da 40 a 50
minuti a seconda delle
preparazioni
• Batteria in Nickel NiMH
• Per garantire una lunga durata della batteria è necessario farla scaricare
completamente.
BATTERIA RICARICABILE :
• Tensione di alimentazione :
230 Volts
• Tensione di uscita : 12 Volts
• Tempo di ricarica : 2 ore
• Spegnere prima di togliere l’apparecchio dal prodotto.
• Spegnere e togliere la batteria prima di pulire l’apparecchio.
• Non far entrare liquido nel motore durante l’uso o la pulizia.
A- Ricarica della batteria
• Per ricaricare la batteria:collegare il carica batteria alla presa di corrente a
230 V.La spia verde si illumina.
• Inserire la batteria dentro il caricatore, inizia la ricarica.
• Dopo circa 2 ore la carica è terminata. La spia rossa si spegne.
B- Tipi di ricarica :
SUPPORTO MURALE :
• Simplice e pratico
➜ 1- Carica rapida:la spia rossa si illumina
➜ 2- Carica ridotta: la spia rossa lampeggia
➜ 3- Carica di mantenimento:la spia rossa si spegne.
• Quando la batteria è ricaricata, potete toglierla dal
caricabatteria che ora può caricare un ‘altra batteria.
Caricabatteria
Frustini
page 20
• Una volta inserita, se la batteria scarica non inizia il
caricamento, può essere che ci sia una temperatura troppo
elevata-La batteria può essere lasciata nel caricabatteria e
quando avrà raggiunto una temperatura compresa
tra 0 e 50 °C., comincerà a ricaricarsi
automaticamente.
Il caricabatteria è provvisto di una dispositivo
elettronico per il controllo della temperatura.
page 21
Preparazioni, manutenzione e pulizia
Minifrusta senza filo FTP94
11
2
➜ Attenzione : NON FARE FUNZIONARE MAI la minifrusta Dynamic senza filo a vuoto con i frustini non
immersi nel prodotto.
B- Messa in marcia del Minifrusta Dynamic Senza
filo : Prima di mettere in funzione la minifrusta senza
filo Dynamic, inserire la batteria come mostrato sugli
schemi 1 e 2.
IMMERGERE L’APPARECCHIO :
➜ I disegni che segono mostrano come utilizzare
la minifrusta Dynamic senza filo per lavorare in
condizioni ottimali :
G
• Tenere l’apparecchio per l’impugnatura con una mano,
mettendo un dito sull ‘interruttore G (senza premere).
• Con l‘atra mano, premere sul pulsante di sicurezza BS.
• Premere contemporaneamente sull ‘interruttore G, l’appaBS
recchio à ora in funzione. Potete rilasciare il pulsante di
sicurezza BS.
• Per fermare l’apparechio, rilasciare l’interruttore G.
PREPARAZIONI :
• La minifrusta Dynamic è adatta per la maggior parte della preparazioni :
bianchi d’uovo, spumoni, creme, pate ‘e in particolar modo : pandispagna,
pasta di mandorle, pastella per crêpes, meringhe, creme al burro, soufflé,
crema chantilly, salse, creme di formaggio, maionese. E scoprirete da soli
molte altre possibilità di utilizzo.
• E ‘stato studiata per lavorare piccole quantità di prodotto.
MANUTENZIONE E PULIZIA :
• NON PULIRE MAI l’apparecchio direttamente sotto il getto d’acqua.
• NON IMMERGERE MAI il blocco motore nel liquido. Per pulire l’apparecchio
è sufficiente passare i frustini sotto il rubinetto SENZA SMONTARE NULLA.
PER SICUREZZA, TOGLIERE LA BATTERIA DAL MINIMISCELATORE DOPO
L‘USO.
• In seguito pulire l’esterno della campana e il tubo sotto il rubinetto.
• Utilizzare il supporto murale per collocare l’apparecchio a riposo.
MANUTENZIONE :
Non è necessario nessuna lubrificazione, né manunzione particolare.
page 22
Dichiarazione di conformita’alle Servizio assistenza e garanzia
DICHIARAZIONE DI CONFORMITA‘ ALLE REGOLE DI IGIENE E
DI SICUREZZA SUL LAVORO :
Si dichiara che l’apparecchio minimiscelatore senza filo Dynamic è
conforme alla norma di sicurezza EN 12853
La direzione Dynamic
SERVIZIO ASSISTENZA E GARANZIA :
➜ In caso di guasti si raccomanda vivamente di non intervenire sull’apparecchio ma di rivolgersi al vostro rivenditore di fiducia che provvedera’ per
una rapida sistemazione.
➜ Gli apparecchi Dynamic sono garantiti per il periodo di un anno dall’acquisto per difetti di fabbrica. Non sono garantiti i danni provocati da cattivo
uso e non si assumono responsabilità per danni diretti e indiretti derivanti
da tale cattivo uso.
DITTA ARRIGO POZZATO - Via R. Fowst, 4/bis - 35135 PADOVA (Italia)
Telefono 049/605684 - Telefax 049/8897894
SERVIZIO ASSISTENZA DYNAMIC
GARANZIA :
➜ I nostri apparecchi sono garantiti 1 anno
➜ Questo apparecchio è garantito per un anno dalla data di acquisto contro tutti
i difetti di fabbrica. La garanzia comprende la sostituzione di tutti i pezzi difettosi, ma non copre le rotture per cadute o danni provocati, il deterioramento
dovuto ad usura, o ad un uso improprio, gli errori di collegamento elettrico e
il non rispetto delle condizioni di utilizzo spiegate nel manuale d’uso.
➜ Per essere valido, il certificato di garanzia dovrà essere :
1 - certificato dal venditore (data e timbro)
2 - unito all’apparecchio in caso di riparazione in garanzia.
ISTRUZIONI PER LA RIPARAZIONE DEL VOSTRO APPARECCHIO :
➜ Se il vostro apparecchio non funziona più correttamente, vogliate rivolgervi al vostro rivenditore che provvederà per la sistemazione oppure spedire
l’apparecchio ben imballato a :
DITTA ARRIGO POZZATO - Via R. Fowst, 4/bis - 35135 PADOVA (Italia)
Le spese di trasporto dell’apparecchio fino al centro di assistenza sono a carico dell’utilizzatore.
page 23
Descrizione pezzi di ricambio
codice pezzo
Minifrusta senza filo FTP94
Vis de poignée (l’unité)
Interrupteur non verrouillable
Bande décor “Dynamic”
Vis de tirants (les 4)
Demi-poignée inférieure (avec étiquette)
Demi-poignée supérieure
Griffes (la paire)
Tirants (les 4)
Moteur + pignon
Boîte fouet + 3 bagues
Pignon intermédiaire + axe
Axes de sortie équipés de 2 pignons + 2 goupilles (les 2)
Embase équipée de bagues et joints
Outil fouet (la paire)
Poignée équipée
9401.1
9402
9404
0702
0908
1027
8317
9401.1
9402
9404
9416
9417
9418
9420
9421
9422
9424
9431
0908
0702
8317
9416
9417
9418
9420
9421
9422
9424
page 24
page 25
Istruzioni d’uso e manutenzione del
Mini triturador inalámbrico
FTP94
Kit Batería
recargable
Soporte mural
Tecla de mando
Motor
DESCRIPCION :
Istruzioni d’uso e manutenzione del
Mini triturador inalámbrico
FTP94
INSTRUCIONES DE SEGURIDAD :
• Tensión : 9,6 V
• Velocidad : 700 rv/mn
• Largo de las varillas :
185 mm
• Largo total : 445 mm
• Peso : 1,5 kg
➜ Cuidado :
BATERÍA RECARGABLE :
UTILIZACIÓN Y PUESTA EN MARCHA :
• Tensión de salida : 9,6 V
• Autonomía 40 a 50 mn
en función de las
preparaciones
• Bateria de Níquel Metal
Hydrure (NiMH).
• Para garantizar la duración de la batería, se necesita asegurar su descarga
completa antes de volverla a cargar.
CARGADOR :
• Insertar el kit batería en el cargador, la carga empieza.
• Tensión de alimentación :
230 Voltios
• Tensión de salida :
12 Voltios
• Tiempo de carga : 2 horas
• Al final de 2 horas aproximadamente, la carga está hecha. El señal rojo se
queda apagado.
SOPORTE MURAL :
• Sencillo y práctico
• No hacer funcionar nunca el aparato vacío, fuera de la preparación alimenticia.
• Apagar y desenchufar el aparato antés de limpiarlo.
• No dejar entrar líquido en el motor durante el uso, ni durante la limpieza.
A- Carga de la bateria
• Para cargar el kit batería:Enchufar el cargador (230V). La señal verde se
enciende.
B- tipos de carga :
➜ 1- Carga rápida: El señal roja está encendido
➜ 2- Carga corta: La señal roja está parpadeando
➜ 3- Carga de mantenimiento: La señal roja está apagado
• Cuando la batería está cargada, se puede quitar del cargador.
El cargador está entonces listo para cargar una nueva batería.
Cargador
Varillas
page 26
• Una vez insertada, si la batería descargada no empieza a
cargar, pueder ser que tenga una temperatura alta.
La batería puede quedar insertada en el cargador.
Desde el momento en que la temperatura
alcanza 0 a 50 °C, la batería empieza a cargar.
El cargador dispone de un dispositivo
electrónico de control de la temperatura.
page 27
Istruzioni d’uso e manutenzione del
Mini triturador inalámbrico
FTP94
11
2
Declaración de conformidad
Servicio, postventa y garantia
➜ Cuidado : No hacer funcionar nunca el Mini triturador inalámbrico fuera de la preparación alimenticia.
ATESTADO DE CONFORMIDAD A LAS NORMAS DE HIGIENE ET DE
SEGURIDAD DEL TRABAJO :
B- Puesta en marcha del Mini Fouet inalámbrico
Dynamic : Antes de poner en marcha el aparato, hay
que poner la bateria recargable según dibujos 1 y 2 a
continuación:
Certificamos que el aparato Mini triturador inalámbrico FTP94 es conforme a las exigencias esenciales de la Norma EN 12853
La Société DYNAMIC S.A.
SERVICIO POSTVENTA Y GARANTIA :
SUMERGIR LAS VARILLAS :
➜ Para ser lo más eficaz posible, mantener el
aparato en posición inclinada sin llegar a tocar
el fondo de la olla, según dibujo a continuación.
• Coger el batidor de una mano por la empuñadura, sin
apretar en el interruptor G.
G
• Con la otra mano, pulsar la tecla de seguridad BS, y sin
dejarla apretar también el interruptor G el aparato se pone
BS
en marcha.A partir de este momento se puede dejar de
pulsar le tecla de seguridad BS (y mantener sólo el interruptor G pulsado).
• Para parar el aparato, dejar de pulsar el interruptor G.
PRÉPARACION :
• El batidor MINI Fouet inalámbrico Dynamic concebido para pequeñas cantidades, permite realizar la mayoria de las preparaciones como: Claras de
huevo en nieve, cremas, masas fluidas y en particular bizcocho, mazapan,
merengue, crema de mantequilla, soufflé, nata montada, salsa, base para
buñuelos, quesos batidos, mayonesas etc.
UTILIZACIÓN :
• No limpiar el aparato debajo del grifo
• No sumergir el bloque motor en el líquido Para limpiar las varillas del MINI
FOUET, ponerlas debajo agua clara durante unos segundos. Por medidas
de seguridad, quitar la batería del aparato Utilizar el soporte de pared para
colocarlo.
➜ En caso de averia del aparato Dynamic, contactar a su vendedor o enviar
su aparato a :
GUERRERO CLAUDE - C/San Luís, 15 Bajos
08850 GAVA (BARCELONA)
Tel. : 93 662 81 61 - Fax : 93 662 75 21
E-Mail: [email protected]
GARANTIA :
➜ Este aparato está garantizado durante un año a partir de la fecha de compra
por cualquier defecto de fabricación. La garantia Dynamic cubre totalmente
los recambios y la mano de obra. La garantia incluye el cambio de cualquier
recambio defectuoso pero no cubre : las roturas por choque o caída, los
deterioros provocados por mal uso, error de corriente, o no-respecto de las
condiciones de uso indicadas en el documento de instrucciones.
➜ Para ser válido, este vale de garantia tiene que ser :
1°) certificado por el vendedor (fecha y sello)
2°) junto al aparato en caso de reparación en garantia.
INSTRUCCIÓN PARA LA REPARACIÓN DE SU APARATO :
En el caso de que su aparato no funcione correctamente, le pedimos que
contacte a su vendedor para que pueda aconsejarlo. En efecto, la mayor
parte del tiempo podrá ayudarle, sino que mándenos su aparato en un bulto
muy sólido a la dirección siguiente :
GUERRERO CLAUDE - C/San Luís, 15 Bajos - 08850 GAVA (BARCELONA)
Los aparatos devueltos tienen que ser mandados a PORTES PAGADOS
MANTENIMIENTO :
• No se necesita echar grasa, ni proceder a un mantenimiento particular.
page 28
page 29
Esquema – Nomenclatura
Mini triturador inalámbrico
FTP94
Tornillos empuñadura (los 3)
Interruptor sin bloqueo
Cinta adhesiva “Dynamic”
Tornillos de tirantes (los 4)
Media carcasa inferior (con etiqueta)
Media carcasa superior
Clips (las 2)
Tirantes (los 4)
Motor + piñon
Caja reductora + anillos
Piñon intermedario + eje
Ejes de salida con 2 piñones + 2 pasadores
Base inferior equipada de juntas y anillos
Varillas (las 2)
Empuñadura equipada
9401.1
9402
9404
0702
0908
1027
8317
9401.1
9402
9404
9416
9417
9418
9420
9421
9422
9424
9431
0908
0702
8317
9416
9417
9418
9420
9421
9422
9424
page 30
page 31