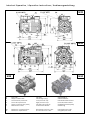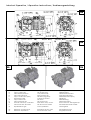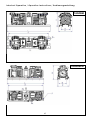
1
ISTRUZIONI D’USO COMPRESSORI SEMIERMETICI
OPERATING INSTRUCTIONS SEMI-HERMETIC
COMPRESSORS
BEDIENUNGSANLEITUNG FÜR HALBHERMETISCHE
VERDICHTER
Istruzioni Operative / Operative Instructions / Bedienungsanleitung
SOMMARIO / SUMMARY / INHALTSVERZEICHNIS
Sicurezza / Safety / Sicherheit
•
2
Descrizione generale / Overview / Übersicht
•
7
Installazione / Installation / Installation
•
9
Collegamenti elettrici / Electrical connections / Elektrische Anschlüsse
•
12
Messa in servizio / Commissioning / Inbetriebnahme
•
14
Accessori / Accessories / Zubehörteile
•
17
Manutenzione / Maintenance / Wartung
•
19
Emergenze / Emergency / Notfälle
•
20
Dismissione / Dismantling / Demontage
•
21
Avvertenze / Warning / Hinweise
•
22
Prospetto anomalie / Failures chart / Fehlerliste
•
23
Figure / Figures / Abbildungen
•
30
1
OFFICINE MARIO DORIN S.p.A.
Sicurezza
INFORMAZIONI
SUL
Safety
PRESENTE
Sicherheit
INFORMATION ON THIS DOCUMENT
BEZÜGLICH DIESER ANLEITUNG
We recommend to read
carefully the content of these
instructions and to keep them
near the compressor.
Wir empfehlen diese Anleitung
sorgfältig durchzulesen und sie
in der Nähe des Verdichters
aufzubewahren.
We also recommend to keep
a copy of these instructions at
the technical divisions of the
user enterprise
Ebenfalls empfehlen wir eine
Kopie
der
vorliegenden
Anleitung im technischen Büro
der
anwendenden
Firma
aufzubewahren.
Bei jedem Eingriff den Sie am
Verdichter
auszuführen
beabsichtigen, ziehen Sie stets
diese Anleitung zu Rate und
folgen
Sie
strikt
den
angegebenen Hinweisen; in all
jenen Fällen die hier nicht
ausdrücklich
erwähnt
sind,
wenden Sie sich vor jeglichem
Eingriff immer an den Hersteller.
DOCUMENTO
Si raccomanda di leggere
attentamente il contenuto di
queste istruzioni e conservarle
in
prossimità
del
compressore.
Si raccomanda inoltre di
mantenere una copia delle
presenti istruzioni presso gli
uffici
tecnici
dell’impresa
utilizzatrice.
Per qualsiasi intervento si
voglia
effettuare
sul
compressore,
consultare
sempre
il
presente
documento,
attenendosi
strettamente alle indicazioni
in esso contenute; per tutto
ciò non espressamente citato,
prima
di
intervenire,
contattare
sempre
il
costruttore.
Il costruttore declina ogni
responsabilità
per
danni
causati a persone o cose
dovuti
alla
mancata
osservanza delle avvertenze
contenute in questo manuale.
Le Officine Mario Dorin. si
riservano
il
diritto
di
aggiornare
questa
pubblicazione in qualunque
momento
o
apportare
modifiche
a
componenti
dell’unità se questo viene
ritenuto
necessario
per
esigenze
costruttive
o
commerciali.
E’ vietata la riproduzione
parziale o totale di queste
istruzioni senza l’autorizzazione
scritta delle Officine Mario
Dorin S.p.A.
Queste istruzioni non possono
contenere tutte le avvertenze
e precauzioni in grado di
coprire i rischi derivanti da
qualsiasi eventualità; deve
essere tenuto presente che
prudenza, attenzione, buon
senso, sono fattori che il
personale
che
effettua
l’installazione,
la
For any intervention you want
to
execute
on
the
compressor, look it up always
in this document strictly
following the indications it
provides; for anything which is
not
expressly
mentioned,
contact
always
the
manufacturer
before
intervening
The manufacturer refuses all
responsability
for
the
damages caused to people
or to things because of the
non-conformity
with
the
instructions this handbook
provides.
Officine Mario Dorin S.p.A.
reserves the right to update
this publication at any time or
to change the components
of this unit if this is considered
as
necessary
for
manufacturing
or
commercial needs.
The
partial
or
total
reproduction
of
these
instructions
is
forbidden
without
the
written
authorization
by
Officine
Mario Dorin S.p.A.
These instructions cannot
include all the instructions
and the precautions able to
cover the risks resulting from
any event; you have to bear
in mind that caution, care
and common sense are
factors that the staff, who
executes the installation, the
2
Der
Hersteller
verweigert
jegliche
Verantwortung
bezüglich
Schäden
an
Menschen oder Gegenständen
die auf eine Missachtung der
Hinweise
der
vorliegenden
Anleitung zurückzuführen sind.
Officine Mario Dorin S.p.A
behält
das
Recht
diese
Anleitung zu jedem beliebigen
Zeitpunkt zu aktualisieren oder
Teile der Einheit zu verändern
falls dies aus bautechnischen
oder kommerziellen Gründen
als erforderlich erachtet werden
sollte.
Es ist verboten diese Anleitung
ganz oder teilweise ohne der
schriftlichen Genehmigung von
Officine Mario Dorin S.p.A. zu
reproduzieren.
Diese Anleitung kann nicht alle
Hinweise
und
Vorsichtsmaßnahmen enthalten
um jegliche Art von Risiko zu
vermeiden; es ist zu beachten,
dass das für die Installation und
Wartung zuständige Personal in
der
Lage
sein
muss
angemessene
Vorsicht,
Aufmerksamkeit und gesunden
Istruzioni Operative / Operative Instructions / Bedienungsanleitung
manutenzione, e uso deve
possedere e sono elementi
che
il
costruttore
può
trasmettere
ma
non
aggiungere.
maintenance and the use,
has
to
know;
the
manufacturer can convey
these elements but cannot
add them.
Menschenverstand anwenden
zu können; diese Faktoren kann
der Hersteller zwar mitteilen
aber nicht mitliefern.
CONFORMITÀ NORMATIVA
COMPLIANCE
Il compressore a cui si riferisce
questo
manuale
di
installazione/manutenzione è
classificato
come
“quasimacchina” ai sensi della
Direttiva
“Macchine”
2006/42/CE e NON deve
essere messo in servizio finché
la macchina finale in cui
deve essere incorporato non
è stata dichiarata conforme,
se del caso, alle disposizioni
della
stessa
Direttiva
“Macchine” 2006/42/CE.
Il compressore è conforme
alla Direttiva “Bassa Tensione”
2006/95/CE.
Il compressore è escluso
dall’applicazione
della
Direttiva
“Apparecchi
a
pressione” 97/23/CE (art. 1 §
3.10).
Il compressore è realizzato in
conformità alla norma EN
12693:2008.
L’installatore del compressore
all’interno
dell’impianto
frigorifero
è
tenuto
a
rispettare
le
pertinenti
disposizioni di legge del
paese di installazione in
riferimento
agli
impianti
elettrici ed agli impianti di
climatizzazione e le norme
della serie EN 378.
REGULATIONS
KONFORMITÄTSERKLÄRUNG
Der Verdichter der Gegenstand
der vorliegenden Installationund Wartungsanleitung ist, wird
laut
der
2006/42/EG
Maschinenrichtlinie als „QuasiMaschine“ bezeichnet und darf
NICHT in Betrieb genommen
werden solange er nicht in die
Endmaschine eingebaut wird
und diese, wenn notwendig
und immer gemäß der selbigen
Maschinenrichtlinie 2006/42/EG,
als konform erklärt worden ist.
Der Verdichter entspricht der
Niederspannungsrichtlinie
2006/95/EG.
Der Verdichter obliegt nicht
den
Anforderungen
der
Regelung
bezüglich
„Druckgeräte“ 97/23/EG (Art. 1
§ 3.10).
Der
Verdichter
wurde
entsprechend der Norm DIN EN
12693:2008 gebaut.
Der Installateur ist verpflichtet
beim Einbau des Verdichters in
die
Kühlanlage,
die
im
Installationsland
geltenden
gesetzlichen
Vorschriften
in
bezug auf elektrische Anlagen,
Klimaanlagen und Vorschriften
der Serie DIN EN 378 zu
beachten
PERSONALE QUALIFICATO
Qualsiasi
operazione
di
installazione
e/o
manutenzione
di
questi
compressori dovrà
essere
eseguita solo da personale
qualificato ed in accordo alle
varie Normative nazionali
applicabili.
Questo manuale deve essere
letto attentamente prima di
eseguire ogni operazione sul
macchinario;
l’osservanza
WITH
THE
The compressor specified and
described
in
this
installation/maintenance
manual
is
provided
for
incorporation in machines as
defined in the Machines
Directive 2006/42/EC; and
MUST NOT be put to use till
the final machine it has to be
incorporated to has not been
declared as compliant, if
need be, with the provisions
of
the
same
Directive
“Machines” 2006/42/EC.
The
compressor
is
in
compliance with the Low
Voltage Directive 2006/95/EC.
The compressor is excluded
from
Pressure
Equipment
Directive 97/23/EC (art. 1 §
3.10).
The
compressor
is
in
compliance
with
the
standard EN 12693:2008.
The
installer
of
the
compressor
inside
the
refrigerant system, is obliged
to
follow
the
relevant
provisions of the law in the
installation country, making
reference to the electrical
systems and to the airconditionning systems, as well
as the regulations of the EN
378 series.
QUALIFIED STAFF
FACHPERSONAL
Any
installation
and/or
maintenance operations of
these compressors shall be
carried out by qualified staff
only and according to the
several applicable national
regulations.
This manual shall be carefully
read before carrying out any
operation on the machinery;
the
observance
of
the
Jeglicher Installations- und/oder
Wartungseingriff
an
diesen
Verdichtern darf ausschließlich
von qualifiziertem Fachpersonal
und
entsprechend
der
verschiedenen,
nationalen
anwendbaren
Vorschriften,
durchgeführt werden.
Diese Anleitung muss vor jedem
Eingriff
an
der
Maschine
sorgfältig
durchgelesen
werden; die Beachtung der
3
OFFICINE MARIO DORIN S.p.A.
delle
disposizioni
è
condizione necessaria per la
sicurezza dell’operatore e dei
macchinari interessati.
DISPOSITIVI
DI
provisions is essential to the
operator as well as the
involved machinery safety.
PROTEZIONE
PERSÖNLICHE
INDIVIDUALE
DEVICES OF PERSONAL PROTECTION
Per qualsiasi intervento di
trasporto,
installazione,
regolazione, manutenzione o
smantellamento
del
compressore,
il
tecnico
addetto deve munirsi di
scarpe di sicurezza, guanti di
protezione ed occhiali di
protezione.
For
any
transportation,
installation,
adjustment,
maintenance or dismantling
of
the
compressor,
the
authorized technician has to
supply himself with safety
shoes, protection gloves and
glasses.
RISCHI RESIDUI
Il
compressore
è
stato
progettato
e
realizzato
cercando di eliminare o
laddove impossibile ridurre al
minimo i rischi per la sicurezza
e la salute degli utilizzatori.
Nonostante ciò, permangono
una serie di rischi residui per i
quali è indispensabile che
l’utilizzatore
adotti
delle
misure
di
sicurezza
complementari a quelle già
realizzate tecnicamente sul
compressore.
OTHER RISKS
The
compressor
was
designed and manufactured
trying to avoid or, whenever it
is impossible, to reduce to a
minimum the risks for the
users’ safety and health.
Nevertheless, there is still a
series of other risks and for
them
it
is
absolutely
necessary for the user to
implement
the
safety
measures complementary to
those technically already
applied to the compressor.
PRESSIONE INTERNA
Prima di procedere alla
manutenzione
del
compressore, rimuovere la
pressione
all’interno
del
compressore,
agendo
su
entrambi i rubinetti.
Non rimuovere parti del
compressore
soggette
a
pressione interna prima di
aver
effettuato
tale
operazione.
INSIDE PRESSURE
Before
starting
the
maintenance
of
the
compressor, take away the
pressure inside by acting on
both taps.
Do not remove those parts of
the compressor subject to an
inside pressure before having
executed this operation.
PRECARICA DEL COMPRESSORE
All’interno dello stabilimento
di produzione il compressore
è
stato
opportunamente
essiccato e caricato con gas
protettivo (aria secca – PR-70)
con sovrappressione di circa
0,5 ÷ 1 bar.
Vorschriften
stellt
eine
notwendige Bedingung dar, um
die Sicherheit des Bedieners
und der betroffenen Maschinen
zu gewährleisten.
PRE-CHARGE OF THE COMPRESSOR
Inside the production factory,
the compressor has been
appropriately
dried
and
charged with protective gas
(dry air – PR-70) with an exta
pressure of about 0,5 ÷ 1 bar.
4
SICHERHEITSVORKEHRUNGEN
Während des Transports, der
Installation, der Einstellung, der
Wartung oder der Demontage
des Verdichters muss der
zuständige
Techniker
Sicherheitsschuhe,
Schutzhandschuhe
und
Schutzbrillen tragen.
VERBLEIBENDE RISIKEN
Bei der Planung und Herstellung
des
Kompressors
wurde
versucht alle Sicherheits- und
Gesundheitsgefährdende
Risiken für den Bediener zu
vermeiden oder, wo dies
unmöglich war, diese auf ein
Minimum
zu
beschränken.
Trotzdem
verbleiben einige
Restrisiken die es unabdingbar
notwendig machen, dass der
Bediener zuzüglich zu den
Sicherheitsvorkehrungen
die
technisch
am
Kompressor
angebracht sind, ergänzende
Schutzmaßnahmen anwendet.
INNENDRUCK
Vor jedem Wartungseingriff den
Druck im Kompressor durch die
zwei
dazu
vorgesehenen
Ventile ablassen.
Entfernen Sie keine Teile des
Verdichters die dem Innendruck
ausgesetzt sind, bevor Sie nicht
den Druck abgelassen haben.
SCHUTZGASFÜLLUNG DES VERDICHTERS
In der Produktionsstätte wurde
der Verdichter angemessen
getrocknet und mit Schutzgas
(Trockenluft – PR 70) mit einem
Überdruck von ungefähr 0,5 ÷ 1
bar gefüllt.
Vor
der
Installation
des
Istruzioni Operative / Operative Instructions / Bedienungsanleitung
Prima
di
procedere
all’installazione
del
compressore, scaricare la
pressione
di
precarica
agendo
su
entrambi
i
rubinetti. Non rimuovere alcun
componente
dal
compressore prima di aver
effettuato questa operazione.
Before starting the installation
of the compressor, discharge
the pressure of pre-charge by
acting on both service valves.
Do
not
remove
any
component
from
the
compressor before having
executed this operation.
USTIONE DA CALDO / DA FREDDO
Attendere il raffreddamento /
riscaldamento delle superfici
esterne dopo lo spegnimento
del
compressore
per
intervenire sullo stesso, in
modo che non siano presenti
temperature pericolose.
Utilizzare guanti di protezione.
Installare il compressore in
luoghi non accessibili a
personale non informato sui
rischi
oppure
impedirne
l’accesso con recinzione.
BURNS FOR HEAT/FOR COLD
Wait for the cooling/heating
of the external surfaces after
the compressor stopped if
you want to intervene on it; in
this way there are not
dangerous temperatures.
Make use of protection
gloves. Install the compressor
in places that are not
accessible to the staff who
does not know about the risks
or block their access by
means of fences.
IRRITAZIONI CUTANEE
Attenzione: il compressore è
spedito con carica di olio.
Evitare il contatto diretto con
la pelle e con gli occhi, in
quanto irritante.
SKIN IRRITATIONS
Caution: the compressor is
shipped with a charge of oil.
Avoid the direct contact with
the skin and the eyes since it
is irritant.
ASFISSIA
I refrigeranti HFC e HCFC non
sono tossici né nocivi, né
esplosivi, ma possono portare
ad asfissia nel caso di perdita
dell’impianto in ambiente non
correttamente aerato.
I refrigeranti HFC e HCFC sono
inodore e incolore e possono
non
essere
percepiti
direttamente in caso di
emissione.
Rispettare
le
prescrizioni
sull’aerazione dell’ambiente
di installazione.
ASPHYXIA
HFC and HCFC refrigerants
are not toxic or injurious or
explosive, but can cause
asphyxia in case of system
leak into a not correctly wellaired place.
HFC and HCFC refrigerants
are odourless and colourless
and can be not perceived
directly in case of emission.
Follow the instructions on
airing of the installation
place.
RUMORE
Indossare
dispositivi
di
protezione dell’udito in caso
di permanenza prolungata in
prossimità del compressore in
funzione.
NOISE
Wear protection devices for
your hearing if you stay for a
long time near the working
compressor.
5
Verdichters, entladen Sie den
Druck
der
Schutzgasfüllung
über die beiden Absperrventile.
Entfernen
Sie
keine
Verdichterteile bevor Sie nicht
den Druck abgelassen haben
BRAND-/KÄLTEWUNDEN
Nach dem Ausschalten des
Verdichters muss man vor
jeglichem
Eingriff
das
Abkühlen/sich erwärmen der
Außenflächen abwarten um
gefährliche Temperaturen zu
vermeiden.
Schutzhandschuhe verwenden.
Installieren Sie den Verdichter in
Räumen zu denen kein Personal
Zugang hat, das nicht über
dessen Risiken informiert ist oder
untersagen Sie den Zugang
mittels einer Einzäunung.
HAUTREIZUNGEN
Achtung: der Verdichter wird
mit einer Ölfüllung geliefert.
Vermeiden Sie den direkten
Kontakt mit Haut oder mit den
Augen da das Öl reizend ist.
ERSTICKUNG
Die Kühlmittel HFC und HCFC
sind weder toxisch, noch giftig,
noch
explosionsgefährdend,
können aber zu Erstickungstod
führen, falls die Anlage ein Leck
in einem schlecht belüfteten
Raum haben sollte.
Die Kühlmittel HFC und HCFC
sind
Geruchund
Geschmacklos und können bei
Austritt
nicht
sofort
wahrgenommen werden.
Folgen Sie den Vorgaben
bezüglich der Belüftung des
Installationsraumes.
LÄRMSCHUTZ
Tragen
Sie
eine
Lärmschutzvorrichtung falls Sie
sich länger in der Nähe des in
Betrieb befindlichen Verdichters
aufhalten sollten.
OFFICINE MARIO DORIN S.p.A.
LESIONI DOVUTE AL TRASPORTO E
MOVIMENTAZIONE
INJURIES
CAUSED
Adottare le comuni misure di
sicurezza per il trasporto di
carichi
pesanti
mediante
attrezzature a forche o a
gancio.
Utilizzare unicamente il punto
di sollevamento indicato.
Indossare scarpe di sicurezza.
TRANSPORTATION AND HANDLING
BY
Take
the
usual
safety
measures
for
the
transportation of heavy loads
by means of forklift trucks or
hook equipments.
Use the indicated lifting point
only.
Wear safety shoes.
SEGNALETICA DI SICUREZZA
Sul compressore sono riportati
i seguenti simboli grafici la cui
comprensione è importante
ai fini della consapevolezza
dei pericoli, degli obblighi e
dei
divieti
legati
alla
macchina:
It is important to understand
the following graphic signs in
order to be aware of the
dangers, the duties and the
prohibitions connected with
the machine:
CORRENTE ELETTRICA
Esiste pericolo di folgorazione
qualora si venga a contatto
con i terminali elettrici. Il
coperchio
della
scatola
attacchi elettrici previene tale
contatto. Non alimentare
elettricamente il compressore
fino a che il coperchio della
scatola
non
sia
completamente chiuso e
integro.
ELECTRICAL CURRENT
The danger of electrocution
exists when you are in
contact with the electrical
terminals. The lid of the box
for the electrical connections
prevent this contact. Do not
feed
electrically
the
compressor till the lid of the
box is not completely closed
and integral.
SUPERFICI CALDE/FREDDE
Le superfici del compressore
possono avere temperature
tali da determinare ustioni da
caldo o da freddo.
PUNTO DI SOLLEVAMENTO:
É l’unico punto dove è
possibile
agganciare
il
compressore per realizzarne il
sollevamento in sicurezza.
Non sollevare il compressore
da altri punti di ancoraggio.
SAFETY INDICATIONS
HOT/COLD SURFACE
The temperatures of the
compressor surfaces are such
to cause burns for heat or for
cold.
LIFTING POINT:
It is the only point where the
compressor can be hooked
so as to be lifted safely.
STROMZUFUHR
Das Berühren der elektrischen
Anschlüsse kann zu einem
Stromschlag führen. Der Deckel
des elektrischen Schaltkastens
verhindert
eine
solche
Berührung. Schließen Sie den
Kompressor nicht am Strom an,
solange der Schaltkastendeckel
nicht vollständig geschlossen
und unversehrt ist.
KALTE/WARME OBERFLÄCHEN
Die
Oberflächentemperatur
des Verdichters kann zu Brandoder Kälteschäden führen.
HEBESTELLE:
Dies ist die einzige Stelle an der
der
Kompressor
sicher
hochgehoben werden kann.
Heben Sie den Kompressor
nicht an anderen Stellen hoch.
Do not lift the compressor
from other anchor points
RISCHIO ESPLOSIONE
Il compressore deve essere
protetto da un pressostato di
alta pressione che fermi il
compressore in caso di
pressione eccessiva:
VERLETZUNGEN BEIM TRANSPORT ODER
BEI DER BEWEGUNG
Wenden Sie die üblichen
Sicherheitsvorkehrungen an, die
beim Schwerlasttransport mittels
Gabelstapler
oder
Transportgeräten mit Kranhaken
angebracht sind.
Die Maschine ausschließlich an
der
angegebenen
Stelle
anheben.
Tragen Sie Sicherheitsschuhe.
SICHERHEITSBESCHILDERUNG
Auf dem Kompressor befinden
sich die folgenden Schilder. Es
ist wichtig sie zu verstehen um
sich
der
Gefahren,
der
Vorschriften
und
der
maschinenbezogenen Verbote
bewusst zu sein:
RISK OF EXPLOSION
A high pressure manostat
has
to
protect
the
compressor so that it stops
the compressor when the
6
EXPLOSIONSGEFAHR
Ein Kompressor muss durch
einen
HochdruckDruckwächter
geschützt
werden um den Kompressor bei
überhöhtem Druck anzuhalten:
Istruzioni Operative / Operative Instructions / Bedienungsanleitung
Il valore di taratura deve
essere inferiore al valore della
PS indicata sulla targhetta del
compressore.
Il
pressostato
deve
essere collegato alla presa di
pressione situata sulla testa o
sulla camera di compressione
del compressore (a monte
del rubinetto di mandata).
pressure is extreme:
The calibration value
has to be lower than the PS
value
reported
on
the
compressor plate.
The pressostat has to
be
connected
to
the
pressure tube located on the
head or on the compression
chamber of the compressor
(upstream of the discharge
gas valve).
Der
Einstellwert
muss
unter dem Druckwert liegen
der auf dem Verdichter Schild
eingetragen ist.
Der Druckwächter muss
an
dem
unabsperrbaren
Hochdruckanschluss
des
Verdichters
angeschlossen
werden,
der
sich
am
Zylinderkopf oder auf der
Verdichtungskammer
des
Kompressors
befindet
(oberhalb
des
Druckabsperrventiles).
Descrizione generale
Overview
Übersicht
Il compressore è composto
da una carcassa che ospita
al suo interno il motore
elettrico
e
la
parte
meccanica di compressione
a pistoni.
Il motore, opportunamente
collegato all’alimentazione di
energia elettrica, aziona il
manovellismo e i pistoni che
permettono,
tramite
collegamento delle tubazioni
di aspirazione e di mandata,
la
pressurizzazione
del
refrigerante all’interno di un
impianto frigorifero.
The compressor consists of a
framework
hosting
the
electric engine inside and the
mechanical part of the piston
compression
The engine, which is suitably
connected to the power
supply, triggers the crank
gear and the pistons that
allow, by means of the
connection to the suction
and delivery pipes, the
pressurization
of
the
refrigerant inside a refrigerant
system.
Der Verdichter besteht aus
einem Gehäuse in dessen
Inneren sich ein Elektromotor
und der mechanische KolbenVerdichtungsteil befinden.
Nach
dem
fachgerechten
Stromanschluss, setzt der Motor
das Kurbelgetriebe und die
Kolben in Bewegung die durch
die Verbindung der An- und
Absaugrohre, das Kühlmittel
innerhalb der Kühlanlage unter
Druck setzen.
USO PREVISTO DEL COMPRESSORE
EXPECTED USE OF THE UNIT
Il
compressore
è
stato
progettato
e
costruito
unicamente
per
la
compressione di refrigeranti
HFC (R404A / R507 / R134a /
R407C) e HCFC - CFC (solo
dove
permesso
dalle
legislazioni
nazionali)
nei
campi operativi descritti dai
diagrammi di applicazione
riportati in allegato (Fig. 4),
con
il
vincolo
della
temperatura di mandata di
130°C e surriscaldamento in
aspirazione compreso tra 5K e
30K.
Il refrigerante utilizzato deve
avere
un
contenuto
di
umidità inferiore a 10 ppm.
This compressor has been
designed and manufactured
only for the compression of
the HFC (R404A / R507 /
R134a / R407C) and HCFC CFC
refrigerants
(when
national laws allow it only) in
the operational fields the
attached application charts
describe (Fig. 4), with the
restrain
of
a
delivery
temperature of 130°C and
overheating at the suction
between 5K and 30K.
È vietato:
• l’utilizzo al di fuori del
campo operativo e dei
What follows is forbidden:
• The use outside the
operational field and the
The employed refrigerant has
to have a humidity content of
10 ppm.
7
ANWENDUNG
DES
KOMPRESSORS
Dieser
Verdichter
wurde
ausschließlich zur Verdichtung
der
folgenden
Kühlmittel
entworfen und hergestellt: HFC
(R404A / R507 / R134a / R407C)
sowie HCFC – CFC (nur wo
durch nationalen Vorschriften
erlaubt) zur Anwendung in
jenen Bereichen die in den
beiliegenden
Anwendungsschaubildern
beschrieben sind (Abb. 4), unter
Einhaltung
der
Druckgastemperatur von 130°C
und einer Überhitzung bei der
Ansaugung die zwischen 5K
und 30K liegt.
Das Kühlmittel muss einen unter
10
ppm
liegenden
Feuchtigkeitsgehalt haben.
Es ist verboten:
• Den Verdichter in anderen
VORGESEHENE
OFFICINE MARIO DORIN S.p.A.
vincoli sopra indicati;
• la compressione di fluido
diverso da quelli indicati
sopra;
• immergere il compressore
in modo totale o parziale
in fluidi o sottoporlo a getti
d’acqua violenti;
• l’utilizzo in ambienti a
rischio di esplosione;
• l’utilizzo con temperature
ambiente inferiori a -20°C
o superiori a 60°C;
• l’utilizzo
in
ambiente
completamente
chiuso
(non aerato);
• l’utilizzo in ambienti con
presenza di agenti chimici
corrosivi.
Sulla targhetta di ciascun
compressore è riportato il tipo
e la quantità di olio caricato
in fabbrica. Per eventuali
rabbocchi e/o sostituzioni del
lubrificante utilizzare solo il
tipo indicato in targhetta.
IDENTIFICAZIONE DEL COMPRESSORE
Ogni
compressore
è
identificato
attraverso
un
numero di serie riportato su
targhetta metallica rivettata.
In accordo alla norma EN
12693, tale targhetta riporta:
• Nome del costruttore
• Modello del compressore
• Numero di serie
• Data di fabbricazione
• Max
pressione
di
funzionamento in mandata
(PS, in bar)
• Max pressione della zona
di bassa pressione, sia in
funzionamento che a fermo
(Pss, in bar)
• Numero
di
fasi
di
alimentazione elettrica
• Voltaggio nominale, in
•
•
•
•
•
•
above
mentioned
restrains;
The compression of a fluid
other than the abovementioned ones;
To plunge totally or
partially the compressor
into fluids or to subject it
to strong jets of water;
The use into places at risk
of explosion;
The use at ambient
temperatures lower than
-20°C or higher than 60°C;
The use into a completely
closed place (not wellaired);
The use in places where
corrosive
chemical
agents are present.
The plate of each compressor
reports type and quantity of
oil loaded at the factory.
For any possible topping up
and/or replacement of the
lube, use the type indicated
on the plate only.
COMPRESSOR IDENTIFICATION
Each compressor is identified
thanks to a serial number
reproduced on the metal
plate riveted in compliance
with the EN 12693 regulation;
this plate specifies:
• Manufacturer’s name
• Compressor model
• Serial number
• Manufacture date
• Max
delivery
running
pressure (PS, in bar)
• Max pressure of the low
pressure area both in the
running and in the idle
condition (Pss, in bar)
• Number of phases of
power supply
• Nominal voltage, in volts
• Nominal frequency, in Hz
8
•
•
•
•
•
•
Bereichen
oder
unter
Missachtung
der oben
aufgeführten Bedingungen
einzusetzen;
ein anderes Kühlmittel zu
verwenden als die oben
angegebenen;
den Verdichter ganz oder
teilweise in Flüssigkeiten
einzutauchen oder starken
Wasserspritzern
auszusetzen;
den
Verdichter
in
explosionsgefährdeten
Räumen zu betreiben
der
Betrieb
bei
Raumtemperaturen
die
unter –20°C oder über 60°C
liegen;
der Betrieb in vollständig
geschlossenen
Räumen
(nicht belüftet);
der Betrieb in Räumen in
Anwesenheit
von
zersetzenden chemischen
Stoffen.
Auf dem Schild eines jeden
Verdichters ist die Art und die
Menge des Öles angegeben
das werkseitig eingefüllt worden
ist.
Bei
einem
etwaigen
Nachfüllen und/oder Ersetzen
des Schmieröls ausschließlich
die
auf
dem
Schild
angegebene Sorte verwenden.
KENNZEICHNUNG DES VERDICHTERS
Jeder Verdichter ist durch
eine
Seriennummer
gekennzeichnet die auf
einem
vernieteten
Metallschild eingetragen
ist. Gemäß Norm DIN EN
12693 stehen auf dem
Schild
folgende
Angaben:
• den Herstellername
• das Verdichter Modell
• die Seriennummer
• das Herstellungsdatum
• Max.
Betriebsdruck
in
Ausgangsrichtung (PS, in Bar)
• Max
Druck
im
Niederdruckbereich, sei es bei
Betrieb wie bei Stillstand (Pss. in
Istruzioni Operative / Operative Instructions / Bedienungsanleitung
Volt
• Frequenza nominale, in Hz
• Corrente
a
rotore
bloccato, in Ampère
• Max
corrente
di
funzionamento, in Ampère
• Classe di protezione IP
• Velocità
di
rotazione
nominale, in RPM
• Volume spostato, in m3/h
• Current when the rotor is
blocked, in Ampère.
• Max running current, in
Ampère.
• IP protection category.
• Nominal rotation speed in
RPM.
• Displaced volume in m3/h
! AVVERTENZA:
IL COMPRESSORE
! WARNING:
IT SHALL BE POSSIBLE TO USE THE
IMPIEGATO
QUANTO
POTRÀ
ESSERE
LIMITATAMENTE
RIPORTATO
A
SULLA
COMPRESSOR
PRESSURES
IN
WITHIN
SYSTEM
ACCORDANCE
Bar)
• Phasenanzahl
der
elektrischen Anspeisung
• Nominale
Spannungsangabe, in Volt
• Nominale Frequenz, in Hz
• Strom
bei
blockiertem
Rotor, in Ampere
• Max
Betriebsstrom,
in
Ampere
• IP Schutzklasse
• Nominale
Rotationsgeschwindigkeit
in
RPM
(Umdrehungen
pro
Minute)
• Theor. Hubvolumen in m3/h
TO
PS
(MASSIMA PRESSIONE AMMISSIBILE) E
PSS (MASSIMA PRESSIONE DI
STANDSTILL) COSÌ COME DEFINITE
DALLA EN 12693.
PS (MAXIMUM ALLOWABLE
PRESSURE) AND PSS (MAXIMUM
STANDSTILL PRESSURE) AS DEFINED IN
EN12693.
Nelle comunicazioni con le
O.M.D. è importante fare
riferimento al numero di
matricola del compressore al
fine di consentire una corretta
e veloce rintracciabilità del
prodotto.
For communications with
O.M.D. it is important to
make reference to the
registration number of the
compressor in order to allow
a
correct
and
quick
traceability of the item.
Installazione
Installation
Installation
! ATTENZIONE:
Qualora
l’imballo
risulti
danneggiato e/o sussistano
comunque
dubbi
sulla
integrità del compressore
ricevuto
non
procedere
all’installazione dello stesso.
! ATTENTION:
Should
packaging
be
damaged and/or doubts on
the
integrity
of
the
compressor received arise do
not
proceed
to
the
compressor installation.
! ACHTUNG:
Falls
die
Verpackung
beschädigt ist und/oder Zweifel
über die Unversehrtheit des
gelieferten
Verdichters
bestehen sollten, installieren Sie
das Gerät nicht.
TRASPORTO DEL COMPRESSORE
COMPRESSOR TRANSPORT
Il trasporto del compressore
imballato su pallet o in cassa
deve avvenire sollevandolo
tramite un carrello elevatore
a
forche,
verificando
preventivamente la portata
dello stesso rispetto al peso
del compressore indicato in
figura 3.
The
transport
of
the
packaged compressor on
pallets or into a case has to
be executed by lifting it by
means of a forklift truck, by
checking in advance the
capacity of it compared with
the weight of the compressor
indicated in figure 3.
TRANSPORT DES VERDICHTERS
Der auf einer Palette und
Karton oder in einer Kiste
verpackte Verdichter muss mit
einem Hub- oder Gabelstapler
transportiert werden nachdem
die Ladefähigkeit des selbigen
mit
dem
Gewicht
des
Kompressors verglichen wurde wie in Abb. 3 angegeben.
Nel caso il compressore sia
privo di pallet o cassa, la
movimentazione
deve
Should the compressor be
without pallet or case, the
handling has to be executed
Falls der Verdichter ohne
Palette oder Kiste sein sollte,
erfolgt der Transport durch den
TARGHETTA
IN
TERMINI
DI
WHAT STATED ON ITS NAMEPLATE IN
TERMS OF
9
! ACHTUNG:
DER VERDICHTER DARF AUSSCHLIEßLICH
ZU DEN AUF DEM SCHILD ANGEGEBENEN
PS WERTEN BETRIEBEN WERDEN
(MAXIMAL
ZUGELASSENER
BETRIEBSDRUCK) UND PSS (MAXIMAL
ZUGELASSENER DRUCK BEI STILLSTAND)
GEMÄß DIN EN12693.
Bei Mitteilung an Officine Mario
Dorin ist es wichtig, auf die
Seriennummer des Verdichters
hinzuweisen um das Produkt
richtig und schnell identifizieren
zu können.
OFFICINE MARIO DORIN S.p.A.
avvenire mediante il golfare
in dotazione (indicato in
figura 1 come lifting point) al
quale applicare il gancio di
sollevamento dell’attrezzatura
utilizzata,
verificando
preventivamente la portata
dello stesso rispetto al peso
del compressore indicato in
figura 3.
Se è necessario utilizzare un
accessorio di sollevamento,
verificare che la portata dello
stesso sia pari o superiore al
peso
del
compressore
indicato in figura 3.
by means of the supplied
eyebolt (which is indicated in
figure 1), the lifting hook of
the employed equipement
has to be coupled to, by
checking in advance its
capacity compared with the
weight indicated in figure 3
If it is necessary to use a lifting
accessory, check that its
capacity is equal to or higher
than the compressor weight
figure 3 shows.
in der Ausstattung enthaltenen
Hebering (in Abb. 1 als Lifting
Point (Hebepunkt) bezeichnet).
In diesen Hebering greift der
Kranhaken der angewandten
Hebevorrichtung ein nachdem
die Ladefähigkeit der selbigen
mit
dem
Gewicht
des
Kompressors verglichen wurde sowie in Abb. 3 angegeben.
Wenn notwendig verwenden
Sie Hebezubehör nachdem die
Ladefähigkeit des selbigen mit
dem Gewicht des Verdichters
verglichen wurde - wie in Abb.
3 angegeben.
AUFSTELLUNG
Der Verdichter kann in einem
angemessen belüfteten Raum
oder auch im Freien, jedoch
gut
von
Wetterunbilden
geschützt, aufgestellt werden.
in beiden Fällen muss dem
zugelassenen
Personal
der
Zugang frei stehen.
POSIZIONAMENTO
COMPRESSOR ASSEMBLY
Il compressore può essere
posizionato in un locale
opportunamente
areato
oppure all’esterno purché
ben riparato dalle intemperie.
In entrambi i casi la macchina
deve essere accessibile solo
al personale autorizzato.
It is possible to place the
compressor into a suitably
well-aired room or outdoor
provided that it is well
sheltered from bad weather.
In both cases the machine
has to be accessible to the
authorized staff only.
Installare
il
compressore
orizzontalmente sulle apposite
sospensioni
antivibranti
(vedere
figura
2).
Il
compressore può lavorare
anche
con
inclinazioni,
secondo l’asse longitudinale
e/o trasversale, diverse da
zero e dipendenti dal modello
di
compressore
(per
informazioni
contattare
il
nostro servizio di assistenza
tecnica).
Install the compressor in a
horizontal position on the
appropriate
vibration
dampers (see figure 2). The
compressor can work also
with inclination, in respect to
longitudinal
and/or
transversal axis, different from
zero and dependent on
compressor model (for further
information please contact
our
technical
customer
service).
Den Verdichter auf den dazu
vorgesehenen
Schwingungsdämpfern
horizontal aufstellen (siehe Abb.
2). Der Verdichter kann, je nach
Modell, auch in anderen
Längsund/oder
QuerSchräglagen betrieben werden
(für eingehende Informationen
setzten Sie sich mit unserem
technischen
Dienst
in
Verbindung).
BELÜFTUNG DES INSTALLATIONSRAUMES
Um
gefährliche
Konzentrationen im Falle einer
unerwarteten Ausströmung von
Kühlmittel zu vermeiden, ist es
notwendig eine angemessene
Belüftung
des
Maschinenraumes
zu
gewährleisten in dem der
Verdichter aufgestellt ist. Der
Maschinenraum muss über eine
natürliche
oder
eine
mechanische
Belüftung
verfügen;
gemäß
anwendbarer,
technischer
Vorschriften.
AERAZIONE LOCALE INSTALLAZIONE
AIRING OF THE INSTALLATION ROOM
Per evitare concentrazioni
pericolose di refrigerante in
caso
di
fuoriuscita
accidentale, è necessario
disporre
di
adeguata
ventilazione
nel
locale
tecnico
dove
viene
posizionato il compressore. Il
locale di installazione deve
essere provvisto di areazione
naturale
o
ventilazione
meccanica, in accordo alle
norme tecniche applicabili.
To
avoid
dangerous
concentrations of refrigerant in
case of casual leak, it is
necessary to provide a suitable
airing in the technical room
where the compressor is
located. The installation room
has to be equipped with
natural airing or mechanical
ventilation, in compliance with
the
applicable
technical
regulations
Dal momento che eventuali
fughe
di
refrigerante
Since possible refrigerant leaks
would tend to occupy the
10
Istruzioni Operative / Operative Instructions / Bedienungsanleitung
tenderebbero a occupare la
parte inferiore dell’ambiente
circostante si raccomanda di
porre l’aspirazione del sistema
di ricambio aria in posizione
ribassata.
lowest part of the surrounding
space we recommend to
place the suction of the air
exchange system in a lower
position
Da
etwaig
ausströmendes
Kältemittel dazu neigt sich in
Bodennähe des umliegenden
Raumes auszubreiten, ist es
ratsam das Belüftungssystem in
tiefer Position einzubauen.
Rohranschluss
Vor
der
Installation
Verdichters den Druck
Schutzgasfüllung durch die
Absperrventile ablassen.
diesem Eingriff, keinen Teil
Verdichter entfernen.
COLLEGAMENTO DELLE TUBAZIONI
PIPES CONNECTION
Prima
di
procedere
all’installazione
del
compressore, scaricare la
pressione
di
precarica
agendo
su
entrambi
i
rubinetti. Non rimuovere alcun
componente
dal
compressore prima di aver
effettuato questa operazione.
Before starting the installation
of the compressor, discharge
the pressure of pre-charge by
acting on both service valves.
Do
not
remove
any
component
from
the
compressor before having
executed this operation.
Procedere
all’installazione
come segue:
Rimuovere i rubinetti del
compressore;
Saldare i rubinetti alle
tubazioni dell’impianto;
Rimontare i rubinetti sul
compressore;
Eseguire la verifica delle
perdite
dalle
tubazioni
mediante prova in pressione
con N2 o aria secca,
seguendo tutte le procedure
di sicurezza necessarie, come
ad esempio l’impiego di un
riduttore
di
pressione
interposto tra la bombola e
l’impianto e lasciando i
rubinetti del compressore
chiusi (ATTENZIONE! Durante
questa prova non superare la
pressione di standstill);
Aprire i rubinetti del
compressore;
Rimuovere
l’aria
dall’impianto mediante vuoto
fino a minimo 1,5 mbar;
Procedere alla carica
del refrigerante nell’impianto.
Execute the installation in the
following way:
Remove the service
valves of the compressor;
Weld
the
service
valves to the system pipes;
Reassemble
the
service
valves
on
the
compressor;
Check the leaks from
the pipes by means of a
pressure test with N2 or dry
air following all the required
safety procedures such as,
for example, the use of a
pressure reducer placed
between the bottle and the
system and leaving the
compressor service valves
closed (ATTENTION! During
this test do not overcome the
standstill pressure);
Open
the
service
valves of the compressor;
Take away the air of
the system by means of the
vacuum till a minimum of 1,5
mbar;
Fill up the system with
refrigerant.
Die
Installation
wie
folgt
durchführen:
Die Absperrvenile des
Verdichters entfernen;
Die Absperrventile an die
Anlagenrohre anlöten ;
Die Ventile wieder auf
den Verdichter montieren;
Die Dichtheit der Rohre
durch einen Druckprüfung mit
oder
Trockenluft
N2
kontrollieren. Dabei sind alle
Sicherheitsvorschriften
zu
beachten wie z.B. Verwendung
eines Druckminderers zwischen
der Gasflasche und der Anlage
und die Absperrventile am
Verdichter
geschlossen
zu
halten
(ACHTUNG!
Überschreiten Sie bei dieser
Kontrolle nicht den StillstandDruck);
Öffnen Sie die Verdichter
Absperrventile;
Saugen
Sie
durch
Vakuum die Luft aus der
Anlage bis zu einem Minimum
von 1,5 mbar ab;
Füllen Sie das Kühlmittel
in die Anlage.
! Attenzione:
Non usare il compressore per
fare il vuoto.
Non
alimentare
elettricamente il compressore
in condizioni di vuoto!
! Attention:
Do not use the compressor to
create a vaccum
Do not feed electrically the
compressor
in
vacuum
conditions!
! Achtung:
Verwenden Sie den Verdichter
nicht um das Vakuum zu
erzeugen.
Schließen Sie den Verdichter
nicht an das Stromnetz an wenn
er sich im Vakuum-Zustand
befindet!
11
des
der
zwei
Vor
vom
OFFICINE MARIO DORIN S.p.A.
! Attenzione:
Non utilizzare il compressore
per
fare
la
carica
di
refrigerante nell’impianto.
!Attention:
Do not use the compressor to
fill up the system with
refrigerant.
! Achtung:
Verwenden Sie den Verdichter
nicht um die Anlage mit
Kühlmittel zu füllen.
! Attenzione:
Prima di collegare i rubinetti
alle tubazioni assicurarsi che
tutti i tappi in plastica siano
stati rimossi.
Evitare per quanto possibile
l’ingresso
di
aria
nel
compressore! Tenere chiuse
le
connessioni
del
compressore
durante
la
saldatura dei rubinetti alle
tubazioni.
Mantenere chiusi i rubinetti,
una volta rimontati, finché
non si avvia la procedura di
messa in vuoto.
Assicurarsi
che
tutte
le
tubazioni e le giunzioni siano
perfettamente pulite e a
tenuta.
!Attention:
Before connecting the service
valves to the pipes be sure
that all the plastic caps have
been taken away.
Avoid, as much as possible,
the
air
inlet
into
the
compressor!
Keep the connections closed
during the welding of the
service valves to the pipes.
Once the service valves have
been reassembled, keep
them closed till the vacuum
procedure
is
not
implemented.
Make sure all the piping and
junctions are perfectly clean
and sealed.
! Achtung:
Bevor Sie die Absperrventile an
die
Rohre
anschließen,
überprüfen
Sie,
dass
alle
Plastikstöpsel entfernt worden
sind.
Verhindern Sie soweit wie
möglich den Lufteingang in den
Kompressor! Halten Sie die
Verdichter
Verbindungen
während des Anlötens der
Ventile
an
die
Rohre
geschlossen.
Halten
Sie
die
Ventile
geschlossen
nachdem
Sie
diese wieder montiert haben
und
solange
nicht
die
Evakuierung eingeleitet worden
ist.
Überprüfen Sie, dass alle Rohre
und Verbindungsstellen perfekt
sauber und dicht sind.
Le indicazioni relative alle
connessioni standard sono
presenti nella figura 3.
The indications regarding
standard connections are
shown in figure 3.
Angaben
bezüglich
der
Standardverbindungen sind in
Abb. 3 geschildert.
Collegamenti
elettrici
Electrical
connections
Elektrische Anschlüsse
Il
collegamento
all’alimentazione
elettrica
deve avvenire aprendo la
scatola attacchi elettrici e
collegando
le
fasi
di
alimentazione, il conduttore
equipotenziale ed i conduttori
per i segnali dei sensori di
temperatura
secondo
le
indicazioni riportate all’interno
del coperchio della scatola e
sulla
targhetta
del
compressore.
Collegare elettricamente la
resistenza carter, laddove
prevista,
e
le
altre
apparecchiature elettriche.
The connection to the power
supply has to be made by
opening the box of the
electric connections and by
connecting the phases of
power
supply,
the
equipotential wire and the
wires for the signals of the
temperature sensors following
the
instructions
provided
inside the lid of the box and
on the compressor plate.
Der Anschluss an das Stromnetz
erfolgt
durch
Öffnen
des
elektrischen Schaltkastens und
Anschließen
der
Stromzufuhrphasen, der Erdung
und
der
Melder
der
Temperatursensoren
gemäß
den Angaben, die auf der
Innenseite des Kastendeckels
und auf dem Typenschild
angebracht sind.
Schließen Sie die anderen
elektrischen Geräte und die
Ölheizung des Kurbelgehäuses
an, wo diese vorgesehen sind.
La targhetta posta su ogni
compressore riporta i valori di
The plate positioned on each
compressor
shows
the
Connect
the
carter
resistance, whenever it is
provided, and the other
electric equipments.
12
Das Typenschild das auf jedem
Verdichter angebracht ist, gibt
Angaben über die Spannung
und die Motorfrequenz an:
Istruzioni Operative / Operative Instructions / Bedienungsanleitung
tensione e frequenza del
motore: assicurarsi che siano
in accordo con la tensione e
frequenza della linea.
motor’s
voltage
and
frequency values: make sure
they comply with the line’s
voltage and frequency.
überprüfen
Sie
dass
die
Zuleitungen dieser Spannung
und Frequenz entsprechen.
! Attenzione:
La
potenza
nominale
installata in HP NON è un
parametro significativo per il
dimensionamento
dei
componenti elettrici.
! Attention:
The rated HP is NOT a
significant parameter for the
dimensions of the electrical
components.
! Achtung:
Die
in
PS
angegebene
Nennleistung
stellt
KEINEN
wesentlichen Parameter der
Dimensionierung
der
elektrischen Bestandteile dar.
! Attenzione:
Per il dimensionamento dei
contattori, dei cavi e dei
dispositivi
di
protezione
(fusibili,
interruttori
magnetotermici)
dell’impianto
elettrico
di
alimentazione riferirsi ai valori
di
max
corrente
di
funzionamento (FLA) e di
corrente a rotore bloccato
(LRA) riportate sulla targhetta,
sui cataloghi e sul software di
selezione.
! Attention:
For the dimensions of the
contactors,
cables
and
protection devices (fuses,
circuit breakers) of the
electrical power refer to the
values of maximum working
(FLA) and start-up current
(LRA)
shown
on
the
nameplate as well as in the
catalogues and in the
selection software.
! Achtung:
Zur
Dimensionierung
der
Schütze, der Kabel und der
Schutzvorkehrungen
(Schutzsicherungen,
magnetthermische
Schalter)
der
elektrischen
Stromzufuhranlage, beachten
Sie
die
maximalen
Betriebsstrom Werte (BSW) und
die Betriebsstrom Werte bei
blockiertem Rotor (LRA) die auf
dem Typenschild, in den
Katalogen und in der Software
angegeben sind.
! Attenzione:
Prevedere
sull’impianto
elettrico di alimentazione le
opportune misure di sicurezza
contro la protezione dai
contatti indiretti, in funzione
del sistema di distribuzione e
della resistenza di terra o
impedenza
dell’anello
di
guasto a terra (es. interruttore
differenziale
ad
alta
sensibilità).
!Attention:
Take the suitable safety
measures for the electric
power supply against the
protection
from
indirect
contacts, depending on the
distribution system and the
earth
resistance
or
the
impedance of the earth fault
ring
(i.e. high sensitivity
differential switch).
!Achtung:
Sehen
Sie
angemessene
Sicherheitsvorkehrungen gegen
indirekte Kontakte auf der
Anlage der Stromzufuhr vor;
beachten
Sie
dabei
das
Verteilungssystem
und
den
Erdungswiderstand oder die
Impedanz des Erdungsrings (z.B.
hochempfindliche
Differentialschalter).
(Per gli schemi elettrici e le
indicazioni
per
il
collegamento vedi anche
pagina web www.dorin.com).
(For
diagrams
and
information for the electrical
connection see also the
page www.dorin.com).
! Attenzione:
Pericolo
di
cortocircuito
dovuto alla presenza di
condensa
nella
scatola
attacchi elettrici.
Usare
soltanto
passacavi
standard
e
prestare
la
massima
attenzione
nell’effettuare
una
ermetizzazione
corretta
durante il montaggio.
! Attention:
Danger of short circuit due to
the presence of condensate
in the electrical connections
box.
Exclusively
use
standard
fairleads and be careful while
carrying out the correct
airtight sealing during the
assembly.
13
(Für Schaltpläne und Angaben
bezüglich der Anschlüsse lesen
Sie
auch
die
Web-Seite
www.dorin.com).
! Achtung:
Kondenswasser im Schaltkasten
kann zu einem Kurzschluss
führen.
Verwenden Sie ausschließlich
Standard Verschraubungen und
wenden Sie die größte Sorgfalt
bei der richtigen Abdichtung
während der Montage an.
OFFICINE MARIO DORIN S.p.A.
! Attenzione:
Nel caso di motori PWS fare
particolare attenzione al fatto
che sia rispettata la sequenza
delle fasi sui due avvolgimenti
altrimenti
al
momento
dell’alimentazione
del
secondo avvolgimento si avrà
una condizione di “rotore
bloccato” con pericolo di
gravi danni elettrici.
Il tempo di ritardo tra
l’alimentazione
dei
due
avvolgimenti dovrà essere tra
0,2 e 0,5 secondi.
Un
intervallo
più
lungo
porterebbe solo maggiori
rischi al motore.
! Attention:
In the event of PWS motors
pay particular attention to the
observance of the sequence
of the phases on the two
windings, otherwise upon the
second winding feed, there
will be a condition of “rotor
blocked” with danger of
serious electrical damages.
The delay time between the
two windings feed shall be
included between 0,2 and 0,5
seconds.
A longer range would only
give rise to more risks for the
motor.
! Achtung:
Falls PWS (Teilwicklungsanlauf)
Motoren verwendet werden,
beachten Sie die richtige
Sequenz der Phasen auf den
zwei Wicklungen weil sonst
nach dem Stromanschluss der
zweiten Wicklung dies zu einem
blockierten Zustand des Rotors
führen würde mit schweren
elektrischen Folgeschäden.
Die
Verzögerung
der
Stromanspeisung zwischen den
zwei Wicklungen muss zwischen
0,2 und 0,5 Sekunden betragen.
Eine
längere
Zwischenzeit
würde den Motor lediglich
größeren Risiken aussetzen.
Collegare
il
conduttore
equipotenziale di protezione
al terminale di terra.
Connect
the
protection
equipotential wire to the
earth terminal.
Verbinden
Sie
den
äquipotentialen Schutzleiter an
die Erdung.
SISTEMA DI PROTEZIONE
I motori vengono forniti con
protezione interna PTC o
tramite THERMIK; per quanto
riguarda i sensori PTC, i relativi
contatti (indicati con T1-T2
nello
schema
attacchi
elettrici) non devono essere
collegati alla tensione di
alimentazione ma alimentati
solo
tramite
il
modulo
elettronico
di
protezione
motore disponibile su richiesta
per i protettori tipo termistore;
viceversa per i protettori tipo
THERMIK non è necessario
l’impiego
del
modulo
elettronico
e
i
contatti
andranno collegati in serie
con
le
altre
protezioni
dell’impianto.
PROTECTION SYSTEM
The motors are equipped with
PTC internal protection or
through THERMIK; as for PTC
sensors,
the
relevant
connections (indicated as T1T2 in the wiring diagram) shall
not be connected to the
power supply voltage but fed
only through the motor
protection electronic module
REL, available on demand for
protections
such
as
thermistor; vice versa for
protections such as thermik
the use of REL is not necessary
and the contacts shall be
connected in series with the
other system protections.
SCHUTZSYSTEM
Die Motoren werden mit einem
internen PTC Schutz geliefert
oder
sind
durch
THERMIK
geschützt. In Bezug auf die PTC
Sensoren, dürfen die jeweiligen
Kontakte (im Schema der
elektrischen Anschlüsse als T1T2 angegeben) nicht an das
Stromnetz angeschlossen und
nur durch das elektronische
Modul versorgt werden das auf
Anfrage für Schutzleitungen der
Art Thermistor lieferbar ist:
umgekehrt ist es für THERMIK
Schutzleiter nicht notwendig
das
elektronische
Modul
anzuwenden
und
die
Anschlüsse müssen in Serie zu
den
anderen
Schutzvorrichtungen der Anlage
angeschlossen werden.
Messa in servizio
Commissioning
Inbetriebnahme
Lavori preparatori:
- Alimentare la resistenza
carter, se prevista (iniziare il
processo di ricarica del
refrigerante non al di sotto di
35°C÷40°C di temperatura
dell'olio).
Una volta raggiunte tali
Preliminary works:
- Feed
the
carter
resistance, if provided (start
the
refrigerant
recharge
process
not
below
35°C÷40°C
of
the
oil
temperature).
Once
the
indicated
Vorarbeiten:
- Die Ölheizung anschließen,
wenn vorgesehen (mit dem
Füllen des Kühlmittels nicht
beginnen,
solange
das
Schmieröl nicht 35°C÷40°C
erreicht).
Setzten Sie den Verdichter nach
14
Istruzioni Operative / Operative Instructions / Bedienungsanleitung
temperature,
mettere
marcia il compressore.
in
temperatures are reached,
start the compressor.
Erreichen dieser Temperaturen
in Betrieb.
! Avvertenza:
Prima di mettere in marcia il
compressore:
assicurarsi che il rubinetto di
aspirazione e di mandata
siano aperti;
Non avviare il compressore
quando
al
suo
interno
sussistono condizioni di alto
vuoto. Il mancato rispetto di
questa avvertenza può avere
gravissime
conseguenze
come il repentino aumento
della pressione interna con
possibilità di esplosione e
conseguenti rischi per il
personale che operi, transiti o
stazioni in prossimità del
macchinario.
! Warning:
Before
starting
the
compressor:
make sure the suction
service
valve
and
the
discharge gas valve are
open;
Do
not
start
the
compressor
when
high
vacuum conditions occur
inside it. Non-observance of
this warning can have very
serious consequences such
as the sudden increase of the
internal
pressure
with
possibility of explosion and
consequent risks for the staff
operating, passing by or
staying close to the machine.
! Achtung:
Vor der Inbetriebnahme des
Verdichters:
versichern Sie sich, dass
Saug-und Druckabsperrventile
offen sind;
Starten Sie den Verdichter
nicht wenn sich in seinem
Inneren ein Vakuum befindet.
Die
Nichtbeachtung
dieses
Hinweises kann zu extrem
schweren Folgen führen, z.B.
zum raschen Anstieg des
Innendrucks, Explosionsgefahr
und nachfolgenden Risiken für
das bedienende Personal oder
für das Personal das sich in der
Nähe des Gerätes aufhält oder
daran vorbeigeht.
Controllare il livello dell’olio,
verificando che sia compreso
fra
i
livelli
chiaramente
indicati sulla spia visiva, come
nella, seguente figura:
Check the oil level and verify
that the oil level is between
the levels clearly indicated on
the oil sight glass, as shown in
the following figure:
Kontrollieren Sie den Ölstand
und überprüfen Sie, dass er
zwischen den Grenzwerten liegt
die klar auf der Anzeige am
Ölschauglas zu sehen sind, so
wie in der nachfolgenden
Abbildung:
INDICAZIONE LIVELLO OLIO
OIL LEVEL INDICATION
ÖLSTANDANZEIGE
Durante le prime ore di
funzionamento
del
compressore,
verificare
il
livello dell’olio varie volte.
During the first hours of
operation of the compressor,
check the oil level several
times.
Während der ersten Stunden
nach der Inbetriebnahme des
Kompressors überprüfen Sie
wiederholt den Ölstand.
! Avvertenza:
Nel caso sia necessario
aggiungere olio, utilizzare il
tipo indicato in targhetta e
farlo
gradualmente,
controllando il suo corretto
ritorno al compressore:
Pericolo di colpi di liquido!
! Warning:
If oil have to be added, use
the type indicated on the
nameplate
and
do
it
gradually,
checking
his
return to compressor:
Danger of liquid slugging!
! Avvertenza:
Durante il funzionamento del
compressore occorre evitare
la migrazione di liquido
dall’evaporatore
al
compressore.
Il
funzionamento
con
refrigerante
liquido
può
! Warning:
During
compressor
functioning, liquid migration
from
evaporator
to
compressor has to be avoid.
! Achtung:
Falls Öl nachgefüllt, werden
sollte, verwenden Sie den Typ
der auf dem Schild angegeben
ist, füllen Sie stufenweise nach
und kontrollieren Sie ob der
Rücklauf zum Verdichter richtig
erfolgt:
Risiko von Flüssigkeitsschlägen!
! Achtung:
Ist der Verdichter in Betrieb,
muss die Verschiebung von
Flüssigkeit vom Verdampfer
zum
Verdichter
vermieden
werden.
Der
Betrieb
mit
flüssigen
Kühlmitteln kann zu folgenden
The functioning with liquid
refrigerant
may
cause
15
OFFICINE MARIO DORIN S.p.A.
provocare
i
seguenti
inconvenienti sulla macchina:
Olio con minor potere
lubrificante;
Rottura delle valvole e
conseguente
danneggiamento
di
altri
organi meccanici.
following failures:
Oil with less lubricant
power;
Broken of valves and
consequent damage of other
components.
Verdichterstörungen führen:
weniger schmierfähiges Öl;
Ventilbruch
und
nachfolgender Bruch anderer
mechanischen Teile.
L’installatore deve verificare
che l’impianto presenti tutti gli
accorgimenti per evitare la
migrazione
di
liquido
dall’evaporatore
al
compressore, in tutte le
condizioni di funzionamento.
Tale fenomeno può essere
identificato dalle seguenti
anomalie:
Formazione di ghiaccio o
brina
sul
rubinetto
di
aspirazione e sulla linea
d’aspirazione;
Formazione di schiuma
eccessiva nel lubrificante
visibile attraverso la spia
dell’olio;
Bassa temperatura nella
pancia del compressore.
The installer shall verify that
the plant has all the solution
to avoid the liquid migration
from
evaporator
to
compressor, in all possible
operating conditions.
This phenomenon may be
identified by the following
functioning failures:
Ice or frost formation on
the suction service valves
and on suction line;
Excessive foam formation
on lubricant, visible through
warning light;
Low
temperature
of
surface of oil sump.
Der
Installateur
muss
sicherstellen, dass die Anlage
derart angelegt ist, dass eine
Flüssigkeitsverschiebung
vom
Verdampfer zum Verdichter in
jedem
Augenblick
des
Betriebes vermieden wird.
Folgende Anomalien weisen
darauf hin:
Eis- oder Frostbildung auf
dem Saugabsperrventil und
entlang der Ansaugleitung;
Durch
das
Ölschauglas
sichtbare
starke
Schaumbildung im Öl ;
Niedrige Temperatur im
Ölsumpf.
AUSTAUSCH DES VERDICHTERS
Besondere Sorgfalt ist beim
Austausch eines Verdichters
aufzuwenden; in der Anlage
könnte eine gewisse Menge an
Öl
verblieben
sein
die
„Flüssigkeitsschläge“ bei der
Inbetriebnahme
verursachen
könnte. Es könnte notwendig
sein eine gewisse Menge an Öl
aus dem neuen Verdichter zu
entfernen.
Nach dem Start des Verdichters
kontrollieren Sie, dass sich der
Ölstand
zwischen
den
Grenzwerten die im vorigen
Absatz angegeben worden
sind, stabilisiert.
SOSTITUZIONE DI COMPRESSORI
COMPRESSORS’ REPLACEMENT
Una particolare attenzione va
posta quando si installa un
compressore al posto di un
altro;
nell’impianto
infatti
potrebbe esserci rimasta una
certa quantità d’olio tale da
causare “colpi di liquido” alla
partenza. Potrebbe essere
necessario rimuovere una
certa quantità di lubrificante
dal nuovo compressore.
Dopo
l’avviamento
del
compressore verificare che il
livello dell’olio si stabilizzi fra i
livelli indicati al paragrafo
precedente.
A particular attention shall be
paid in case a compressor is
replaced with another one;
as a matter of fact in the
plant a certain oil quantity
could have been left such as
to cause “liquid slugging” at
the start. It could be
necessary to remove a
certain lube quantity from the
new compressor.
After the compressor starting
check that the oil level is
stabilised between the levels
indicated
in
previous
paragraph.
! Avvertenza:
Durante
il
funzionamento
della macchina controllare
periodicamente che il livello
dell’olio sia compreso fra i
livelli chiaramente indicati
sulla spia visiva.
! Warning:
During operation of the
machine periodically check
that the oil level is between
the levels clearly marked on
the sight glass.
16
! Achtung:
Ist die Maschine im Gang,
kontrollieren Sie regelmäßig
dass sich der Ölstand zwischen
den zwei klar angegebenen
Grenzwerten des Ölschauglases
befindet.
Es
könnte
nützlich
sein
regelmäßige
Ölanalysen
Istruzioni Operative / Operative Instructions / Bedienungsanleitung
Potrebbe
essere
utile
prevedere
delle
analisi
periodiche
dell’olio
per
verificare l’assenza di umidità
e/o di acidità.
Numero di partenze
Non avviare il compressore
più di 8 volte l’ora. Far
funzionare la macchina per
almeno
4
minuti
ad
avviamento.
In ogni caso assicurarsi che i
ripetuti
avviamenti
non
pregiudichino il corretto livello
dell’olio nel carter.
It could be useful to provide
with regular oil analysis in
order to check the lack of
humidity and/or acidity.
durchzuführen
um
die
Anwesenheit von Feuchtigkeit
und/oder Säure nachzuweisen.
Number of starts
Do not start the compressor
more than 8 times per hour.
Let the machine run for at
least 4 minutes for each
starting.
However,
be
sure
that
numerous startings do not
undermine the right oil level
into the case
Anzahl der Startanläufe
Den Kompressor nicht mehr als
8 Mal pro Stunde starten. Die
Maschine pro Start mindestens
4 Minuten laufen lassen.
Jedenfalls sicherstellen, dass
die wiederholten Starts nicht
den
Ölstand
des
Kurbelgehäuses
beeinträchtigen.
Accessori
Accessories
Zubehörteile
I compressori possono essere
corredati di alcuni accessori
quali:
Compressors
can
equipped
with
accessories such as:
be
some
Die Kompressoren können mit
einigen
Zubehörteilen
ausgestattet sein, wie z.B.:
Ölheizung
Es empfiehlt sich die Ölheizung
im Kurbelgehäuse einzubauen
weil die Möglichkeit besteht
dass die Kühlflüssigkeit sich
nach einem Betriebsstopp im
Kurbelgehäuse ansammelt. Die
Ölheizung
verringert
die
Verdünnung des Öles durch
flüssiges Kältemittel.
Es
ist
eine
Bohrung
im
Kurbelgehäuse zum Einbau der
Ölheizung vorgesehen (siehe
Montageanleitung in Abb. 5).
Standard-Widerstände gibt es
zu:
100 oder 200 W je nach
Kompressor Größe;
230 V Spannung.
RESISTENZA CARTER
CRANKCASE HEATER
E’ buona regola applicare il
riscaldatore
dell’olio
nel
carter, perché esiste la
possibilità
che
il
fluido
frigorigeno si accumuli nel
carter stesso, a seguito di un
fermo impianto. Il riscaldatore
riduce
la
diluizione
del
refrigerante liquido nell’olio.
Un foro è già previsto nel
carter dal lato del livello olio
per applicare la resistenza
(vedere
istruzioni
di
montaggio in figura 5).
Le resistenze standard sono
da:
100 o 200 W a seconda
della taglia del compressore;
tensione 230 V.
It is recommended to fit an oil
heater in the compressor
crankcase, because, If the
compressor is stopped, there
is the possible storage of
refrigerant
inside
the
crankcase.
The
heater
reduce the dilution of liquid
refrigerant with the oil.
On the oil level side, the
compressor
crankcase
is
already equipped with a hole
where the resistance may be
applied
(see
mounting
instructions in figure 5).
The standard resistances are:
100 or 200 W on the basis of
compressor size;
Voltage 230 V.
Su richiesta si possono fornire
resistenze per tensioni diverse
o di potenze diverse; si veda
la
pagina
web
www.dorin.com.
On demand the crankcase
heater can be provided for
different voltages or different
power; see the web page
www.dorin.com.
Auf
Anfrage
können
Ölheizungen
für
unterschiedliche Spannungen
oder
Leistungen
geliefert
werden:
siehe
Web-Seite
www.dorin.com.
! Avvertenza:
Prima
di
alimentare
la
resistenza carter assicurarsi
che la tensione sia quella
corretta e che la resistenza
sia
inserita
e
bloccata
! Warning:
Before
energizing
the
crankcase heater make sure
the voltage is correct and
that the heater is inserted and
locked inside its seat by
! Achtung:
Bevor
die
Ölheizung
angeschlossen wird, überprüfen
Sie, dass die Stromspannung
richtig ist, dass die Ölheizung
sich in seinem Sitz befindet und
17
OFFICINE MARIO DORIN S.p.A.
all’interno della sua sede
avvitando la boccola filettata
in dotazione.
screwing the bush supplied.
RAFFREDDAMENTO AUSILIARIO TESTA
AUXILIARY COOLING HEAD
I sistemi di raffreddamento
ausiliario sono due:
Ventilatore su testa;
Teste raffreddate ad
acqua.
Per maggiori dettagli vedere i
cataloghi compressori o il
bollettino tecnico (pagina
web www.dorin.com).
The most common auxiliary
cooling system are:
Body cooling fan;
Water cooled head.
For more details see the
catalogues on compressors
or the technical news letter
(web page www.dorin.com).
! Avvertenza:
Verificare che il ventilatore
ruoti nel corretto senso di
rotazione.
! Warning:
Make sure the fan is in the
right direction of rotation
MODULO ELETTRONICO PROTEZIONE
MOTOR
MOTORE
MODULE
Per
poter
utilizzare
la
protezione a termistori del
motore
è
necessario
collegarla al modulo di
controllo elettronico (fornito di
serie insieme al compressore).
In order to use the motor
thermistor protection it is
necessary to connect it to the
electronic module (supplied
as
standard
with
the
compressor).
PROTECTION
ELECTRONIC
CONTROLLO PRESSIONE OLIO
OIL PRESSURE CHECK
Sui compressori dotati di
pompa dell’olio è installato di
serie
(tranne
che
sulla
gamma H4 dove è un
accessorio) un pressostato
differenziale olio elettronico,
che misura la differenza di
pressione fra lato bassa
pressione sul carter e la
pressione di mandata della
pompa.
Il pressostato differenziale
dell’olio può essere collegato
alla presa di bassa pressione
presente sui carter di tutti i
compressori e alla presa di
pressione lato mandata sulla
pompa olio.
Il sensore DPS va inserito
nell’apposito alloggiamento
nella pompa olio.
Il valore di taratura del
pressostato è minimo 0,8 bar
(differenziale).
E’ previsto un ritardo di
risposta del pressostato di
almeno 90 secondi. Tale
ritardo permette la corretta
On the compressor equipped
with oil pump, it is installed as
standard (except on the
range H4 where is an option)
an oil differential pressure
switch, that measure pressure
difference from low pressure
side on the crankcase and
discharge pressure of the
pump.
The
differential
pressure
switch can be connected to
the low pressure connection
located on the carter of all
compressors and to the
pressure connection on the
discharge side of the oil
pump.
The oil differential pressure
sensor
DPS
must
be
introduced in the apposite
lodging of the oil pump.
The setting value of switch is
at least 0,8 bar (differential).
It is set a delay time of the
switch at least of 90 seconds.
This delay allows the correct
oil pressurization at the
18
mit dem dazu vorgesehenen
Drehring festgeschraubt ist.
ZUSÄTZLICHE ZYLINDERKOPFKÜHLUNG
Es sind zwei Abkühlungssysteme
vorhanden:
Zylinderkopfventilator;
Wassergekühlte
Zylinderköpfe.
Für eingehende Details finden
Sie in den Verdichter Katalogen
oder
in
den
technischen
Informationen
(Web-Seite
www.dorin.com).
! Achtung:
Kontrollieren Sie die richtige
Drehrichtung des Ventilators
ELEKTRONISCHES
MODUL
ALS
MOTORSCHUTZ
Um den Thermistorschutz des
Motors anwenden zu können
muss
dieser
an
das
elektronische
Kontrollmodul
angeschlossen werden (der
serienmäßig mit dem Verdichter
geliefert wird).
ÖLDRUCKKONTROLLE
Bei Verdichtern die mit einer
Ölpumpe ausgestattet sind
(außer in der H4 Serie wo diese
als Zubehör geliefert wird) wird
serienmäßig ein elektronischer,
DifferentialÖldruckwächter
eingebaut. Dieser misst den
Druckunterschied
zwischen
Niedrigdruckseite
des
Kurbelgehäuses
und
Hochdruckseite der Pumpe.
Der Differential-Öldruckwächter
kann
an
den
Niederdruckanschluss
angeschlossen werden, der sich
auf dem Kurbelgehäuse aller
Kompressoren befindet sowie
an den Hochdruckanschluss der
Ölpumpe.
Der
DPS-Sensor
(Differentialdruck-Sensor) muss
in die dazu vorgesehene
Bohrung in der Ölpumpe
montiert werden.
Der
Einstellwert
des
Druckwächters
beträgt
mindestens 0,8 bar (differential).
Es ist eine Verzögerung des
Istruzioni Operative / Operative Instructions / Bedienungsanleitung
pressurizzazione
dell’olio
all’avvio del compressore ed
evita
improvvisi
blocchi
dell’impianto
per
brevi
cadute di pressione.
compressor start up and
avoids compressor stops in
case of short pressure drop.
Druckwächters von mind. 90
Sekunden vorgesehen. Diese
Verzögerung ermöglicht die
Erreichung
des
richtigen
Öldruckes beim Anlaufen des
Verdichters und vermeidet eine
Abschaltung des Verdichters
bei
kurzanhaltendem
Öldruckabfall.
Manutenzione
Maintenance
Wartung
PROCEDURE FOR THE COMPRESSOR
DES
ISOLIERUNGSPROZEDUR
VERDICHTERS
Vor jeglichem Wartungseingriff
am Verdichter, ist es notwendig
diesen von der Stromzufuhr
abzuschalten.
Bauen Sie in die Stromzufuhr
einen verriegelbaren Schalter
ein; bringen Sie diesen in die
offene
Stellung
(0)
und
blockieren Sie diese Stellung
während der Wartung.
Nach der Installation, oder bei
Eingriffen die eine Demontage
von Teilen des Kompressors
benötigen, oder weil der
Kompressor still gelegt werden
muss, ist es notwendig den
Druck im Kompressor wie folgt
zu verringern:
•
Trennen
Sie
den
Stromkreis
wie
oben
beschrieben;
•
Schließen
Sie
das
Saugabsperrventi das sich auf
der Saugseite des Verdichters
befindet;
•
Schließen
Sie
das
Druckabsperrvenil das sich auf
der Druckseite des Kompressors
befindet;
•
Lassen Sie den Druck des
Verdichters solange ab (ohne
das Kühlmittel zu verlieren) bis
der Luftdruck erreicht wird.
PROCEDURA
DI
ISOLAMENTO
DEL
COMPRESSORE
INSULATION
Prima
di
intervenire
sul
compressore per attività di
manutenzione è necessario
sezionare
lo
stesso
dall’alimentazione elettrica.
Installare
sulla
linea
di
alimentazione elettrica un
sezionatore
lucchettabile;
portarlo in posizione aperta
(0) e lucchettarlo durante
l’intervento di manutenzione.
A seguito dell’installazione,
nel caso di interventi che
richiedono lo smontaggio di
parti del compressore o per il
suo
smantellamento,
è
necessario procedere alla
depressurizzazione
del
compressore
secondo
le
seguenti indicazioni:
• Sezionare l’alimentazione
elettrica
come
sopra
indicato;
• Chiudere la valvola di
intercettazione
posta
sull’aspirazione
del
compressore;
• Chiudere la valvola di
intercettazione posta sulla
mandata del compressore;
• Depressurizzare
il
compressore
(senza
disperdere
il
refrigerante
nell’ambiente) fino a che la
pressione non è diventata
quella atmosferica.
Before carrying out any kind
of
intervention
on
the
machine it is necessary to
interrupt the main power
supply of the system.
Install on the power supply
line a switch selector that can
be padlocked, place it in an
open condition (0) and
padlock
it
during
the
maintenance.
After the installation, in case
of interventions requiring the
dismantling of parts of the
compressor
or
for
its
dismantling, it is necessary to
start
the
compressor
depressurization according to
the following indications:
•
Dissect
the
power
supply as it is above
specified;
•
Close the on-off valve
placed on the suction of the
compressor;
•
Close the on-off valve
placed on the delivery of the
compressor;
•
Depressurize
the
compressor
(without
dispersing the refrigerant in
the room) till the pressure
does not correspond to the
atmospheric one.
Se
si
rende
necessario
lavorare con la scatola
attacchi elettrici aperta e
sotto tensione, l’operazione
deve essere eseguita da
personale specificatamente
In case it is necessary to work
with the live open electric
board, such operation shall
be carried out by qualified
and expert staff.
In
no
case
keep
on
19
Wenn es notwendig wäre bei
offenem und angeschlossenem
Anschlusskasten zu arbeiten;
darf der Eingriff ausschließlich
von spezifisch qualifiziertem
Personal ausgeführt werden
OFFICINE MARIO DORIN S.p.A.
qualificato per operare su
impianti elettrici in tensione.
In nessun caso insistere con il
riarmo
della
protezione
elettrica
dopo
un
cortocircuito.
Prima
di
rimettere
in
funzione
l’impianto il guasto deve
essere eliminato e devono
essere sostituiti tutti quei
componenti che possono
essere danneggiati.
reactivating
the
electric
protection after a short
circuit.
Before
re-operating
the
system, the failure shall be
eliminated and all damaged
components
shall
be
replaced.
das in der Lage ist an
elektrische Anlagen zu arbeiten
die
sich
unter
Spannung
befinden.
Wiederholen Sie keinesfalls ein
Wiederherstellen
des
elektrischen
Schutzes
nach
einem Kurzschluss. Vor einem
Neustart der Anlage muss der
Fehler beseitigt werden und es
müssen alle Teile ersetzt werden
die beschädigt sein könnten.
CONTROLLO AD INTERVALLI REGOLARI
CONTROL AT REGULAR INTERVALS
Verificare
il
livello
dell’olio;
Prelevare un campione
di olio per verificarne la
buona qualità (colore e
acidità).
Ad
ogni
sostituzione
dell’olio verificare il filtro
dell’olio.
Verify oil level;
Take a sample of oil and
verify its good quality (color
and acidity).
Every time the oil is
replaced also the oil filter
shall be verified.
IN
REGELMÄßIGEN
KONTROLLE
ABSTÄNDEN
Kontrollieren
Sie
den
Ölstand;
Entnehmen Sie eine Öl
Probe und überprüfen Sie
dessen gute Qualität (Farbe
und Säure).
Bei
jedem
Ölwechsel
kontrollieren Sie den Öl Filter.
! Attenzione:
Gli oli POE e PAG sono
fortemente
igroscopici.
L’umidità
si
lega
chimicamente alla molecola
di olio.
Operare con estrema cura
durante le fasi di sostituzione
dell’olio. Evitare che l’aria
penetri nel circuito.
! Attention:
POE and PAG oils are strongly
hygroscopic. Moisture binds
itself chemically to the oil
molecule. Carefully operate
while replacing the oil.
Prevent the air from entering
the circuit.
! Achtung:
Die POE (Polyol-Ester)- und PAG
(Polyalkylene-Glykol)-Ölsorten
sind stark hygroskopisch. Die
Feuchtigkeit
verbindet
sich
chemisch mit dem Ölmolekül.
Wenden Sie größte Sorgfalt
während des Ölwechsels an.
Vermeiden Sie dass Luft in den
Kreislauf kommt.
! Attenzione:
Non disperdere il lubrificante
nell’ambiente; è un rifiuto
speciale e come tale deve
essere smaltito secondo le
norme in vigore.
! Attention:
Do not waste the lube in the
environment: it is special
waste and as such it shall be
disposed of according to the
standards in force.
! Achtung:
Das Schmiermittel nicht in der
Umwelt auslassen; es handelt
sich um einen Sonderabfall und
als solcher muss er gemäß der
gültigen Vorschriften entsorgt
werden.
Emergenze
Emergency
Notfälle
Nel
caso
di
malfunzionamento chiamare
il più vicino centro di
assistenza.
In caso di fuga di gas
refrigerante aerare il locale
dove è avvenuta la fuga
prima di intervenire. Non
sostare
nel
locale
di
installazione se non è stato
opportunamente
areato;
anche se il gas inalato non è
In case of malfunctioning or
black-out call the nearest
service centre.
In case of refrigerant gas
leak, aerate the room where
the leak occurred before any
operations. Do not stay in the
machinery room if it has not
been properly aerated; even
if the gas inhaled is not
harmful, the gas replaces
oxygen and can therefore
Im Falle eines fehlerhaften
Funktionierens wenden Sie sich
an
das
nächstliegen
Servicecenter.
Im Falle eines Austritts von
Kältemittel, lüften Sie den Raum
wo der Austritt stattgefunden
hat bevor Sie eingreifen. Halten
Sie sich im Installationsraum
nicht auf bevor dieser nicht
angemessen belüftet worden
ist;
auch
wenn
das
20
Istruzioni Operative / Operative Instructions / Bedienungsanleitung
nocivo, questo sostituisce
l’ossigeno e quindi può dare
origine
a
sintomi
di
soffocamento.
In caso di incendio spegnere
la
macchina
agendo
sull’interruttore generale a
monte dell’apparecchiatura.
Non
usare
acqua
per
spegnere le fiamme ma solo
estintori a secco.
cause choking symptoms.
In case of fire turn off the
machine by the general
switch upstream.
Do not use water to extinguish
the flames but only use dry
extinguishers.
eingeatmete Gas nicht giftig ist,
ersetzt dieses den Sauerstoff
und kann demzufolge zu
Erstickungserscheinungen
führen.
Schalten Sie das Gerät Im
Brandfall aus indem Sie den
Hauptschalter betätigen der
sich an der Anlage befindet.
Verwenden Sie kein Wasser um
die
Flammen
zu
löschen
sondern nur Trockenlöscher.
Dismissione
Dismantling
Demontage
! Attenzione:
Il compressore può essere
sotto pressione! Pericolo di
gravi ustioni. Usare guanti e
occhiali protettivi.
! Attention:
The compressor can be under
pressure! Danger of serious
burns. Wear protective gloves
and glasses.
Quando verrà deciso di non
utilizzare più l’impianto, si
raccomanda
di
renderla
inoperante
eliminando
opportunamente i materiali.
In conformità alle norme per
lo smaltimento vigenti nei vari
paesi e per il rispetto
dell’ambiente
le
parti
dell’impianto devono essere
divise per tipologia di rifiuto in
modo da poter smaltire o
recuperare opportunamente.
When the system is no longer
used, it shall be made
inoperative
by
properly
eliminating materials.
In compliance with the
standards in force in the
different countries regarding
the waste disposal and the
respect of the environment,
the parts of the system shall
be divided according to the
waste types so as to dispose
of and recycle materials in a
proper way.
! Achtung:
Der Verdichter kann unter
Druck stehen! Es besteht die
Gefahr
schwerer
Verletzungen.Verwenden
Sie
Schutzhandschuhe
und
Schutzbrillen.
SMONTAGGIO DEL COMPRESSORE
COMPRESSOR DISASSEMBLY
• attuare la procedura di
isolamento
descritta
al
capitolo Manutenzione;
• chiudere i rubinetti sul
compressore;
• aspirare il refrigerante;
• rimuovere le viti di fissaggio
dei rubinetti al compressore;
• smontare i supporti di
fissaggio del compressore a
terra;
• rimuovere il compressore
come indicato al capitolo
Trasporto e posizionamento.
• implement the insulation
procedure described in the
Maintenance section;
• close the service valves on
the compressor;
• suck the refrigerant;
• remove
the
screws
fastening the valves to the
compressor;
• remove
the
mounting
points of the compressor on
the ground;
• remove the compressor as
described in transportation
and positioning.
21
Falls beschlossen werden sollte
die Anlage nicht mehr zu
verwenden, empfiehlt es sich
diese
betriebsunwirksam
zu
machen und deren Materialien
angemessen zu entsorgen.
Laut der Vorschriften die für die
Entsorgung
in
den
verschiedenen Ländern gültig
sind und zum Schutz der
Umwelt, ist es notwendig die
Anlage in ihre Bestandteile zu
zerlegen und diese, je nach
Abfallart, einer fachgerechten
Entsorgung
oder
Wiederverwertung
zu
unterziehen.
DEMONTAGE DES KOMPRESSORS
• wenden
Sie
die
Isolierungsprozedur an so wie
Sie
im
Wartungsabschnitt
beschrieben ist;
• schließen die Absperrventile;
• saugen Sie das Kühlmittel ab;
• schrauben
Sie
die
Befestigungsschrauben
der
Absperrventile auf;
• bauen
Sie
die
Bodenhalterungen
des
Verdichters ab;
• folgen Sie den Hinweisen des
Abschnitts
Transport
und
Aufstellen um den Kompressor
OFFICINE MARIO DORIN S.p.A.
zu entfernen.
! Attenzione:
Non disperdere il lubrificante
nell’ambiente; è un rifiuto
speciale e come tale deve
essere smaltito secondo le
norme in vigore.
! Attention:
Do not waste the lube in the
environment: it is special
waste and as such it shall be
disposed of according to the
standards in force.
! Achtung:
Das Schmiermittel nicht in der
Umwelt auslassen; es handelt
sich um einen Sonderabfall und
als solcher muss er gemäß der
gültigen Vorschriften entsorgt
werden.
Avvertenze
Warning
Hinweise
Qualsiasi
operazione
di
smontaggio o modifica del
compressore
può
pregiudicare
la
iniziale
conformità del prodotto alle
norme e direttive applicabili.
Any disassembly action or
modification made on any
DORIN product can affect
product compliance to the
aforesaid directives.
Jeder Eingriff zur Demontage
oder
Veränderung
des
Verdichters
kann
die
anfängliche Konformität des
Produktes
bezüglich
der
Vorschriften
und
Richtlinien
beinträchtigen.
OFFICINE MARIO DORIN S.p.A.
non riconosce/garantisce la
conformità dei propri prodotti
alle attuali norme e direttive
cogenti qualora vengano
revisionati da soggetti diversi
dal costruttore.
OFFICINE MARIO DORIN S.p.A.
will not recognize/guarantee
product conformity to the
aforesaid
directives
whenever the products are
overhauled from DORIN itself.
Die Firma OFFICINE MARIO
DORIN
S.p.A.
kann
die
Konformität
der
eigenen
Produkte bezüglich der derzeit
gültigen
Vorschriften
und
Richtlinien
nicht
anerkennen/gewährleisten falls
ihre Produkte von anderen
Personen als dem Hersteller
überprüft werden.
Di conseguenza si informa
che, qualora necessario, il
compressore dovrà essere
manutenuto
e
riparato
esclusivamente da OFFICINE
MARIO DORIN S.p.A..
Dunque
OFFICINE
MARIO
DORIN S.p.A. declina ogni
tipo di responsabilità qualora
si
verificassero
danni
a
persone o cose derivanti da
qualsiasi malfunzionamento
di ogni proprio prodotto
qualora venga revisionato da
soggetti
diversi
dal
costruttore.
Consequently we inform you
that,
if
necessary,
the
compressor must be serviced
and
repaired
only
by
OFFICINE MARIO DORIN S.p.A.
Therefore OFFICINE MARIO
DORIN S.p.A. declines any
type of responsibility in case
damages of any nature
occurs to things or persons
due
to
product
malfunctioning in case the
product have not been
overhauled from OFFICINE
MARIO DORIN S.p.A. itself.
Demzufolge darf der Verdichter,
wenn notwendig, ausschließlich
durch OFFICINE MARIO DORIN
S.p.A. gewartet und repariert
werden.
OFFICINE MARIO DORIN S.p.A.
lehnt deswegen jede Art der
Verantwortung
hinsichtlich
Schäden an Menschen oder
Gegenständen ab, die auf das
fehlerhafte Funktionieren ihrer
Produkte zurückzuführen sind,
falls diese
von anderen
Personen als dem Hersteller
selber überprüft worden sind.
22
Istruzioni Operative / Operative Instructions / Bedienungsanleitung
Prospetto sinottico
degli inconvenienti e
delle possibili cause
ANOMALIA
FAILURE
ANOMALIE/FEHLER
1
Il compressore non parte
The compressor does not
start up
Der Kompressor läuft nicht an
Synoptic chart of
failures and their
possible causes
Übersichtstafel der
Fehler und mögliche
Ursachen
CAUSA POSSIBILE
POSSIBLE CAUSE
MÖGLICHE URSACHE
Mancanza di alimentazione
RIMEDIO
REMEDY
ABHILFE
Controllare il collegamento e gli
interruttori
Lack of power
Check the connection and switches
Stromzufuhr fehlt
Contatto pressostato olio aperto
Anschlüsse und Schalter kontrollieren
Fare il reset
Oil safety switch open
Reset Manually
Schalter des Öldruckwächters ist offen
Contatto della protezione motore
aperto
Zurücksetzen/ den Reset durchführen
Fare il reset
Current safety switch open
Reset Manually
Thermischer Relaisschalter ist offen
Connessioni elettriche allentate o
collegamento difettoso
Zurücksetzen/ den Reset durchführen
Serrare le connessioni. Controllare il
collegamento con il corretto schema
Electrical connections loosened
or connection defective
Tighten the connections.
Check the connection with the
correct diagram
Elektrische Verbindungen sind locker
oder defekte Verbindung
Alle Verbindungen nachziehen.
Kontrollieren Sie die Verbindung anhand
des richtigen Schemas
Controllare e sostituire il compressore,
se difettoso
Motore bruciato
Motor is burnt out
Check and replace the compressor, if
defective
Verbrannter Motor
Kontrollieren Sie und ersetzen Sie den
Verdichter, falls er defekt sein sollte
bloccato Controllare e sostituire il compressore,
se difettoso
Compressore
meccanicamente
Mechanically locked compressor
Check and replace the compressor, if
defective
Mechanisch blockierter Verdichter
Kontrollieren Sie und ersetzen Sie den
Verdichter, falls er defekt sein sollte
23
OFFICINE MARIO DORIN S.p.A.
ANOMALIA
FAILURE
ANOMALIE/FEHLER
2
Il compressore ha una
oscillazione intermittente
The compressor oscillates
intermittently
Der Verdichter schwankt
intermittierend
CAUSA POSSIBILE
POSSIBLE CAUSE
MÖGLICHE URSACHE
Rubinetto di aspirazione chiuso
Aprire il rubinetto
Suction service valve closed
Open the service valve
Saugabsperrventil geschlossen
Rubinetto di mandata chiuso
Öffnen Sie das Ventil
Aprire il rubinetto
Discharge service valve closed
Open the service valve
Druckabsperrventil geschlossen
Carica di refrigerante insufficiente
Öffnen Sie das Ventil
Aggiungere gas
Refrigerant load insufficient
Add gas
Ungenügende Kühlmittellfüllung
Intervento errato del pressostato di
bassa pressione
Füllen Sie Kältemittel nach
Controllare la taratura ed il montaggio
dell’interruttore
Wrong operation of the low pressure
switch
Check the setting and the assembly
of the low pressure switch
Falsches Ansprechen des
Niederdruck- Druckwächters
Condensatore insufficiente o sporco
Kontrollieren Sie die Einstellung und die
Montage de Schalters
Controllare la portata d’aria o d’acqua al
condensatore. Pulire il condensatore
Condenser insufficient or dirty
Check the flow rate of air or water to the
condenser. Clean the condenser
Verflüssiger
verschmutzt
ungenügend
Aria nell’impianto
RIMEDIO
REMEDY
ABHILFE
oder Kontrollieren Sie die Luft- oder Wasserzufuhr
zum Verflüssiger. Reinigen Sie den
Verflüssiger.
Effettuare il vuoto completamente
Air in the plant
Make a total vacuum
Luft in der Anlage
Intervento protezione motore
Stellen Sie ein vollständiges Vakuum her
Controllare che la quantità di refrigerante
sia sufficiente. Controllare le connessioni
elettriche.
Intervention motor protection
Check that the quantity of refrigerant is
sufficient. Check electrical connections
Ansprechen des Motorschutz
Kontrollieren Sie dass die Kühlmittelmenge
ausreichend ist. Kontrollieren Sie die
elektrischen Verbindungen.
24
Istruzioni Operative / Operative Instructions / Bedienungsanleitung
ANOMALIA
FAILURE
ANOMALIE/FEHLER
3
Il compressore oscilla
Continuamente
CAUSA POSSIBILE
POSSIBLE CAUSE
MÖGLICHE URSACHE
Pressostati difettosi
RIMEDIO
REMEDY
ABHILFE
Riparare o sostituire
Defective pressure switches
Repair or replace
Die Druckwächter sind defekt
Reparieren oder ersetzen
Carica di refrigerante troppo elevata Togliere il refrigerante in eccesso
e pressione di scarico troppo alta
The compressor oscillates
Continusly
Refrigerant load and discharge
pressure too high
Remove excess refrigerant
Der Verdichter schwankt
ständig
Kühlmittelfüllung zu groß oder zu
hoher Hockdruck
Filtri disidratatori otturati
Kühlmittelüberschuss entfernen
Blocked deshydrators filters
Replace filters
Verstopfte Trocknungsfilter
Perdite delle valvole o sedi delle
valvole sporche; rottura delle valvole
Filter ersetzen
Smontare le teste e controllare la
piastra valvole e le valvole
Leakages from the valves or dirty
valve plate; breakage of valves
Disassemble the heads and check the
valve plate and the valves
Sostituire i filtri
Ventile undicht oder verschmutzte Zylinderköpfe abmontieren und die
Ventilsitze ; Ventilbruch
Ventilplatte sowie die Ventile kontrollieren
Trafilamento
dalla
valvola
di Sostituire la valvola
sicurezza interna
4
Diminuzione di resa del
compressore
Decrease in compressor
efficiency
Leistungsabfall des
Verdichters
Leakage from internal safety valve
Replace the safety valve
Leck des inneren Sicherheitventils
Perdite dalla guarnizione della testa
Das Ventil ersetzen
Sostituire la guarnizione
Leakage from the gasket of the head Replace the gasket
Leck der Zylinderkopfdichtung
Usura dei segmenti
Die Dichtung ersetzen
Sostituire il compressore
Piston rings wear
Replace the compressor
Kolbenringverschleiß
Usura delle sedi spinotto su pistoni
e/o bielle
Sostituire il compressore
Piston pin seat wear on the pistons
and/or piston rods
Replace the compressor
Verschleiß der Kolbenbolzenlager in
den Kolben und/oder Pleueln
Verdichter ersetzen
5
Perdite dalla guarnizione della Tiranti non sufficientemente serrati
testa
Leakage from the gasket of
the head
Leck der Zylinderkopfdichtung
Verdichter ersetzen
Sostituire le guarnizioni e riserrare i bulloni
Heads bolts not enough tighten
Replace the gasket and tighten bolts again
Schrauben nicht richtig angezogen
Dichtungen auswechseln und die
Schrauben korrekt anziehen
25
OFFICINE MARIO DORIN S.p.A.
ANOMALIA
FAILURE
ANOMALIE/FEHLER
6
Presenza di liquido nel carter
CAUSA POSSIBILE
POSSIBLE CAUSE
MÖGLICHE URSACHE
Tubazioni mal progettate
RIMEDIO
REMEDY
ABHILFE
Correggere le tubazioni
Piping not properly designed
Correct piping
Rohrleitungen schlecht entworfen
Il ciclo di sbrinamento non funziona
correttamente
Rohrleitungen berichtigen
Controllare il funzionamento del sistema di
sbrinamento
The defrost cycle does not work
correctly
Check the defrost cycle
Der Entfrostungs Zyklus funktioniert
Presence of liquid in the carter nicht richtig
Taratura errata della valvola di
Anwesenheit von Flüssigkeit im espansione
Kurbelgehäuse
Wrong calibration of the expansion
valve
Schlechte
Einstellung
Expansionsventils
Non funziona l’evaporatore
7
Pressione di scarico bassa
High pressure too low
Hochdruck zu gering
Kontrollieren Sie die Funktionstüchtigkeit
des Entfrostungssystems
Sostituire la valvola o cambiare la taratura
Replace the valve or change the
calibration
des Ventil ersetzen oder Einstellung verändern
Verificare
The evaporator does not work
Check
Verdampfer funktioniert nicht
Portata d’acqua eccessiva al
condensatore
Kontrollieren
Regolare la valvola dell’acqua
Excessive water flow rate to the
condenser
Adjust the water valve
Übermäßige Wasserzufuhr zum
Verflüssiger
Il rubinetto di scarico è parzialmente
chiuso
Regeln Sie das Wasserventil
Aprire la valvola
The discharge service valve is partially Open the discharge service valve
closed
Das Druckabsperrventil ist teilweise Ventil öffnen
geschlossen
Le valvole di compressione non
Smontare le teste e controllare la piastra
tengono perfettamente
valvole e le valvole
The discharge valve are not gastight
Disassemble the heads and check the
valve plate and the valves
Druckventile sind nicht vollständig
dicht
Resistenza carter non funzionante
Zylinderköpfe abmontieren und die
Ventilplatte und Ventile kontrollieren
Sostituire la resistenza
Crankcase heater does not work
Replace the heater
Ölheizung funktioniert nicht
Ölheizung ersetzen
26
Istruzioni Operative / Operative Instructions / Bedienungsanleitung
ANOMALIA
FAILURE
ANOMALIE/FEHLER
7
Pressione di scarico bassa
High pressure too low
CAUSA POSSIBILE
POSSIBLE CAUSE
MÖGLICHE URSACHE
I segmenti dei pistoni sono usurati
RIMEDIO
REMEDY
ABHILFE
Sostituire il compressore
The piston rings are worn
Replace the compressor
Kolbenringe sind abgenützt
Verdichter ersetzen
Quantità di refrigerante insufficiente
Aggiungere refrigerante
Quantity of refrigerant insufficient
Add gas
Kühlmittelmenge ungenügend
Kühlmittel nachfüllen
Hochdruck zu gering
8
Problemi ai ventilatori
Pressione di aspirazione bassa dell’evaporatore
Controllare
Low suction pressure
Problems with evaporator fans
Check
Saugdruck zu niedrig
Probleme an den Ventilatoren des
Verdampfers
Filtri disidratatori sporchi
Kontrollieren
Sostituire i filtri
Deshydrators filters dirty
Replace filters
Schmutzige Trocknungsfilter
Battiti dovuti alla presenza di liquido
nel compressore
Filter ersetzen
Vedere N°6
Beats due to liquid in the compressor
See N°6
Schläge wegen Flüssigkeit im
Kompressor
Battiti dovuti all’eccesso di olio
nel compressore
Siehe N°6
Beats due to excess of oil inside
the compressor
Remove the excess of oil
Schläge wegen überschüssigen Öls
im Kompressor
Bronzine e/o altri componenti usurati
Überschüssiges Öl entfernen
Bearings and/or other components
worn
Replace the compressor
Bronzelager oder andere Teile sind
abgenützt
Compressore non montato
correttamente
Kompressor ersetzen
9
Rumori del compressore
Compressor noises
Togliere l’olio in eccesso
Sostituire il compressore
Geräusche des Kompressors
Controllare i supporti
Compressor not assembled properly
Check the supports
Falsch montierter Verdichter
Halterungen kontrollieren
27
OFFICINE MARIO DORIN S.p.A.
ANOMALIA
FAILURE
ANOMALIE/FEHLER
9
Rumori del compressore
CAUSA POSSIBILE
POSSIBLE CAUSE
MÖGLICHE URSACHE
Tubazioni non isolate
RIMEDIO
REMEDY
ABHILFE
Controllare
Piping non insulated
Check
Nicht isolierte Rohre
Rottura di pistoni, bielle o valvole
Kontrollieren
Sostituire il compressore
Breakage of pistons, pistons rods or
valves
Replace the compressor
Bruch von Kolben, Pleuel oder
Ventilen
Mancanza di olio
Verdichter ersetzen
Lack of oil
Add oil
Öl fehlt
Pompa olio rotta
Öl nachfüllen
Sostituirla
Oil pump broken
Replace it
Compressor noises
Geräusche des Kompressors
10
Gebrochene Ölpumpe
Pressione dell’olio insufficiente Bronzine eccessivamente usurate
o livello dell’olio basso
Bearing too worn
Insufficient oil pressure or low
Übermäßig abgenützte Bronzelager
oil level
Le tubazioni non garantiscono un
Unzureichender Öldruck oder sufficiente ritorno di olio
niedriger Ölstand
Piping does not guarantee enough
return oil return
Ansprechen der Kompressor
Schutzvorrichtungen
Ölpumpe ersetzen
Sostituire il compressore
Replace the compressor
Kompressor ersetzen
Controllare le tubazioni
Check the pipes
Die Rohrführung verhindert einen
richtigen Rückfluss des Öles
Filtro olio sporco
Rohrleitungen kontrollieren
Oil filter dirty
Replace the filter
Schmutziger Ölfilter
Eccessiva pressione di scarico
Filter ersetzen
Controllare funzionamento condensatore
Too high discharge pressure
Check the condenser is working properly
Übermäßiger Hochdruck
Funktionstüchtigkeit des Verflüssigers
kontrollieren
Sostituirlo
11
Relay difettoso
Intervento delle protezioni del
compressore
Relay defective
Intervention of the protection
of the compressor
Aggiungere olio
Sostituire il filtro
Replace it
Defektes Relais
Temperatura di aspirazione elevata
Relais ersetzen
Ridurre la temperatura di aspirazione
High suction temperature
Reduce the suction temperature
Erhöhte Ansaugtemperatur
Pressione di aspirazione bassa
Die Ansaugtemperatur herabsetzen
Low suction pressure
See failure 8
Niedriger Ansaugdruck
Siehe Anomalie 8
28
Vedere anomalia 8
Istruzioni Operative / Operative Instructions / Bedienungsanleitung
ANOMALIA
FAILURE
ANOMALIE/FEHLER
CAUSA POSSIBILE
POSSIBLE CAUSE
MÖGLICHE URSACHE
Collegamenti di potenza o del
circuito di controllo allentati
RIMEDIO
REMEDY
ABHILFE
Verificare tutti i collegamenti
11
Intervento delle protezioni del Power or control circuit connections
compressore
loosened
Intervention of the protection
of the compressor
Ansprechen der Kompressor
Schutzvorrichtungen
Check all connections
Leistungsverbindungen oder die des Alle Verbindungen kontrollieren
Kontrollkreislaufs sind locker
Motore difettoso
Sostituire il compressore
Defective motor
Replace the compressor
Defekter Motor
Verdichter ersetzen
Bassa tensione di alimentazione o Controllare la linea
errore di collegamento
Low power supply or mistake in the Check the supply tension
connections
Niedrige
Spannung
Anschlussfehler
Il compressore è grippato
oder Elektrische Anschlüsse kontrollieren
The compressor is blocked
Verdichter ist festgefressen
12
Il compressore funziona con la Il motore è difettoso
corrente di rotore bloccato
The motor is defective
The compressor run with
locked rotor amps
Der Verdichter läuft mit
blockiertem Rotorstrom
Sostituirlo
Replace it
Verdichter ersetzen
Controllare gli avvolgimenti
Check the windings
Der Motor ist defekt
Mancanza di fase
Die Wicklungen kontrollieren
Controllare la tensione ai 3 terminali
Lack of one phase
Check the tension on the terminals
Phase fehlt
Die Spannung an den 3 Phasen
kontrollieren
Controllare il contattore e controllare il
ritardatore
In un compressore con partenza
PWS, il secondo avvolgimento può
non essere alimentato
In a compressor with PWS starting the Check the contactor and check the timer
second winding may not be supplied
13
Motore bruciato
Motor burnt out
Verbrannter Motor
In einem Kompressor mit PWS-Start
konnte die zweite Wicklung nicht
angeschlossen sein
Verificare i contatti di potenza e/o di
controllo saldati per individuare quelli
bruciati
Den Kontakt- und Verzögerungsschalter
kontrollieren
Sostituire i componenti difettosi e il
compressore
Check the welded power and/or
control contacts to identify the burnt
out parts
Replace the defective parts and the
compressor
Die Leistungs- und/oder
Kontrollkontakte kontrollieren um die
Ursache zu ermitteln
Die defekten Bestandteile und den
Verdichter ersetzen
29
OFFICINE MARIO DORIN S.p.A.
14
La temperatura del
compressore è elevata
Valvole di aspirazione o di
compressione rotte
Sostituire la piastra valvole; controllare il
compressore e verificare l’assenza di
frammenti nel compressore e nell’impianto.
Suction or discharge valves broken
Replace the valve plate; check the
compressor and verify the presence of
particles inside the compressor or the plant.
Kaputte Ansaug- oder Druckventile
Ventilplatte ersetzen ; den Verdichter
kontrollieren und die Anwesenheit von
Bruchstücken im Kompressor und in der
Anlage kontrollieren
Controllare i pressostati, la pulizia del
condensatore e I ventilatori
The temperature of the
compressor is too high
Erhöhte Temperatur des
Verdichters
Rapporto di compressione troppo
elevato
Compression ratio too high
Check the pressure switches, that the
condenser is clean and motors fans
Kompressionsverhältnis zu hoch
Die Druckwächter, die Sauberkeit der
Verflüssiger und die Ventilatoren
kontrollieren,
30
Istruzioni Operative / Operative Instructions / Bedienungsanleitung
Figure
Figures
H40CC ÷ H8001CC
Abbildungen
K10000CC ÷ K15000CC
TANDEM – TANDEM HI
Fig. 1: Sollevamento tramite golfare - Lifting point use - Anheben mittels Hebering
31
OFFICINE MARIO DORIN S.p.A.
H40CC ÷ H8001CC
K10000CC ÷ K15000CC
Fig. 2: Impiego degli antivibranti - Vibrational dampers use - Anwendung der Schwingungsdämpfer
32
Istruzioni Operative / Operative Instructions / Bedienungsanleitung
MODELLO
CARICA OLIO
ASPIRAZIONE
MANDATA
PESO
MODEL
OIL CHARGE
SUCTION
DISCHARGE
WEIGHT
MODELL
ÖLFÜLLUNG
SAUGLEITUNG
DRUCKLEITUNG
GEWICHT
[kg]
[mm]
[mm]
[Kg]
H40CC÷H75CC
1
12s
12s
36
H75CS÷H180CS
1
16s
12s
39
H200CC
1
16s
16s
40
H200CS÷H280CS
1
18s
16s
43
H290CS÷H300CC
1,4
22s
16s
54
H300CS÷H392CS
1,4
28s
16s
56
H403CC÷H503CC
2
28s
16s
79
H503CS÷H743CC
2
35s
16s
80
H450CS÷H550CC
2
28s
18s
95
H550CS÷H700CC
2
35s
18s
99
H700CS÷H860CS
2
35s
22s
111
H401CS÷H451CC
2
22s
16s
91
H451CS÷H551CC
2
28s
16s
91
H551CS÷H751CC
2
28s
22s
94
H751CS÷H801CC
2
35s
28s
94
H850CS
2,5
35s
22s
117
H1000CC
2,5
35s
28s
136
H1000CS÷H2400CC
2,5
42s
28s
145
H851CS÷H1001CS; H1501CS
2,5
35s
28s
132
H1501CC; H2001CC÷H2201CC
2,5
42s
28s
137
K1500CS÷K2500CC
3,5
42s
28s
180
K2500CB÷K3000CC
3,5
54s
35s
184
H2000CS÷H2500CC
3,5
42s
28s
190
H2500CS÷H3000CC
3,5
54s
28s
194
H2700CS÷H3400CC
3,5
54s
35s
196
Y3060CB÷Y4060CB; Y4560CB
6,5
54s
35s
250
Y4560CC; Y5060CC
6,5
54s
42s
257
H3000CS÷H4000CC
4
54s
35s
260
H4000CS÷H5000CC
4
54s
42s
265
Y4780CB÷Y5080CC; Y5580CC
8,5
66s
42s
346
Y5080CB; Y5580CB÷Y7580CC
8,5
80s
42s
353
H5000CS÷H5500CC
9
66s
42s
360
H5500CS÷H7500CC
9
80s
42s
366
H7500CS÷H8001CC
9
80s
54s
366
K10000CC÷K15000CC
21
80s
54s
602
Fig. 3: Pesi e rubinetti– Weight and valves– Gewichte und Absperrventile
33
OFFICINE MARIO DORIN S.p.A.
R134a
______________________________________________
Solo per modelli “CC”
B
Applicazione standard
C
Ventilatore su testa
______________________________________________
A
“CC” models only
B
Normal operation
C
Head fan
______________________________________________
A
Uniquement modèles “CC”
B
Application standard
C
Avec ventilateur de culasse
______________________________________________
A
Nur “CC” Modelle
B
Standard Einsatz
C
Zylinderkopfbelüftung
85
80
Temperatura condensazione / Condensing temperature
Temperature de condensation / Kondensationtemperatur
[°C]
A
75
70
65
60
55
50
45
40
35
30
25
20
15
______________________________________________
-30
-25
-20
-15
-10
-5
0
5
10
15
20
25
Temperatura evaporazione / Evaporation temperature
Temperature d'évaporation / Verdampfungstemperatur
[°C]
R404A / R507
60
A
Solo per modelli “CC”
B
Applicazione standard
C
Ventilatore su testa
______________________________________________
A
“CC” models only
B
Normal operation
C
Head fan
______________________________________________
A
Uniquement modèles “CC”
B
Application standard
C
Avec ventilateur de culasse
______________________________________________
A
Nur “CC” Modelle
B
Standard Einsatz
C
Zylinderkopfbelüftung
Temperatura condensazione / Condensing temperature
Temperature de condensation / Kondensationtemperatur
[°C]
______________________________________________
55
50
45
40
35
30
25
20
15
______________________________________________
-50
-45
-40
-35
-30
-25
-20
-15
-10
-5
0
5
10
15
Temperatura evaporazione / Evaporation temperature
Temperature d'évaporation / Verdampfungstemperatur
[°C]
R407C
65
A
Applicazione standard
B
Ventilatore su testa
______________________________________________
A
Normal operation
B
Head fan
______________________________________________
A
Application standard
B
Avec ventilateur de culasse
______________________________________________
A
Standard Einsatz
B
Zylinderkopfbelüftung
______________________________________________
Temperatura condensazione / Condensing temperature
Temperature de condensation / Kondensationtemperatur
[°C]
______________________________________________
60
55
50
45
40
35
30
25
20
15
-30
-25
-20
-15
-10
-5
0
Temperatura evaporazione / Evaporation temperature
Temperature d'évaporation / Verdampfungstemperatur
[°C]
Fig. 4: Limiti d’applicazione – Application limits – Anwendungsgrenzen
34
5
10
15
Istruzioni Operative / Operative Instructions / Bedienungsanleitung
Abb. 5: Istruzioni montaggio resistenza carter - Mounting instructions
crankcase heater - Montageanleitung der Ölheizung
35
OFFICINE MARIO DORIN S.p.A.
H1
H2
H1
H2
A
B
C
D
E
F
Spia olio
Tappo carica olio
Presa bassa pressione
Presa alta pressione
Tappo scarica olio (M8)
Resistenza carter
Oil sight
Oil charge plug
Low pressure tap
High pressure tap
Oil drain plug (M8)
Crankcase heater
Ölschauglas
Ölfüllschraube
Niederdruckanschluss
Hochdruckanschluss
Ölablaßschraube(M8)
Ölheizung
DL
SL
Rubinetto compressione
Rubinetto aspirazione
Discharge service valve
Suction service valve
Druckabsperrventil
Saugabsperrventil
36
Istruzioni Operative / Operative Instructions / Bedienungsanleitung
H32
H34
H32
H34
A
B
C
D
E
F
Spia olio
Tappo carica olio
Presa bassa pressione
Presa alta pressione
Tappo scarica olio (M10)
Resistenza carter
Oil sight
Oil charge plug
Low pressure tap
High pressure tap
Oil drain plug (M10)
Crankcase heater
Ölschauglas
Ölfüllschraube
Niederdruckanschluss
Hochdruckanschluss
Ölablaßschraube(M8)
Ölheizung
DL
SL
Rubinetto compressione
Rubinetto aspirazione
Discharge service valve
Suction service valve
Druckabsperrventil
Saugabsperrventil
37
OFFICINE MARIO DORIN S.p.A.
H35
H41
Serie
Range
Serie
Modello
Model
Modell
H41
H851CS
H1001CC
H1001CS
H1501CC
H1501CS
H2001CC
H1601CS
H2201CC
H35
L
[mm]
640
"
"
680
640
680
"
"
H41
A
B
C
D
E
F
Spia olio
Tappo carica olio
Presa bassa pressione
Presa alta pressione
Tappo scarica olio (M10)
Resistenza carter
Oil sight
Oil charge plug
Low pressure tap
High pressure tap
Oil drain plug (M10)
Crankcase heater
Ölschauglas
Ölfüllschraube
Niederdruckanschluss
Hochdruckanschluss
Ölablaßschraube(M8)
Ölheizung
DL
SL
Rubinetto compressione
Rubinetto aspirazione
Discharge service valve
Suction service valve
Druckabsperrventil
Saugabsperrventil
38
Istruzioni Operative / Operative Instructions / Bedienungsanleitung
H4
K5
H4
K5
A
B
C
D
E
F
G
H
Spia olio
Tappo carica olio
Presa bassa pressione
Presa alta pressione
Tappo scarica olio (M10)
Resistenza carter
Tappo ritorno olio
Presa pressione olio
Oil sight
Oil charge plug
Low pressure tap
High pressure tap
Oil drain plug (M10)
Crankcase heater
Oil return
Oil pressure tap
Ölschauglas
Ölfüllschraube
Niederdruckanschluss
Hochdruckanschluss
Ölfüllschraube(M10)
Ölheizung
Ölrückführung
Öldruckanschluss
DL
SL
Rubinetto compressione
Rubinetto aspirazione
Discharge service valve
Suction service valve
Druckabsperrventil
Saugabsperrventil
39
OFFICINE MARIO DORIN S.p.A.
H5
Y6
H5
Y6
A
B
C
D
E
F
G
H
M
P
Q
Spia olio
Tappo carica olio
Presa bassa pressione
Presa alta pressione
Tappo scarica olio (M10)
Resistenza carter
Tappo ritorno olio
Presa pressione olio
Sensore max temp. mandata
Pressostato diff. olio elettr.
Equalizzazione gas
Oil sight
Oil charge plug
Low pressure tap
High pressure tap
Oil drain plug (M10)
Crankcase heater
Oil return
Oil pressure tap
Max disch. temp. sensor
Oil diff. Pressure switch
Gas equalisation
DL
SL
Rubinetto compressione
Rubinetto aspirazione
Discharge service valve
Suction service valve
40
Ölschauglas
Ölfüllschraube
Niederdruckanschluss
Hochdruckanschluss
Ölablaßschraube(M10)
Ölheizung
Ölrückführung
Öldruckanschluss
Sensor der max. Druckgastemp.
Druckwächter elektr. Öl Diff.
Gasausgleich
Druckabsperrventil
Saugabsperrventil
Istruzioni Operative / Operative Instructions / Bedienungsanleitung
H6
H6
H6
H6
A
B
C
D
E
F
G
H
M
P
Q
Spia olio
Tappo carica olio
Presa bassa pressione
Presa alta pressione
Tappo scarica olio (M10)
Resistenza carter
Tappo ritorno olio
Presa pressione olio
Sensore max temp. mandata
Pressostato diff. olio elettr.
Equalizzazione gas
Oil sight
Oil charge plug
Low pressure tap
High pressure tap
Oil drain plug (M10)
Crankcase heater
Oil return
Oil pressure tap
Max disch. temp. sensor
Oil diff. Pressure switch
Gas equalisation
Ölschauglas
Ölfüllschraube
Niederdruckanschluss
Hochdruckanschluss
Ölablaßschraube(M10)
Ölheizung
Ölrückführung
Öldruckanschluss
Sensor der max. Druckgastemp.
Druckwächter elektr. Öl Diff.
Gasausgleich
DL
SL
Rubinetto compressione
Rubinetto aspirazione
Discharge service valve
Suction service valve
Druckabsperrventil
Saugabsperrventil
41
OFFICINE MARIO DORIN S.p.A.
Y7
H7
Y7
H7
A
B
C
D
E
F
G
H
M
P
Q
Spia olio
Tappo carica olio
Presa bassa pressione
Presa alta pressione
Tappo scarica olio (M10)
Resistenza carter
Tappo ritorno olio
Presa pressione olio
Sensore max temp. mandata
Pressostato diff. olio elettr.
Equalizzazione gas
Oil sight
Oil charge plug
Low pressure tap
High pressure tap
Oil drain plug (M10)
Crankcase heater
Oil return
Oil pressure tap
Max disch. temp. sensor
Oil diff. Pressure switch
Gas equalisation
DL
SL
Rubinetto compressione
Rubinetto aspirazione
Discharge service valve
Suction service valve
42
Ölschauglas
Ölfüllschraube
Niederdruckanschluss
Hochdruckanschluss
Ölablaßschraube(M10)
Ölheizung
Ölrückführung
Öldruckanschluss
Sensor der max. Druckgastemp.
Druckwächter elektr. Öl Diff.
Gasausgleich
Druckabsperrventil
Saugabsperrventil
Istruzioni Operative / Operative Instructions / Bedienungsanleitung
K8
A
B
C
D
E
F
G
H
Spia olio
Tappo carica olio
Presa bassa pressione
Presa alta pressione
Tappo scarica olio (M10)
Resistenza carter
Tappo ritorno olio
Presa pressione olio
Oil sight
Oil charge plug
Low pressure tap
High pressure tap
Oil drain plug (M10)
Crankcase heater
Oil return
Oil pressure tap
Ölschauglas
Ölfüllschraube
Niederdruckanschluss
Hochdruckanschluss
Ölablaßschraube(M10)
Ölheizung
Ölrückführung
Öldruckanschluss
DL
SL
Rubinetto compressione
Rubinetto aspirazione
Discharge service valve
Suction service valve
Druckabsperrventil
Saugabsperrventil
43
OFFICINE MARIO DORIN S.p.A.
HI RANGE
Modello
Model
Modell
Forma
Mark
Ausführung
Dimensioni - Dimensions - Abmessungen
Aspirazione
Scarico
Carica olio
Peso netto
Suction
Discharge
Oil charge
Net weight
Saugabsperr Drucabsperr
Ölfüllung
Nettogewicht
ventil
ventil
SL
DL
L
P
H
A
B
Φ
[kg]
[mm]
[mm]
[kg]
HI100CC
I
435
230
315
170
183
M8x1,25
1
18s
12s
43
HI150CC
I
435
230
315
170
183
M8x1,25
1
18s
16s
44
HI240CC
I
460
230
315
170
183
M8x1,25
1
22s
16s
50
HI400CC
II
551
347
345
295
250
M8x1,25
2
28s
16s
94
HI550CC
II
551
347
345
295
250
M8x1,25
2
35s
22s
96
HI700CC
II
551
347
345
295
250
M8x1,25
2
42s
28s
98
HI750CC
II
551
347
345
295
250
M8x1,25
2
42s
28s
100
HI1000CC
II
645
422
380
284
270
M8x1,25
2,5
42s
28s
135
HI1500CC
II
645
422
380
284
270
M8x1,25
2,5
42s
28s
143
FORMA / MARK / AUSFÜHRUNG I
FORMA / MARK / AUSFÜHRUNG II
44
Istruzioni Operative / Operative Instructions / Bedienungsanleitung
TANDEM
TANDEM HI
45
OFFICINE MARIO DORIN S.p.A.
Dimensioni - Dimensions - Abmessungen
Modello
Model
Modell
TH1700CS
TH2000CC
TH2000CS
TH3000CC
TH3000CS
TH4000CC
TK3000CS
TK4000CC
TK3000CB
TK5000CC
TK5000CB
TK6000CC
TY6060CB
TY7060CC
TY7060CB
TY8060CC
TY8060CB
TY9060CC
TY9060CB
TY10060CC
TY9480CB
TY10080CC
TY10080CB
TY11080CC
TY11080CB
TY12080CC
TY12080CB
TY15080CC
TH15000CS
TH16000CC
L
P
H
A
B
?
1300
1300
1300
1300
1300
1300
1300
1300
1300
1300
1300
1300
1800
1800
1800
1800
1800
1800
1800
1800
1800
1800
1800
1800
1800
1800
1800
1800
1850
1850
423
423
423
423
423
423
530
530
530
530
530
530
515
515
515
515
515
550
550
550
550
550
550
550
550
550
550
550
570
570
441
441
441
441
441
411
535
535
535
535
535
535
590
590
590
590
590
650
650
650
650
650
650
650
650
650
650
650
650
650
1200
1200
1200
1200
1200
1200
1210
1210
1210
1210
1210
1210
1680
1680
1680
1680
1680
1680
1680
1680
1680
1680
1680
1680
1680
1680
1680
1680
1680
1680
270
270
270
270
270
270
405
405
405
405
405
405
305
305
305
305
305
305
305
305
305
305
305
305
305
305
305
305
345
345
13
13
13
13
13
13
13
13
13
13
13
13
13
13
13
13
13
13
13
13
13
13
13
13
13
13
13
13
13
13
T-HI300CC
T-HI500CC
T-HI800CC
T-HI1100CC
T-HI1400CC
T-HI1500CC
T-H2000CC
T-HI3000CC
850
850
1080
1080
1080
1080
1301
1301
275
275
425
425
425
425
425
425
345
345
404
404
404
404
441
441
810
810
1040
1040
1040
1040
1200
1200
183
183
250
250
250
250
270
270
13
13
13
13
13
13
13
13
46
Istruzioni Operative / Operative Instructions / Bedienungsanleitung
2S
2S.1200
2S.1500
2S.2000
2S.2500
2S.3000
2S.3500
2S.3700
Carica olio Aspirazione
Oil charge
Suction
Ölfüllung Saugleitung
Dimensioni - Dimensions Abmessungen
Modello
Model
Modell
L
650
650
650
755
755
755
755
P
520
520
520
560
560
560
560
H
455
455
455
475
475
475
475
A
325
325
325
380
380
380
380
B
330
330
330
305
305
305
305
Φ
10,5
10,5
10,5
10,5
10,5
10,5
10,5
[kg]
3,5
3,5
3,5
6,5
6,5
6,5
6,5
47
SL
[mm]
35
35
35
42
42
42
42
Scarico
Discharge
Druckleitung
Peso netto
Net weight
Nettogewicht
DL
[mm]
22
22
22
35
35
35
35
[kg]
180
187
190
235
236
256
261
OFFICINE MARIO DORIN S.p.A.
NOTE:
48
Istruzioni Operative / Operative Instructions / Bedienungsanleitung
NOTE:
49
OFFICINE MARIO DORIN S.p.A.
1LTG664_05
50