1
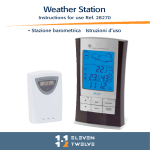
Weather Station
Instructions for use Ref. 28280
• Stazione barometrica Istruzioni d’uso
CARATTERISTICHE E PULSANTI UNITÁ PRINCIPALE
BUTTONS AND FEATURES MAIN UNIT
1. Allarme temperatura
2. History
3. Selezione canale sensore remoto
4. Allarme
5. PULSANTE “-”/Ricerca
6. Memoria
7. PULSANTE “+”
8. MODE
9. Display LCD
10. SNOOZE/LIGHT
1. TEMP/ALARM
2. History
3. Channel selector
4. Alarm
5. “-” button/Wave
6. Memory
7. “+” button
8. MODE
9. LCD display
10. SNOOZE/LIGHT
2
••
11. Table stand
12. “-” button
13. “+” button
14. Unit
15. Pressure/Altitude
16. Battery compartment
17. Wall mount recessed hole
11. Supporto da tavolo
12. PULSANTE “-”
13. PULSANTE “+”
14. Unità di misura
15. Pressione/altitudine
16. Vano batterie
17. Inserto per appensione
••
3
CARATTERISTICHE E PULSANTI SENSORE REMOTO
REMOTE SENSOR BUTTONS AND FEATURES
22
21
16. Transmission Led*
16. Led di indicazione trasmissione*
17. LCD Display
17. Display LCD
18. Battery compartment
18. Vano batterie
19. RESET
19. RESET
20. Wall mount recessed hole
20. Inserto per appensione
21. °C/°F
21. °C/°F
22. Channel selector
22. Selettore canale di trasmissione
* Il LED di trasmissione lampeggerà due volte quando il livello di carica delle batterie sarà troppo basso.
* Flashes twice when low battery is detected on sensor unit.
ICONE DI RICEZIONE SEGNALE SENSORE REMOTO | KINETIC WAVE REMOTE SENSOR
-
L’unità principale è in modalità di ricerca
Main unit is in searching mode
L’unità principale riceve il segnale correttamente
Main unit receives the signal correctly
“--”
L’unità principale non riceve alcun segnale*
No signal*
* Premere il tasto “-” per 3 secondi per forzare la ricerca del sensore remoto.
* Press “-” for 3 seconds to enforce an immediate search of remote sensor.
4
••
LEGENDA
Premere / Push
Batteria / Battery
Peso / Weight
Dimensioni / Dimension
MESSAGGI DI ERRORE (UMIDITÀ/TEMPERATURA)
TEMPERATURE/HUMIDITY ERROR MESSAGES
HHH La temperatura/umidità ha superato il valore massimo |The temperature/humidity has exceeded the maximum value
LLL
La temperatura/umidità ha superato il valore minimo |The temperature/humidity has exceeded the minimum value
DESCRIZIONE PULSANTI UNITÀ PRINCIPALE
MAIN UNIT BUTTONS DESCRIPTION
1. Seleziona l’allarme per il raggiungimento dei valori di minima e massima impostati, visualizza i valori di allarme
Displays the temperature alarm or sets the upper or lower limit
2. Visualizza i valori di pressione atmosferica raggiunti nelle ore precedenti
Displays the pressure history of previous hours
3. Visualizza temperatura e umidità dei sensori remoti collegati
Displays different sensor temperature and humidity
4. Visualizza l’orario dell’allarme o ne cambia lo stato
Displays the alarm time or sets the alarm status
5. Decrementa il valore che si sta impostando
Decreases the value of a setting
6. Richiama i valori di massima e minima temperatura/umidità (interni ed esterni) memorizzati
Recalls the maximum or minimum temperature and humidity of main and remote units
7. Incrementa il valore che si sta impostando
Advances the value of a setting
8. Cambia la visualizzazione dei dati sul display e conferma i dati che si stanno impostando
Toggles the display modes and confirms entry while setting the values for display
9. Di facile lettura, visualizza le previsioni del tempo, i valori di umidità e temperatura interni/esterni, l’ora, la data,
i valori di pressione atmosferica e le fasi lunari
Facilitates easy reading of weather forecast, indoor and outdoor temperature/humidity, calendar clock,
atmospheric pressure chart and moonphase
10. Attiva la retroilluminazione del display e abilita la funzione SNOOZE
Switch on the EL backlight for 5 sec. and switch on the SNOOZE function when the alarm sounds
11. Base da tavolo
Removable table stand
12. Visualizza le fasi lunari del giorno precedente, o seleziona l’altitudine e la pressione al livello del mare
Displays the moonphase of previous days or sets the altitude or sea level pressure
13. Visualizza le fasi lunari dei giorni successivi, o seleziona l’altitudine e la pressione al livello del mare
Displays the moonphase of following days or sets the altitude or sea level pressure
14. Seleziona l’unità di misura dell’altitudine o della pressione atmosferica
Sets the unit of altitude or pressure
15. Commuta la visualizzazione della pressione locale, della pressione al livello del mare e dell’altitudine
Toggles the display between local pressure, sea level pressure and altitude
••
5
PRIMA ATTIVAZIONE | GETTING STARTED
• Rimuovere la linguetta di protezione dal vano batterie dell’unità principale,
la ricerca della sonda esterna partirà automaticamente.
• Rimuovere la linguetta di protezione dal vano batterie del sensore remoto.
• Posizionare la sonda esterna ad una distanza massima dall’unità principale di 20-30m.
• La distanza di trasmissione può variare a seconda della posizione della centralina e/o della sonda esterna.
• Cambiare eventualmente il posizionamento della weather station per ottenere il miglior risultato di ricezione
possibile.
• Proteggere la sonda dai raggi diretti del sole, dalla pioggia e dalla neve.
• Una volta che il segnale è agganciato, la lettura della temperatura, sarà aggiornata ogni 45 secondi.
• Remove stopping device from the battery compartment of the unit,
the main unit will automatically seek out sensor.
• Remove stopping device from battery compartment of sensor.
• Place sensor and main unit within effective transmission range (20-30 meters).
• Effective range could be affected by remote and main units positions.
• Try various set-up for best result.
• Do not place sensor under direct sun rays,rain or snow.
• Once signal is received, temperature readings will be updated every 45 seconds.
COME IMPOSTARE IL BAROMETRO
SETTING UP THE BAROMETER
Quando la stazione viene attivata, sul display lampeggeranno le icone “hPA” e “mBar”.
Impostare entro un minuto l’altitudine del luogo.
When batteries are installed, the display will show the “hPa” and “mBar” icons. Set the local altitude in one minute.
G COME IMPOSTARE L’ALTITUDINE | TO SET THE ALTITUDE
• Per inserire il valore di altitudine
To set the altitude value
UNIT • Per selezionare l’unità di misura
To set the unit of altitude
“-” / “+” (m/feet)
• Per confermare
To confirm
UNIT • Per modificare il valore di altitudine
To enter the correct altitude value
“-” / “+” PRESSURE/ALTITUDE COME CAMBIARE L’UNITÀ DI MISURA DEL BAROMETRO
TO SET THE PRESSURE UNIT
• hPa
Hg
• Per confermare
To confirm
UNIT x 2 sec.;
“-” / “+” UNIT 6
••
RICEZIONE DEL SEGNALE DI RADIO CONTROLLO
TO SET THE RADIOCONTROLLED CLOCK
Alla prima attivazione, l’orologio automaticamente ricerca il segnale radiocontrollato.
Questa operazione può durare a seconda dei casi da 3 a 20 minuti circa (copertura del segnale).
Una volta ricevuto il segnale correttamente, la data e l’ora, si imposteranno automaticamente sui valori correnti e
l’icona di radiocontrollo si accenderà.
Se la zona dove si sta utilizzando la stazione barometrica non riceve correttamente il segnale, l’icona di
radiocontrollo scomparirà. L’orario può allora essere impostato manualmente.
At first activation the clock will seek the radiocontrolled signal automatically.
This operation can last about three or twenty minutes depending on the radiocontrolled signal intensity.
Once signal is correctly received, date and time will set automatically and the radiocontrolled icon will turn on.
If the zone where you use the weather station doesn’t receive the radiocontrolled signal correctly, the icon
on the LCD display will turn off. Now you can set manually the time .
COME IMPOSTARE I DATI DELLA VOSTRA WEATHER STATION
SETTING UP THE WEATHER STATION
MODE x 2 sec.
• Per cambiare la lingua
To set the language
“+” / “-” • Per regolare la cifra che lampeggia
To set the blinking digit
MODE • Per confermare
To confirm
EN
Inglese/English
GE
Tedesco/German
IT
Italiano/Italian
SP
Spagnolo/Spanish
FR
Francese/French
Ripetere la stessa operazione per regolare °C/°F, l’anno, il mese, la data, il formato mese-data, 12/24 h, ora e
minuti.
Repeat the same operation to set the °C/°F, year, month, date, date-month format, 12/24 h, hour and minute.
OROLOGIO CALENDARIO (DIFFERENTI TIPI DI VISUALIZZAZIONE)
TIME CALENDAR (DIFFERENT DISPLAY MODE)
MODE • Per cambiare visualizzazione
To change display mode
(Orologio e secondi, orologio e giorno della settimana, fuso orario e giorno della settimana, fuso orario e secondi,
giorno e mese).
(Clock with second, clock with day of week, zone time with day of week, zone time with second and day-month).
••
7
COME VERIFICARE LA PRESSIONE ATMOSFERICA
TO CHECK THE BAROMETRIC PRESSURE
Per gli utilizzatori che abitano a elevate altitudini, come ad esempio in montagna, è importante regolare la
pressione atmosferica a livello del mare.
For user staying at a higher altitude such as in the mountain area, see-level barometric pressure applies. Use
PRESSURE/ALTITUDE button to toggle the display to sea level pressure display.
G COME REGOLARE LA PRESSIONE ATMOSFERICA A LIVELLO DEL MARE
TO CHECK THE BAROMETRIC PRESSURE AT THE SEA LEVEL
• In modalità normale (pressione locale)
In “local pressure” mode
• Per visualizzare la pressione a livello del mare
To see the sea-level pressure
PRESSURE/ALTITUDE x 2
• Per entrare in modalità regolazione
To enter the sea-level pressure adjusting mode
Premere PRESSURE/ALTITUDE x 2 sec.
Hold PRESSURE/ALTITUDE x 2 sec.
• Per impostare il valore
To enter the sea-level pressure
“+” / “-” • Per confermare
To confirm
PRESSURE/ALTITUDE • Come cambiare l’unità di misura della pressione
To change the pressure unit
UNIT x 2 sec.
• Per impostare l’unità di misura (hPa/Hg)
To change the pressure unit (hPa/Hg)
“+” / “-” • Per confermare
To confirm
UNIT COME VISUALIZZARE I VALORI DI PRESSIONE ATMOSFERICA
DELLE PASSATE 36 ORE
TO CHECK THE PRESSURE HISTORY FOR A PARTICULAR
HOUR DURING THE PAST 36 HOURS
HISTORY *
• Per visualizzare i dati memorizzati
To check the pressure history
* Ad ogni pressione del tasto si visualizzerà l’ora precedente a quella visualizzata.
* Each press on the button will go back by an hour.
I valori di pressione delle passate 24 ore vengono visualizzati tramite il diagramma a barre sul display della vostra
stazione barometrica.
The recorded atmospheric changes for the past 24 hours are displayed in a bar chart above the atmospheric
pressure window.
8
••
ANDAMENTO DELLA PRESSIONE ATMOSFERICA
BAROMETRIC PRESSURE TREND
Icona
Icon
Andamento della pressione
Pressure trend
IN AUMENTO
RISING
STABILE
STEADY
IN DIMINUZIONE
FALLING
Nota: l’accuratezza della pressione atmosferica, basata sulle previsioni del tempo è generalmente pari al 70%.
L’icona del sole che appare durante le ore notturne, indica una condizione di tempo sereno.
Note: the accuracy of a general pressure based weather forecast is about 70%.
The sunny icon, as applies to night time implies clear weather.
ICONE DI TENDENZA DI TEMPERATURA E UMIDITÀ INTERNA ED ESTERNA
TREND ICONS OF INDOOR/OUTDOOR TEMPERATURE/HUMIDITY
Arrow Indicator
Andamento dell’umidità
Temperature/Humidity trend
IN AUMENTO
RISING
STABILE
STEADY
IN DIMINUZIONE
FALLING
PREVISIONI DEL TEMPO | WEATHER FORECAST
L’unità principale è in grado di rilevare e di monitorare le variazioni di pressione atmosferica e in base ai dati
rilevati, è in grado di fornire le previsioni del tempo da 12 a 24h.
Per questo, non sempre l’icona che viene visualizzata, corrisponde alla condizione reale del momento.
Main unit can detect and register atmospheric pressure changes.
Based on collected data, main unit can forecast weather conditions in the forthcoming 12/24h.
That is why not always displayed icon corrisponds to the current weather conditions.
Icone animate Display
Animated icons
Previsioni
Forecast
••
SOLE
SUNNY
COPERTO
SLIGHTLY CLOUDY
9
NUVOLOSO
CLOUDY
PIOGGIA
RAIN
TEMPORALE
HEAVY RAIN
COME VISUALIZZARE LE FASI LUNARI
TO SCAN THE MOON PHASE
Luna nuova
Primo quarto
Luna piena
Ultimo quarto
New moon
First quarter
Full moon
Last quarter
Luna crescente
Gobba a ponente
Luna calante
Gobba a levante
Waxing crescent
Waxing gibbous
Waning gibbous
Waning crescent
• Per verificare la fase lunare di un particolare giorno (+/- 39 gg)
To check the moon phase for a particular day (+/- 39 gg)
“+” / “-” Il display tornerà in modalità normale se per due secondi non verranno premuti i tasti “+” / “-” .
The unit will return to the last display mode when the “+” / “-” buttons are left idle for 2 seconds.
ALLARMI | ALARMS
• SETTIMANALE “W”
WEEKLY
L’allarme suonerà tutti i giorni all’ora impostata
The alarm will sound every day at set time
• SINGOLO “S”
SINGLE
L’ allarme suonerà una volta e si disattiverà automaticamente
The alarm will be sound once and will be switched off automatically
• PRE ALLARME
Avviso acustico impostabile (15,30,45 o 90min.) prima del normale allarme che si
attiverà solo in caso di temperatura esterna inferiore ai 0°C
Buzzer can be set (15, 30, 45 or 90 min.) ahead of normal alarm starting only in
case of temperature lower than 57,6 °F
“PRE-ALARM”
COME IMPOSTARE GLI ALLARMI | TO SET THE ALARMS
• Per selezionare il tipo di allarme
To set the type of the alarm
ALARM (W, S, pre-alarm)
• Per impostare l’orario dell’allarme
To set the alarm time
ALARM x 2 sec.
• Per regolare la cifra che lampeggia
To set the blinking digit
“+” / “-” • Per confermare
To confirm
ALARM • Per attivare/disattivare gli allarmi
Alarm ON/OFF
“+” / “-” • Stop buzzer
ALARM 10
••
FUNZIONE SNOOZE | SNOOZE FUNCTION
G PER ATTIVARE LA FUNZIONE | TO ACTIVATE SNOOZE FUNCTION
SNOOZE/LIGHT • Quando suona l’allarme
When the alarm sounds
• L’allarme ripartirà automaticamente dopo 8 minuti
The alarm will restart automatically after 8 minutes
ALARM • Per spegnere l’allarme
To stop the alarm
FUSO ORARIO | ZONE
• In modalità orologio
in time mode
• Per impostare il fuso orario
To set the zone time
MODE x 2;
• Per regolare il fuso orario
To set the offset
“+” / “-” • Per confermare
To confirm
MODE MODE x 2 sec.
COME VISUALIZZARE I VALORI DI MINIMA E MASSIMA
TEMPERATURA/UMIDITÀ RAGGIUNTI
TO DISPLAY MAXIMUM/MINIMUM TEMPERATURE/HUMIDITY VALUES
• Minima temperatura/umidità raggiunta
Minimum temperature/humidity value
MEM • Massima temperatura/umidità raggiunta
Maximum temperature/humidity value
MEM x 2
• RESET
MEM x 3 sec.*
* I valori di temperatura e umidità massima o minima verranno aggiornati con i valori di temperatura e umidità
correnti.
* The maximum/minimum temperature/humidity values will be refreshed with the current values.
••
11
COME IMPOSTARE L’ALLARME DI SOGLIA DI MASSIMA/MINIMA
TEMPERATURA ESTERNA
TO SET THE OUTDOOR MAX/MIN TEMPERATURE ALARM
• Per visualizzare il valore di massima
To set the maximum value
TEMP ALARM • Per visualizzare il valore di minima
To set the minimum value
TEMP ALARM x 2
• Per impostare il valore di allarme
To set the alarm value
TEMP ALARM x 2 sec.
• Per regolare il valore
To regulate the value
“+” / “-” • Per confermare
To confirm
TEMP ALARM CURA E MANUTENZIONE | CARE INSTRUCTIONS
G CURA DEL PRODOTTO | CARE OF YOUR PRODUCT
• Evitare di esporre il prodotto a condizioni ambientali estreme (sotto 0° C o sopra 60° C), all’acqua, alla polvere e
ad urti violenti.
Don’t expose your product to extreme climatic condition , water, dust or shock.
• Evitare il contatto con sostanze aggressive, solventi, profumi, alcool o detergenti corrosivi ed abrasivi.
Avoid the contact with aggressive substances, solvents, perfume, alcohol or corrosive and abrasive detergents.
• Per la pulizia dello strumento utilizzare un panno morbido leggermente inumidito.
To clean the instrument use a soft cloth slightly dampened.
G PRECAUZIONI | PRECAUTIONS
• Tenere le batterie lontano dalla portata dei bambini; l’ingerimento di una batteria può essere pericoloso.
Keep the batteries away from children.
• Se si espone lo strumento a condizioni ambientali estreme, la visualizzazione del display potrebbe risultare sbiadita.
If you expose the instrument to extreme environmental conditions the LCD display will be faded.
• Utilizzare unicamente batterie nuove per evitare la fuoriuscita di sostanze corrosive.
When replacing batteries, use only new batteries as specified in this user manual.
G SOSTITUZIONE DELLE BATTERIE | TO REPLACE THE BATTERY
• Se il display LCD risulta sbiadito o lo strumento non risponde correttamente alle funzioni, sostituire le batterie.
Replace the batteries if the display is faded or if the instrument does not work correctly.
• Quando le batterie hanno una carica troppo bassa per garantire un corretto funzionamento della stazione, compare
la relativa icona.
When batteries have low power, in order to have a good functioning of
the station, iconof low battery indicator will appear on display.
• Sostituire le batterie della stazione se l’icona compare vicino alla temp. interna.
Change batteries if icon is displayed near indoor temp. value.
• Sostituire le batterie della sonda se l’icona compare vicino alla temp. esterna.
Change sensor batteries if icon is displayed near outdoor temp. value.
2 x AA 1,5V
2 x AA 1,5V
Temp. < -15°C :
use Li-On Battery
12
••
RISOLUZIONE PROBLEMI | PROBLEM SOLVING
G L’unità principale non visualizza la temperatura esterna (“- -“)
• Premere per 2 secondi il tasto “– “ sull’unità principale per forzare la ricerca del sensore remoto.
• La temperatura ha superato il range massimo di funzionamento del sensore esterno:
Mettere al riparo dai raggi del sole il sensore remoto poi, forzare la ricerca come descritto al punto 1.
• Controllare lo stato delle batterie e se necessario sostituirle con delle nuove.
• Controllare la distanza tra unità principale e sensore esterno; diminuirla se necessario.
• Assicurarsi che tra sensore esterno e unità principale non ci siano ostacoli che impediscano una corretta
trasmissione del segnale.
• Premere il tasto RESET prima sulla sonda esterna poi, sull’unità principale e attendere che la stazione barometrica
si reimposti automaticamente.
G L’unità principale visualizza valori di temperatura differenti rispetto a quelli del sensore remoto
• Premere per 2 secondi il tasto “– “ sull’unità principale per aggiornare il valore di temperatura inviato dal
sensore remoto.
• Controllare lo stato delle batterie del sensore remoto e se necessario sostituirle con delle nuove.
G L’unità principale non visualizza correttamente i dati (Display sbiadito)
• Controllare lo stato delle batterie e se necessario sostituirle con delle nuove.
G La stazione non riceve il segnale radiocontrollato nonostante numerosi cicli di ricerca
• Allontanare l’unità principale da eventuali apparecchiature elettroniche che possano disturbare la ricezione del
segnale.
• Cambiare posizione dell’unità principale ad esempio avvicinandola ad una finestra.
G Main Unit does not display outdoor temperature (“- -“)
• Hold button “_” for 2 seconds on main unit to enforce another signal search
• Current temperature is higher or lower than effective operating range
• Protect sensor from sunrays and then enforce another signal search
• Check battery power and if necessary change them
• Check distance between remote senor and main unit, shorten it if necessary
• Make sure there are no obstacle between main unit and sensor which make signal transmission difficult
• Press RESET on sensor first and then on main unit and wait till weather station automatically resets
G Registered temperature readings on main unit are different from those on sensor
• Hold button “_” for 2 seconds on main unit to update temperature reading
• Check battery power of remote sensor and change them if necessary
G Main unit does not display data correctly
• Check battery power and change them if necessary
G Main unit does not receive radio controlled signal even after several searches
• Place main unit far away from electronical devices which may disturb signal transmission
• Change the position of the main unit for example place it near a window.
••
13
GARANZIA | GUARANTEE
Questo prodotto è garantito da Centrostyle S.p.A. per ogni difetto di fabbricazione per 2 anni dalla data di acquisto,
ad esclusione dei danni provocati da manomissione, uso improprio o incuria dello strumento o difetti riscontrati
dopo la scadenza del periodo di garanzia.
In caso di difetto il prodotto dovrà essere restituito al punto vendita in cui è stato acquistato in imballo adeguato e
porto franco.
Il prodotto dovrà essere accompagnato dallo scontrino fiscale o da un documento comprovante la data di acquisto
(scontrino-bolla-fattura).
Al prodotto andrà allegata la descrizione del difetto riscontrato e la causa del reso.
Il prodotto in garanzia verrà ripristinato o sostituito senza alcun onere.
This product is guaranteed against manufacturing defects by Centrostyle SPA for a period of 2 years, apart from
damages caused by wrong handling or improper use or defects found after warranty expiry date.
In case of defect, the product must be returned to purchasing shop in suitable packing and in free port
The product must be accompanied by its original sales receipt or any document proving buying date (bill-invoice)
A †detailed description of the defect and the reason for sending back the product must be attached to the product:
Product under warranty will be repaired or changed with no charges.
Modello / Model
Difetto / Defect
Nominativo Rivenditore / Retailer Name
Nome, Cognome / Name and Surname
Indirizzo / Address
Data di acquisto / Purchasing date
14
••
G CE - DICHIARAZIONE DI CONFORMITÁ | EC DECLARATION OF CONFORMITY
Questo prodotto utilizza un sistema di trasmissione approvato e che risponde alle caratteristiche dell’articolo 3 della
direttiva R&TTE 1999/5/CE se utilizzata per l’utilizzo per cui è predisposta e gli standard seguenti, sono applicati:
• Uso dello spettro di radio frequenza (articolo 3.2 della direttiva R&TTE)
• Standard applicato: EN 300 220- 1.3:2000
• Compatibilità elettromagnetica (articolo 3.1.b della direttiva R&TTE)
• Standard apllicati: EN 301 489- 1.3:2000 / EN 300 339 :1998
INFORMAZIONI ADDIZIONALI
Il prodotto è quindi conforme alla direttiva di basso voltaggio 73/23/CE, alla direttiva EMC 89/336/CE e alla direttiva
R&TTE 1995/5/CE (appendice II) ed è portatore del relativo marchio CE.
CE0125
This product contains the approved transmitter and complies with the essential requirements of Article 3 of the
R&TTE 1999/5/EC directives, if use for its intended use and that the following standard(s) has/have been applied:
• Efficient use of radio frequency spectrum: (article 3.2 of the R&TTE Directive)
• Applied standard: EN 300 220- 1.3:2000
• Electromagnetic compatibility (article 3.1.b of the R&TTE Directive)
• Applied standard: EN 301 489- 1.3:2000 / EN 300 339 :1998
ADDITIONAL INFORMATION:
The product is therefore conform with the Low Voltage Directive 73/23/CE, the EMC Directive 89/336/EC and
and R&TTE Directive1995/5/EC (appendix II) and carries the respective CE marking.
CE0125
••
15
SPECIFICHE TECNICHE | SPECIFICATIONS
• UNITA’ PRINCIPALE
Range di operatività temperatura:
Risoluzione:
• Orologio
Formato data:
Giorno della settimana:
Allarme:
Pre allarme:
Range di misurazione umidità (IN-OUT)
Risoluzione
• Barometro
Range di misurazione pressione atmosferica
Cicli di misurazione pressione
• SONDA ESTERNA
Range di operatività temperatura:
Risoluzione:
Frequenza di trasmissione:
Sonde remote collegabili:
Distanza di trasmissione:
Cicli di trasmissione:
• MAIN UNIT
Proposed operating range:
Temperature resolution:
• Calendar clock
Date format:
Day of week selectable in 5 language:
Alarm:
Pre alarm:
Humidity measuring range
Humidity resolution
• Barometric pressure measurement
Pressure measuring range
Pressure sampling cycle
• REMOTE SENSOR
Proposed operating range:
Temperature resolution:
RF Transmission Frequency:
Max n° of remote unit:
RF Transmission Range:
Temperature sensing cycle:
93,4 x 185,7 x 33,2 mm
55 x 110 x 25 mm (sensor)
-5.0°C ~ +50°C / 23°F ~ 122°F
0.1°C / 0.2°F
12/24h (hh:mm)
giorno/mese o mese/giorno
selezionabile in 5 lingue (E, F, D, I, S)
doppio allarme con suoneria in crescendo
per temperature inferiori allo 0°C
(25% ~ 95%) U.R.
1% U.R.
(750 ~ 1100) mb/hPa (22.15 ~ 32.49) Hg
20 min.
-20°C ~ +60°C / 48°F ~ 140°F
0.1°C / 0.2°F
433Mhz
3 Max.
30m. in campo aperto
43/47 Sec.
-5.0°C ~ +50°C / 23°F ~ 122°F
0.1°C / 0.2°F
12/24h (hh:mm)
day/month or month/day
(E, F, D, I, S)
dual crescendo alarm with snooze function
for ice alert
R.H. 25% to 95%
1% R.H.
750 to 1100 mb/hPa (22.15 to 32.49 in Hg)
20 minutes
-20°C ~ +60°C / 48°F ~ 140°F
0.1°C / 0.2°F
433Mhz
3 Max.
30m. (open space)
43/47 Sec.
276,3 g
2 x AA 1,5V
2 x AA 1,5V (sensor)
ZIU28280
••